Note: The plug gauge will develop small
scratches as it is repeatedly rotated against
the blade prior to removal. It has been
made of soft brass so that it does not nick
the corner of the blade. It has also been
made long enough so that you may place it
in the tenon cutter at varying depths to find
an unblemished area.
While adjusting the blade, never allow the
blade to override the plug. Doing so will
cause deep scratches in the gauge as it is
rotated prior to removal, and likely result
in undersized tenons.
Tenon Length
A tenon cut to full depth will be 1"long with
the 1/4", 5/16"and 3/8"dia. tenon cutters, and
13/8"long with the 7/16", 1/2"and 9/16"dia.
tenon cutters. To cut shorter tenons, just stop
cutting before bottoming out.
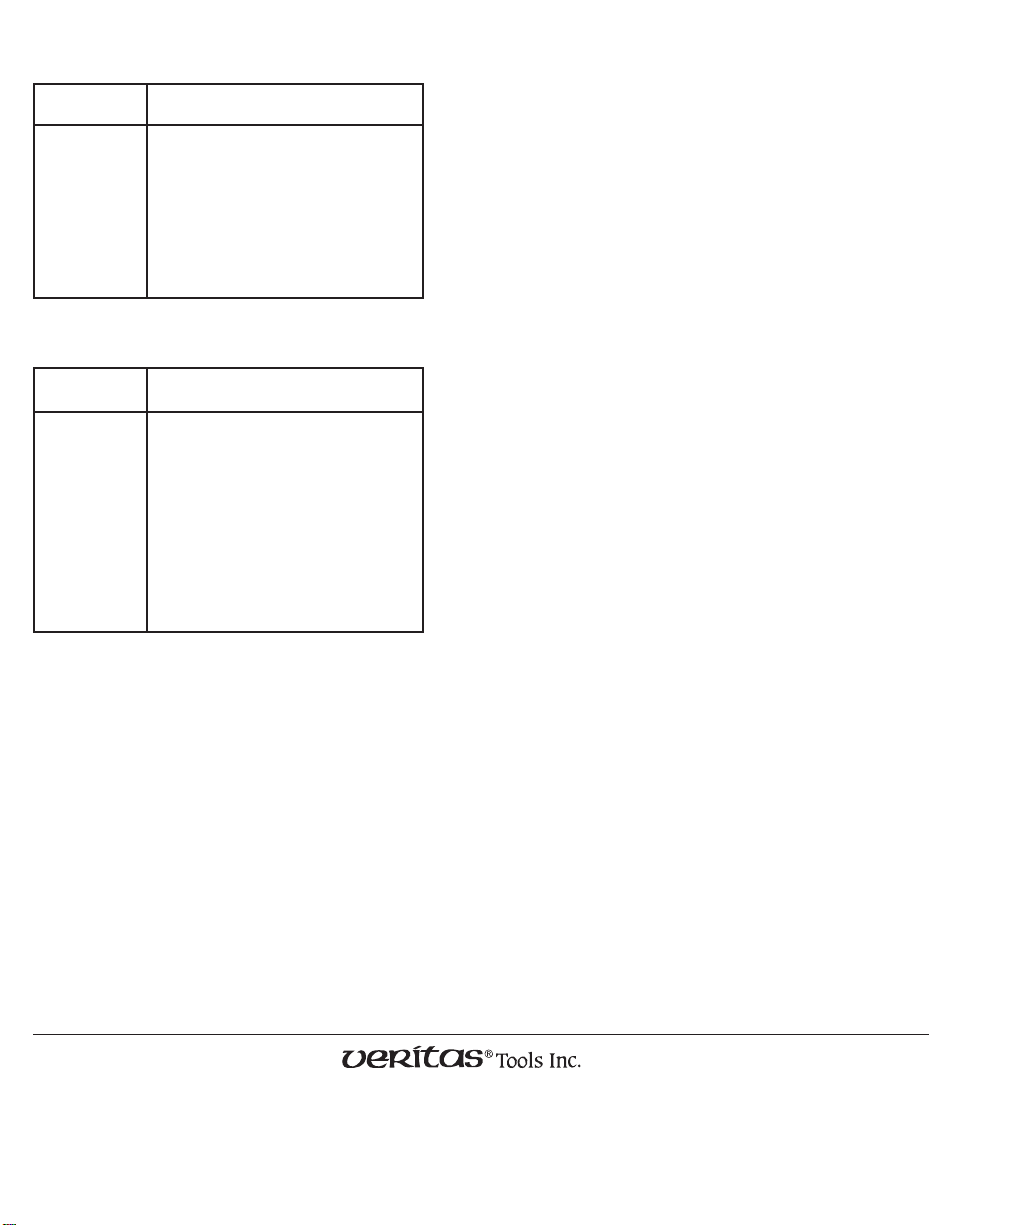
Sharpening
You can hold the small blade for sharpening
by making a blade holder from 1/2" square
stock, 4"to 6"long. Using a bandsaw or
other thin blade, cut a center groove at least
3/4"deep in one end. Drill a 3/16"dia. hole
perpendicular to the groove, 3/16"from
the end, and just deep enough to reach the
groove. Countersink to accommodate a
#10 × 1/2"flat-head wood screw. Chamfer
the front portion of the non-drilled section
below the slit at approximately 30°.
Insert the blade in the slot (bevel facing
the chamfered section). Secure it in place
with the #10 × 1/2"flat-head wood screw.
Coat the entire length of the bevel with an
indelible marker. Clamp the blade holder
in a honing guide at a 30° angle, and
progressively hone the blade to 4000x.
Observe where the marker coating has
worn off. Continue sharpening until the
full width of the blade is clear of marker
coating (and at least 1/32"wide). Check to
ensure that the bevel remains square to the
side edge of the blade.
Alternatively, you can sharpen the blade
held at a 30° angle against a belt sander
(fitted with a 180x belt for rough sharpening,
progressing to 15µ or finer for finishing).
Do not hold the blade in contact with the
belt for extended periods of time (more
than few seconds) or you may overheat the
blade. Use indelible marker as described
above to ensure that the entire bevel has
been sharpened and remains square to the
side edge of the blade.
Remove the blade from the holder. To
remove the wire burr from the edge of
the blade, draw the face across a fine grit
(1000x or higher) sharpening stone or a
piece of silicon carbide abrasive paper on
a flat surface.
6
3/4"
1
/
2
"×
1
/
2
"stock,
4"to 6"long.
3/16"
30°
Figure 3: Shop-made blade holder.
Note: Whether you are cutting in-line
or angled tenons, the secret to cutting
a uniform tenon is to keep the drill very
steady while cutting.
While leaning into the wood, switch on the
drill at a moderate speed (800 to 1000 rpm).
Turning too fast may cause you to wander
from a straight cut. If the blade is properly
set, the shaving of wood will curl out of the
tenon cutter as it rotates. If the tenon cutter
stops cutting or does not cut at all, you will
need to adjust the blade.
Note: The tenon cutter’s shank has a hole
drilled down the center. This is to allow you
to insert a 3/16" dia. pin into the back end to
drive out a broken tenon.
Adjusting the Blade
A brass plug gauge has been provided to
help you obtain the desired tenon diameter.
To Adjust the Tenon Diameter:
Loosen the blade clamping screw slightly
to just allow the blade to slide with minimal
vertical play. Insert the plug gauge into the
tenon cutter, rotating it so that either of the
two round surfaces faces the blade. Lightly
push the blade in until the front corner
(the part that determines the final tenon
diameter) touches the plug gauge, while
the right-hand edge remains in contact with
the body shoulder. Firmly tighten the blade
clamping screw.
Rotate the plug in either direction until
the round surfaces are no longer touching
the blade. While the flat on the gauge
provides clearance under the blade,
withdraw the gauge. Make a test cut
and measure the tenon. If the tenon is
not cutting the desired size, repeat this
procedure, or see Troubleshooting.
Figure 1: Adjusting the blade.
To Adjust the Shaving Thickness:
The blade can be adjusted to cut more
aggressively to produce larger shavings.
Repeat the above procedure, but swivel
the blade away from the body shoulder,
rotating it about the right-hand front
corner, which is to remain in contact with
the plug gauge.
Figure 2: Adjusting shaving thickness.
5
Body
Shoulder
Swivel about front
corner of blade
Body
Shoulder
Blade
Clamping
Screw
Plug Gauge
Front Corner
of Blade