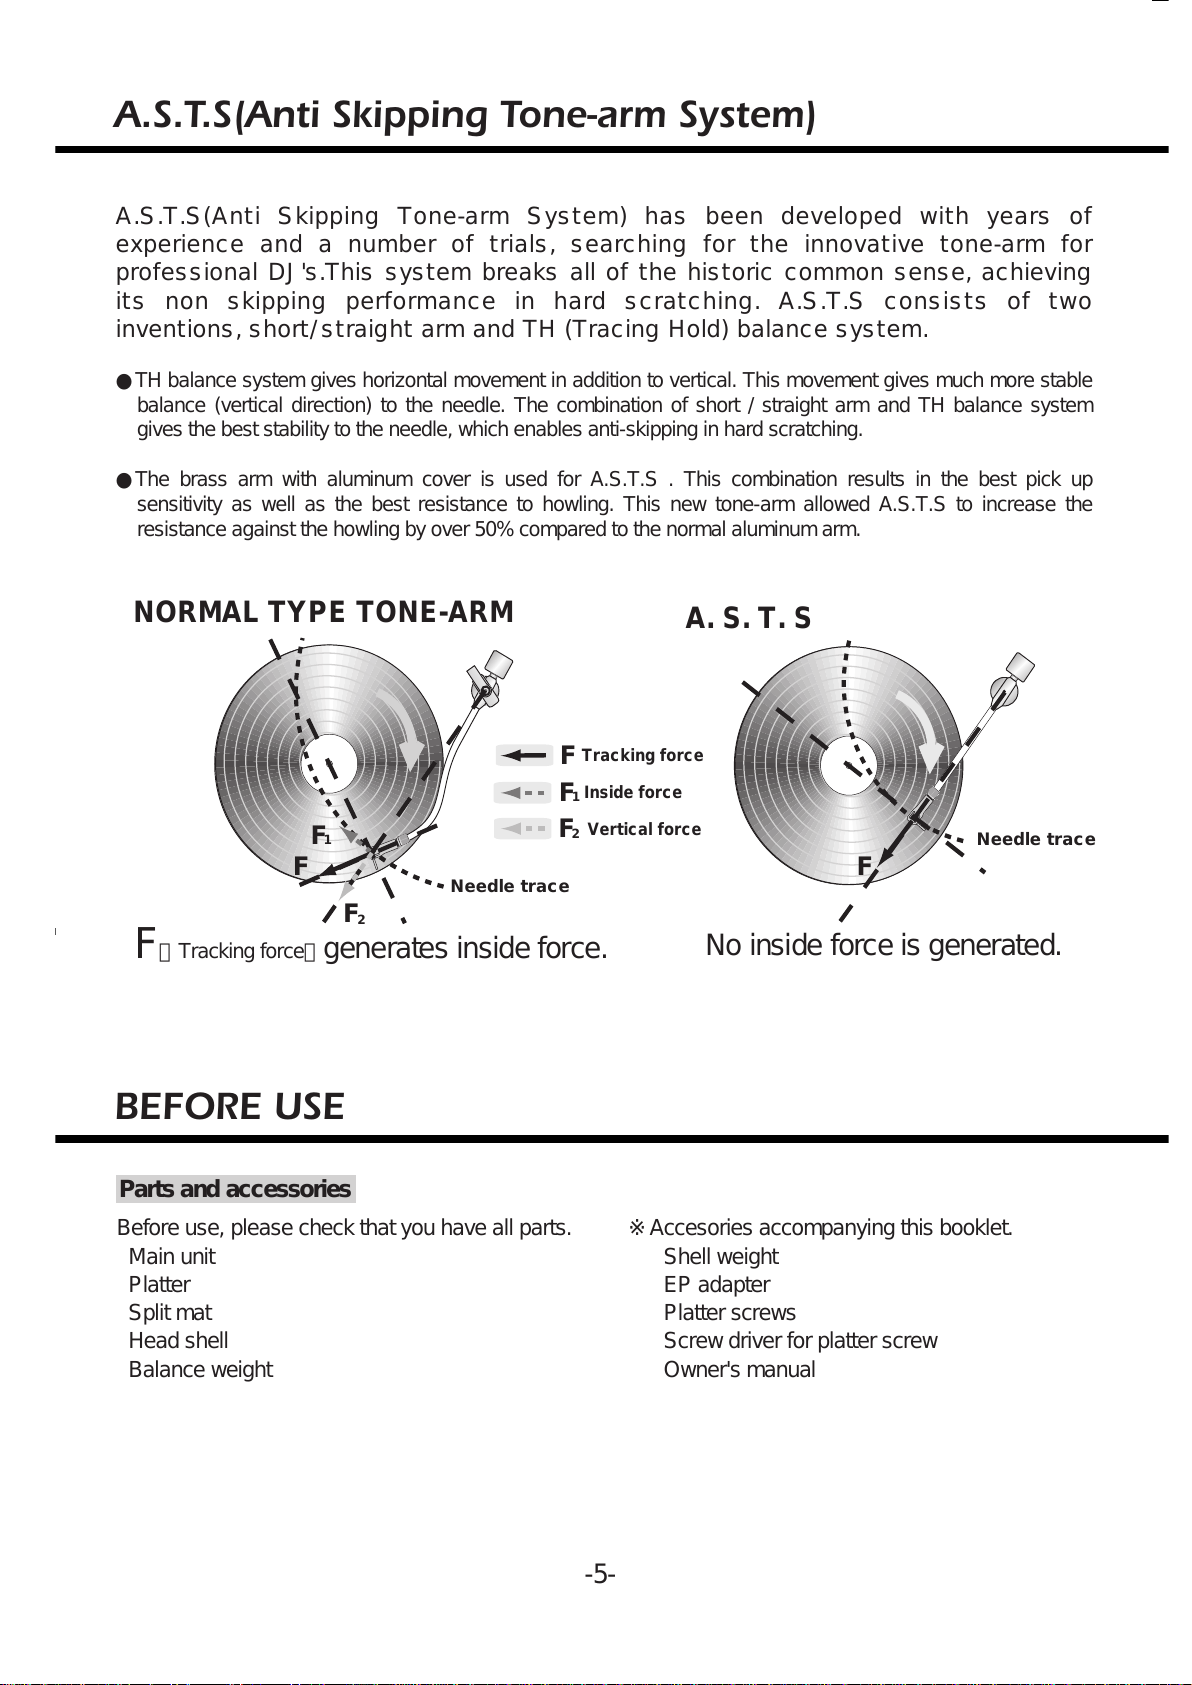
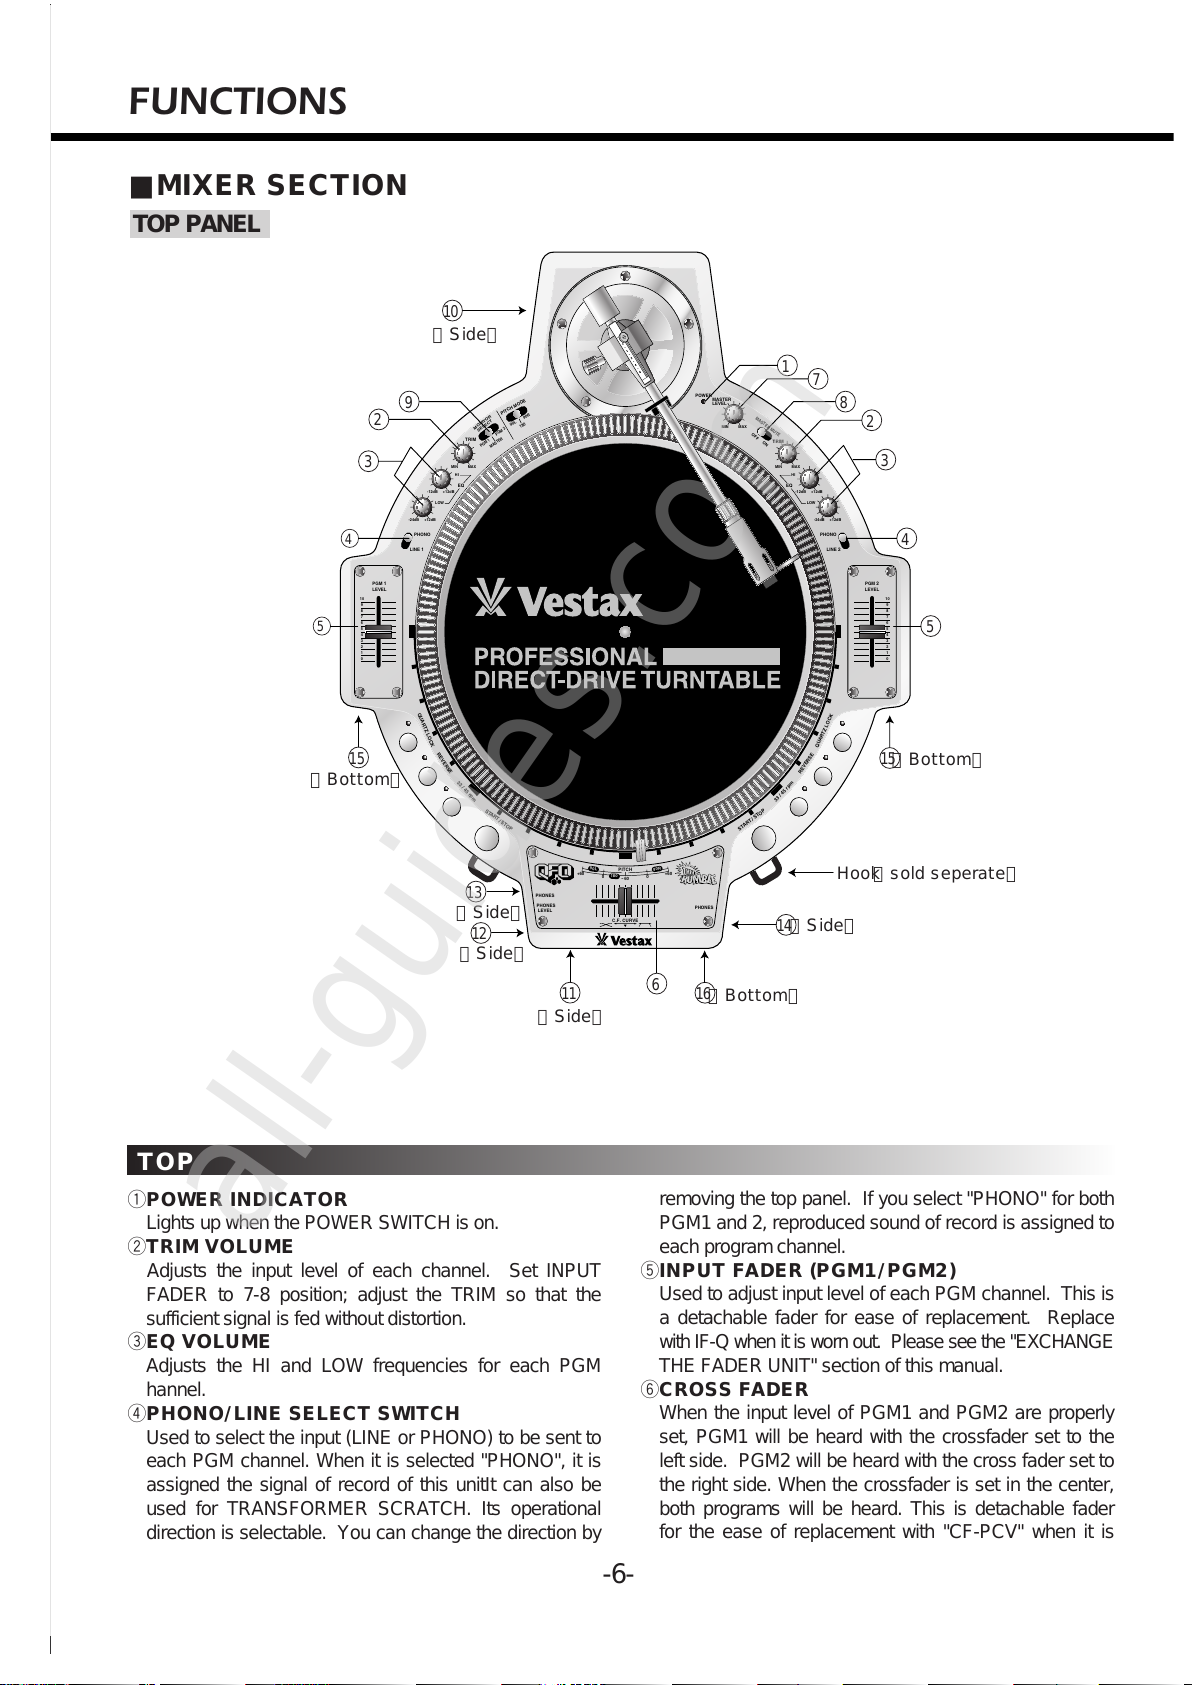
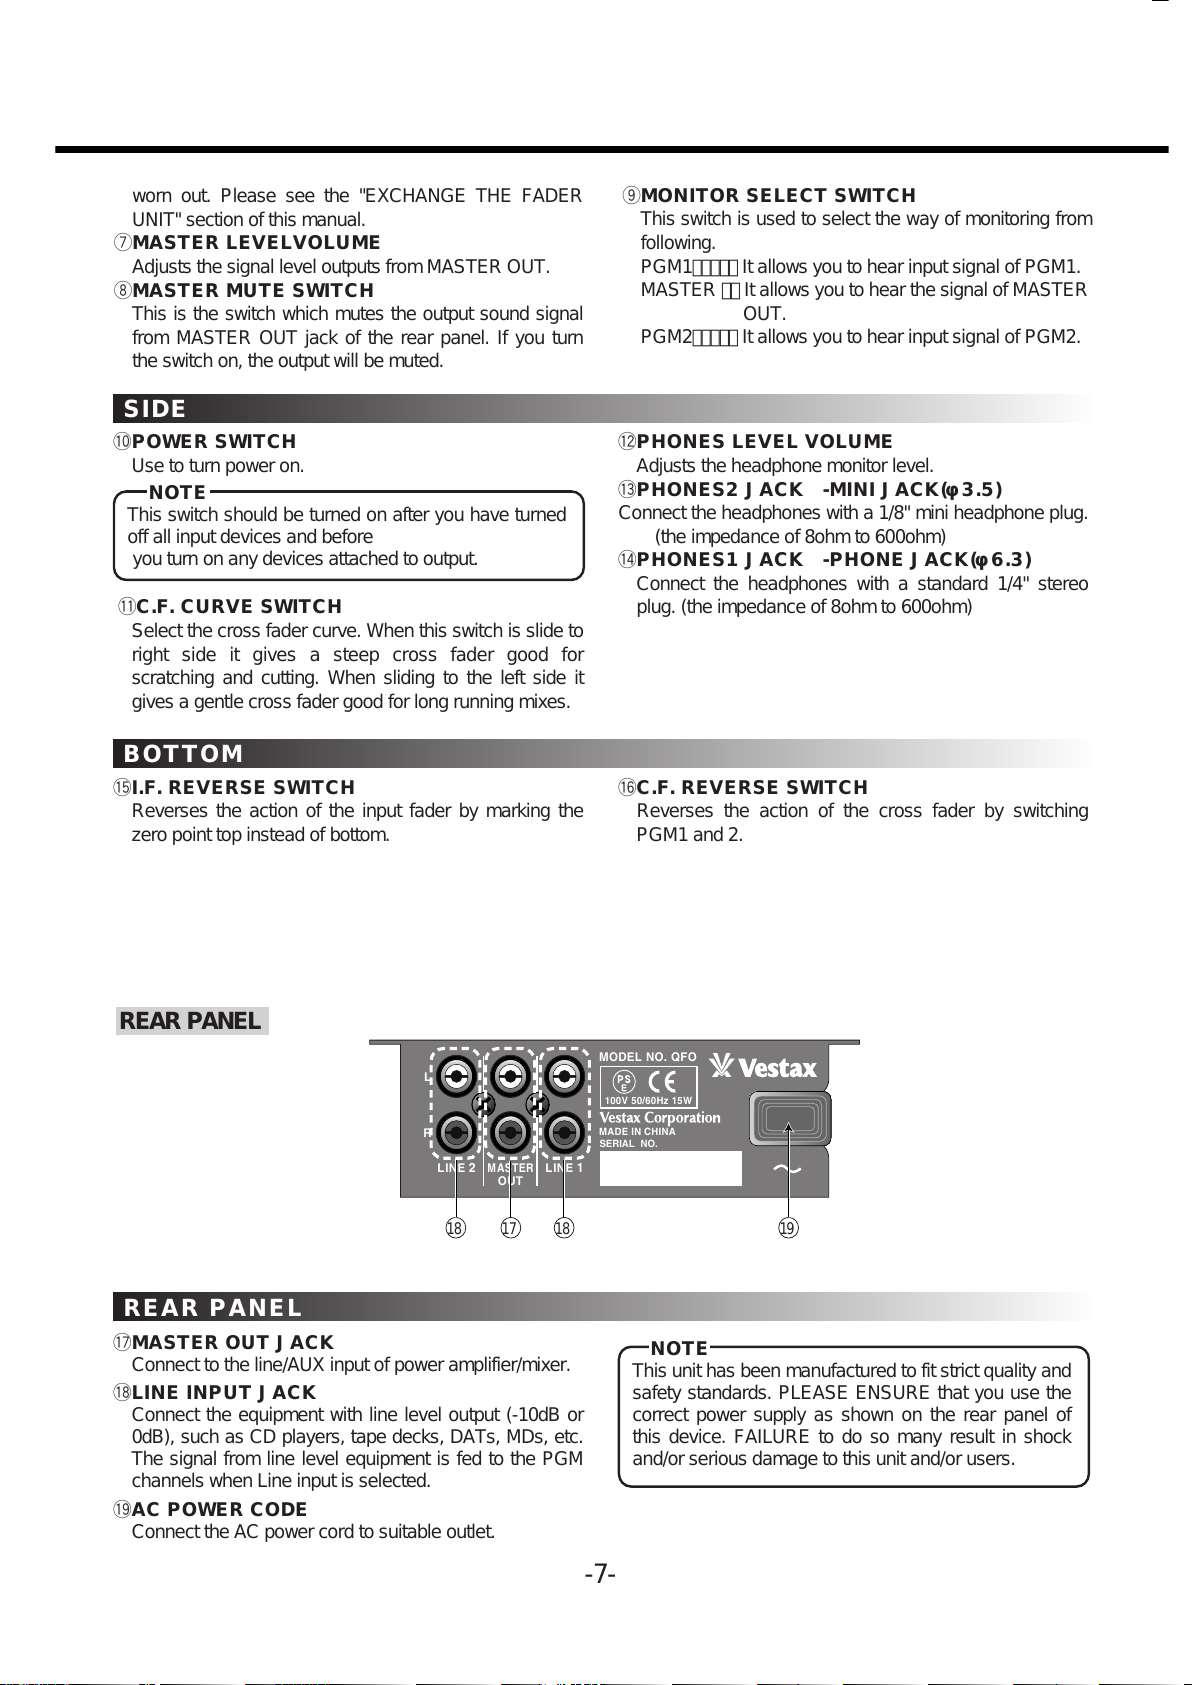
Vestax QFO User manual

Creative Musical Interface
OWNER'S MANUAL
NOTE
1.VESTAX insulater is needed (not included) when the QFO is placed horizontaly to suppress
howlingunderhighvolumeuse.
2.VESTAXQFOstraphook(notincluded)willbeneededwhenplayingtheQFOstrappedaround
shoulderorhip.
※Attachmentinstructionsareshownonpage16
All manuals and user guides at all-guides.com
all-guides.com

CONGRATULATIONS!
ThankyouforpurchasingtheVestaxQFOCreativeMusicalInterface.Wesuggest
thatyoureadthroughthisowner'smanualthoroughlysothatyoumayenjoythefull
use of this product safety and in the knowledge of all its special features and
suitablyapplications.
CONTENTS
CAUTION 2
IMPORTANTSAFEGUARDS 3
FEATURES 4
A.S.T.S(AntiSkippingTone-armSystem) 5
BEFOREUSE
5
FUNCTION
S 6
MIXERSECTION 6
TURNTABLESECTION 8
ASSEMBLYANDSET-UP 9
INSTALLATIONANDCONNECTION 11
ADJUSTMENT 12
OPERATIONOFRECORD 13
EXCHANGETHEFADERUNIT 14
HowtoattachVESTAXinsulaterandVESTAXQFOhook
15
SPECIFICATION 16
-2-
CAUTION
RISKOFELECTRICSHOCKDONOTOPEN
CAUTl0N:TOREDUCETHERlSKOFELECTRlCSHOCK
DONOTREMOVECOVER(ORBACK)
NOUSER-SERVICEABLEPARTSINSIDE
REFERSERVlCINGT0QUALIFIEDSERVlCEPERSONNEL
Thelightningflashwitharrowheadsymbol,withinanequilateral triangle,is
intendedtoalerttheusertothepresenceofuninsulateddangerousvoltage
withintheproduct'senclosurethatmaybeofsufficientmagnitudetoconsitutea
riskofelectricshocktopersons.
Theexclamationpointwithinanequilateraltriangleisintendedtoalerttheuser
tothepresenceofimportantoperatingandmaintenance(servicing)instructions
intheliteratureaccompanyingtheappliance.
T0REDUCETHERISK0FFIRE0RELECTRlCSHOCK,DONOT
EXPOSETHISAPPLIANCET0 RAIN0RM0ISTURE.
All manuals and user guides at all-guides.com

-3-
IMPORTANTSAFEGUARDS
READBEFOREOPERATINGEQUIPMENT
Thisproductwasdesignedandmanufacturedtomeetstrictqualityandsafety
standards.Thereare,however,someinstallationandoperationprecautions
whichyoushouldbeparticularlyawareof.
1.Read instructions-All the safety and operating
instructionsshouldbereadbeforetheapplianceis
operated.
2.Retain instructions-The safety and operating
instructionsshouldberetainedforfuturereference.
3.HeedWarnings-Allwarningsontheapplianceand
intheoperatinginstructionsshouldbeadheredto.
4.FollowInstructions-Alloperatinganduseinstructions
shouldbefollowed.
5.Cleaning-Unplug this product from the wall outlet
before cleaning. Do not use liquid cleaners or
aerosolcleaners.Useadampclothforcleaning.
6.Attachments-Do not use attachments not
recommendedbytheproductmanufacturerasthey
maycausehazards.
7.Water and Moisture-Do not use this product near
water-for example, near a dath tub, wash bowl,
kitchensink,orlaundrytub,inawetbasement,or
nearaswimmingpool,andthelike.
8.Accessories-Do not place this product on an
unstable cart, stand, tripod, or table. The product
mayfall,causingseriousinjurytoachildoradult,
andseriousdamagetotheappliance.Useonlywith
acart,.stand,tripod,bracket,ortablerecommended
by the manufacturer, or sold with product. Any
mounting of the appliance should follow the
manufacturer's instructions, and sholud use a
mounting accessory recommended by the
manufacturer.
9.Ventilation-Slots and openings in the cabinet are
provided for ventilation and to ensure reliable
operation of the product and to protect it from
overheating, and these openings must not be
blockedorcovered.Theopeningsshouldneverbe
blockedbyplactingtheproductonabed,sofa,rug,
orothersimilarsurface.Thisproductshouldnever
beplacednearoroveraradiatororheatregister.
This product should not be placed in a built-in
installation such as a bookcase or rack unless
properventilationisprovidedorthemanufacturer's
instructionshavebeenadheredto.
10.Power sources-This product should be operated
onlyfromthetypeofpowersourceindicatedonthe
marking label. If you are not sure of the type of
powersupplytoyourhome,consultyourappliance
dealerorlocalpowercompany.
11.GroundingorPolarization-Thisproductisequipped
withapolarizedalternating-currentlineplug(aplug
havingonebladewiderthantheother).Thispiug
willfitintothepoweroutletonlyoneway.Thisis
safetyfeature.Ifyouareunabletoinserttheplug
fully into the outlet, try reversing the plug. If this
should still fail to fit, contact your electrician to
replace your obsolete outlet. Do not defeat the
safetypurposeofthepolarizedplug.
12.Power-CordProtection-Powersupplycordsshould
beroutedsothattheyarenotlikelytobewalkedon
orpinchedbyintemsplaceduponoragainstthem,
paying particular attention to cords at plugs,
conveniencereceptacles,andthepointwherethey
exitfromtheappliance.
13.Protective Attachment Plug-The appliance is
equippedwithanattachmentplughavingoverload
protection.Thisisasafetyfeature.SeeInstruction
Manual for replacement or resetting of protective
device. If replacement of the plug is required, be
suretheservicetechnicianhasusedareplacement
plug specified by the manufacturer that has the
sameoverloadprotectionastheoriginalplug.
14.Lightning-For added protection for this product
duringlightningstorm,orwhenitisleftunattended
andunusedforlongperiodsoftime,unplugitfrom
the wall outlet. This will prevent damage to the
productduetolightningandpower-linesurges.
15.Overloading-Do not overload wall outlets and
extensioncordsasthiscanresultinariskoffireor
electricshock.
16.ObjectandLiquidEntry-Neverpushobjectsofany
kindintothisproductthroughopeningsastheymay
touch dangerous voltage points or short-out parts
thatcould resultin afire orelectric shock.Never
spillliquidofanykindontheproduct.
17. Servicing-Do not attempt to service product
yourselfasopeningorremovingcoversmayexpose
youtodangerrousvoltageorotherhazards.Refer
allservicingtoqualifiedsersonnel.
18. Damage Requiring Service-Unplug this product
fromthewalloutletandreferservicingtoqualified
servicepersonnelunderthefollowingconditions:
a.Whenthepower-supplycordorplugisdamage.
b.Ifliquidhasbeenspilledorobjectshavefalleninto
theproduct.
All manuals and user guides at all-guides.com

FEATURES
-4-
●ThisistheveryfirstmodeldesignedbyQ-BERTwhichhasDJMixerandTurntableinoneunitedbody.
●TheDynamicBalanceA.S.T.S.allowstheneedletotracethegrooveatanyanglewithnoskippingor
tracingerror.
●Theheartofmachine,motorhasprovenitshighstabilityandreliabilityinVestaxPDX-2000series.The
motorisouroriginalhightorquedirectdrive.
●VestaxPMC-05PROsreliablecircuitryisloaded
●Spinslidepitchcontrollerplacedaroundtheplatter(MAX±60%).Linkingpitchmovesandscratchesare
possible.
c.Iftheproducthasbeenexposedtorainorwater.
d. If the product dose not operate normally by
following the operating instructions. Adjust only
those controls that are coverd by the operating
instructions as an improper adjustment of other,
controlsmayresultindamageandwilloftenrequire
extensiveworkbyaqualifiedtechniciantorestore
theproducttoitsnormaloperation.
e.Iftheproducthasbeendroppedorcabinethas
beendamaged.
f. When the product exhibits a distinct change in
perfromance-thisindicatesneedforservice.
19.Replacement Parts-When replacement parts are
required,be surethe service technician has used
replacementpartsspecifiedbythemanufactureror
havethesamecharacterristicsastheoriginalparts.
Unauthorizedsubstitutionsmayresultinfire,electric
shockorotherhazards.
20.SafetyCheck-Uponcompletionofanyserviceor
repairs to product, ask the service technician to
perfromsefetycheckstodeterminethattheproduct
isinproperoperatingcondition.
21.Carts and Stands-The appliance should be used
only with a cart stand that is recommended by
manufacturer.
22.An appliance and cart combination should be
movedwithcare.Quickstops,excessiveforce,and
unevensurfacesmaycausetheapplianceandcart
combinationtooverturn.
All manuals and user guides at all-guides.com

2
F
F1
F2
F
FF1
F
Trackingforce
Insideforce
Verticalforce
NORMALTYPETONE-ARM A.S.T.S
Needletrace
Needletrace
Noinsideforceisgenerated.
F(Trackingforce)generatesinsideforce.
BEFORE USE
-5-
A.S.T.S(Anti Skipping Tone-arm System)
Beforeuse,pleasecheckthatyouhaveallparts.
Mainunit
Platter
Splitmat
Headshell
Balanceweight
※Accesoriesaccompanyingthisbooklet.
Shellweight
EPadapter
Platterscrews
Screwdriverforplatterscrew
Owner'smanual
A.S.T.S(Anti Skipping Tone-arm System) has been developed with years of
experience and a number of trials, searching for the innovative tone-arm for
professionalDJ's.Thissystembreaksallofthehistoriccommonsense,achieving
its non skipping performance in hard scratching. A.S.T.S consists of two
inventions,short/straightarmandTH(TracingHold)balancesystem.
●THbalancesystemgiveshorizontalmovementinadditiontovertical.Thismovementgivesmuchmorestable
balance(verticaldirection)totheneedle.Thecombinationofshort/straightarmandTHbalancesystem
givesthebeststabilitytotheneedle,whichenablesanti-skippinginhardscratching.
●The brass arm with aluminum cover is used for A.S.T.S . This combination results in the best pick up
sensitivityas well asthebest resistance tohowling. This newtone-armallowed A.S.T.S toincrease the
resistanceagainstthehowlingbyover50%comparedtothenormalaluminumarm.
Partsandaccessories
All manuals and user guides at all-guides.com

-6-
FUNCTIONS
-24dB +12dB
TRIM
HI
EQ
LOW
PHONO
LINE 2
-12dB +12dB
MIN MAX
MIN MAX
-24dB +12dB
PHONES
LEVEL
PHONES
PHONES
TRIM
HI
EQ
LOW
PHONO
LINE 1
MASTER
LEVEL
POWER
PGM
1
LEVEL
PGM
2
LEVEL
QUARTZLOCK
QUARTZLOCK
REVERSE
REVERSE
33 / 45 rpm
33 / 45 rpm
START / STOP
START / STOP
MASTER MUTE
OFF
ON
PITCH MODE
90L 90R
180
MONITOR
SELECT
PGM 1 PGM 2
MASTER
PITCH
-
60
00
180
+60 +60
90L
C.F. CURVE
-12dB +12dB
MIN MAX
90R
0
1
2
3
4
5
6
7
8
9
10
0
1
2
3
4
5
6
7
8
9
10
1782
3
4
5
15
14
16
6
11
12
13
15
5
4
3
29
(Bottom)
(Side)
Hook(soldseperate)
(Side)
(Side)
(Side)
10
(Side)
(Bottom)
(Bottom)
TOP
qPOWERINDICATOR
LightsupwhenthePOWERSWITCHison.
wTRIMVOLUME
Adjusts the input level of each channel. Set INPUT
FADER to 7-8 position; adjust the TRIM so that the
sufficientsignalisfedwithoutdistortion.
eEQVOLUME
Adjusts the HI and LOW frequencies for each PGM
hannel.
rPHONO/LINESELECTSWITCH
Usedtoselecttheinput(LINEorPHONO)tobesentto
eachPGMchannel.Whenitisselected"PHONO",itis
assignedthesignalofrecordofthisunitItcanalsobe
used for TRANSFORMER SCRATCH. Its operational
directionisselectable.Youcanchangethedirectionby
removingthetoppanel.Ifyouselect"PHONO"forboth
PGM1and2,reproducedsoundofrecordisassignedto
eachprogramchannel.
tINPUTFADER(PGM1/PGM2)
UsedtoadjustinputlevelofeachPGMchannel.Thisis
adetachablefaderforeaseofreplacement.Replace
withIF-Qwhenitiswornout.Pleaseseethe"EXCHANGE
THEFADERUNIT"sectionofthismanual.
yCROSSFADER
WhentheinputlevelofPGM1andPGM2areproperly
set,PGM1willbeheardwiththecrossfadersettothe
leftside.PGM2willbeheardwiththecrossfadersetto
therightside.Whenthecrossfaderissetinthecenter,
bothprogramswillbeheard.Thisisdetachablefader
fortheeaseofreplacementwith"CF-PCV"whenitis
■MIXERSECTION
TOPPANEL
All manuals and user guides at all-guides.com
all-guides.com

-7-
MADE IN CHINA
LINE 2LINE 1
L
R
MASTER
OUT
SERIAL NO.
100V 50/60Hz 15W
MODEL NO. QFO
18 17 18 19
SIDE
BOTTOM
REARPANEL
worn out. Please see the "EXCHANGE THE FADER
UNIT"sectionofthismanual.
uMASTERLEVELVOLUME
AdjuststhesignalleveloutputsfromMASTEROUT.
iMASTERMUTESWITCH
Thisistheswitchwhichmutestheoutputsoundsignal
fromMASTEROUTjackoftherearpanel.Ifyouturn
theswitchon,theoutputwillbemuted.
oMONITORSELECTSWITCH
Thisswitchisusedtoselectthewayofmonitoringfrom
following.
PGM1・・・・・ItallowsyoutohearinputsignalofPGM1.
MASTER・・ItallowsyoutohearthesignalofMASTER
OUT.
PGM2・・・・・ItallowsyoutohearinputsignalofPGM2.
!0POWERSWITCH
Usetoturnpoweron.
!1C.F.CURVESWITCH
Selectthecrossfadercurve.Whenthisswitchisslideto
right side it gives a steep cross fader good for
scratchingandcutting.Whenslidingtotheleft sideit
givesagentlecrossfadergoodforlongrunningmixes.
!2PHONESLEVELVOLUME
Adjuststheheadphonemonitorlevel.
!3PHONES2JACK -MINIJACK(φ3.5)
Connecttheheadphoneswitha1/8"miniheadphoneplug.
(theimpedanceof8ohmto600ohm)
!4PHONES1JACK -PHONEJACK(φ6.3)
Connect the headphones with a standard 1/4" stereo
plug.(theimpedanceof8ohmto600ohm)
!5I.F.REVERSESWITCH
Reversestheactionoftheinputfaderbymarkingthe
zeropointtopinsteadofbottom.
!6C.F.REVERSESWITCH
Reverses the action of the cross fader by switching
PGM1and2.
!7MASTEROUTJACK
Connecttotheline/AUXinputofpoweramplifier/mixer.
!8LINEINPUTJACK
Connecttheequipmentwithlineleveloutput(-10dBor
0dB),suchasCDplayers,tapedecks,DATs,MDs,etc.
ThesignalfromlinelevelequipmentisfedtothePGM
channelswhenLineinputisselected.
!9ACPOWERCODE
ConnecttheACpowercordtosuitableoutlet.
NOTE
Thisswitchshouldbeturnedonafteryouhaveturned
offallinputdevicesandbefore
youturnonanydevicesattachedtooutput.
NOTE
Thisunithasbeenmanufacturedtofitstrictqualityand
safetystandards.PLEASEENSUREthatyouusethe
correctpowersupplyasshownontherearpanelof
thisdevice.FAILUREtodosomanyresultinshock
and/orseriousdamagetothisunitand/orusers.
REARPANEL
All manuals and user guides at all-guides.com

-24dB +12dB
TRIM
HI
EQ
LOW
PHONO
LINE 2
-12dB +12dB
MIN MAX
MIN MAX
-24dB +12dB
PHONES
LEVEL
PHONES
PHONES
TRIM
HI
EQ
LOW
PHONO
LINE 1
MASTER
LEVEL
POWER
PGM
1
LEVEL
PGM
2
LEVEL
QUARTZ LOCK
QUARTZ LOCK
REVERSE
REVERSE
33 / 45 rpm
33 / 45 rpm
START / STOP
START / STOP
MASTER MUTE
OFF
ON
PITCH MODE
90L 90R
180
MONITOR
SELECT
PGM1 PGM 2
MASTER
PITCH
-
60
00
180
+60 +60
90L
C.F. CURVE
-12dB +12dB
MIN MAX
90R
0
1
2
3
4
5
6
7
8
9
10
0
1
2
3
4
5
6
7
8
9
10
22
23
21
20
24
20
21
22
23
25
BalanceWeight(Option)
DynamicStylusPressureAdjustmentKnob
ToneArm
ArmRest
Tone-ArmHeightFixedScrew
SlipMat(Option)
LockRing
Headshell
Platter(Option)
-8-
■TURNTABLESECTION
@0START/STOPSWITCH
Itisstarted/stoppedtheplattereverypush.
@133/45(33/45rpm)SELECTSWITCH
Selecttheplayingspeedtoeither331/3or45rpm.
WhentheindicatorLEDislit,itisselected33rpm.
@2REVERSESWITCH
When pushed, this switch will instantly reverse the
playing direction of the platter. In reverse mode, an
indicatorLEDwillbeon.Whentheunitisfirstturnedon,
theplatterissettospininthenormalforwarddirection.
@3QUARTZLOCKSWITCH
Whenthisswitchison,theindicatorLEDislit.Whenthis
switchison,thespeedwillbecomepre-determinedone
eventhePitchControlVolumenotinthe0%position.
@4PITCHCONTROLVOLUME
Thisvolumeisforadjustingthepitch.
1.When the Quartz Lock is off, the pitch can be
adjusted.
2.When moving the Pitch Control Volume, you can
adjusttherevolutionsby±60%.
@5PITCHMODESELECTSWITCH
Selectthemodeofthepitchcontrol. Themodeisas
below.
1.Whenpressingthequartzlockbutton,quartzlockis
off.(theindicatorlampisoff)
2.When moving the Pitch Control Volume, you can
adjusttherevolutionsasbellows.
90L:The position of 9 o'clock is +60% and that of 6
o'clock is -60%. It changes from +60% to -60%
counter clockwise. Between 6 o'clock and 3
o'clock,itisfixedat-60%andunchanged.
180:Thepositionof3o'clockis+60%,6o'clockis-60%
and 9 o'clock is +60%. The rotation pace is
changeable.
90R:Theposition of 3o'clockis +60% andthatof6
o'clock is -60%. It changes from +60% to -60%
clockwise.Between6o'clockand9o'clock,itis
fixedat-60%andunchanged.
All manuals and user guides at all-guides.com

DRIVER
-9-
InstallingtheBalanceWeight
TurntableAssembly
Fromthebackendofthetonearm(towardstherearpanel)
placethebalanceweightontotheshaftandturncounter
clockwise.(Refertotheillustration)
-60% +60%
0% 0%
+60% -60%
-60%
0% 0%
S
l
i
d
e
s
v
a
r
i
a
b
l
y
f
r
o
m
-
6
0
%
t
o
+
6
0
%
I
t
d
o
e
s
n
o
t
s
l
i
d
e
t
o
-
6
0
%
i
n
t
h
i
s
r
a
n
g
-60% +60%
0% 0%
I
t
d
o
e
s
n
o
t
s
l
i
d
e
t
o
-
6
0
%
i
n
t
h
i
s
r
a
n
g
S
l
i
d
e
s
v
a
r
i
a
b
l
y
f
r
o
m
-
6
0
%
t
o
+
6
0
%
90L 90R
180
S
l
i
d
e
s
v
a
r
i
a
b
l
y
f
r
o
m
-
6
0
%
t
o
+
6
0
%
S
l
i
d
e
s
v
a
r
i
a
b
l
y
f
r
o
m
-
6
0
%
t
o
+
6
0
%
-60%
-60%
ASSEMBLY AND SET-UP
(1)Placetheplatteronthecenterspindle.Theplatterwill
adjustitselftobestfitoverthespindle.
(2)Adjustthepositioningofaplattersothatascrewgoes
intoascrewholes.
(3)Tightenscrewsusing adriverandfixaplatteranda
mainunit.
(4)Placetheslipmatontheplatter.
NOTE
Incaseofanassembly,becarefulsothatamainunit
andaplatterdonotcollidestrongly.
Iftheplayerisoperatedwithoutfixingthescrews,the
plattermaynotrotateproperly.
Donotplugintoapoweroutletuntilthisunitisfully
assembledandadjusted.
All manuals and user guides at all-guides.com

50mm
Slipmat
Placetheslipmatontheplatter.Thenplacearecordon
top of the slip mat. By using a slip mat, it becomes
possibletostoparecordboardbyhandduringrotationof
aplatter or tomakeit reverse.Moreover,if anoptional
slip-sheetissetandused,itwilltakeeffectmore.
CartridgeInstallation
(1)Makesurethatyoufollowtheinstructionsincludedwith
yourcartridge.
(2)Connect the lead wires to the respective terminals.
Industry standard cartridges come with color-coded
wires.Makesurethatyoumatchthesecolorscorrectly.
Red(R+)RightChannel+ Green(R-)RightChannel-
White(L-)LeftChannel+ Blue(L-)LeftChannel-
(3)Theoverhangofyourcartridgeneedstobeadjustedto
bestsuittheA.S.T.Stonearm.For besttrackingand
styluspressureadistanceof50mm(asshown)should
beset.
(4)Inserttheheadshellintothefrontpartofthetonearm.
Turnthelookingringinthedirectionshownbelowuntil
theheadshellisfirmlyfixedinplace.
NOTE
Ifusingalightweightcartridge,wesuggesttheuseof
theshellweightenclosed.
NOTE
Toavoidprematuredamagetothestylustakecareto
avoidtouchingitduringanyadjustment(s).
-10-
Top:Recorddiscside(Printedside)
Bottom:Slipsurfaceside
NUT
HEADSHELL
(OPTION)
SHELLWEIGHT
(OPTION)
CARTRIDGE
STYLUS
SCREW
LEADWIRE
All manuals and user guides at all-guides.com

MASTEROUT
MADE IN CHINA
LINE 2LINE 1
L
R
MASTER
OUT
SERIAL NO.
100V 50/60Hz 15W
MODEL NO. QFO
LINE1
LINEIN
LINE2
Connection To Input
Connect to line input/AUX input on your mixer/pre-amp.
QFO REAR PANEL
PlayerInstallation
・Donotplacetheunitwhereitisexposedtodirectsun
light,hightemperatureofhumiditytopreventpossible
troubles.
・Placetheunitinastableandhorizontalposition,where
thereislittleornovibration.
・ocatetheunitasfarawayfromthespeakersaspossible
andisolatetheunitfromsoundradiationfromthem.
・Iftheunitisplacedtooclosetotheradio,interferenceto
AM/FMreceptionmayresult
PowerConnection
ConnecttheACpowercordtosuitableoutlet.
NOTE
Thisunithasbeenmanufacturedtofitstrictqualityand
safetystandards.PLEASEENSUREthatyouusethe
correctpowersupplyasshownontherearpanelof
thisdevice.FAILUREtodosomanyresultinshock
and/orseriousdamagetothisunitand/orusers.
INSTALLATION AND CONNECTION
-11-
All manuals and user guides at all-guides.com
all-guides.com

ADJUSTMENT
-12-
①Installthecartridge,headshellandbalanceweighttothe
tonearm.
②Adjustthedynamicstyluspressureknobobthetonearm
toZero.
③Carefullyreleasethetonearmfromthetonearmclamp.
④Turnthebalanceweightclockwiseorcounterclockwise
untilbalancedhorizontally.
⑤Returnthetonearmtothearmrest.
⑥LoosenthedynamicStyluspressureadjustmentknob
and pull it to the position with appropriate needle
pressure,tightentheknob.
NOTE
Be careful not to touch your finger to the stylus tip
duringtheadjustment.
NOTE
Exceeding stylus pressure recommendations may
couseskippingand/orreducestyluslife.
NOTE
BesuretotightentheTonearmHeightScrewwell.The
stylusmayjump/skipiftheheightsettingisnotsecured.
NOTE
Incasethebalanceweightismoved,dotheadjustment
ofhorizontalzerobalanceagain.
AdjustmentofHorizontalZero(0)Balance
In case of the height of Tone-arm is needed for
adjustment,itispossibletoadjusttheheightbyloosening
theTone-armHeightFixedScrew.Theadjustmentrange
is9mmatthemaximum.Incaseof16mmcartridgeheight
→Adjustmentoftone-armheightdonotneed.Incaseof
25mmcartridgeheight→Adjustmentoftone-armheight
needtoset9mm(MAX).
AdjustmentofTone-armHeight
DynamicStylusPressure
Adjustmentknob
DynamicStylusPressure
Adjustmentknob
a)When the balance weight and cartridge are
balanced,thetonearmisheldhorizontal.
b)Excessive forward advancement of the balance
weightcausesthecartridgesidetobelowered.
c)Excessive backward retreatment of the balance
weightcausesthecartridgesidetoberaised.
LoosenLoosen
SlideandadjustSlideandadjust TightenTighten
ScrewDriver
COIN
ArmHeight
AdjustmentScrew
Loose tTghten
Loose Tighten
All manuals and user guides at all-guides.com

MIN MAX
TRIM
HI
EQ
LOW
MASTER
LEVEL
POWER
PITCH MODE
90L 90R
180
MONITOR
SELECT
PGM 1 PGM 2
MASTER
-12dB +12dB
MIN MAX
-24dB +12dB
HI
EQ
LOW
PHONO
LINE 1
PGM
1
LEVEL
QUARTZ LOCK
REVERSE
P
GM
M
AST
-12dB +12dB
MIN MAX
0
1
2
3
4
5
6
7
8
9
10
図a
図b
OPERATION OF RECORD
①Placearecordontheslipmat.
②Turnpowerswitchto"ON"position.
③Removestylusprotectorifapplicable.
④Selecttheinputselectswitchto"phono".
⑤Selectappropriaterotationspeed.(33/45rpm)
⑥PushStart/StopSwitchtostartrotation.
⑦Carefullyplacetonearmontherecord.
⑧Adjusttheeachlevelvolume.
⑨Replacetonearmtorestpositionafterplayhasfinished.
⑩PressStart/StopSwitchtostoprotation.
⑪Turnpowerswitchto"OFF"position.
-13-
FittheEPadaptoroverthecenterspindleandfollowthe
sameplayinginstructionsaswrittenabove.
MEMO
If you select "PHONO" for both program channels,
reproducedsoundofrecordis
assignedtoeachchannel.Forexample,ifyousqueeze
EQofPGM1andfixEQofPGM
atthecenterlevelandatthesametimeusingCross
FaderwithInputLevelVolumeof
both program channels risen, it enables the
mixing/changingofEQadjustedreproduced
soundandnon-adjustedreproducedsound.
NOTE
If the power switch is turned off without pressing the
START/STOPSwitch,theelectricbrakewillnotfunction.
PLAYINGEPRECORDS
POWERSWITCH
Inputselectswitch
to"PHONO"
All manuals and user guides at all-guides.com

-14-
①Remove the 4 screws which fix the fader unit, and
removethefaderunitfrompositioninthisunit.
②Raise fader unit and remove both the surface fader
panelandthebufferrubberbelowthepanel.
③Carefully remove the multi-cable connector from the
faderunit.
④Removethefaderknobs.
⑤Removethebracketwhichisscrewedtofadervolume
fromtheremovedfaderunit.(seetherightpicture)
⑥Fix the bracket to the new fader unit in the way of
reverseprocess.
⑦Attachmulti-cableconnectortonewfaderunit.
⑧Positionthefaderunitcarefullyandsecurewithscrews.
NOTE
Thebufferrubberisveryimportantparttoavoidthe
stylusskip.Becarefulnottoloseitwhenyouchange
fader unit. When you change to new fader unit,
pleasefixthebufferrubberproperly.
【InstructionsforcrossfaderCF-CPVreplacement】
①Unscrew the two screws on the
CF-PCVpanelandvolumeasitis
shownbelow
②SetthechangeswitchoftheCF-
PCVtoPMC ③Connect the QFO bracket to the
CF-PCVfadervolume
NOTE
CF-PCV has to types of connectors
butconnectittothePMCconnector
asshownbelow
EXCHANGE THE FADER UNIT
FADERKNOB
FADERVOLUME
FADERVOLUME
CONNECTORCABLE
FADERPANEL
BUFFERRUBER①
BUFFERRUBER②
BRACKET
BRACKET
PMCConnecter
Setthisswitchto"PMC"
All manuals and user guides at all-guides.com

-15-
How to attach VESTAX insulater and VESTAX QFO hook
Whenthemachineisplacedhorizontalyto suppress
howling under high volume use, attach VESTAX
insulater(notincluded)on4sectionsofthebottomof
thebodyasshownbelow.
Howtoattachinsulater
Inuse oftheQFO strappedaroundshoulder orhip,
attach VESTAX QFO hook(not included) to the 2
sectionsofthebottomofthebodyasshownbelow.
HowtoattachQFOhook
All manuals and user guides at all-guides.com

JUL.2004QFOE○
1
Vestax Corporation
TURNTABLE MOTOR DIRECTDRIVEQUARTZ
STARTINGUPTIME 0.5sec(331/3rpm)70°
STARTINGTORQUE 2.7kg・cm
BRAKINGSYSTEM ELECTRONICBRAKE
SPEED 331/3rpm,45rpm
PITCH ±60%
WOW&FLUTTER 0.07%W.R.M.S
TONEARM TYPE DYNAMICBALANCESTRAIGHTTONEARM
STYLUSPRESSURE ADJUSTMENTRANGE0〜4.0g
MIXER INPUT NOMINALINPUTLEVEL IMPEDANCE
LINE -10dBv 10kΩ
OUTPUT NOMINALOUTPUTLEVEL IMPEDANCE
MASTER -10dBv 220Ω
PHONES 58mWMAX(@47Ω) ≧8Ω
FREQUENCYRESPONSE 25Hz〜25kHz
CROSSTALK ≧100dB
THD <0.01%
S/NRATIO ≧75dB
OTHER DIMENSIONS(W×H×D) 455×130×524(mm)
WEIGHT 7.0kg
SPECIFICATION
All manuals and user guides at all-guides.com
all-guides.com
Other manuals for QFO
2
Table of contents
Other Vestax Recording Equipment manuals

Vestax
Vestax GE-31A User manual

Vestax
Vestax QFO User manual

Vestax
Vestax DDG-X2 User manual

Vestax
Vestax QFO User manual

Vestax
Vestax PMC-05ProSL VCA User manual

Vestax
Vestax VMC-002XLu User manual

Vestax
Vestax VCI-100MKII User manual

Vestax
Vestax DSG-300 User manual

Vestax
Vestax DCR-2500F User manual

Vestax
Vestax QFO LE User manual
Popular Recording Equipment manuals by other brands

Dickson Industrial
Dickson Industrial SC3 user manual

Extron electronics
Extron electronics RGB 460xi SC Series installation guide

Beckhoff
Beckhoff EPP6001-0002 Documentation

Videoswitch
Videoswitch Vi-POSCON installation guide

Extron electronics
Extron electronics CIA111 Specification sheet

Kramer
Kramer SP-4D user manual