ViaAqua In-Sump Skimmer 2 SK-200NW User manual

• COMPLETE PROTEIN SKIMMER FOR SALT WATER AND REEF AQUARIUMS
• EXCLUSIVE FORCE THROUGH U/D MIXING TOWER (14”UP, 14”DOWN)
AVAILABLE MODEL: SK-200NW & SK-388NW
WARNING!
Buyer/user assumes all responsibility for
safety and proper use not in accordance
with the directions and safety labels.

14”

1
FE AT URES
• COMPLETE PROTEIN SKIMMER FOR SALT WATER
AND REEF AQUARIUMS
• EXCLUSIVE FORCE THROUGH U/D MIXING TOWER
(14”UP, 14”DOWN)
• NeedleWheelImpellerwithIntakeVenturi
• NoExtraPlumbingPartsRequired
• ReplacementDischargeSponge
• EasytoRegulate
• EasytoInstallandMaintain
• CompactandEfficientDesign
• ReadytoRunOutofTheBox
ViaAqua®In-Sump Skimmer 2™incorporates needle wheel
technology with an exclusive U/D force through mixing tower for
added contact time. The needle wheel and venturi intake tube create
micro bubbles, which provide a tremendous amount of surface area
to attract organics. The U/D mixing tower adds an additional 28”
of contact time (14”up, 14”down). This contact time allows more
time for organics to adhere to the surface of the micro bubbles.
This unique feature provides the contact time of skimmers twice as
large. Designed to be easy to set up and easy to regulate. Each unit
comes with water level control and air volume control to ensure the
ability to precisely tune the skimmer for maximum efficiency for any
aquatic environment. The combination of design and engineering
has created one of most efficient and affordable protein skimmers
in the aquarium hobby.

2
PARTLIST
1. Collection Cup Lid
2. Collection Cup
3. Discharge Sponge
4. Discharge Compression Nut
5. Variable Discharge Tube
6. Main Body
7. Base
8. Force Through U/D Mixing Tower
9. Air Control Valve
10. Intake Compression Nut
11. Venturi Intake Tube
12. Pump
13. Venturi Tubing Adapter
14. Needle Wheel Impeller
15. Ceramic Shaft
Model Dimensionininches AquariumSize UPC#0069037
SK-200NW 13 L x 8.5 W x 16 H 150 Gal. 2972 7
SK-388NW 14.5 L x 8.8 W x 18.1 H 250 Gal. 2973 4
Model Voltage Frequency Wattage
SK-200NW 110v –120v 60Hz 37 Watts
SK-388NW 110v –120v 60Hz 47 Watts
SPECIFICATION
8
9
10
11
12
13
14
7
6
5
4
3
2
1
15

Drip
Loop
GFCI
ONLY
3
WARNINGANDSAFEGUARDS
BeforeinstallationoftheViaAqua®In-SumpSkimmer2™readandfollow
theseimportantsafeguardsandsafetyguidelines.
ThisproductmaycontainchemicalsknowntothestateofCaliforniato
causecancerandorbirthdefectsorotherreproductiveharm.Washyour
handafterhandlingthisproduct.
• DonotoperateViaAqua®pumpwithoutitbeingfullysubmersedatall
times.Failuretodosowillcausepermanentdamagetothepump.
• Priortomaintenanceonanyelectricalaquariumdeviceormaintenance
totheaquarium,youmustdisconnect/unplugallelectricalaquarium
devices.
• Routinemaintenanceisrequiredtoensurethemaximumperformance
andlongevityoftheViaAqua®pump.Seemaintenance.
This product may contain chemicals known to the state of California
to cause cancer and or birth defects or other reproductive harm. Wash
your hand after handling this product.
It is your sole responsibilities to verify that the plug and the receptacle
are clean and free of moisture and salt build up at all times. The
receptacle must be free of water, salt, calcium,
magnesium and dust. Failure to do so can cause
fire, damage to property, permanent damage to
the product and personal injury not limited to loss
of life.
Do not plug into extension cord/power strip.
A drip loop must be used when plugging all
electrical aquarium devices. A drip loop is that
part of the cord hanging below the receptacle.
The national code requires that a GFCI (Ground
fault circuit interrupter) be used in the branch
circuit supplying all power to water pumps and
electrical aquarium equipment. If you do not have
a GFCI, have an electrician install one prior to
operating any aquarium component.

4
DIRECTIONFORINSTALLAION
Note: A constant water level in the sump is needed to ensure the optimum
performance of any skimmer. To do this consult with your local dealer for
the properly designed sump or install a float valve.
1. AttachtheU/Dmixingtower.
• Thread the U/D mixing tower to the pump.
• Adjust the U/D mixing tower until the compression fitting aligns with
intake of the skimmer.
• Secure the intake compression nut to the intake of the skimmer.
2. Removethecollectioncupandwash wellwithamilddetergent
andrinsewithhotwater.Besureallofthedetergentisremoved
fromthecollectioncup.
3. Filltheskimmerhalfwaywith
saltwaterandplaceinthesump.
• The discharge sponge of the
skimmer should be placed the
farthest from the return pump.
• Sumps minimum water level is 5.5”
and maximum water level is 9.5”.
4. PlugthepumpintoaGFCI
electricaloutlet.
5. Placethecollectioncupon
theskimmer.
6. Opentheaircontrolvalve75%
andadjustthevariabledischarge
tubeto¾”higherthanthebottom
ofthecollectioncup.

Sump
water level
Min. 5.5”
Max. 9.5”
Sump
Discharge Sponge
Return Pump
3⁄4”
Drip
Loop
GFCI
ONLY
5
7. Letitoperateforaminimumof1hourbeforedoinganyotheradjustments
totheskimmer.
8. Theskimmerwillbeeitherskimmingproperlyorcollectingwaterand/
or no protein or not skimming and not collecting any protein. If the
skimmerisnotworkingproperly,followtheinstructionsdependingon
thespecificsituation.(seepage6)
Note: The skimmer will not work without a biological load. Increasing air
volume will decrease water flow, decreasing air volume will increase
water flow.

6
COLLECTING WATER AND NO PROTEIN
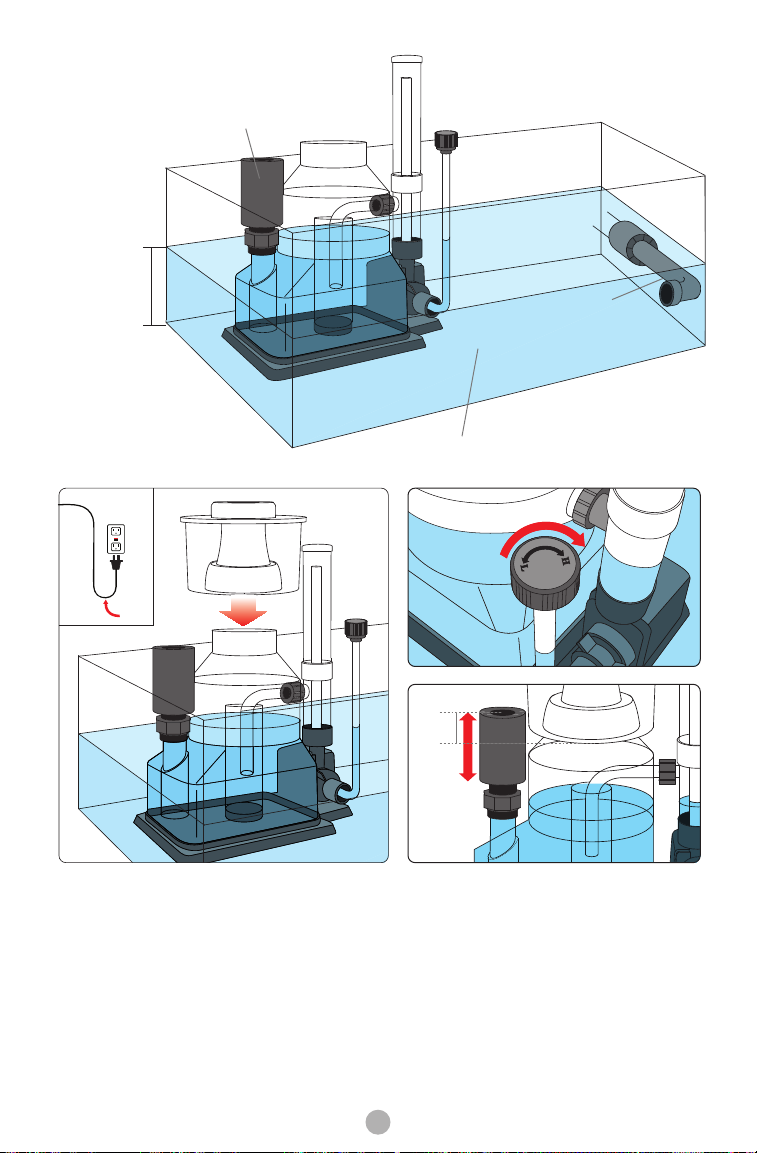
1. Lower the variable discharge tube in ½”increments until the bubbles stop
overflowing into the collection cup and the unit begins to skim. Loosen the
discharge compression nut and lower variable discharge tube.
Tighten discharge compression nut to set.
2. If the variable discharge tube is as low as possible and water is still collecting
in the cup, then start to increase the volume of air by turning the air control
valve towards the H by a 1⁄8of a turn until the unit begins to skim. By increasing
the air volume it will decrease the water level and speed of the water entering
and exiting the skimmer.
Note:
• Set salinity at 10.0022-10.0025.
• The use of certain water conditioners will cause excess bubbles and
the skimmer to collect excessive water. This will occur until the water
conditioner is completely removed. Certain water conditioners that
increase slime coat are more prone to affect to the skimmer.
• The use of medications will cause excess bubbles and the skimmer
to collect excessive water. This will occur until the medication in the
water is completely removed.
• if the water level in the sump is too high that above 5.5”-9.5”, It will
cause the skimmer to collect excessive water.
NOT SKIMMING AND NOT COLLECTING ANY PROTEIN
1. Decrease air volume by turning the air control valve towards the L by a 1⁄8of a
turn until the unit begins to skim.
2. Raise the variable discharge tube in ½”increments until the bubbles reach
halfway up the neck of the collection cup. Loosen the discharge compression
nut and raise the variable discharge tube. Tighten discharge compression nut
to set. Wait a short period of time and if skimming does not begin, raise the
variable discharge tube a small amount (approximately 1⁄8”). Continue to raise
the variable discharge tube until the unit begins to skim.
Note:
• Set the salinity at 10.0022-10.0025.
• There must be a biological load. In short there must be livestock in
the aquarium.
• The collection cup has not been washed with a mild detergent.
• Water level in the sump is too low, around 5.5”-9.5”.

7
MAINTENANCE
VIAAQUA®WATER PUMP AND VENTURI
1. Disconnect the pump from the electrical outlet.
2. Remove the skimmer from the sump.
3. Remove all the water from the skimmer’s main body.
4. Remove the venturi intake tube and air control valve. This will run water
through the unit so that water runs through air control valve remove all
salt deposits.
5. Remove the impeller well cover.
6. Remove the impeller and the shaft, clean well. A small amount of vinegar
should be used to clean the ceramic shaft. Soak shaft in a 1 part vinegar to 3
parts water soluation for 30 minutes.
7. Clean the inside of the impeller well with a small brush.
8. Reassemble and install the unit back into the sump.
DISCHARGE SPONGE
• If sponge clogs, the water level in the skimmer will increase and cause the
skimmer to collect wetter foam/water in the collection cup. In a new tank it
may be necessary to clean the sponge every week.
Replace sponge as needed.
COLLECTION CUP
• Clean as often as needed. At times the collection cup may have to be cleaned
everyday. Keeping the collection cup clean ensures a properly
operating skimmer.
MAIN BODY
1. Disconnect the pump from the electrical outlet.
2. Remove the skimmer from the sump.
3. Remove all the water from the skimmer body.
4. Disconnect the U/D mixing chamber.
5. Remove the pump from the skimmer body.
6. Fill unit with water and add a small amount of bleach.
Approximately one capful.
7. Let stand for one hour.
8. Rinse unit well and refill with fresh water.
9. Add a water conditioner that removes chlorine to the water and let stand
for one hour.
10. Rinse well, reassemble and install.

8
REPLACEMENTPARTS
Part
Number Description ForIn-Sump
Skimmer
UPC#
0069037
3Discharge sponge SK-200NW
SK-388NW 2985 7
14 VA 2300 needle wheel impeller assembly SK-200NW 2981 9
14 VA 2600 needle wheel impeller assembly SK-388NW 2982 6
15 VA 2300 needle wheel impeller shaft SK-200NW 2983 3
15 VA 2600 needle wheel impeller shaft SK-388NW 2984 0
TECHNICAL SERVICE DEPARTMENT
Monday to Friday 9 am - 5 pm PST
(805) 383-3566 ext. 102
e-mail: [email protected]

9
LIMITED WARRANTY
Commodity Axis, Inc.®warrants that the ViaAqua®In-Sump Skimmer2™is free
from defects for a period of one year from the initial date of purchase shown on the original
cash register receipt. Commodity Axis, Inc.®disclaims all other warranties, express or
implied, including but not limited to any implied warranties of merchantability and/or fitness
for a particular purpose. Although this limited warranty gives you specific rights, you may
have other rights which vary from state to state. This warranty is void if the failure is due
to misuse, tampering, negligence, abuse, accident and/or submersion, a failure to properly
install, maintain, clean, prefilter, reassemble, and/or failure to use the ViaAqua®In-Sump
Skimmer2™with a Ground Fault Circuit Interrupter (GFCI).
CONSUMER REMEDIES
Commodity Axis, Inc.®’s entire liability and your sole and exclusive remedy shall
be either repair or replacement of the ViaAqua®In-Sump Skimmer 2™only if you return the
defective unit directly to Commodity Axis, Inc.®with the original receipt in its original box
along with twenty five dollars ($25.00) for shipping and handling. Do not send the ViaAqua®
In-Sump Skimmer 2™by insured mail. You may send your returns or replacements by UPS
if requiring a signature upon arrival. Any replaced unit will be warranted for the remaining
time of the original warranty period. In no event shall any shipping charges be reimbursed.
In no event will Commodity Axis, Inc.®be liable for any consequential or incidental damages,
including but not limited to, lost of sea life, personal injury, property damage, equipment
damage, lost profits, lost wages, lost savings, lost income, etc., arising out of the use of the
ViaAqua®In-Sump Skimmer 2™. Some states do not allow for the limitation or exclusion of
liability for incidental or consequential damages, so the above exclusion may not apply
to you.
RETURNS
Please contact our service center at (888) 838-3882 or fax (888) 989-0878 to
arrange repair and/or replacement. Please allow 4-6 weeks for all returns. Commodity
Axis, Inc.®cannot ship nor respond to a P.O. Box address.
IN-SUMP SKIMMER 2™ WARRANTY CARD
Please mail warranty card and PROOF OF PURCHASE within 15 days of purchase to:
Commodity Axis, Inc., 300 South Lewis Rd. Unit J. Camarillo CA 93012
Model #: Customer’s Name:
Date of Purchase: Address:
Dealer Name: Phone #:

Commodity Axis, Inc.®is also a manufacture of
ViaAqua®Acro-Cal™ Reactor, ViaAqua®Poly Reactor™,
ViaAqua®Oceanpure™Salt, ViaAqua®Glass Heater, ViaAqua®Titanium Heater,
ViaAqua®MillionAir™Air Pump, ViaAqua®Water Pumps, ViaAqua®Glass Aquariums
and Helios®Lighting Systems.
© 2009 Commodity Axis, Inc.®
Specifications are subject to change without notice
Bringing Products to Life
300 South Lewis Rd. Unit J.
Camarillo CA 93012
www.CommodityAxis.com
www.ViaAquaOceanpure.com
This manual suits for next models
1
Table of contents
Other ViaAqua Aquarium manuals
Popular Aquarium manuals by other brands

Aqua Medic
Aqua Medic Kauderni CF Operation manual

Aqua Medic
Aqua Medic Refill System easy Operation manual

Aqua Medic
Aqua Medic Mistral 100 Operation manual

Coolworks
Coolworks IceProbe IPAC-50W Instructions & warranty

Smarter Reefs
Smarter Reefs Protein Skimmer 150 instructions

Tetra
Tetra Whisper 10-30 INSTRUCTIONS, SAFEGUARDS & WARRANTY