ViaAqua R1 120B User manual

R1 Aquarium Kit
Congratulations for purchasing a ViaAqua® self-contained aquarium kit!
All ViaAqua® aquarium kits can be used for either saltwater or
freshwater environments.
Having a well-maintained and established aquarium in the house or ofce provides a
soothing and tranquil felling for all. It is known that aquariums and
sh and help reduce stress and anxiety. A child’s love for sh can be used
to teach responsibility as well as basic biology.
The following are some helpful hints as well as specic guidelines to set up and maintain an
aquarium. These are guidelines and can’t account for every variable in owning
and/or taking care of an aquarium with live animals.
We recommend that when having any questions always consult
you local tropical sh store or pet supply store.
Please follow these guidelines for a successful aquatic environment.
• Radius corner glass aquarium
• Dual dry/wet ltration
• Quiet and energy efcient
• Easy installation and maintenance
• Complete mechanical and biological ltration
system with top lter and pump
• Aluminum moisture resistant uorescent light
xture with three rows of lights
and individual switches for each row
WARNING
Buyer/User assumes all responsability for safety and proper
use not in accordance with the directions and sately labels.

WARNING
»This product may contain chemicals known to the State of California to cause cancer and/or
birth defects or other reproductive harm. Wash you hand after handling the product.
»It is your sole responsability to verify that the plug and receptacle are clean/free of moisture
and salt build up at all times. The receptacle must be free of water, salt, calcium, and
magnesium. Failure to do so may cause re and/or loss of life.
»Do not plug into an extension cord or power strip.
»A drip loop must be used when plug into any electrical devices. A drip loop is part of the
cord hanging below the receptacle.
»The national code requires all aquarium equipment to be plugged into a G.F.C.I. (Ground
Fault Circuit Interrupter) electrical outlet. If you do not have a G.F.C.I., have an electrician
install one prior to operating any aquarium components.
PRECAUTION AND WARNING
Before installing a ViaAqua® Aquarium Kit Read and Follow all warn-
ings and safeguards and to guard against injury, basic safety precau-
tions need to be observed.
* Read and follow all warning and instructions.
* The aquarium must be placed on a strong and level aquarium stand.
* If the light hood is to fall into the water or is sitting in water do not reach for
it. Unplug the light xture rst then retrieve and/or remove. If the light is to
get wet unplug immediately.
* Always unplug all electrical devices prior to working on the aquarium and/or
lter.
* Do not operate if any of the electrical cords are damaged.
* Never yank or pull the cord from the electrical outlet.
* Only use the aquarium for it intended use.
* Do not lift the aquarium with water inside.
* Do not operate the pump without water.
* All components are intended for indoor use only.
INSTALLATION
First decide on what kind of sh you would like to keep.
• Goldsh-coldwater
• Tropical sh
• Saltwater aquarium
• Planted aquarium
• Reef aquarium
1. On a perfectly at surface ll the aquarium with water to verify that there are not any
leaks. Now that there are not any leaks remove the water from the aquarium. Never lift
the aquarium with water either scoop or siphon water from the aquarium.
2. Guidelines for aquarium location.
a. Do not put the aquarium directly in the front of a window.
b. Do not put next to a door that leads to the outside. Any consistent draft will make it
very difcult to maintain a stable temperature.
c. If you are not placing the aquarium on an aquarium stand verify that the surface is
at, level and strong. Note that water weights approx. 8 lbs. per gallon.
d. Keep out of reach of children.
Drip
Loop
GFCI
ONLY

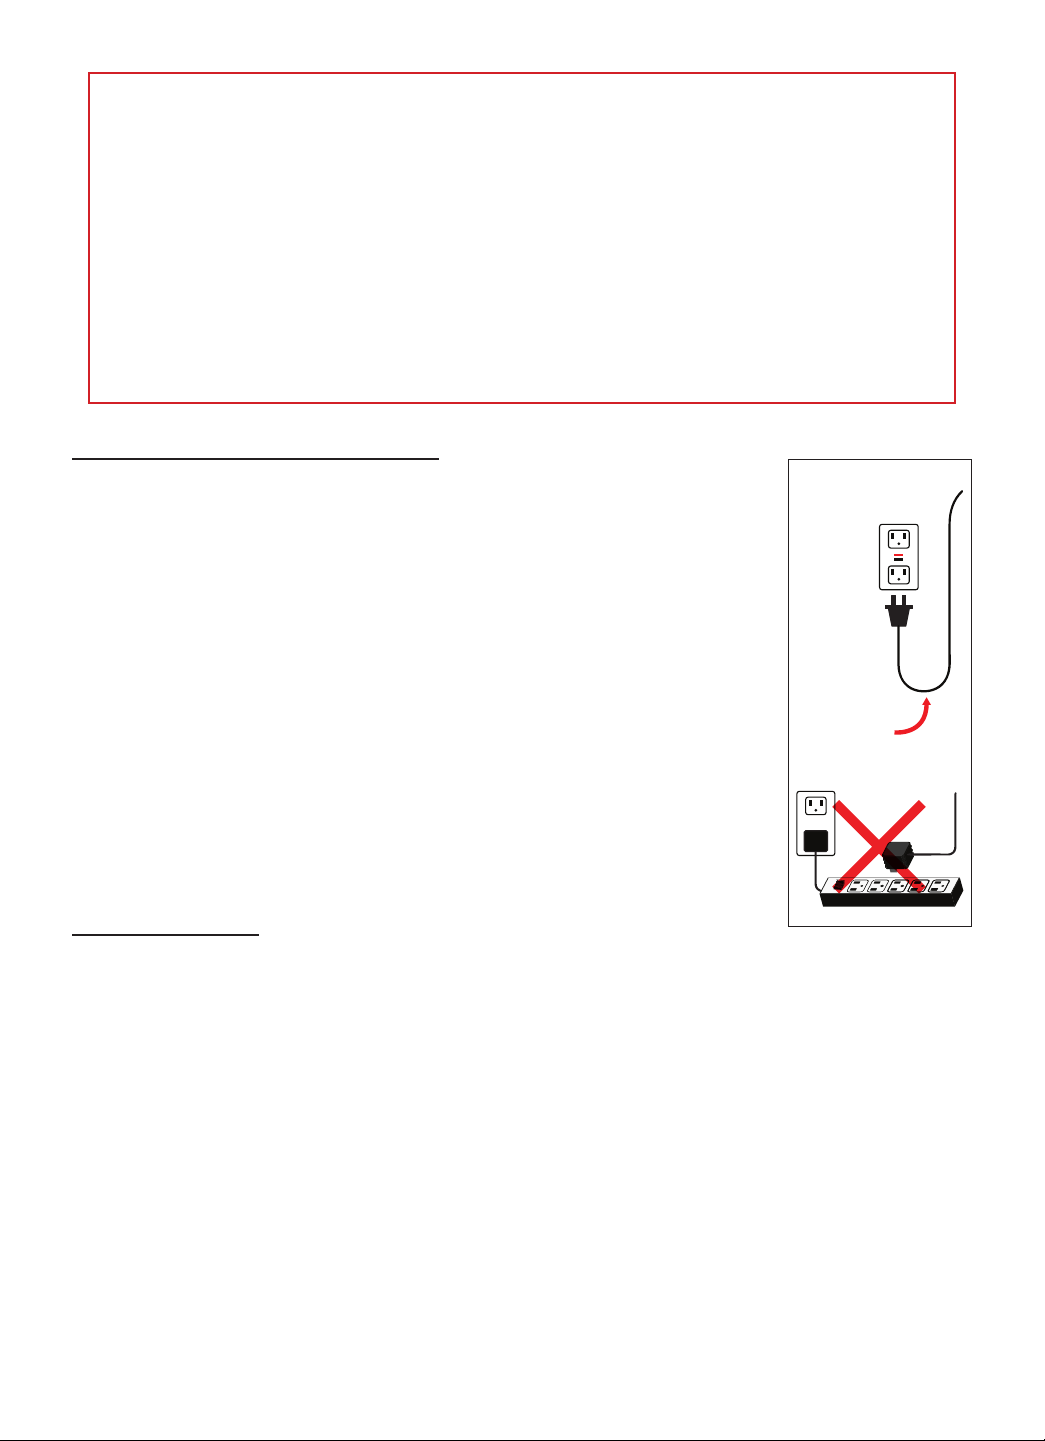
3. Electrical supply
a. Plug in all electrical aquarium appliances into a G.F.C.I. electrical outlet only
b. Do not plug into a extension cord
c. Always disconnect the power to all aquarium devices prior to maintenance
d. Do not plug in the pump until the aquarium is full of water.
4. Filtration
a. Attach the intake tube and the intake strainer to the intake of the pump. The intake
of the pump is that side without the cord
b. Now secure the pump into the left side of the ltration box.
• R-1 80 rotates the pump until the output is facing the right side of the lter box.
• R1-100 to R150 slides the rectangle discharge bracket into the top of the
pump. Now align the tabs with the slots and push tabs into the slots.
• Then insert the 3.5” pipe adapter into the output of the pump. Now the
discharge elbow slides into the 3.5” pipe adapter. See Diagram 1b.
c. Rinse and place the biological media evenly in one of the trays. Each bag of media
is for one tray.
d. Now place the lter pads above the biological media
e. Optional carbon and other resin media may be used. Place all media in a media
bag.
f. Attach the spray bar so the discharge elbow using the 1” coupler provided. Verify
the holes from the spray bar are facing down or towards the lter pads.
g. Now place square oat into the right side of the lter box. If an all wet biological
lter is desired place the clear standpipe in the discharge hole.
h. Place lids back on top of the lter.
5. Lighting
a. On the bottom of the light are four screws. Using a coin turn the screw 180 degrees
and remove. Do not use excess force
b. Peel off protective paper
c. Verify the bulbs are seated in the end caps
d. Reassemble and the light is ready to use.
e. Plug the lighting unit into a GFCI electrical outlet
f. Verify that a drip loop is being used.
6. Rinse gravel well
7. Fill aquarium with water. When lling the aquarium with water verify that the container is
clean and not contaminated
8. Fill the aquarium to just below the discharge adapter on the right side of the dual stage
biological lter.
9. When keeping Tropical sh or a saltwater aquarium a Via Aqua heater is
recommended. Please consult your local tropical sh store or pet supply store for the
proper wattage heater.
* R-1 80: 150 watt ViaAqua® preset heater
* R-1 100: 200 watt ViaAqua® preset heater
* R-1 120: 250 watt ViaAqua® preset heater
* R-1 150: 300 watt or two 200 watt ViaAqua® preset heater
10. Place a thermometer on the opposite side of the heater
11. Install the heater according to the manufactures guidelines. Wait 15 min. for the heater
to acclimate to the water temperature in the aquarium prior to plugging the heater into a
G.F.C.I. electrical outlet.
12. Place the heater where there is good water circulation.
13. Due to varying water conditions water supplements may be necessary, consult with

your local tropical sh store or pet supply store for the required water conditioners for
your area.
14. Verify that there are not any leaks.
15. Once the aquarium has reached the proper temperature you are ready to add sh and
plants.
Helpful Hints:
The light xture must remain free of water and/or salt creep at all times failure to do so will cause
permanent damage to the light xture, cause electrical arching and/or start a re.
Do not add all the sh and plants at one time. See your local tropical sh store and pet supply store
for proper new tank setup. An additional life support system is recommended.
Aeration-aids is use of a secondary water circulating pump.
BASIC GUIDELINES
Keeping Tropical sh is easy once you understand the basics. Every aquarium is a self-
contained ecosystem. Meaning that water, shes, plants and nitrifying bacteria all work
together to maintain a stable environment. At rst the aquarium is not balance because the
nitrifying bacteria have not had a chance to cultivate in the biological media. The introduction
of nitrifying bacteria will help speed up the biological cycle and create a healthy environment
for your sh. Adding the bacteria is not an instant solution but will greatly improve set up of
any new aquarium. Now, add few shes and plants, as this will start your biological cycle.
Consult your local tropical sh store or pet supply store for a few hearty sh and plants.
Now it will take a little patience since it is a natural process there is not an exact time frame
as when the biological cycle will end. To verify that the biological cycle is complete test
the water for ammonia and nitrite. If both the ammonia and nitrite are at 0.0 ppm you are
ready to slowly stock your aquatic environment. Adding sh weekly is recommended so
the environment has time to adjust to the increased biological load. Two weeks after the
biological cycle is complete change 25-30% of the water once a month.
Remember these are only guidelines and not rules of aquarium set up. Set up can very
depending on local water conditions and the type of sh or animals you would like to keep.
A good tropical sh store or pet supply store can assist with good advice.
* Do not add all the sh and plants at one time.
* See your local tropical sh store for proper new tank setup.
* An additional life support system is recommended.
* Aeration-aids in good gas exchange or use of a secondary water circulating pump.

AQUARIUM AND CABINET
Item no. Color Dimensions
(approx.)
Hood
Size Capacity Light Bulb UPC #
0069037
R1 120B Black
48 1/4”L x 18”W x 26”H 4.5 in.
H80 gal. 2 x 22 13/16” 20w Pink
2 x 35 3/16” 30w Pink
1214 9
R1 120S Silver 1215 6
R1 120RWO Red walnut oak 3006 8
R1 120T-B Black
48 1/4”L x 18”W x
27 3/8”H
4.5 in.
H100 gal. 2 x 22 13/16” 20w Pink
2 x 35 3/16” 30w Pink
2460 9
R1 120T-S Silver 2461 6
R1 120T-RWO Red walnut oak 3007 5
R1 150-B Black
60 3/8”L x 18”W x 28
1/4”H
4.75
in. H 105 gal. 3 x 22 13/16” 20w Pink
3 x 29 3/16” 25w Pink
1219 4
R1 150-S Silver 1220 0
R1 150-RWO Red walnut oak 3008 2
R1 150T-B Black
60 3/8”L x 18”W x 32
3/4”H
4.75
in. H 130 gal. 3 x 22 13/16” 20w Pink
3 x 29 3/16” 25w Pink
2463 0
R1 150T-S Silver 2464 7
R1 150T-RWO Red walnut oak 3009 9
R1 180-B Black
72”L x 20”W x 28 1/2”H 3.5 in.
H150 gal. 3 x 35 3/16” 30w Pink
3 x 29 3/16” 25w Pink
1259 0
R1 180-S Silver 1262 0
R1 180-RWO Red walnut oak 3010 5
AQUARIUM CABINET
High density compress board
Full size aquarium cabinet
Item no. Aquarium Model Color Dimensions (approx.) UPC #0069037
R1 120KD-B R1-120 Black 50” L x 18 3/4” W x 30” H 1358 0
R1 120KD-S Silver 2513 0
R1 150KD-B R1-150 Black 61 3/4” L x 18 3/4” W x 30” H 1361 0
R1 150KD-S Silver 2494 4

LIMITED WARRANTY
Commodity Axis Inc. warrants that the ViaAqua® Aquarium kit is free from defects for a
period of one year from the initial date of purchase shown with the original cash register
receipt. Commodity Axis Inc. disclaims all other warranties of merchantability and/or tness
for a particular purpose. Although this limited warranty may give you specic rights, you may
have other rights that may vary from state to state. This warranty is void if the failure of the
ViaAqua® Aquarium kit or any part, sealant or component there of is due to (i) misuse, (ii)
tampering, (iii) negligence, (iv) misapplication, (v) abuse, (vi) accident and/or (vii) failure to
properly (a) maintain, (b) clean, (c) keep in contact with water and or use the ViaAqua®
Aquarium Kit with a Ground Fault Circuit Interrupter (G.F.C.I.).
CONSUMER REMEDIES
Commodity Axis Inc. entire liability and your sole exclusive remedy be, either the repair or
replacement of the ViaAqua® Aquarium Kit only if the return the defective ViaAqua® Aquarium
Kit directly to Commodity Axis Inc. with the original cash register receipt in this original box
along with $25.00 for shipping and handling. Do not send the ViaAqua® Aquarium kit by
insured mail. The ViaAqua® Aquarium kit may be sent by UPS requiring a signature on arrival.
Any replacement of ViaAqua® Aquarium kit will be warranted for the remaining for the original
warranty period. In no event will shipping charges be reimbursed. In not event will Commodity
Axis Inc. be liable for any consequential or incidental damages including, but not limited to
loss of life, personal injury, property damage, damaged equipment, lost prots, lost wages,
lost savings, lost income, etc. Some states do not allow for the limitations or exclusion of
liability for incidental or consequential damages, so the above exclusion may not apply to you.
Name Date
Address
City State Zip Code
Country Home Phone
Cell Phone Email
Seller (Retail Name) Date of Purchase
Seller’s Location Phone
*Afx a copy of your original purchase receipt here.Please mail warranty card and proof of
purchase within 15 days of purchase to:
Commodity Axis® Inc., 300 South Lewis Rd. Unit J. Camarillo CA 93012
IMPORTANT: Please make a copy of this warranty card and retain it for your records. Warranty
policy is subject to change without notice.
REGISTRATION CARD
ONE (1) YEAR WARRANTY CARD
This manual suits for next models
18
Table of contents
Other ViaAqua Aquarium manuals