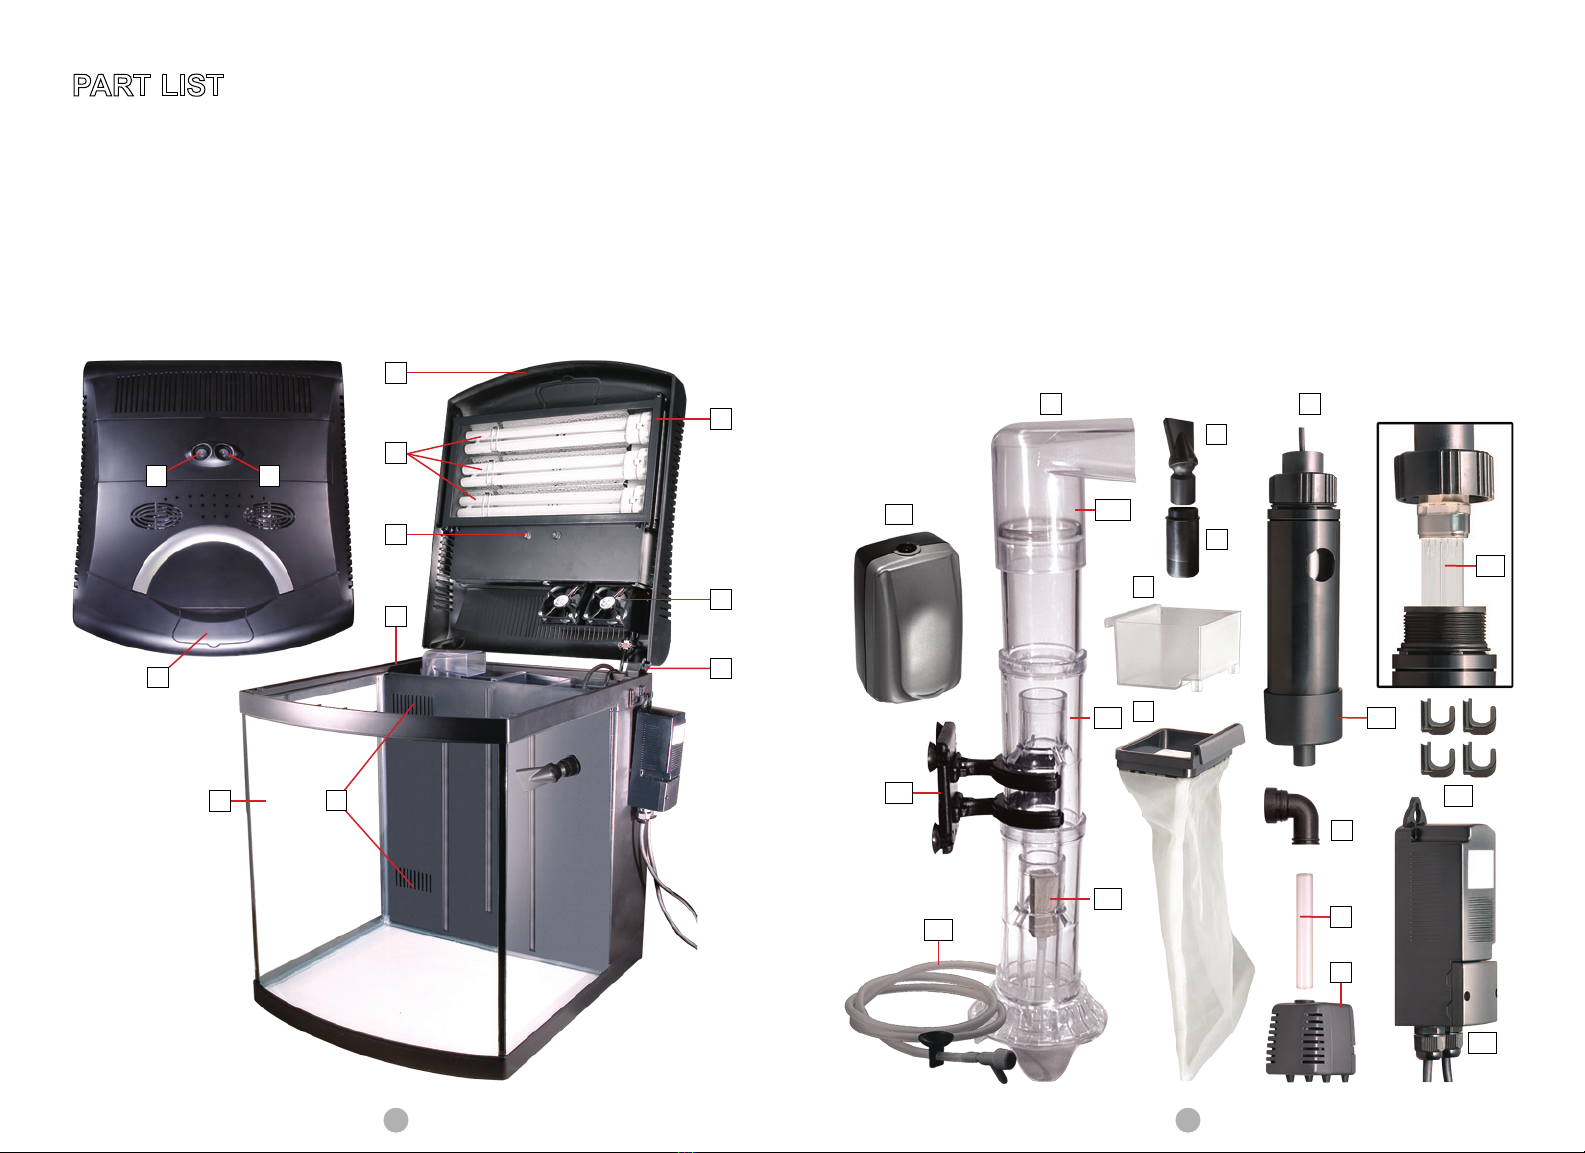
ViaAqua Cube Star CS-15B Installation and operation manual

NOTE: Please send all warranty Card to our new address
300 South Lewis Rd. Unit J.
Camarillo, CA 93012
WARNING!
Buyer/user assumes all responsibility for
safety and proper use not in accordance
with the directions and safety labels.


1
FEATURES
• Panoramic bow front with 4 versatile filtration chambers
• 72 watts (3x 24 watts) PL Lamps powered by a UL listed
Fulham ballast
• Dual cooling fans
• Dual blue LED moonlights
• Removable micron filter bag
• 5 stage filtration system:
1. Mechanical: Micron filter bag.
2. Chemical: Activated carbon or resin filtration media.
3. Biological: Ceramic bio media.
4. Protein skimmer: Integrated air driven counter current skimmer.
5. UV sterilizer: 5 watts PL UV bulb with a quartz sleeve (UV model ONLY)
Filtration layout
SPECIFICATION
Cube star aquarium
Model # Color Description UPC #
0069037
Size
(approx.) Dimension
(L x W x H) (approx.) light
bulbs Pump
Model
CS-15B Black
15 Gal.
15.5 x 17.75 x 20in 3x 24w
VA820
(13w)
3012 9
CS-15S Silver 3x 24w 3013 6
CS-15B-UV Black 15.5 x 17.75 x 20in
with 5 watt UV sterilizer 3x 24w 3014 3
CC-15S-UV Silver 3x 24w 3015 0
CS-28B Black
28 Gal
22 x 23.75 x 23.25in 3x 36w
VA305
(18w)
TBA
CS-28S Silver 3x 36w TBA
CS-28B-UV Black 22 x 23.75 x 23.25in
with 5 watt UV sterilizer 3x 36w TBA
CC-28S-UV Silver 3x 36w TBA
Cube star stand (sold separately)
Model # Color Aquarium model Dimension
(L x W x H) (approx.) UPC #
0069037
CS-15KD-B Black CS-15B / CS-15B-UV 15.5 x 17.75 x 30in 3016 7
CS-15KD-S Silver CS-15S / CS-15S-UV 3017 4
CS-28KD-B Black CS-28B / CS-28B-UV 22 x 23.75 x 30in TBA
CS-28KD-S Silver CS-28S / CS-28S-UV TBA
Standard model:
1. Return pump
2. Heater or bio media
3. Collection cup and
micro filter bag
4. Protein skimmer
UV sterilizer model:
1. UV sterilizer and return pump
2. Heater or bio media
3. Collection cup and
micro filter bag
4. Protein skimmer

2 3
PART LIST
1. Light hood
2. Led moonlight on/off switch
3. PL lamp on/off switch
4. Feeding door
5. 24 watts linear PL lamps
6. Dual blue Led moonlights
7. Splash guard
8. Dual cooling fans
9. Light hood hinge
10.Filter
11. Aquarium
12.Intake strainers
13.Counter current skimmer
13a. skimmer discharge elbow
13b. Main body
13c. Wood airstone
13d. Airline tubing & control valve
13e. Suction cup bracket
13f. Air pump
14.Collection tray
15.Micron filter bag
16.Directional discharge
17. Directional discharage adapter
18.Clear discharge tube
19.Return pump
20.Discharge elbow
(ONLY in CS-15B and CS-15S)
21.Terminator 5 watts UV sterilizer
21a. 5 watts UV bulb
21b. Reaction chamber with
quartz sleeve
21c. Hangers
21d. Ballast
NOTE: all Part No. 21 is available
ONLY in CS-15B-UV and CS-15S-UV
14
15
9
1
7
5
6
11 12
8
10
13 21
13c
13d
13e
13f
21a
21b
21c
21d
4
13a
18
19
2 3
13b
16
17
20

4 5
WARNINGS
UV Lamp: The UV lamp used in this unit
produces harmful ultraviolet radiation. Never
look directly at the lamp as damage to eyes
will occur. Always disconnect the power
supply before opening the unit for service.
Failure to do so will expose the user to
harmful UV radiation.
Drip loop: A Drip Loop must be used when
plugging in all electrical aquarium devices.
The Drip Loop is that part of the cord which
hangs below the level of the receptacle.
See Diagram.
IMPORTANT
It is your sole responsibility to verify that the receptacle is clean
and free of moisture at all times. The receptacle must be free
of water, salt, calcium and magnesium failure to do will cause a
fire and/or loss of life.
Having a well-maintained and established aquarium in the
house or office provides a soothing and tranquil felling for
all. It is known that aquariums and fish help reduce stress
and anxiety. A child’s love for fish can be used to teach
responsibility as well as basic biology.
The following are some helpful hints as well as specific
guidelines to set up and maintain an aquarium. These are
guidelines and cannot account for every variable in owning and/
or taking care of an aquarium with live animals. We recommend
that when having any questions always consult you local
tropical fish store or pet supply store.
Do not deviate from the safeguards, warning and/or safety guidelines
WARNING AND SAFEGUARDS
Before installing Cube Star read and follow all warnings and
safeguards and to guard against injury, basic safety precautions
need to be observed.
• Read and follow all warning and instructions.
• The national code requires that a ground fault circuit interrupter
(GFCI) be used in the branch circuit that is supplying power to
any aquarium device.
• The aquarium must be placed on a strong and level
aquarium stand.
• If the light hood is to fall into the water or is sitting in water do
not reach for it. Unplug the light fixture first then retrieve and/or
remove. If the light is to get wet unplug immediately.
• Do not operate if any of the electrical cords are damaged.
• Always unplug all electrical devices prior to working on the
aquarium, light and/or filter.
• Never yank or pull the cord from the electrical outlet.
• Only use the aquarium for it intended use.
• Do not lift the aquarium by the frame.
• Do not lift or move aquarium with water in unit.
• Do not operate the pump without water.
• Close supervision is necessary when the aquarium is worked
on by or near children.
• All components are intended for indoor household use only.
• Do not plug into an extension cord.
• Important to keep the light hood clean and free of moisture and
salt deposits at all times. Always unplug the light hood prior to
performing maintenance or cleaning of the exterior of the hood.
Drip Loop

4.8 in (12cm)
from the wall
6 7
IV - FILTRATION SET UP
Open canopy and light fixture (Fig. 2).
A. Intallation of micro filter bag, collection cup & Protein skimmer
1. Install micron filter bag. The clasp will attach to the left side
of the filter chamber (Fig. 3).
2. Rinse the protein skimmer with hot water and install
suction cup bracket (Fig. 4).
3. Position the skimmer in the first chamber so the suction cups face the
left side of the filter. Verify the airline tubing is accessible (Fig. 5).
4. Verify the salinity is 10.021-10.025.
5. Connect a small piece of tubing to the air pump (Fig. 6).
6. Connect the inline air control valve (Fig. 7).
7. Collection tray goes directly over the micron filter (Fig. 8).
8. Reinstall skimmer so that the skimmer discharge is touching the
collection tray (Fig. 9).
9. Using the air control valve adjust bubbles are about ¾”-1 ¼” below
discharge elbow.
Helpful hints for protein skimmer (see Troubleshooting in page 12)
DIRECTION FOR INSTALLAION
Required tools: Flat head screw driver.
NOTE: When adding water to the aquariums don’t use any water conditioners that
contain polymers. It is recommended to use RO water with synthetic sea salt or buy
salt pre-made from you local fish store. If water conditioners with polymers are used
the skimmer will not work properly until it is removed from the water.
I - CHECK FOR LEAKS
On a perfectly flat level surface fill the aquarium with water to verify that there
are not any leaks. Now that there are not any leaks remove the water from the
aquarium. Never lift the aquarium with water either scoop or siphon water from
the aquarium.
II - AQUARIUM LOCATION
1. Do not put the aquarium directly in the front
of a window.
2. Do not put the aquarium next to a door
that leads to the outside. Any consistent
draft will make it very difficult to maintain a
stable temperature.
3. Find a leveled surface to place the stand
and aquarium. If you are not placing the
aquarium on an aquarium stand verify that
the surface is flat, level and strong.
NOTE: Water weights approximately
8 pounds per gallon.
4. Make sure no part of the aquarium
hangingoff the stand
5. Position the aquarium a minimum of
4.8” (12cm)from the wall.
6. Keep out of reach of children.
III - ELECTRICAL SUPPLY
1. Plug in all electrical aquarium appliances directly into
a GFCI electrical outlet only!
2. Do not plug into a extension cord.
3. Do not plug in the pump until the aquarium is full of water.
4. Always disconnect the power to all aquarium devices prior
to maintenance.

8 9
V - DECORATING THE TANK
1. Add substrate. Verify that the sand or gravel is well rinsed.
2. Add decorations and/or live rock.
3. Add water.
NOTE: When adding water to the aquariums don’t use any water conditioners
that contain polymers. It is recommended to use RO water with synthetic sea
salt or buy salt pre-made from you local fish store. If water conditioners with
polymers are used the skimmer will not work properly until it is removed from
the water.
VI - FINAL STEP
1. Remove the light hood by placing a flat head screw driver just below the
light hood hinge and rotate (Fig. 17 and 18). Position all power cord to the
back of the tank and reinstall (Fig 19).
2. Verify the water level is at or above the top intake strainer.
3. Plug water pump directly to a GFCI electrical outlet.
4. Plug in the remaining electrical aquarium device directly
into a GFCI outlet.
5. Verify that there are not any leaks.
B. Installation of heater or bio media chamber/carbon
1. Install the proper wattage heater securing with suction cups.
2. Add bio media and or carbon. All media needs to be secured
in a media bag.
C. Installation of water pump and UV sterilizer
NOTE: Skip step C and to go step D for tank with no UV Sterilizer
1. Attach the clear discharge tube to the return pump output (Fig. 11).
2. Connect the UV chamber directly to the discharge tube (Fig. 11).
3. Slide the completed pump assembly into the chamber and align the
discharge of the UV chamber with discharge port of the filter (Fig. 12).
4. Attach the directional discharge to adapter (Fig. 13).
5. Insert the directional discharge with adapter through filter wall into the UV
chamber (Fig. 13).
D. Installation of water pump
1. Attach the clear discharge tube to the return pump output (Fig. 14).
2. Connect the discharge elbow directly to the discharge tube (Fig.14)
3. Slide the completed pump assembly into the chamber and align the
discharge elbow with discharge port of the filter (Fig.15).
4. Attach the directional discharge to adapter (Fig.16)
5. Insert directional discharge with adapter through filter wall into the
discharge elbow (Fig. 16)

10 11
LIGHT HOOD
• Replace light bulbs every 9-12 months.
• Keep the hood clean and free all salt deposits at all times.
• To ensure maximum light penetration keep splash guard clean.
• Fans must be cleaned and maintained as needed.
To remove bulbs and clean splash guard:
1. Disconnect from electrical outlet prior to servicing the aquarium.
2. Remove all four screws securing the splash guard (Fig. 20).
3. Remove splash guard and gasket (Fig. 20).
4. Remove silicone bands (Fig. 21).
5. Clean and/or replace bulbs (Fig. 22).
6. If replacing bulbs replace with ONLY 24 watts linear pin PL bulbs.
7. Replace gasket.
8. Replace splash guard and screws.
TECHNICAL SERVICE DEPARTMENT
Monday to Friday 9 am - 5 pm PST
(805) 383-3566 ext. 102.
e-mail: info@commodityaxis.com
TROUBLESHOOTING
PROBLEM: Nothing will collect in the collection cup
Reasons and solutions:
1. There is not a biological load.
2. The salinity is too low adjust to 10.021-10.025.
3. Increase air volume.
4. It may take up to 24 hours for a skimmer to start to work. Set up and wait
without any adjustments.
MAINTENANCE
CAUTION: Disconnect from electrical outlet prior to servicing the aquarium.
WATER PUMP
NOTE: To ensure a properly operating pump: Clean pump, impeller and
intake strainer every 3 weeks. Failure to do so will cause premature failure
of the pump.
1. Disconnect the pump from power supply prior to remove the pump from water.
2. Remove the impeller well cover.
3. Once the impeller well cover is removed, slide both the impeller and shaft out
of the main body of the pump and clean well. Please not do not use any soap
detergents during cleaning.
4. After the impeller and shaft are cleaned, use a small brush to clean inside of
the motor housing.
5. Reassemble above parts and your ViaAqua® pump is again ready to use.
Confirm that all the washer and bushing a reassembled properly. Failure to do
so will cause permanent damage to the pump.
UV STERILIZER
NOTE: The PL ultraviolet bulb needs to be replaced every 8,000-9,000 hours.
This will ensure optimum performance. Replacement quartz sleeves and
quartz bulbs are available at your independent dealer.
1. Follow all safeguards and warnings.
2. Disconnect from electrical outlet prior to servicing the aquarium .
3. Unscrew the threaded PL bulb cap on the end of the ultraviolet sterilizer. Once
unscrewed the inside of the cap will reveal the PL light bulb socket.
4. Remove the PL ultraviolet bulb from the box. Important: Do not touch the
quartz part of the bulb. If needed use a clean clothe to handle the bulb.
5. Align the pins with the holes in the bulb socket. Press the bulb directly into the
holes in the bulb socket. Avoid all angle failure to do so may cause permanent
damage to the bulb and/or the bulb socket.
6. Screw cap back onto the UV sterilizer.
PROTEIN SKIMMER
1. Disconnect from electrical outlet prior to servicing the aquarium.
2. Change wood airstone as needed. If bubbles decrease or increase in size
replace airstone.
3. Clean the discharge elbow and collection cup at least once a week.

12 13
LIMITED WARRANTY
Commodity Axis, Inc.®warrants that the ViaAqua®Cube Star is free from defects
for a period of one year from the initial date of purchase shown on the original cash register
receipt. Commodity Axis, Inc.®disclaims all other warranties, express or implied, including
but not limited to any implied warranties of merchantability and/or fitness for a particular
purpose. Although this limited warranty gives you specific rights, you may have other rights
which vary from state to state. This warranty is void if the failure is due to misuse, tampering,
negligence, abuse, accident and/or submersion, a failure to properly install, maintain, clean,
prefilter, reassemble, and/or failure to use the ViaAqua®Cube Star with a Ground Fault Circuit
Interrupter (GFCI).
CONSUMER REMEDIES
Commodity Axis, Inc.®’s entire liability and your sole and exclusive remedy shall
be either repair or replacement of the ViaAqua®Cube Star only if you return the defective
unit directly to Commodity Axis, Inc.®with the original receipt in its original box along with
twenty five dollars ($25.00) for shipping and handling. Do not send the ViaAqua®Cube Star
by insured mail. You may send your returns or replacements by UPS if requiring a signature
upon arrival. Any replaced unit will be warranted for the remaining time of the original warranty
period. In no event shall any shipping charges be reimbursed. In no event will Commodity
Axis, Inc.®be liable for any consequential or incidental damages, including but not limited to,
lost of sea life, personal injury, property damage, equipment damage, lost profits, lost wages,
lost savings, lost income, etc., arising out of the use of the ViaAqua®Cube Star. Some states
do not allow for the limitation or exclusion of liability for incidental or consequential damages,
so the above exclusion may not apply to you.
RETURNS
Please contact our service center at (888) 838-3882 or fax (888) 989-0878 to arrange
repair and/or replacement. Please allow 4-6 weeks for all returns. Commodity Axis, Inc.®
cannot ship nor respond to a P.O. Box address.
WARRANTY CARD
Please mail warranty card and PROOF OF PURCHASE within 15 days of purchase to:
Commodity Axis, Inc., P.O. Box 1210, Camarillo, CA 93011-1210.
Model #: Customer’s Name:
Date of Purchase: Address:
Dealer Name: Phone #:
5. The foam is unable to climb into the collection cup due to oils from your hands,
lotions, tank additives and/or foods feed. Run carbon filter to remove any
impurities.
6. Remove the collection cup and wash well with a mild detergent and rinse with
hot water. Insure all the detergent is removed from the collection cup. Replace
collection cup.
PROBLEM: Only water will collect in the collection cup
Reasons and solutions:
1. The salinity is too high. Adjust salinity to 1.018-1.023.
2. The use of additives such as water conditioners, medications, red slime
remover and or use of synthetic sea salt are causing the bubbles to bond
longer thus the water in the cup. As collection cup fills dump water and repeat
until skimmer is working properly. The problem will persist until the agent
causing the problem.
3. Decrease air volume.
REPLACEMENT PARTS
Part No. Description UPC # 0069037
15 VA 2600 needle wheel impeller shaft 2984 0

Commodity Axis, Inc.®is also a manufacture of
ViaAqua®Acro-Cal™ Reactor, ViaAqua®Poly Reactor™, ViaAqua® Pressure Pond Filters,
ViaAqua®Oceanpure™Salt, ViaAqua®Heaters, ViaAqua® Skimmers, ViaAqua®MillionAir™
Air Pump, ViaAqua®Water Pumps, ViaAqua®Aquariums and Helios®Lighting Systems.
© 2009 Commodity Axis, Inc.®
Specifications are subject to change without notice
Bringing Products to Life
P.O. Box 1210, Camarillo, CA 93011-1210
www.commodityaxis.com, www.viaaqua.net
www.oceanpuresalt.com
This manual suits for next models
11
Table of contents
Other ViaAqua Aquarium manuals