manuals.online logo
Brands
  1. Home
  2. •
  3. Brands
  4. •
  5. Vicon
  6. •
  7. Recording Equipment
  8. •
  9. Vicon VDR Administrator Guide

Vicon VDR Administrator Guide

Vicon Industries Limited © 2007
Connecting a VDR to a Network
A step by step ‘How to Guide’
(Last updated 23/02/07)
13
Vicon Industries Limited © 2007
Connecting a VDR to a Network
The Vicon VDR range of Digital recorders are ready to be connected to a
Local Area Network (LAN) or the Internet using some additional equipment.
Connecting to a LAN is relatively simple but a degree of IT knowledge is
required to configure access via the Internet. Please read through both
sections of this document before trying to connect via the internet.
Firstly you need to obtain an unused IP address.
Connecting to a single PC
1. Obtain the current network settings from the PC to be used as a viewer.
This can be done from the desktop by clicking on the Start button and
then Run. Type in CMD and press OK. At the prompt type in ipconfig
Write down the following information:
IP Address . . .
Subnet Mask . . .
Default Gateway . . .
If the PC is not currently connected to the Internet or a Network you may
wish to change the settings. They could be something like this:
IP Address 192.168.0.100
Subnet Mask 255.255.255.0
Default Gateway 192.168.0.1
Connecting to an existing Network
2. Ask the IT administrator for an IP address that you can use with the
VDR and tell him which PCs will be viewing the images. Also ask for the
Sub Net mask and Gateway. If there is no IT administrator follow the
procedure as detailed above.
13
Vicon Industries Limited © 2007
Configuring the VDR Network settings
3. On the VDR, press the Menu button and then select Network Set up
and press OK,select Network Type Set up and press OK. Set the
Network type to Static and the following screen should be seen.
Enter the IP address, this must be in the same range as the PC(s) on
the network but must not be exactly the same. For example, if the PC
is 192.168.0.100, you could set the VDR to 192.168.0.200.
Enter the Subnet mask exactly as it was on the PC.
Enter the Gateway (if used) exactly as it was on the PC.
Note the Port number which by default is 80.
The other settings do not need to be adjusted for a simple set up and
the menu screen can now be closed. You may need to reboot the VDR.
Network Connections
4. If connecting directly to a PC you can use a CAT5 cross over cable.
This simply connects to the network port on the rear of the VDR and to
your PCs network adapter port. If however you are connecting to an
existing network you will need to use a CAT5 patch lead.
If you are providing a network for a number of VDR units and/or PCs
you will need to use a network switch and the appropriate number of
patch leads.
13
Vicon Industries Limited © 2007
Installing the Software
5. You now need to install the Remote Access Monitoring System (RAMS)
software on to the PC that will be used as a viewer. The PC must meet
the minimum requirements set out below:
Windows 98 (XP preferred) DirectX 8
Internet Explorer 5.0
VGA card over 2 x AGP minimum 64MB RAM
Resolution 1024 x 768
When installed, click on the RAMS icon situated on the desktop.
Once the software has opened click on the connect icon
and the followin
g
window will appear.
Enter the details of the
VDR into the DVR List as
shown.
Unless it has been changed
by the user the default port
is 80
The default password is
111111
Click on Add to save the
details into the DVR list.
Click on Connect
13
Vicon Industries Limited © 2007
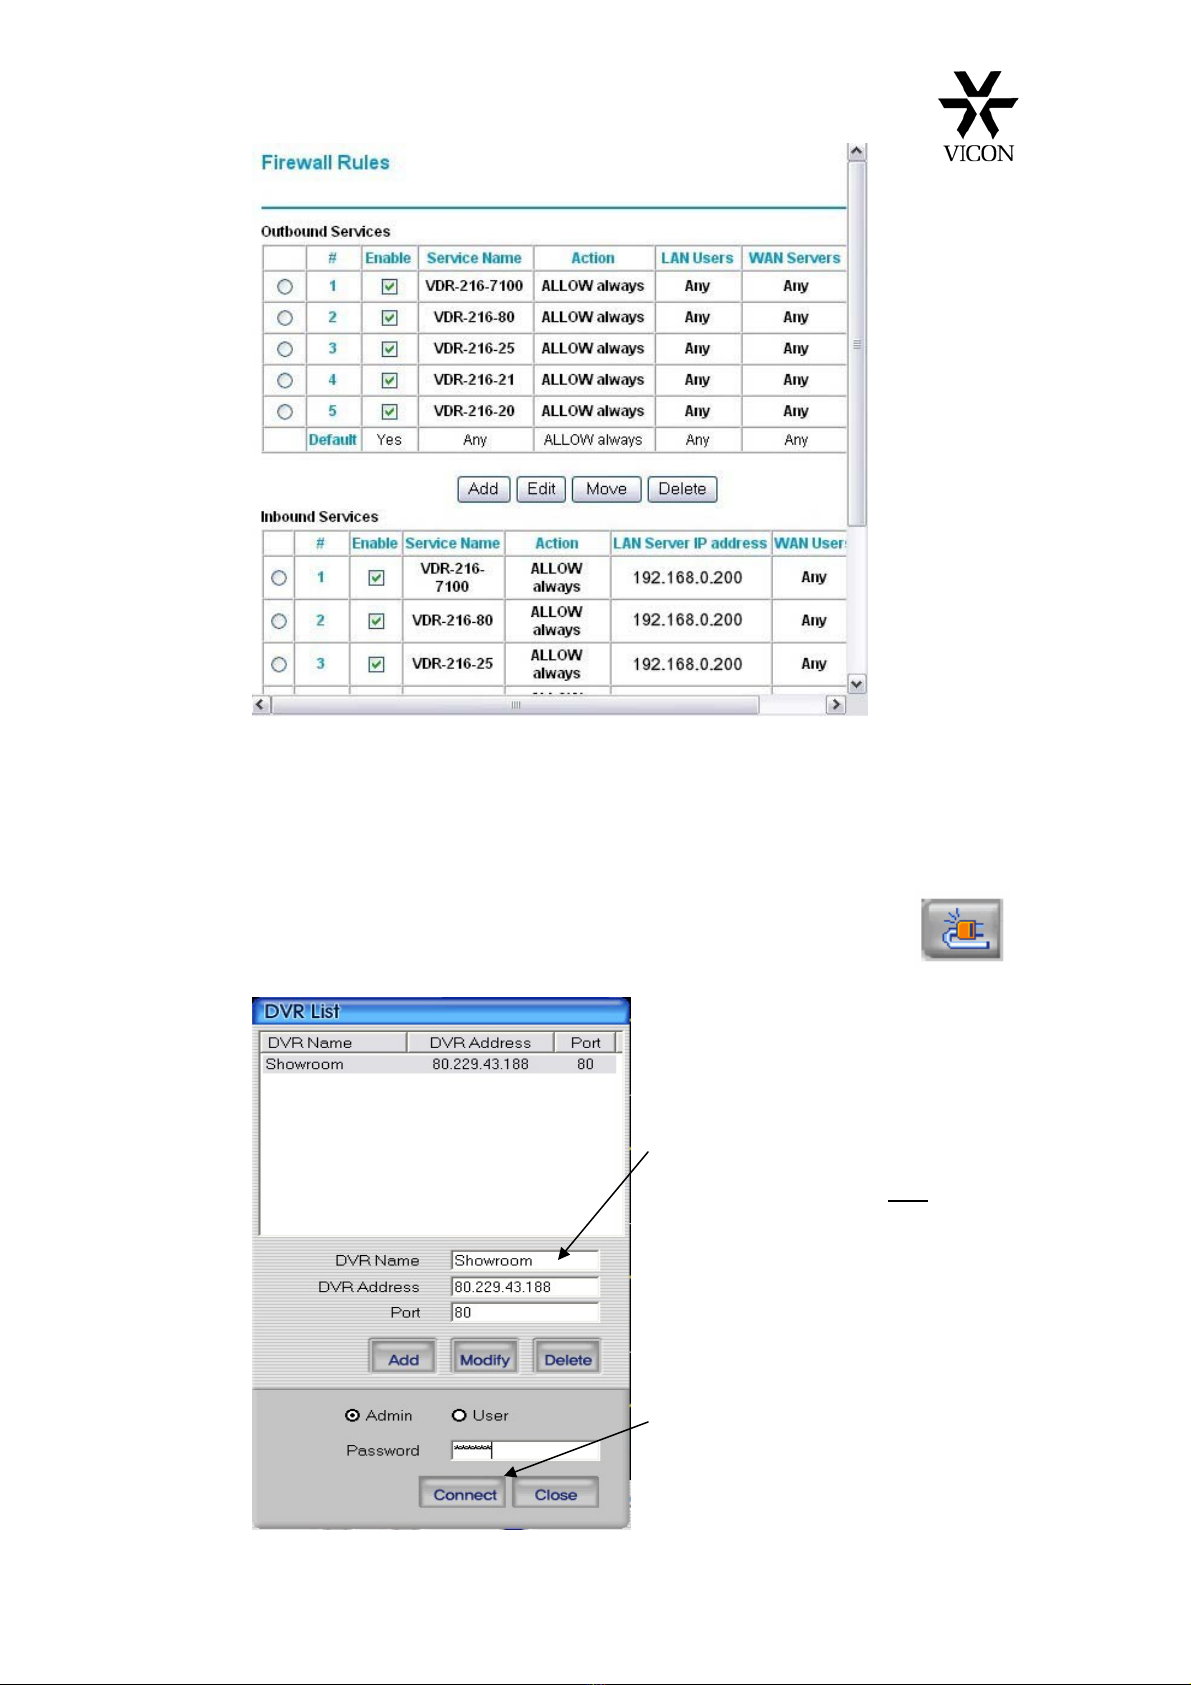
6. Once the connect button has been pressed ‘Connecting’ will appear on
the screen shortly followed by the details of the remote VDR which will
appear within the right hand control panel.
If after a time you get ‘Connection Failed’ then follow the procedure
below.
•Ensure that you have correctly entered all the network settings
on both the VDR and PC.
•Check the Network connections.
•Switch off the VDR, wait a while and then Switch on again.
Wait until the VDR has finishing booting (Text will appear and
beeps) and then try to connect again.
•If you are still unable to connect try to PING the VDR from the
PC. This can be done by clicking on the Start button and then
Run. Type in CMD and press OK. At the prompt type in ping
and the address of the VDR. For example ping 192.168.0.200
If you get a reply then this proves that your connections are OK.
You may also need to check that your PCs Firewall is not
blocking the RAMS software. You could try to temporarily
disable the Firewall to see if this is the problem.
7. When a connection is established you will be able to view, record,
playback and control the PTZ cameras if connected. You may not be
able to search for recorded files until the VDR has had time to create
an Index. This can take a number of hours.
8. This is intended to be a brief guide to setting up a simple network
using the Vicon VDR range of digital recorders. A more comprehensive
manual is on the CD supplied with the product.
Should you require any further information please contact Vicon
customer support on +44 (0)1489 566300 where we will try to assist
you further.
Important Note: Once the VDR is connected via a network, particularly the
internet, you may wish to change the password to prevent unauthorised access.
Please refer to the VDR instruction manual for details on how to do this.
13
Vicon Industries Limited © 2007
Connecting a VDR via the Internet
The Vicon VDR range can be accessed via the Internet in 3 different ways 2
of which are covered here. The simplest method is to have a Internet
connection with a Static (Fixed) IP address. You can request this from the
Internet Service provider (ISP) although it may be more expensive than a
Dynamic address. Some ISPs may not be able to provide a Static IP address.
The second method is to use a Domain Name System (DNS) whereby a 3rd
party server translates a name into an IP address. For example you could
type in ‘myvdr.gotdns.com’ rather than the IP address. This requires
registration and a degree of IT knowledge to configure the system.
Equipment required
In addition to the basic connections already discussed in the simple network
set up you will also require a Router. If the ISP uses an ADSL line (BT etc)
you will need an ADSL Router. For cable providers such as NTL and Telewest
you will need a DSL Router. Both of these are available from PC stockists such
as PC World. You should aim for a known brand such as Netgear or D-Link
and select a model which has a number of LAN ports fitted.
The Internet connection itself should be as fast as possible to prevent too
much delay in image update. A minimum speed of 1Mb is advised.
Rear connections found on a typical ADSL Router
13
Vicon Industries Limited © 2007
Connecting via a Static IP Address
The basic system should look something like this:
*Note: IP addresses shown as an example only.
You do not need to use the same numbers.
9. The ISP will have given details of the Static IP address that they have
provided you with. You will need to know this later.
10.The Router will need to be configured via a local PC so it is essential
that a PC is available at the time of installation. Normally the default IP
address of the Router is 192.168.0.1 or 192.168.1.1, this will be your
Gateway. When this address is entered into the address bar of your
Internet browser it will allow you to access the menus of the Router.
You will now need to configure your Router to access the internet
using the details supplied by your ISP. Check your Router instructions
for details of how to do this. Some routers supplied by the ISP may not
be configurable by the user.
11.Next you will need to set up your IP addresses and settings as covered
in steps 1-3 above. You will also need to enter the Default gateway of
the Router into the PCs and Digital recorder.
12.Once you have completed the above steps you should be able to view
the VDR on the local PCs over the internal network. If you cannot
please follow step 6.
Broadband Provider (ISP)
13
Vicon Industries Limited © 2007
13.You will now need to configure the Router to allow it to pass
data from the VDR to and from the Internet. Below is a list of Ports
that need to be opened or forwarded when using the Vicon VDR.
Web Port and protocol for VDR range
Function Port Protocol Connection Possibility of
changing Port Remarks
Transmission
of Picture
of FTP Event
20,
21 FTP Client X
Back up
by RAMS
20,
21 FTP Server X
S/W Upgrade
by RAMS
20,
21,
80
FTP,
HTTP Server X
Image Transmission : FTP
Instruction of Upgrade :
HTTP
Sending mail 25 SMTP Client X
Transmission
of live image
and Search
80 HTTP Server √ Packet : by protocol
Quick Installer 80 HTTP Server √ Packing : by protocol
DDNS Update 7100 Client X by protocol
14.Each manufacturer of Router will have a different menu structure but
should be similar to the Netgear examples shown in this guide.
Please refer to the manual supplied with your Router. To open a port
on the Netgear router you first have to add a service as shown below.
You need to do this for each port listed in the table above.
13
Vicon Industries Limited © 2007
15.These services will then be shown in the services table as shown below.
16.You will now need to configure the Firewall. This is done by creating
Firewall rules for the services added above.
The Firewall rules must be configured to allow inbound and outbound
traffic as shown. These will then be shown in the Firewall rules table as
shown below.
13
Vicon Industries Limited © 2007
17.The VDR and Router should now be ready to allow remote access via
the internet using a Static (Fixed) IP address. You will now need to
install the supplied RAMS software onto the remote PC. Start the
software and click on the connect button.
Enter the VDR Name and IP address
into the site list. This time you need
to enter the Static IP address
supplied by your ISP not the IP
address of the VDR itself. This is
because the VDR IP address is only
seen on the LAN side of the Router.
To access via the internet you need
to use the WAN IP address of the
service connected to the router.
Now click the Connect button and the
PC should start ‘connecting’ to the
VDR.
13
Vicon Industries Limited © 2007
18.The images from the VDR should now start to appear on the PC screen.
You may need to configure any Firewall or Anti-Virus software that you
have on the PC to allow connection to the VDR.
If a message appears ‘Connection Failed’ you will need to check all of
your settings at both ends again. You can try pinging the router (if the
router allows this) again using the IP address supplied by the ISP.
You will not be able to ping the VDR via the internet.
Connecting via a Dynamic IP Address
Most Broadband internet connections have a Dynamic IP address. This means
that the IP address changes every so often which makes it impossible to use
as method of connection as you will never know what the IP address is. You
can ask your ISP for a Static IP address but this may be more expensive than
a standard dynamic IP.
To get around this problem the VDR is able to use a DNS server which
basically translates a Static host name into an IP address. When the IP
address changes the DNS server is updated and ties the new address to the
host name. So for example by typing in ‘myvdr.dyndns.com’ into the remote
software the VDR can be accessed even if the IP address has changed.
Currently there are a number of ‘free’ DNS servers available for private use.
You will need to register with one of these before you can use their service.
There is normally a charge for commercial use. Two of the most popular
providers are:
DynDNS http://www.dyndns.com
No IP http://www.no-ip.com
Please Note: These providers are not connected with nor have been endorsed by Vicon Industries.
You are advised to check their terms and conditions of service before registering.
A guide to setting up a DNS account is available from http://www.cctv4all.com
19. Once registered you will need to configure the Router or the VDR with
the address of the DNS server. As discussed earlier, some simple
routers may not have a DNS option or the have the necessary
configuration to be set up for remote access.
Please contact your IT department or us for advice on which routers
may be suitable.
13
Vicon Industries Limited © 2007
20. Enter the details of the DNS server into the Router as shown.
21. Or alternatively enter the details into the VDR by going to the DDNS
set up menu. If you use this option please ensure that you set the
DDNS link option in the Network Type Setup menu to ON.
22.The VDR and Router should now be ready to allow remote access via
the internet using a Dynamic IP address. You will now need to install
the supplied RAMS software onto the remote PC.
13
Vicon Industries Limited © 2007
23.Once installed, start the software and click on the connect button.
If however the connection appears to be good but no pictures appear
then the PC specification will need to be checked particularly the
graphics adapter which should have a minimum of 64Mb of RAM.
Enter the VDR Name, Static host
name and port number into the site
list. The host name is the one you
would have registered with a DNS
organisation as detailed previously.
Now click the Connect button and the
PC should start ‘connecting’ to the
VDR.
As the unit connects, the first
indication of a successful
connection is that the site details
are displayed on the right hand
side of the GUI.
If this does not appear within
about 20 seconds then the
“connection failed” message will
appear. At this point all of the
settings will need to be checked.
13
Vicon Industries Limited © 2007
Troubleshooting
If after following this guide you still cannot get your unit to connect please
check through the points below before calling Technical support.
Not able to connect on a local area network (LAN)
Check network cables. Crossover if straight to PC, Patch cable if using a
switch/hub.
Check IP addresses of VDR and PC are in the same range and that the Subnet
addresses are the same.
Reboot the VDR. Particularly if any Network settings have been changed.
Ensure that any Firewall or Anti-Virus software on the PC is not blocking the
communication with the VDR.
PING the VDR IP address from the PC to see if you can get a reply.
Note: If you can connect using a PC and a crossover cable there is nothing
wrong with the VDR
Not able to connect remotely
Firstly ensure that a local connection can be made to the VDR. If this does
not work see the checks above.
Ensure that all the settings on the remote software, router and VDR are
correct and that all the necessary ports have been opened in the Firewall.
If on a corporate network, contact the IT administrator to ensure that
communications are not being blocked by any of their equipment and show
them the list of ports that the VDR uses.
Connects but no images
This is normally due to the PC being below the minimum requirements for the
software and not being able to display the Video images. Please ensure that
the PC at least meet the minimum specification below.
Windows 98 or XP, DirectX 8, IE 5.00, VGA Card above 2x
64MB RAM Video card memory and the latest drivers
1024 x 768 Screen resolution.
Please read this guide in conjunction with the relevant VDR and Router manuals.
For further advice or assistance please contact the local IT administrator
or Vicon customer support on 01489 566300.
1
Vicon Industries Limited © 2007
Glossary
ADSL (DSL) Asymmetric (Digital Subscriber Line)
This is the type of connection provided by your broadband supplier
DDNS (DNS) Dynamic (Domain Name System)
A service that converts a host name into an IP number
DHCP Dynamic Host Configuration Protocol A protocol that allows a
PC to request an IP address from a DHCP enabled server
Dynamic IP Dynamic IP An IP address that is subject to change at the end of
the lease period provided by the DHCP server
Firewall Firewall A software or hardware device that can be configured to
block certain ports or IP addresses from reaching a PC
Gateway Gateway A term used to indicate a transition between one system
or network and another
IP Address Internet Protocol Address
A unique number that identifies a piece of equipment
ISP Internet Service Provider The company that provides the
broadband connection. E.g. BT, Tiscali, NTL, Telewest etc
LAN Local Area Network
A network that is limited to a small area
Ping Ping A computer command used to test for a response from
a specific address. E.g. ping 192.168.0.1
Port Port Services that run on the internet listen to certain port
numbers. Port 80 is typically used by web servers
RAMS Remote Access & Monitoring System
The remote viewing software supplied with the VDR
Router Router A piece of equipment that sits between 2 networks and
‘routes’ data in the relevant direction
Subnet mask Subnet mask In simple terms the subnet sets the range of
available IP addresses on the network
Static IP Static IP
An IP address that is ‘Fixed’ and never changes
WAN Wide Area Network
A network that extends beyond a building. For example the Internet

Other Vicon Recording Equipment manuals

Vicon VDR-208 User manual

Vicon

Vicon VDR-208 User manual

Vicon Aurora 99 V800KBD User manual

Vicon

Vicon Aurora 99 V800KBD User manual

Vicon V1311R-VPS-1 User manual

Vicon

Vicon V1311R-VPS-1 User manual

Vicon AurorAcord User manual

Vicon

Vicon AurorAcord User manual

Vicon Valerus-PoE NVR User manual

Vicon

Vicon Valerus-PoE NVR User manual

Vicon V1300X-IAF User guide

Vicon

Vicon V1300X-IAF User guide

Vicon NOVA V1400X-HSB-M User manual

Vicon

Vicon NOVA V1400X-HSB-M User manual

Vicon AurorAcord XX091 User manual

Vicon

Vicon AurorAcord XX091 User manual

Vicon V1400X-MSSV User manual

Vicon

Vicon V1400X-MSSV User manual

Popular Recording Equipment manuals by other brands

TECHNOSAURUS EFFEXON owner's manual

TECHNOSAURUS

TECHNOSAURUS EFFEXON owner's manual

Delta Electronics USB/RS485 Communication Interface VFD-USB01 instruction sheet

Delta Electronics

Delta Electronics USB/RS485 Communication Interface VFD-USB01 instruction sheet

Arturia beatstep pro user guide

Arturia

Arturia beatstep pro user guide

HMS Networks Intesis INBACHIT001R000 quick start guide

HMS Networks

HMS Networks Intesis INBACHIT001R000 quick start guide

Yamaha VL1-m Feature reference

Yamaha

Yamaha VL1-m Feature reference

Dynasound DS30002 manual

Dynasound

Dynasound DS30002 manual

EHX MICRO SYNTH quick start guide

EHX

EHX MICRO SYNTH quick start guide

Electro-Harmonix 16 Second Digital Delay instructions

Electro-Harmonix

Electro-Harmonix 16 Second Digital Delay instructions

Viessmann VITOCONNECT 100 Operating Instructions for the System User

Viessmann

Viessmann VITOCONNECT 100 Operating Instructions for the System User

Converters.TV 725 Operation manual

Converters.TV

Converters.TV 725 Operation manual

Novation SL MkIII user manual

Novation

Novation SL MkIII user manual

Osram e:cue Bridge8 INFORMATION FOR USE

Osram

Osram e:cue Bridge8 INFORMATION FOR USE

Extron electronics RGB 160xi user manual

Extron electronics

Extron electronics RGB 160xi user manual

Korg EMX-1 Quick start tutorial

Korg

Korg EMX-1 Quick start tutorial

Superscope PSD410 user manual

Superscope

Superscope PSD410 user manual

Tascam DA-3000 owner's manual

Tascam

Tascam DA-3000 owner's manual

iKEY-AUDIO iKEYplus manual

iKEY-AUDIO

iKEY-AUDIO iKEYplus manual

Spycentre Security 5817 manual

Spycentre Security

Spycentre Security 5817 manual

manuals.online logo
manuals.online logoBrands
  • About & Mission
  • Contact us
  • Privacy Policy
  • Terms and Conditions

Copyright 2025 Manuals.Online. All Rights Reserved.