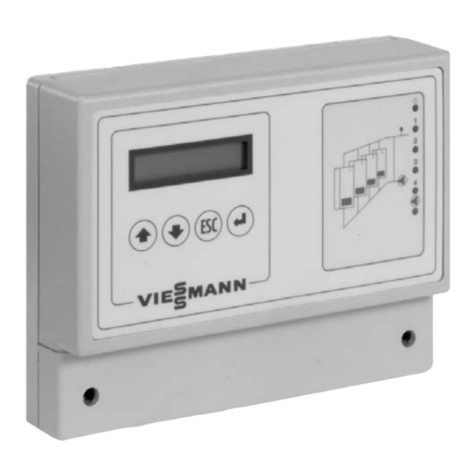
Viessmann Vitocontrol-S, WB2 Dimensions and installation guide

Installation, Start-up and
Service Instructions
for use by heating contractor
Vitocontrol-S, WB2
Master control for
up to four gas-fired wall-mounted boilers
Vitodens 200, WB2-44 or -60
VITOCONTROL-S, WB2
Read and save these instructions
for future reference.
IMPORTANT
Certified as a component part
of Viessmann boilers only
Please file in Service Binder
5285 781 v1.5 11/2007

2
Safety, installation and warranty requirements
Please ensure that this manual is read and understood before commencing installation. Failure to comply with the issues listed be-
low and details printed in this manual can cause product/property damage,severe personal injury, and/or loss of life. Ensure all
requirements below are understood and fulfilled (including detailed information found in manual subsections).
HLicensed professional heating
contractor
The installation, adjustment, service,
and maintenance of this equipment
must be performed by a licensed pro-
fessional heating contractor.
"Please see section
entitled “Important
Regulatory and
Installation Requirements”.
HProduct documentation
Read all applicable documentation be-
fore commencing installation. Store
documentation near boiler in a readily
accessible location for reference in the
future by service personnel.
HAdvice to owner
Once the installation work is complete,
the heating contractor must familiarize
the system operator/ultimate owner
with all equipment, as well as safety
precautions/requirements, shut-down
procedure, and the need for profession-
al service annually before the heating
season begins.
HWarranty
Information contained in this and re-
lated product documentation must be
read and followed. Failure to do so ren-
ders warranty null and void.
5285 781 v1.5

3
General Information
Index
Content Page
General Information 3
.................................................................................................................................................................................................
Terminology 3................................................................................................................................................................................................................
Safety 4...............................................................................................................................................................................................................................
Important regulatory and installation requirements 4............................................................................................................................
About these instructions 4.......................................................................................................................................................................................
Installation 5......................................................................................................................................................................................................................
Control panel connections 5....................................................................................................................................................................................
Outdoor temperature sensor 7...............................................................................................................................................................................
Common supply temperature sensor (strap-on sensor) 7....................................................................................................................
Installation Example 9..................................................................................................................................................................................................
Multiple Vitodens 200 Installation 9..................................................................................................................................................................
Plug-in connections 10..................................................................................................................................................................................................
Troubleshooting 11..........................................................................................................................................................................................................
General faults 11..............................................................................................................................................................................................................
Faults on display panel 12..........................................................................................................................................................................................
Faults displayed in the “Faults” menu 12.........................................................................................................................................................
Technical Specifications 13........................................................................................................................................................................................
Sensor resistance chart 13........................................................................................................................................................................................
Technical data 13..............................................................................................................................................................................................................
Internal Wiring Diagram 14.........................................................................................................................................................................................
Terminology
The terminology used by the Cascade Control of the Vitocontrol-S may not always coincide with the terms
used in the North American market.
The following is a cross-reference chart between the terms used by the control and corresponding, more
commonly used, terms of the North American heating industry.
Term used by control North American term
Flow Supply
Frost protection Freeze-up protection
Outside temperature Outdoor temperature
Desired Setpoint temperature
Time clock Timer
5285 781 v1.5

4
Safety
Important regulatory and installation requirements
Power supply
Install power supply in accordance with
the regulations of the authorities hav-
ing jurisdiction or, in the absence of
such requirements, in accordance with
National Codes.
External “potential-free” contacts to
the Cascade Control
Ensure that all contacts have sufficient
insulation clearance to live parts and
are certified for these applications.
Working with an open control
No static discharge to the internal com-
ponentry must ever occur when work-
ing with opened control equipment.
About these instructions
Take note of all symbols and notations intended to draw attention to potential hazards or important product information.
These include ”WARNING”, ”CAUTION”, and ”IMPORTANT”. See below.
Warnings draw your attention to the
presence of potential hazards or im-
portant product information.
Cautions draw your attention to the
presence of potential hazards or im-
portant product information.
Helpful hints for installation, opera-
tion or maintenance which pertain to
the product.
This symbol indicates that additional,
pertinent information is to be found in
column three.
This symbol indicates that other in-
structions must be referenced.
5285 781 v1.55285 781 v1.55285 781 v1.5
Indicates an imminently hazardous
situation which, if not avoided, could
result in death, serious injury or
substantial product/property damage.
WARNING
Indicates an imminently hazardous
situation which, if not avoided, may
result in minor injury or
product/property damage.
CAUTION
IMPORTANT

5
Installation
Control panel connections
The Vitocontrol-S, WB2 control panel houses a Viessmann Cascade Control for use with up to four Vitodens
200, WB2-44 or WB2-60 wall-mounted condensing boilers.
Power supply
The panel is powered by 120 VAC, 60 Hz from the wall receptacle.
Fuses
Once the power switch is turned to ON, voltage is supplied to fuses F1 and F2.
Fuse F1 (0.063 A slow blow) protects the transformer.
Fuse F2 (6.3 A slow blow) protects the pump output.
Fuses F1 and F2 are time delay type and
should not be replaced with any other type.
Pump connection
Provisions have been made for one system supply pump to terminate inside the control panel.
This output is rated to a maximum current of 6.3 FLA. A single 6.3 A fuse protects this pump output against
over-current condition of the pump.
Cascade control
Within the control panel, the Cascade Control is powered by a 120 VAC/12 VAC transformer. The maximum
power consumption is 4 VA.
Relays R1 and R2
Along with the Cascade Control, two internal control relays are powered by the 12 VAC transformer. Relay R1
controls the operation of the system supply pump. Relay R2 provides a dry contact alarm output for a compiled
failure alarm.
5285 781 v1.55285 781 v1.5
IMPORTANT

6
Control panel connections (continued)
The remaining sensor and communication connections are completed on the Cascade Control as follows:
HOutdoor temperature sensor
The outdoor temperature sensor is connected to terminals 1 and 2. See page 7 for installation details.
HCommon supply temperature sensor
The common supply temperature sensor is connected to terminals 3 and 4. The sensor is of a strap-on type.
See page 8 for installation details.
H“Party” function
The control panel has provisions for an input dry contact switch to control the “Party” function of the cascade
control. Refer to the operating instructions regarding usage of this feature. This connection is made on termi-
nals 5 and 6.
Operating Instructions and
User’s Information Manual
Cascade Control
HExternal heat demand
A dry contact external heat demand can also be connected to the panel. This demand may be from an exter-
nal control for pool, spa, snow melt or domestic hot water.
Refer to the Operating Instructions for information regarding this feature. The contact connection is made on
terminals 5 and 7.
Operating Instructions and
User’s Information Manual
Cascade Control
HBoiler connections
The remaining connections are used for communication (KM-BUS) with the individual Vitodens 200 boilers.
HTerminals 9 and 10 on the Cascade Control are terminated in Vitodens number 1 on X5.3 and X5.4 plug
respectively.
HTerminals 11 and 12 on the Cascade Control are terminated in Vitodens number 2 on X5.3 and X5.4 plug
respectively.
HTerminals 13 and 14 on the Cascade Control are terminated in Vitodens number 3 on X5.3 and X5.4 plug
respectively.
HTerminals 15 and 16 on the Cascade Control are terminated in Vitodens number 4 on X5.3 and X5.4 plug
respectively.
Mounting requirements
The panel shall be securely mounted to a wall or support system.
Follow applicable local codes and/or requirements.
Do not mount panel under taps or in areas where the panel is at risk of water damage.
5285 781 v1.5

7
Outdoor temperature sensor
Mount outdoor temperature sensor
on the north or northwest outside
wall of the building. If the boiler is
intended to supply heat to the
south side of the building only (split
piping system), mount the sensor
on the south side.
Mount the sensor so that water
cannot infiltrate the sensor
housing.
Install sensor where it will not be
affected by heat sources such as
windows or ventilation openings.
The sensor should be installed far
enough above ground to prevent
accidental damage or tampering.
The outdoor sensor must not be
covered with mortar, stucco, paint
or any form of coating or siding. If
the outside wall is finished after the
sensor is installed, the sensor
should be removed and placed on
the finished wall.
To make the electrical connection,
use a 2-wire cable with a maximum
lengthof115ft./35mandwitha
minimum wire size of AWG 16
copper.
1.Slide protective cover from sen-
sor body.
2.Loosen the two slot-head screws
from main body and remove sen-
sor cover.
3.Fasten sensor body to wall with
single screw through middle of
body.
4.Remove cone-shaped strain relief
from sensor cover.
5.Cut wide end of cone to allow
wire/cable to be inserted into
sensor body. Size cone by
pushing wire/cable into wide end
of cone. Cut cone at the spot
where wire stops.
6.Remove wire/cable from cone
and reinsert into narrow end.
7.Push wire into body of sensor
and connect to screw terminals.
8.Secure wire in place with
supplied strain relief.
Re-attach sensor cover, tighten
screws and slide protective cover
into place.
5285 781 v1.5
When extending wire, there is the
possibility of exposure to
electromagnetic interference.
Avoid running wires beside or near
high voltage 120/240 VAC
conductors. If proximity to high
voltage conductors cannot be
avoided, use stranded, twisted pair
or shield design wire. Ensure that
only one end of the shielding is
grounded.
WARNING
8
Common supply temperature sensor
(strap-on sensor)
1.Place sensor as shown. Install on
low-loss header system supply
pipe (before flange) as close to
low-loss header as possible.
2.Hook tension spring to one side
of the sensor tab.
3.While holding sensor on pipe,
bring tension spring around pipe
and hook spring to second sen-
sor tab. Ensure that sensor has
compressed into sensor housing.
4.The sensor is supplied with
approximately 6 ft./2 m of cable.
If required connect extension
wire (16 AWG) from sensor to
the panel of the Vitocontrol.
5.Connect wires to the Cascade
Control terminals 3 and 4 in the
Vitocontrol control panel to
complete installation of sensor.
5285 781 v1.5
When extending wire, there is the
possibility of exposure to
electromagnetic interference.
Avoid running wires beside or near
high voltage 120/240 VAC
conductors. If proximity to high
voltage conductors cannot be
avoided, use stranded, twisted pair
or shield design wire. Ensure that
only one end of the shielding is
grounded.
WARNING

9
Installation Example
Multiple Vitodens 200, WB2-44 or -60 installation (up to four boilers) with one boiler dedicated to DHW
production and one heating circuit.
The following installation example
depicts a possible piping layout for
multiple Vitodens 200 boilers
equipped with Viessmann System
Technology. Please note that the
following examples are simplified
conceptual drawings only!
Piping and necessary componentry
must be field verified.
A low water cut-off (LWCO) must
be installed where required by local
codes.
Proper installation and functionality
in the field is the responsibility of
the heating contractor.
*2A DHW recirculation pump (#20) can
be connected to Boiler 1 only.
*1 Ensure that the correct communication board is installed in mixing valve control.
5285 781 v1.5
Boiler 1*2Boiler 2 Boiler 3 Boiler 4 Vitocontrol-S
KM-BUS Boiler 3
KM-BUS Boiler 2
KM-BUS Boiler 1
KM-BUS Boiler 4
Low-loss
header
DHW tank
120 V, 60 Hz, 1 PH
120 V, 60 Hz, 1 PH
120 V, 60 Hz, 1 PH
120 V, 60 Hz, 1 PH
120 V, 60 Hz,
1PH
Power supply
System
pump
20-A
20-A
20-A
20-A
21
Outdoor temperature
sensor
Common supply
temperature sensor
21
Viessmann 2-wire
BUS
HK1
HK1M
200-H
M
*1
IMPORTANT
If a DHW storage tank other than
a Viessmann Vitocell 100 or 300
tank is used, the installer must
verify proper operation of the
Viessmann DHW tank
temperature sensor with the
original manufacturer of the tank.
Viessmann strongly recommends
the installation of a temperature
tempering valve in the DHW
supply line.
WARNING

10
Installation Example (continued)
Plug-in connections multiple Vitodens 200 (model WB2-44 or -60) with one boiler dedicated to DHW production
and one heating circuit.
AVitodens 200 plug-in
connections
Vitodens 200 pump junction
box
BPower/Pump module
CBoiler pump
DDHW pump (one boiler only)
EWall receptacle (main power
supply)
FLow water cut-off (if
applicable)
GMain disconnect switch
HDHW sensor (one boiler only)
IVitocontrol-S, WB2*1
JPower supply, 120 VAC, 7 A
KSystem pump
LOutput: alarm, dry contact
MOutdoor temperature sensor
NCommon supply temperature
sensor (strap-on)
OInput: dry contact, “Party”
switch
PInput: dry contact, heat
demand
RVi-BUS connection
SKM-Bus
*1See page 14 for internal wiring diagram
R
S
5285 781 v1.5
A1

11
Troubleshooting
General faults
Connected system components are not correctly controlled or not controlled at all
HCheck connections and cables (see section entitled “Control panel connections” on page 5).
HCheck the voltage at the terminals.
HScan operating states in the ”Operating data” menu.
Operating Instructions and
User’s Information Manual
Cascade Control.
Room temperature too cold/too warm
HCheck nominal values.
HCheck actual room temperature.
HCheck individual boiler control units of connected boilers.
Start-up/Service
Instructions
Vitodens 200, WB2-44/60.
System components operate erratically (e.g. severe temperature fluctuations)
HCheck control unit settings in the “Nominal value” menu path.
Operating Instructions and
User’s Information Manual
Cascade Control.
Incorrect temperature recording
HCheck temperature sensors concerned.
5285 781 v1.5

12
Faults on the display
All LED displays are off, no text in the display
Check power supply and fuse (underneath large cover).
LED ”9” illuminates, no text in the display and/or keys do not function
Switch on power supply again and then check control unit settings.
Keys do not function or not always
Check location and seating of large cover.
LED ”9”flashes
The control unit has registered a fault. Scan the cause of the fault in the ”Faults” menu.
Operating Instructions and
User’s Information Manual
Cascade Control.
Faults displayed in the “Faults” menu
Cause: Supply temperature sensor not/incorrectly connected or faulty.
Result: Functions based on the supply temperature are failing.
Remedy: Check connections and sensor using the resistance table (see page 13).
Cause: The supply temperature does not reach the nominal value less the set
temperature difference within the set period.
Result: The control unit stays in normal mode.
Remedy: Check system components. If necessary, match the set time and/or
temperature difference. Reset the fault by pressing twice.
Cause: Outdoor temperature sensor not/incorrectly connected or faulty.
Result: The control unit changes over to average outdoor temperature.
Some functions based on the outdoor temperature are failing.
Remedy: Check connections and sensor using the resistance table (see page 13).
Cause: The supply temperature is too low to ensure freeze-up protection.
Result: The control unit creates a heat demand. The set supply temperature is
raised at least to the nominal value for freeze-up protection.
Remedy: Check system components.
Cause: The room temperature is too low to ensure freeze-up protection.
Result: The control unit creates a heat demand.
Remedy: Check system components.
Cause: At least one boiler is in a fault state (multi-boiler control unit).
Result: Output possibly too low.
Remedy: Check boiler and boiler fault message.
Cause: Communication error
Remedy: Check KM-BUS connection.
5285 781 v1.5
Flowtemp
System too slow
Outside temp
Frost prot. flow
Frost protection
room
Boiler 1
Fault code:
Comm. boiler 1

13
Technical Specifications
Sensor resistance chart
Temp-
erature
[ºF / ºC]
Resis-
tance
[Ω]
Temp-
erature
[ºF / ºC]
Resis-
tance
[Ω]
Temp-
erature
[ºF / ºC]
Resis-
tance
[Ω]
Temp-
erature
[ºF / ºC]
Resis-
tance
[Ω]
5 / –15 36475 59 / 15 7885 113 / 45 2185 167 / 75 739
14 / –10 27665 68 / 20 6245 122 / 50 1801 176 / 80 627
23 / –5 21166 77 / 25 5000 131 / 55 1493 185 / 85 535
32 / 0 16325 86 / 30 4028 140 / 60 1244 194 / 90 457
41 / 5 12695 95 / 35 3265 149 / 65 1041 203 / 95 393
50 / 10 9995 104 / 40 2663 158 / 70 876 212 / 100 339
Technical data
Dimensions: 10½ × 11 × 2½ inches
265 × 280 × 60 mm
Weight
Panel weight: 6.25 lbs / 2.8 kg
Shipping weight: 7.2 lbs / 3.3 kg
Power supply: 120 VAC, 7 A, 60 Hz, 1 PH
Max. ambient temperature
HStorage and transport: –4 to+140 ºF
–20 to +60 ºC
HOperation: –4 to+104 ºF
–20 to +40 ºC
Relay outputs
Breaking capacity
HPump relay: 120 VAC, 6.3 A max.
HRelay fault message: 120 VAC, 5 A max.
Terminal connection: 16-10 AWG
Sensor inputs
Outdoor temperature sensor/
supply temperature sensor: NTC sensors
Terminal connection: 16-10 AWG
Switch inputs
External heat demand,
“Party “ (override) switch: potential-free switching contacts
Terminal connection: 16-10 AWG
5285 781 v1.5

14
Internal Wiring Diagram
Power supply, 120 VAC,
7A,1PH
Supply pump, 120 VAC,
6.3 FLA
Dry contact, 120/24 V, 5 A
compiled failure alarm
Outdoor temperature sensor
Common supply temperature
sensor
Party switch (dry contact)
External heat demand
(dry contact)
KM-BUS
IViessmann-BUS
F1 Fuse 0.63 A/250 V, time
delay
F2 Fuse 6.3 A/250 V, time delay
5285 781 v1.5
M
LG N LG N
LG N
I
TR
12VAC
120VAC
F1 T0.63A
F2 T6.3A

15
5285 781 v1.5

Viessmann Manufacturing Company Inc.
750 McMurray Road
Waterloo, Ontario •N2V 2G5 •Canada
Tel. (519) 885-6300 •Fax (519) 885-0887
Viessmann Manufacturing Company (U.S.) Inc.
45 Access Road
Warwick, Rhode Island •02886 •USA
Tel. (401) 732-0667 •Fax (401) 732-0590
16
5285 781 v1.55285 781 v1.5 Printed on environmentally friendly
(recycled and recyclable) paper.
Technical information subject to change without notice.
Table of contents
Other Viessmann Control Panel manuals

Viessmann
Viessmann VITOTRONIC 100 User manual

Viessmann
Viessmann 5545 User manual

Viessmann
Viessmann Vitotronic 100 GC1 Guide

Viessmann
Viessmann 5548 User manual

Viessmann
Viessmann 5549 User manual

Viessmann
Viessmann VITODENS 200 Guide

Viessmann
Viessmann 5546 User manual

Viessmann
Viessmann 5549 User manual

Viessmann
Viessmann Vitotronic 200 GW1 User manual

Viessmann
Viessmann 5545 User manual
Popular Control Panel manuals by other brands

Honeywell
Honeywell AQ254 Series manual

Fire Burglary
Fire Burglary Star XL4600DL owner's manual

Bentel Security
Bentel Security FireClass100 Software manual

Siesta
Siesta ARCWA operating manual

OERTLI
OERTLI OEtroCom-2 technical information

Busch-Jaeger
Busch-Jaeger Busch-free@homePanel 4.3 inch product manual