Vileda JetClean User manual

5
1
2
21
I
II
21
CLICK!
12
16 17
13 14
15
24 h
CLICK!
GCord DKabel ICavo m Cordon nSnoer
QKabel tKabel 1Kabel vKabel uŠnúra
RCablul
GDetach handle DAbziehen des Stiels IManiglia
rimovibile m Défaire la poignée nDe steel
losmaken QOdłączanie uchwytu tOdstranitev
ročaja 1Odvajanje ručke vOdpojení rukojeti
uOdpojiteľná rukoväť RDetașarea mânerului

6
EASY CLEAN STORAGE TRAY
OFF
ON
2
3 4
5
1
1
2
1
6
78
9
150 ml
150 ml
60 s
MAX
150 ml

7
G
SYMBOLS IN THE OPERATING INSTRUCTIONS
•Danger - Immediate danger that can cause severe injury or death.
1. GENERAL WARNINGS
READ ALL INSTRUCTIONS BEFORE USING YOUR
JetClean.
When using an electrical appliance, basic precautions should
be observed, including the following:
IGNORING THE FOLLOWING INSTRUCTIONS CAN CAUSE
DANGER TO HEALTH AND SAFETY AS IT MAY CAUSE FIRE,
ELECTRIC SHOCK AND SERIOUS INJURY.
THANK YOU FOR PURCHASING OUR NEW VILEDA JetClean!
This manual represents an indispensable guide for the correct and safe use of the Vileda
JetClean. Read all instructions before using the product for the first time because it contains
information necessary to ensure that the product can be used in compliance with safety
standards and environmental protection for the entire period of product usage. Retain this
document for future reference. Instructions also available on: www.vileda.com. This appli-
ance is intended for indoor private household use only.
Contents
1. GENERAL WARNINGS 7
2. PRODUCT OVERVIEW 10
3. ASSEMBLY & OPERATIONS 10
4. MAINTENANCE AND CARE 11
5. TROUBLESHOOTING 12
6. VILEDA WARRANTY 14
7. TECHNICAL SPECIFICATION 15
8. ENVIRONMENTAL AND PRODUCT RECYCLING 16

8
GWARNING
To reduce the risk of fire, electric shock, or injury: Connect to
a properly grounded outlet only. Do not modify the 3-prong
grounded plug. Unplug from electrical socket when not in use
and before cleaning, maintaining or servicing the appliance.
This appliance can be used by children aged from 8 years
and above and persons with reduced physical, sensory or
mental capabilities or lack of experience and knowledge if
they have been given supervision or instruction concerning
use of the appliance in a safe way and understand the hazards
involved. Cleaning and user maintenance shall not be made by
children without supervision. Children should be supervised
to ensure they do not play with the appliance. If the supply
cord is damaged, it must be replaced by the manufacturer,
service agent or similarly qualified persons in order to avoid
a hazard. Keep hair, loose clothing, fingers, and all parts of
body away from openings and moving parts of the appliance
and its accessories. Use only the type and amount of liquids
specified under the Operations section of this guide. Do not
leave appliance when plugged in. Do not modify earthed
plug. Roller may start unexpectedly. Do not remove the nozzle
cover while the appliance is running. Do not run the appliance
without all the elements (dirt water tank with 2in1 filter,roller and
nozzle cover) properly assembled. Unplug before cleaning or
servicing. Do not expose to rain. Store indoors. Do not allow
to be used as a toy. Use only as described in the user guide.
Use only manufacturer's recommended attachments. Do not
use with damaged cord or plug. Do not immerse in water or
liquid. If appliance is not working as it should, or has been
dropped, damaged, left outdoors, or dropped into water; do
not attempt to operate it and have it repaired at an authorized
service center. Liquid must not be directed towards equipment
containing electrical components. Do not pull or carry by cord,
use cord as a handle, close a door on cord, or pull cord around
sharp edges or corners. Do not run appliance over cord.

9
G
Keep cord away from heated surfaces. Do not unplug by
pulling on cord. To unplug, grasp the plug, not the cord. Do
not handle plug or appliance with wet hands. Do not put any
object into openings. Plug must be removed from the socket-
outlet before cleaning or maintaining the appliance. Do not
use with any opening blocked; keep openings free of dust, lint,
hair, and anything that may reduce air flow. Turn off all controls
before plugging or unplugging appliance. Use extra care
when cleaning on stairs. Do not use to pick up flammable or
combustible materials (lighter fluid, gasoline, kerosene, etc.) or
use in areas where they may be present. Do not use to pick up
toxic material (chlorine bleach, ammonia, drain cleaner, etc.).
Do not use appliance in an enclosed space filled with vapors
given off by oil base paint, paint thinner, some moth proofing
substances, flammable dust, or other explosive or toxic vapors.
Use indoors only. Close attention is necessary when used by or
near children. Do not use for any purpose other than described
in this User’s Guide. Use only manufacturer’s recommended
attachments. Donotpickuphardorsharpobjectssuchasglass,
nails, screws, coins, etc. Keep appliance on a level surface. To
reduce the risk of injury from moving parts, correctly assemble
the Roller nozzle cover before operation. Do not immerse. Use
only on surfaces moistened by the cleaning process.Use only
cold water, optionally with non-foaming floor cleaner detergent
in intended dosage, with this appliance to prevent internal
component damage. Do not pick up anything that is burning
or smoking, such as cigarettes, matches, or hot ashes. Verify
presence and correct function of the floater before any use.
Do not lift the nozzle from the floor while in use. Do not use in
combination with hot liquids. The max. temperature must not
exceed 40 °C. Do not overfill the appliance. Do not pour water
on the nozzle to clean the roller or the nozzle cover, follow the
'cleaning the nozzle' instructions.

10
G2. PRODUCT OVERVIEW
see page 3 of this instruction manual.
1. Handle 8. Nozzle cover
2. Power ON / OFF 9. Spray indicator LEDs
3. Clean water tank 10. Clean water spray switch
4. Main unit 11. Quick release cord hooks
5. Dirt water tank 12. Plug
6. 2in1-Filter 13. Easy clean storage tray
7. Microfiber roller 14. Water cup
3. ASSEMBLY & OPERATIONS
see page 2 of this instruction manual.
12Remove protecting elements including carton in the bottom of the nozzle. Insert the handle into body of
main unit until you hear a click.
Place the appliance on its nozzle in the upright park positon.
3Fill the water cup with tap water, optionally with a drop of non-foaming floor cleaner detergent. Important: Fill
with cold water or hand warm tap water (max. 40° C). Do not under any circumstances add hot or boiling water.
4Open the clean water tank cap and fill with water.
• Do not overfill the tank, watch out for the MAX level sign!
5Unwrap the power cord from the cord hooks and plug into main power socket. To facilitate the cleaning, the
cord can be positioned in the cord holder.
Press the power ON button above the clean water tank to switch on the appliance.
6Recline the body of the appliance by placing your foot gently on the nozzle and tilting the handle backward.
7To activate wet mopping, press the clean water spray switch on the handle grip. LED lights will turn on when
water is being distributed. Press a second time to stop the water distribution.
8Clean and vacuum in a forward-backward movement over the same area to remove excess water from the
floor. > Forward movement: the suction mouth in the front picks up dust and all kinds of particles; the rotating
microfiber roller mops the floors with clean water. > Backward movement: the rotating microfiber roller mops
a second time and the suction mouth sucks up excess dirty water from the floor, leaving the floor clean and
dry.
9When finished cleaning, turn power OFF and disconnect plug from electric main power socket before
emptying the dirt water tank.
•Do not remove the plug by pulling the cable.
10
Take the dirt water tank out from the main unit.
11
Open the dirt water tank by pressing the red opening buttons on the front and back of the dirt water tank and
with your other free hand, carefully remove the upper tank cover.
12
Empty out the contents of the dirt water tank, rinse out with clean water until clean, then set aside to dry.
13
For further maintenance or troubleshooting please read the instruction manual.
Cord
see page 5 of this instruction manual.
1
Wrap the cord around the quick release cord hook and the lower cord hook.
2
To easily unwrap the cord for use, just turn the quick release cord hook downward to remove the cord from the
cord hook.

11
G
Detach handle
see page 5 of this instruction manual.
1
Unscrew only the top centered screw on the back of the product and do not drop the screw.
2
To detach the handle from the body, gently insert the screw driver into the hole where the screw used to be and
lift the handle to release it from the body. Once the handle is released, you can screw the screw back into the
hole so it does not get lost.
Filling your clean water tank
a. The clean water tank is located on the front of the device.
b. Open the blue cap of the clean water tank.
c. Fill with cold water or hand warm tap water (max. 40° C) with help of the water cup to the MAX.
d. Optional: add a drop of non-foaming floor cleaner detergent into the water cup. USE DETERGENT
INSTRUCTION FOR RIGHT DOSAGE; IMPORTANT: DO NOT OVERDOSE THE DETERGENT, IT MAY DAMAGE
THE FLOOR AND THE APPLIANCE
•Do not overfill the tank, watch out for the MAX level sign!
e. Close the blue cap.
•Do not fill with hot or boiling water!
4. MAINTENANCE AND CARE
Cleaning the nozzle.
see page 4 of this instruction manual.
•Plug must be removed from the socket-outlet before cleaning or maintaining the appliance. Do not remove
the plug by pulling the cable.
1Press nozzle cover button and rotate outwards to remove.
2Pull microfiber roller out by grabbing the roller tab and pulling upward.
3Clear out debris and coarse dirt from the suction mouth and channel.
4Hand rinse the nozzle cover and microfiber roller. For easier cleaning of the microfiber roller, see 'Easy clean
storage tray' instruction. Running your machine with a wet microfiber roller will help the roller dry faster. Wet
mopping and the LEDs in the nozzle should be deactivated.
5Set your microfiber roller and nozzle cover aside to dry before reassembling.
6Return the microfiber roller to the main unit by inserting roller end into the left side of the foot, then press the
roller tab back into place.
78Return the nozzle cover by first lining up nozzle cover with edges of the nozzle. Then press the nozzle cover
back into place until you hear a click. Check the side to ensure the proper nozzle cover assembly.
Empty and clean dirt water tank
see page 4 and 5 of this instruction manual.
9To release dirt water tank from the main unit, pull on red grip of the dirt tank and remove the tank from the unit.
10
Open the dirt water tank by pressing the red opening buttons on the front and back of the dirt water tank and
with your other free hand, carefully remove the dirt water tank cap.
11
Empty dirty water and debris. Rinse clean the inside of the dirty water tank.
12
Remove 2in1 filter from the top part of the dirt water tank by pulling it up.
13
Open the mesh grid filter and rinse with warm water through the filter to clear off debris and coarse particles.
14
Hand wash the dirt water tank cap (without filter), removing trapped debris and coarse dirt. In particular clean
the float from all sides, verify the free movement of it. If the inside area where the dirty water tank sits is dirty,
wipe it clean with a cloth or sponge.
15
Leave all parts out to dry before reassembling.
16
Once parts are dry, reassemble and place the 2in1 filter back into the top of the dirt water tank.
17
Return the reassembled dirt water tank to the main unit, inserting the tank at the bottom first then tilting it and
pressing it with two hands at the top of the tank into the unit until you hear a click.
Note: Replace the 2in1 filter every 4 months or if too dirty

12
GEasy Clean Storage Tray
see page 6 of this instruction manual.
To prevent any harm to delicate floors, always store the appliance in the storage tray. As the appliance works
with water, it could retain water and humidity that can damage delicate floors when not in use.
The storage tray can also be used for a quick clean of the microfiber roller before or after use. For a thorough
cleaning of the device, please refer to MAINTENANCE & CARE on page 11.
1Place unit on Easy clean storage tray.
2Ensure the dirt water tank is empty before running the cleaning mode. If not, empty the dirt water tank,
following the instruction for 'Empty and clean the dirt water tank', before running the cleaning mode.
3Fill the water cup with 150 ml of water (until the mark), optionally add a drop of non-foaming floor cleaner
detergent.
4Unwrap the power cord from the cord hooks, plug into main power socket, and press the power ON button.
5Pour 150 ml of water into the water chamber at the back of the storage tray while the unit is ON! Allow the
cleaning mode to run 60 seconds untill all water flows through and has been picked up. Repeat if needed.
6Once all water has been picked up, press the power OFF button. Unplug the unit from the main power socket.
•Do not remove the plug by pulling the cable.
7Empty and clean the dirt water tank, following the instruction for 'Empty and clean the dirt water tank'.
89Open the nozzle cover and leave open to dry. From time to time, clean the storage tray under tap water and
let it dry completely before using again.
Note: Pour water in the easy clean storage tray only when the appliance is ON! If the appliance is not running,
the water will spill on the floor. If too much water is poared into the easy cleaning storage tray, this will spill onto
the floor. Do not leave the appliance unattended while the cleaning process in running.
Storage: Store the unit in a protected, dry area. Since the product uses water, it must not be stored where
there is a danger of freezing. Freezing will damage internal components and will void the warranty.
5. TROUBLESHOOTING
Problem description Possible cause Possible solution
Reduced spray OR no spray • Clean water tank may be empty
• System isn't wet enough
• Roller nozzle cover is not latched
in place
• Water flow not activated.
• Internal system may be clogged
with dirt.
• Spray tips on nozzle clogged
• Turn OFF and unplug unit. Refill clean
water tank with cold water.
• Activate wet mopping by pressing the
clean water spray swtich on the
handle grip. LED lights will turn on
when water is being distributed. Move
the appliance back and forth to wet
the microfiber roller.
• Turn OFF and unplug unit. Remove
and re-position nozzle cover to firmly
click onto nozzle.
• Activate wet mopping by pressing the
clean water spray swtich on the
handle grip. LED lights will turn on
when water is being distributed.
• Turn OFF and unplug unit. Send unit to
authorized maintenance service.
• Turn OFF unit. Clean the nozzle holes
from dirt with descaling liquid.

13
G
Problem description Possible cause Possible solution
Loss of suction power • Dirt water tank may be not be
inserted properly
• Dirt water tank has picked up
maximum amount of dirty water
and needs to be emptied
• Nozzle cover is not attached in
correct place
• Vacuum channel in nozzle is
clogged by debris
• Air filter clogged by debris
• Turn power OFF and remove dirt water
tank. Reposition it properly and press
into the appliance until it clicks.
• Turn power OFF and remove dirt water
tank. Empty dirt water tank
• Turn OFF and unplug appliance.
Remove and re-position nozzle cover
to firmly click onto nozzle.
• Turn OFF and unplug appliance.
Remove and rinse clean the nozzle
cover under tap water.
• Turn OFF and unplug appliance.
Remove the dirt water tank and take
out the 2in1 filter from the tank cap.
Clean the filter following the
instruction of 'Empty and clean dirt
water tank'. If the filter is too dirty,
replace the filter with a new Vileda
2in1 filter.
Water puddle remain on
floor
• Floor very uneven with deep tiles
joint
• Nozzle cover damaged (rubber
element eroded)
• Change cleaning direction, go over
the puddles in backwards direction
with water spray off
• Replace the nozzle cover with a new
one
Microfiber roller is not
turning (LED light in the
nozzle blinking fast)
• Blocking has caused microfiber
roller to stop
• Nozzle cover not properly in
place.
• Microfiber roller is not properly in
place.
• Turn power OFF and unplug unit.
Remove nozzle cover and microfiber
roller to ensure the system is free
from hairs, dirt or larger particles.
• Turn power OFF and unplug unit.
Detach the nozzle cover and
re-position it.
• Turn power OFF and unplug unit.
Remove and reposition the roller
following the instructions for
'Cleaning the nozzle'
Device does not turn on • Product not properly plugged
into the power socket or issue
with mains power
• Cord is damaged
• Verify presence of power in the main
power socket. Ensure proper
connection of appliance to the mains
power socket.
• Try in different power socket.
• Turn power OFF and unplug unit
immediately. Send unit to authorized
maintenance service.

14
GProblem description Possible cause Possible solution
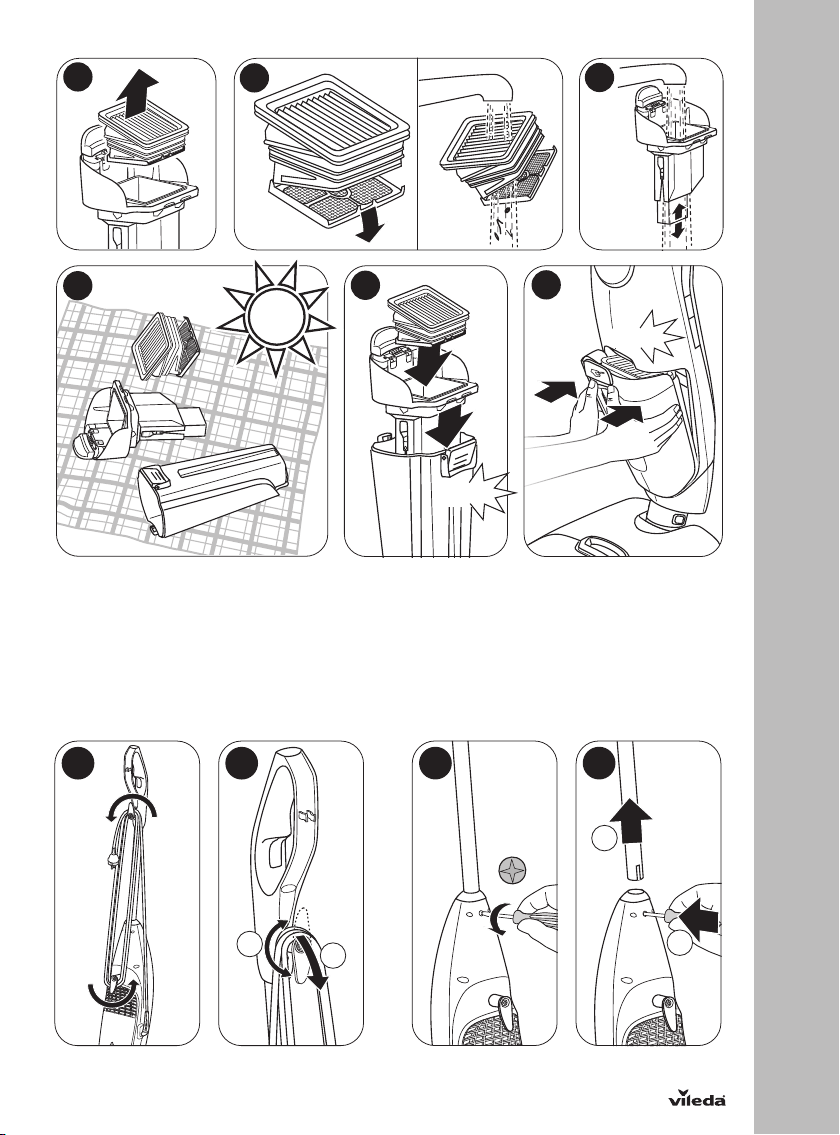
Device dripping from air
exhaust during or after use
• Product fell on the floor when
OFF.
• Too much water in the dirt water
tank due to jammed floater.
• Check product to ensure that it has
not been damaged. 1. Turn power
OFF, follow instruction for 'Empty and
clean dirt water tank'. 2. Turn power
ON and run in its storage tray,
allowing the airflow to dry the air
channels. Note: The product remains
safe even if water is dripping from the
air exhaust during or after use.
• 1. Turn power OFF, follow instruction
for 'Empty and clean dirt water tank'.
2. Turn power ON and run in its
storage tray, allowing the airflow to
dry the air channels. Note: The
product remains safe even if water is
dripping from the air exhaust during
or after use.
Water spillage on floor
during cleaning mode
• Dirt water tank is not emptied
before running the cleaning
mode.
• Too much water filled into the
water chamber at the back of the
easy clean storage tray
• The product is not ON during the
cleaning mode.
• Turn power OFF, follow instruction for
'Empty and clean dirt water tank'.
• Turn power OFF. Use the prescribed
amount of water (150 ml) during
cleaning mode.
• Turn the unit ON during the cleaning
mode to ensure the water is sucked
up into the dirt water tank.
6. VILEDA WARRANTY
A. SCOPE
1. Freudenberg Household Products LP (“FHP”) guarantees the product to be free from defects in materials and
workmanship a for a period of two years from the date of purchase. 2. If the product becomes faulty for any reason
for which FHP is responsible within two years from the date of purchase (“the Guarantee Period”), FHP or an authorised
service network member in the Guarantee Area (meaning anywhere within the United Kingdom, including the Channel
Islands and the Isle of Man and the Republic of Ireland) will repair or replace it subject to the terms and limitations
below. FHP may replace defective products or parts with new or refurbished products or parts. All products and parts
replaced become the property of FHP. 3. This guarantee does not cover: a) periodic maintenance or repair or parts
replacement due to wear and tear; b) consumables (namely components that are expected to require necessary
periodic replacement during the lifetime of a product such as pads and rubber lip); c) damage or defects caused by use,
operation or treatment of the product inconsistent with normal personal or domestic use; d) damage or deterioration in
the condition or performance of the product arising as a result of: I. misuse, including:
- treatment resulting in physical, cosmetic or surface damage to or deterioration in product;
- failure to install or use the product for its normal purpose or in accordance with FHP’s instructions on installation or use;
- failure to maintain the product in accordance with FHP’s instructions on maintenance;
- installation or use of the product in a manner inconsistent with the technical or safety laws or standards in the
country where it is installed or used; II. use of the product with accessories, peripheral equipment and other products
of a type, condition and standard other than prescribed by FHP; III. repair or attempted repair by persons who are not
FHP or authorised service network members; IV. accidents, fire, liquids, chemicals, other substances, flooding,
vibrations, excessive heat, improper ventilation, power surges, excess or incorrect supply or input voltage, radiation,
electrostatic discharges including lighting, other external forces and impacts; or V. any event or circumstances
beyond the reasonable control of FHP.
B. TERMS
1. Guarantee services will be provided only if the original invoice or sales receipt (indicating the date of purchase, model
name and dealer’s name) is presented with the defective product within the Guarantee Period. FHP may refuse free-of-
charge guarantee service if these documents are not presented or if they are incomplete or illegible. This Guarantee

15
G
will not apply if the model name or serial number on the product has been altered, deleted, removed or made illegible.
2. Except where FHP has a legal duty to reimburse them, this Guarantee does not cover transport costs or any risks as-
sociated with the transportation of the product to and from FHP. 3. If FHP or one of its authorised service network mem-
bers carries out a diagnostic test on the product and that test demonstrates that the product is working properly and no
hardware fault is present, you will not be entitled to a repair under this Guarantee. In that event, you will be liable to pay
for any repairs to rectify the defect and the cost of the diagnostic test.
C. EXCLUSIONS AND LIMITATIONS
11. Except as stated above, FHP makes no guarantee (express, implied, statutory or otherwise) regarding product qua-
lity, performance, accuracy, reliability, fitness for a particular purpose, or otherwise. 2. FHP does not take responsibili-
ty for any damage caused by the incorrect use of the product. Save as set out elsewhere in this Guarantee, the respon-
sibility of FHP will not exceed the purchase price of the product. If you have any doubts referring to the correct use of
the product or in relation to this Guarantee, please call Vileda Customer Service. 3. Nothing in this Guarantee is inten-
ded to restrict or limit FHP’s liability in any way in which it would be unlawful to do so, including for death or personal in-
jury caused by FHP’s negligence, or damage to private property caused by the goods proving to be defective while in
the consumer’s use as a result of FHP’s negligence or for defective products under the Consumer Protection Act 1987.
D. YOUR LEGAL RIGHTS RESERVED
This Guarantee is in addition to, and does not affect, your legal rights in relation to goods that are faulty or not as de-
scribed. All products will be provided in accordance with the contract. Further advice relating to your legal rights can
be obtained from your local Citizens Advice Bureau or Trading Standards Office. You may assert any rights you have at
your sole discretion.
E. YOUR GUARANTOR
The Guarantee for this product is provided and will be honoured by Freudenberg Household Products LP, 2 Chich-
ester Street, Rochdale, Lancashire, OL16 2AX. www.vileda.com/uk Tel: 0345 7697356.
7. TECHNICAL SPECIFICATION
Power connection
Voltage 220 - 240 V
50-60 Hz
Protection class IPX 4
Protective class I
Performance Data
installed power 400 W
Roller revolutions per minute 2800 rpm
Filling quantity
Clean water tank 640 ml
Dirty water tank 400 ml
Dimensions
Cable length 7,0 m
weight (without water) 4,7 kg
length 26 cm
width 27 cm
height 124 cm

16
G8. ENVIRONMENTAL AND PRODUCT RECYCLING
The Vileda JetClean fulfils the EU directive 2012/19/EU, covering electrical and electronic appaliances and the
management of its disposal.
The packaging material is entirely recycable, and marked with the recycling symbol. Follow local regulations for
scrapping. Keep the packaging materials (plastic bags, polystyrene parts, etc) out of children's reach, as they are
potentially dangerous.
When the product has reached the end of its life please do not dispose of it with general household waste. To
prevent possible harm to the environment of human from uncontrolled waste disposal, recycle it responsibly to
promote the sustainable reuse of material resources.
The symbol identifies the Vileda JetClean as a product submitted to the regime of selective electrical appliance
recycling collection.
For more detailed information about treatment, recovery and recycling of this cleaning tool, please contact your
local city office, your household waste disposal service or the shop where you purchased the product.
The product falls under the WEEE Category 4 (large equipment, at least one outer dimension more than 50cm) and
has no built-in battery.

17
D
SYMBOLE IN DER GEBRAUCHSANWEISUNG
•Gefahr - Unmittelbare Gefahr, die ernste Verletzungen oder den Tod hervorrufen
kann.
1. ALLGEMEINE WARNHINWEISE
LESEN SIE VOR DEM GEBRAUCH IHRES JetCleans
ALLE HINWEISE SORGFÄLTIG.
Bei der Benutzung von Elektrogeräten sollten stets die
grundlegenden Sicherheitsvorkehrungen befolgt werden,
einschließlich der folgenden:
EINE MISSACHTUNG DER FOLGENDEN HINWEISE KANN
IHRE GESUNDHEIT UND SICHERHEIT BEDROHEN, DA ES ZU
FEUER, ELEKTRISCHEM SCHLAG UND SCHWERER
VERLETZUNG KOMMEN KANN.
Inhalt
1. ALLGEMEINE WARNHINWEISE 17
2. PRODUKTANSICHT 20
3. MONTAGE & BETRIEB 20
4. WARTUNG 21
5. PROBLEMLÖSUNGEN 23
6. VILEDA PRODUKTGARANTIE 25
7. TECHNISCHE DATEN 27
8. UMWELTSCHUTZ UND ENTSORGUNG 27
VIELEN DANK FÜR DEN KAUF DES NEUEN VILEDA JetClean!
Dieses Handbuch ist eine unverzichtbare Anleitung für den korrekten und sicheren Gebrauch
des Vileda JetClean. Sie sollten alle Hinweise vor dem ersten Gebrauch des Produkts
sorgfältig lesen, da diese notwendige Informationen beinhalten, wie das Produkt über die
gesamte Nutzungsdauer hinweg entsprechend der Sicherheitsstandards und im Sinne des
Umweltschutzes zu handhaben ist. Bitte bewahren Sie dieses Dokument für den zukünftigen
Gebrauch auf. Das Dokument ist auch verfügbar auf: www.vileda.de. Dieses Gerät ist lediglich
für den Innengebrauch in privaten Haushalten bestimmt.

18
DWARNUNG
Zur Vermeidung der Gefahr eines Brandes, elektrischen
Schlages oder einer Verletzung: Schließen Sie dieses Gerät
nuraneineordnungsgemäßgeerdeteSteckdosean.Verändern
Sie den dreiadrigen, geerdeten Stecker nicht. Trennen Sie das
Gerät von der Steckdose, wenn es nicht in Gebrauch ist oder
bevor es gereinigt, gewartet oder repariert wird. Das Gerät
kann von Kindern ab 8 Jahren sowie von Personen mit
reduzierten physischen, sensorischen oder mentalen
Fähigkeiten oder Mangel an Erfahrung und/oder Wissen
benutzt werden, wenn sie beaufsichtigt oder bezüglich des
sicheren Gebrauchs des Gerätes unterwiesen wurden und die
daraus resultierenden Gefahren verstanden haben. Reinigung
und Benutzer-Wartung dürfen nicht von Kindern ohne
Beaufsichtigung durchgeführt werden. Kinder sollten
beaufsichtigt werden, damit sie nicht mit dem Gerät spielen.
Ein beschädigtes Netzkabel muss vom Hersteller, dessen
KundendienstodereinerähnlichenFachpersonausgewechselt
werden, um Gefahren vorzubeugen. Halten Sie Haare, lockere
Kleidung, Finger und alle Körperteile von Öffnungen und
beweglichen Teilen des Geräts und seinem Zubehör fern.
Benutzen Sie nur den Typ und die Menge der Flüssigkeiten, die
im Abschnitt „Betrieb“ dieser Anleitung aufgeführt sind. Lassen
SiedasangeschlosseneGerätnichtunbeaufsichtigt.Verändern
Sie nicht den Schuko-Stecker. Die Rolle kann unerwartet
starten. Ziehen Sie vor Reinigung oder Wartung den
Netzstecker. Nicht dem Regen aussetzen. Im Innenbereich
lagern. Das Gerät darf nicht als Spielzeug verwendet werden.
Verwenden Sie es nur gemäß Gebrauchsanleitung. Nutzen Sie
das Gerät nur mit dem vom Hersteller empfohlenen Zubehör.
Nicht mit beschädigtem Kabel oder Stecker verwenden. Nicht
in Wasser oder Flüssigkeiten tauchen. Wenn das Gerät nicht
ordnungsgemäß funktioniert, fallen gelassen, beschädigt, im
Freien gelassen oder ins Wasser gefallen ist,
benutzen Sie es nicht und lassen Sie es von einem autorisierten

19
D
Kundendienst reparieren. Flüssigkeiten dürfen nicht auf Geräte
mit elektrischen Komponenten gerichtet werden. Ziehen Sie
und tragen Sie das Gerät nicht mit dem Kabel und nutzen Sie
das Kabel nicht als Griff. Klemmen Sie das Kabel nicht in der
Tür ein, wickeln Sie es nicht um scharfe Kanten oder bringen
Sie das Kabel mit heißen Oberflächen in Kontakt. Ziehen Sie
nicht am Kabel, um das Gerät vom Stromnetz zu trennen.
Benutzen Sie zum Herausziehen den Stecker und nicht das
Kabel. Fassen Sie den Stecker oder das Gerät nicht mit nassen
Händen an. Der Stecker muss aus der Steckdose gezogen
werden, bevor das Gerät gereinigt oder gewartet wird. Keine
Gegenstände in die Öffnungen stecken. Nicht mit verstopften
Öffnungen benutzen. Öffnungen frei von Staub, Flusen, Haaren
und Sonstigem halten, die den Luftstrom drosseln könnten.
Vor dem Einstecken oder Herausziehen des Kabels alle
Bedienelemente ausschalten. Bei der Reinigung von Treppen
besonders achtsam vorgehen. Nicht zur Aufnahme von
entflammbaren oder brennbaren Materialien (Feuerzeugbenzin,
Benzin, Kerosin usw. ) verwenden oder in Bereichen, in denen
diese Materialien vorhanden sein können. Nicht zum
Aufnehmen von toxischen Materialien (Chlorbleichmittel,
Ammoniak, Rohrreiniger usw.) verwenden. Nutzen Sie das
Gerät nicht in geschlossenen Räumen, die mit Ausdünstungen
von Ölfarben, Verdünnern, Mottenschutzmittel, entflammbarem
Staub oder anderen explosiven oder giftigen Dämpfen gefüllt
sind. Dieses Gerät ist lediglich für den Innengebrauch.
Besondere Aufmerksamkeit ist geboten beim Gebrauch durch
oder in der Nähe von Kindern. Nur für den in dieser
Gebrauchsanleitung beschriebenen Zweck verwenden.
Verwenden Sie nur die vom Hersteller empfohlenen
Zubehörteile. Saugen Sie keine harten Gegenstände auf, wie
z.B. Glas, Nägel, Schrauben, Münzen usw. Stellen Sie das
Gerät auf ebenem Untergrund ab. Zur Verringerung der
Verletzungsgefahr durch bewegliche Teile bringen Sie vor
Inbetriebnahme die Düsenabdeckung korrekt an. Nicht ins

20
DWasser tauchen. Nur auf Flächen verwenden, die durch den
Reinigungsprozess angefeuchtet wurden. Verwenden Sie nur
kaltes Wasser, eventuell mit einem nicht schäumenden
Bodenreinigungsmittel in vorgesehener Dosierung, um eine
Beschädigung von inneren Bauteilen zu vermeiden. Saugen
Sie keine brennenden oder rauchenden Gegenstände auf, wie
Zigaretten, Streichhölzer oder heiße Asche. Überprüfen Sie
vor jedem Gebrauch das Vorhandensein und die korrekte
Funktionsweise des Schwimmers. Während des Gebrauchs
die Düse nicht vom Boden abheben. Nicht in Kombination mit
heißen Flüssigkeiten verwenden. Die max. Temperatur darf
40°C nicht überschreiten. Überfüllen Sie das Gerät nicht.
Gießen Sie kein Wasser auf die Düse, um die Walze oder die
Düsenabdeckung zu reinigen. Befolgen Sie die Anweisungen
unter „Reinigen der Düse“.
2. PRODUKTANSICHT
siehe Seite 3 der Bedienungsanleitung
1. Stiel 8. Düsenabdeckung
2. EIN/AUS-Schalter 9. LED-Sprühanzeige
3. Frischwasserbehälter 10. Umschalter Frischwassersprühen
4. Hauptgerät 11. Schnelllösehaken fürs Netzkabel
5. Schmutzwasserbehälter 12. Stecker
6. 2in1-Filter 13. Easy-Clean-Abstellfach
7. Mikrofaserrolle 14. Wasserbecher
3. MONTAGE & BETRIEB
Anwendung
siehe Seite 2 der Bedienungsanleitung
12Entfernen Sie die Schutzelemente, einschließlich des Kartons auf der Unterseite der Düse. Führen Sie den
Stiel in das Hauptgerät ein, bis Sie ein Klicken hören.
Stellen Sie das Gerät auf seiner Düse in eine aufrechte Abstellposition.
3Füllen Sie den Wasserbecher mit Leitungswasser und optional mit einem Tropfen nicht schäumenden
Bodenreinigungsmittel. Wichtig: Kaltes oder lauwarmes Leitungswasser einfüllen (max. 40° C). Keinesfalls
heißes oder kochendes Wasser einfüllen.
4Öffnen Sie den Frischwasserbehälter und füllen ihn mit Wasser.
• Den Behälter nicht überfüllen, auf die max. Füllstandsmarkierung achten!

21
D
5Wickeln Sie das Netzkabel von den Haken und stecken Sie es in die Steckdose. Um die Reinigung zu
erleichtern, kann das Kabel im Kabelhalter befestigt werden. Drücken Sie den EIN-Schalter über dem
Frischwasserbehälter, um das Gerät einzuschalten.
6Neigen Sie den Gerätekörper nach hinten, indem Sie Ihren Fuß vorsichtig auf der Düse platzieren und den
Stiel nach hinten kippen.
7Zur Aktivierung des Nasswischens drücken Sie den Frischwassersprühschalter am Handgriff. Die LED
leuchten, sobald Wasser verteilt wird. Drücken Sie ein zweites Mal, um die Wasserverteilung zu stoppen.
8Reinigen und saugen Sie mit einer Vor- und Rückwärtsbewegung über den gleichen Bereich, um
überschüssiges Wasser vom Boden zu entfernen.
• Vorwärtsbewegung: die Saugöffnung im Vorderteil nimmt Staub und alle Partikel auf; die rotierende
Mikrofaserrolle wischt die Böden mit sauberem Wasser.
• Rückwärtsbewegung: die rotierende Mikrofaserrolle wischt ein zweites Mal und die Saugöffnung nimmt
überschüssiges Schmutzwasser vom Boden auf, so dass dieser danach sauber und trocken ist.
9Nach Abschluss der Reinigung schalten Sie das Gerät aus und ziehen den Stecker aus der Steckdose, bevor
der Schmutzwasserbehälter geleert wird.
•Ziehen Sie den Stecker nicht am Kabel aus der Steckdose.
10
Nehmen Sie den Schmutzwasserbehälter aus dem Gerät.
11
Öffnen Sie den Schmutzwasserbehälter durch gleichzeitiges Drücken der roten Öffnungstasten auf der Vorder-
und Rückseite des Behälters und entfernen mit der anderen Hand vorsichtig die obere Behälterabdeckung.
12
Entleeren Sie den Inhalt, spülen Sie mit sauberem Wasser nach, bis der Behälter sauber ist und lassen Sie ihn
trocknen.
13
Hinweise zur weiteren Wartung und Fehlerbehebung finden Sie in der Gebrauchsanleitung.
Kabel
siehe Seite 5 der Bedienungsanleitung
1
Wickeln Sie das Kabel um den Schnelllösehaken und den unteren Kabelhaken.
2
Zum einfachen Abwickeln drehen Sie den Schnelllösehaken einfach nach unten, um das Kabel freizugeben.
Abziehen des Stiels
siehe Seite 5 der Bedienungsanleitung
1
Entfernen Sie die obere mittige Schraube auf der Produktrückseite. Schraube nicht fallen lassen.
2
Führen Sie den Schraubendreher vorsichtig in das Loch der entfernten Schraube ein und ziehen Sie den Stiel
nach oben aus dem Gerät. Ist der Stiel herausgezogen, schrauben Sie die Schraube wieder ein, damit sie
nicht verloren geht.
Befüllen des Frischwasserbehälters
a. Der Frischwasserbehälter befindet sich auf der Vorderseite des Geräts.
b. Öffnen Sie den blauen Deckel des Frischwasserbehälters.
c. Füllen Sie mit Hilfe des Wasserbechers kaltes oder lauwarmes Leitungswasser (max. 40° C) bis zur Markierung
MAX auf.
d. Optional: Geben Sie einen Tropfen nicht schäumendes Bodenreinigungsmittel in den Wasserbecher.
BEACHTEN SIE BEI DER DOSIERUNG DES REINIGUNGSMITTELS DESSEN GEBRAUCHSANWEISUNG;
WICHTIG: NEHMEN SIE NICHT ZUVIEL REINIGUNGSMITTEL, DIES KANN DEN BODEN UND DAS GERÄT
BESCHÄDIGEN
•Den Behälter nicht überfüllen, auf die max. Füllstandsmarkierung achten!
e. Schließen Sie den Behälterdeckel.
•Nehmen Sie kein heißes oder kochendes Wasser!
4. WARTUNG
Reinigen der Düse.
siehe Seite 4 der Bedienungsanleitung
•Ziehen Sie vor dem Reinigen der Düse den Stecker aus der Steckdose.

22
D1Drücken Sie die Verriegelung der Düsenabdeckung und drehen diese zum Abnehmen nach außen.
2Greifen Sie die Lasche der Mikrofaserrolle und ziehen diese nach oben heraus.
3Entfernen Sie Ablagerungen und groben Schmutz aus Ansaugöffnung und Ansaugkanal.
4Spülen Sie Düsenabdeckung und Mikrofaserrolle per Hand ab. Zum leichteren Reinigen der Mikrofaserrolle -
siehe Anweisungen zum „Easy-Clean-Abstellfach“. Zum schnelleren trocknen der Rolle, können Sie das
Gerät mit der eingesetzen Mikrofaserolle laufen lassen. Nasswischen und die LEDs in der Düse müssen dabei
deaktiviert sein.
5Lassen Sie Mikrofaserrolle und Düsenabdeckung vor dem Zusammenbau trocknen.
6Setzen Sie die Mikrofaserrolle wieder in das Gerät ein, indem Sie das Rollenende in die linke Fußseite
einsetzen und dann die Rollenlasche an ihren Platz drücken.
78Bringen Sie die Düsenabdeckung an, indem diese zuerst an den Kanten der Düse ausgerichtet wird. Dann
drücken Sie die Düsenabdeckung wieder in Position, bis Sie ein Klicken hören. Überprüfen Sie die Seite, um
sicherzustellen, dass die Abdeckung korrekt montiert ist.
Leeren und Reinigen des Schmutzwasserbehälters
siehe Seite 4 und 5 der Bedienungsanleitung
9Um den Schmutzwasserbehälter vom Hauptgerät zu lösen, ziehen Sie am roten Griff des Behälters und
nehmen diesen aus dem Hauptgerät.
10
Öffnen Sie den Schmutzwasserbehälter durch gleichzeitiges Drücken der roten Öffnungstasten auf der
Vorder- und Rückseite des Behälters und entfernen Sie mit Ihrer anderen Hand vorsichtig die
Behälterabdeckung.
11
Entleeren Sie Schmutzwasser und Schmutz. Spülen Sie das Innere des Schmutzwasserbehälters sauber.
12
Ziehen Sie den 2in1-Filter aus dem oberen Teil des Schmutzwasserbehälters.
13
Öffnen Sie den Maschengitterfilter und spülen diesen mit warmem Wasser, bis er frei von Ablagerungen und
Schmutzpartikeln ist.
14
Entfernen Sie per Handwäsche aufgefangenen Schmutz und grobe Schmutzpartikel aus der Abdeckung des
Schmutzwasserbehälters (ohne Filter). Reinigen Sie insbesondere den Schwimmer von allen Seiten und
überprüfen dessen uneingeschränkte Beweglichkeit. Wenn der Innenbereich dort schmutzig ist, wo der
Wasserbehälter sitzt, wischen Sie ihn mit einem Tuch oder Schwamm sauber.
15
Lassen Sie alle Teile vor dem Zusammenbau trocknen.
16
Sobald die Teile trocken sind, wieder zusammenzusetzen und den 2in1-Filter wieder in den oberen Teil des
Schmutzwasserbehälters einsetzen.
17
Setzen Sie den wieder zusammengebauten Schmutzwasserbehälter zuerst mit dem Boden in das Gerät ein
und pressen Sie dann mit beiden Händen das Behälteroberteil in das Gerät, bis Sie ein Klicken hören.
Hinweis: Ersetzen Sie den 2in1-Filter alle 4 Monate oder wenn er zu stark verschmutzt ist.
Easy-Clean-Abstellfach
siehe Seite 6 der Bedienungsanleitung
Um Schäden an empfindlichen Böden zu vermeiden, bewahren Sie das Gerät stets im Abstellfach auf. Da
das Gerät mit Wasser betrieben wird, könnte es Restwasser oder -feuchtigkeit enthalten, was zu Schäden an
empfindlichen Böden führen kann, wenn es nicht in Gebrauch ist. Das Abstellfach kann auch für eine schnelle
Reinigung der Mikrofaserrolle vor und nach Gebrauch verwendet werden. Für eine gründliche Reinigung des
Gerätes - siehe „Reinigen der Düse“ sowie „Leeren und Reinigen des Schmutzwasserbehälters“.
1Stellen Sie das Gerät in das Easy-Clean-Abstellfach.
2Vergewissern Sie sich, dass der Schmutzwasserbehälter leer ist, bevor der Reinigungsmodus läuft. Wenn
dies nicht der Fall ist, befolgen Sie die Anweisung „Leeren und Reinigen des Schmutzwasserbehälters“.
3Füllen Sie den Wasserbecher mit 150 ml Wasser (bis zur Markierung) und fügen optional einen Tropfen nicht
schäumendes Bodenreinigungsmittel hinzu.
4Wickeln Sie das Netzkabel von den Haken, stecken Sie es in die Steckdose und drücken Sie den Stromschalter
auf EIN.
5Gießen Sie 150 ml Wasser in die Wasserkammer auf der Rückseite des Abstellfachs, während das Gerät
eingeschaltet ist! Lassen Sie den Reinigungsmodus 60 Sekunden laufen, bis das gesamte Wasser
durchgelaufen ist und aufgesaugt wurde. Wiederholen Sie dies, falls nötig.
6Sobald das gesamte Wasser aufgesaugt wurde, drücken Sie den AUS-Schalter. Trennen Sie das Gerät von
der Stromversorgung.
•Ziehen Sie den Stecker nicht am Kabel aus der Steckdose.

23
D
7Leeren und reinigen Sie den Schmutzwasserbehälter, indem Sie die Anweisung „Leeren und Reinigen des
Schmutzwasserbehälters“ befolgen.
89Öffnen Sie die Düsenabdeckung und lassen Sie diese zum Trocknen geöffnet. Reinigen Sie von Zeit zu Zeit
das Abstellfach unter fließendem Wasser und lassen Sie dieses vor Benutzung vollständig trocknen.
Hinweis: Gießen Sie Wasser nur in das Easy-Clean-Abstellfach, wenn das Gerät eingeschaltet ist! Wenn das
Gerät nicht läuft, wird sich das Wasser über den Boden ergießen. Wird zu viel Wasser in das Easy-Clean-
Abstellfach geschüttet, ergießt es sich ebenfalls über den Boden. Lassen Sie das Gerät während des
laufenden Reinigungsprozesses nicht unbeaufsichtigt.
Lagerung: Lagern Sie das Gerät an einem geschützten, trockenen Ort. Da Wasser verwendet wird, darf es
nur in frostfreien Bereichen aufbewahrt werden. Bei Frost werden interne Bauteile beschädigt und die
Garantie erlischt.
5. PROBLEMLÖSUNGEN
Problem Mögliche Ursache Mögliche Lösung
Reduziertes Sprühen ODER
kein Sprühen
• Frischwasserbehälter ist u. U.
leer
• System ist nicht feucht genug
• Düsenabdeckung der Rolle ist
nicht richtig eingerastet
• Wasserfluss nicht aktiviert
• Gerät kann innen mit Schmutz
verstopft sein
• Düsenöffnungen verstopft
• Gerät ausschalten und vom
Stromnetz trennen.
Frischwasserbehälter mit
kaltem Wasser neu auffüllen.
• Nasswischen durch Drücken
des Frischwassersprühschalters am
Handgriff aktivieren. Die LED
leuchten, sobald Wasser verteilt wird.
Das Gerät vorwärts und rückwärts
bewegen, um die Mikrofaser
rolle zu befeuchten.
• Gerät ausschalten und vom
Stromnetz trennen.
Düsenabdeckung abnehmen
und nochmals auf der Düse
fest einrasten lassen.
• Nasswischen durch Drücken
des Frischwassersprühschal-
ters am Handgriff aktivieren.
Die LED leuchten, sobald
Wasser verteilt wird.
• Gerät ausschalten und vom
Stromnetz trennen. Gerät
einem autorisierten
Wartungsdienst übergeben.
• Gerät ausschalten.
Düsenöffnungen mit
Entkalkerflüssigkeit vom
Schmutz befreien.

24
DProblem Mögliche Ursache Mögliche Lösung
Verlust der Saugleistung • Schmutzwasserbehälter wurde
nicht richtig eingesetzt
• Schmutzwasserbehälter ist
maximal gefüllt und muss
geleert werden
• Düsenabdeckung nicht an der
richtigen Stelle angebracht
• Saugkanal in der Düse ist durch
Schmutz verstopft
• Luftfilter durch Schmutz
verstopft
• Gerät ausschalten und
Schmutzwasserbehälter
entfernen. Richtig
positionieren und in das Gerät
drücken, bis er einrastet.
• Gerät ausschalten und
Schmutzwasserbehälter
entfernen.
Schmutzwasserbehälter
leeren.
• Gerät ausschalten und vom
Stromnetz trennen.
Düsenabdeckung abnehmen
und nochmals auf der Düse
fest einrasten lassen.
• Gerät ausschalten und vom
Stromnetz trennen.
Düsenabdeckung abnehmen
und unter fließendem Wasser
reinigen.
• Gerät ausschalten und vom
Stromnetz trennen.
Schmutzwasserbehälter
herausnehmen und den
2in1-Filter aus dem
Behälterdeckel nehmen. Filter
gemäß Anweisung in „Leeren
und Reinigen des
Schmutzwasserbehälters“
reinigen. Wenn der Filter zu
stark verschmutzt ist, diesen
durch einen neuen Vileda 2in1-
Filter ersetzen.
Auf dem Boden verbleiben
Wasserpfützen
• Boden sehr uneben mit tiefer
Fliesenfuge
• Düsenabdeckung beschädigt
(Gummielement erodiert)
• Reinigungsrichtung ändern, Pfützen
rückwärts überfahren und Wasser
aufsaugen.
• Ersetzen Sie die Düsenabdeckung
durch eine neue Abdeckung
Mikrofaserrolle dreht sich
nicht (LED blinkt schnell)
• Blockierung hat einen Stopp der
Mikrofaserrolle verursacht
• Düsenabdeckung sitzt nicht
richtig.
• Mikrofaserrolle sitzt nicht
richtig.
• Gerät ausschalten und vom
Stromnetz trennen.
Düsenabdeckung und
Mikrofaserrolle entfernen, um
zu gewährleisten, dass das
System frei von Haaren,
Schmutz oder größeren
Partikeln ist.
• Gerät ausschalten und vom
Stromnetz trennen.
Düsenabdeckung abnehmen
und wieder anbringen.
• Gerät ausschalten und vom
Stromnetz trennen. Rolle
gemäß Anweisung „Reinigen
der Düse“ herausnehmen und
wieder einsetzen
Other manuals for JetClean
2
Table of contents
Languages:
Other Vileda Vacuum Cleaner manuals

Vileda
Vileda VR 302 User manual

Vileda
Vileda Relax User manual

Vileda
Vileda Virobi User manual

Vileda
Vileda VR 101 User manual

Vileda
Vileda JetClean User manual

Vileda
Vileda VR301 User manual

Vileda
Vileda VR 302 User manual

Vileda
Vileda JetClean User manual

Vileda
Vileda VR 201 PetPro User manual

Vileda
Vileda VR 101 User manual