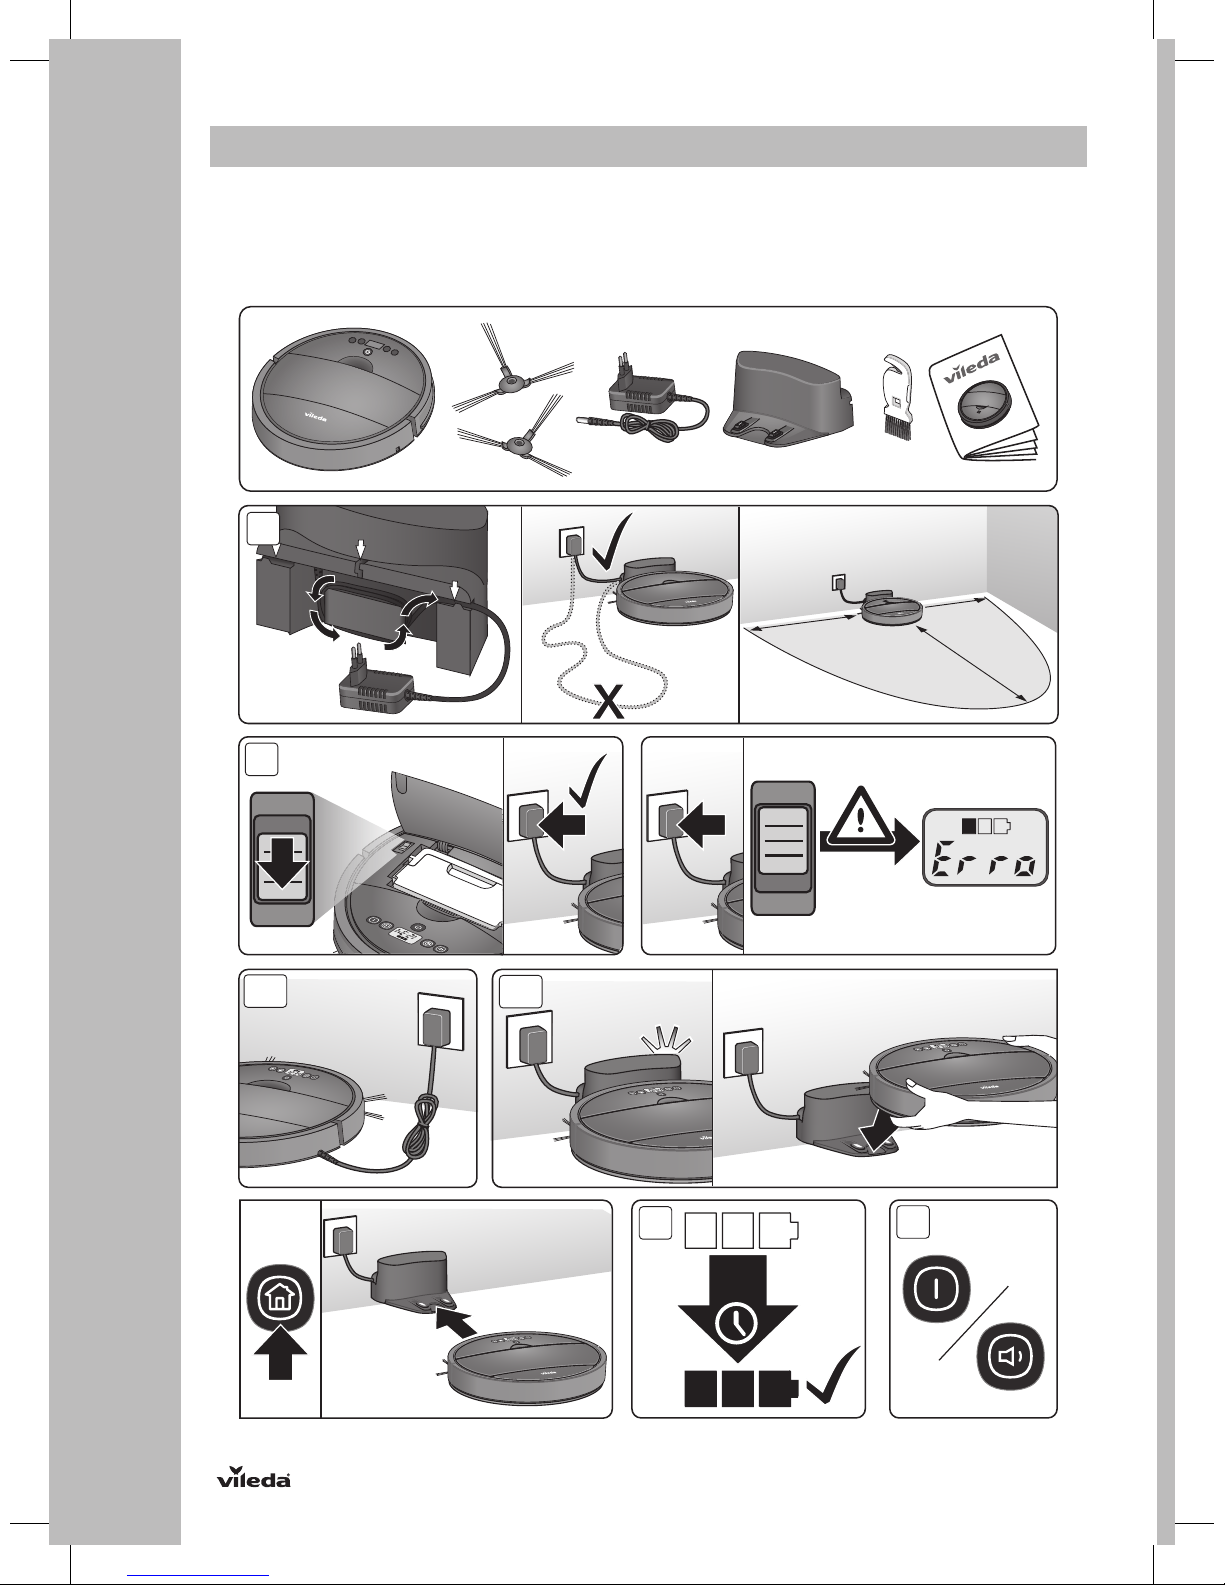
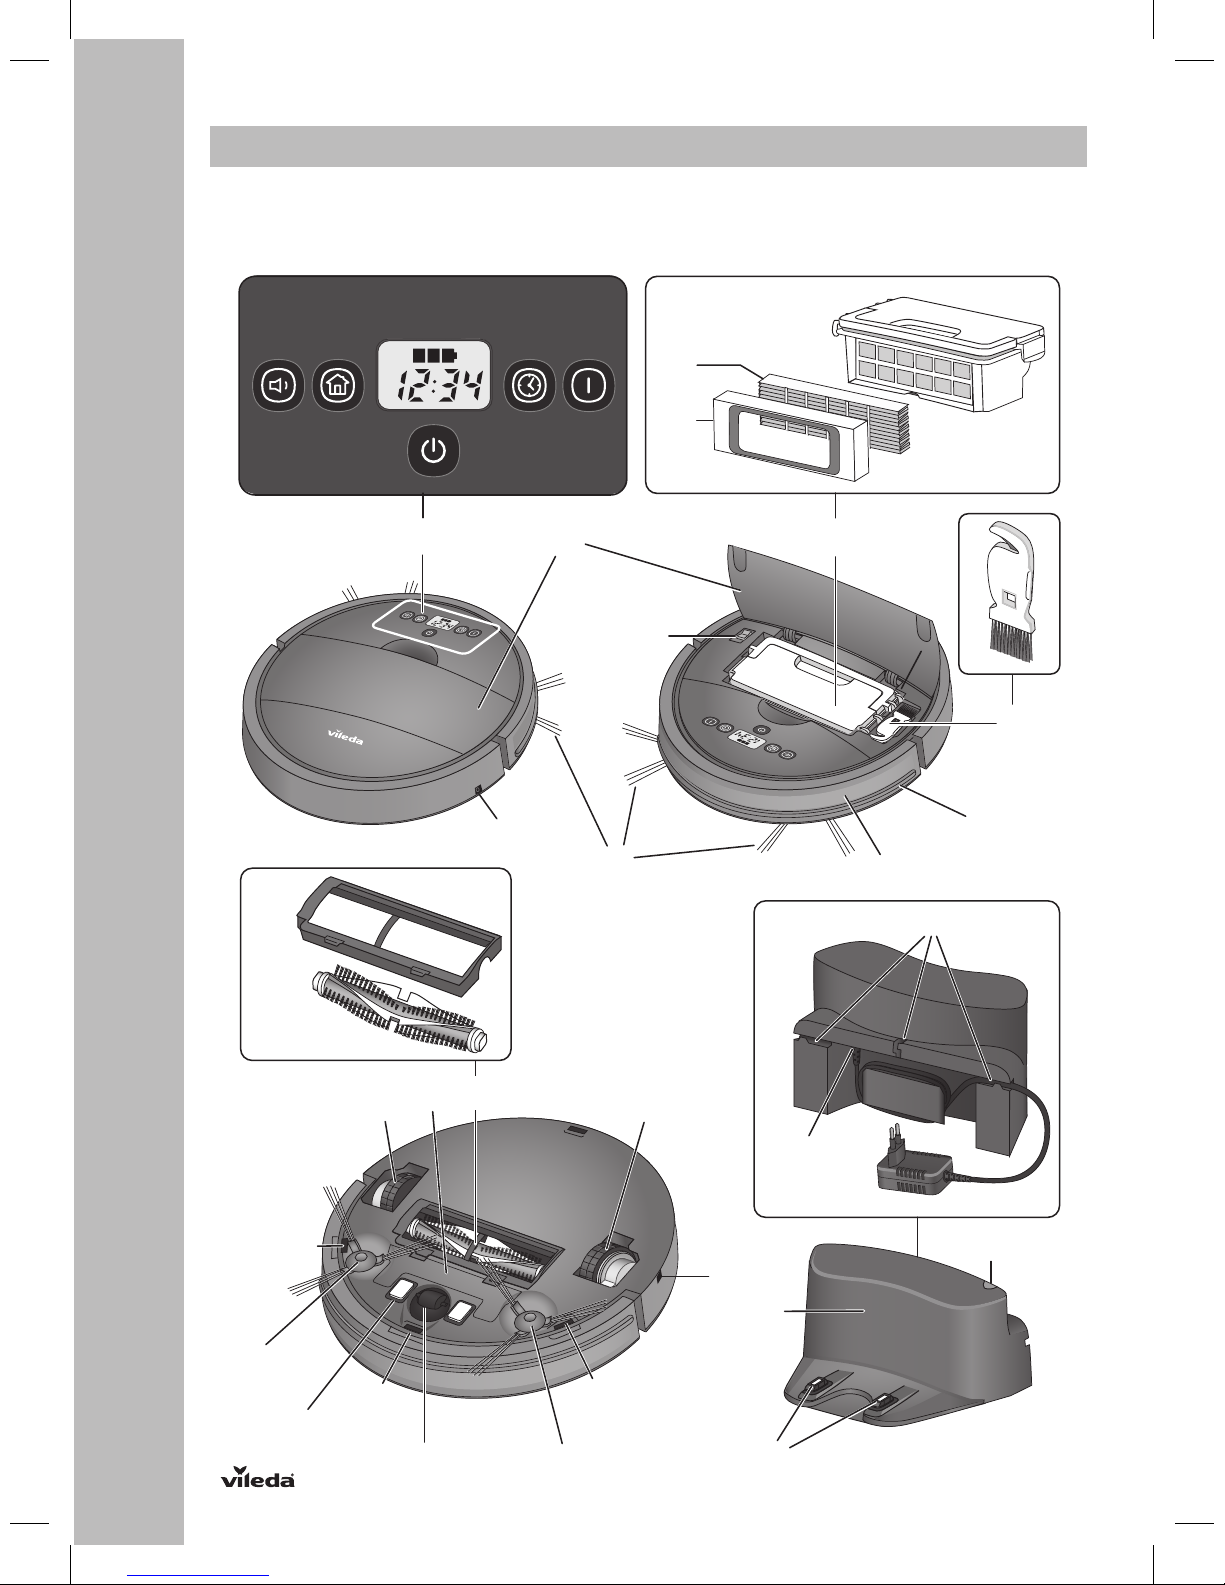
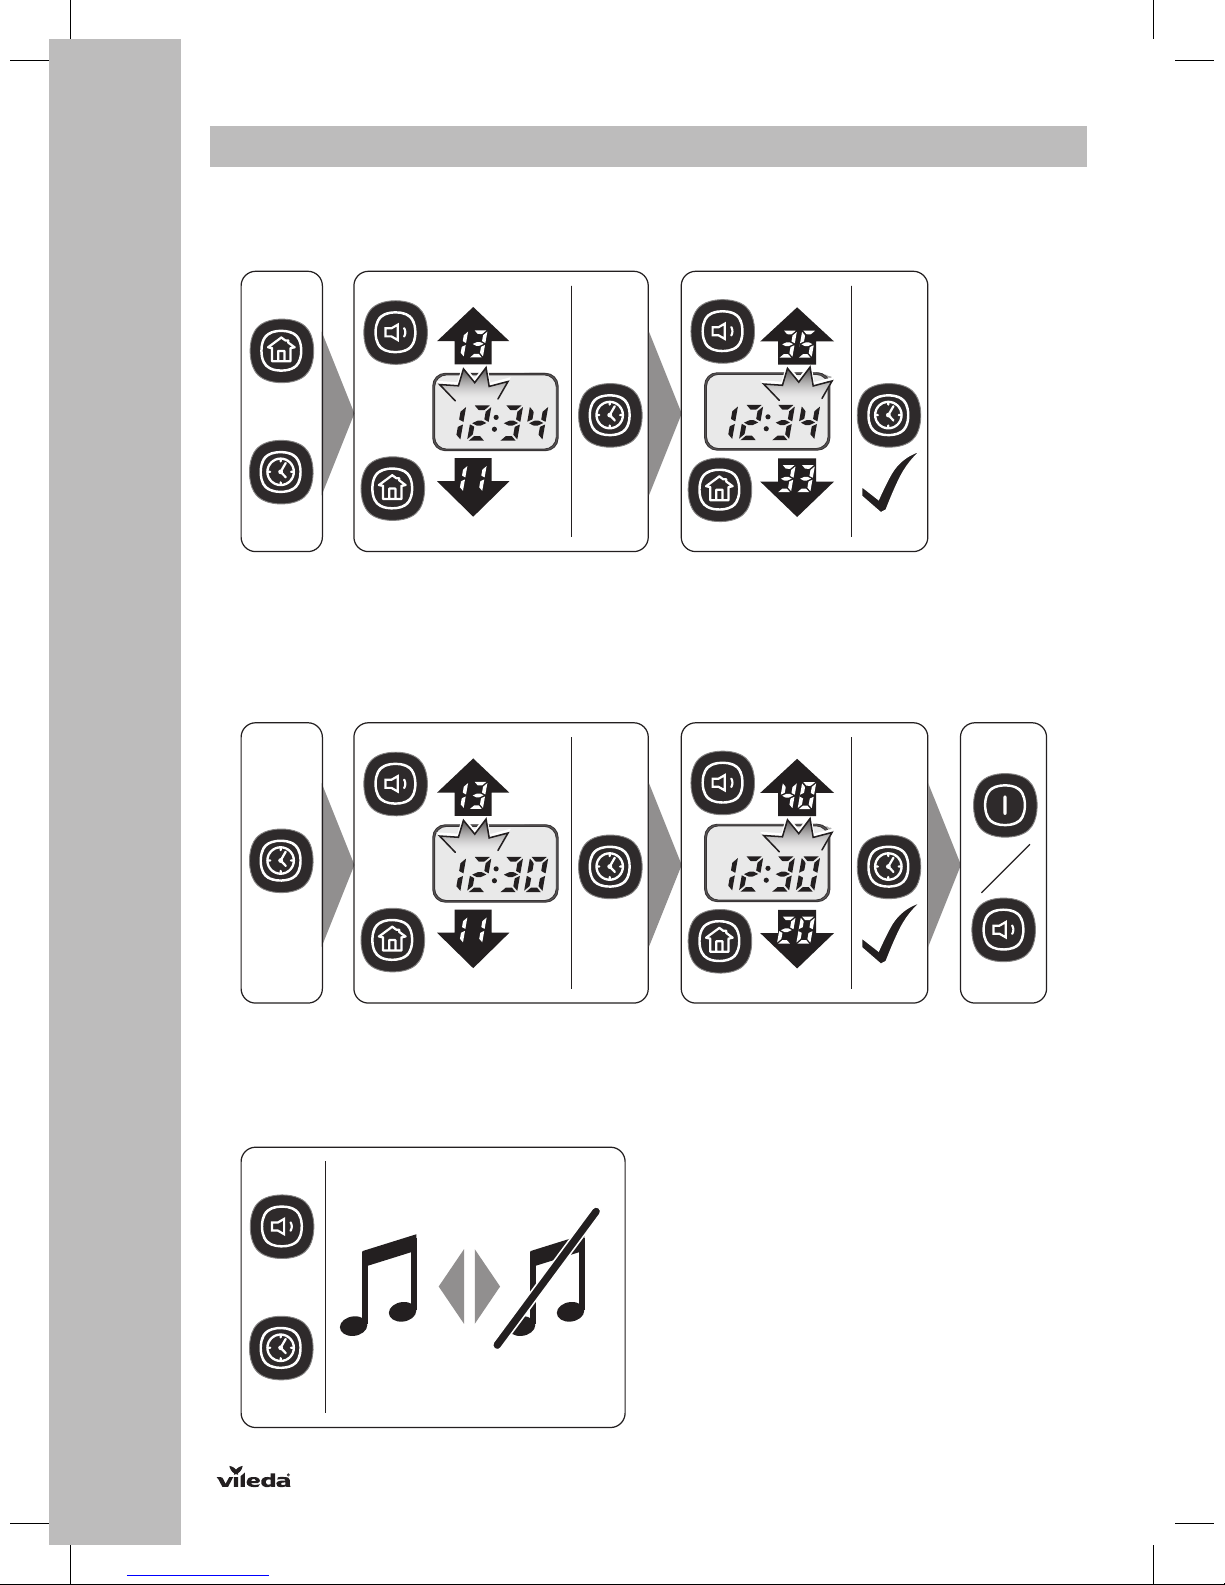
Vileda VR 201 PetPro User manual

User & care guide • Bedienungsanleitung • Manuale d'uso e manutenzione • Guía de usuario y
cuidados • Manual de utilização e cuidados • Guide d'utilisation et d'entretien • Onderhouds- en
gebruikshandleiding • Bruksanvisning och skötselguide • Bruker og vedlikeholdsmanual •
Käyttö- ja hoito-opas • Instrukcja użytkowania i czyszczenia • Navodila za uporabo in nego •
Uživatelská příručka • Užívateľská príručka • Vodič za korisnika i za njegu
VR 201 PetProVR 201 PetPro
CLEANING ROBOT
Model No: 0769-02

2
VR201 Quick Start KURTZ DESGN 03.05.18
ON
OFF
5-6h
1 m 1 m
2 m
1
2
3a 3b
45
ON
OFF
VR201 Packaging List KURTZ DESGN 26.04.18
PACKAGING CONTENT & QUICK START GUIDE
DLieferumfang & Schnellstart Anleitung IContenuto della confezione e Guida Rapida EContenido y
Guía de inicio rápido PConteúdo da embalagem & manual de iniciação rápida mContenu de la boîte et
démarrage rapide nInhoud van de doos en snelle start SFörpackningsinnehåll och snabbstartsguide
xEmballagens indhold & Hurtigstartsguide rPakkauksen sisältö ja pikakäyttöopas QZawartość
opakowania i skrócona instrukcja obsługi tVsebina pakiranja & Hiter začetek vObsah balení a stručný
průvodce uObsah balenia a stručný sprievodca 1Sadržaj pakiranja i vodič za brzi start

3
3
3a
3b
4
9
2
5
6
7
8
VR201 Explo KURTZ DESGN 03.05.18
8
11a
11b
1f
1a 1b 1d 1e
1c
11
10
13 17
16
14
15
12b
15
15
18
19
20
15
12a
7
7
1
PRODUCT OVERVIEW
DProduktübersicht IDescrizione del prodotto EDescripción del producto PVisão geral do produto
mPrésentation du produit nProductvoorstelling SProduktöversikt xProduktoversigt
rTuotekuvaus QPrzegląd produktu tPregled izdelka vPřehled produktu uPrehľad produktu
1Pregled proizvoda

4
1 2
5
VR201 Empty Filter KURTZ DESGN 07.05.18
click!
Tue
1
4
3
MAINTENANCE
DWartung IManutenzione EMantenimiento P Manutenção mEntretien nOnderhoud
SUnderhåll xVedligeholdelse/vedlikehold rHuolto QKonserwacja tVzdrževanje vÚdržba
uÚdržba 1Održavanje

5
VR201 Clean Brushes KURTZ DESGN 07.05.18
1
2 3
1
off
1
4 5
6
click!
click!
23 4
5

6
VR201 Clean Bottom KURTZ DESGN 03.05.18
1
off
4
3
5
2

7
23
45
1
off

8
VR201: Setting Scheduling Time
VR201: Setting Robot Time
VR201: Sound on/off
+
+
VR201 Timer Settings KURTZ DESGN 03.05.18
VR201: Setting Scheduling Time
VR201: Setting Robot Time
VR201: Sound on/off
+
+
VR201 Timer Settings KURTZ DESGN 03.05.18
VR201: Setting Scheduling Time
VR201: Setting Robot Time
VR201: Sound on/off
+
+
VR201 Timer Settings KURTZ DESGN 03.05.18
SCHEDULING
G Time Setting DZeit einstellen I Impostazione dell’orario E Configuración de la hora
P Definição das horas mRéglage de l'heure nTijd instellen S Tidsinställning x Tidsindstilling
r Ajan asettaminen Q Ustawienie czasu t Nastavitev časa v Nastavení času uNastavenie času
1 Postavljanje vremena
G Daily cleaning schedule D Programmierung täglicher Reinigungszeit I Programmazione della
pulizia quotidiana E Programación diaria de limpieza P Programação diária da limpeza
m Programmation quotidienne du nettoyage n Dagelijkse schoonmaak programmeren
S Schemaläggning av daglig städning x Daglig rengøringsskema/timeplan r Päivittäinen
imurointiohjelma Q Dzienny harmonogram sprzątania t Časovno dnevno programiranje čiščenja
v Denní úklidový plán u Denný čistiaci plán 1 Raspored dnevnog čišćenja
G Sound on / off DTon ein/ausschalten I Suono on / off E Sonido activado / desactivado P Som ligado/
desligado mSon on / off nGeluid aan / uit S Ljud på/av xLyd til/fra / på/av r Äänet päällä/pois
Q Włączanie i wyłączanie dźwięków t Vklop / Izklop zvoka v Zapnutí / Vypnutí zvuku uZapnutie/Vypnutie
zvuku 1 Zvuk uključen / isključen

9
G
1. GENERAL WARNINGS
IMPORTANT
Read all instructions before use. Retain instructions for future
reference.
WARNING
Use the robot only as described in this manual. Failure to follow
all instructions listed below may result in electric shock, fire
and/or serious injury.
When using any electrical robot, basic safety precautions
should always be observed, including the following, in order to
reduce the risk of fire, electrical shock, leaking batteries or
personal injury.
Thank you for choosing our new Vileda VR 201 PetPro robotic vacuum cleaner. VR 201 PetPro
will become your partner for daily cleaning, helping remove dirt, dust and even pet hair from
your floors so you don’t have to.
CONTENTS
1. GENERAL WARNINGS 9
2. GETTING TO KNOW VR 201 PETPRO 13
3. PRODUCT OPERATION 14
4. MAINTENANCE 15
5. TROUBLESHOOTING 16
6. ENVIRONMENTAL AND PRODUCT RECYCLING 17
7. PRODUCT SPECIFICATION 17
8. VILEDA PRODUCT GUARANTEE 17

10
G
USE RESTRICTIONS
•When starting the robot, place it in the middle of a room or
surface, at least half a metre away from an edge with a drop.
•Only for indoor use. Do not use outdoors or on balconies.
•Intended for domestic use only.
•The robot is not a toy. Do not sit or stand on it. Small children
and pets should be kept away from the robot and supervised
when the robot is cleaning.
•Do not put heavy or sharp objects on the top of the product.
•Do not let the robot pick up anything that is flammable, burning
or smoking.
•Do not use this robot to pick up anything wet.
•Do not use on long-pile carpets or rugs or on wet floors, for
example in the bathroom or laundry room.
•Only use this product in temperatures from 15° C to 35° C. Do
not use this product in a high-temperature environment or
direct sunlight for a long period of time.
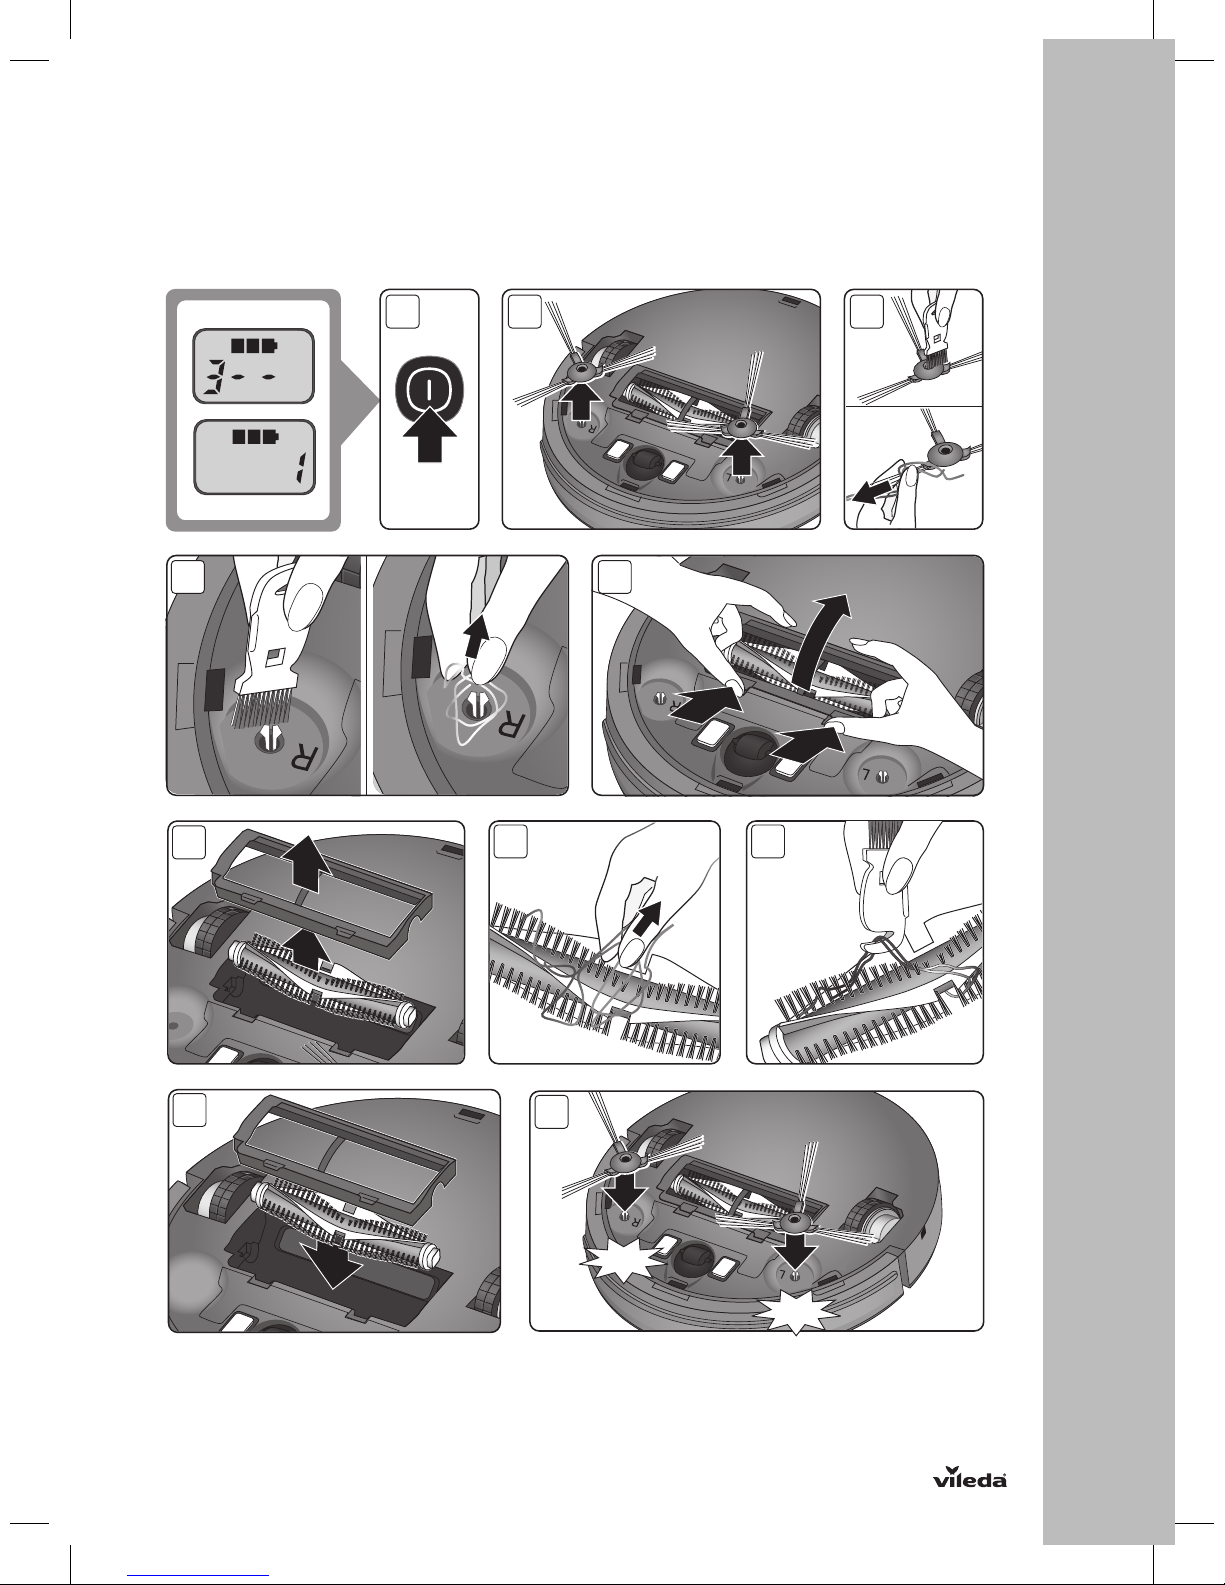
•Before using, pick up objects like clothing, loose papers, pull
cords for blinds or curtains, power cords, and any fragile
objects off the floor as they may entangle with the cleaning
brushes.
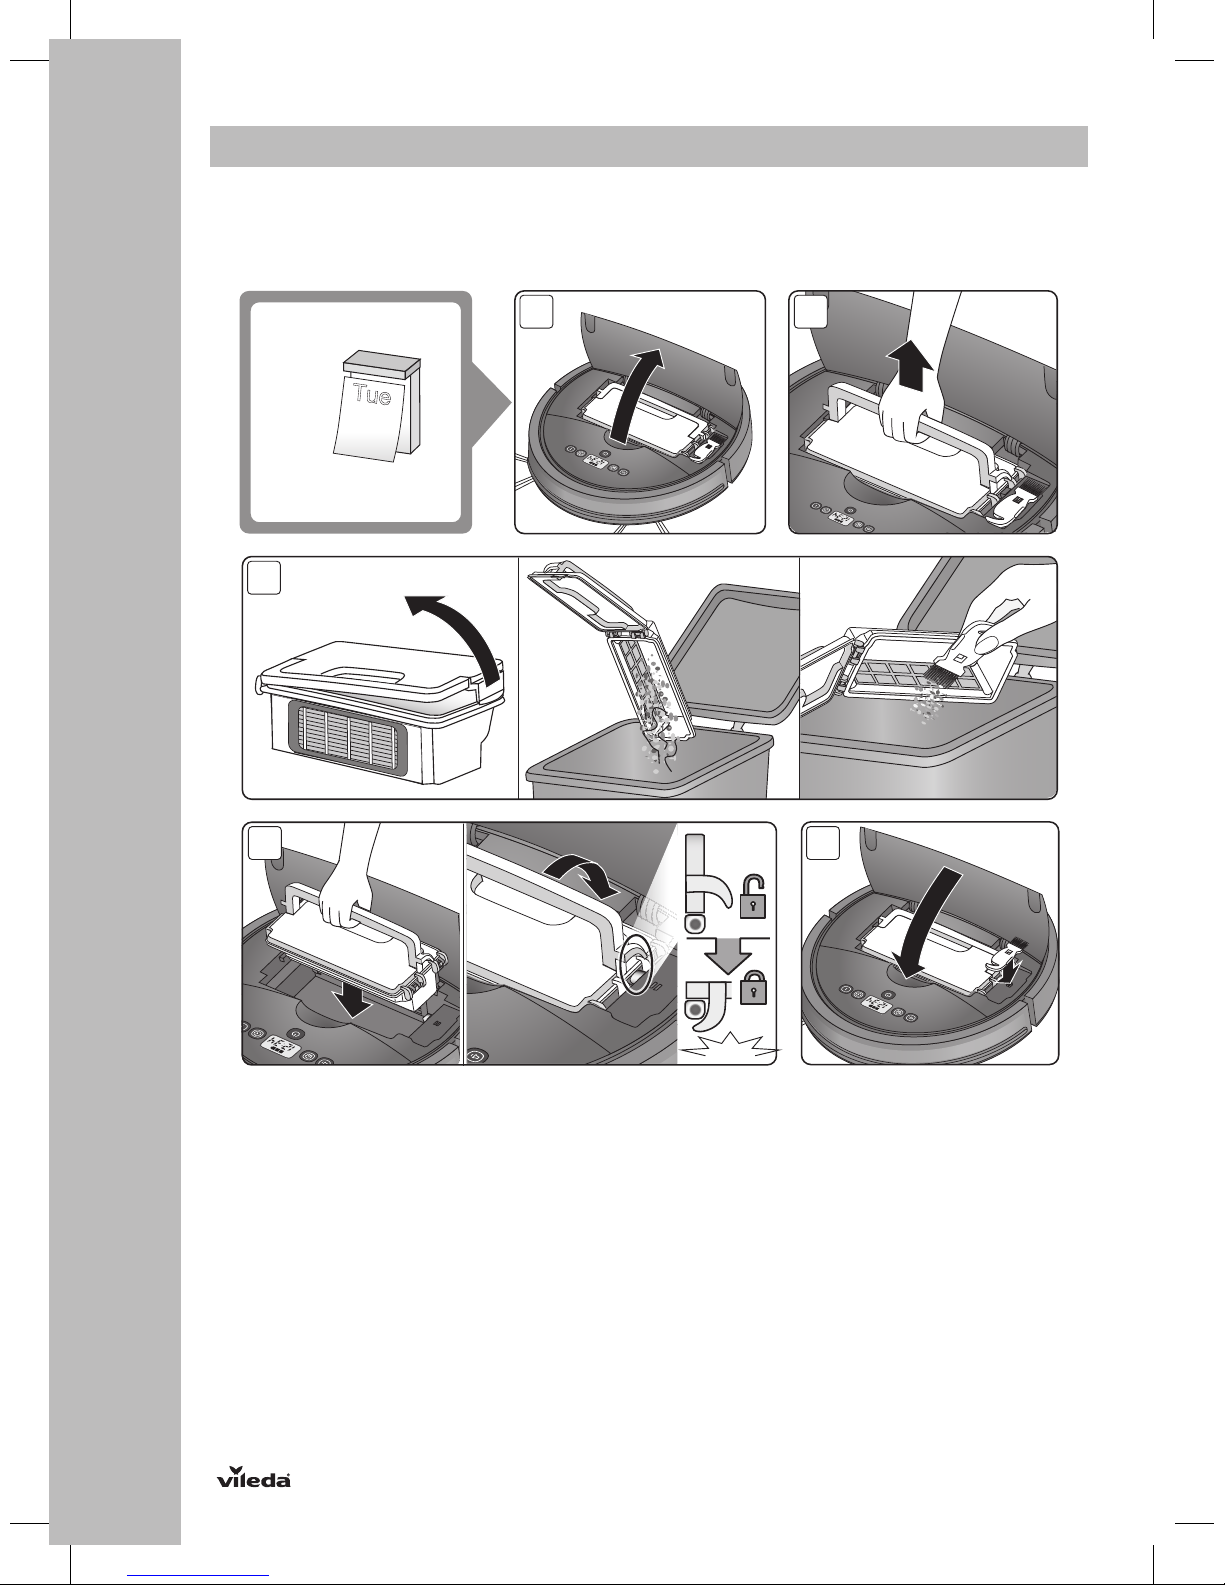
•Ensure the dust box is empty before use.
•WARNING: Black or dark coloured types of floors and stairs
could reduce the reliability of drop sensors. Test with your
specific floor and stairs before use.
PERSONAL SAFETY
•The intended use is described in this manual. The use of any
accessory or attachment or the performance of any operation
with this robot other than those recommended in this
instruction manual may present a risk of personal injury.
•This robot is only intended for use by adults over the age of
18. This robot may only be used by children aged from 8 years
and above and persons with reduced physical, sensory or
mental capabilities or lack of experience and knowledge if
they have been given proper supervision or proper instruction

11
G
concerning use of the robot in a safe way and understand the
hazards involved.
•Children shall not play with the appliance.
•This appliance contains batteries that are only replaceable by
skilled persons.
•Cleaning and user maintenance shall not be made by children
without supervision.
•Store in a dry place.
•Store out of reach of children.
•Use only with the attachments recommended by the
manufacturer.
•Do not use without the filter in place.
•Keep the product and all accessories away from fire, hot
surfaces and any flammables.
•Do not immerse the robot in water or other liquid.
•Do not use this product in areas above your body, as this may
increase the risk of personal injury.
ELECTRICAL SAFETY INSTRUCTIONS
•Never modify the charger in any way.
•The charger has been designed for a specific voltage. Always
check that the mains voltage is the same as that stated on the
rating plate.
•Before use, check the charger cord for signs of damage or
ageing.
•Do not abuse the charger cord; never carry the charger by
the cord.
•Do not over-bend the power cord or apply pressure to the
power cord with heavy or sharp objects.
•Never pull the charger cord to disconnect from a socket;
grasp the charger and pull to disconnect.
•Keep the charger cord away from hot surfaces and sharp
edges.
•Do not handle the charger, plug, adapter and wires or the
robot with wet hands.
•Do not store or charge the robot outdoors.

12
G
•Unplug the charger before cleaning or maintaining. Product
contains electronic parts. Do not submerge it or spray it with
water. Clean with a dry cloth only.
BATTERY USE AND CARE
•Only use the battery supplied with the product.
•WARNING: For the purposes of recharging the battery, only
use the detachable supply unit (GQ12-190060-AG / GQ12-
190060-AB / NLB060190W1E4S58 / NLB060190W1U4S58)
provided with this appliance.
•Do not attempt to use the charger with any other product nor
attempt to charge this product with another charger, as this
may damage the product and the battery, and will invalidate
your guarantee.
•Only use the battery supplied with the product or provided by
the manufacturer.
•Leaks from battery cells can occur under extreme conditions.
If the liquid gets on the skin, wash it immediately with soap
and water. If the liquid gets into the eyes, flush them
immediately with clean water for a minimum of 10 minutes
and seek urgent medical attention.
•This product contains Lithium-Ion batteries. Do not incinerate
batteries or expose to high temperatures, as they may explode.
•When the battery pack is not in use, keep away from other
metal objects such as: paper clips, coins, keys, nails, screws
or other small metal objects that can make a connection from
one terminal to another.
•Shorting the battery terminals may cause fire.
•The battery must be removed from the robot before it is
discarded.
•The battery is to be disposed of safely and in accordance with
Environmental and Product Recycling, as per page 17 of this
manual. The battery must not be disposed of with household
waste.
•The robot must be disconnected from the mains supply when
removing the battery.

13
G
•WARNING: If the battery is damaged in any way, do not attempt
to recharge it. Contact Vileda customer service address (see
last page).
•Charge the battery for 6 hours before first use. After the first
use, charging time is about 5-6 hours.
•If the robot is not to be used for 3 months or longer, charge it
directly by the power adapter for 6 hours.
•WARNING: Only use a battery supplied by Vileda.
SERVICE
•Before using the robot and after any impact, check for signs of
wear or damage.
•Do not use the robot if any part is damaged or defective.
•Repairs should only be carried out by an approved service
agent or a suitably qualified person.
•Never modify the robot in any way as this may increase the risk
of personal injury.
•Only use replacement parts or accessories provided or
recommended by Vileda.
2. GETTING TO KNOW VR 201 PETPRO
Please take page 3 in the manual for reference.
1. Display
1a. Silent button
1b. Home button to find
docking station and
decrease time for time
or schedule setting
1c. Time, error code and battery
status indication
1d. Plan button
1e. Auto-cleaning button
1f. Power button
2. Dust box cover
3. Dust box incl. fine dust filter
3a. Fine dust filter
3b. Filter frame
4. Maintenance brush
5. Soft bumper
6. Front bumper incl. obstacle
sensors
7. Side brushes
8. Charging socket
9. Main switch
10. Battery cover
11. Main brush unit
11a. Main brush cover with
removal clamps
11b. Main brush
12a/12b. Wheels
13. Front wheel
14. Charging contacts
15. Drop sensors
16. Docking station
17. Charging poles for
automated charging in
the docking station
18. LED indication of
docking station
19. Cable management system
20. Power supply socket

14
G
BUTTONS, DISPLAY AND CLEANING MODES
TO TURN ON THE ROBOT, ACTIVATE THE MAIN SWITCH: "ON" (9)
1a. SILENT BUTTON
In standby or auto-cleaning mode, press the SILENT button to enter the quiet cleaning mode for more comfort
while cleaning.
The robot will automatically choose the optimal cleaning pattern and reduce its noise level, by reducing
speed, brush bar rotation and suction power for a more quiet product performance.
In silent cleaning mode, press SILENT button to enter the standby mode.
In plan mode: increase number when scheduling cleaning and setting time
1b. HOME BUTTON
In standby or operating mode, press the HOME button to find docking station and charge.
In plan mode: decrease number when scheduling cleaning.
1c. TIME, ERROR CODE AND BATTERY STATUS INDICATION
The number and letter combinations display the current time, scheduled cleaning and error codes.
The battery indication displays the remaining capacity level and battery charging status.
1d. PLAN BUTTON
You can program the cleaning time of your robot according to your needs. The robot will then automatically
start to clean every day at the set time.
Step 1: In standby mode press the PLAN and HOME button to enter the clock setting mode
Step 2: In standby mode press the PLAN button to enter the time setting mode for daily cleaning
To clear the scheduled cleaning time, press the PLAN button for 5 seconds
1e. AUTO-CLEANING BUTTON
In standby or silent mode, press AUTO button to enter the auto cleaning mode.
The robot will automatically choose the optimal cleaning pattern, consisting of an iteration of auto, zig-zag
and spiral movement pattern.
In auto cleaning mode, press the AUTO button to enter standby mode.
1f. POWER BUTTON
Press the POWER button to switch the robot on and off. By pressing it when the robot is working, it enters
standby mode.
In standby mode, press POWER button to enter sleep mode.
Note: To switch off the sound of the robot press SILENT + PLAN button simultaneously
3. PRODUCT OPERATION
3.1 BATTERY CHARGING & RECHARGING
The battery indication (1c) is displayed in three blocks:
Three blocks illuminated: Battery is fully charged and full Auto and Silent program can be used.
Two blocks illuminated: Battery is half charged.
One block illuminated: Battery level is low. Recommended to start charging.
One block blinking: Battery needs to be charged. No cleaning mode possible.
TIPS TO EXTEND THE BATTERY LIFE:
• Before first use, charge the robot for 5-6 hours.
• Charge the robot as soon as battery power is low.
• If the robot is not to be used for a long time, fully charge the battery, turn the power switch off,
remove and store it in a cool, dry place.
• If the robot is not to be used for 3 months or longer, charge it directly by the power adapter for 5-6
hours.
!
3.2 TURNING ON AND OFF
STARTING UP
To turn your robot on, activate the mainswitch, next to the dust box (9). You will hear a sound and the LED
display and the buttons will be illuminated.
If the plan mode is activated, the plan button will get illuminated as well.
To start the AUTO or SILENT cleaning cycle press the “AUTO” or “SILENT” mode button.
To pause the robot press the activated button again.

15
G
Note: When starting the robot, place it in the middle of a room or surface, at least half a metre away from an edge
with a drop.
STANDBY
Standby means, the robots main power is turned on, and the robot is ready to use. The power button is
flashing. When the robot is cleaning, press the activated button on main body to pause the robot and enter
standby mode.
SLEEP MODE
In sleep mode the robots display will turn dark (but robot is not powered off). The power button is pulsating
slowly.
In order to save power, you can turn the robot into sleep mode from standby mode via either of the following
methods:
• Long press “POWER” button on main body
• Robot will automatically enter sleep mode if the power is low or after 5min in standby mode
POWER OFF
To turn the device off, deactivate the robot at its main switch (9).
Note: when storing the robot for a longer period of time, make sure the robot is switched off
3.3 TIME SCHEDULING
Please take page 8 in the manual for reference.
TIPS FOR EASY SCHEDULING
• The scheduling time uses the machine’s time as a reference. So, before scheduling, please set
the robots time clock to be the same as real time.
• Once scheduled the machine, it will start cleaning at that time automatically, when the main switch
is switched on. The programed time will remain saved, even when switching the device off.
• To clear the scheduled cleaning time, press the “PLAN” button for 5 seconds.
!
Note: The robot can only be set when it’s in standby or charging on docking station. If the robot is in sleep mode,
long press “POWER” button on main body. If the robot is in cleaning mode, pause it before scheduling.
4. MAINTENANCE
Please take page 4-7 in the manual for reference
Tips for keeping the performance stable:
To keep your Vileda robot at the best level of performance, it is recommended to maintain the robot regularly.
Robot Part Care Frequency Care Code Replacement
Frequency
Dust box After every use — —
Side brush and
main brush
Once per week (twice
per week in home
with pets) and when
maintenance code "1" is
displayed
Every 6-12 months for
the side brushes
High efficiency filter Once per month (twice
per month in home
with pets) and when
maintenance code «2» is
displayed
High efficiency filter:
Every 4 months
Front wheel and
driving wheels
Drop sensors
Charging contacts
Once per month and
when maintenance code
"2" is displayed
—

16
G
BATTERY REMOVAL AND REPLACEMENT
Only use a replacement battery as supplied by Vileda.
• Make sure the device is switched off at the main switch
• Remove the screws on the battery cover with a screw driver
• Remove the battery cover
• Lift the battery and remove it from the housing
• Unplug the wire connector that links the battery and robot
5. TROUBLESHOOTING
Problem Possible reason Possible solution
Robot is not running • Battery is too low
• Dust box is not inserted
(correctly)
• Recharge the battery for 6
hours
• Insert the dust box
Low or no suction • Dust box is full
• Filter is blocked with dirt
• Filter is missing
• Empty dust box
• Clean the filter with brush
• Put filter back in place
Abnormal movement • Wheels are dirty
• Drop sensors are dirty
• Clean wheels
• Clean drop sensors
Low battery after charging or no
charging possible
• Battery connection is not good
• Charger or battery is defective
• Contact the Vileda service
(address see last page)
Display shows the error code • Main brush and side brushes
are blocked
• Clean main brush and
side brushes as described in
the chapter “Maintenance”
Display shows the error code • Front wheel and driving wheels
are dirty/blocked
• Charging contacts are dusty
• Drop sensors are dusty
• Fine dust filter is blocked
• Clean the respective parts as
described in the chapter
“Maintenance”
Error code
“A / U / B / N”
• Dust box not (correctly) inserted • Remove and reassemble
dust box in the robot
Error code
“E / r / r / o”
• Battery connection is not good. • Contact the Vileda service
(address see last page)
Error code
“E / various / various / various”
• Device off the ground
• Sensors jammed or dirty
• Put robot on solid ground
• Check sensitivity of the front
bumper
• Clean bottom anti-drop
sensor lens
• Clean front bumper sensor lens
Error code
“L / various / various / various”
• Motors overload or jammed • Check if fan opening is free
and clean dust box
• Check if wheels or brush unit
is stuck or wired by obstacles
If above described solutions do not work, please try switching off and on and check again.
For further help, technical advice, or to order spare or replacement parts contact Vileda (address see
last page).

17
G
6. ENVIRONMENTAL AND PRODUCT RECYCLING
The Vileda vacuum cleaning robot VR 201 PetPro fulfils the EU directive 2012/19/EC, covering electrical and
electronic appliances and the management of its disposal.
The packaging material is entirely recyclable, and marked with the recycling symbol. Follow local regulations for
scrapping. Keep the packaging materials (plastic bags, polystyrene parts, etc.) out of children’s reach, as they are
potentially dangerous.
When the product has reached the end of its life please do not dispose of it with general household waste. To
prevent possible harm to the environment or human health from uncontrolled waste disposal, recycle it responsibly
to promote the sustainable reuse of material resources.
The symbol identifies the Vileda VR 201 PetPro as a product submitted to the regime of selective electrical ap-
pliance recycling collection.
The product contains a Li-Ion battery which should not be disposed of with general household waste. Deposit the
battery in an official collection point for its recycling.
Batteries can be detrimental for the environment and can explode if they are exposed to high temperatures. The
violation of these precautions could cause fire and / or serious injuries.
For more detailed information about treatment, recovery and recycling of this robot, please contact your local city
office, your household waste disposal service or the shop where you purchased the product.
For example, disposal of the robot and any part of it may need to be taken to a Designated Collection Facility.
7. PRODUCT SPECIFICATION
Model 0769-02
Mechanical Specifications Size 32 x 8 cm
Weight ~2.2 kg
Electrical Specifications Rated Voltage 10,8 V
Battery Li-Ion 10,8 V / 2600 mAh
Charging Time 5-6 h
Charger Specifications Rated Input Voltage 100-240 V AC
Rated Output Voltage 19 V DC
Rated Output Current 600 mA
8. VILEDA PRODUCT GUARANTEE
A. SCOPE
1. Freudenberg Household Products LP (“FHP”) guarantees the product to be free from defects in materials and
workmanship a for period of two years from the date of purchase.
2. If the product becomes faulty for any reason for which FHP is responsible within two years from the date
of purchase (“the Guarantee Period”), FHP or an authorised service network member in the Guarantee
Area (meaning anywhere within the United Kingdom, including the Channel Islands and the Isle of Man and
the Republic of Ireland) will repair or replace it subject to the terms and limitations below. FHP may replace
defective products or parts with new or refurbished products or parts. All products and parts replaced become
the property of FHP.
3. This guarantee does not cover:
a) periodic maintenance or repair or parts replacement due to wear and tear;
b) consumables (namely components that are expected to require necessary periodic replacement during
the lifetime of a product such as pads);
c) damage or defects caused by use, operation or treatment of the product inconsistent with normal
personal or domestic use;
d) damage or deterioration in the condition or performance of the product arising as a result of:
I. misuse, including:
- treatment resulting in physical, cosmetic or surface damage to or deterioration in product;
- failure to install or use the product for its normal purpose or in accordance with FHP’s instructions
on installation or use;

18
G
- failure to maintain the product in accordance with FHP’s instructions on maintenance;
- installation or use of the product in a manner inconsistent with the technical or safety laws or
standards in the country where it is installed or used;
II. use of the product with accessories, peripheral equipment and other products of a type, condition and
standard other than prescribed by FHP;
III. repair or attempted repair by persons who are not FHP or authorised service network members;
IV. accidents, fire, liquids, chemicals, other substances, flooding, vibrations, excessive heat, improper
ventilation, power surges, excess or incorrect supply or input voltage, radiation, electrostatic discharges
including lighting, other external forces and impacts; or
V. any event or circumstances beyond the reasonable control of FHP.
B. TERMS
1. Guarantee services will be provided only if the original invoice or sales receipt (indicating the date of purchase,
model name and dealer’s name) is presented with the defective product within the Guarantee Period. FHP
may refuse free-of-charge guarantee service if these documents are not presented or if they are incomplete
or illegible. This Guarantee will not apply if the model name or serial number on the product has been altered,
deleted, removed or made illegible.
2. Except where FHP has a legal duty to reimburse them, this Guarantee does not cover transport costs or any
risks associated with the transportation of the product to and from FHP.
3. If FHP or one of its authorised service network members carries out a diagnostic test on the product and that
test demonstrates that the product is working properly and no hardware fault is present, you will not be entitled
to a repair under this Guarantee. In that event, you will be liable to pay for any repairs to rectify the defect and
the cost of the diagnostic test.
C. EXCLUSIONS AND LIMITATIONS
1. Except as stated above, FHP makes no guarantee (express, implied, statutory or otherwise) regarding product
quality, performance, accuracy, reliability, fitness for a particular purpose, or otherwise.
2. FHP does not take responsibility for any damage caused by the incorrect use of the product. Save as set out
elsewhere in this Guarantee, the responsibility of FHP will not exceed the purchase price of the product. If you
have any doubts referring to the correct use of the product or in relation to this Guarantee, please call Vileda
Customer Service.
3. Nothing in this Guarantee is intended to restrict or limit FHP’s liability in any way in which it would be unlawful
to do so, including for death or personal injury caused by FHP’s negligence, or damage to private property
caused by the goods proving to be defective while in the consumer’s use as a result of FHP’s negligence or for
defective products under the Consumer Protection Act 1987.
D. YOUR LEGAL RIGHTS RESERVED
This Guarantee is in addition to, and does not affect, your legal rights in relation to goods that are faulty or not
as described. All products will be provided in accordance with the contract. Further advice relating to your legal
rights can be obtained from your local Citizens Advice Bureau or Trading Standards Office. You may assert any
rights you have at your sole discretion.
E. YOUR GUARANTOR
The Guarantee for this product is provided and will be honoured by Freudenberg Household Products LP,
2 Chichester Street, Rochdale, Lancashire, OL16 2AX. www.vileda.com/uk Tel: 0345 7697356.

19
D
1. ALLGEMEINE WARNHINWEISE
WICHTIG
Lesen Sie vor Gebrauch die Anleitung sorgfältig durch.
Bewahren Sie die Anleitung zum Nachschlagen auf.
WARNUNG
Verwenden Sie den Roboter ausschließlich wie in dieser
Anleitung beschrieben. Eine Nichtbefolgung der nachfolgend
aufgeführten Anweisungen kann zu Stromschlag, Feuer und/
oder ernsthaften Verletzungen führen.
Bei der Nutzung aller elektrischen Roboter müssen die
grundsätzlichen nachfolgenden Sicherheitsmaßnahmen stets
befolgt werden, um das Risiko eines Feuers, Stromschlags,
auslaufender Akkus oder von Körperverletzungen zu
reduzieren.
INHALT
1. ALLGEMEINE WARNHINWEISE 19
2. KENNENLERNEN DES SAUGROBOTERS 24
3. BEDIENUNG DES GERÄTS VR 201 PETPRO 25
4. WARTUNG 26
5. FEHLERBEHEBUNG 26
6. UMWELTSCHUTZ UND ENTSORGUNG 28
7. TECHNISCHE DATEN 28
8. VILEDA PRODUKTGARANTIE 29
Vielen Dank, dass Sie sich für unseren neuen Saugroboter Vileda VR 201 PetPro entschieden
haben. Ab sofort steht Ihnen mit dem Vileda VR 201 PetPro ein Partner in der täglichen Boden-
reinigung zur Verfügung. Er hilft Ihnen Staub, Schmutz und sogar Tierhaare von Ihren Böden
zu entfernen, sodass Sie dies nicht mehr selbst erledigen müssen.

20
D
NUTZUNGSEINSCHRÄNKUNGEN
•Vor dem Start des Roboters das Gerät immer in der Mitte
des Raumes oder der zu reinigenden Oberfläche platzieren,
mindestens 50 cm entfernt von jeglichen Sturzkanten.
•Ausschließlich in geschlossenen Räumen verwenden. Nicht
im Freien oder auf dem Balkon einsetzen.
•Das Gerät ist nur für den Hausgebrauch bestimmt.
•Der Roboter ist kein Spielzeug. Stellen oder setzen Sie sich
nicht auf den Roboter. Kleine Kinder oder Haustiere müssen,
während der Roboter reinigt, beaufsichtigt werden.
•Legen sie keine schweren oder scharfen Gegenstände auf
den Roboter
•Verhindern Sie, dass der Roboter entflammbare, brennende
oder rauchende Gegenstände aufsammelt.
•Verwenden Sie den Roboter nicht, um nasse Gegenstände
aufzusammeln.
•Den Roboter nicht auf langflorigen Teppichen oder nassen
Böden, wie bspw. im Bad oder Waschraum einsetzen.
•Verwenden Sie den Roboter bei einer Raumtemperatur
zwischen 15°C und 35°C. Verwenden Sie das Gerät nicht bei
hohen Umgebungstemperaturen und lassen Sie es nicht
über lange Zeit direktem Sonnenlicht ausgesetzt.
•Entfernen Sie vor dem Gebrauch alle Gegenstände wie
Kleidung,Papier,ZugschnürevonVorhängenoderGardinen,
Stromkabel und alle zerbrechlichen Gegenstände vom
Boden, da sie sich in den Reinigungsbürsten des Roboters
verfangen können.
•Stellen Sie sicher, dass der Schmutzbehälter vor der
Benutzung leer ist.
•WARNUNG: Schwarze oder dunkle Böden und Treppen
können das zuverlässige Funktionieren der Sensoren
beeinflussen. Prüfen Sie vor dem Gebrauch, ob der Roboter
für den Einsatz auf Ihrem Boden geeignet ist.
PERSÖNLICHE SICHERHEIT
•DerVerwendungszweckwirdindieserAnleitungbeschrieben.
Die Verwendung von anderem Zubehör oder Zusatzteilen
sowie der Einsatz des Geräts zu anderen als in dieser
Anleitung beschriebenen Zwecken kann zu
Other manuals for VR 201 PetPro
1
This manual suits for next models
1
Table of contents
Languages:
Other Vileda Vacuum Cleaner manuals

Vileda
Vileda Cleaning Robot M-488A User manual

Vileda
Vileda Relax Plus User manual

Vileda
Vileda Relax User manual

Vileda
Vileda VR 102 User manual

Vileda
Vileda VR 201 PetPro User manual

Vileda
Vileda JetClean User manual

Vileda
Vileda VR301 User manual

Vileda
Vileda JetClean User manual

Vileda
Vileda VR 101 User manual

Vileda
Vileda Relax User manual