Vileda VR 302 User manual

User & care guide • Manuale dell'Utilizzatore • Bedienungs- und Pflegeanleitung• Manual del usuario •
Manual do Utilizador Manuel de l'Utilisateur • Gebruikershandleiding • Kullanıcı Kılavuzu
Robot
VR 302

2
G
Quick Start Guide
Contents
Quick Start Guide 2
1. General Warnings 3
2. Getting to know VR 302 7
3. Product Operation 9
3.1 Battery charging & recharging 10
3.2 Turning on and off 11
3.3 Cleaning modes & movement patterns 11
3.4 Scheduling 12
4. Maintenance 13
4.1 Cleaning dust bin and filters 13
4.2 Cleaning main brush and side brushes 15
4.3 Cleaning Sensors and Wheels 16
4.4 Cleaning driving wheels and center wheel 16
4.5 Battery Removal 16
5. Troubleshooting 17
6. Environmental and product recycling 18
7. Technical product specification 18
8. Vileda product guarantee 19
Thank you for chosing our new Vileda VR 302 robotic vacuum cleaner. VR 302 will become
your reliable partner for daily cleaning, helping remove the dirt, dust and hair so you don’t
have to.

3
G
1. General Warnings
IMPORTANT:
Read all instructions before use. Retain instructions for future
reference.
WARNING:
Use the Robot only as described in this manual. Failure to follow
all instructions listed below may result in electric shock, fire
and/or serious injury.
When using any electrical Robot, basic safety precautions
should always be observed, including the following, in order to
reduce the risk of fire, electrical shock, leaking batteries or
personal injury.
USE RESTRICTIONS:
•When starting the robot, always place it in the middle of a
room or surface, at least half a meter away from any cliffs.
•Only for indoor use. Do not use outdoors or on balconies.
•Intended for domestic use only.
•Robot is not a toy. Do not sit or stand on it. Small children and
pets should be supervised when the robot is cleaning.
•Do not let the Robot pick up anything that is flammable, burning
or smoking.
•Do not use this Robot to pick up anything wet.
•Do not use on long-pile carpet or on wet floors, like bathroom
or laundry.
•Use this product in temperature from 10°C to 35°C. Do not use
this product in high-temperature environment or under baking
sunlight for a long time.
•Before using, pick up objects like clothing, loose papers, pull
cords for blinds or curtains, power cords, and any fragile
objects as they may entangle with the cleaning brushes.
•WARNING: Black or dark coloured types of floors and stairs
could reduce the reliability of cliff sensors. Test with your
specific floor and stairs before use.

4
G
PERSONAL SAFETY:
•The intended use is described in this manual. The use of any
accessory or attachment or the performance of any operation
with this Robot other than those recommended in this
instruction manual may present a risk of personal injury.
•Children must be supervised to ensure they do not play with
the Robot.
•This Robot may only be used by children aged from 8 years
and above and persons with reduced physical, sensory or
mental capabilities or lack of experience and knowledge if
they have been given proper supervision or proper instruction
concerning use of the Robot in a safe way and understand
the hazards involved.
•Children shall not play with the appliance. The Robot should
only be used as intended.
•Cleaning and user maintenance shall not be made by children
without supervision.
•Store in a dry place.
•Store out of reach of children.
•Use only with the attachments recommended by the
manufacturer.
•Do not use without the filter in place.
•Keep the product and all accessories away from fire, hot
surfaces and any flammables.
•Do not immerse the Robot in water or other liquid.
ELECTRICAL SAFETY INSTRUCTIONS:
•Never modify the charger in any way.
•The charger has been designed for a specific voltage. Always
check that the main voltage is the same as that stated on the
rating plate.
•Only use the charger supplied with the product. Do not
attempt to use the charger with any other product nor attempt
to charge this product with another charger.
•Before use, check the charger cord for signs of damage or
ageing.

5
G
•Do not abuse the charger cord; never carry the charger by
the cord.
•Do not over-bend the power cord or pressure the power cord
with heavy or sharp objects.
•Never pull the charger cord to disconnect from a socket;
grasp the charger and pull to disconnect.
•Keep the charger cord away from hot surfaces and sharp
edges.
•Do not handle the charger or the Robot with wet hands.
•Do not store or charge the Robot outdoors.
•Unplug the charger before cleaning or maintaining.
Product contains electronic parts. DO NOT submerge it or
spray it with water. Clean with a dry cloth only.
BATTERY USE AND CARE:
•WARNING: For the purposes of recharging the battery, only
use the detachable supply unit (model no. GQ15-240060-AG
/ GQ15-240060-AB / GQ12-240060-AG / GQ12-240060-AB /
NLB060240W1U3 / NLB060240W1E3) provided with this
appliance.
•Only use the battery supplied with the product or provided by
the manufacturer.
•Leaks from battery cells can occur under extreme conditions.
If the liquid gets on the skin, wash it immediately with soap
and water. If the liquid gets into the eyes, flush them
immediately with clean water for a minimum of 10 minutes
and seek medical attention.
•This product contains Lithium-Ion batteries. Do not incinerate
batteries or expose to high temperatures, as they may
explode.
•When the battery pack is not in use, keep away from other
metal objects such as: paper clips, coins, keys, nails, screws
or other small metal objects that can make a connection from
one terminal to another.
•Shorting the battery terminals may cause fire.
•The battery must be removed from the Robot before it is
discarded.

6
G
•The battery is to be disposed of safely and in accordance with
Environmental and Product Recycling, as per page 18 of this
Manual. The battery must not be disposed of with household
waste.
•The Robot must be disconnected from the main supply when
removing the battery.
•WARNING: If the battery is damaged in any way, do not
attempt to recharge it. Contact Vileda customer service
address (see last page).
•Charge the battery for 5 hours before first use. After the first
use, charging time is about 4-5 hours.
•If the robot is not to be used more than 3 months, charge it
directly by power adapter for 5hrs.
•WARNING: Turn the robot’s main power switch to OFF when
transporting or when in storage, otherwise the battery may
become damaged.
•Only use the charger provided with the product. Do not
attempt to use the charger with any other product nor attempt
to charge this product with another charger as this may
damage the product and the battery, and will invalidate your
guarantee.
•WARNING: Only use a replacement battery as supplied by
Vileda.
SERVICE:
•Before using the Robot and after any impact, check for
signs of wear or damage.
•Do not use the Robot if any part is damaged or defective.
•Repairs should only be carried out by an approved service
agent or a suitably qualified person.
•Never modify the Robot in any way as this may increase the
risk of personal injury.
•Only use replacement parts or accessories provided or
recommended by Vileda.

7
G
2. Getting to know VR 302
2.1 CONTENT
Package Contents:
1. Robot Main Body
2. Docking Station
3. Charger Cable + Adaptor
4. Remote Control incl. 2 Batteries
5. 2 Sidebrushes (left + right, marked by “L” and “R” on the sidebrushes)
6. User Manual
2.2 PRODUCT FEATURES AND FUNCTIONS
TOP VIEW
1. Soft bumper
2. LED display
3. Push button for opening the dust bin cover
4. Bumper strip with sensors
5. Main power switch
6. Dust bin

8
G
LED DISPLAY 1. LED panel, it shows the time, time setting and
common error codes by using numbers,
letters or graphs. The overview for the
different commands can be found on page 12.
2. Battery Indiciation
3. MAX mode button / Increase number when
scheduling cleaning or setting the time.
4. Home button to find docking station and
charge / Decrease number when scheduling
cleaning
5. Scheduling function button
6. Eco cleaning / ON-OFF / Sleep Mode (hold
for 3 seconds)
BOTTOM VIEW
1. Main brush kit
2. Left wheel
3. Left side brush (marked with printed “L” on
sidebrush)
4. Battery Cover
5. Front wheel
6. Charging poles for automated charging in the
dockingstation
7. Right side brush (marked with printed "R" on
sidebrush)
8. Charging port
9. Right wheel
DUST BIN
1. Primary mesh filter
2. Handle
3. Dust Bin
4. Secondary high efficiency fine dust filter
5. High efficiency filter frame
6. Maintenance brush
MAIN BRUSH KIT
1. Main brush cover plate
2. Main brush
3. Main brush holder
4. Main brush retainer

9
G
DOCKING STATION
1. Power indicator
2. Charging socket
3. Charging poles
REMOTE CONTROL
1. Power button / ON-OFF
2. Arrow keys for navigation of the robot
3. MAX mode button
4. Spot mode button
5. Cleaning mode button
6. Home / Auto charging button
•
3. Product Operation
TIPS BEFORE THE FIRST USE
Before you use the robot for the first time, make sure your home is ready and safe to use it:
Remove power cords and small objects
from the floor.
The device is not suitable for long piled
carpets.
HOW TO SET UP YOUR REMOTE CONTROL
• Install two AAA type batteries into the remote controller before use.
• Remove the batteries if the remote controller will be left unused for a long period.
• If you use the remote controller near the charging station, the robot may not recognize the command and
may not work
!

10
G
3.1 Battery charging & recharging
CHARGING BATTERY:
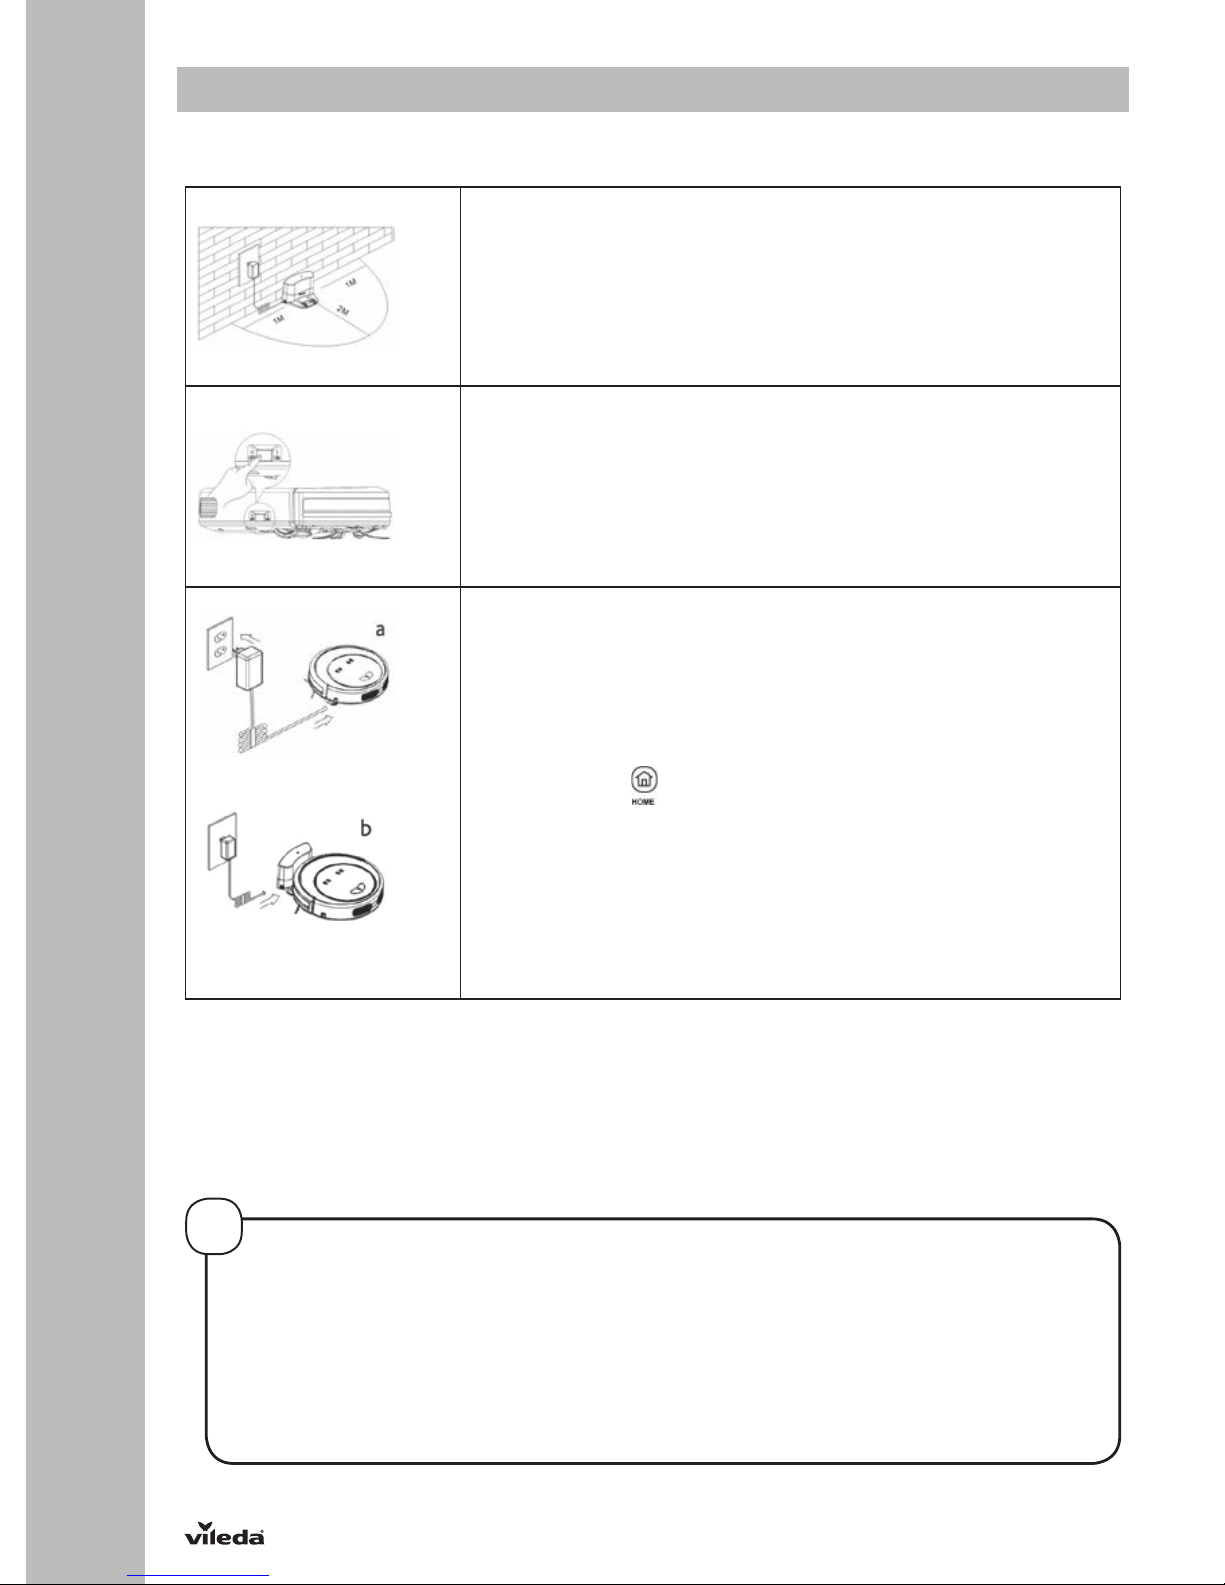
1. Placement of docking station
Place the docking station against the wall and remove
obstacles about 1 meter at two sides and about 2 meters
in front of the docking station.
2. If the robot is powered off, switch on the robot by pressing
the power switch at the right side of the robot.
3. Charge the robot in either way as shown on the left.
a. Plug the adapter into the robot and the other end to
power socket as shown in Fig.a.
b. Press the button on either the robot or the remote
control to operate the robot to go to the charging home
base for recharging as shown in Fig.b.
4. During charging the battery indication will build up the three
bars of the battery in a row. When fully charged all three
battery blocks will be illuminated permanently.
BATTERY INDICATION:
The battery indication is build in three blocks:
1. Three blocks illuminated: Battery is fully charged and full Eco program (90 min) or MAX mode (60 min) can be used.
2. Two blocks illuminated: Battery is half charged for up to 45min runtime in eco mode.
3. One block illuminated: Battery level is low. Recommended to start charging.
4. One block blinking: Battery needs to be charged. No cleaning mode possible.
TIPS TO EXTEND THE BATTERY LIFE:
• Before first use, charge the robot for 5hrs.
• Charge the robot as soon as battery power is low.
• The robot will return to the docking station automatically when cleaning is finished or battery power is
low. Therefore the docking station has to be plugged into the socket.
• If the robot is not to be used for a long time, fully charge the battery, turn the power switch off, remove
and store it in a cool, dry place.
• If the robot is not used more than 3 months, charge it directly by power adapter for 5hrs.
!

11
G
3.2 Turning on and off
1. STARTING UP
To turn your VR 302 on, switch the ON/OFF button on the right side of the device. You will hear a welcome melo-
dy and the LED display will be illuminated. To start the standard or intensive cleaning cycle press the “POWER” or
“MAX” button on either the LED display or the remote control.
To pause the robot press the “POWER” button again.
NOTE: when starting the robot, always place it in the middle of a room or surface, at least half a meter away from
any cliffs.
2. STANDBY
Standby means, the robot’s main power is turned on, and the robot is ready to use. Through one of the following
methods, you can change into standby mode:
• When robot is cleaning, press “POWER” button on main body to pause robot and enter standby mode.
• When cleaning, press the ON/OFF on remote controller to pause the robot to enter standby.
3. SLEEP MODE
In sleep mode, the robot’s display will turn dark (but robot is not powered off).
In order to save power, you can turn the robot into sleep mode from standby mode via either of the following methods:
a. Long press “POWER” button on main body for 3 seconds, robot will enter into sleep mode.
b. Robot will automatically enter sleeping if power is low when in standby mode.
4. POWER OFF
To turn the device off, switch the ON/OFF button on the right side of the robot.
3.3 Cleaning modes & movement patterns
THE ROBOT IS EQUIPPED WITH FOUR DIFFERENT CLEANING MODES
1. Eco Cleaning Mode The robot cleans the room automatically and adjust its
cleaning pattern according to the room’s architecture. The Eco
mode balances energy consumption and the cleaning
performance.
2. MAX Cleaning Mode The robot will increase it’s suction power and slow down in
speed to reach the peak performance and clean dirtier areas
thoroughly.
NOTE: On carpet it is recommended to always use MAX mode
to achieve best results.
3. Spot Cleaning Mode In this mode, the robot will clean intensively in a spiral way with
more suction power. This mode is created for picking up dirt
on a limited area of around 1,20 m x 1,20m. The mode lasts 90
seconds.
When activated in standby the robot will start and stop at the
same position. When activated while the robot is already
cleaning the robot will continue cleaning after the Spot
cleaning mode has finished.
4. Scheduling mode After scheduled, the robot will leave the dockingstation and
start working daily in the Eco mode at the scheduled time.

12
G
THE ROBOT IS EQUIPPED WITH THREE DIFFERENT MOVEMENT PATTERNS:
Automatic 1. In this mode, the robot will clean the area automatically
and adjust its cleaning behavior based on specific
situations.
Spiral cleaning mode 2. In this mode, robot takes the starting point as the center,
then turns outward in a spiral action, suitable for an open
area.
Zig-zag mode 3. The robot will automatically go into Zig-Zag cleaning when it
detects an open area or an environment with less
obstacles.
3.4 Scheduling
Schedule the robot to start cleaning automatically at a certain time every day.
NOTE: The robot can only be set when it’s in standby or charging on docking station. If the robot is in sleep mode,
long press “POWER” button on main body or ON/OFF on remote controller to wake it up. If the robot is in cleaning
mode, pause it before scheduling.
SCHEDULING ON THE ROBOT DISPLAY
1. Time Clock Setting
• Press “PLAN” button shortly to enter time setting mode. The LED panel will show the current time. The left
two numbers on LED panel will flash, press “MAX” or “HOME” to increase or decrease hours.
• Press “POWER” button to enter the minute-setting, the right two numbers on LED panel will flash, press
“MAX” or “HOME” to increase or decrease minutes.
• Press “POWER” button to confirm and save the setting.
• Press “PLAN” button to quit the time setting mode.
2. Setting scheduling time (keep the robot in standby or charging on station)
• Press “PLAN” button long to enter scheduling setting, the left two numbers on LED panel will flash, press
“MAX” or “HOME” to increase or decrease hours.
TIP FOR ADAPTING THE CLEANING PATTERN
Press "mode" button on the remote control to select the cleaning pattern.
The chosen mode will be displayed on the LED display of the robot:
Mode no. 1111 shows on robot led display: intensive spiral cleaning mode;
Mode no. 2222 shows on robot led display: automatic cleaning mode;
Mode no. 3333 shows on robot led display: fast spiral cleaning mode;
Mode no. 4444 shows on robot led display: zig-zag cleaning mode.
!

13
G
• Press “POWER” button to enter the minute-setting, the right two numbers on LED panel will flash, press
“MAX” or “HOME” to increase or decrease minutes.
• Press “POWER” button to confirm and save the setting.
• At last, press “PLAN” button to quit the time setting mode.
Note: If machine is in real time setting, pls press “POWER” button to quit the real time setting, then long press
“PLAN” button to enter scheduling setting.
3. Cancel scheduling
• Set the scheduling time to 00:00 in scheduling setting.
4. Maintenance
TIPS FOR BEST PERFORMANCE
To keep your Vileda robot at the best level of performance, it is recommended to maintain the robot regularly.
Robot Part Care Frequency Replacement Frequency
Dust Bin After every uses -
High efficiency filter and Mesh
Filter
Once per week (twice per week in
home with pets)
High efficiency filter: Every 3
months / Mesh Filter: Every 6
months
Side Brush and Main brush Once per week (twice per week in
home with pets)
Every 6-12 months
Front Wheel and Driving Wheels
Cliff Sensors
Charging Contacts
Once per month -
4.1 Cleaning dust bin and filters
Empty and clean dust bin after each use following the steps as shown in the below figures.
Press PUSH to open the cover.
Take out the dust bin
TIPS FOR EASY SCHEDULING
• The scheduling time uses the machine's time as a reference so before scheduling, please set the robot's
time clock to be the same as real time.
• Once scheduled the machine will start cleaning at the time automatically when the main switch is
switched on. The programed time will remain saved even when switching the device off.
!

14
G
Take out the high efficiency fine dust filter
Open dust bin cover, take out the primary
mesh filter
Empty the dust bin
Wash the dust bin and primary mesh filter or
clean it with the maintenance brush. The
high efficiency filter can softly be beaten to
release fine dust gathered. Do not wash the
filter.
Install the primary mesh filter, maintenance
brush and high efficiency filter back into the
dust bin, when fully dried.
TIPS FOR THE FILTER USAGE:
• Wash primary mesh filter after 15~30 days of use. Maximum life span for filters is 12-24 months
• Re-install the dustbin and primary filter after they’re fully dry
• Do not dry the filters under intense sunlight directly
• Don’t wash the high efficiency filter under water
• Spare parts can be bought separately. Further information can be found at the Vileda service or on the
Vileda website
!

15
G
4.2 Cleaning main brush and sidebrushes
CLEANING OF SIDEBRUSHES
Check the sidebrushes after every use and remove dust and dirt stuck to the sidebrushes. Maximum life span for
sidebrush is 6 -12 months.
NOTE: Before replacing sidebrushes, please pay attention to the left mark and the right mark on sidebrushes,
which match with the ‘L’/ ‘R’ mark on the bottom base of robot.
CLEANING OF MAIN BRUSH
Release the clamp on the right side
of the main brush kit and take it out
of the robot
Open the main brush cover
1. Let the lid of the main brush face
yourselves.
2. Both hands thumb holding the lid
of the main brush, push the red
part up.
3. Remove the cover of main brush.
Remove the main brush
1. Lever the red main brush retainer.
2. Remove the main brush from the
holder.
3. Clean the brush and the brush
holder, by either using the
maintenance brush or running
water.
NOTE: If hair is knotted on the main
brush, you can use small scissors to
cut and remove easily.
4. Re-install the main brush in the
original order of disassembly
after it is fully dry.
5. Check if sidebrush can rotate
free. Take care that the
sidebrushes are not trapped by
the main brush kit.

16
G
4.3 Cleaning Sensors and Wheels
Once per month slightly wipe all the
sensors as well as the charging
poles from the dockingstation with a
soft cleaning cloth or tool.
NOTE: Keep the robot and sensors
dry and avoid to be affected with
damp.
4.4 Cleaning driving wheels and center wheel
Monthly remove hair and dust from
the left, right and center wheel with
the maintenance brush or a soft
cleaning tool.
4.5 Battery Removal
In case you want to replace the battery of VR 302, please make sure you use only a battery provided by the
manufacturer.
1. Make sure the device is switched off at the main switch.
2. Remove the screws on battery cover with a screw driver.
3. Remove the battery cover.
4. Lift the battery and remove it from the housing.
5. Unplug the wire connector that links the battery and robot.

17
G
5. Troubleshooting
Problem Possible reason Possible solution
Robot is not running • Battery is too low.
• Dust bin is not inserted
(correctly).
• Recharge the battery for 5
hours.
• Insert the dust bin.
Low or no suction • Dust bin is full.
• Filter is blocked with dirt.
• Suction port is blocked.
• Filter is missing.
• Empty dust bin.
• Clean the filter with brush.
• Clear the port with brush.
• Put filter back in place.
Abnormal movement • Wheels are dirty.
• Cliff sensors are dirty.
• Clean wheels.
• Clean cliff sensors.
Error sound is occuring • In combination with shown
on the display: low power.
• Robot is stuck.
• Wheels are blocked.
• Recharge the battery for 5
hours.
• Put the robot in a safe place or
clean its bottom sensors.
• Clean the wheels, including
the front wheel.
Low battery after charging or no
charging possible
• Main on/off switch at the robot
is off.
• Charger or battery is defective.
• Turn on main switch / “on/off”
to enable charging.
• Contact the Vileda service
(address see last page).
Display shows the error code
“A / U / B / F”
• Suction passage blocked. • Clean suction passage with
the main brush.
Display shows the error code
“A / U / B / N"
• Dust bin not placed in position
or robot without dust bin.
• Put back dust bin and place it
in position.
Display shows the error code
“E / R / R / O"
• Main switch is switched off, no
charging possible.
• Switch the main switch on and
continue charging the robot.
Display shows the error code
“E / various / various / various"
• Device off the ground or sensors
jammed or dirty.
• Put robot on solid ground.
• Check sensitivity of the front
bumper.
• Clean bottom anti-drop
sensor lens.
• Clean front bumper sensor
lens.
Display shows the error code
“L / various / various / various"
• Motors overloaded or jammed.• Check if fan opening is free
and clean dust bin.
• Check if wheels or brush unit
is stuck or wired by obstacles.
If above described solutions do not work, please try switching off VR 302, switch it on and check again.
For further help, technical advice, or to order spare or replacement parts contact Vileda (address see
last page).

18
G
6. Environmental and product recycling
The Vileda vacuum cleaning robot VR 302 fulfils the EU directive 2012/19/EC, covering electrical and electronic
appliances and the management of its disposal.
The packaging material is entirely recyclable, and marked with the recycling symbol. Follow local regulations for
scrapping. Keep the packaging materials (plastic bags, polystyrene parts, etc.) out of children’s reach, as they are
potentially dangerous.
When the product has reached the end of its life please do not dispose of it with general household waste. To
prevent possible harm to the environment or human health from uncontrolled waste disposal, recycle it responsibly
to promote the sustainable reuse of material resources.
The symbol identifies the Vileda VR302 as a product submitted to the regime of selective electrical appliance
recycling collection.
The product contains a Li-Ion battery which should not be disposed of with general household waste. Deposit the
battery in an official collection point for its recycling.
Batteries can be detrimental for the environment and can explode if they are exposed to high temperatures. The
violation of these precautions could cause fire and / or serious injuries.
For more detailed information about treatment, recovery and recycling of this Robot, please contact your local
city office, your household waste disposal service or the shop where you purchased the product.
For example, disposal of the Robot and any part of it may need to be taken to a Designated Collection Facility.
7. Technical product specification
Model 0769-01
Mechanical Specifications Size 34 x 9 cm
Weight 3,5 KG
Electrical Specifications Rated Voltage 14,6 V DC
Rated Power 22 W
Battery Li-ion 2.150 mAh
Charging Time 240-300 min
Charger Specifications Rated Input Voltage (V AC) 100-240
Rated Output Voltage (V DC) 24
Rated Output Current (A) 0.6
8. Vileda product guarantee
A. SCOPE
1. By this Guarantee, Vileda guarantees the product to be free from defects in materials and workmanship at the
date of original purchase for a period of two years from that date. The Vileda company that provides and will
honour this Guarantee is designated in this Guarantee or accompanying leaflets or can be found on our website
www.vileda.com.
2. If within the guarantee period the product is determined to be defective (at the date of original purchase) due
to improper materials or workmanship, Vileda or an authorized service network member in the Guarantee Area
will, without charge for labour or parts, repair or (at Vileda’s discretion) replace the product or its defective
parts subject to the terms and limitations below. Vileda may replace defective products or parts with new or
refurbished products or parts. All products and parts replaced become the property of Vileda.
3. This guarantee does not cover:
a) periodic maintenance and repair or parts replacement due to wear and tear.
b) consumables (components that are expected to require periodic replacement during the lifetime of a
product such as pads).
c) damage or defects caused by use, operation or treatment of the product inconsistent with normal
personal or domestic use.
d) damage or changes to the product as a result of:
I. misuse, including:
- treatment resulting in physical, cosmetic or surface damage or changes to the product;

19
G
- failure to install or use the product for its normal purpose or in accordance with Vileda instructions
on installation or use;
- failure to maintain the product in accordance with Vileda instructions on proper maintenance;
- installation or use of the product in a manner inconsistent with the technical or safety laws or
standards in the country where it is installed or used;
II. use of the product with accessories, peripheral equipment and other products of a type, condition and
standard other than prescribed by Vileda;
III. repair or attempted repair by persons who are not Vileda or authorized service network members;
IV. Accidents, fire, liquids, chemicals, other substances, flooding, vibrations, excessive heat, improper
ventilation, power surges, excess or incorrect supply or input voltage, radiation, electrostatic discharges
including lighting, other external forces and impacts.
B. TERMS
1. Guarantee services will be provided only if the original invoice or sales receipt (indicating the date of purchase,
model name and dealer’s name) is presented with the defective product within the guarantee period. Vileda
may refuse free-of-charge guarantee service if these documents are not presented or if they are incomplete
or illegible. This Guarantee will not apply if the model name or serial number on the product has been altered,
deleted, removed or made illegible.
2. This Guarantee does not cover transport costs and risks associated with transport of your product to and from
Vileda or the service agent.
3. We would like to inform you that the diagnosis fee of your product shall be paid by you if the diagnosis of your
product proves that you will not be entitled to a repair under this guarantee (for whatever reason) to rectify the
defect or your product is working properly and no hardware fault could be designed.
C. EXCLUSIONS AND LIMITATIONS
1. Except as stated above, Vileda makes no guarantee (express, implied, statutory or otherwise) regarding
product quality, performance, accuracy, reliability, fitness for a particular purpose, or otherwise.
2. Vileda does not take responsibility for secondary or indirect damages caused by the incorrect use of the
product. Save as set out elsewhere in this clause the responsibility of Vileda will not exceed the purchase price
of the product. If you have any doubts referring to the correct use of the product or referring to the guarantee,
call Vileda Customer Service.
3. Nothing in this guarantee is intended to restrict Vileda’s liability for death, personal injury or damage to private
property caused by the goods proving defective while in the consumer’s use as a result of Vileda’s negligence.
D. YOUR LEGAL RIGHTS RESERVED
As a consumer, you have legal rights in relation to goods that are faulty or not as described. Advice about your legal
rights is available from your local Citizens Advice Bureau or Trading Standards Office. Nothing in this guarantee
will affect these rights.
E. YOUR GUARANTOR
The guarantee for this product is provided and will be honoured by Freudenberg Household Products, Vileda
House, 2 Chichester Street, Rochdale, Lancashire, OL16 2AX.www.vileda.com/uk Tel: 0345 7697356.

06447-20-26-414 pt1/V1
DFHP Export GmbH
69448 Weinheim
Other manuals for VR 302
1
Table of contents
Other Vileda Vacuum Cleaner manuals

Vileda
Vileda Cleaning Robot M-488A User manual

Vileda
Vileda VR 201 PetPro User manual

Vileda
Vileda VR 201 PetPro User manual

Vileda
Vileda VR 101 User manual

Vileda
Vileda JetClean User manual

Vileda
Vileda VR301 User manual

Vileda
Vileda VR 102 User manual

Vileda
Vileda Cleaning Robot M-488A User manual

Vileda
Vileda JetClean User manual

Vileda
Vileda Virobi User manual