vinmetrica SC-300 User manual

SC-300 Pro Kit Manual 1 Version 2.2
Vinmetrica SC-300 Pro Kit™
User Manual
Vinmetrica SC-300*Pro Kit is a simple and robust device that provides high accuracy in determination
of sulfite (SO2), pH and titratable acidity (TA) levels in wines, ciders, and other liquids. These are
essential parameters to control in the effort to make high quality wines. The Pro kit includes lab
accessories for the SC-300 Analyzer.
Table of Contents:
Materials Provided in the Kit...............................................................................................................
Things you will need............................................................................................................................
Why Test for SO2, pH and TA?............................................................................................................
Theory of Operation.............................................................................................................................
Setup....................................................................................................................................................
Setting up the SC-300 for the first time...................................................................................
Assembling the Pro Kit Equipment.........................................................................................
Burette Maintenance................................................................................................................
Burette Reading .......................................................................................................................
Instrument Operation.......................................................................................................................
Procedures...........................................................................................................................................
Measuring Free Sulfite (SO2) by Titration..............................................................................
Measuring Total Sulfite (SO2) by Titration..............................................................................
Calibration of pH .....................................................................................................................
Measuring pH...........................................................................................................................
Measuring Titratable Acidity (TA) by Titration.......................................................................
Finishing up.............................................................................................................................
Warranties, Liabilities & Hazards....................................................................................................
Appendix A - Test Mode.....................................................................................................................
Appendix B - Sulfite & TA Adjustments...........................................................................................
Appendix C1 - Troubleshooting: pH and TA Issues.......................................................................
Appendix C2 - Troubleshooting: SO2Issues...................................................................................
*US Patent pending
2
2
3
4
5
5
6
8
9
10
12
12
15
15
16
16
18
19
20
22
23
25
26

SC-300 Pro Kit Manual 2 Version 2.2
Materials provided in the kit:
1. Vinmetrica SC-300 SO2/pH instrument
(Part number SC-300-1)
2. SO2Electrode (Part number SC-100-3)
3. pH Electrode (Part number SC-200-7)
4. Two 5 mL syringes
5. Two 3 mL polyethylene transfer pipettes
6. One 25 mL serological sampling pipette
7. One 5mL serological sampling pipette
8. 100 mL polypropylene titration beaker
9. SO2Reagent set (Part number SC-100-2):
SO2Titrant solution (0.0156N) Acid reagent Reactant solution
10. pH/TA reagent set (Part number SC-200-8):
pH 4.01 Reference solution pH 7.00 Reference solution TA Titrant (0.133N NaOH)
11. Lab Support stand (Part number SC-300-3)
12. Electrode Holder (Part number SC-300-8)
13. Double Burette Clamp (Part number SC-300-6)
14. 10 mL or 25 mL Glass burette with Teflon Stopcock (with ~2 grams of Burette detergent)
(Part number SC-300-7)
15. Magnetic Stirrer (includes two AA batteries, stir bar and 25 mL cylindrical container)
(Part number SC-300-4)
16. Rinse Bottle (Part Number SC-100-17)
Things you will need:
1. Two standard AA batteries (alkaline type).
2. Distilled water, which usually can be found at your local grocery store (aka purified water by
deionization).
3. (Optional) 1N Sodium Hydroxide solution (if you want to do total SO2). Available from
Vinmetrica (Part number SC-100-7)
Figure 1. The SC-300 instrument

SC-300 Pro Kit Manual 3 Version 2.2
Why Test for SO2, pH and TA?
Testing for sulfite (SO2) is crucially important for making sure your wine does not spoil by
oxidation or from microbial growth. By monitoring your SO2levels, you can make adjustments when
needed, especially before starting primary fermentation, after malolactic fermentation has completed,
after racking or when ready to bottle. To correctly adjust sulfite, you need values for your current free
SO2level and your wine's pH, both of which can be measured with the Vinmetrica SC-300 analyzer.
The key parameter in protecting your wine is molecular SO2which for most wines should be at
0.8 ppm (mg/L) following secondary fermentation. This in turn depends on the free SO2(it can also be
referred to as unbound SO2) and the pH. Overall, you can reach your target molecular SO2by
measuring and adjusting your free SO2levels and considering your wine's particular pH. See Table 1.
Table 1. Free SO2concentrations necessary to attain 0.8 mg/L molecular SO2 at a designated pH.
Free SO2(ppm)
13
16
21
26
32
40
50
63
79
99
125
pH
3.0
3.1
3.2
3.3
3.4
3.5
3.6
3.7
3.8
3.9
4.0
We recommend using a sulfite calculator for determining how much sulfite to add to your wines
after taking a sulfite measurement with the SC-300 Pro Kit. Winemaker Magazine's Sulfite Calculator
at http://winemakermag.com/guide/sulfite can walk you through the process. See Appendix B for more
information on how to adjust your wine for sulfite.
Monitoring your wine's pH is also important for the first few months of the wine making
process. Proper pH and Titratable Acidity (TA) levels influence mouth feel and provide wine stability.
During malolactic fermentation, the pH can increase somewhat and should be monitored. Typically,
wine pH and TA are inversely related; when pH goes up, TA goes down and vice versa. Adjustments
may be made to your wine to prevent wine instability. See Appendix B for more information on
adjustments.

SC-300 Pro Kit Manual 4 Version 2.2
Theory of Operation:
1. Sulfite (SO2): The SC-300, with the SO2 electrode and reagents provided, can be used to
determine sulfite (or SO2) levels in wine, musts, and other samples. It relies on the Ripper
titration based on the quantitative reaction of the SO2with iodine (generated during the titration)
which oxidizes the SO2in the sample under acid conditions.
IO3
-+ 5I-+ 6H+3I2+ 3H2O generation of iodine (I2) from iodate (IO3-)
SO2+ I2+ H2O 2I-+ SO3 + 2H+reaction of SO2and iodine
When all the SO2is titrated at the endpoint, excess iodine appears in solution. This is detected
as current with the SO2electrode and signaled by audible and visual indicators. The endpoint is
much more sensitive than the starch color change commonly employed for Ripper titration, and
it is sharp and clear, even when titrating red wines and musts. From the known concentration
of the titrant and its volume required to reach the endpoint, the free SO2is simply calculated.
2. pH and TA: The SC-300 kit also provides a pH electrode and reagents for calibration and
determination of pH and titratable acidity (TA) values in wines and other samples. The pH
value is simply determined by placing the calibrated pH electrode into a sample and reading the
value. TA is determined by titrating a 5 mL sample of wine to an endpoint pH of 8.2* with the
TA titrant (0.133N NaOH) from the syringe in the kit. From the known concentration of the TA
titrant and its volume required to reach the endpoint, the TA is simply calculated (results are in
units of g/L tartaric acid).
3. Potential measurements: In firmware versions 3.1.1 and higher, the SC-300 can display the
voltage reading on an electrode attached to the pH connector. This can be used with certain
electrodes, for example, Vinmetrica’s Dissolved Oxygen System, potassium, or sodium
electrodes, or to view the raw voltage reading of a pH electrode.
*In some countries, pH 7.0 is taken as the endpoint; see Instrument Operation, Step 6 (page 11).

SC-300 Pro Kit Manual 5 Version 2.2
Setup:
Setting up the SC-300 for the first time:
1. The SC-300 (See Figure 1) runs on two standard AA batteries (alkaline cells recommended). To
insert the batteries, open the battery housing on the bottom of the back of the unit by removing
the two screws and gently prying off the lid. Install the batteries, then close the housing. If
desired, you can prop the unit up using its folding stand.
2. Low Battery Detection: When the battery level is getting low, the instrument shows a low
battery icon on the upper left side of the display but continues to operate without impairment of
any function. Replace the batteries as soon as practicable. When the battery level drops too far,
the instrument does not operate. It rapidly flashes the low battery icon for 3.0 seconds, beeps
and shuts itself off.
3. Auto Shut-off: The SC-300 shuts off after 30 minutes. If this happens unexpectedly, just press
the POWER button to resume from where you were.
4. Electrodes: When directed to do so, attach the desired electrode (SO2or pH, Figures 2 & 3) via
the proper connector protruding from the top (on earlier model SC-300s, there is just a single
connector for both electrodes). Your electrodes and/or instrument may have different connectors
than what is shown in the figures below. Be sure to secure the electrode plug to the BNC
connector to insure proper function.
5. SO2electrode: Remove any protective cover from the electrode tip (most electrodes are
shipped without one). This cover need not be used routinely.
Put the electrode on its side, or hang it from the electrode holder if you have one. The SO2
electrode is sturdy with its plastic housing, but do take care not to let things touch or strike the
platinum wires; they are somewhat fragile and will break if bent and straightened repeatedly.
Figure 2. Attach the SO2 electrode
to the connector on the SC-300.
Figure 3. Be sure the pH electrode
attachment is screwed into place
on the BNC connector.

SC-300 Pro Kit Manual 6 Version 2.2
Electrode care: When done, always rinse with DI water and let air dry. There is no need to
store the SO2electrode in any kind of solution.
6. pH electrode: The pH electrode is fragile and should always be handled carefully. Remove the
liquid storage bottle from the electrode by unscrewing the cap first, then gently removing the
bottle and pulling off the cap. Rinse the electrode with a little distilled water before each use.
Electrode care: Do not touch the glass bulb, nor attempt to wipe it with anything. When necessary, you
may gently blot excess liquid away from the electrode surface, but avoid directly touching it. Rinse the
electrode with DI water and gently blot or shake off excess water. Push the electrode through the hole
in the cap about an inch, then gently screw the bottle onto the cap so that the electrode is in contact
with the solution in the bottle. If you happen to spill your pH electrode storage solution, your pH 4.01
solution (SC-200 pH/TA Reagents) can be used as a temporary storage solution but you should order
more pH electrode storage solution as soon as possible. The pH electrode should always be kept in
the liquid storage bottle with its pH electrode storage solution (Part Number SC-200-10) when
not in use.
Note: It is recommended to replace your pH electrode storage solution once a year or if the solution
becomes cloudy or moldy.
Assembling the Pro Kit Equipment:
Remove the items from their packaging: the Lab Support Stand, the Electrode Holder, the
Double Burette Clamp, the Glass Burette, Rinse Bottle and the Magnetic Stirrer. Carefully pull
out the glass burette from its cardboard cylindrical container and out of its container. Use
caution not to exert too much force on the burette as it is fragile and can break.
Open the Magnetic Stirrer from its packaging, then insert the double AA batteries included. We
recommend you do not use the cylindrical container provided with the magnetic stirrer but use
the 100mL titration beaker (Figure 4) included with the SC-300.
Assemble the Lab Support Stand by attaching the long metal rod and screwing it into the large
metal base. We have found that adding a drop of super glue to the threads of the metal rod can
prevent loosening of the assembly. Then place the magnetic stirrer below the lab support stand
as shown below in Figure 4.
To attach the Electrode Holder, loosen the thumb screw on the Holder and slide it onto the Lab
Support Stand rod (Figure 5), then tighten the thumb screw to adjust it to an appropriate height
(Figure 6). Make sure the thumb screw is on the left side of your set up.
Attach the Double Burette clamp to the Lab Support Stand using its thumb screw to adjust for
height, as shown in Figure 7 below. Place the Double Burette Clamp a few inches above the
electrode holder.

SC-300 Pro Kit Manual 7 Version 2.2
Carefully open the Double Burette Clamp's spring arms with your thumb and forefinger and
place the burette in between the four indentations in the double burette clamp's spring arm's
plastic knobs (Figure 8 below). Slowly release the clamp spring to secure the burette between
these four spring arm plastic knobs. You can adjust the burette at any time by raising and
lowering it within the spring arm clamps of the Double Burette Clamp. When making these
adjustments, hold onto the burette and do not apply too much force to it as the burette is
delicate. Use the end of the Electrode Holder as a guide for the tip of the burette (Figure 9).
DO NOT try and force the burette into the cutout at the end of the electrode holder. This
may cause your burette to snap and break. Finally, insert the electrode that you wish to use into
one of the open side slots. Once the black rubber neck of the electrode is sitting on top of the
electrode holder, stabilize the electrode holder and then press the electrode down so the
electrode is further stabilized into the slot. Remember to be gentle with the electrode.
You are now ready to titrate!
Note: The magnetic stir bar that is placed within the 100 mL titration beaker can potentially
damage the SO2and pH electrodes. When adjusting the height of the electrodes, make sure that
the stir bar in the beaker is below the bottom of the electrode. You do not want the spinning
magnetic stir bar to strike the SO2or pH electrode. When titrating for SO2or TA, you can add a
few milliliters of distilled water to raise the liquid level in the titration beaker by a half inch or
so.
Figure 4. The Magnetic
stirrer and beaker with the
pH electrode inserted into
the Electrode Holder
to the wine sample.
Figure 5. The Electrode
Holder slides onto the Lab
Support Stand.
Figure 7. The Double
Burette Clamp slides
easily onto the Lab
Support Stand.
Figure 6. The thumb
screw makes adjusting
The Electrode Holder's
height easy.

SC-300 Pro Kit Manual 8 Version 2.2
Burette Maintenance
Keep the burette clean and wash with deionized (distilled) water when you are finished using
the burette. This is especially important for TA titrations because the TA Titrant is caustic and can etch
the burette. Every so often, you will want to clean your burette with a cleaning solution to maintain
accuracy of the burette. The included ~2 grams of Burette Detergent is specially formulated to clean
glassware. The dry detergent ships in an Eppendorf tube that has markings with approximate half gram
increments. Upon first receiving the detergent, mix approximately half a gram (about an 1/8th of a
teaspoon) with about 50 milliliters (mL) of distilled water into a small bottle. We recommend capping
the bottle and shaking well for a minute or until the detergent is dissolved. Bubbles may form but the
detergent will still be effective. The detergent solution should be made fresh every time you clean the
burette, as it loses its potency quickly if stored as a liquid.
After you have run distilled water through your burette, close the stopcock, and fill with the
Burette Detergent solution. You can open and close the stopcock over a waste bucket or sink to allow
the solution to pass into the tip of the stopcock. We recommend letting this detergent solution sit in the
burette for one hour. Dispense the detergent solution then rinse the burette with distilled water twice
more. During this time we recommend opening and closing the stopcock to make sure the stopcock is
turning easily. If it is not, remove the stopcock and clean it thoroughly. Once drained, allow to hang dry
by hanging the burette upside down with the stopcock in the open position. Once the burette is dry, flip
it back over and cover the top opening with a piece of tape. This will prevent dust from getting in that
can cause aberrations when reading the burette. Remove the tape when you're ready to titrate.
Figure 8. The burette sits
firmly between the
notches of the four
spring arm knobs of the
Double Burette Clamp.
Figure 9. Use the end of
the Electrode Holder as a
guide for the glass burette
for accurate titrations.
Figure 10. The Pro Kit
Assembly is complete. Go
take some measurements!

SC-300 Pro Kit Manual 9 Version 2.2
Burette Reading
ALWAYS use eye protection and preferably gloves (latex or nitrile) when using glassware
and chemical reagents. To get the most accurate results when titrating, there are a few things to keep
in mind. We recommend reading from the bottom of the meniscus (Figure 12). First, use a thick sheet
of white paper, note card or the back of a business card and draw a black band down the center of the
paper about an inch and a half thick (Figure 11). When taking a measurement, hold the paper about an
inch behind the burette and the black band about a half an inch below the meniscus (Figure 13). This
provides a clear view of the bottom of the meniscus which helps make a precise, consistent
measurement. Second, when filling the burette, make sure the titrant (in most cases this will be either
the SO2Titrant or the TA Titrant) has completely filled the bottom of the burette including within the
tip. Sometimes bubbles can be trapped in the tip of the burette but can usually be dislodged by opening
and closing the stopcock while the burette is hovering over a waste container. We also recommend
washing a couple of milliliters of the titrant you are using through the burette to remove any excess
water or contaminants that may remain from a previous titration. Finally, make sure there are not any
large bubbles in the burette after filling. If there are, cover the top of the burette with some saran wrap
(or parafilm if you have it) and make sure the stopcock is in the closed position. Then take the burette
out of its clamp and hold the saran wrapped end tightly. Rotate and invert the burette to allow the
bubbles to move out of the column of titrant. Once the bubbles have been displaced, you are ready to
titrate.
Note: the gradations on your burette may be different than shown in the figures below. These photos
are of the 10 mL burette; the 25 mL burette will have fewer gradations. Please take a look at your
burette and determine the values for the gradations (lines).
Figure 11. On a thick white
sheet of paper or a business card,
use a black marker to draw a
band approximately an inch and
a half thick. This card will assist
you in reading the burette
accurately.
Figure 12. The meniscus of the
water column. We recommend
measuring the titrant volume
from the bottom of the
meniscus. In the picture the
value is about 3.27 mL.
Figure 13. Reading the meniscus of
the water column is easier and more
precise if you use the paper with the
black band held up an inch behind the
burette and its black band 1/2 an inch
below the meniscus. In this picture the
value from Figure 11 is further
resolved to 3.26 mL.

SC-300 Pro Kit Manual 10 Version 2.2
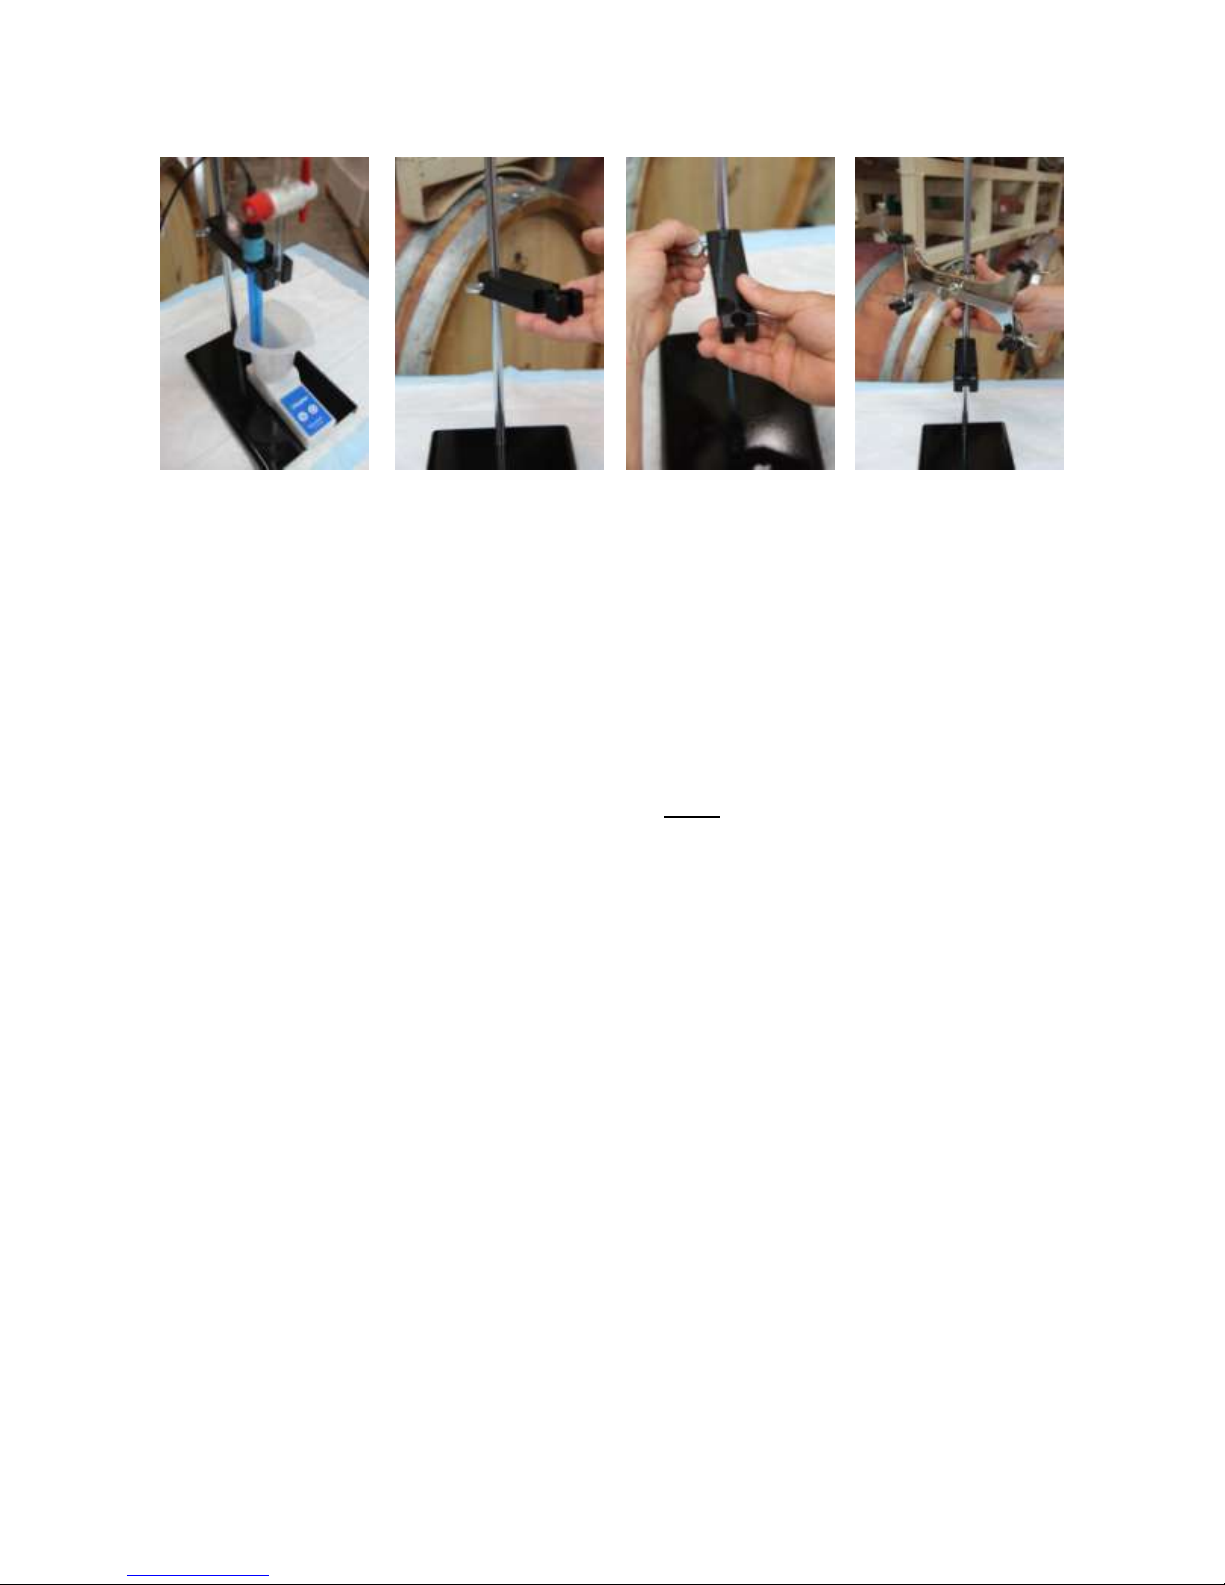
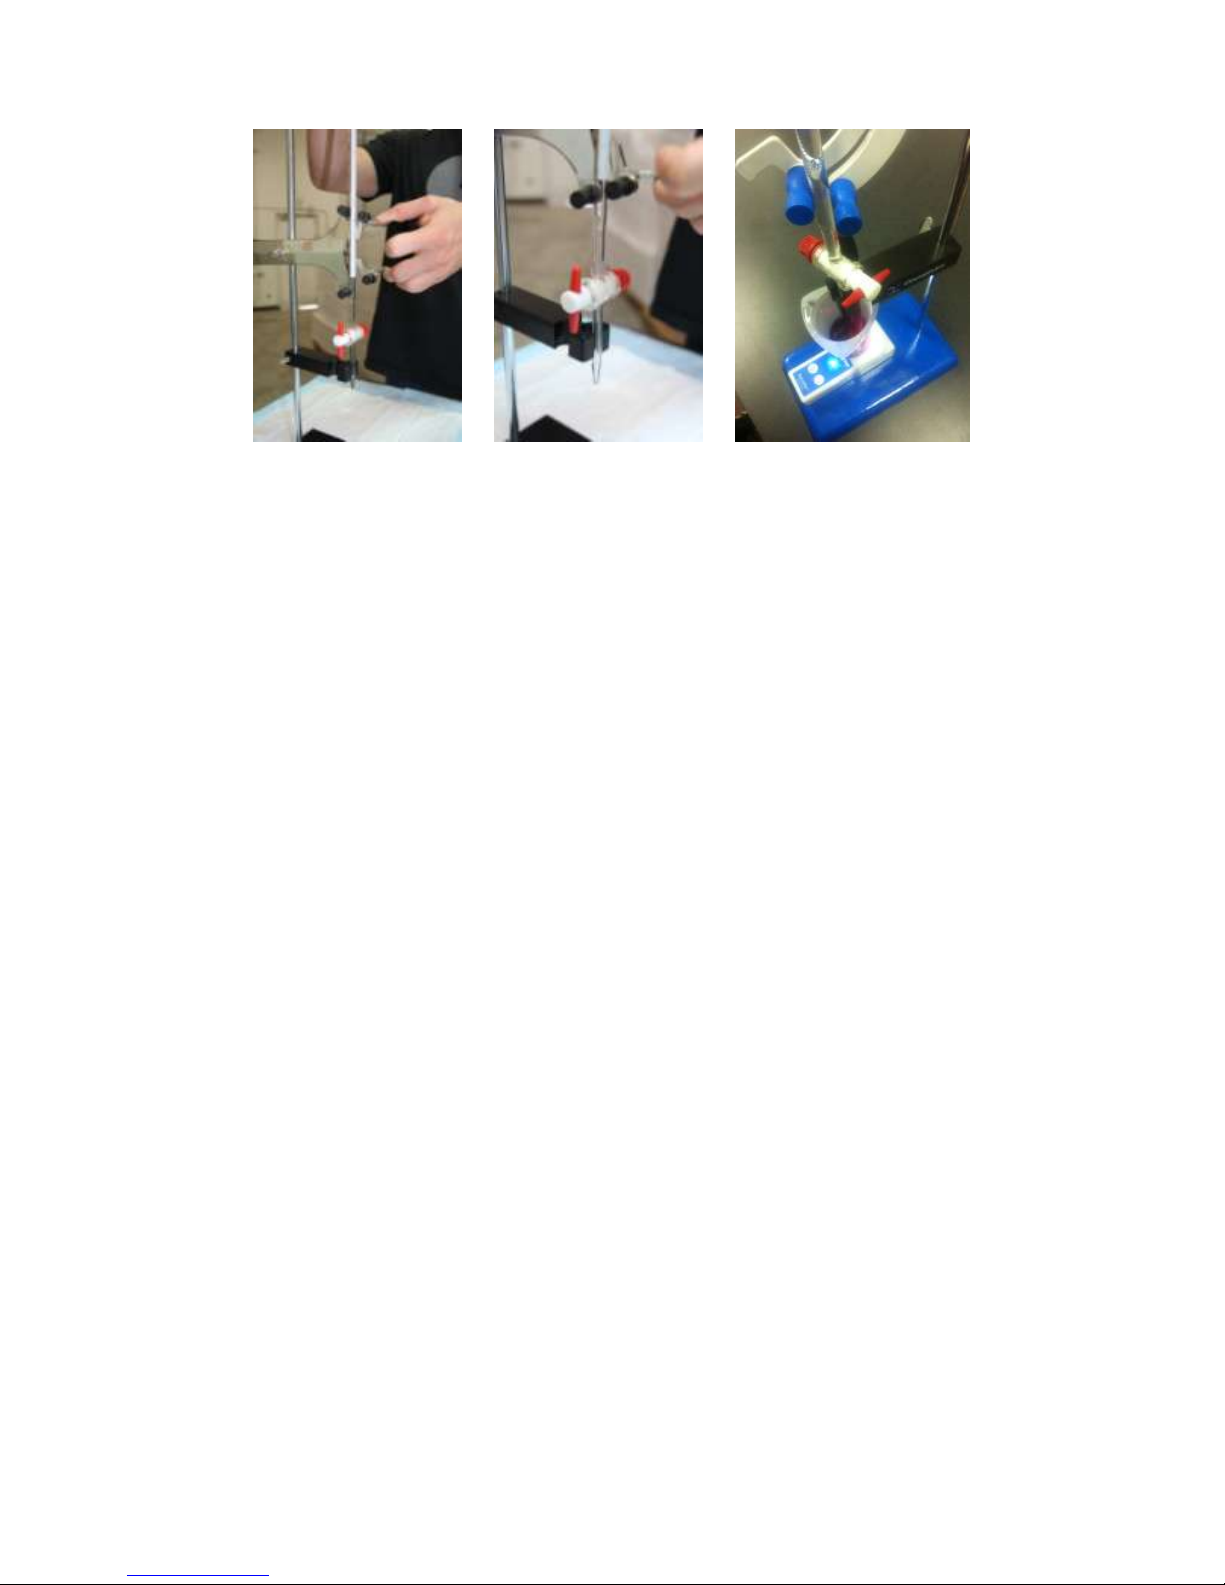
Before beginning the titration, record the starting titration volume, using the thick white paper
with the black band, and then begin titrating, slowly. With enough practice, you will eventually be able
to read the burette without black banded paper. Record the final titration volume using the same
technique. You can also checkout these websites for more burette info:
http://www.titrations.info/pipette-burette or http://www.csudh.edu/oliver/demos/buretuse/buretuse.htm
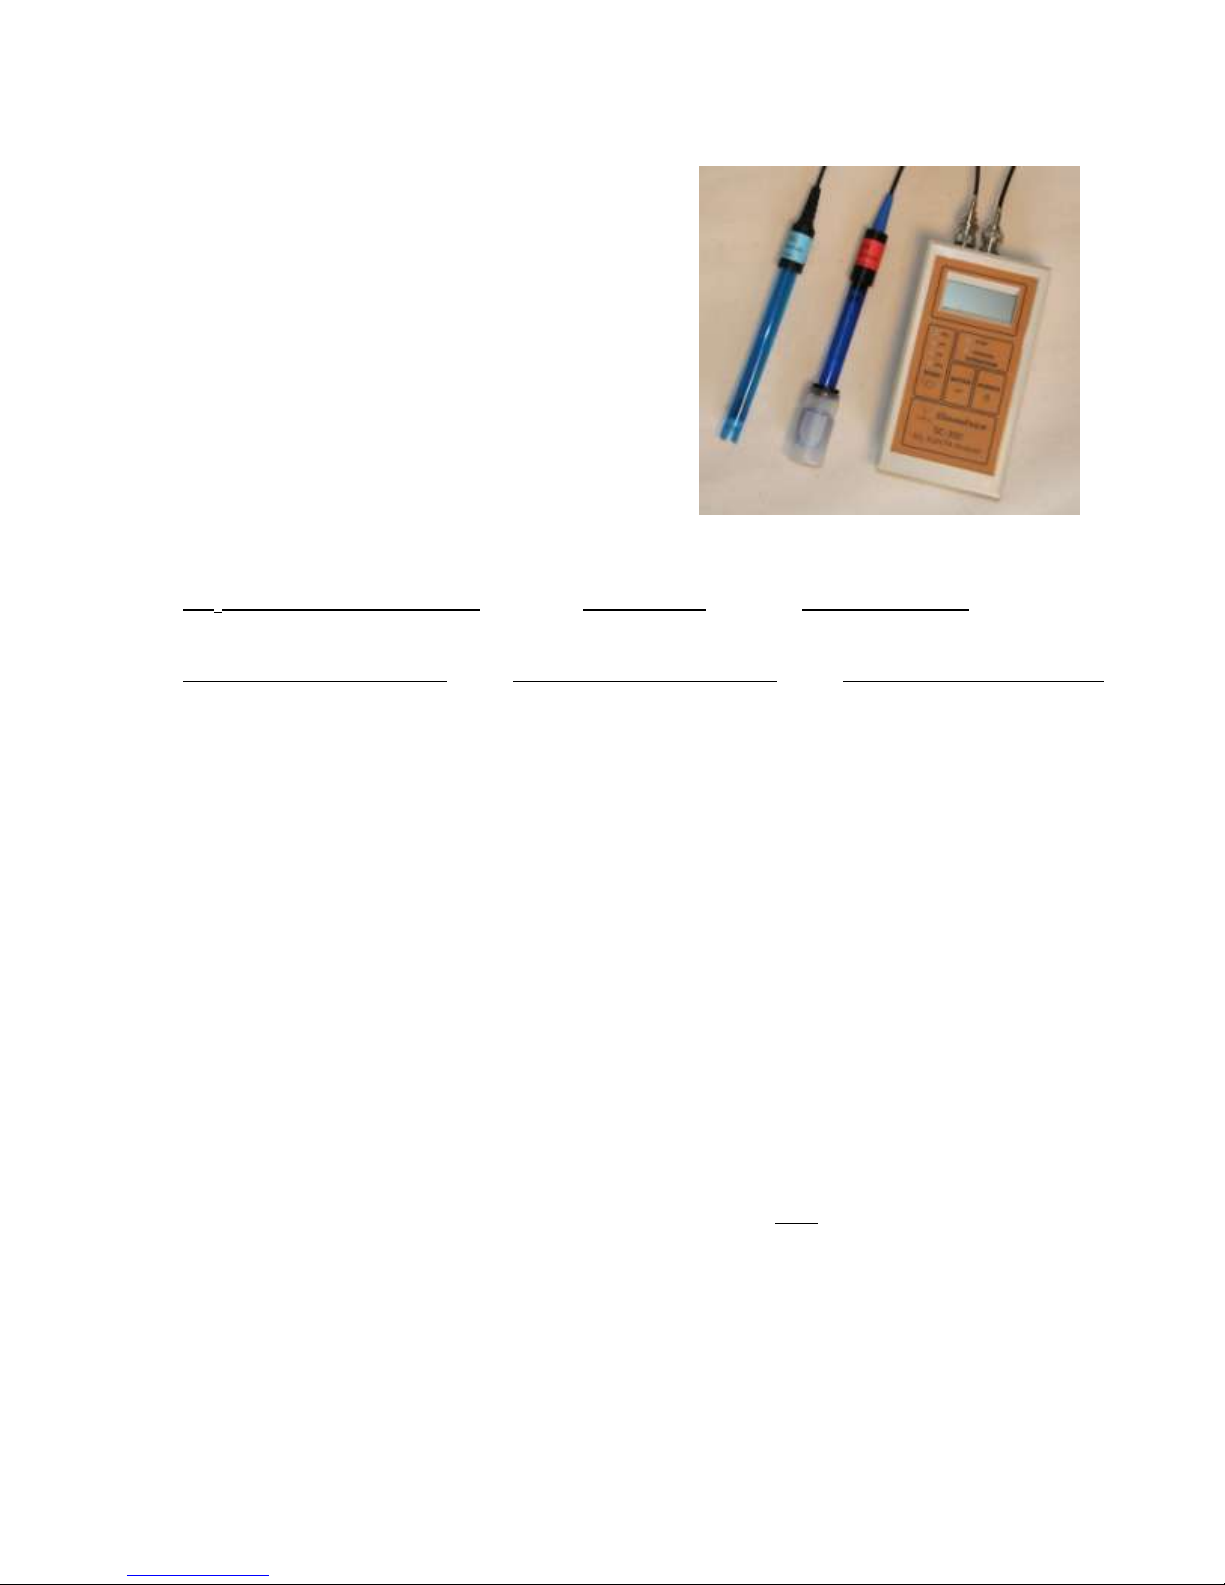
Instrument Operation:
1. Turn on the instrument by pressing the POWER button briefly (Note: depressing the POWER
button longer than two seconds at start-up will cause the instrument to enter Test Mode; see
Appendix A). The instrument will go through a power-up sequence. After a few seconds the
instrument will start in whatever mode was last selected. The mode is indicated by the yellow
LED panel on the left. Select the desired mode by pressing the MODE button.
2. SO2mode: This is for determining ppm of SO2 by titration (see below under ‘Procedures’) and
the SO2 electrode must be used. As a safety precaution, you must press the ENTER button after
selecting SO2mode to confirm that the SO2electrode is attached before the mode will be
enabled. However, scrolling through the MODE selections (such that you pass by the SO2
selection) with a pH electrode attached is safe, as long as you do not press ENTER to confirm
the SO2mode. After pressing ENTER, you should see the display show a value less than 50
(usually 0.0) and the green "PROCEED" LED should be on. Make sure to attach the SO2
electrode. Note: On older style, single connector units (pre-2014), the pH electrode can be
damaged by connecting it to the instrument in SO2 mode.
3. pH mode: In this mode, the meter measures the pH. The pH electrode must be attached. If the
instrument has not yet been calibrated, the message “doCal” scrolls across the screen, and you
need to do a calibration (see Calibration of pH below). We recommend re-calibrating the
instrument for pH once each day of use. Warning: Be careful not to press ENTER when the pH
electrode is attached while the instrument is in SO2mode, as this can potentially damage the pH
electrode. If this does happen, and the pH electrode does not respond correctly, place it into the
pH 4 Reference solution for an hour and it should return to normal function.
4. Potential mode (Firmware version 3.1.1 and higher) (pH LED flashing): In this mode the
instrument displays the potential in volts, (or millivolts in version 3.1.2 and above) coming
from an electrode attached to the pH connector. This can be used with certain electrodes, for
example, Vinmetrica’s Dissolved Oxygen System, ORP, potassium, or sodium electrodes, or to
view the raw voltage reading of a pH electrode. In this mode, when the red STOP LED is
illuminated, the values on the screen are negative; otherwise the values are positive.
5. TA mode: This is for titration in determining titratable acidity (TA). As in the pH mode, the pH
is displayed and the pH electrode must be attached. The green (“PROCEED”) LED is lit if the
pH is below the TA endpoint (normally 8.2, but can be set to 7.0, see Appendix A, Test Mode,

SC-300 Pro Kit Manual 11 Version 2.2
section 16), while the red "STOP" LED is lit if the pH is above the endpoint (see below under
Measuring TA by Titration).
6. CAL mode: This is for calibrating the pH electrode, which must be attached. The display
initially shows CAL for a few seconds as it prepares to read pH and lets readings settle.
Thereafter, the display shows the measured pH level with two decimal places.
7. Calibration works with one of the following reference calibration sets:
pH 4.01 and 7.00 or “4/7”
pH 7.00 and 10.00 or “7/10”
pH 3.00 and 7.00 or “3/7”
Vinmetrica recommends use of the pH 4/7 Reference Solution set provided with the kit.
Note: The magnetic stirrer has two modes. Pressing the "light bulb" button on the magnetic
stirrer activates a light underneath the sample and the stirrer. The power button activates just the
stirrer. After pressing either button, the stirrer remains active for 60 seconds, a feature to
conserve its batteries. If during the titration it turns off, simply press the button again for it to
continue. We recommend using the light mode because it helps us indicate when the stirrer
stops. When using the magnetic stirrer, be sure that the electrode does not touch the spinning
stir bar as there is a slight chance that it can damage the glass bulb of the pH electrode or the
platinum wires of the SO2electrode. If you are using the Vinmetrica Electrode Holder, adjust
the electrode’s height so that its probe end is above the level of the stir bar.

SC-300 Pro Kit Manual 12 Version 2.2
Procedures
Measuring Free SO2by Titration:
1. Turn on the instrument and select SO2mode with the MODE button. [On some older versions
of firmware the display will scroll across reading “Press Enter”; Press the ENTER button to
confirm selection of SO2mode. The display should show a value less than 20, usually 0.0. Now
attach the SO2 electrode.
2. Fill the syringe by drawing up the SO2Titrant (the bottle with the blue label) (Figure 14).
Expel bubbles and set the plunger on the syringe to a readable point, preferably the 5.0 mL
point. Make sure the outside of the syringe is dry, to minimize any inaccuracies. [Note: the 5.0
mL setting allows determination of up to 100 ppm SO2 in a standard 25 mL wine sample.] If
using the burette, use the syringe to dispense the SO2titrant into the top of the burette. Make
sure the burette stopcock is in the closed position (where the red handle is horizontal). When
filling the burette make sure the SO2titrant has completely filled the bottom of the burette
including the tip. Sometimes bubbles can be trapped in the tip of the burette but can usually be
dislodged by opening and closing the stopcock while the burette is above a waste container. If
you spill any titrant on the outside of the burette, be sure to clean it up with a paper towel or dry
rag. If the spilled titrant is not cleaned from the outside of the burette you may introduce these
spilled titrant droplets into the wine sample leading to an inaccurate reading. Be sure to record
your starting burette or syringe volume; refer to 'Burette Reading' section under the Setup
section for how to measure accurately.
3. Place 25 mL of wine or must in the titration vessel. We recommend using the 25 mL sampling
pipette provided in the kit: draw the sample up to the 0 mL mark, and then dispense the sample
into your titration vessel by letting the tip of the pipette touch the side of the vessel while the
Figure 14. Withdraw
the titrant from its bottle
using a clean 5 mL
syringe. If you are using
the glass burette, use the
syringe to fill it.
Figure 16. The transfer
pipette. One full squeeze
of the transfer pipette in
either the Acid solution
or Reactant should be
approximately 2 mL.
Figure 15. Dispense 25
mL of your wine into the
titration beaker using the
25 mL sampling pipette.
Make sure this is clean
before putting the pipette
into your wine container!

SC-300 Pro Kit Manual 13 Version 2.2
sample drains (Figure 15). NEVER pipette any reagents by mouth! Also make sure the
pipette you are using is completely clean before submerging into your wine sample.
4. Using the transfer pipettes (Figure 16), add about 2 mL Acid Reagent and 2 mL Reactant
solution to the titration beaker. It is not necessary to be extremely accurate in this step; with
these pipettes, 2 mL is roughly the amount that fills the pipette up to the 2 mL mark after a
single thorough squeeze of the bulb. To preserve the shelf life of these reagents take care not to
cross contaminate the transfer pipettes, we recommend marking the pipettes “A” for Acid and
“R” for Reactant. If they do get contaminated rinse them off with distilled water and let air dry.
Caution: the Acid reagent is corrosive and can cause damage to clothing, skin and eyes.
The reagents should not be ingested. ALWAYS use safety glasses! We recommend the use
of laboratory latex or nitrile gloves during this procedure. If any solutions contact skin or
eyes, flush with plenty of water.
5. Using the magnetic stirrer, place the stir bar in the 100mL titration beaker and place the beaker
on top of the magnetic stirrer. Turn on the magnetic stirrer. The magnetic stirrer provided with
the SC-300 Pro Kit operates at a suitable preset speed. Make sure your electrode is not being
struck by the spinning stir bar. To prevent this, we recommend using the Electrode Holder to
stabilize your electrode. If you decide to stir manually, make sure to maintain a constant
moderate swirling motion. Hold the electrode against the side of the vessel (Figure 17)
6. Rinse the electrode briefly with distilled water. Insert the electrode into the titration beaker so
that the tip is completely submerged to just above the circulation gaps (cutouts at the tip of the
electrode) but above the level of the stir bar (approximately half an inch from the bottom of the
titration beaker). If you are using the Electrode Holder adjust it to a similar level. If needed, you
can add 2-5 mL distilled water to raise the liquid level.
7. Verify that the current is less than 50 and the green (“PROCEED”) LED is lit (Figure 19). If the
current is greater than this, and/or the red (“STOP”) LED is lit and the buzzer sounds, your
sample has less than 2 ppm SO2and there is no need to proceed.
8. Titrate the sample by adding the SO2Titrant drop-wise from the syringe (Figure 17) or from the
burette (Figure 18), being sure to note the starting volume mark on the syringe or burette. Try
to accomplish the titration as rapidly as possible (in 3 minutes or less), but be careful near the
endpoint so as not to overrun it –here, dispense one or two drops at a time. Be sure to maintain
stirring or swirling throughout the entire procedure. If the magnetic stirrer turns off, turn it back
on.

SC-300 Pro Kit Manual 14 Version 2.2
9. During the titration, the LCD display will show transient currents, the red "STOP" LED will
briefly illuminate, and the beeper will sound (“beep-beep!”). These transient indicators will last
longer and longer as you approach the endpoint (Figure 20). Take the endpoint as the first
addition of Titrant that causes the display to exceed 50, and the red LED and beeper to stay on,
for longer than 15 seconds (or a count of 20 sets of "beep-beep"). It is important to maintain
stirring or swirling to detect the endpoint well. Do not add titrant while the red "STOP" LED is
lit. Read the remaining titrant volume off of the syringe or burette.
10. Calculate the volume of titrant used "V" (using the Syringe: Starting volume minus final
volume; Burette: final volume minus starting volume), e.g., V = 5.0 mL - 3.5 mL = 1.5 mL
11. The free SO2content is calculated in units of parts per million (ppm) or mg/L as:
ppm (mg/L) Free SO2= 64 * V * N * 1000
Where V = mL SO2Titrant needed to reach the endpoint; N = normality (concentration) of the
Titrant; and S = mL of your wine sample. 1 If you use a 25 mL wine sample as directed and the
SO2Titrant's normality is 0.0156 as supplied in the kit, then the calculation is simply:
ppm (mg/L) Free SO2 = 20 * V (i.e. 20 times V)
1
2 * S
Figure 17.Manual stirring
technique. Hold the electrode
against the side of the titration
beaker and swirl gently; add
SO2 Titrant with other hand.
Figure 18.Automated stirring
technique. Turn on the
magnetic stirrer; add SO2
Titrant by slowly opening the
burette stopcock valve.
Figure 19.Make sure
that the "PROCEED"
LED is lit. You should be
reading close to 0.0 when
you first start. You are
now ready to titrate!
Figure 20.Once the device
beeps for 15 seconds or 20
sets of "beep-beep"
you are done with the
titration. The red "STOP"
LED will also remain lit.

SC-300 Pro Kit Manual 15 Version 2.2
Measuring Total SO2by Titration (optional - requires 1N NaOH):
1. Place 25 mL wine or must in the 100mL titration beaker (See Figure 15).
2. Add 10ml 1N sodium hydroxide (Vinmetrica Part number SC-100-17) and mix well. Let stand
approximately 10 minutes.
3. Using the transfer pipettes, add approximately 8 mL of the Acid Reagent and 2 mL of the
Reactant solution to the vessel. Remember that if you are using the transfer pipettes in the kit, 2
mL is the amount that fills the bulb with a vigorous squeeze, so dispense four of these for the
Acid Reagent.
4. Proceed from step 5 in the Free SO2procedure above. The result calculated will be total SO2,
rather than free SO2in parts per million (ppm) or mg/L.
Calibration of pH:
1. Be sure the pH electrode is attached to the unit. Then select CAL mode by pressing the MODE
button until the CAL LED illuminates.
2. Choose a calibration set that corresponds to the range you are working in. Usually for wine this
will be at pH values below 4, so use the 4/7 set. If you have a source of a pH 3.00 reference
solution, you can use this in place of pH 4.
3. Rinse the electrode with DI water, shake or blot off excess liquid gently, and place the electrode
into a small vessel (like the pH 4 Reference Solution cap) containing one of the reference
solutions (e.g. pH 4.01).
4. The instrument will determine which calibration solution is being used, and will display the
apparent pH value. This may be different by as much as 0.40 from the value of the reference
solution (e.g. the LCD may display 4.41 when the pH electrode is sitting in the pH 4.01
reference solution). When the pH level is sensed as stable, the nominal value is shown on the
display, flashing, and the “CAL” LED flashes to convey that calibration for this value is ready.
Press the ENTER button to accept the calibration.
5. The display stops flashing, scrolling the message 'Good CAl', and four beeps are rapidly
sounded to indicate success. [Note: if an error occurs during this process, the message 'BAd

SC-300 Pro Kit Manual 16 Version 2.2
CAl' will scroll and a single beep will sound; the instrument will then continue to wait for a
stable pH level. Repeat step 4.] Following the 'Good CAl' message, the display will now show
the calibrated pH value.
6. Now rinse the electrode again and place it in the second member of the calibration set (e.g., pH
7.00 reference solution). Repeat the process to get a second 'Good CAl' message. Exit into pH
or TA mode.
Measuring pH:
1. Make sure the pH electrode is attached. Calibrate it as described above, if necessary. Select pH
mode with the MODE button.
2. Rinse the pH electrode with DI water. Gently shake off or carefully blot away excess liquid.
3. Place the electrode in the solution to be tested. Be careful not to let the electrode strike any
surfaces.
4. Allow the pH reading to stabilize. Typically this takes about 10-15 seconds. Read the pH value
on the display.
Measuring Titratable Acidity (TA) by Titration:
1. Sample pretreatments: If you are working with a sample of must, we recommend homogenizing
your sample in a blender before proceeding. Take 100 mL or more of your must and put it in a
blender on high for 30 seconds. Allow solids to settle for 2 minutes before sampling or use a
cheese cloth or mesh strainer to remove solids.
If your sample has appreciable outgassing of CO2, as in a sparkling wine or newly-fermenting
must, degas the sample by repeated shaking, then venting, in a closed small jar or sample bottle
until no more gas evolves.
2. Fill the syringe with the TA Titrant (0.133N NaOH). Expel bubbles and set the plunger on the
syringe to a readable point, preferably the 5.0 mL point. [Note: the 5.0 mL setting allows
determination of up to 10 g/L TA in a standard 5 mL wine sample.] If you are using a burette,
you can use the syringe to dispense the TA titrant into the top of the burette. Make sure the
burette stopcock is in the closed (the red handle is horizontal) position. When filling the burette
make sure the TA titrant has completely filled the bottom of the burette including the tip.
Sometimes bubbles can be trapped in the tip of the burette but can usually be dislodged by
opening and closing the stopcock while the burette is above a waste container. If you spill any
TA titrant on the outside of the burette, be sure to clean it up with a paper towel or dry rag. If

SC-300 Pro Kit Manual 17 Version 2.2
the spilled titrant is not cleaned from the outside of the burette you may introduce these spilled
titrant droplets into the wine sample leading to an inaccurate reading. Be sure to record your
starting volume (burette or syringe). Caution: the TA Titrant is caustic and can cause
damage to clothing, skin and eyes. We recommend use of laboratory safety glasses and
latex or nitrile gloves during this procedure. If any solutions contact skin or eyes, flush
with plenty of water.
3. Place 5.0 mL wine or must in the titration beaker. We recommend using the 5 mL pipette
provided in the kit: draw sample up to the 0 mL mark, then dispense the sample into your
titration vessel by letting the tip of the pipette touch the side of the vessel while the sample
drains. For best accuracy, do not blow out the liquid that remains in the tip. Add about 15 ml
of deionized (DI) water (distilled water).
4. Turn on the instrument. Make sure the pH electrode is attached. If necessary, calibrate it as
described above. Select TA mode with the MODE button.
5. If you are using the magnetic stirrer, place the stir bar in the beaker, set the beaker on top of the
magnetic stirrer and turn on the magnetic stirrer. Be sure the stir bar will not strike the electrode
in the following steps. (Figure 22)
6. Rinse the electrode briefly with DI water. Insert the electrode into the titration beaker so that the
tip is fully submerged to just above the circulation gaps (cutouts at the tip of the electrode).
7. If you are stirring manually, begin now; use a moderate swirling motion. If the electrode is not
held in a stand, hold it against the side of the beaker with one finger and grasp the beaker with
the remaining fingers so that the two move together while swirling (Figure 21).
Figure 21.Manual stirring
technique. Hold the
electrode against the side of
the titration beaker and
swirl gently; add TA Titrant
with other hand.
Figure 22.Automated
stirring technique. Turn on
the magnetic stirrer; add
TA Titrant by slowly
opening the burette
stopcock valve.
Figure 23.Make sure that
the green "PROCEED"
LED is lit. You should be
reading a pH close to what
you expect your wine is at.
You are ready to titrate!
Figure 24. Once the pH
arrives at or passes 8.20
you are done with the
titration. The red "STOP"
LED will be lit and the
instrument will be beeping

SC-300 Pro Kit Manual 18 Version 2.2
8. Verify that the pH is less than 7 and the green (“PROCEED”) LED is lit (Figure 23). If the pH
is greater than this, and/or the red (“STOP”) LED is lit and the beeper sounds, your sample has
less than 0.1g/L TA and there is no need to proceed.
9. Titrate the sample by adding the TA Titrant drop wise from the syringe or burette, being sure to
note the starting volume mark on the syringe or burette. During the titration, the pH will
gradually rise from its starting value (below 4 usually). As you approach pH 7, go slowly in
adding successive drops of titrant so as not to overrun the endpoint. Be sure to mix thoroughly
after each successive drop of titrant. Take the endpoint as the first addition of TA Titrant that
causes the pH to stay above the TA endpoint (8.2 or 7.0, depending on your setup; see Appendix
A -Test Mode, section 16) for longer than 15 seconds. The red "STOP" LED and the beeper
will provide additional indication of the endpoint (Figure 24). Read the endpoint volume off of
the syringe or burette. To silence the beeper after the endpoint, select pH mode, or turn off the
instrument.
10. Calculate the TA value as:
where V= mL Titrant needed to reach the endpoint; 0.133 = normality of the Titrant, S= mL
sample. If you use 5 mL of sample as directed, and the Titrant is 0.133 N as supplied, then the
calculation is simply
Note: to express these values as % tartaric acid, divide by ten; e.g. if the TA is 7.1 g/L, that is
equivalent to 0.71 % tartaric acid.
Finishing up:
1. Turn off the instrument.
2. Rinse the SO2 electrode and syringe with distilled water. Let air dry.
3. Be sure to rinse the pH electrode with distilled water and then store it in its storage solution as
directed under 'Setting up the SC-300 for the first time', item 6 (page 6 of this manual).
4. Store all reagents tightly capped and away from heat and sunlight.
5. Discard waste samples and solutions in accordance with local regulations. Acidic solutions can
be neutralized by slow addition of baking soda (sodium bicarbonate) with stirring until
effervescence ceases.

SC-300 Pro Kit Manual 19 Version 2.2
WARRANTIES AND LIABILITIES
1. The materials provided in the kit, as described on pages 1 and 2 above, (“Materials”) are
warranted as follows: The SC-300 instrument, SO2electrode and non-reagent accessories are
warranted against defects in workmanship for 24 months from date of purchase. The reagents
are warranted to perform as described herein up until any stated expiration date or 6 months
after purchase, whichever is later. The pH electrode is warranted for 12 months. THE
WARRANTIES IN THESE TERMS AND CONDITIONS ARE IN LIEU OF ALL OTHER
WARRANTIES, EXPRESS OR IMPLIED, INCLUDING WITHOUT LIMITATION ANY
WARRANTIES OF MERCHANTABILITY, NONINFRINGEMENT, OR FITNESS FOR A
PARTICULAR PURPOSE, SAID WARRANTIES BEING EXPRESSLY DISCLAIMED.
2. Buyer agrees that its sole and exclusive remedy against Vinmetrica shall be limited to the
repair and replacement of Materials or parts of Materials, provided Vinmetrica is promptly
notified in writing, prior to the expiration of the warranty period specified above, of any
defect. Vinmetrica’s liability for any damages due Buyer shall be limited to the purchase price
of the Materials.
3. VINMETRICA'S MAXIMUM LIABILITY FOR ALL DIRECT DAMAGES, INCLUDING
WITHOUT LIMITATION CONTRACT DAMAGES AND DAMAGES FOR INJURIES TO
PERSONS OR PROPERTY, WHETHER ARISING FROM VINMETRICA’S BREACH OF
THESE TERMS AND CONDITIONS, BREACH OF WARRANTY, NEGLIGENCE, STRICT
LIABILITY, OR OTHER TORT WITH RESPECT TO THE MATERIALS, OR ANY
SERVICES IN CONNECTION WITH THE MATERIALS, IS LIMITED TO AN AMOUNT
NOT TO EXCEED THE PRICE OF THE MATERIALS. IN NO EVENT SHALL
VINMETRICA BE LIABLE TO BUYER FOR ANY INCIDENTAL, CONSEQUENTIAL OR
SPECIAL DAMAGES, INCLUDING WITHOUT LIMITATION LOST REVENUES AND
PROFITS.
HAZARDS AND TOXICITY
All Materials offered by Vinmetrica are intended for use by individuals who are familiar with
laboratory procedures and their potential hazards. The Materials contain chemicals which may be
harmful if misused. Due care should be exercised with all Materials to prevent direct human contact.
Glassware can break and chemicals can splash during experiments; Always use safety glasses. We
strongly recommend using nitrile or latex gloves and wearing long pants, long sleeves and closed toed
shoes. Keep out of reach of children.
6084 Corte Del Cedro Suite 105, Carlsbad CA 92011
www.vinmetrica.com
(760) 494-0597
Copyright 2010-17. Sportsman Consulting, LLC DBA Vinmetrica. All rights reserved.

SC-300 Pro Kit Manual 20 Version 2.2
Appendix A - Test Mode
Test Mode provides various special functions that may be useful in testing the device, for example, if
troubleshooting is necessary.
•Test Mode is entered when the POWER button is pressed longer than 2 seconds while turning
the instrument on. Remove the pH electrode if it is attached.
•Test Mode is organized into sections. Press the POWER button briefly to move to the next
section. After the last section, Test Mode restarts the first. WARNING! DO NOT MOVE
THROUGH SECTIONS WITH THE pH PROBE ATTACHED! This can damage the
electrode. Only connect the pH electrode if needed in section 2 or 4. Always remove the pH
electrode before leaving these sections.
•Combinations of the yellow MODE LEDs are illuminated to indicate the section number as
shown in the table below.
•The Stop LED (red) is illuminated when an error is detected by the instrument The Proceed
LED (green) is illuminated to indicate no error detected. The green LED does not guarantee
proper functioning; it only indicates that no problem could be automatically detected. The user
should make careful observations to discern proper operation.
•To exit Test Mode, hold the POWER button down (5-10 seconds) until the instrument shuts off.
If the device does not shut off after 10 seconds of holding down the button, move to the next
section by releasing, then pressing again the POWER button briefly; then try to exit again.
Yellow
LEDs
Section
Equipment Required
Description
1. Version
None.
The version number of the instrument
software is displayed.
2. Burn-in
None
The instrument goes through a
continuous “burn-in” cycle, exercising
relay, sound, LEDs, and display.
3. pH
pH probe or precision
voltage source. Do
not exceed +/- 0.5 V.
An uncalibrated pH level is shown in two
alternating parts. First, the integer
portion of pH level is shown (1 to 14).
Next, three decimal places are shown.
Readings above 14.00 are shown as "---".
Readings below 0.00 are shown as
" ---".
4. SO2
SO2probe or SO2
probe simulator ( e.g.,
500 kOhm resistor)
The SO2current in nanoamperes is
displayed. For values under 10, one
decimal place is shown.
5. pH Voltage
pH probe or precision
voltage source. Do
not exceed +/- 0.5 V.
The raw voltage output from the
instrument's pH amplifier is displayed as
X.XX volts. Readings can range from
0.00 to 4.10.
Other manuals for SC-300
2
Table of contents
Other vinmetrica Measuring Instrument manuals