VisioFocus PRO User manual

06480
PRO
IT
EN
FR
Manuale d’Uso
Leggere attentamente le
presenti istruzioni prima di
usare il termometro
User Manual
Read these instructions
carefully before using
the thermometer
Mode d’Emploi
Lire attentivement
les instructions avant
d’utiliser le thermomètre
!
Seguire le istruzioni per l’uso /
Follow instructions for use /
Suivre les instructions
d’utilisation
Riferirsi al manuale d’uso /
Refer to the user manual /
Reportez-vous au mode
d'emploi
ATTENZIONE: leggere le
avvertenze / ATTENTION: read
the warnings / ATTENTION: il y
a des précautions d’emploi

1.
2.
3.
4.
5.
6.
7.
8.
9.
10.
11.
12.
13.
Luce di puntamento
Guida d’onda
Sensore (sul fondo della
guida d’onda)
Luce di puntamento
Display LCD
Pulsante FACCIA per le
misurazioni sulla fronte
Pulsante CASA per le
altre misurazioni
Pulsante MEMORIA (per
riattivare la
retroilluminazione del
display, per 3 secondi;
mostrare le ultime 9
misurazioni, se il
pulsante “Mem” è attivo;
cambiare le impostazioni)
Cappuccio protettivo
Etichetta con numero di
serie
Sportello batterie (4 x
AAA) con istruzioni brevi
Far scorrere lo sportello
per aprirlo
Lanyard con istruzioni
brevi aggiuntive – da
indossare intorno al collo
Aiming light
Waveguide
Sensor (at the bottom of
the waveguide)
Aiming light
LCD display
FACE button for body
temperature readings
HOME button for other
readings
MEMORY button
(intended for reactivating
the display backlight for
3 seconds, showing the
last 9 measurements - if
“Mem” is enabled -
and to changing the
settings/modes)
Protective cap
Label with serial number
Battery door (4 x AAA)
with brief instructions
Slide to open
Special lanyard with
additional brief
instructions - to be worn
around the neck
Faisceau lumineux de
positionnement
Orifice avant
Capteur (au fond de l’orifice
avant)
Faisceau lumineux de
positionnement
Ecran LCD
Bouton VISAGE pour les
mesures sur le front
Bouton MAISON pour les
autres mesures
Bouton MEMOIRE (permet de
réactiver le rétro éclairage de
l’écran pendant 3 secondes,
de rappeler les 9 dernières
mesures effectuées (si le
bouton “Mem” est activé)
et de modifier les options)
Capuchon de protection
Etiquette avec numéro de
série
Couvercle des piles (4 x LR03)
avec de brèves instructions
Soulevez le couvercle pour
le retirer
Cordon porte-thermomètre
contenant de brèves
instructions au sujet de
l’utilisation et à mettre autour
du cou.
Fig. 1
10 11
12
13
9
6
5
8
7
23
4
1
CALIBRATE VISIOFOCUS:
at start or at room change or if appears
presstogetherand release and ; appears.
Within10secopenthecap,press andfocusthe
projection on an internal wall far from windows
and heat or cold sources; release and wait for the
projectiontoflashslowly.Readyformeasurements
in the middle of forehead with .

01 - English -
INTENDED USE: VisioFocus® PRO is an infrared thermometer intended for
intermittent measurement of human body temperature in people of all ages
(professional use).
IMPORTANT
Each non contact thermometer needs to be stabilized at the room temperature.
VisioFocus PRO is equipped with 2 quick calibration systems, which allows the
thermometer to quickly stabilize at the room temperature: the MQCS (Manual Quick
Calibration System) and the AQCS (Automatic Quick Calibration System). See par. # 8.
Additionally, VisioFocus PRO foresees two different settings:
“NURS” (default setting): the MQCS is requested and mandatory every 30 minutes.
This setting is highly recommended for nurses who take many measurements moving
from room to room as well as for any intensive use, such as in airports etc. The
“HOME” button is disabled. The “Mem” button is disabled and it can be
enabled by changing the settings (see par. 7).
“DOCT”: the MQCS is not mandatory, but if the thermometer’s temperature is
changing, the AQCS (Automatic Quick Calibration System) is automatically activated
and allows the rapid stabilization of the thermometer to the room temperature: the
display shows a countdown indicating the time required for its stabilization.
To make a measurement is necessary to wait the end of the countdown without
touching the device. Alternatively, at any time, it is possible to do the manual MQCS
(suggested procedure). In “DOCT” mode the “HOME” and the “Mem”
buttons are enabled.
Please note that if the thermometer set in “DOCT” is used too frequently and
intensively (as in an hospital department) the system will ask the user to make
the MQCS anyway (although with some delay).
To change the setting from “NURS” to “DOCT” – and vice-versa – see par. #7.
1. FOREWORD
VisioFocus PRO is specifically studied to be used in a hospitals, ambulances or
clinic environments, but also airports, schools, factories, etc. in case of emergency
and/or pandemic situations where it is necessary to take several fast and hygienic
temperature readings.
VisioFocus PRO is:
hygienic: never touches the patient, does not need disinfection and does not require
expensive disposable caps;
comfortable: as it is totally not invasive, there is no need to wake up the patient or
to ask for his cooperation while taking the temperature;
accurate: detects the body temperature with constancy, repeatability and accuracy;
unique: it cancels all variables which can’t be monitored by and do not depend on
the health worker (i.e. the presence of earwax during a tympanic measurement or
the displacement of the thermometer during the armpit or oral measurement). With
VisioFocus PRO the user can be sure of having the total control on all measurements
made in the hospital ward.
-
-
-
-
-
-

02 - English -
2. WARNINGS
Read these instructions carefully before using the thermometer
2.1 Precautions
To avoid reading anomalies, use VisioFocus PRO according to this user manual.
Use VisioFocus PRO in a draft-free room, at a steady temperature between 16 and
40°C (60.8 and 104°F).
If the thermometer was stored in another room (or even in a drawer, etc.), before
using it, run the manual calibration procedure (MQCS – par. #8). No matter if it is
set in “NURS” or “DOCT”.
Do not take a temperature reading in the following situations:
• if the subject is sitting in a draft or has come from another room that was ventilated
or at a different temperature than the room where the thermometer is used;
• if, in the minutes before reading, the subject has:
- been walking, running or exercising;
- been wearing a cap, hat or scarf;
- been cool sponged on the forehead;
- been exposed to agents that could alter forehead temperature, e.g. shower,
shampoo, hair-drier, direct sunlight, fireplace heat, cold compresses therapies, air
conditioner flow etc.; even touching the forehead can alter the temperature.
In all the above cases, interrupt the exposition of the subject to these agents and wait
a few minutes for the forehead temperature to stabilize.
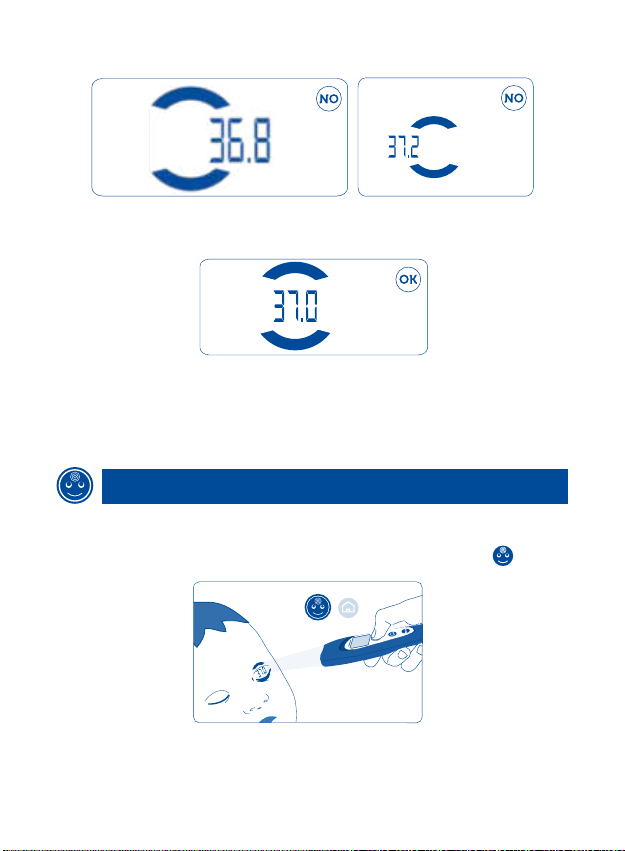
Changing the reading point will lead to different results. Therefore, remember,
always aim the projection on the same spot, precisely at the center of the
forehead (midway between the top of the nose and the hairline) and keep the
thermometer perpendicular to the forehead. Do not take measurements on areas
other than the centre of the forehead, except for the case at #4.2.
The temperature reading is taken in the area where the temperature is projected.
Make certain that a 1 cm (0,4 in) area is free all the way around the temperature
projection area: it is of major importance to make sure that this area does not include
eyebrows, hair or clothing. If necessary, brush away any hair from the forehead but
remember, this must be done a couple of minutes beforehand or the temperature
reading will be higher than the actual body temperature.
When taking a temperature reading, please note that in the presence of oils, make-up
or an oxygen mask, and in the case of elderly, the temperature detected may be
lower than the actual body temperature.
The forehead temperature reading can be affected by profuse sweating, superficial
wounds or head injuries.
Do not use the thermometer on a sweaty forehead, since the temperature
reading will be unreliable.
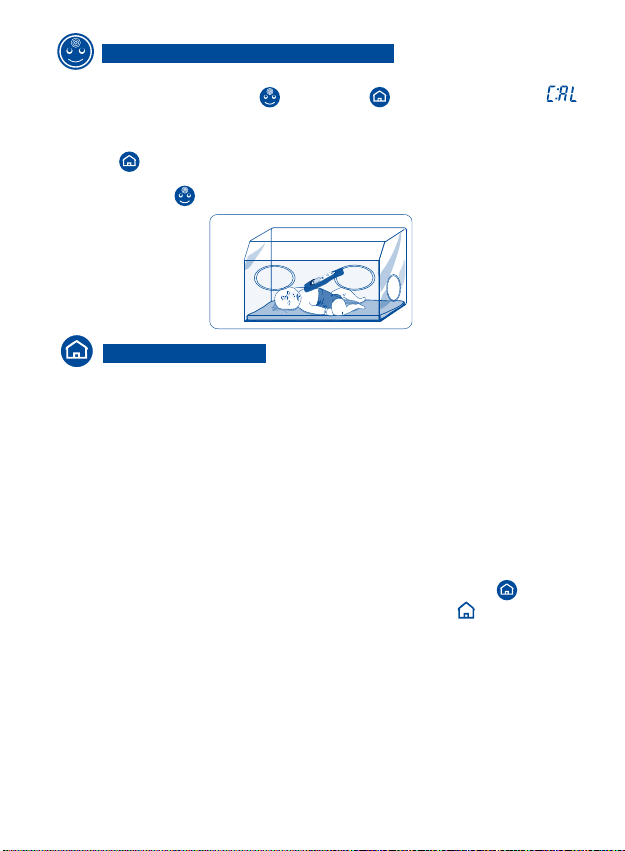
In the cases at #7, #8, #9, take the temperature reading on the alternative area
(read the par. #4.2.).
The gilt waveguide (figure 1) is the most delicate part of the thermometer. It is
composed of a gold-plated concave mirror that must be kept clean, crystal clear and
intact. Any damage, dust or dirt will alter the temperature reading.
!
1.
2.
3.
4.
5.
6.
7.
8.
9.
10.
11.

03 - English -
Do not handle the thermometer for longer than strictly necessary before taking
the reading.
Do not use the thermometer in direct contact with the ear or other parts of the
body.
Do not use the thermometer in direct contact with objects or liquids, keep it
away from water and sources of heat, and out of direct sunlight. Do not submerge
in water or other liquids. If water seeps into the thermometer, contact your Dealer
immediately for technical service.
Do not use VisioFocus PRO on a subject making a call with a mobile or cordless
telephone or in the presence of strong electromagnetic fields.
Avoid knocking and dropping it, and do not use it if damaged or if not
functioning properly.
2.2 Attention
Failure to observe the above-mentioned precautions (par. #2.1) may lead
to very low or very high temperature readings, which cannot be attributed
to product’s malfunctions.
The aiming lights meet the photo-biological safety requirements outlined in
standard EN 62471. No harm can be caused should the aiming lights be
accidentally pointed in the eyes: the beams are harmless!
The unit is a delicate measurement instrument and must not be used by little
children. It is not a toy. Keep it out of the reach of children or persons with limited
sensorimotor skills. Small parts can be ingested or inhaled.
If the patient’s fidgeting makes it difficult to take a correct reading (especially in
case of children), first become familiar with the device and, anyway, turn the aiming
lights on before bringing the thermometer close to the forehead.
Since it never comes into contact with the body, VisioFocus PRO does not require
any “disposable” protection covers.
12.
13.
14.
15.
16.
1.
2.
3.
4.
5.

04 - English -
3. HOW IT WORKS
VisioFocus PRO detects the infrared radiation naturally emitted by the body and,
in particular, from the human forehead.
The forehead is the ideal site for taking a temperature reading because it is crossed
by the temporal artery which receives blood flowing from the aorta and carotid
artery.
Moreover, the forehead is the only part of the head in direct contact with the brain
that is not covered by hair.
The brain is the most important, most delicate organ in the human body and it is
the most susceptible to injury from fever.
The head is also the first part of the body to change its temperature as a fever
rises and falls.
With each temperature measurement, your VisioFocus PRO takes a series of 125
readings a tenth of a second. Its sophisticated microprocessor then amplifies and
processes this information along with the room temperature and shows the correct
body temperature through the projection.
Please note that the body temperature varies among individuals: moreover,
individual temperature varies according to the measurement’s site and
throughout the day, also in response to physical or mental effort (for example
a baby's crying). Moreover, the body temperature can be affected by the outside
temperature and, depending on the type of reading taken, other factors may also
come into play.
Due to heat dispersion from uncovered parts of the body, the actual temperature
at the forehead is generally lower than that in covered zones.
Therefore, when the “FACE” button is pressed, the VisioFocus PRO software
automatically applies a correction factor and thus the resulting value is comparable
to that given by other more usual temperature reading sites commonly used in
the countries where the unit is sold - axillary, oral or rectal reading, or internal
temperature reading -, according to the customer’s choice.
Nevertheless, the reference value can be changed. Remember, an “oral” reading
is generally 0.2°C (0.4°F) higher than an axillary reading while a “rectal” or “core”
reading is 0.8°C (1.4°F) higher (see par. #7).
The VisioFocus PRO temperature reading taken on the forehead of a healthy
person can range between 35 and 37.5°C (95 and 99.5ºF), in axillary mode,
although in an adult it may even be below 35°C (95°F).

4. HOW to USE IT
4.1 Taking the body temperature: FOREHEAD
• At the first use, insert 4 AAA batteries (LR03, preferably alkaline) as explained at #11.
• Open the protective cap by rotating it 90° (fig. 2).
• Press the “FACE” button.
If the display shows:
it is reminding to do the MQCS if necessary before proceeding with the body
temperature measurement.
Proceed as follows:
press and release at the same time “FACE” and “HOME” buttons: the
word “CAL” will appear on the display;
within 10 seconds point the thermometer against on an internal wall (not the
inside of an external wall), pressing the “HOME” button;
release the button: lights will flash twice s l o w l y and then the display will show
the acquired temperature.
VisioFocus PRO is now ready to take a measurement.
For more details about MQCS see par. #8.
• To take a reading, press the “FACE” button and hold it down.
The two aiming lights turn on and you will begin to see the temperature reading,
projected onto the forehead between two arches. The display starts to show the
temperature, together with the symbol .
• While keeping the VisioFocus PRO perpendicular to the center of the
forehead, move it in or back away from the forehead until the temperature reading
is set squarely between the two arches (fig. 3):
Fig. 2
90°
Correct distance and
thermometer perpendicular to
the middle of forehead
Fig. 3
05 - English -
-
-
-

Fig. 6
Correct
distance
Too
far
Fig. 4
Too
near
Fig. 5
Alternative reading
on eyelid
Fig. 7
if the thermometer is too far away, or too close, the temperature will not fall
between the two arches (fig. 4 and 5).
• When you see the temperature at the midpoint between the two arches (fig. 6),
the thermometer is at the right distance: release the button and keep the projection
flashes and read the temperature value.
You can also read the temperature on the display, lit in light blue.
If necessary, you can immediately take another reading.
• Close the protective cap.
When the thermometer remains idle for 20 seconds, it reverts to stand-by mode
and will display the room temperature for 45 minutes (“DOCT” mode) or 30 minutes
(“NURS” mode) before shutting off.
4.2 In case of sweating, oxygen mask, elderly patients: take
the reading on the eyelid
In case of perspiring forehead, oxygen mask, elderly patients - especially with
wrinkled forehead - , the measurement must be taken on the eyelid.
Proceed as you would do for a forehead reading, using the “FACE” button,
but taking a scan of the closed eyelid (fig. 7).
No need to worry that the patient could open the eyes while you are taking the
reading: the lights are harmless.
Precision is not guaranteed, but such reading can be considered a valid approximation
of one's body temperature. Such reading is also indicated when one has oil or
make-up on the forehead. 06 - English -

07 - English -
4.3 Use on newborns in incubators
For use in the incubator do the MQCS inside (see par. #8):
• press simultaneously “FACE” and “HOME” buttons. The word CAL
appears on the display;
• within 10 sec open the protective cap and, handling the device according to the
position of the forehead of the baby, introduce it in the incubator, press the
“HOME” button and focus the lights on the inner wall of the incubator.
• Release the button.
Using the “FACE” button, take the temperature on the forehead of the baby
(fig. 8). Fig. 8
4.4 Other readings
In “DOCT” mode, using the “HOME” button, VisioFocus PRO can also be used
to:
1) read the temperature of objects and liquids in the 1-80°C (33.8-176°F)
temperature range. For example: canteen meal, liquids, blood bag, incubator,
professional tools, room temperature, etc.;
2) scan the skin temperature of different body areas, in order to detect possible
inflammations and/or circulatory diseases or any other problem which may cause
an alteration of the surface skin temperature. Of course VisioFocus PRO can be
used on open wounds or organs during surgical interventions, ensuring maximum
hygiene thanks to the total absence of contact.
These measurements are not entirely accurate and must be considered as
relative rather than absolute values. If taken on the skin, they can show the
difference between two close or symmetrical areas.
Proceed as you would for a forehead reading but press the “home” button;
the display will light up in green and show the house symbol .
In “NURS” mode the “HOME” button is disabled; anyway, using the “FACE”
button, you can also take any temperature from 1 to 80°C/33.8 to 176.0°F, but
in this case, these measurements are not entirely accurate and must be
considered as relative rather than absolute values. If taken on the skin, they can
show the difference between two close or symmetrical areas. The display will
show alternately the temperature value and “Lo.3”, if the recorded value is
<34°C/93.2°F or “Hi.2”, if it is >37°C or 38°C (98.6 or 104°F) depending on the
Alarm level - see par. #7.

08 - English -
5. ROOM TEMPERATURE
When the thermometer is in stand-by, the room temperature and the symbol
flash and remain displayed automatically for 45 minutes (DOCT mode) or 30
minutes (NURS mode) after the last reading is taken.
To display the room temperature on the backlit display, while the thermometer
is in stand-by mode, press the “Mem” button: the display illuminates in
orange showing the room temperature and the symbol flashing.
6. MEMORY FUNCTION
The “Mem” button (in DOCT mode or in NURS mode if it is enabled) lets you call
up the last 9 temperature readings.
Press twice the "Mem” button: the display will light up in violet and the value
of the last reading will be shown accompanied by the number 1 and the symbol
or depending on which button was used for that reading.
Pressing the button again calls up the second to last, third to last reading and so
on, accompanied by the numbers 2, 3, etc.
7. HOW to CHANGE the SETTINGS
Depending on where it is going to be sold, your thermometer leaves the factory:
• Celsius ( ) or Fahrenheit ( ) degrees;
• referred to oral ( ), rectal ( ) or axillary ( ) or internal temperature
readings ( ) or only internal temperature readings (no symbol will be
shown);
• “NURS” mode ( ), (highly recommended if used by nurses, in
ambulances and for any intensive use, such as in airports etc: “HOME” and “Mem”
buttons are disabled; MQCS is requested and mandatory every 30 minutes) or
“DOCT” mode ( ), (suggested for doctors’ use: “HOME” and “Mem”
buttons are enabled; AQCS is automatic and MQCS is optional);
• ≥37.0°C (≥98.6°F) or ≥38.0°C (≥100.4°F) temperature level alarm: you can
choose the temperature threshold beyond which the thermometer alternates the
projection of “Hi.2” and the temperature (for 7 seconds);
• memory function enabled ( ) or disabled ( );
• “air” function enabled ( ) or disabled ( ): to be activated
in case of high air conditioning in the room, to minimize the cooling effect of intense
air conditioning on the subject/patient.
If necessary, these settings can be modified as follows:
• while the thermometer is off or in stand-by mode, press the “Mem” button an
hold it down; after about 8 seconds the visualization on the display changes showing
in rotation the following combinations:

09 - English -
The current settings are highlighted by the green backlight.
• When the new desired setting appears, release the button. The purple backlight
will turn green.
Only one setting can be modified at a time.
NOTES:
- The measurement of the body temperature must be taken always at the centre
of the forehead (par. #4.1) or at the eyelid (par. #4.2), no matter what the current
setting is: in fact, the axillary, oral, rectal or core settings provide a forehead
temperature value that is a valid approximation of the axillary, oral or rectal/internal
temperature respectively (see par. #3).
- if the thermometer was produced with the sole internal temperature setting, the
ORAL, RECTAL, AXILLA and CORE settings will not appear in the sequence.
- Temperature level alarm: if you choose 37.0°C the thermometer alternates the
projection of "Hi.2" and the temperature above 37°C; if you choose 38.0°C the
thermometer alternates the projection of "Hi.2" and the temperature above 38°C.
- Air function: choose in case of high air conditioning in the room (in case of
high air conditioning in the room, when appears, wait for and release
the button - the display will show alternately the word and the temperature
value); otherwise choose .
8. ROOM TEMPERATURE CALIBRATION
8.1 MQCS
The exclusive Manual Quick Calibration System (MQCS) promptly corrects the
device’s internal temperature and adapts it to the real temperature of the room
where the reading is to be taken.
This system is extremely useful in case of prolonged use, when you need to keep
the temperature of the thermometer steady, or in case you have to move quickly
from one room to another - having different temperature - and you cannot wait too
long to have the thermometer stabilized to room temperature: for example, if you
move from room to room in a hospital department, especially if rooms have different
exposures (North, South, etc.) or in case of ambulance use for home-care.
This system is very useful also if the device is kept in the pocket or if handled for
long time for example during screening of passengers in airports.
Proceed as follows (room temperature must be in the 10-45°C/50.8-113°F
temperature range):
• press the “FACE” and "HOME" buttons (fig. 9) simultaneously;
• the symbol CAL will appear and the display will light up in blue. Open the
cap;

10 - English -
• within 10 seconds focus the thermometer on an internal wall (not the inside of an
external wall) or wardrobe with uniform temperature and at a point approximately
80/150 cm (30 to 60 inches) from the floor. Press the "HOME” button (fig. 10);
• once the right distance is reached (temperature value between the arches, fig. 5),
release the button: the lights flash slowly and the display shows the room
temperature.
To ensure a reliable temperature reading, do not focus the thermometer on an
outside wall, window, source of heating or cooling (radiator, air conditioner, lamp,
computer, surface in contact with the human body, etc.).
The thermometer is now ready to take a reading and will keep the MQCS for 30 minutes.
“MQCS” on the display indicates that manual quick calibration has been performed.
This system enables the thermometer to take accurate readings.
The MQCS can also be performed in case of countdown (see par. 8.2).
In “NURS” setting, the MQCS is mandatory every 30 minutes.
In “DOCT” setting, see the par. #8.2.
8.2 AQCS - countdown (only DOCT MODE)
In DOCT setting, if the thermometer is handled at length or if there is a significant
temperature difference with respect to the room temperature, a countdown will
appear on the display indicating that you should wait until automatic temperature
calibration AQCS (Automatic Quick Calibration System) has been completed.
The countdown will continue updating as long as differences in temperature are
detected (for example, because the thermometer has been continuously handled).
At this point you have 2 options:
1. make the MQCS as described in par. #8.1
or
2. without touching the thermometer, wait until the countdown has run its course
and automatic quick calibration AQCS (countdown) is completed.
At the end of the countdown, the thermometer can take accurate readings.
“AQCS” appears on the display indicating that automatic quick calibration has
been performed.
Fig. 10
Fig. 9

9. MEANING of DISPLAY MESSAGES
11 - English -
DESCRIPTION: during normal operation, the symbol appears on the display.
PROBLEM: the batteries are running low but it is still possible to take several readings.
SOLUTION: obtain new batteries for changing them when the signal E.1 (below)
appears.
DESCRIPTION: “E.1” and the symbol appear on the display, or the unit does not
turn on at all.
PROBLEM: the batteries are dead.
SOLUTION: remove the batteries immediately and insert the new ones when
necessary (see par. #11).
DESCRIPTION: the projection/display reads "E.8".
PROBLEM: the thermometer was moved before the light started flashing, or the area
is subject to strong electromagnetic fields.
SOLUTION: wait until the lights flash before moving the thermometer; make certain
that you are not in the vicinity of calls with mobile or cordless telephones.
DESCRIPTION: the display reads C:AL and/or a countdown (in
minutes and seconds), a pictogram of a hand inviting to stop, and
the messages AQCS and MQCS?
PROBLEM: the thermometer has not stabilized.
SOLUTION: • wait until the AQCS countdown has run its course
without touching the thermometer, or
• perform an MQCS (par. #8).
DESCRIPTION: while in stand-by mode, the room temperature
displayed is accompanied by the symbol MQCS or AQCS.
MEANING: the thermometer has undergone manual or automatic
quick calibration (par. #8).
DESCRIPTION: if you’ve pressed the “FACE” button and
the projection/display shows "Hi.4" and the value alternately.
PROBLEM: the room temperature is between 40.1 and 45°C
(104.1 and 113°F).
MEANING: the temperature reading can be taken but accuracy
is not guaranteed.
DESCRIPTION: the projection/display reads "Hi.4”.
PROBLEM: the room temperature is too high (above 45°C/113°F).
SOLUTION: move to another, cooler site and, if you are taking the body temperature,
wait for the stabilization of the device and of the subject.
DESCRIPTION: the projection/display shows "Lo.5" and the
value alternately.
MEANING: - reading with “FACE” button: the room
temperature is between 10 and 15.9°C (50 and 60.6ºF).
- reading with “HOME” button (DOCT mode): the room
temperature is between 41 and 60.6ºF (5 and 15.9°C).
SOLUTION: the temperature reading can be taken but
accuracy is not guaranteed.

DESCRIPTION: the projection/display reads "Lo.5”.
PROBLEM: the room temperature is too low (below 10°C/50°F if you've pressed the
“FACE” button or below 5°C/41°F if you've pressed the “HOME” button).
SOLUTION: move to another, warmer room and, if you are taking the body
temperature, wait for the stabilization of the device and of the subject.
DESCRIPTION: the projection/display shows "Hi.2" and the
value alternately.
MEANING: ATTENTION! The temperature is above the level
alarm you’ve chosen (see par. 7).
DESCRIPTION: the projection/display reads "Hi.2".
PROBLEM: the temperature detected exceeds the limit for operation (>42.5°C /
>108.5ºF if you've pressed the “FACE” button or >80°C / >176°F if you've
pressed the “HOME” button).
SOLUTION: if you’ve pressed the “FACE” button: please make certain that you’ve
pressed the correct button, with regard to the measured object, and that the warnings
have been met.
If you’ve pressed the “HOME” button (DOCT mode): the temperature reading
cannot be taken (because it is too high).
DESCRIPTION: the projection/display reads "Lo.3".
PROBLEM: if you’ve pressed the “FACE” button: the forehead temperature appears
to be too low (<34.0°C or <93.2°F).
If you’ve pressed the “HOME” button (DOCT mode): the surface temperature read is
below the operating limit (<1°C/33.8°F).
SOLUTION: if you’ve pressed the “FACE” button: make certain the waveguide is not
soiled or damaged and that the subject has not come from a cold room.
If you’ve pressed the “HOME” button: the temperature reading cannot be taken.
DESCRIPTION: the display shows "off".
MEANING: the button that you've pressed is disabled when the device is set in NURS.
SOLUTION: if you want to enable it see par. 7.
12 - English -
10. TROUBLESHOOTING
The projection/display does not turn on: the batteries are completely dead or
incorrectly inserted; replace or reinsert them (par. #11).
The temperature is not projected between the two arches: the unit is not at the correct
distance; move the thermometer forward or back until the projected temperature falls
precisely between the two arches (fig. 6).
The projected temperature is not clearly visible: there is too much light in the room
or the batteries are low; cast a shadow over the subject or replace the batteries.
The sensor (fig. 1) is damaged or water has seeped into the thermometer: contact
your Dealer right away for technical service.
The thermometer temperature reading is too low:
- make certain that the conditions outlined in the warnings (par. #2) have been met;
- check that the waveguide (fig. 1) is not soiled or damaged; if it is, clean it as
indicated in par. #12 or contact your Dealer for technical service;
- check that the thermometer is perpendicular to the forehead as indicated in fig. 3.
The temperature reading is too high: make certain that the conditions outlined
1.
2.
3.
4.
5.
6.

13 - English -
Open
Close
Fig. 11
in the warnings have been met (par. #2).
The thermometer appears blocked, for instance, some lights remain on for longer
than 2 minutes: reset the thermometer by removing and reinserting the batteries.
11. REPLACING the BATTERIES
• Set your thumb in the oval hollow on the
back of the unit, press down and slide the
battery hatch out as shown in fig. 11.
• Remove the battery hatch.
• Remove the old batteries and dispose of
them as required in the containers provided
for this purpose.
• Insert 4 new AAA - LR03 batteries, preferably
alkaline, carefully complying with the position indicated in their housing.
• To close the hatch, slide it in the opposite direction from which it was opened.
After changing the batteries, let the thermometer stabilize for 20 minutes before
taking a temperature reading, or run a manual quick calibration (MQCS, par. #8).
• Remove the batteries if you do not expect to use the thermometer for a long
time.
12. CLEANING
CLEANING THE WAVEGUIDE: the thermometer waveguide (fig. 1) is very delicate.
Therefore, when the thermometer is not being used, we recommend that you
always keep the cap on. However, if you need to remove dust or dirt from the
waveguide or sensor at its base, use a cotton swab that has been slightly
dampened with alcohol.
Remove all dirt and make certain that nothing accumulates at the bottom of the
waveguide where the sensor is located.
Do not use any other objects or liquids as the surface of the sensor could easily
be scratched or damaged. Never let any excess liquid penetrate into the
waveguide and sensor.
CLEANING THE THERMOMETER BODY: use a soft cloth dampened with soap
and water and possibly re-wipe with a sodium hypochlorite disinfectant.
DO NOT USE the thermometer for at least 30 minutes after cleaning.
7.

14 - English -
Accuracy
°C
from 1,0 to 19,9°C:
from 20,0 to 35,9°C:
from 36,0 to 39,0°C:
from 39,1 to 42,5°C:
from 42,6 to 80°C:
±
1,0°C
±
0,3°C
±
0,2°C
±
0,3°C
±
1,0°C
Accuracy
°F
from 33.8 to 67.9°F
from 68.0 to 96.7°F
from 96.8 to 102.2 °F
from 102.3 to 108.6°F
from 108.7 to 176 °F
±
1.8°F
±
0.5°F
±
0.4°F
±
0.5°F
±
1.8°F
13. TECHNICAL CHARACTERISTICS
Series VisioFocus®, model VisioFocus® PRO 06480: non-contact infrared thermometer
Resolution: 0.1
Body temperature readings Measurement range: 34,0/42,5°C (93.2-
108.5
°F)
Room temperature working range: 16/40°C (60.8/113°F ) (1)
from 34,0 to 35,9°C:
±0,3°C
from 36,0 to 39,0°C: ±0,2°C (2)
from 39,1 to 42,5°C:
±0,3°C
Other readings Measurement range: 1,0/80,0°C (33.8-176°F)
Room temperature working range: 10/40°C (40/104°F) (3)
(1) In rooms where the temperature is between 10 and 15,9°C (50 and 60.6°F), accuracy and the operating range
are not guaranteed and the message “Lo.5" and the temperature value are displayed alternately. In rooms where the
temperature is between 40,1 and 45°C (104.1 and 113°F), accuracy and the operating range are not guaranteed
and the message “Hi.4" and the temperature value are displayed alternately.
(2) ASTM E1965-98-2009 laboratory accuracy requirements in the display range of 37 to 39°C (98 to 102°F) for IR
thermometers is
±
0,2 °C (
±
0.4 °F), whereas for mercuryin-glass and digital thermometers, the requirement per ASTM
Standards E 667-86 and E 1112-86 is
±
0,1 °C (
±
0.2°F).
3) In rooms where the temperature is between 5 and 9,9 °C (41 and 50°F) accuracy and the operating range are not
guaranteed and the display shows "Lo.5" and the value alternately. In rooms where the temperature is between 40,1
and 45°C (104.1 and 113°F), accuracy and the operating range are not guaranteed and the message “Hi.4" and the
temperature value are displayed alternately.
Power supply: 4 AAA (LR03) alkaline batteries - 1.5 V (included)
Life of high quality batteries: up to 3 years or 30,000 readings (depending on use)
Dimensions: 144 x 43,5 x 21,5 mm (5.67 x 1.71 x 0.85 inches) - including cap
Weight: 98 gr. (3.46 oz.) - batteries included
Distance from the subject: calculated using an optical aiming system (approx. 6 cm/2.36 inches).
Large, clearly visible, backlit display in 5 colors:
1. light blue (button used: FACE. See par. #4.1 and #4.2);
2. green (button used: HOME. See par. #4.3);
3. violet (button used: MEM, memory function. See par. #5);
4. orange (button used: MEM, ambient temperature function. See par. #6);
5. blue (MQCS function. See par. #8).
Atmospheric pressure range of operating conditions: from 700 hPa to 1,060 hPa. Relative humidity
range of operating conditions: from 15% to 93%, non-condensing.
Keep in a clean, dry place, preferably at a temperature ranging between +16 and +40°C (60.8 and
104°F). Store at a temperature included between -10 and +60°C (14 and 140°F) and in any case
not lower than -18°C (0.4°F) or higher than +70°C (158°F).
Expected life: 10 years.
VisioFocus PRO is a class IIa medical device (per Directive 93/42/EEC and subsequent amendments
and integrations). Its measuring system has been tested in hospitals, private clinics and medical
offices. It is compliant with the pertinent ASTM standard (E1965-98:2009) and with IEC 60601-1
and IEC 60601-1-2 standards. Internally powered equipment for continuous operation. The
VisioFocus PRO LEDs emit low light radiation in compliance with IEC 62471. Tecnimed srl, P.le
Cocchi, 12 - 21040 Vedano Olona (VA) - Italy undertakes full responsibility for this product's
compliance with the reference standards.
Accuracy
°C
Accuracy
°F
from 93.2 to 96.7°F:
±0.5°F
from 96.8 to 102.2°F: ±0.4°F
(2)
from 102.3 to 108.5: ±0.5°F

Misurazione alternativa
sulla palpebra /
Alternative reading
on the eyelid /
Mesure alternative
sur la paupière
Fig. 7
Distanza corretta e termometro
perpendicolare al centro della fronte /
Correct distance and thermometer
perpendicular to the forehead /
Bonne distance et thermomètre
perpendiculaire au milieu du front
Fig. 3
Fig. 6
Distanza corretta /
Correct distance /
Bonne distance
Troppo
lontano /
Too far /
Trop loin
Fig. 4
Troppo
vicino /
Too near /
Trop près
Fig. 5
Fig. 2
90°
Fig. 8
Fig. 9
Fig. 10
This manual suits for next models
1
Table of contents
Other VisioFocus Thermometer manuals