VisioFocus 06400 User manual

Operating instructions
EN
Rev. 9/6400-2021-09
Read these instructions carefully before using
the thermometer
CAUTION: read the warnings
06400

1
10
11
9
6
5
8
7
23
4
1
Fig. 1
1. Aiming light
2. Waveguide
3. Sensor (at the bottom of the waveguide)
4. Aiming light
5. LCD display
6. FACE button for forehead temperature readings
7. HOME button for other readings
8. MEMORY button
9. Protective cap
10. Label with serial number
11. Battery door (4 x AAA)

2
INTENDED USE: VisioFocus®is an infrared medical thermometer intended for non-
contact measurement of body temperature in children and adults.
It can also be used to monitor the temperature of inammations, ulcers, wounds (e.g.
on diabetics and under medical supervision).
1. FOREWORD
Dear Client, thank you for buying VisioFocus®- the Thermofocus®evolution (the wor-
ld’s rst non-contact thermometer) -.
VisioFocus is truly easy to use. It is capable of measuring a child or adult’s tempera-
ture without ever coming into contact with the skin: just bring it close to the forehead,
at the distance that the thermometer itself will tell you. VisioFocus does not need to be
placed in any parts of your child’s body. If your baby is sleeping, you can use VisioFo-
cus without waking him up; and, if the child is awake, VisioFocus will not bother him.
2. WARNINGS
Read these instructions carefully before using the thermometer
2.1 Precautions
1. To avoid reading anomalies, use VisioFocus according to this user manual.
2. Use VisioFocus in a draft-free room, at a steady temperature between 16,0 and
40,0°C (60.8 and 104.0°F). VisioFocus can also work if room temperature is in the
ranges 10,0-15,9°C (50.0-60.7°F) and 40,1-45,0°C (104.1-113.0ºF), but accuracy is
not guaranteed - see also par. #13.
3. If the device comes from a room having an ambient temperature dierent from the
one of the room in which you are taking the reading (or even from a drawer, etc.), it
needs to be stabilized. Do the MQCS before using it (see par. #8). As alternative, wait
at least 5 minutes or the end of the countdown (if any), for the temperature to stabilize
through the AQCS (see par. #8), without touching the device.
4. Do not take a temperature reading if the person is sitting in a draft or if the subject has:
• been walking, running or exercising;
• come from another room that was ventilated or at a dierent temperature than the
room where the thermometer is used;
• been wearing a cap, hat or scarf;
• been exposed to agents that could alter forehead temperature, e.g. shower, sham-
poo, hair-drier, sponging, etc.
In all the above cases, interrupt the exposition of the subject to these agents and
wait a few minutes for the forehead temperature to stabilize.
5. Changing the reading point will bring to dierent results. Therefore, remember,
always aim the projection on the same spot, precisely at the centre of the
forehead (midway between the top of the nose and the hairline) and keep the ther-
mometer perpendicular to the forehead. Do not take measurements on areas

3
other than the centre of the forehead, except for the case at #4.2. ATTENTION:
measurements on areas other than the centre of forehead (e.g. temples, neck,
wrists) have not been clinically validated.
6. The temperature reading is taken in the area where the temperature is projected.
Make certain that a 1 cm (0,4 inches) area is free all the way around the temperature
projection area: it is of major importance to make sure that this area does not include
eyebrows, hair or clothing. If necessary, brush away any hair from the forehead but
remember, this must be done a few minutes beforehand or the temperature reading
will be higher than the actual body temperature.
7. When taking a temperature reading, please note that in the presence of oils,
make-up or an oxygen mask, and in the case of elderly, the temperature detected may
be lower than the actual body temperature (see also par. #4.2).
8. The forehead temperature reading can be aected by profuse sweating, super-
cial wounds or head injury.
9. Do not use the thermometer on a sweaty forehead, since the temperature
reading would be unreliable. Read the par. #4.2.
10. In the cases at #7, #8, #9, take the temperature reading on the alternative area
(read the par. #4.2.).
11. The gilt waveguide (g. 1) is the most delicate part of the thermometer. It is
composed of a gold-plated concave mirror that must be kept clean, crystal clear and
intact. Any damage, dust or dirt will alter the temperature reading. To prevent dust or
dirt inltrations in the waveguide, always close the cap.
12. Do not handle the thermometer for longer than strictly necessary before taking
the reading.
13. Do not use the thermometer in direct contact with the ear or other parts of the body.
14. Do not use the thermometer in direct contact with objects or liquids. Do not
submerge the thermometer in water or other liquids and keep it away from sources
of heat and out of direct sunlight. If water seeps into the thermometer, contact your
Dealer immediately for Technical Service.
15. Do not use VisioFocus on a subject making a call with a mobile or cordless
telephone or in the presence of strong electromagnetic elds.
16. Avoid knocking and dropping it, and do not use it if damaged or if not functioning
properly.
2.2 Attention
1. Failure to observe the above-mentioned precautions (par. #2.1) may lead
to very low or very high temperature readings, which cannot be attributed to
product’s malfunctions.
2. The aiming lights meet the photo-biological safety requirements outlined
in standard EN 62471. No harm can be caused should the aiming lights be acciden-
tally pointed in the eyes: the beams are harmless!
3. The unit is a delicate measurement instrument and must not be used by little
children. It is not a toy. Keep it out of the reach of children or persons with limited
sensorimotor skills. Small parts can be ingested or inhaled.
4. Using this thermometer should not substitute medical consultation. Tell your phy-

4
sician what type of thermometer you are using and in which part of the body the
temperature reading was taken.
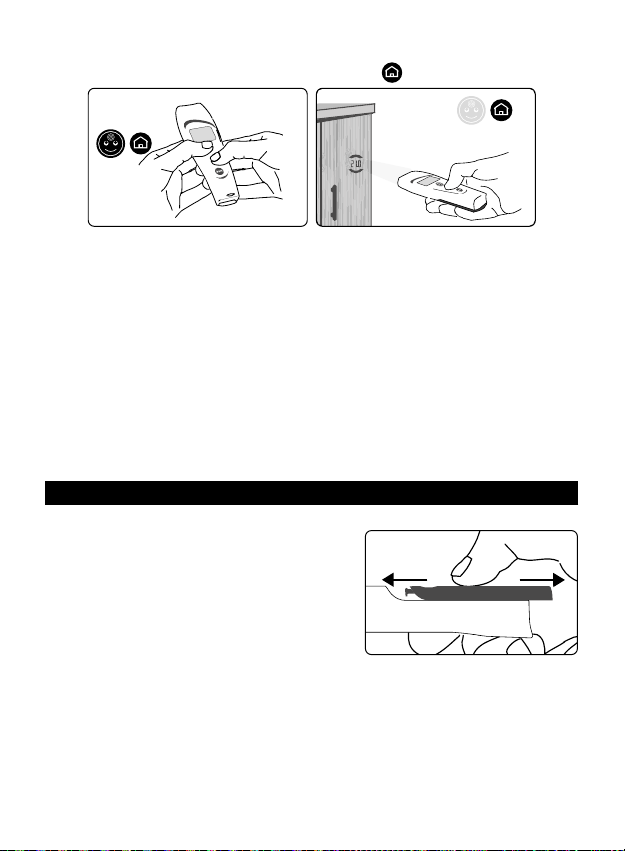
5. If the child’s dgeting makes it dicult to take a correct reading, rst become
familiar with the device and, anyway, turn the aiming lights on before bringing the
thermometer close to the forehead.
6. When taking your own temperature, use a mirror, or the black screen of a smartphone,
or, if you have a child over six years of age, you can teach him how to use VisioFocus.
7. Since it never comes into contact with the body, VisioFocus does not require any
disposable protection covers.
8. ATTENTION: any serious incident that occurs in relation to the device should be
country.
3. HOW IT WORKS
VisioFocus detects the infrared radiation coming from the human body.
The forehead is an ideal site for taking a temperature reading, as it is crossed by the
temporal artery and in direct contact with the brain. The head is also the rst part of
the body to change its temperature as a fever rises and falls.
With each temperature measurement, your VisioFocus takes a series of 125 readings
a tenth of a second. Its sophisticated microprocessor then amplies and processes
this information along with the room temperature and shows the correct body tempe-
rature through the projection.
Please note that that body temperature varies among individuals: moreo-
ver, individual temperature varies according to the measurement’s site and
throughout the day, also in response to physical or mental eort (for example
a baby’s crying). Moreover, the body temperature can be aected by the outside tem-
perature and, depending on the type of reading taken, other factors may also come
into play.
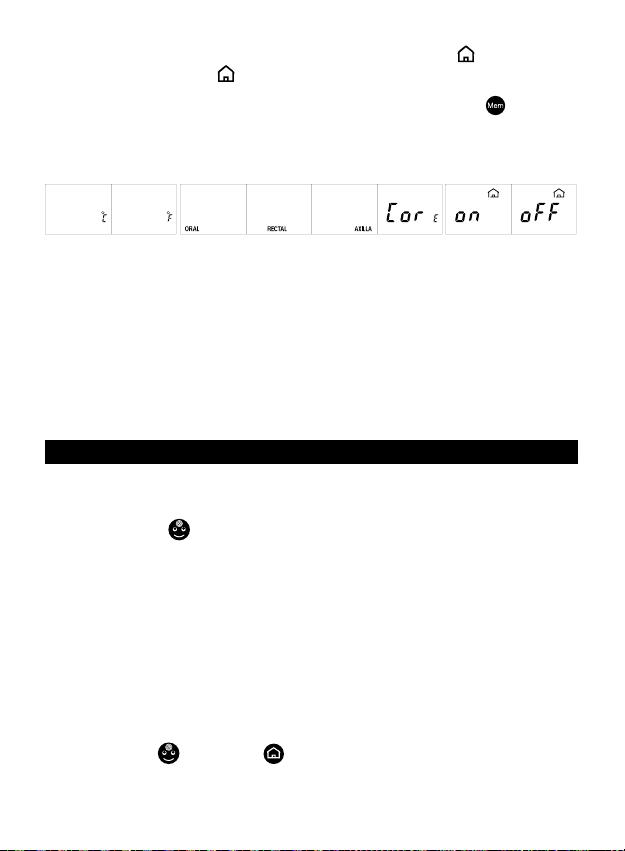
Due to heat dispersion from uncovered parts of the body, the actual temperature at the
forehead is generally lower than that in covered zones. Therefore, when the “face”
button is pressed, the VisioFocus software automatically applies a correction factor
and thus the resulting value is comparable to that given by other more usual tempe-
rature reading sites commonly used in the countries where the unit is sold - axillary,
oral or rectal reading, or internal temperature reading -, according to the customer’s
choice. Nevertheless, the reference value can be changed. An “oral” reading is gene-
rally 0,2°C (0.4°F) higher than an “axillary” reading while a “rectal” or “internal” reading
is 0,8°C (1.4°F) higher (see par. #7).
Remember, the measurement of the body temperature should be taken always at the
centre of the forehead (par. #4.1) or at the eyelid (par. #4.2), no matter what the cur-
rent setting is: in fact, the axillary, oral or rectal/internal settings provide a forehead
temperature value that is a valid approximation of the axillary, oral or rectal/internal
temperature respectively (see par. 7).
The VisioFocus temperature reading taken on the forehead of a healthy person can

5
range between 35 and 37,5°C (95 and 99.5ºF), although in an adult it may even be
below 35°C (95°F) (in axillary mode).
To correctly judge a fever, you need to know the usual temperatures of your family
members when they are in good health condition and at various times of the day. To
help you with this, ll out the table “FAMILY MEMBER TEMPERATURES at dierent
times of day and when in good health conditions” and keep it as a reference: https://
www.tecnimed.it/download/Tables.pdf
4. HOW to USE IT
4.1 Taking the body temperature: FOREHEAD
• At the rst use, insert 4 AAA batteries as explained at #9.
• Open the protective cap by rotating it 90° (g.
2).
• Approach VisioFocus to the forehead.
• Press the “face” button and hold it down.
The two aiming lights turn on and you will begin
to see the temperature reading, projected onto
the forehead between two arches. The display
starts to show the temperature, together with the
symbol .
• While keeping the VisioFocus perpendicular to the center of the forehead, move
it in or back away from the forehead until the temperature reading is set squarely
between the two arches (g. 3):
Fig. 3
Correct distance and
thermometer perpendi-
cular to the forehead
If the thermometer is too far away, or too close, the temperature will not fall between
the two arches (g. 4 and 5).
NO:
too far
Fig. 4
Fig. 5NO:
too close
90°
Fig. 2

6
• When you see the temperature at the midpoint between the two arches (g.
6), the thermometer is at the right distance: release the button and keep the device
steady while the lights ash.
OK
correct
distance
Fig. 6
You can also read the temperature on the display, lit in light blue.
If necessary, you can immediately take another reading.
• Close the protective cap.
When the thermometer remains idle for 20 seconds, it reverts to stand-by mode and
will display the room temperature for 4 hours before shutting o. If you want it to shut
down immediately after the 20 second interval, read the chapter on “Energy Saving”
mode (par. #7).
4.2 In case of sweating: take the reading on the eyelid
At times, the forehead can show signs of
sweat, for example as a fever drops, and this
can result in a low reading. Dry the forehead
is not enough. In this case, you can take the
temperature reading, again at distance on the
closed eyelid (g. 7).
Proceed as you would do for a forehead rea-
ding. No need to worry that your child could
open its eyes while you are taking the reading:
the lights are harmless.
Precision is not guaranteed, but such reading can be considered a valid approximation
of one’s body temperature. In adults, such reading is also indicated when one has oil
or make-up on the forehead; moreover it is also valid for the elderly as well as in case
of oxygen mask.
4.3 Readings of skin surface temperature
VisioFocus can also scan the skin surface temperature: this can be useful to monitor
the temperature of inammations, ulcers, wounds (for example on diabetic patients
and under control of your physician).
Proceed as you would for a forehead reading but press the “home” button; the
display will light up in green and will show the “home” symbol.
NOTE: skin surface temperature is NOT body temperature. To measure body tempe-
rature, proceed as described in par. 4.1.
Fig. 7
alternative reading
on eyelid

7
4.4 Other readings (non-medical use)
VisioFocus can also be used to read the tem-
perature of objects, food and liquids in the 1,0-
80,0°C (33.8-176.0°F) temperature range.
For example, you can take the temperature of:
1 a baby’s feed bottle (g. 8),
2. food,
3. bathwater.
Mix liquids well before taking the reading and,
with hot liquids or foods, take the reading quickly
to prevent condensation from forming on the lens and wait 30 min. before taking
another reading.
Proceed as you would for a forehead reading but press the “home” button; the
display will light up in green and will show the “home” symbol.
NOTE: this intended use is not subject to assessment by the Notied Body.
5. ROOM TEMPERATURE
When the thermometer is in stand-by mode (“Peak Performance” - see par. #4.1 and
#7), the room temperature remains displayed automatically for 4 hours after the last
reading is taken and the symbol ashes.
To display the room temperature on the backlit display, while the thermometer is in
stand-by mode, press the “Mem” button once: the display illuminates in orange
showing the room temperature and the symbol ashing.
6. MEMORY FUNCTION
The «Mem” button lets you call up the last 9 temperature readings.
To activate this function, press the “Mem” button twice: the display will light up
in violet and the value of the last reading will be shown accompanied by the number
1 and the symbol or depending on which button was used for that reading.
Pressing the button again calls up the second to last, third to last reading and so on,
accompanied by the numbers 2, 3, etc.
7. HOW TO CHANGE the SETTINGS
Depending on where it is to be sold, your thermometer leaves the factory as follows:
• preset to Celsius (°C) or Fahrenheit (°F)
• referred to oral (“ORAL”) or rectal (“RECTAL”) or axillary (“AXILLA”) or internal tem-
perature readings (“CorE”) or only internal temperature readings (no symbol shown);
Fig. 8

8
• with display o when in stand-by mode (“Energy Saving”, o ) or always on
(“Peak Performance” - on ).
If necessary, these settings can be modied as follows:
1. while the thermometer is o or in stand-by mode, press the “Mem” button and
hold it down; after about 8 seconds the visualization on the display changes showing
in rotation the following combinations (the display is backlit in green in correspon-
dence of the active setting; while for non active settings the display is always backlit
in purple):
2. When the new desired setting appears, release the button. The purple backlight will
turn green. Only one setting can be modied at a time.
Note:
- if the thermometer was produced with the sole internal temperature setting, the
ORAL, RECTAL, AXILLA and CORE settings would not be available for changing.
- The measurement of the body temperature must be taken always at the centre of the
forehead (par. #4.1) or at the eyelid (par. #4.2), no matter what the current setting is: in
fact, the axillary, oral, rectal or core settings provide a forehead temperature value that
is a valid approximation of the axillary, oral or rectal/internal temperature respectively
(see par. #3).
8. ROOM TEMPERATURE CALIBRATION
If the thermometer is handled at length or if there is a signicant temperature dierence
with respect to the room temperature, a countdown will appear on the display indica-
ting that you should wait until automatic temperature calibration has been completed.
Pressing the “face” button, the projection shows “CAL”.
At this point you have 2 options:
1. Automatic Quick Calibration System (AQCS): without touching the thermome-
ter, wait until the countdown has run its course and automatic quick calibration is com-
pleted. The countdown will continue updating as long as dierences in temperature
are detected (for example, because the thermometer has been continuously handled).
At the end of the countdown, the thermometer can take suciently accurate readings.
When the thermometer is in stand-by mode, “AQCS” appears on the display indicating
that automatic quick calibration has been performed.
2. Manual Quick Calibration System (MQCS): the alternative is to promptly correct
the thermometer temperature, adapting it to the real temperature of the room where
the reading has to be taken.
Proceed as follows:
• press the “face” and “home” buttons (g. 9) simultaneously: the symbol CAL
will appear, and the display will light up in blue. Open the cap.
• within 10 seconds focus the thermometer on an internal wall (not the inside of an ex-

9
ternal wall) or wardrobe with uniform temperature and at a point approximately 80/150
cm (30 to 60 inches) from the oor. Press the “home” button (g. 10);
Fig. 10
MQCS
• once the right distance is reached (temperature value between the arches, g. 6), re-
lease the button: the lights ash slowly and the display shows the room temperature.
To ensure a reliable temperature reading, do not focus the thermometer on an outside
wall, window, source of heating or cooling (radiator, air conditioner, lamp, computer,
surface in contact with the human body, etc.).
• The thermometer is now ready to take a reading and will keep the MQCS for 30
minutes.
Manual quick calibration (MQCS) can also be performed without the countdown if, for
example, you are moving between rooms with dierent temperatures.
This system, too, enables the thermometer to take suciently accurate readings.
In this case, “MQCS” appears on the display indicating that manual quick calibration
has been performed.
The MQCS is possible only if the room temperature is in the 10,0-45,0°C (50.0-
113.0°F) temperature range.
9. REPLACING the BATTERIES
• Set your thumb in the oval hollow on the back of the unit, press down and slide the
battery hatch out as shown in g. 11.
• Remove the battery hatch.
• Remove the old batteries and dispose of them
as required in the containers provided for this
purpose.
• Insert 4 new AAA - LR03 batteries, preferably
alkaline, carefully complying with the position in-
dicated in their housing.
• To close the hatch, slide it in the opposite direction from which it was opened.
• After changing the batteries, let the thermometer stabilize for 20 minutes before
taking a temperature reading, or run a manual quick calibration (MQCS, par. #8).
• Remove the batteries if you do not expect to use the thermometer for a long
time.
Fig. 9
MQCS
Fig. 11
Close Open

10
10. CLEANING
CLEANING THE WAVEGUIDE: the thermometer waveguide (g. 1) is very delicate.
Therefore, when the thermometer is not being used, we recommend that you always
keep the cap on. However, if you need to remove dust or dirt from the waveguide or
sensor at its base, use a cotton swab that has been slightly dampened with alcohol.
Remove all dirt and make certain that nothing accumulates at the bottom of the wave-
guide where the sensor is located. Do not use any other objects or liquids as the sur-
face of the sensor could easily be scratched or damaged. Never let any excess liquid
penetrate into the waveguide and sensor.
CLEANING THE THERMOMETER BODY: use a soft cloth dampened with soap and
water and possibly re-wipe with a sodium hypochlorite disinfectant.
DO NOT USE the thermometer for at least 30 minutes after cleaning.
11. MEANING OF DISPLAY MESSAGES
Messages about batteries
DESCRIPTION: during normal operation, the symbol appears
on the display.
PROBLEM: the batteries are running low but it is still possible to take
several readings.
SOLUTION: obtain new batteries for changing them when the signal
“E.1” appears.
DESCRIPTION: “E.1” and the symbol appear on the display, or
the unit does not turn on at all.
PROBLEM: the batteries are dead.
SOLUTION: remove the batteries immediately and replace them
when necessary (see par. #9).
Messages about thermometer’s stabilization
DESCRIPTION: the projection/display shows “E.8”.
PROBLEM: the thermometer was moved before the light started
ashing, or the area is subject to strong electromagnetic elds.
SOLUTION: wait until the lights ash before moving the thermome-
ter; make certain that there are no mobile or cordless telephones in
the vicinity.
DESCRIPTION: the display shows a countdown (in
minutes and seconds) and/or C:AL, a pictogram of a
hand inviting to stop , and the messages AQCS
and MQCS?
PROBLEM: the thermometer has not stabilized. The
symbols prompt you to choose between:

11
SOLUTION:
- wait until the AQCS countdown has run its course
without touching the thermometer, or
- perform an MQCS (par. #8).
DESCRIPTION: while in stand-by mode, the room
temperature displayed is accompanied by the symbol
MQCS or AQCS.
MEANING: the thermometer has undergone quick
automatic or manual calibration.
Messages about room temperature working range
DESCRIPTION: when you press the “face”
button, the projection/display shows «Hi.4» and the
value alternately.
PROBLEM: the room temperature is between
40,1 and 45,0°C (104.1 and 113.1ºF).
SOLUTION: the temperature reading can be taken
but accuracy is not guaranteed.
DESCRIPTION: the projection/display shows “Hi.4”.
PROBLEM: the room temperature is too high (above 45,0°C/113.0°F).
SOLUTION: move to another, cooler site and, if you are taking the
body temperature, wait for the stabilization of the device and of the
subject.
DESCRIPTION: the projection/display shows
«Lo.5» and the value alternately.
PROBLEM:
- reading with “face” button: the room tempera-
ture is between 10,0 and 15,9°C (50.0 and 60.6ºF).
- reading with “home” button: the room tem-
perature is between 5 and 9,9°C (41 and 48.2ºF).
SOLUTION: the temperature reading can be taken
but accuracy is not guaranteed..
DESCRIPTION: the projection/display shows “Lo.5”.
PROBLEM: the room temperature is too low (below 10,0°C/50.0°F if
you’ve pressed the “face” button or below 5,0°C/41.0°F if you’ve
pressed the “home” button).
SOLUTION: move to another, warmer room and, if you are taking
the body temperature, wait for the stabilization of the device and of
the subject

12
Messages about the detected temperature
DESCRIPTION: the projection/display shows
«Hi.2» and the value alternately when you press the
“face” button.
MEANING: ATTENTION! The temperature is
40,0°C/104.0°F or more.
DESCRIPTION: the projection/display reads “Hi.2”.
PROBLEM:
- reading with “face” button: the temperature detected exceeds
the limit for operation with this button (>43,0°C / >109.4ºF).
- reading with “home” button: the temperature detected exceeds
the limit for unit operation (>80,0°C / >176.0°F).
SOLUTION:
- reading with “face” button: please make certain that you’ve
pressed the correct button, with regard to the measured object, and
that the warnings have been met.
- Reading with “home” button: the temperature reading cannot
be taken.
DESCRIPTION: the projection/display shows “Lo.3”.
PROBLEM:
- reading with “face” button: the forehead temperature appears to
be too low (<34,0°C / <93.2°F).
- reading with “home” button: the surface temperature read is
below the operating limit (<1.0°C / <33.8°F).
SOLUTION:
- reading with “face” button: make certain the sensor is not soiled
or damaged and that the subject has not come from a cold room.
- reading with “home” button: the temperature reading cannot
be taken.
12. TROUBLESHOOTING
1. The projection/display does not turn on: the batteries are completely dead or
incorrectly inserted; replace or reinsert them (par. #9).
2.The temperature is not projected between the two arches: the unit is not at the
correct distance; move the thermometer forward or back until the projected tempera-
ture falls precisely between the two arches (g. 6).
3. The projected temperature is not clearly visible: there is too much light in the room
or the batteries are low; cast a shadow over the subject or replace the batteries.
4.The sensor (g. 1) is damaged or water has seeped into the thermometer: contact

13
your Dealer right away for technical service.
5.The thermometer temperature reading is too low:
- make certain that the conditions outlined in the warnings (par. #2) have been met;
- check that the waveguide (g. 1) is not soiled or damaged; if it is, clean it as indi-
cated in par. #10 or contact your Dealer for technical service;
- check that the thermometer is perpendicular to the forehead as indicated in g. 3.
6. The temperature reading is too high: make certain that the conditions outlined in
the warnings have been met (par. #2).
7. The thermometer appears blocked or does not revert to stand-by after being idle
for 20 seconds, or the aiming LEDs remain on after the button is released: reset the
thermometer by removing and reinserting the batteries.
13. TECHNICAL CHARACTERISTICS
13. Measuring specifications
Resolution: 0.1
Body temperature readings
Measurement range: 34,0/43,0°C (93.2/109.4°F)
Room temperature working range:
- standard range: 16,0/40,0°C (69.8/104.0°F)
- extended range: 10,0/45,0°C (50.0/113°F) (1)
Accuracy:
from 34,0 to 35,9°C: ±0,3°C from 93.2 to 96.7°F: ±0,5°F
from 36,0 to 39,0°C: ±0,2°C (2) from 96.8 to 102.2°F: ±0,4°F (2)
from 39,1 to 43,0°C: ±0,3°C from 102.3 to 109.4°F: ±0,5°F
(1) When the FACE button is used in rooms where the temperature is in the range 10,0-15,9°C (50.0-
60.7°F) or 40,1-45,0°C (104.1-113.0°F), accuracy and operating range are not guaranteed, and the
temperature value is displayed alternately with the message “Lo.5» or “Hi.4” respectively.
(2) ASTM E1965-98-(2016) laboratory accuracy requirements in the display range of 37 to 39°C (98 to
102°F) for IR thermometers is ±0,2°C (±0.4 °F), whereas for mercury in-glass and electronic thermome-
ters, the requirement per ASTM Standards E 667-86 and E 1112-86 is ±0,1°C (±0.2°F).
Other readings
Measurement range: 1,0/80,0°C (33.8/176.0°F)
Room temperature working range:
- standard range: 16,0/40,0°C (69.8/104.0°F)
- extended range: 5,0/45,0°C (41.0/113°F) (3)
Accuracy:

14
from 1,0 to 33,9°C: ±0,3°C from 33.8 to 93.1°F: ±1.8°F
from 34,0 to 35,9°C: ±0,3°C from 93.2 to 96.7°F: ±0,5°F
from 36,0 to 39,0°C: ±0,2°C (2) from 96.8 to 102.2°F: ±0,4°F (2)
from 39,1 to 43,0°C: ±0,3°C from 102.3 to 109.4°F: ±0,5°F
from 43,1°C to 80,0°C: ±1,0°C from 109.5 to 176.0°F ±1.8°F
(3) When the HOME button is used in rooms where the temperature is in the range 5,0-9,9°C (41.0-
49.9°F) or 40,1-45,0°C (104.1-113.0°F), accuracy and operating range are not guaranteed, and the
temperature value is displayed alternately with the message “Lo.5» or “Hi.4” respectively.
Ambient temperature (shown when in stand-by)
Measurement range: 5,0/45,0°C (41.0/113.0°F)
Accuracy: ±1.0°C (±1.8°F)
13.2 General specifications
- Power supply: 4 AAA (LR03) alkaline batteries - 1.5 V (included)
- Life of high quality batteries: up to 3 years or 30,000 readings (depending on use)
- Dimensions: 144 x 43,5 x 21,5 mm (5.67 x 1.71 x 0.85 inches) - including cap.
- Weight: 98 gr. (3.46 oz.) - batteries included
- Distance from the subject: calculated using an optical aiming system (approx. 6
cm/2.36 inches).
- Large, clearly visible, backlit display in 5 colors: light blue, green or violet, depending
on the button used (respectively, “face”, “home” or “Mem”); orange and blue depen-
ding on the function (respectively, room temperature – par. 5 and MQCS – par. 8)
- Expected life: 10 years.
- Atmospheric pressure range of operating conditions: from 700 hPa to 1,060 hPa.
- Relative humidity range of operating conditions: from 15% to 93%, non-condensing.
- Protection degree IP22
- Keep in a clean, dry place, preferably at a temperature ranging between +16 and
+40°C (60.8 and 104°F). Store at a temperature not lower than -25°C (-13°F) or higher
than +70°C (158°F).
- Internally powered equipment; mode of operation: continuous.
- The VisioFocus LEDs emit low light radiation in compliance with EN 62471.
- Measuring system tested in hospitals, private clinics and medical oces. Clinical
accuracy, characteristics and procedures are available from the manufacturer on re-
quest.

15
13.3 Declaration of Conformity UE
Tecnimed srl, P.le Cocchi, 12 - 21040 Vedano Olona (VA) - Italy is the manufacturer of
the VisioFocus 06400 non-contact clinical infrared thermometer.
TECNIMED guarantees that VisioFocus 06400 meets all the provisions applicable in
the Regulation (UE) 2017/745.
VisioFocus 06400 is a class IIa medical device manufactured following appro-
priate production processes in accordance with an EN ISO 9001:2015 and EN ISO
13485:2016 certied Quality System, with GMP requirements and with the following
standards: EN 60601-1, EN 60601-1-2, EN 60601-1-6, EN 60601-1-11, EN 62366,
EN 62471, EN 62304, EN 80601-2-56, ASTM E 1965-98.
Full responsibility for the conformance of this product to the standards is assumed by
Tecnimed srl, P.le Cocchi, 12 - 21040 Vedano Olona (VA) – ITALY.
Complete Declaration of Conformity is available from the manufacturer on request:
SYMBOLS on the thermometer, on its packaging or in this user manual
Manufacturer
UDI
UDI code
MD Medical Device
SN
Serial Number
0051
European Conformity mark. The product conforms to:
- Regulation (EU) 2017/745 on medical devices. The Conformity to
the Regulation (EU) 2017/745 applies to the medical use only and it is
veried by the notied body no. 0051 (IMQ).
- 2014/30/EU directive for the non-medical use (ref. par. 4.4)
Operating
instructions
Refer to the instruction manual
CAUTION: read the
warnings
Direct current
Applied part: type BF Recyclable material
IP22 Protected against insertion of objects >12,5 mm (>0.5 inches) and
against vertical dripping water when tilted up to 15°

16
Crossed-out wheeled bin (WEEE and batteries)
Instructions for disposal: this product contains electrical and
electronic components and batteries that may contain materials
which, if disposed with general waste, could be damaging to the en-
vironment. Residents of the European Union must follow specic dis-
posal or recycling instructions for this product. Residents outside the
European Union must dispose or recycle this product in accordance
with local laws or regulations that apply.
WARRANTY
Tecnimed s.r.l. guarantees this product against any lack of conformity for 24
months as of the date of purchase (indicated on the cash register receipt or other
scal document). Follow the instructions given by your Dealer for the technical
service procedures.
This warranty does not cover the batteries and any damage caused by defective
or run down batteries or damage to the casing due to carelessness or improper
use. The warranty is also voided if:
- the product is tampered with, damaged or used improperly;
- the label on the back bearing the serial number is removed, damaged or rende-
red illegible;
- the product is opened or repaired by unauthorized personnel;
- the product has been damaged due to non-compliance with the instructions
given in this manual.
If Technical Service is required, contact the Manufacturer or your Dealer.
In case the Product was purchased through an Online-store, warranty service
can only be provided through the Internet Seller, where the product was pur-
chased. In case of any lack of conformity, the product will be either repaired or
replaced, as decided by the Manufacturer or Dealer, at their sole discretion. Any
repaired or replaced product does not extend the original warranty beyond the
period of 2 years from original date of purchase.
If, after technical evaluation, the Product is found not to be covered by the terms
and conditions of this Warranty (because no lack of conformity is found), Tecni-
med reserves the right to charge a handling fee for technical check and delivery.
Under no circumstance may Tecnimed be held responsible for damages related
to the improper use of the product or for costs exceeding the original price of the
product.

Product name: VisioFocus®
Model: 06400
Classe IIa medical device
Patents: US 7,001,066 - US 7,651,266B2 - US 8,128,280 - US 8,821,010
- EP 1.283.983 - EP 1.886.106 - EP 2577242(B1) - KR 10-1898897 - CN
103026192B.
Other international patents pending.
Manufactured in Italy by:
TECNIMED srl
P.le Cocchi, 12 -21040 Vedano O. (VA) - ITALY
Tel. +39 0332 402350 - [email protected]
www.visiofocus.com
0051
Other manuals for 06400
1
Table of contents
Other VisioFocus Thermometer manuals