Vision Drive VD-9500H User manual

CAR BLACK BOX
®
'VMM -$%
Ver. 1.0E
User Manual

Before Use
Operational Precautions
Contents
Part Names
Product Specifications
Installation Precautions
Installation Procedure
How to Use
Touch Screen LCD
PC viewer on windows based computers
Service and Support
Warranty
1.
2.
3.
4.
5.
6.
7.
1.
1.
2.
1.
2.
2
4
6
7
8
9
10
17
20
30
42
43
..................................................
....................................
.....................................................
..................................................
......................................
....................................
......................................
.................................................
.........................................
................
.......................................
....................................................
Index
General Info.
Basic Info.
Using the Menus
Additional Info.

General Info._ 1. Before Use
Thank you for purchasing the VISIONDRIVE proudly designed and manufactured by
VisionDrive Co., Ltd in Korea.
Please read the product manual carefully before use so you can be informed of all the features of
this advanced product.
This product is a secondary device for safe driving as such the manufacturer and their
approved agents cannot be held liable or responsible for any loss of data experienced
through the operation of the unit.
This product is designed to record / save / play and analyze videos related to impacts /
accidents or videos recorded at your own discretion while driving. Product features can be
different according to driving conditions, the status of the car as well as firmware version on
the unit. (Firmware updates are supplied by the manufacturer as required to improve product
quality and stability)
Note that the operating environment and SD memory card status may affect video recording
so please take this into consideration.
This product records and saves videos related accidents which are triggered by an internal
Shock Sensor. In instances where the shock is not sufficient to activate the event mode you
are recommended to press SHOT button to store the data into the separate event folder.
Updates to this manual (which are subject to change without notice to improve understanding
and any new features will be posted on VISIONDRIVE website.
Please refer to www.visiondrive.co.kr/eng
-
-
-
-
-
2
Scope of Warranty and Liability
visiondrive.co.kr

General Info._ 1. Before Use
SD memory card use and precautions
3
This product is recommended to work with only the SD card dedicated to VISIONDRIVE. Please
contact the dealer/agent or distributor to purchase a new one when the SD card is lost or
damaged.
Please make sure to use dedicated SD card as the use of non authentic, defective or faulty SD
cards might result in loss of recorded video content.
Failure to completely power down the recorder before removing the SD card will damage the card
and any current recording in progress. Please always power down the recorder so that no lights
are illuminated before removing the SD card. Also please follow Windows based procedures to
Safely Eject Removable Media on your computer as failure to do so will also damage the SD card.
SD card damage through failure to power down the recorder or safely eject the media is not
covered under support or warranty.
Also store the SD card in its carry case when not in use to protect it from static discharge and
other external elements.
SD cards are a consumable item so please note that SD cards are only guaranteed with us for six
months as some sector loss is expected and could result in data loss in which case a replacement
SD card should be sourced and used in your recorder.
To pull out the SD card while writing, copying or deleting data in SD card may cause data loss,
damage of data or SD card itself.
We are not responsible for any recorded data destruction or loss.
Please copy and archive important recorded data/files on other media. (hard disk, CD, portable
memory, etc.)
visiondrive.co.kr

General Info._ 2. Operational Precautions
4
Please keep these instructions in mind for safe and proper use of the product by preventing
unexpected accident or risks in advance. We will not be responsible for the problems arising from
failure to follow the instructions contained within this manual.
You are required to deal with the product safely. If you need to do something with it we ask that
you stop and park the vehicle in a safe place before engaging with the recorder via the touch
screen. Never interact the device whilst the vehicle is in motion.
Do not disassemble or modify this product. This prohibited action may cause accidents such as an
electric shock and the product is not guaranteed for further after service or support. Any products
requiring inspection or repair should be returned to the agent/dealer in the first instance.
DC12V ~ DC24V is the allowed voltage range for proper operation of the device without
malfunction or fire.
Cables other than the supplied units or by connecting the cable to a different power source, may
result in recorder malfunction or fire. In addition, please carefully manage wires and cable routing
to prevent damage to the cable.
If the vehicle is not used for a long time, disconnect the power cable from the recorder as
continued long term use could discharge the vehicles primary battery.
When mounting the product in the vehicle, follow the procedure to attach it securely to the inside
of the vehicle glass. Impurities on the vehicle windshield mounting surface may weaken the
adhesive strength. If the product falls from its mount it may be damaged.
This product and its accessories are not waterproof. Under no circumstances should you expose
the product to liquids or impurities.
Do not use chemicals or detergents to clean the device. This can result in malfunctioning of the
product.
Accumulation of impurities on the camera lens or the window surface near the camera may result
in diffused or abnormal refraction phenomena. You may not get a clean image from this so please
ensure that the area surrounding the product, camera lens is kept clean.
visiondrive.co.kr

General Info._ 2. Operational Precautions
Excessive tinting on the window may also distort or reduce the clarity of recorded data.
Recording can be distorted under the condition where brightness suddenly changes like passing
through a tunnel, direct sunlight reflection during daytime or where only low light is available at
night time.
If not enough light is available, the use of additional external lighting may improve the
performance of the recorder.
In case of slight impact, the product may not be able to classify it as an event file automatically (it
is however recorded as a Normal file). In such cases, please use the SHOT button to force the
creation an event file manually.
Dropping or strong shocks applied to this product will cause malfunctions.
Please try to keep the product away from water, fire, hot, cold or humid environments. If
long-term exposure to the summer sun light or too low temperatures, deformation or malfunction
may occur.
5
visiondrive.co.kr

General Info._ 3. Contents
Please make sure that all of contents are included in good condition, if not then please contact
your dealer to correct any detected issues.
( Specifications and contents are subject to change without notice and this manual can also be
provided in soft copy format. This product image can vary depending on the model. )
Recorder Main Body
Mounting Bracket SD card
(8~128GB
varies as per order)
Cable Holders Cigarette Lighter
Power Adapter
Second Camera and Connecting Cable
External GPS Module
(Optional – required for
GPS information embedding)

General Info._ 4. Part Names
7
visiondrive.co.kr
-$%4DSFFO
4%$"3%4-05
#3"$,&5
"44&.#-&%
$".&3"
108&31035
&951035
5&$)46110351035
(141035 015*0/"-4&$0/%
$".&3"1035
$0//&$5*/(
$"#-&1035
.*$
(14-&%
3&$-&% 70*$&-&%
"VEJP3&$-&%
108&3-&%
*."(&4&/403-&%

* Over 64GB SD (exFAT) is compatible by formatting it as FAT 32, cluster size 64KB format with a formatter.
* 8GB ~ 128GB SD card can be properly formatted through Menu > System Settings > Additional Settings
> format
Model VD-9500H VD-9600WHG/B
Camera(s)
2 Cameras
Main : HD Color CMOS Digital
cameras
Main : HD WDR Color CMOS
Digital Camera
Second : HD Color CMOS digital cameras
Resolution 1280 x 720(HD) 30fps + 1280 x 720(HD) 30fps (2ch Mode)
Display 3.2” TFT Color Touch LCD
Recording Normal/Event/Emergency/Parking Mode based on All-time
recording
Lighting Environment Min. 0.1 Lux
Camera Angle Diagonal 126° (Front) /
Diagonal 132° (Rear)
Diagonal 110° (Front) /
Diagonal 132° (Rear)
Camera Rotation Vertical 65° (Front)
GPS External GPS Module (Sirf IV) (Optional)
G-Sensor Built-in 3-Axis Shock Sensor (x-y-z)
Storage SD(HC) memory card 8G ~ 128G compatible
(*Over 64GB supportive to FAT 32 format, cluster size 64KB)
Audio Recording Built-in MIC
Voice Announcement Built-in Speaker
Event Recording 10 sec. before impact ~ 15/25/35/45 sec. after impact
Power Supply DC 12V ~ 24V Cigarette Lighter Power Adapter
Emergency Power EDLC for Emergency Power Backup (Capacitor)
Operating Temperature Range -20 °C ~ 65 °C
Car Battery Monitoring Low Voltage Detection / Control
Dimensions 100mm * 77mm * 30mm
Operating System Support Windows XP / VISTA / Windows 7 / Windows 8
Image Analysis Dedicated PC viewer (Based on AVI format)
Security Security LED

General Info._ 6. Installation Precautions
9
visiondrive.co.kr
- It is recommended to use only authorized SD cards provided with the VisionDrive® product.
- Only install the product after parking the vehicle in a bright and safe area.
- Make sure that you start installation with the power source completely turned off. The power
connection should be the last step of the installation.
- Use the power cable provided with the product for the cigarette lighter power connection in the
range of DC12V to DC24V. If power wiring is involved, we recommend a professional service for
the installation.
- Prior to the installation, clean the area of the installation where the camera will be positioned.
- DO NOT eject the SD card when the product is in operation or when starting / booting up.
- DO NOT attempt to disassemble, modify or repair the product yourself in any way.
For safe installation and operation, carefully read all the information stated below.
DO NOT disconnect the power supply while the system is booting up for start or update.
Please keep it in mine that the product can be off for a short period of time during
start-up.

General Info._ 7. Installation Procedure
10 visiondrive.co.kr
Assemble the bracket with the main body
Insert the SD card into the unit
Connect the cable and attach on windshield
Connect to power source to turn on the product
Adjust the camera angle
Check LED lamps
Arrange wires using wire holders
*Connect the optional rear camera.
1)
2)
3)
4)
5)
6)
7)

General Info._ 7. Installation Procedure
11
visiondrive.co.kr
1
2
Assemble the mounting bracket with the main
unit and push it to the direction 1 to secure
the lock. You will hear a solid click sound
when the main unit is locked to the
attachment bracket.
Move the bracket to direction 2 to release the
bracket.
Insert the SD card as shown in the picture.
When ejecting the SD card from the unit, turn
off the main power completely and wait for all
indicator lights to go out and then push in
the SD card. The SD card will pop out when
pushed in.
Use of force or other methods to eject the SD
card may defect the SD card or damage the
recorder.
1) Assemble the bracket with the main body
2) Insert the SD card into the unit

General Info._ 7. Installation Procedure
12 visiondrive.co.kr
Clean the area on the windshield where the
unit will be installed.
For the placement of the unit, it is better to
place the unit closer to the center of the
vehicle. If the unit is installed on the right or
left side of the rear view mirror, ensure there
is room to detach the unit if needed via the
sliding action. Also check that the installation
does not affect normal viewing angle
adjustment for the rear view mirror.
Insert the cigarette lighter power adapter into
an appropriate outlet.
If you start up the car or place the car key to
ACC, the product will commence booting up
with voice announcement.
Blinking of LED lamps notifies that the system
booting has succeeded.
DO NOT turn off the power source while
the system start-up is in progress as this
may cause damage to the product.
The adhesive on the bracket is very strong. Partially remove the cover of the adhesive area
and then use the full adhesive surface area for final installation.
When you are comfortable with the installation position, fully attach the recorder bracket to
the screen.
Connect cigarette lighter power adapter as the last stage of installation.
3) Connect cable and attach on windshield
4) Connect to power source to turn on the product
General Info._ 7. Installation Procedure
13
visiondrive.co.kr
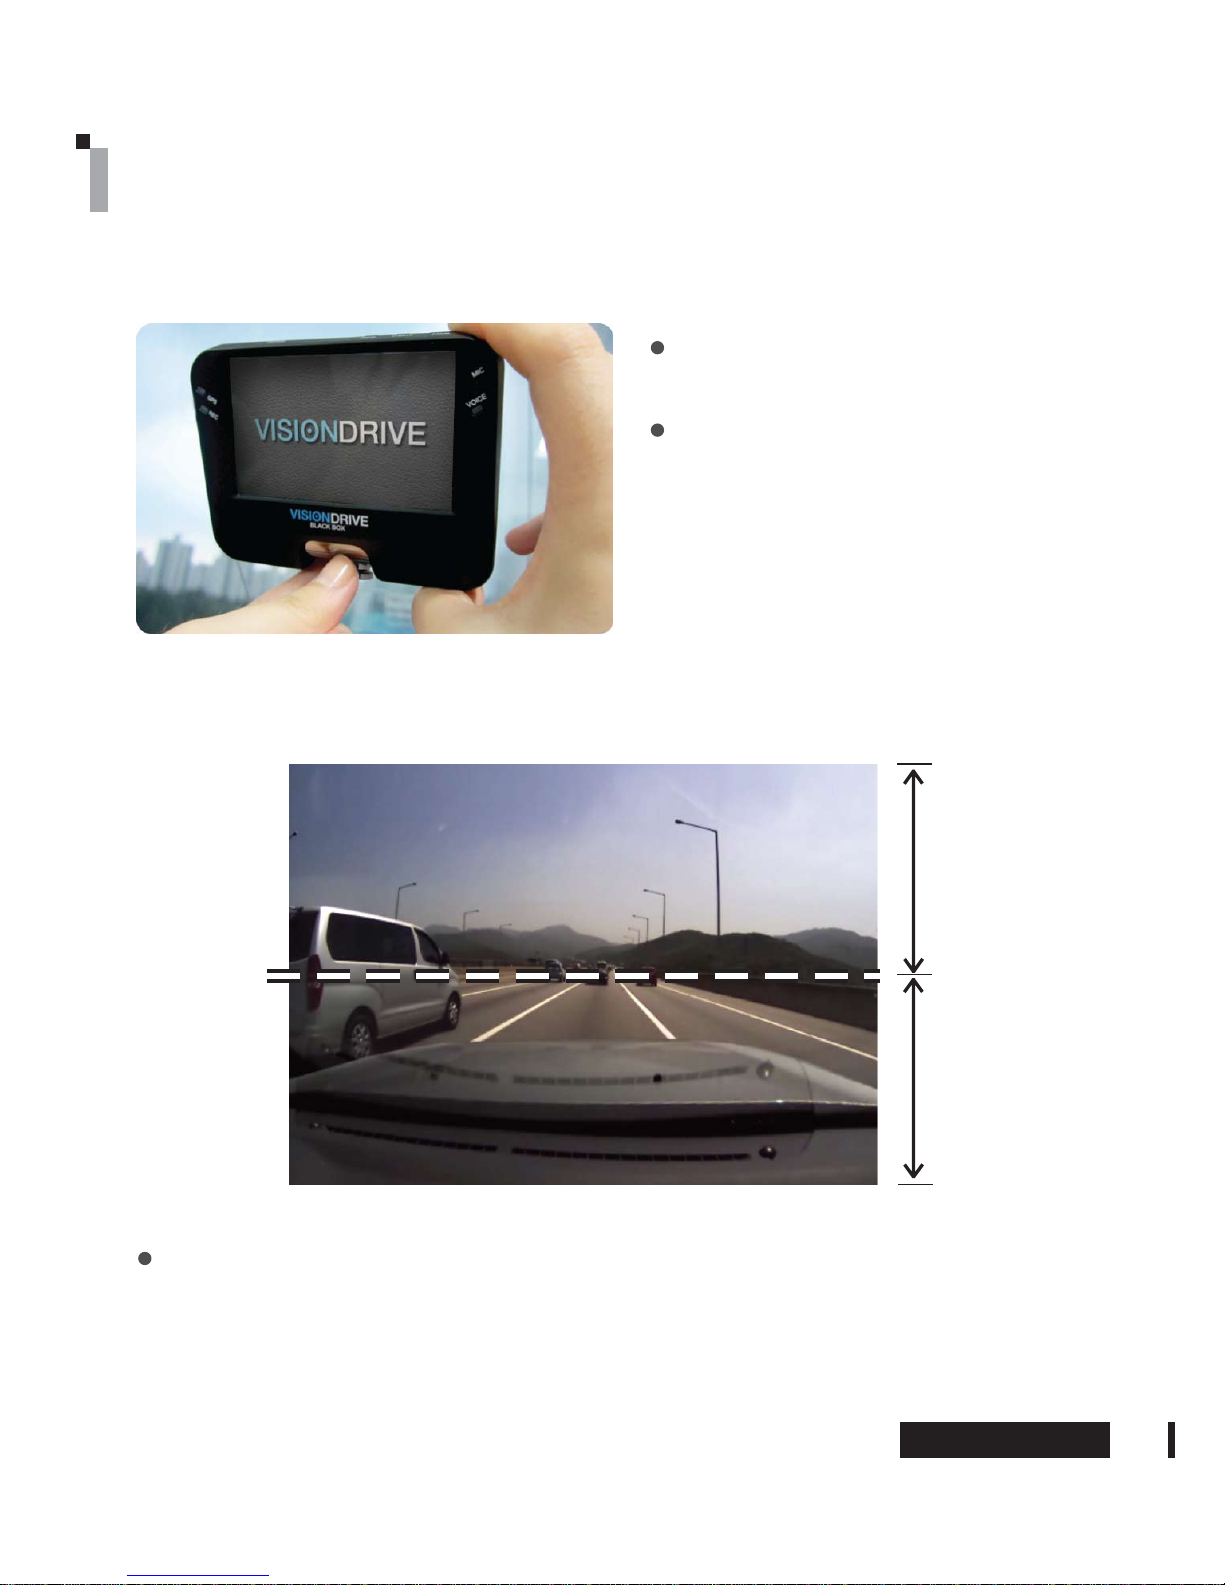
Move the camera top to bottom to fix it to
the best position.
The recording view can be checked on LCD
screen.
(Please touch the LCD screen in order to
switch between front and rear camera in
installations where the second optional
camera is present).
For better images and operation of the analysis program, ensure that over 1/2 of the
vehicle hood/bonnet area is included in the recorded data.
5) Adjust the camera angle

Highest
Position
Lowest
Position
65˚
Bracket
Unit
Camera
Vehicle Exterior Vehicle Interior (Driver’s Side)
Windshield
General Info._ 7. Installation Procedure
14 visiondrive.co.kr
When the unit is installed, set the camera lens to face the front direction of the vehicle.
Camera lens is movable up and down to adjust the angle.
The camera is tightly fixed to prevent random movement by slight vibration so apply
enough force to adjust the angle of the camera.

General Info._ 7. Installation Procedure
The GPS lamp is red before receiving GPS signal and stays blue when it is received okay.
It may take a couple of seconds to several minutes to get the GPS signal depending on the
location of your vehicle and movement of the recorder in an unpowered state.
15
visiondrive.co.kr
The REC lamp is blue when the unit is
recording (NORMAL) files and red when
recording an (EVENT) file after an impact or if
the SHOT button has been activated.
The status of voice recording can be changed
Menu> System Settings> Voice Recording ON
/ OFF. If Voice Recording is disabled then the
VOICE lamp will turn off from the normal blue
state.
Use the enclosed cable holders to organize
cables.
6) Check LED lamps
7) Arrange wires using wire holders

General Info._ 7. Installation Procedure
16 visiondrive.co.kr
Connect the optional second camera
*
The optional camera can be used by being connected to CAM IN port. We recommend to
power off the main unit before connecting the second camera to the CAM IN port.

Basic Info._ 1. How to Use
17
visiondrive.co.kr
Power ON/OFF
- Check if the SD card is inserted into the unit.
- This product operates when vehicle starts or ACC is on.
- It starts recording while voice announcement reporting current status of voice recording as
well after checking the SD card once the product starts.
- The REC and GPS lamps turn on following the above stages.
- The REC lamp blinks in blue.
- GPS lamp is red before receiving GPS signal and it is blue while receiving GPS signal.
- Depending on the environment, it may take a couple of seconds to several minutes to receive
GPS signal blue status.
- The LCD screen automatically turns off one minute after recording commences. You can turn
the screen on again by touching it.
- The recorder will beep and reboot to apply 1channel mode recording if the connecting cable
for the rear camera is disconnected during operation.
- When reconnected, the unit will reboot to reactive twin channel recording mode.
(To turn off before reconnection is recommendation.)
Normal Recording and Event Recording
- The normal recording commenced with vehicle start-up and the REC lamp blinks blue in color.
- In normal recording mode, recordings are 1 minute in duration and are stored in the NORMAL
folder. If the allocated memory area is full while in normal or event recording mode, the program
will erase the oldest recorded data in those folders to allow the saving of new files. The
management is based on First-In First-Out (FIFO).
- In the case of an impact, the sensors will trigger the event mode with an alarm. The REC lamp
blinks in red and the recorded data with the alarm by the impact will be saved in the EVENT folder.
- An event file contains images of 60 seconds duration in total, 10 seconds before the point of
impact and afterwards a maximum of 45 seconds according to your settings.
- Recording time after an impact can be changed at MENU > System Setting >
Shock Sensor Recording or via the PC based dedicated PC viewer program.
- Sensitivity of shock sensor settings should be set differently according to vehicle type in order to
support correct event folder video storage.
*RWR0(18!6\VWHP6HWWLQJV!6KRFN6HQVRU5HFRUGLQJ6HWWLQJVWRFKDQJHWKHVHQVLWLYLW\YDOXH
- EVENT folder content is overwritten when it is full.
- Sensitivity of Shock sensor, storage ratio of each folder or recording time for an event file after an
impact can also be set in Menu> System Settings> Shock sensor and recording settings on the LCD
screen.

Basic Info._ 1. How to Use
Manual EVENT Recording
- The data is saved in the EVENT folder with alarm like as event files when you press SHOT button.
- Please use SHOT button when you would like to save scenes or accident as a witness to keep
them separately in the Emergency folder.
-MENU mode is not available while EVENT or EMERGENCY recording is going on.
Real-time video check on the LCD
- Each time you touch the LCD, Front > Rear screen is displayed on the LCD.
(In one channel mode, only the front camera view is displayed.)
Please always stop the vehicle before operating the LCD touch screen of the device using.
Parking Surveillance Mode
- ”Auto switching to Parking mode” option is selected as a default setting and it automatically places
the unit in the “Parking Mode” once the vehicle does not move for longer than 10minutes after the
last driving mode recording. The unit will automatically return to “Driving Mode” once the unit
registers successive movement like as starting up vehicle.
*You are notified the number of impact occurrences when it is in Parking mode to enhance
safety during Parking. The notice will disappear when you go to MENU to play that impact
related file.
- In parking mode and whilst there is no impact, the system records 10 frames/second per channel
to save the SD card space and returns to normal full frame recording mode making an EVENT file
when it detects an impact or movement around the vehicle and then returns to parking mode again.
- The REC lamp flashes in purple whilst the recorder is in Parking mode.
- The number of impact occurrence in Parking mode is shown on the LCD screen when you start the
vehicle. It helps you not to miss the files to check.
- Impact based data files while parking are stored separately in the EVENT folder.
- If you do not require Auto switching to parking mode, please disable this in the configuration.
- Once in Parking Mode, the system automatically rearranges its impact sensing sensitivity to the most
sensitive in order to register even the slightest impact/bump.
- No audio is recorded in parking mode.
- To use the parking mode, the product has to be connected directly to the power source as there are
no internal batteries in the recorder other than the EDLC which is a capacitor providing a short
power supply to ensure that the latest video is correctly stored to the SD card on the recorder being
shutting down.
*When connecting the unit to permanent power we recommend the use of a professional auto
electrician to assist with the wiring.
- Extensive and continuous use of the vehicle’s power source may exhaust the performance of the
product. The company is not liable for the damages from continuous use of the product more than
24 hours. We recommend the full power to be off after continuous use of 2~3 days for maintenance
purpose.
18 visiondrive.co.kr

Use of SD Card
- Users are recommended to use the SD card issued by the manufacturer. VISIONDRIVE® untested
SD cards may not be recognized nor may they save video data correctly.
- To eject the SD card from the product, the engine has to be turned off and the key should be
removed from the ignition (all power should be removed from the device). A few seconds after
the key has been removed, the product automatically turns off with LED lamps all extinguished.
Remove the SD card when all signals are off (The built-in back up capacitor helps the last file to
be stored into proper folders before the product is completely turned off.)
- If there is no SD card in the product, it needs to be inserted before you drive your vehicle for
proper recording. There is no internal storage in the product other than the SD card.
- Use only SDHC compatible SD card readers to read the SD(HC) card in your PC.
- You need to insert the SD card or replace the inserted SD card when "Please insert an SD card"
is heard due to absence of SD cards or unusable SD cards.
- SD card readers can be purchased at computer accessory stores or from your VISIONDRIVE
agent/dealer/distributor.
- Regular software upgrades applied to your SD cards help to prevent or resolve bad sectors and
malfunctions. Execute SD card defrag, or error checking for stable and effective usage of the
SD card.
-Please format the SD card based on FAT32 Cluster size (Allocation unit size) 64KB.
-If you want to format SD cards larger than 32GB in your windows bases computer, please
use a program which makes them FAT 32 format supportive.
Automatic System Check and Safe Rebooting Function
- This product is programmed to automatically check and reboot the system, if the product is in
a non-functional status. By rebooting the system, the product notifies the user that such action is
taking place.
- By safeguarding the system in this manner, the stability of the system is reinforced. The system
might keep rebooting repeatedly when the program installed in the SD card has been damaged
or altered. In this case, please stop the system and format the SD card then install the latest
Software to use the SD card like it is supplied for the first time.
Voice Recording
- "Voice recording is on." is heard when voice recording starts while the product boots and VOICE
LED stays in the blue state.
7KHVWDWXVRIYRLFHUHFRUGLQJFDQEHVHWLQ0HQX!9RLFH5HFRUGLQJȡJXLGDQFH!9RLFH5HFRUGLQJ
ON / OFF on the LCD screen. If Voice recording is set to OFF then the VOICE LED will be OFF.
Basic Info._ 1. How to Use
19
visiondrive.co.kr
This manual suits for next models
1
Table of contents
Other Vision Drive Dashcam manuals

Vision Drive
Vision Drive VD-1600HD User manual

Vision Drive
Vision Drive VD-8500WHG User manual

Vision Drive
Vision Drive VD-9000FHD User manual

Vision Drive
Vision Drive VD-3000 User manual

Vision Drive
Vision Drive VD-3000 User manual

Vision Drive
Vision Drive VD- 8500WHG User manual

Vision Drive
Vision Drive VD-7000W User manual

Vision Drive
Vision Drive VD-1500MG/1500MB User manual

Vision Drive
Vision Drive Black Box VD-9000FHD User manual

Vision Drive
Vision Drive VD-7000W Quick start guide


