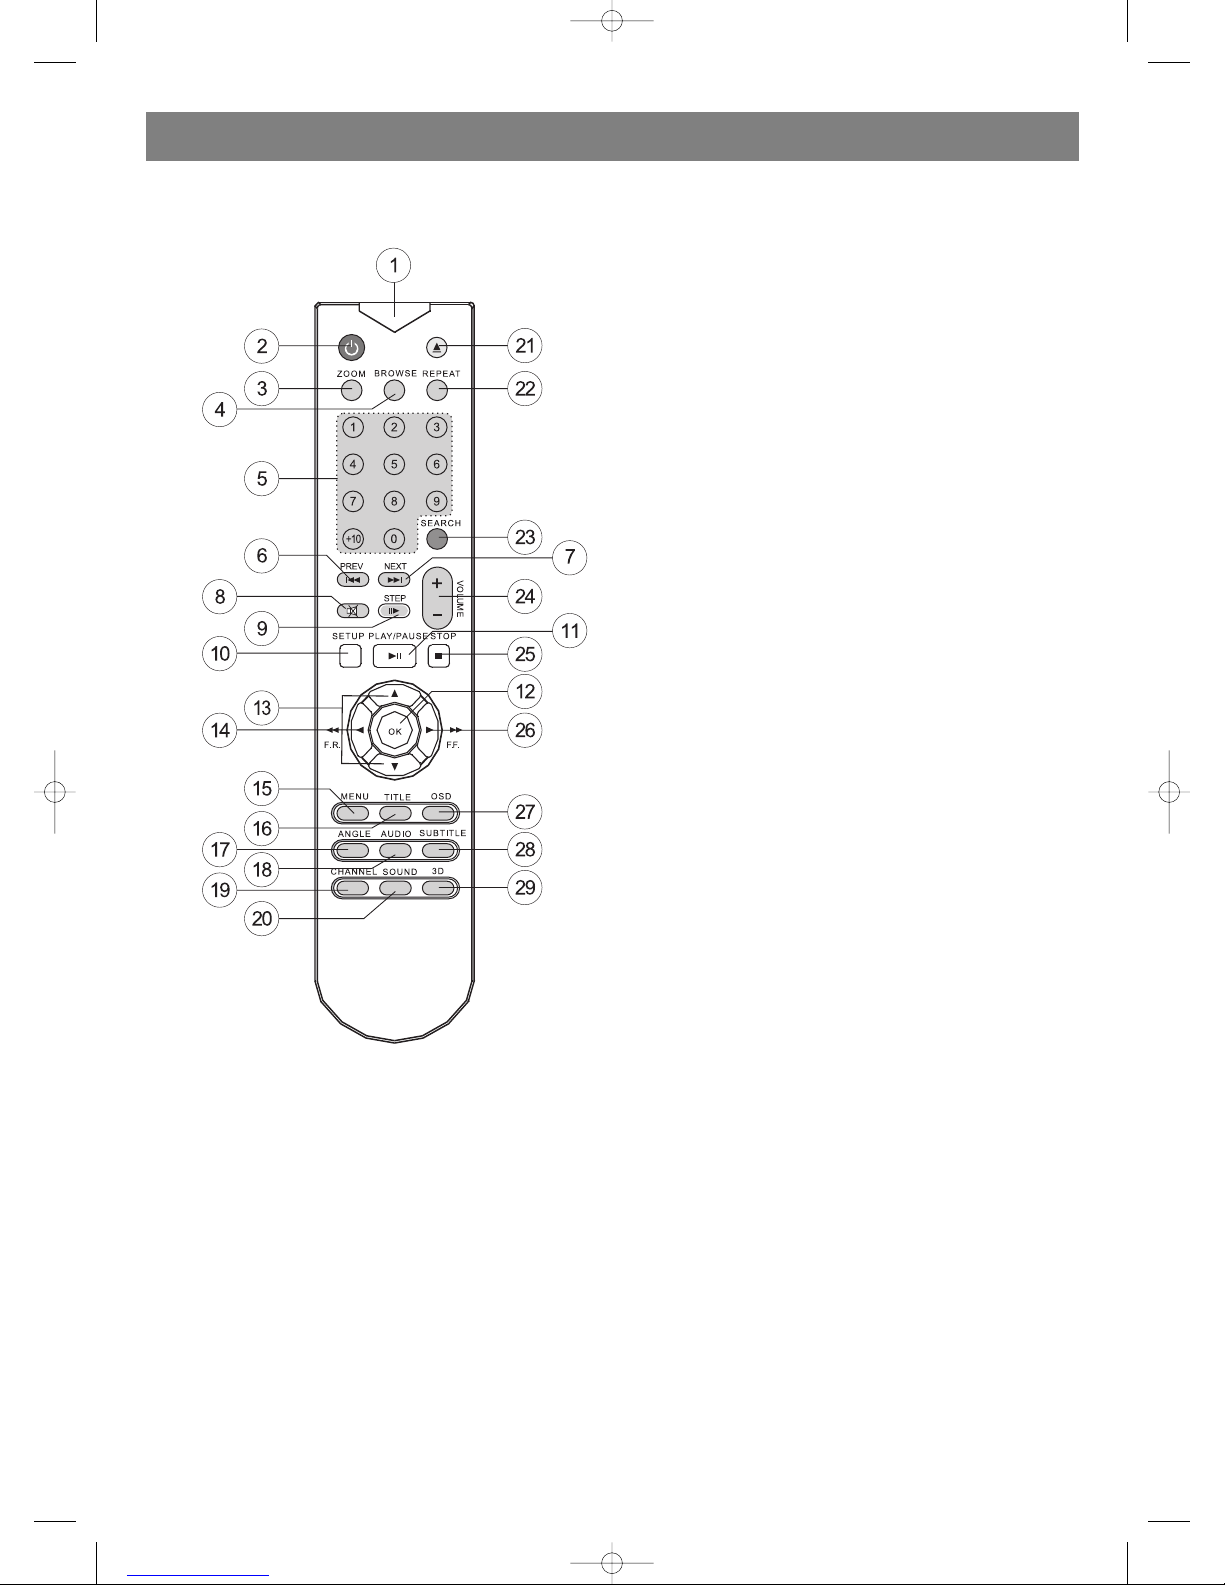
1. REMOTE SIGNAL EMITTER
Point the remote control to the remote sensor on the front
panel.
Effective distance: less than 6 meters.
Effective an le: (H/V) ±30°C
2. STANDBY
Press this button to turn on or turn off this unit.
3. ZOOM
Press this button to zoom in or zoom out the current picture.
There are three zoomin modes.
4. BROWSE
For SVCD and VCD discs, when the playback is stopped,
press this button to browse tracks on the disc in a 9small
picture screen. Each track will be played for 3 seconds. The
PBC will be automatically turned off after the browsin start
ed if it was turned on before browsin . Press PREVIOUS and
NEXT buttons to turn pa es on the screen. Press PLAY/PAUSE
to resume disc playin .
5. NUMBER
Press number buttons to play relevant chapter/track.
6. PREVIOUS
Press this button to o to previous title/chapter/track. For
SVCD and VCD discs. when the PBC is OFF, if the playin
track is the first track, press this button will stop the play
back; and if the playback is stopped, press this button will
take no effects.
7. NEXT
Press this button to skip to next title/chapter/track. For
SVCD and VCD, when the PBC is OFF, if the playin track is
the last track, press this button will stop the playback.
8. MUTE
Press this button to turn off the sound. The "Mute" si nal will
be displayed on the screen. Press MUTE a ain or press the
"Vol +" or "Vol " button to resume the sound.
Remarks:
The microphone will output no sound in the mute status.
9. STEP
Each pressin the button advance the disc a frame ahead.
Press the PLAY button to resume normal playback.
10. SETUP
Press this button to access the setup menu.
11. PLAY/PAUSE
Press this button to to le between the PLAY and PAUSE
statuses.
12. OK
Press this button to confirm current operation.
13. UP/DOWN
Press to move the cursor to make choice.
14. LEFT/FAST REVERSE
Press this button to to le between the followin modes:
F.R. 2>F.R. 4>F.R. 8>F.R. 20>PLAY. For DVD discs, press
this button will fast reverse to the be innin of previous
chapter/title to start playback. For SVCD and VCD discs, if
the PBC is ON, press this button will fast reverse to the
be innin of previous track to start playback.
15. MENU
For VCD 2.0 and above versions, . The initial status is PBC
ON. For DVD disc, select the item with the CURSOR buttons
then press OK to start playback.
16. TITLE
Press TITLE button to access the title menu of the disc.
Select the item with the CURSOR buttons then press OK to
start playback.
Remarks: Only for DVD discs.
17. ANGLE
Press for the first time to play the current camera an le. For
DVD discs that contains scenes recorded in multiple camera
an les, press to switch the camera an le durin playback.
18. AUDIO
For DVD discs, press this button to to le between different
audio modes. The selected audio mode will be displayed on
the screen. For stereo discs, Remarks: For bilin ual edition
VCD discs, press the CHANNEL button to select your
desired lan ua e.
19. CHANNEL
Press this button to to le between different channels.
Note: Only for VCD discs.
When the disc tray is opened, press this button will to le
betweendifferent video output modes.
20. SOUND
Press this button to to le between different sound effects.
21. EJECT
Press this button to open/close the disc tray.
22. REPEAT
For DVD discs, press this button to to le between CHAP
TER, TITLE and ALL DISC modes. For other discs, press to
to le between TRACK and ALL DISC modes.
23. SEARCH
This function allows the user to start playback from a desi
nated point. Press the SEARCH button to display the search
menu on the TV screen, then use the CURSOR buttons and
the NUMBER buttons to input the desired title/chapter/track
number or the specific time.
At last, press OK to confirm and start playback from the des
i nated point. This function is not available for MP3 discs.
24. VOLUME
Press VOL+ to increase the volume and press VOL to
decrease the volume. When audio out is set to SPDIF/RAW
for DVD discs, the VOL+/ buttons are invalid.
25. STOP
Press once to stop and then press PLAY/PAUSE button to
resume playback from the stop point; press this button twice
causes the disc to return to the be innin of the disc if play
back starts a ain.
Note: For VCD 2.0 and SVCD discs, with the PBC on, press
this button will return to the parent menu.
26. RIGHT/FAST FORWARD
Press this button to to le between 4 different playback
speeds.
27. OSD
Press to display the current disc information includin title
information, chapter information, time information, etc.
28. SUBTITLE
For DVD and SVCD discs record multi subtitle information,
press this button to select your desired subtitle.
29. 3D
Press for the first time to display the surround sound setup
menu on the TV screen, Then use CURSOR buttons to make
settin s; press SOUND a ain to remove the setup menu. In
the menu, you can set the surround sound mode (SRND) to
OFF, CONCERT, CHURCH, PASSIVE, WIDE or LIVE; you can
set the equalization mode (EQ) to STANDARD, CLASSIC,
ROCK, JAZZ, POP or USER. When choosin USER, you can
use LEFT/RIGHT button to move the red hi hli ht to choose
ENGLISH
6