Vitek VT-4101 BK User manual

1
VT-4101_IM.indd 1 29.11.2012 12:53:36

2
ENGLISH
DVD-PLAYER
Dear Customer,
Before connection, usage and setting of
the device read the instruction carefully.
Follow all the warnings and operating rec-
ommendations listed in this manual.
Keep the instruction for further reference.
ATTENTION!
Electric shock
hazard!
DO NOT OPEN!
WARNING: In order to avoid risk of fire or
electric shock, do not expose the device to
rain or moisture.
In order to avoid electric shock do not open
the device housing by yourself.
Device technical maintenance should be
performed by service centers‘ qualified
specialists only.
This lightning flash with arrowhead
symbol, within an equilateral tri-
angle, is intended to alert the user
to the presence of dangerous volt-
age within the product’s housing
that may constitute a risk of electric
shock.
The exclamation mark within an
equilateral triangle is intended to
alert the user to the presence of
important operating recommenda-
tions in the instruction accompany-
ing the device.
CLASS 1 LASER PRODUCT
This device is a CLASS 1 LASER PRODUCT. The
corresponding label on the rear panel of device
means that device employs laser beams. There
is no danger of laser emission if the device is not
opened. Servicing of device should be performed
only by qualified specialists of authorized service
centers.
SAFETY MEASURES
Read all instructions carefully before using
the device.
WARNING
To avoid hazard of electric shock, fire or injury
follow the rules specified below.
• Use the device in strict accordance with the
instruction manual.
• Before connecting the device to the mains,
make sure that voltage specified on the
device corresponds to your home mains volt-
age.
• In order to avoid fire do not use adapters for
connecting the device to the mains.
• Never immerse the device into water.
• To prevent fire or electric shock hazard do
not use this device in places with high humid-
ity (near bath tubs, basins filled with water,
kitchen sinks, washing machines, near a
swimming pool, in wet basements, etc.)
• Protect the device from dripping and splash-
ing. Do not place containers filled with water
(for instance, vases) on the device. To avoid
condensation (when you bring the player
from the warmer room to the colder one and
vice versa) do not switch the device on at
once, wait for about 2 hours.
• Do not use power extension cords which are
not approved by the manufacturer as this can
be dangerous.
• Do not overload sockets or extension cords
as this can result in fire or electric shock.
• Place the device in such a way that you can
immediately pull out the plug from the socket
in case of any malfunction. The power cord
should not be stretched at junction point; lay
it avoiding tangling, do not place any pieces
of furniture on it.
• For children safety reasons do not leave
polyethylene bags, used as a packaging,
unattended.
• Attention! Do not allow children to play with
polyethylene bags or film. Danger of suf-
focation!
• Keep the device away from children.
• Do not allow children to use the device as a
toy.
• This device is not intended for usage by chil-
dren or disabled persons unless they are
given all the necessary instructions by a per-
son who is responsible for their safety on
safety measures and information about dan-
VT-4101_IM.indd 2 29.11.2012 12:53:37

3
E N G L I S H
ger that can be caused by improper usage of
the device.
• For additional device protection during light-
ing storm and in cases when you are not
going to use it for a long time, unplug it. It will
prevent the device from being damaged by
lightning and power surges.
• Do not remove the power cord when the
power is on.
• To unplug the device, hold the plug. Do not
pull the cord.
• Never leave the device connected to the
mains unattended.
• To prevent shock hazard do not open the
device body by yourself. Do not repair the
device or make any changes in it by yourself.
Device technical maintenance should be per-
formed by service centers’ qualified special-
ists only.
THE DEVICE IS INTENDED FOR HOUSEHOLD
USAGE ONLY
Installation of the device
Note: After device transportation or storage at
low temperature it is necessary to keep it for
at least two hours at room temperature before
switching on.
• Remove all stickers and packaging elements
that can prevent device operation.
• Install the device in places with proper ven-
tilation. Do not place the device inside the
built-in furniture (bookshelves or wall cup-
boards), if it is not ventilated enough.
• Do not place the device on soft surfaces (for
instance, on the couch, sofa, carpet or any
other such piece of furniture).
• Install the device in places with proper ven-
tilation.
• Do not cover the device and do not place any
objects on it.
• Do not place the device near heat sources
such as radiators, heaters, stoves, or other
devices (including amplifiers) that produce
heat. Do not expose the device to direct sun-
light and excessive dust.
• Do not place heavy objects on the device.
• Do not place the device on pieces of furniture
with unfixed wheels, on unstable stands, tri-
pods, brackets, tables as the device may be
dropped and lead to children’s and grown-
ups’ injuries and the device malfunction. Use
only the stands, tripods, brackets, tables
supplied with the device or recommended by
the manufacturer. When placing the device on
the stand follow the instructions, use only the
fixing hardware recommended by the manu-
facturer. Move the stand with installed device
very carefully. Sudden stop, kicks or moving
on uneven surface may cause overturning of
the stand and dropping of the device.
Foreign objects
Provide that no foreign objects get into open-
ings of device body; it can lead to fire or electric
shock. If it happened, immediately unplug the
device and contact qualified specialists.
Damages requiring repair
In case of the following conditions unplug the
device and apply to the authorized service center
to repair the device:
a. Damage of power cord or the plug.
b. Getting of foreign objects into device hous-
ing.
c. Exposure of device to rain or water.
d. Distinct changes in device operation.
e. Dropping or some other damage of device.
Cleaning and care
Unplug the device before cleaning. Use a soft
damp cloth to clean the device. Do not use liquid
or aerosol substances for cleaning.
Cleaning of discs
• Do not use cracked or deformed discs, this
can damage the device.
• Hold the disc on the edges only. Insert the
disc with the label up. Do not touch the disc
operating surface. Dust, scratches or finger-
prints on the operating surface may lead to a
failure of disc playback.
• Make sure that the discs are not exposed
to direct sunlight, keep them away from
heat sources, high temperatures and
humidity.
• After use, put the disc in a case for storage.
• Periodically wipe the disc operating surface
with a soft cloth from the center to edges. Do
not use regular detergents.
VT-4101_IM.indd 3 29.11.2012 12:53:37

4
ENGLISH
Using of batteries
Batteries leakage can cause injuries or remote
control damage. In order to avoid the batteries
damage, follow the following instructions, that is:
• do not use the different types of batteries
together; use the batteries only of the same
type for the remote control;
• when replacing batteries, do not use new and
spent batteries together;
• when the remote control operation is unsta-
ble, check the batteries and replace them if
necessary;
• take the batteries out if you are not going to
use the remote control for a long time;
• improper use of batteries can lead to leak-
age of the electrolytic liquid and damage of
device.
Delicate handling measures
• For device transportation use the original
giftbox and packaging details obtained while
buying the device.
• If the player was operating for a long time, its
body may get warm - it is normal.
• Do not move the device during the disc play-
back. Otherwise the reading device and the
disc may be damaged.
COPYRIGHT
This device uses the copyright protection tech-
nology supported by USA patents and other
intellectual property rights, that belong to
Macrovision Corporation and other righthold-
ers. The use of copyright protection technology
must be approved by Macrovision Corporation,
this device is intended for household use only
unless the contrary is allowed by Macrovision
Corporation. Disassembling of the device and
technology duplication are prohibited.
Built under license of Dolby Laboratories. The
name “Dolby” and double “D” symbol are trade-
marks of Dolby Laboratories.
Note: this device meets the requirements of
Electromagnetic Compatibility Directive and
Low-voltage Device Directive.
DEVICE SPECIFICATIONS
• Playable discs:
– DVD: DVD/DVD+RW/DVD+R/DVD-RW/
DVD-R;
– CD: CD-R/CD-RW;
• Supported disc formats: Audio CD, Video CD,
Super Video CD, HDCD, Kodak PhotoCD,
DVD.
• Supported codecs: Xvid, Mpeg1, Mpeg2,
Mpeg4, MP3 (VBR), WMA (Bit rate:
32-192Kbps), Jpeg, PhotoCD
• Built-in decoders Dolby Digital AC-3/5.1.
• Connection slots: HDMI; analog 5.1-chan-
nel; Stereo audio output; SCART; Optical
output; Digital coaxial; Composite VIDEO;
Component Video (Y/Pb/Pr); S-Video.
• USB slot
• Karaoke
• Display menu in Russian and English.
Disc type Symbol Content
DVD Audio + video
MPEG4
(DivX)
Audio + video
Video CD
(VCD)
Audio + video
Super
VCD
(SVCD)
Audio + video
CDDA Audio
MP3 Audio
JPEG Photo
VT-4101_IM.indd 4 29.11.2012 12:53:37

5
E N G L I S H
10 11 12 13 14 15 16 17 18
For your information:
All pictures in this manual are given for refernce only. They can be different from the purchased
device.
DESCRIPTION
1. Disc tray open/close button OPEN/CLOSE
2. Playback/pause button PLAY/PAUSE
3. On/off button POWER
4. Disc tray
5. Remote control signal optical receiver
6. Display
7. Microphone slot
8. USB-slot
9. Mechanical switch off button
10. SCART slot
11. HDMI slot
12. Audio output ML/MR, stereo
13. Digital coaxial output COAXIAL
14. Composite video output VIDEO
15. Video output S-VIDEO
16. Digital optical output OPTICAL
17. Component video output Y Cb/Pb Cr/Pr
18. Audio output 5.1 CH AUDIO OUTPUT
VT-4101_IM.indd 5 29.11.2012 12:53:38

6
ENGLISH
Remote control (RC)
19. ON/OFF button
20. Digital buttons
21. Menu settings button SETUP
22. Navigation buttons
23. Enter button ENTER
24. “MENU” button
25. Stop button STOP
26. Rewind button REV
27. Search menu button SEARCH
28. Fast forward button FWD
29. Volume down button VOLUME -
30. Disc menu button TITLE
31. VCD/SVCD disc menu button RETURN
32. Selected episode repeat button A-B
33. Random playback button RAN
34. Angle selection button ANGLE
35. Zoom button ZOOM
36. Disc tray open/close button
37. Subtitles/copy selection button SUBT/COPY
38. Language selection button LANGUAGE
39. Disc information button OSD
40. Playback programming button PROG
41. Cancel button CLEAR
42. Source selection button DVD/USB
43. Sound off button MUTE
44. Playback/pause button PLAY/PAUSE
45. Previous track button PREV
46. Repeat button REPEAT
47. Next track button NEXT
48. Volume up button VOLUME +
49. Slow playback button SLOW
50. Video output mode selection button V-MODE
51. Sound channel switch button L/R
52. Television system selection button N/P
53. Microphone On/Off button KARAOKE
54. Disc menu exit button RESUME
19 36
37
38
39
40
42
43
44
45
46
47
48
49
50
51
52
53
54
20
21
22
23
24
25
26
27
28
29
30
31
32
33
34
35
41
VT-4101_IM.indd 6 29.11.2012 12:53:38

7
E N G L I S H
Device connection
VT-4101_IM.indd 7 29.11.2012 12:53:38

8
ENGLISH
Before connecting make sure that device operat-
ing voltage corresponds to voltage of your mains.
Select the most suitable connection type from
the below list according to your TV capabilities.
SCART slot (10)
Use 21-contact SCART cable (not supplied) to
connect SCART slot of the DVD-player and the
same slot on the TV or monitor.
HDMI slot (11)
Use special HDMI cable (not supplied) to con-
nect HDMI slot of the DVD-player and HDMI slot
on the TV. This connection type provides a high-
resolution image.
Notes:
• Simultaneous connection of several video
outputs may reduce the image quality.
• You can get quality image only with proper
connection and correct system settings.
Composite video output (14) VIDEO
For standard image quality connect the com-
posite video output of your DVD-player to the
corresponding input of the TV or monitor using
one audio/video cable cord (AV, supplied with the
device) with yellow plugs.
S-video output (15)
For improved image quality connect the output
of your DVD-player to the corresponding input
of the TV or monitor using S-Video cable (not
included).
Component video output (17) Y Cb/Pb Cr/Pr
For color-accurate high quality image connect
component video output Y Cb/Pb Cr/Pr (red/
blue/green) to the input on the TV or monitor
using the corresponding cable (not included).
Audio system connection
Select the most suitable type of connection from
the below list according to your TV capabilities.
Two-channel analog output
To connect external device to the two-channel
analog output use audio output (18) 5.1 CH
(slots FL and FR) and set 2-channel mode in set-
tings menu (See «Speaker setup»).
If the external device doesn’t have stereophonic
input, connect the audio input of the external
device to ML/MR output (12) of your DVD-player.
To set up the sound channel press the L/R button
(51) while watching.
Analog 5.1 CH audio output (18)
To connect the amplifier to five-channel audio
output (18) 5.1 CH use three pairs of AV-cables.
Coaxial digital audio output (13) COAXIAL
To connect COAXIAL slot of your DVD-player to
the respective slot of the amplifier use a special
coaxial cable.
Optical digital output (16) OPTICAL
To connect OPTICAL slot of your DVD-player to
the optical slot of the amplifier use a special fiber
optic cable.
Note: The settings must correspond to the
slot used for DVD-player and external device
connection.
MAIN FUNCTIONS
POWER (POWER-ON)
Press the (3) POWER button on the upper control
panel of the player or the (19) button on the
remote control to switch the player on.
Use these buttons to switch to the stand-by
mode.
OPEN/CLOSE (OPEN/CLOSE THE DISC
TRAY)
Press the (1) OPEN/CLOSE button on the upper
control panel of the player or the (36) button
on the remote control to open the disc tray. Place
the disc into the tray with the operating surface
down (label up). Press the (1)/(36) button once
again to close the tray and the player will start
playback automatically (the automatic playback
function doesn’t work for MP3 and JPEG discs).
VOLUME (VOLUME LEVEL ADJUSTING)
Use the (29, 48) VOLUME +/- buttons to increase
or decrease the volume.
MUTE (VOLUME OFF)
To turn the volume off, press the (43) MUTE but-
ton. To turn the volume on, press the (43) MUTE
button once again or use the volume buttons
(29, 48).
PLAY/PAUSE (PLAYBACK/PAUSE)
Press the (2) PLAY/PAUSE button on the upper
control panel of the player or the (44) PLAY/
PAUSE button on the remote control to start
playback.
VT-4101_IM.indd 8 29.11.2012 12:53:38

9
E N G L I S H
Press the (2)/(44) PLAY/PAUSE button again
to pause playback. To return to normal playback
press this button once more.
STOP (STOP PLAYBACK)
Press the (25) STOP button once during DVD,
SVCD, VCD and CD-playback – in this case
the player will remember the playback-stop
point. Press the (2)/(44) PLAY/PAUSE button to
resume playback. To stop playback completely,
press the (25) STOP button twice.
REV ( ) and FWD ( ) (REWIND/WIND
FORWARD)
Press the (26) REV button for fast-forward wind-
ing.
Press the (28) FWD button for rewinding.
The winding speed increases with each new
pressing.
PREV ( )/NEXT ( ) (SKIP TO
PREVIOUS/NEXT TRACK)
Press the (45) PREV button during playback
to skip to the previous scene (fragment)/track
(depending on the disc you use).
Press the (47) NEXT button during playback to
skip to the next scene (fragment)/track.
PROG (PROGRAMMING)
If a disc contains two and more tracks, scenes
(fragments) or titles (i.e. items), you can set the
playback sequence with the (40) PROG button.
To enter the programming mode, press the (40)
PROG button, the programming menu will appear
on the screen. Use the number buttons (20) to
select the number of track, scene (fragment)
or title (item). To enter the track number 10 and
up use the “10+” button (for example, to enter
the number 26, press buttons in the following
sequence: 10+, 10+, 6). If there are more than 10
tracks, press (47) NEXT to continue the program-
ming table (the maximal number is 20 tracks).
Use the navigation buttons (22) to browse the
menu items. After you have finished program-
ming, select “START” and press the (23) ENTER
button to play the tracks in the programmed
sequence.
Note: Programming is not possible for MP3-
discs!
Press the (40) PROG button once to open the
list of files.
Using the navigation buttons (22), you can select
the desired file to be played.
TITLE (ITEM TITLE)
Press the (30) TITLE button during DVD-playback
to go to the disc menu. To exit the disc menu and
to resume playback, press the (54) RESUME
button.
Note: The availability of this function depends on
the type of the disc played.
MENU
Press the (24) MENU button during DVD-
playback to open the disc menu.
Pressing of the (24) MENU button during VCD/
SVCD-disc loading or playback activates the
Playback Control (PBC).
During VCD/SVCD-disc playback with the PBC-
function on, press the (25) STOP button and
then the (31) RETURN button to return to the
disc menu.
Note: The availability of this function depends on
the type of the disc played.
SUBT/COPY (SUBTITLE SELECTION/
COPYING)
During playback of a subtitled DVD press the (37)
SUBT/COPY button subsequently to select the
subtitle language.
Copying
Copy music files from a CD to a flash drive.
Copy files from MP3/MP4/JPEG/WMA discs to a
USB flash drive.
Press the (37) SUBT/COPY button to delete a file
from the flash drive.
Note: Materials copied from a disc may be sub-
ject to copyright. The disc material may be used
only for reviewing.
ANGLE
During playback of a DVD with more than one
viewing angle press the (34) ANGLE button to
select the desired playback angle.
Note: The availability of this function depends on
the type of the disc played.
REPEAT
Press the (46) REPEAT button to replay a track,
episode (fragment), title (i.e. item) or the whole
disc.
During DVD-playback press the (46) REPEAT
button to replay an episode (fragment), title (i.e.
item), the whole disc or to cancel the repeat.
During SVCD, VCD and CD-playback you can
replay a track, a disc or cancel the repeat.
During MP3-disc playback you can replay a
track, tracks in the folder, all tracks or cancel
the repeat.
RAN (RANDOM PLAYBACK)
Press the (33) RAN button for random playback
of files. To cancel this function, press this button
again.
VT-4101_IM.indd 9 29.11.2012 12:53:38

10
ENGLISH
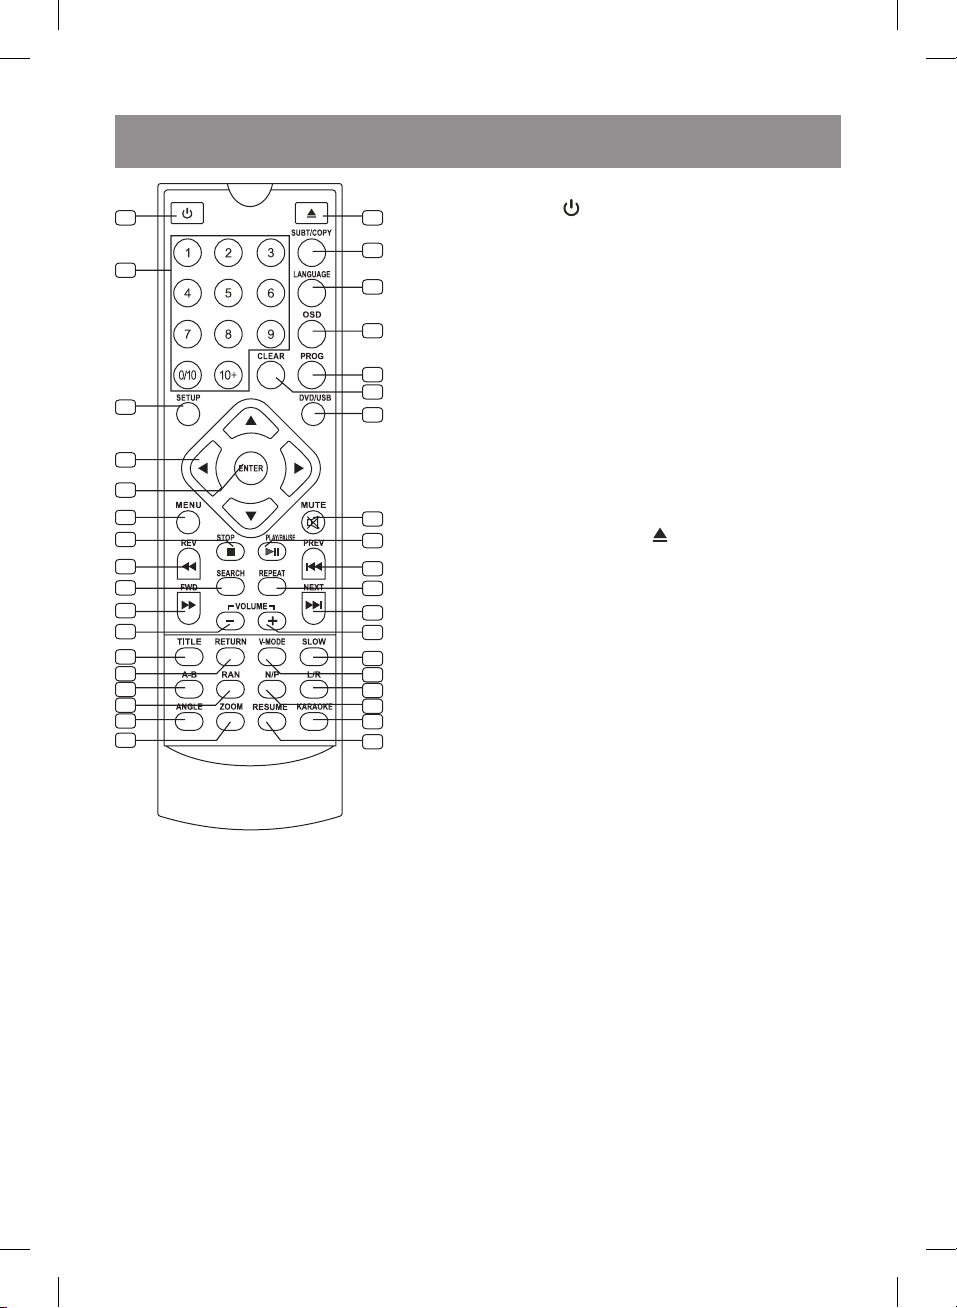
A-B (A-B FRAGMENT REPLAY)
During playback you can set an A-B fragment
for replay.
Press the (32) А-В button to set the starting
point (A).
Press the (32) А-В button to set the end point
(B). The selected fragment will be replayed.
Press the (32) А-В button for the third time to
cancel the replay and to return to normal play-
back.
ZOOM (CHANGING THE SCALE)
To change the scale, press the (35) ZOOM but-
ton. To move an enlarged Jpeg-image around the
screen use the navigation buttons (22).
LANGUAGE (LANGUAGE SELECTION)
During playback of a DVD/SVCD with multiple
languages press the (38) LANGUAGE button
subsequently to select the desired language.
SEARCH
In the playback mode, press the (27) SEARCH
button once, the search menu will appear on the
screen. Use the ( ) buttons in the search menu
to select the desired option, the number buttons
(20) to set the playback starting point or the
number of track or section to be played. Press
the (23) ENTER button to confirm your selection.
Note: The availability of this function depends
on the type of the disc played.
CLEAR (CANCEL ENTRY)
Press the (41) CLEAR button to cancel a num-
ber entry. Press the button once to delete one
character. Hold the button to delete all entered
characters.
OSD (DISC INFORMATION)
Press the (39) OSD button, the disc information
will be displayed on the screen.
SETUP (SYSTEM SETUP MENU)
Press the (21) SETUP button to enter/quit the
system setup menu.
V-MODE (VIDEO-OUTPUT MODE
SELECTION)
Press the (50) V-MODE button to select the
video output mode (CVBS, YUV and RGB).
NUMBER BUTTONS (1-9, 0/10, 10+)
During CD, DVD, MP3 or VCD-playback use the
number buttons to select a track, fragment or
title (i.e. item). Press the (23) ENTER button to
confirm your selection.
To enter the track-number 10 and up use the
“10+” button (for example, to enter number 26,
press buttons in the following sequence: 10+,
10+, 6).
N/P (TV SYSTEM SELECTION)
Press the (52) N/P button to select the TV sys-
tem: PAL, NTSC, Auto.
DVD/USB (SOURCE SELECTION)
Press the (42) DVD/USB button, a menu will be
displayed on the screen, you can select the data
source with the navigation buttons (22): DVD-
disc or USB flash drive. Press the (23) ENTER
button to confirm your selection.
Note: If both a disc and a USB flash drive are
installed in the player simultaneously, the player
will start playback with the disc.
You can connect, replace or disconnect a USB
flash drive when the playback is stopped.
SLOW (SLOW-MOTION PLAYBACK)
Press the (49) SLOW button for slow-motion
playback.
To exit the slow-motion mode, press the (44)
PLAY/PAUSE button.
L/R (SWITCHING THE SOUND CHANNEL)
When connecting an external device to the out-
puts (12) ML/MR, press the (51) L/R button
to set the sound channel during playback. The
output (12) ML/MR is used for different options
of mixing the left and right channels.
OTHER FUNCTIONS
Karaoke
A karaoke-disc is a DVD or VCD disc with record-
ed music and subtitles, showing the user the start
point of a song fragment singing. A microphone
is necessary for singing (not included in the stan-
dard delivery set).
Connect the microphone to the slot (7) on the
front panel of your DVD-player and press the (54)
KARAOKE button.
Insert a karaoke-disc into the DVD-player, the
playback will start automatically.
MP3 files playback
To move across the folder/file list use the naviga-
tion buttons (22) ( ), to open/close a folder use
the ( ) buttons, to play a file press the (23)
ENTER button or the (44) PLAY/PAUSE button.
Viewing images and pictures on CD
After a disc with images is loaded, the list of files
will be shown on the screen. To select files move
across the list using the ( ) and (23) ENTER but-
tons. The selected image will be shown on the full
screen of your TV.
To exit from the full-screen view mode, press the
(25) STOP button. Image previews will be shown
on the screen. Select the desired image using the
VT-4101_IM.indd 10 29.11.2012 12:53:38

11
E N G L I S H
() buttons. Press the (23) ENTER button to
display the image on the TV-screen.
Buttons used for image viewing:
ZOOM (35) – switches to the scale change
mode.
REV (26) and FWD (28) – change image scale.
(22) – moving of the enlarged image.
If the ZOOM function is off, you can rotate the
image with the ( ) buttons.
SYSTEM SETUP
• Connect the DVD-player to an external
device, following the recommendations in the
“Device connection” section.
• Insert the power plug into the mains socket.
• Switch the TV on and set the corresponding
input signal in its settings.
• Switch the power on by turning the switch (9)
on the rear panel to the position «I».
• Switch the device on by pressing the (3)/(19)
PLAY/PAUSE button.
• To enter the setup menu, press the (21)
SETUP button, the system setup window will
appear on the TV screen. To quit the menu
press this button once again.
Using the navigation buttons (), select one
of the following pages: general settings, audio
setup, Dolby setup, video setup or preferences.
Press the (↓) button to go to the selected page.
Select the item you want to change with the ( )
button.
Press the (23) Enter button or the ( ) button to
enter the selected sub-menu. Select the needed
value with the navigation buttons ( )and press
(23) Enter to confirm it, or press ( ) to return to
the list of settings.
Attention! In some modes specific menu items
are marked grey and are inactive, because they
have been preset.
The entered settings are stored after the power
is switched off.
General Audio Dolby Video Preference
— General setup page —
TV Display PS
Angle Mark on
OSD Lang ENG
Captions Off
Screen On
HDCD 1X
Last Memory Off
Go To General Setup Page
GENERAL SETTINGS
TV Display
Adjust the image size displayed on the TV-screen.
Angle Mark
Turn the “Angle” function on/off.
OSD Language
Select the on-screen menu language. The default
OSD language is Russian.
Subtitle
Turn subtitle on/off (disc-optional).
Startup screen
If this function is enabled and the player is on,
but the disc is not played back within several
minutes, a startup screen will appear.
HDCD
Adjust the HDCD function. Options: 1x, 2x, func-
tion is off.
Last Memory
If this function is on, the player keeps the moment
of disc- ejection in memory and at the next load-
ing of the same disc the player continues play-
back from the moment of ejection. This function
is active for DVD/VCD discs.
AUDIO SETUP
Speaker setup
The speaker setup is not necessary for con-
nection through coaxial output (13). Apply to
this menu section when adjusting the 5-channel
sound.
Mixing
Stereo: for two-channel signal listening.
LT/RT: 5.1 original sound. The CH is transmitted
only through the left and right channels.
V SURR: spatial sound effect through two chan-
nels.
5.1. CH: for reproducing of the original sound in
the 5.1 CH-format.
Front speaker, central speaker and rear
speaker
Select the “Lower” option for small speakers and
the “Louder” option for large speakers.
Subwoofer
Turn subwoofer on/off.
Spdif setup
Set the format of digital sound output through the
coaxial or optical slot.
If your amplifier has a built-in Dolby/DTS decod-
er, select the SPDIF/RAW item, then the digital
signal will be processed in the original format
recorded on the disc.
VT-4101_IM.indd 11 29.11.2012 12:53:38

12
ENGLISH
SPDIF/PCM: digital output signal in decoded
PCM-format.
Karaoke setup
MIC: Switching the microphone on/off.
MIC VOLUME: Microphone volume adjustment.
Echo level: Echo-effect adjustment.
DOLBY DIGITAL SETUP
Double mono
Stereo: stereo output signal.
L-mono: left channel output signal.
R-mono: right channel output signal.
Mixed mono: averaged left and right output
signal.
Dynamic
When watching night programs with high dynam-
ic sound range, the selection of this mode will
enable you to turn the volume down to a very low
level (so as not to disturb other family members),
at the same time preserving the quality and
details of the accompanying sound.
VIDEO SETUP
Connection
YUV: select this mode for Y Cb/Pb Cr/Pr compo-
nent output connection.
S-Video: composite video signal setting.
RGB: select this mode for connection to the
SCART-slot.
Resolution:
Select the necessary option according to your TV
resolution for the best playback quality.
Quality
You can adjust image sharpness, brightness and
contrast as you prefer.
HDMI Setup
You can adjust the video output values.
PREFERENCES
TV type
Set the TV system.
Audio
Sound language selection.
Subtitle
Subtitle display adjustment.
Disc menu
Disc menu language selection.
Access control
This function is intended for parental control
over disc content and playback, it enables you to
block unwanted scenes that you don’t want your
children to watch. A password has to be entered
for watching blocked fragments. Password by
default: 0000.
Password
Change the access control password.
Default
Return to the factory settings.
PLAYING BACK FILES RECORDED ON DISC
• MPEG, MPEG1, MPEG2, MP3, WMA and
JPEG files can be recorded on a disc for
future playback on a DVD-player. This device
supports CD-R, CD-RW, DVD-R, DVD-RW,
DVD+R and DVD+RW discs.
• Up to 999 files can be recorded on a disc.
• Different file types can be recorded on one
disc (JPEG-images, MP3 audio-files etc.)
• You can identify the file type by its exten-
sion, specified in file properties and in the file
name. Your player supports files with exten-
sions *.wma, *.avi, *.mpg and *.jpg. Files
with other extensions are not recognized by
this device. For example, when you copy files
from a SVCD disc, you have to rename them
by replacing the extension *.dat with *.mpg.
VT-4101_IM.indd 12 29.11.2012 12:53:38

13
E N G L I S H
NAVIGATION
The navigation window will be shown on your TV screen, when you work with MPEG4/MP3/WMA/
JPEG file formats.
Press the (23) ENTER button or (44) PLAY/PAUSE button to watch/listen to the selected file.
COPYING MUSIC FILES TO A USB flash drive
You can record music files from Audio CD and
write them to USB flash drive in MP3 format.
– Insert the Audio CD into the disc tray and con-
nect the USB flash drive to the USB-slot (8)
– When music playback starts, press the button
(37) SUBT/COPY.
– The copying menu will be shown on the
screen of your TV.
– Select the track from the list on the right and
press «Start».
– To stop the copying select «Exit».
Note: Materials copied from a disc may be
subject to copyright. Distribution (including
via copying to Internet sites and resources) is
restricted. The disc materials may be used only
for reviewing.
RECOMMENDATIONS
– If you are not going to use the device for a
long time, switch the power off by setting the
switch (9) to the position «0».
– Do not switch the player off if you see the
message «Loading» on the TV screen.
– If the device hung, switch it off, count to 30
and switch the player on again.
VT-4101_IM.indd 13 29.11.2012 12:53:39

14
ENGLISH
TROUBLESHOOTING
Failure Reason of failure Troubleshooting
No power The cord is not connected to the
socket.
Plug the power cord in.
No picture Wrong input source in the TV
settings.
Select the correct settings according
to the player connection
The setting doesn‘t correspond
to the actual connection
Select the settings according to the
actual connection
The video cable is not inserted
properly.
Check the video cable connection
No sound The audio cable is not inserted
properly.
Check the audio cable connection
The connected devices are
switched off
Switch the power of connected
devices on
Wrong sound settings Select the corresponding settings
Sound distortion Volume level is too high Decrease the volume level
Unstable image Wrong TV settings Correct the TV settings
No disc playback Disc is not inserted Insert the disc
Disc is placed improperly Check if the disc is placed properly
(label up)
Condensation inside the player Leave the DVD-player operating for 1
hour without a disc
Microphone does not
work
Microphone is not connected Connect the microphone
Low volume level of the
microphone
Adjust the volume level of the
microphone
Remote control
doesn‘t work
Remote control isn‘t aimed to
the player
Aim the remote control to the player
The distance between the
remote control and the player
exceeds 8 meters
Reduce the distance between the
remote control and the player
The batteries of the remote
control are low
Change the batteries
Some system
functions do not work
Buttons were pressed in the
wrong sequence
Repeat the operation according to the
manual
STORAGE
• Clean the device before taking it away for storage
(see chapter «Cleaning and care»)
• Keep the device away from children in a dry cool
place.
DELIVERY SET
DVD-player – 1 pc.
Remote control – 1 pc.
Batteries - 2 pcs.
AV cable - 1 pc.
TECHNICAL SPECIFICTAIONS
Power supply: 220-240 V ~ 50 Hz
Rated consumption power: 10 W
Rated standby power: < 1 W
Batteries (for remote control) - 2 «AAA» batteries, 1,5 V
The manufacturer preserves the right to change the
specifications of the device without a preliminary
notification.
Device operating life is 3 years
Guarantee
Details regarding guarantee conditions can be obtained
from the dealer from whom the appliance was purchased.
The bill of sale or receipt must be produced when making
any claim under the terms of this guarantee.
This product conforms to the EMC-
Requirements as laid down by the Council
Directive 89/336/EEC and to the Low Voltage
Regulation (73/23 EEC)
VT-4101_IM.indd 14 29.11.2012 12:53:39

15
русский
DVD-ПЛЕЕР
Уважаемый покупатель!
Перед подключением, использованием и
настройкой устройства внимательно прочи-
тайте инструкцию. Необходимо соблюдать
все предупреждения и рекомендации по экс-
плуатации устройства, приведенные в данной
инструкции.
Сохраняйте настоящую инструкцию, исполь-
зуйте ее в дальнейшем в качестве справоч-
ного материала.
ВНИМАНИЕ!
Опасность удара
электрическим
током!
НЕ ВСКРЫВАТЬ!
ПРЕДУПРЕЖДЕНИЕ: во избежание
возникновения пожара или поражения
электрическим током не подвергайте
устройство воздействию дождя или влаги.
Чтобы избежать удара электрическим
током, не открывайте корпус устройства
самостоятельно.
Сервисное обслуживание
должно осуществляться только
квалифицированными специалистами
сервисных центров.
Значок молнии в равносторон-
нем треугольнике предупрежда-
ет пользователя о наличии опас-
ного напряжения внутри корпуса
устройства, которое может при-
вести к поражению электриче-
ским током.
Восклицательный знак в равно-
стороннем треугольнике указы-
вает пользователю на наличие
важных рекомендаций по экс-
плуатации и настройке.
CLASS 1 LASER PRODUCT
Данный продукт классифицируется как ЛА-
ЗЕРНОЕ УСТРОЙСТВО КЛАССА 1. Соответ-
ствующая этикетка находится на задней па-
нели устройства и означает, что устройство
использует лазерные лучи. Опасность ла-
зерного облучения отсутствует в том случае,
если устройство не вскрывается.
ОБСЛУЖИВАНИЕ УСТРОЙСТВА ДОЛЖНО
ВЫПОЛНЯТЬСЯ ТОЛЬКО КВАЛИФИЦИРО-
ВАННЫМИ СПЕЦИАЛИСТАМИ СЕРВИСНОГО
ЦЕНТРА.
СОБЛЮДЕНИЕ МЕР БЕЗОПАСНОСТИ
Внимательно прочитайте все инструкции
перед использованием устройства.
ПРЕДУПРЕЖДЕНИЕ
Для снижения риска возникновения пожара,
поражения электрическим током или получе-
ния травм необходимо соблюдать следующие
условия:
• Используйте данное устройство только в
соответствии с инструкцией по эксплуа-
тации.
• Прежде чем подключить устройство к
электросети, убедитесь, что напряжение,
указанное на устройстве, соответствует
напряжению электросети в вашем доме.
• Во избежание риска возникновения пожа-
ра не используйте переходники при под-
ключении устройства к электрической
розетке.
• Запрещается погружать устройство в
воду.
• Во избежание возникновения пожара или
поражения электрическим током не раз-
мещайте данное устройство в условиях
повышенной влажности (около ванн, тазов
с водой, кухонных раковин, стиральных
машин, рядом с плавательным бассейном,
в сырых подвалах и т.п.).
• Не допускайте попадания на устройство
капель или брызг. Запрещается ставить на
устройство заполненные жидкостью ёмко-
сти (например, вазы). Во избежание обра-
зования конденсата (когда вы переноси-
те плеер из более теплого помещения в
более холодное и наоборот) не включайте
прибор сразу, подождите приблизитель-
но 2 часа.
• Не используйте сетевые удлинители, кото-
рые не разрешены изготовителем устрой-
ства, так как это может быть опасным.
• Не допускайте перегрузки электриче-
ских розеток или удлинителей, так как это
может привести к пожару или поражению
электрическим током.
• Установите данное устройство таким обра-
зом, чтобы в случае неисправности вилку
сетевого провода можно было немед-
VT-4101_IM.indd 15 29.11.2012 12:53:39

16
русский
ленно вынуть из электрической розетки.
Сетевой провод не должен быть натянут
там, где он выходит из устройства; его
необходимо прокладывать так, чтобы он
не запутывался, не устанавливайте на него
какие-либо предметы обстановки.
• Из соображений безопасности детей,
не оставляйте полиэтиленовые паке-
ты, используемые в качестве упаковки,
без присмотра.
• Внимание! Не разрешайте детям играть с
полиэтиленовыми пакетами или упаковоч-
ной пленкой. Опасность удушья!
• Храните устройство в местах, недоступных
для детей.
• Не разрешайте детям использовать
устройство в качестве игрушки.
• Данное устройство не предназначено для
использования детьми и людьми с огра-
ниченными возможностями, если только
лицом, отвечающим за их безопасность,
им не даны соответствующие и понятные
им инструкции о безопасном пользова-
нии устройством и тех опасностях, кото-
рые могут возникать при его неправиль-
ном использовании.
• Для дополнительной защиты устройства
во время грозы, а также в тех случаях,
когда вы не собираетесь использовать его
в течение длительного времени, отключи-
те устройство от электрической розетки.
Это исключит выход устройства из строя
из-за ударов молнии или скачков напря-
жения в электросети.
• Не отсоединяйте сетевой шнур при вклю-
ченном электропитании.
• Для отсоединения сетевого шнура бери-
тесь непосредственно за вилку, ни в коем
случае не тяните за провод.
• Не оставляйте включенное в сеть устрой-
ство без присмотра.
• Во избежание удара электрическим током
не вскрывайте корпус устройства само-
стоятельно. Не пытайтесь ремонтировать
устройство самостоятельно и не вносите
в него изменения. Сервисное обслужива-
ние должно осуществляться только ква-
лифицированными специалистами авто-
ризованных (уполномоченных) сервисных
центров.
УСТРОЙСТВО ПРЕДНАЗНАЧЕНО ТОЛЬКО ДЛЯ
БЫТОВОГО ИСПОЛЬЗОВАНИЯ
Установка устройства
Примечание: После транспортировки или
хранения устройства при пониженной темпе-
ратуре необходимо выдержать его при ком-
натной температуре не менее двух часов.
• Удалите любые элементы упаковки и
наклейки, мешающие работе устройства.
• Устанавливайте устройство в местах с
достаточной вентиляцией. Данное устрой-
ство не следует размещать во встроен-
ной мебели (в книжных полках или стен-
ных шкафах), если там нельзя обеспечить
достаточной вентиляции.
• Запрещено размещать устройство на мяг-
ких поверхностях (например, на диване,
софе, ковре или на других подобных пред-
метах обстановки).
• Размещайте устройство в местах с хоро-
шей вентиляцией.
• Не накрывайте устройство и не устанавли-
вайте на него какие-либо предметы.
• Не размещайте устройство вблизи источ-
ников тепла – таких как радиаторы, элек-
трообогреватели, духовки - или рядом
с другими устройствами, являющимися
источниками тепла (в том числе и усили-
телями), а также в местах, подверженных
воздействию прямых солнечных лучей и
чрезмерному запылению.
• Не кладите на устройство тяжелые пред-
меты.
• Не размещайте данное устройство на
предметах мебели с нефиксируемыми
колесиками, на неустойчивых подставках,
треногах, кронштейнах, столах, так как
изделие может упасть и привести к трав-
мам детей, взрослых, а также к неисправ-
ности самого устройства. Используйте
только те подставки, треноги, кронштей-
ны, столы, которые продаются вместе с
устройством, либо рекомендованы изго-
товителем устройства. При установ-
ке устройства на подставке соблюдай-
те инструкции изготовителя, применяйте
только те крепежные изделия, которые
рекомендуются изготовителем. Подставку
с установленным на ней устройством сле-
дует перемещать с крайней осторожно-
стью. При резкой остановке, рывках или
при перемещении подставки по неровной
VT-4101_IM.indd 16 29.11.2012 12:53:39

17
русский
поверхности весьма вероятно опрокиды-
вание подставки и падение устройства.
Посторонние предметы
Не допускайте попадания каких-либо предме-
тов через отверстия внутрь корпуса устрой-
ства, так как это может повлечь за собой
возгорание устройства и поражение электри-
ческим током. Если это все-таки произошло,
немедленно отсоедините устройство от элек-
трической сети и обратитесь к квалифициро-
ванным специалистам.
Повреждения, требующие ремонта
Если у вас возникли описанные ниже ситу-
ации, необходимо отключить устройство от
электрической розетки и обратиться к ква-
лифицированному специалисту для ремонта
устройства:
a. Повреждение сетевого шнура или вилки.
б. В устройство попали какие-либо предме-
ты.
в. Устройство попало под дождь или на него
разлили воду.
г. Заметны явные изменения в работе
устройства.
д. Устройство упало или было повреждено
каким-либо другим образом.
Уход за устройством
Перед чисткой устройство следует отключить
от электрической розетки. Для чистки устрой-
ства пользуйтесь влажной мягкой тканью.
Запрещается использовать для этих целей
жидкие или аэрозольные чистящие средства.
Уход за дисками
• Не используйте треснутые или деформи-
рованные диски, так как это может вызвать
поломку устройства.
• Берите диск только за края. Вставляйте
диск надписью вверх. Не прикасайтесь к
рабочей поверхности диска. Пыль, цара-
пины или отпечатки пальцев на рабочей
поверхности диска могут привести к выхо-
ду его из строя.
• Следите за тем, чтобы на диски не попа-
дали прямые солнечные лучи, чтобы диски
не находились рядом с источниками тепла
и не были подвержены воздействию высо-
кой температуры и влажности.
• После использования диск следует убрать
в футляр на хранение.
• Периодически протирайте рабочую
поверхность диска мягкой тканью от цен-
тра к краям. Не пользуйтесь обычными
моющими средствами.
Использование батареек
Протечка батареек может стать причиной
травм или повреждения пульта дистанцион-
ного управления. Чтобы избежать поврежде-
ния батареек, следуйте приведенным ниже
инструкциям, а именно:
• не используйте вместе батарейки раз-
личных типов; для пульта дистанционного
управления следует использовать только
батарейки одинакового типа;
• При замене батареек не используйте вме-
сте старые и новые батарейки;
• При нестабильной работе пульта дистан-
ционного управления проверьте батарей-
ки и при необходимости замените их;
• Вынимайте батарейки, если пульт дистан-
ционного управления не будет использо-
ваться в течение длительного времени;
• Неправильное использование батареек
может привести к утечке электролита и
повреждению устройства.
Меры по бережному обращению с устрой-
ством
• При транспортировке устройства исполь-
зуйте коробку и детали упаковки, которые
были получены вами при покупке устрой-
ства.
• Если плеер работал продолжительное
время, то его корпус мо жет быть слегка
нагретым - это нормальное явление.
• Не перемещайте данное устройство во
время воспроизведения диска. В против-
ном случае есть опасность повреждения
считываю щего устройства и диска.
АВТОРСКИЕ ПРАВА
В данном устройстве используется техноло-
гия защиты авторских прав, поддерживаемая
патентами США, и других прав на интел-
лектуальную собственность, принадлежащих
компании Macrovision Corporation и другим
правообладателям. Использование техноло-
VT-4101_IM.indd 17 29.11.2012 12:53:39

18
русский
гии защиты авторских прав должно быть раз-
решено компанией Macrovision Corporation,
данное устройство предназначено только
для домашнего использования, если обрат-
ное не разрешено компанией Macrovision
Corporation. Разборка изделия и копирование
технологии запрещены.
Изготовлено по лицензии Dolby Laboratories.
Название «Dolby» и символ в виде двойной
буквы «D» являются торговыми марками ком-
пании Dolby Laboratories.
Примечание: данное устройство соответ-
ствует директиве по электромагнитной со-
вместимости и директиве для низковольтных
устройств.
ХАРАКТЕРИСТИКИ ПРИБОРА
• Воспроизводимые диски:
– DVD: DVD/DVD+RW/DVD+R/DVD-RW/
DVD-R;
– CD: CD-R/CD-RW;
• Поддерживаемые форматы диска: Audio
CD, Video CD, Super Video CD, HDCD,
Kodak PhotoCD, DVD.
• Поддерживаемые кодеки: Xvid, Mpeg1,
Mpeg2, Mpeg4, MP3 (VBR), WMA (Bit rate:
32-192 Kbps), Jpeg, PhotoCD.
• Встроенные декодеры Dolby Digital
AC-3/5.1.
• Разъёмы для подключения: HDMI;
Аналоговый 5.1-канальный; Стерео
аудио выход; SCART; Оптический выход;
Цифровой коаксиальный; Композитный
VIDEO; Компонентный Video (Y/Pb/Pr);
S-Video.
• Разъем USB.
• Караоке.
• Экранное меню на русском и английском
языках.
Тип
диска
Символ Содержимое
DVD Аудио + видео
MPEG4
(DivX)
Аудио + видео
Video CD
(VCD)
Аудио + видео
Super
VCD
(SVCD)
Аудио + видео
CDDA Аудио
MP3 Аудио
JPEG Фото
VT-4101_IM.indd 18 29.11.2012 12:53:39

19
русский
10 11 12 13 14 15 16 17 18
К сведению:
Все рисунки в данном руководстве приведены только для наглядности объяснений. Они могут
несколько отличаться от приобретенного устройства.
ОПИСАНИЕ
1. Кнопка открытия/закрытия лотка для дисков OPEN/CLOSE
2. Кнопка воспроизведения/паузы PLAY/PAUSE
3. Кнопка включения/выключения POWER
4. Лоток для дисков
5. Фотоприёмник сигналов пульта ДУ
6. Дисплей
7. Гнездо для микрофона
8. USB-вход
9. Кнопка механического выключения устройства
10. Разъём SCART
11. Разъём HDMI
12. Выход аудио ML/MR, стерео
13. Цифровой коаксиальный выход COAXIAL
14. Композитный видеовыход VIDEO
15. Видеовыход S-VIDEO
16. Цифровой оптический выход OPTICAL
17. Компонентный видеовыход Y Cb/Pb Cr/Pr
18. Выход аудио 5.1 CH AUDIO OUTPUT
VT-4101_IM.indd 19 29.11.2012 12:53:39

20
русский
Пульт дистанционного управления (ПДУ)
19. Кнопка включения/выключения
20. Цифровые кнопки
21. Кнопка входа в меню настроек SETUP
22. Кнопки навигации
23. Кнопка ввода ENTER
24. Кнопка MENU
25. Кнопка остановки воспроизведения STOP
26. Кнопка перемотки назад REV
27. Кнопка входа в меню поиска SEARCH
28. Кнопка перемотки вперед FWD
29. Кнопка уменьшения уровня громкости VOLUME -
30. Кнопка входа в меню диска TITLE
31. Кнопка входа в меню дисков VCD/SVCD RETURN
32. Кнопка повтора выбранного фрагмента A-B
33. Кнопка режима произвольного воспроизведения
RAN
34. Кнопка выбора ракурса ANGLE
35. Кнопка изменения масштаба ZOOM
36. Кнопка открытия/закрытия лотка для диска
37. Кнопка выбора субтитров/копирования SUBT/
COPY
38. Кнопка выбора языка сопровождения LANGUAGE
39. Кнопка просмотра информации о диске OSD
40. Кнопка программирования воспроизведения
PROG
41. Кнопка отмены ввода CLEAR
42. Кнопка выбора носителя DVD/USB
43. Кнопка выключения звука MUTE
44. Кнопка воспроизведения/паузы PLAY/PAUSE
45. Кнопка перехода к предыдущему треку PREV
46. Кнопка режима повтора REPEAT
47. Кнопка перехода к следующему треку NEXT
48. Кнопка увеличения уровня громкости VOLUME +
49. Кнопка замедленного воспроизведения SLOW
50. Кнопка выбора режима видеовыхода V-MODE
51. Кнопка переключения звукового канала L/R
52. Кнопка выбора системы телевидения N/P
53. Кнопка вкл./выкл. микрофона KARAOKE
54. Кнопка выхода из меню диска RESUME
19 36
37
38
39
40
42
43
44
45
46
47
48
49
50
51
52
53
54
20
21
22
23
24
25
26
27
28
29
30
31
32
33
34
35
41
VT-4101_IM.indd 20 29.11.2012 12:53:39
Table of contents
Languages:
Other Vitek DVD Player manuals

Vitek
Vitek VT-4014 SR User manual

Vitek
Vitek 4015 User manual

Vitek
Vitek VT-4119SR User manual

Vitek
Vitek VT-4079 BK User manual

Vitek
Vitek VT-4015 GY User manual

Vitek
Vitek VT-4106 SR User manual

Vitek
Vitek VT-4110 B User manual

Vitek
Vitek VT-4106 SR User manual

Vitek
Vitek VT-4015 GY User manual

Vitek
Vitek VT-4008 User manual