Vitek VT-4014-SR User manual

DVD PLAYER
MODEL VT4014 SR
www.vitekaus.com
2
13
I STRUCTIO MA UAL
4014.qxd 16.06.2005 14:29 Page 1
All manuals and user guides at all-guides.com
all-guides.com

PRECAUTIO S
The lightning flash with arrowhead symbol
within an equilateral triangle is intended to
alert the user to the presence of uninsulated
dangerous voltage within the product's enclo
sure that may be of sufficient magnitude to
constitute a risk of electric shock to persons.
The exclamation point within an equilateral tri
angle is intended to alert the user to the pres
ence of important operating and maintenance
(servicing) instructions in the literature
accompanying the appliance.
Warning: To reduce the risk of fire or electric shock do not
expose this appliance to rain or moisture.
Dangerous high voltages are present inside the enclosure. Do
not open the cabinet.
Caution: The unit employs a laser system. To ensure the proper
use of the unit read this manual carefully and keep it for future
reference. If the unit requires servicing contact the seller or our
service centersee "troubleshooting". To prevent direct expo
sure to the laser radiation do not open the cabinet. Visible laser
may radiate when the cabinet is opened or the interlocks are
defeated do not stare into the laser beams.
Use of any controls adjustments or procedures other than
those specified herein may result in hazardous radiation expo
sure.
IMPORTA T SAFETY PRECAUTIO S
1. READ I STRUCTIO S All the safety and operating
instructions should be read before the product is operated.
2. RETAI I STRUCTIO S The safety and operating
instructions should be retained for future reference.
3. HEED WAR I GS All warnings on the product and in the
operating instructions should be adhered to.
4. CLEA I G Unplug this product from the wall outlet before
cleaning. Do not use liquid cleaners or aerosol cleaners. Use
a damp cloth for cleaning.
5. WATER A D MOISTURE Do not use this product near
water for example near a bath tub wash bowl kitchen
sink or laundry tub; in a wet basement; or near a swimming
pool; and the like.
6. POWER SOURCES This product should be operated only
from the type of power source indicated on the marking
label.
7. LIGHTE I G For added protection for this product during
a lightening storm or when it is left unattended and unused
for long periods of time unplug it from the wall outlet and
disconnect the antenna or cable system. This will present
damage to the product due to lightening and powerline
surges.
8. SERVICI G Do not attempt to service this product your
self as opening or removing covers may expose you to dan
gerous voltage or other hazards. Refer all servicing to quali
fied service personnel.
9. DAMAGES REQUIRI G SERVICE Unplug this product
from the wall outlet and refer servicing to qualified service
personnel under the following conditions.
When the powersupply cord or plug is damaged.
If liquid has been spilled or objects have fallen into the
product.
If the product has been exposed to rain or water.
If the product does not operate normally by following the
operating instructions. Adjust only those controls that are
covered by the operating instructions as an improver adjust
ment of other controls may result in damage and will often
require extensive work by a qualified technician to restore
the product to its normal operation.
When the product exhibits a distinct change in performance
this indicates a need for service.
10. REPLACEME T PARTS When replacement parts are
required be sure the service technician has used replace
ment parts specified by the manufacturer or have the same
characteristics as the original part Unauthorized substitu
tions may result in fire electric shock or other hazards.
11. SAFETY CHECK Upon completion of any service or repair
to this product ask the service technician to perform safety
checks to determine that the product is in proper operating
condition.
PRECAUTIO S FOR DISCS
To keep the disc clean do not touch the play sides of the
disc.
Do not attach paper or tape to the disc.
Keep the disc away from direct sunlight or heat sources.
Store the disc in a disc case after playback.
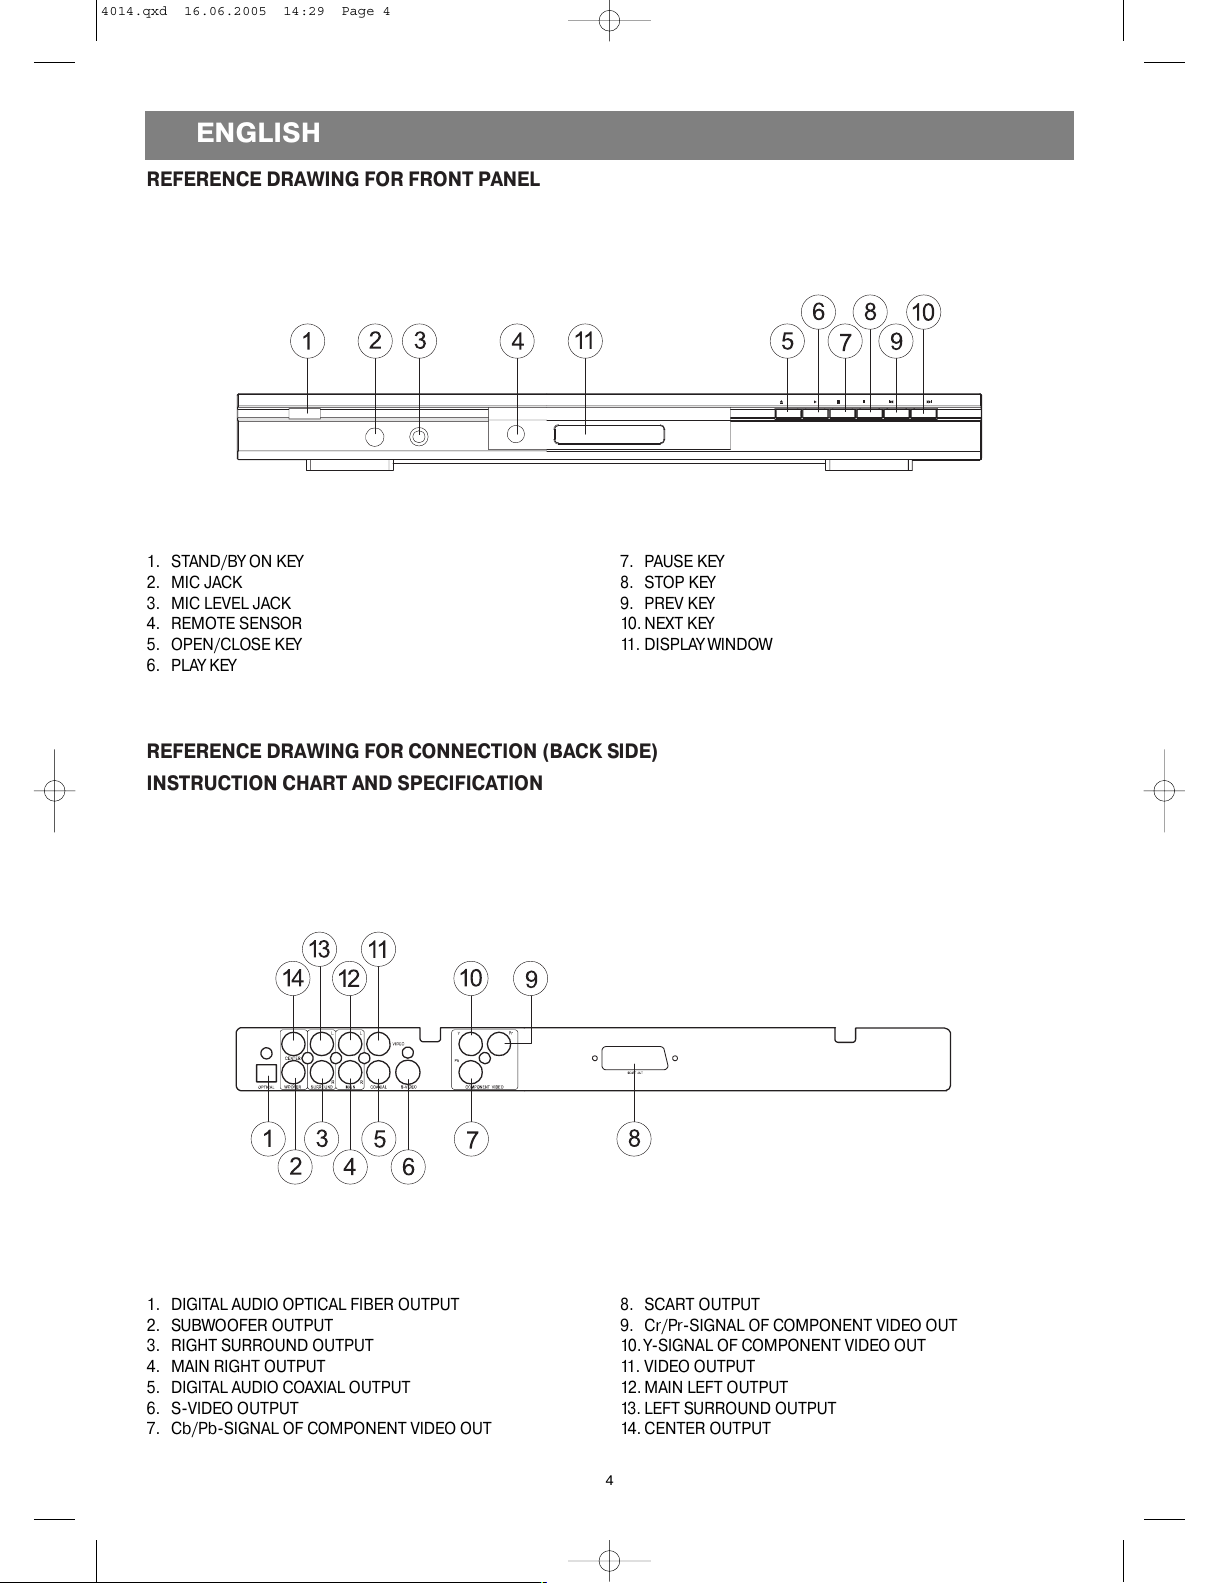
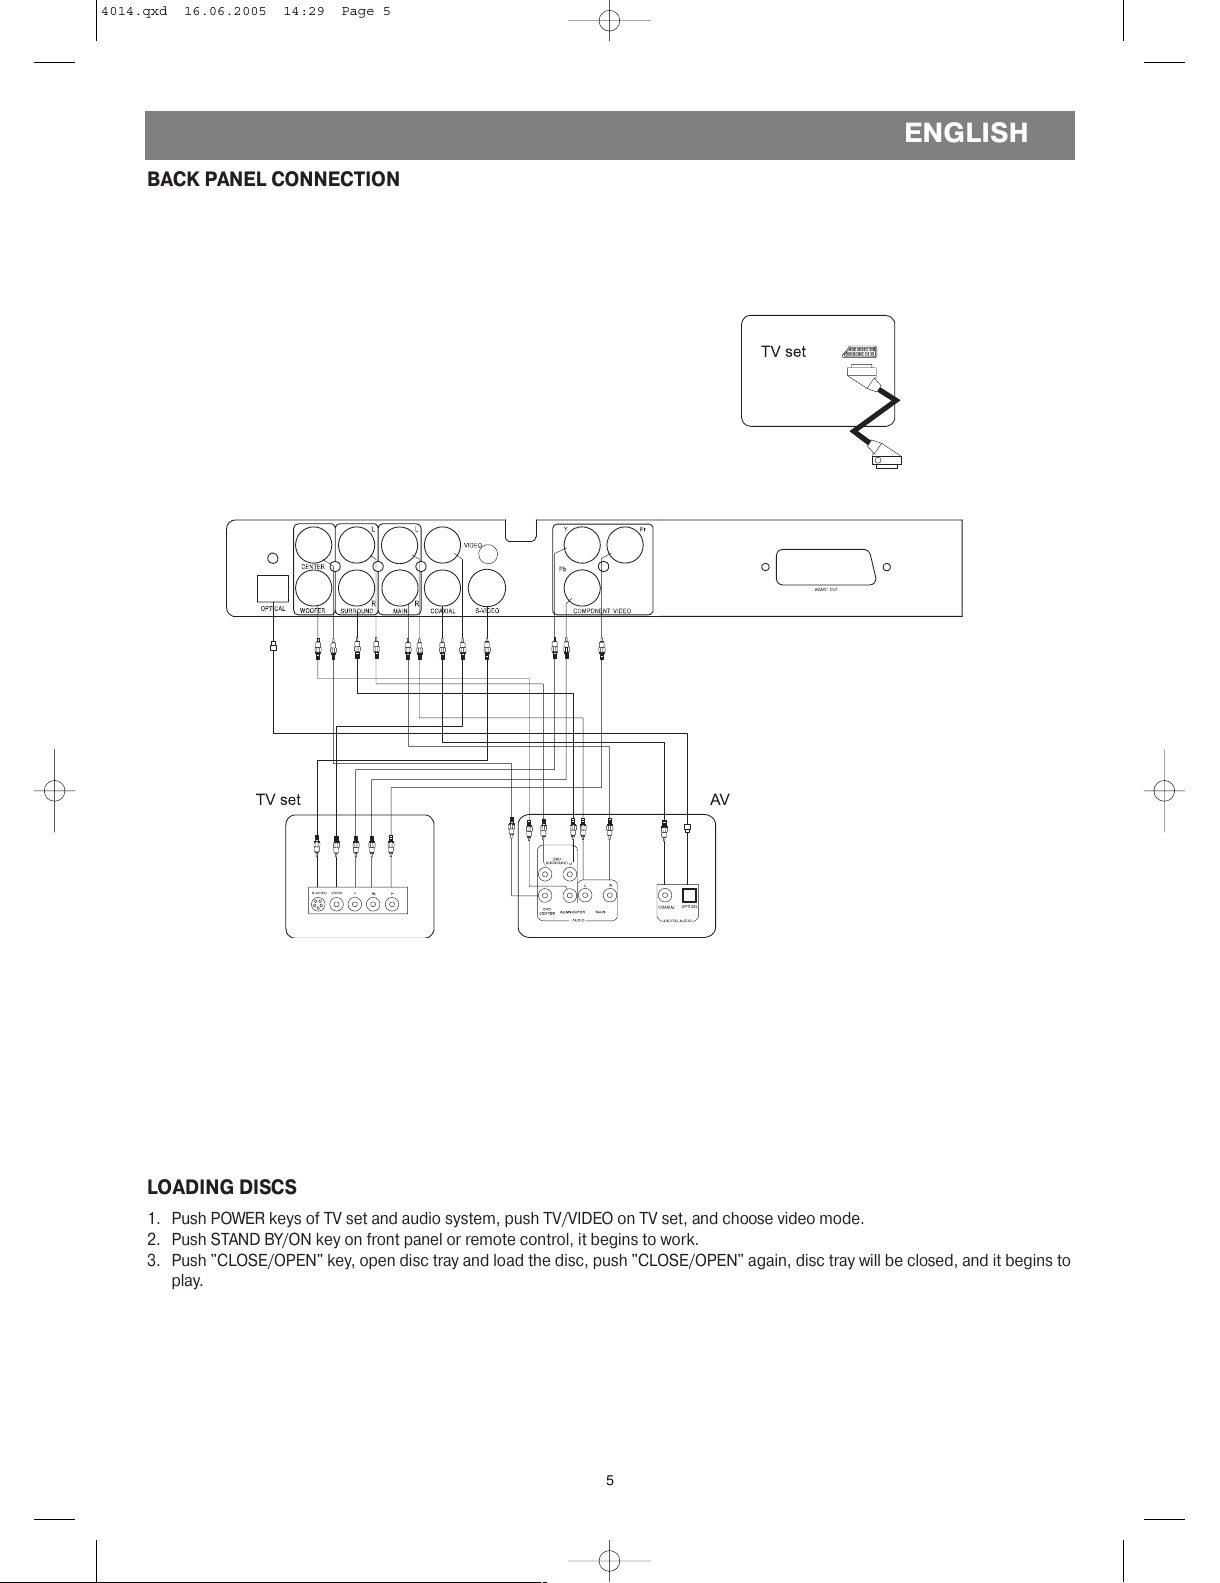
E GLISH
2
CAUTIO : TO REDUCE THE RISK OF ELECTRIC SHOCK,
DO OT REMOVE COVER.
O USERSERVICEABLE PARTS I SIDE.
REFER SERVICI G TO QUALIFIED SERVICE PERSO EL
CAUTIO
RISK OF ELECTRIC SHOCK
DO OT OPE
4014.qxd 16.06.2005 14:29 Page 2
All manuals and user guides at all-guides.com

PREPARATIO S BEFORE OPERATIO
FEATURES
1. HIGH DEFI ITIO
The unit adopts MPEG2 coding format and brings the hori
zontal resolution above 500 lines
2. U IQUE FU CTIO S
Multiangle and multilanguage bring unique trick functions.
Parent lock makes it easy to control the content of discs.
3. COMPATIBILITY
The unit can play DVD discs and is compatible with MP3
CD CDR CDRW and PICCD discs.
4. ZOOM
It can enlarge pictures or reduce pictures.
5. VIDEO OUTPUT
Standard video Svideo signal output mode INTERLACE
(YCbCr) output and progressive scan (YPbPr) output mode.
6. AUDIO OUTPUT
Analog audio output and optical coaxial DTS digital audio
output can be connected with any amplifier with AC3
decoder inside and DTS digital out you can enjoy highqual
ity sound effects.
ABOUT MA UAL
PRI CIPLES FOR WRITI G
This manual mainly introduces how to use buttons on the
remote control.
You may operate the unit if buttons on the unit have the
same or similar names as or to those on the remote control.
TERMS FOR DISCS
TITLE
The images or music of a DVD are divided into some units
among which title is the biggest one.
For an image in videodiscs title is movie; for a piece of
music in audio discs it is music.
Each title has a number that makes it easy to search.
CHAPTER
It is smaller than title among the units of a DVD. A title is
made up of several chapters and each chapter has a num
ber for search but some discs may not have numbered
chapters.
TRACK
The image or music of a CD each track has a number for
search.
USE REMOTE CO TROL
1. Open the battery compartment.
2. Insert two batteries make sure to match "+" and "" of the
batteries to the marks in the battery compartment.
3. Close the battery compartment.
4. Point the remote control at the remote sensor operate in
the range of 8 meters away from the front of the remote sen
sor. Make sure there is no barrier between them.
OTES:
1. Batteries can last for about 6 months generally. Change the
batteries of the remote control that does not work.
2. If the remote control is not used for a long time remove the
batteries to prevent battery leakage.
E GLISH
3
4014.qxd 16.06.2005 14:29 Page 3
All manuals and user guides at all-guides.com

REFERE CE DRAWI G FOR FRO T PA EL
REFERE CE DRAWI G FOR CO ECTIO (BACK SIDE)
I STRUCTIO CHART A D SPECIFICATIO
E GLISH
4
1. STAND/BY ON KEY
2. MIC JACK
3. MIC LEVEL JACK
4. REMOTE SENSOR
5. OPEN/CLOSE KEY
6. PLAY KEY
7. PAUSE KEY
8. STOP KEY
9. PREV KEY
10. NEXT KEY
11. DISPLAY WINDOW
1. DIGITAL AUDIO OPTICAL FIBER OUTPUT
2. SUBWOOFER OUTPUT
3. RIGHT SURROUND OUTPUT
4. MAIN RIGHT OUTPUT
5. DIGITAL AUDIO COAXIAL OUTPUT
6. SVIDEO OUTPUT
7. Cb/PbSIGNAL OF COMPONENT VIDEO OUT
8. SCART OUTPUT
9. Cr/PrSIGNAL OF COMPONENT VIDEO OUT
10. YSIGNAL OF COMPONENT VIDEO OUT
11. VIDEO OUTPUT
12. MAIN LEFT OUTPUT
13. LEFT SURROUND OUTPUT
14. CENTER OUTPUT
4014.qxd 16.06.2005 14:29 Page 4
All manuals and user guides at all-guides.com

BACK PA EL CO ECTIO
LOADI G DISCS
1. Push POWER keys of TV set and audio system push TV/VIDEO on TV set and choose video mode.
2. Push STAND BY/ON key on front panel or remote control it begins to work.
3. Push "CLOSE/OPEN" key open disc tray and load the disc push "CLOSE/OPEN" again disc tray will be closed and it begins to
play.
E GLISH
5
4014.qxd 16.06.2005 14:29 Page 5
All manuals and user guides at all-guides.com

BASIC OPERATIO S
OTICE: This manual mainly return duces how to use buttons on the remote control. You may operate the unit if buttons on the
unit have the same or similar names as or to those on the remote control.
E GLISH
6
1. POWER KEY
2. SETUP KEY
3. ANGLE KEY
4. TITLE/PBC KEY
5. DISPLAY KEY
6. UP/DN/L/R KEY
7. SYSTEM KEY
8. SEARCH KEY
9. PAUSE KEY
10. STEP KEY
11. VOLUME UP/DOWN KEY
12. SUBTTILE KEY
13. AUDIO KEY
14. REPEAT KEY
15. VMODE KEY
16. AB KEY
17. SLOW KEY
18. FAST BACKWARD/FORWARD SEARCH KEY
19.ONE CHAPTER TRACK
BACKWARD/FORWARD
20.STOP KEY
21.ZOOM KEY
22.CHANNEL KEY
23.PLAY KEY
24.MENU KEY
25.RETURN KEY
26.NUMBER KEY
27.MUTE KEY
28.OPEN/CLOSE KEY
4014.qxd 16.06.2005 14:29 Page 6
All manuals and user guides at all-guides.com
all-guides.com

SYSTEM SETTI G
According to the system of the TV to be connected set the sys
tem of the unit to make it match the TV type
1. If the system of the TV is PAL select the menu item in the
Setup Menu as :
PREFERENCE SETUP >> TV DISPLAY >> PAL
2. If the system of the TV is NTSC select the menu item in the
Setup Menu as :
PREFERENCE SETUP >> TV DISPLAY >> NTSC
3. If the TV is multisystem select the menu item in the Setup
Menu as:
PREFERENCE SETUP >> TV DISPLAY >>AUTO
VMODE SETTI G
According to the video mode of TV set push "VMODE" key to
setup its video mode that matching to the video mode of TV set.
OSD
When playing DVD discs the TV screen shows the information as :
First pressing "DISPLAY" key : Title Elapsed
TT ** / ** CH ** / ** **: ** : **
Second pressing "DISPLAY" key: Title Remain
TT** / ** CH ** / ** **: ** : **
Third pressing "DISPLAY" key: Chapter Elapsed
TT** / ** CH ** / ** **: ** : **
Forth pressing "DISPLAY" key: Chapter Remain
TT ** / ** CH ** / ** **: ** : **
Fifthly pressing "DISPLAY" key: Display Off
VOLUME CO TROL
Push "VOLUME" button on the TV or remote control.
The screen shows:
VOL 20
Push "+" button or ""button to raise or lower the volume.
DVD ME U PLAY
Some DVD discs have title menus and root menus. Push
"TITLE/PBC" button the screen shows the title menu. Push
"MENU" button the screen shows the root menu. Push "UP"
button or "DOWN" button the screen shows the last page or
next page. Push number button to select directly.
SELECT WITH UMBER BUTTO
Load a disc Push number button to select tracks after the unit
finishes reading the disc.
1. If the track number is less than 10 just push a button among
110.
2. If the track number is over 10 push 10+ once on the remote
control and a button among 110.
SELECT LA GUAGE
You can choose the language according to your choice when
playing multilanguage DVD.
ote:
1. Different disc has different languages
2. You can push "AUDIO" button to choose the language you
want when you play multilanguage VCD discs.
SELECT CHA ELS
You may select channel when it plays.
Push "CHANNEL" button the screen show alternately and
select the desired audio channel:
Mono Left
Mono Right
MixMono
Stereo
STOP PLAY
It will stop when you push "STOP" key and it will play again if
you push "PLAY" key.
PAUSE PLAY
Push "PAUSE" key it will stop playing and it will play again if you
push "PLAY" key.
FAST PLAY
When playing disc you may play it forward fast or reverse it fast
to find what you need.
1. Push to play forward fast. Each time you push the button
the screen shows orderly.
1. 2X
2. 4X
3. 8X
4. 16X
5. 32X
6.
2. Push to reverse the disc fast. Each time you push the but
ton the screen shows orderly:
1. 2X
2. 4X
3. 8X
4. 16X
5. 32X
6.
SLOW PLAY
Enjoy slow motions by the following steps.
Push "SLOW" button to play slowly.
1. 1/2
2. 1/4
3. 1/8
4. 1/16
5.
E GLISH
7
4014.qxd 16.06.2005 14:29 Page 7
All manuals and user guides at all-guides.com

STEP PLAY
When play DVD disc you may choose step play it will go ahead
one frame by pushing "STEP" key one time and it will come
back to normal playing state if you push "PLAY".
REPEAT PLAY
When play DVD disc this function can be used to repeatedly
play a title chapter or disc.
Push "REPEAT" button the screen shows orderly.
CHAPTER
TITLE
ALL
You may repeat one part of the disc push "AB" key the screen
shows alternately:
A (stands for the beginning point of this part)
AB (stands for the ending point of this part)
On this moment it will play from the beginning point to the end
ing of this part in repeated way you may cancel it if you push "A
B" key and the logo on the top left corner will disappear.
SELECT SUBTITLES
When play a multisubtitle DVD you may select one subtitle to
show it on the screen.
1. Push "SUBTITLE" button to select one.
2. Push "SUBTITLE" button until the screen shows "SUBTITLE
OFF"
For some discs subtitles cannot be removed.
Subtitle function is only available for some discs with subtitle
recorders.
SELECT A GLE
Some discs have images with different screen angles you may
select among them. For example when you watch a running
train you may select to watch it from the front the left window
or the right window without stopping it.
Example:
One DVD has four screen angles at your option.
1. Push "ANGLE" button to select angle. The screen shows
orderly.
1/4 (SELECT ANGLE 1)
2/4 (SELECT ANGLE 2)
3/4 (SELECT ANGLE 3)
4/4 (SELECT ANGLE 4)
ZOOM PLAY
This function can be used to enjoy a motion or motionless pic
ture.
1. Push "ZOOM" button when playing the screen shows orderly:
2X
3X
4X
2. Push "UP/DOWN/LEFT/RIGHT" button to move the enlarged
picture.
3. To resume the picture push "ZOOM" until the screen shows
"ZOOM OFF".
PLAY VCD, SUPERVCD OR CD DISC
OTICE: When the unit playing VCD SUPERVCD and CD
some functions are different from DVD it's only difference as
follows:
OSD (VCD, SUPERVCD)
When PBC ON push "DISPLAY" button the screen shows
orderly:
Single Elapsed
Single Remain
Display Off
When PBC OFF push "DISPLAY" button the screen shows
orderly:
Single Elapsed
Single Remain
Total Elapsed
Total Remain
Display Off
PBC PLAY (VCD OR SUPERVCD)
Push "TITLE/PBC" button you can open and close PBC then
push number button to choose desired tracks.
When PBC ON if push number 8 the screen shows: "select
08" the disc played from track 8.
When PBC OFF if push number 8 the screen shows: "select
track 08/15" ("15" means this disc includes 15 tracks) the
disc played from track 8.
SLOW PLAY (VCD OR SUPERVCD)
Push "SLOW" button the unit has four steps for slow play. The
screen shows orderly:
1/2
1/4
1/8
1/16
Push "PLAY" button to play normally.
REPEAT PLAY (VCD, SUPERVCD OR CD)
You may repeat a track a disc according to the following steps.
After the unit stops push number buttons directly to select
tracks. Push "REPEAT" button the screen shows orderly:
E GLISH
8
4014.qxd 16.06.2005 14:29 Page 8
All manuals and user guides at all-guides.com

Track
ALL
TIME SEARCH (CD)
Push "MENU" button when the unit plays CD only "SEARCH"
function is available.
PLAY MP3 OR PICCD DISC
OTICE: When the unit playing MP3 PICCD some functions
are different from DVD it's only difference as follows:
PLAY MP3
The unit will play and the screen will display as below after the
disc is loaded.
You can scan all tracks in six directories on the disc by using
direction button. You can play
the directory you selected by the digit key. The screen will dis
play as below if the selected directory has songs which can be
played and the unit will play when you push "PLAY".
ote:
All display information has relationship with discs if the number
of directory or songs is over 6 you can use four directions key
to select the item you prefer. You also can use "NEXT" button or
"PREVIOUS" button to change the page number. In the above
status you can use "LEFT" button or "DOWN" button to select
the playing area then push "UP" button or "DOWN" button to
select the item you want to play.
SELECT PLAYING MODE
You may choose one kind of play mode when you push
"REPEAT" key each time it will show as follow:
There are four play modes as follows:
Single mode: the player will stop after finished playing the
current item
Repeat one mode: repeat the current item
Repeat folder mode: repeat the items in the current directory
Folder mode: the player will stop after finished playing the
whole directory
PLAY PICCD DISC
The unit begins to play and display the information after disc is
loaded.
You can scan all tracks in six directories on the disc by using
direction button. You can play the directory you selected by
"PLAY" key. The screen will display as below if the selected
directory has pictures which can be played and picture will be
showed in full screen when you push "PLAY".
"Resolution" under screen stands for the definition of the pic
ture.
NOTICE: All display information (such as amount logo and
name of playable picture and directories etc.) has relationship
with disc.
E GLISH
9
4014.qxd 16.06.2005 14:29 Page 9
All manuals and user guides at all-guides.com

FU CTIO SETTI G
ME U SETTI G
According to the recorded information and external equipment
set the following functions for DVD to obtain the best playing
status. Push "SETUP" button to set the main menu.
Specific setup way: (for example Audio Setup PageDolby
Digital Setup PageDual MonoMIX Mono). Push "L/R"
direction button to choose "Audio Setup Page" enter "Dolby
Digital Setup Page" by pushing "UP/DN" direction buttons then
choose "Dual Mono" there are four options on the right side
"Stereo" "LMono" "RMono" "MIXMono" one of them is
lighted push "PLAY" key to confirm. You may exit "Audio Setup
Page" by push "L" direction key. The same to other menu
options.
ME U I STRUCTIO S
GE ERAL SETUP PAGE
FIRST LEVEL MENU SECOND LEVEL MENU
Normal/PS
TV Display Normal/LB
Wide
Angle Mark On
Off
OSD Lang English
Captions On
Off
Screen Saver On
Off
NORMAL/B
This is selected when the unit is connected with a normal TV.
Widescreen images are shown on the screen but with some
parts cut automatically.
NORMAL/LB
This is selected when the unit is connected with a normal TV.
Widescreen images are shown on screen with black belts on
the top and bottom.
WIDE
This is selected when the unit is connected with a widescreen
TV.
ANGLE MARK
This only works when there is an angle mark on the disc.
• Select "ON" the screen shows the mark when playing a
DVD.
• Select "OFF" the mark is not shown.
OSD LA GUAGE
When select a language the screen show this language.
CAPTIO S
The hidden subtitle is shown or turn off.
SCREE SAVER
Start the screen saver the screen saver image appears when
the unit stops or the image is motionless for a few seconds.
This saver can keep the screen from being damaged.
AUDIO SETUP PAGE
Speaker Setup (FIRST LEVEL ME U)
SECOND LEVEL MENU THIRD LEVEL MENU
DOWNMIX LT/RT
Stereo
Off
Front Speaker Large
Small
Center Speaker Large
Small
Off
Large
Rear Speaker Small
Off
Subwoofer On
Off
DOW MIX
It's 5.1 Channel when choose "Off" in "DOWNMIX" "Dialog" is
unavailable in this case. It's 2.0 Channel when choose "LT/RT"
or "STEREO" mode then "Center Speaker" "Rear Speaker"
"Test Tone" and "Dialog" four options are unavailable.
TEST TO E
"Test Tone" is "ON" you may test whether cables between
sound boxes are connected in correct way the unit will test
"Left Front Speaker" "Center Speaker" "Right Front Speaker"
"Left Surround" and "Right surround" in order.
SPDIF Setup Page (FIRST LEVEL ME U)
SECOND LEVEL MENU THIRD LEVEL MENU
SPDIF Off
SPDIFOUTPUT SPDIF/RAW
SPDIF/PCM
SPDIF OUTPUT
When you choose "SPDIF Off" and "SPDIF/RAW" four options
("CD" "Dolby Digital" "DTS" "MPEG" and "PCM") are unavail
able. If you choose "SPDIF/PCM" four options ("CD" "Dolby
Digital" "DTS" and "MPEG") are unavailable. If choose "MANU
AL" then all options are available in this case.
SPDIF/RAW
Select this when the DVD player is connected with a power
amplifier through optical or coaxial port. When a Dolby Digital
DVD DTS DVD or MPEG DVD is played select this the coaxial
or optical port will output in the corresponding digital format
(source code).
SPDIF/PCM
Select this when the DVD player is connected with a TV or a
power amplifier through audio cord.
E GLISH
10
4014.qxd 16.06.2005 14:29 Page 10
All manuals and user guides at all-guides.com

Dolby Digital Setup Page (FIRST LEVEL ME U)
SECOND LEVEL MENU THIRD LEVEL MENU
Stereo
Dual Mono LMono
RMono
MIXMono
Dynamic
• DUAL MONO
This is the output mode of the L and R signals of the set audio
output. If it is set to "MIX MONO" the function only works when
the DVD being played is 2.0channel.
• DYNAMIC
When the compression mode is set to "LINE OUT" this is
selected to adjust linear compression rate to obtain the differ
ent compression results of the signals.
VIDEO SETUP PAGE
FIRST LEVEL MENU SECOND LEVEL MENU THIRD LEVEL MENU
Component Off
YUV
TV Mode INTERLACE
PSCAN
High
Sharpness Medium
Low
Brightness Brightness ||||||||||||||||0
Contrast Contrast ||||||||||||||||0
• COMPONENT:
"TV Mode" is unavailable when you choose "Off" you can
choose "VGA" option only if it connect with progressive scan TV
set.
• TV MODE:
You may choose the proper mode according to the type of TV
set. INTERLACE is interval scan PSCAN means progressive
scan it can be set under "ComponentYUV".
PREFERE CE SETUP
FIRST LEVEL MENU SECOND LEVEL MENU THIRD LEVEL MENU
PAL
TV Type AUTO
NTSC
English
French
Spanish
Audio Chinese
Japanese
Korean
Russian
Thai
English
French
Spanish
Subtitle Chinese
Japanese
Korean
Russian
Thai
English
French
Spanish
Disc Menu Chinese
Japanese
Korean
Russian
Thai
Parental 1 KID SAF
2 G
3 PG
4 PG 13
5 PGR
6 R
7 NC17
8 ADULT
Password Mode Change
Default RESET
• TV TYPE:
Choose DVD mode according to TV type it will obtain the best
effect.
• AUDIO SUBTITLE and DISC MENU:
All parameter about these options will change after your setup
but if there is no sound subtitle and language in disc setup
doesn't working.
• PARENTAL:
The content of a disc with lock function is evaluated by grades.
You can select an age grade as your need (some DVD without
this function). You may enter the password then all grades can
be controlled freely. The initial password is "3308" and its
default status is "Off" this function is unavailable in this case.
NOTICE: choose "RESET" option in "Default" parental will
restore to the initial status.
• DEFAULT:
Choose "RESET" option all menus will restore to the initial sta
tus.
E GLISH
11
4014.qxd 16.06.2005 14:29 Page 11
All manuals and user guides at all-guides.com
all-guides.com

TROUBLESHOOTI G
If you experience the following problems while using the unit
this troubleshooting guide can help you.
O SOU D
• Check if the unit is connected securely.
• Make sure you operate the TV or amplifier correctly.
O IMAGE , IMAGE ROLLS A D O COLOR
• Check if the unit is connected securely.
• Make sure you operate the TV correctly.
• Make sure you set the color system correctly.
BAD SOU D QUALITY
• Make sure the audio output mode is set correctly.
• Make sure the audio connection between the unit and ampli
fier is right.
DISC CA OT BE PLAYED
• There is no disc in the unit.
• Insert the disc on the disc tray properly with the label side
up.
• Clean the disc.
• Moisture has condensed in the unit. Remove the disc and
leave the unit on for about one hour.
O PHO E SOU D
• Switch on the microphone.
• Turn the MIC LEVEL away knob clockwise.
SCREAMI G
• Keep the phone far away from the speaker
• Turn down the volume
• Turn down the volume of phone and echo.
REMOTE CO TROL DOES OT WORK
• Remove barriers between the remote control and the unit.
• Replace the batteries with new ones.
• Point the remote control at the remote control sensor of the
unit.
TECH ICAL SPECIFICATIO S
Laser Wave length 650nm
Video PAL/AUTO/NTSC
Frequency response 20Hz~ 20KHz (± 1dBB)
Signal/noise ratio 95dB
Audio
distortion + noise 60 dB (1KHz)
Channel separation 85dB(1KHz)
Dynamic range 80dB(1KHz)
Output
Audio out (analog audio) Output level: 2V
Load impedance: 10KOM
Audio out (digital audio) Output level: 0.5Vpp
Load impedance: 75OM
Video out Output level: 1Vpp
Load impedance: 75OM
imbalance negative polarity
Svideo out Output level: 1Vpp
Chromaticity(C)0.286Vpp
Load impedance: 75OM
Power supply AC110~220V 50Hz~60Hz
Power consumption 14W
Dimensions 430 x 38 x 260mm
Gross Weight Around 3.9kg
Net Weight Around 3.1kg
Manufactured under license from Dolby Laboratories.
"Dolby" and the doubleD symbol are trademarks of Dolby
Laboratories
The manufacturer reserves the right to make changes to
the technical characteristics of this device without prior
notice.
Service life – no less than 7 years.
Guarantee
Details regarding guarantee conditions can be obtained from
the dealer from whom the appliance was purchased. The bill of
sale or receipt must be produced when making any claim under
the terms of this guarantee.
This product conforms to the EMCRequirements as laid
down by the Council Directive 89/336/EEC and to the
Low Voltage Regulation (23/73 EEC)
E GLISH
12
4014.qxd 16.06.2005 14:29 Page 12
All manuals and user guides at all-guides.com

МЕРЫ ПРЕДОСТОРОЖНОСТИ
Этот значок расположенный на задней
панели устройства обозначает "опасное
напряжение" внутри корпуса устройства
способное вызвать поражение
электрическим током.
Этот значок расположенный на задней
панели устройства предупреждает
пользователя о наличии важных
сведений о работе и техническом
обслуживании содержащихся в
прилагаемой инструкции по
эксплуатации.
ВНИМАНИЕ: Во избежание возникновения пожара или
поражения электрическим током не подвергайте
устройство воздействию влаги или дождя. Опасное
напряжение внутри корпуса устройства. Не снимайте
верхнюю крышку или заднюю панель устройства.
ОСТОРОЖНО: Устройство содержит источник лазерного
излучения. Для правильной эксплуатации устройства
внимательно ознакомьтесь с данной инструкцией и
сохраните ее для использования в будущем. В случае
возникновения трудностей при эксплуатации устройства
обратитесь к пункту данной инструкции "Устранение
неисправностей" или в авторизованный сервисный центр.
Во избежание воздействия опасной радиации лазерных
лучей не открывайте верхнюю крышку устройства.
ВАЖНЫЕ МЕРЫ ПРЕДОСТОРОЖНОСТИ
1. ОЗНАКОМЬТЕСЬ С ДАННОЙ ИНСТРУКЦИЕЙ Меры
безопасности при эксплуатации устройства описаны в
данной инструкции.
2. СОХРАНИТЕ ДАННУЮ ИНСТРУКЦИЮ Сохраните
данную инструкцию для ее дальнейшего использования.
3. ЗНАЧКИ ПРЕДОСТОРОЖНОСТИ Ознакомьтесь с
значками предупреждения расположенными на задней
панели плеера.
4. ЧИСТКА КОРПУСА УСТРОЙСТВА Перед чисткой
корпуса устройства отключите шнур от сетевой розетки.
Не используйте средства содержащие спирт или едкие
вещества. Используйте мягкую слегка увлажненную
ткань.
5. УСЛОВИЯ ЭКСПЛУАТАЦИИ Не используйте
устройство вблизи емкостей с водой например ванной
природным водоемом или плавательным бассейном.
6. ИСТОЧНИКИ ПИТАНИЯ Электрическое питание
устройства должно соответствовать напряжению
электросети обозначенному на задней панели
устройства.
7. ЭКСПЛУАТАЦИЯ ВО ВРЕМЯ ГРОЗЫ Во избежание
повреждения устройства отключите сетевой шнур от
сетевой розетки во время грозы а также во время
резких перепадов напряжения в сети.
8. ТЕХНИЧЕСКОЕ ОБСЛУЖИВАНИЕ
Не предпринимайте попыток самостоятельного ремонта
устройства. Не вскрывайте верхнюю крышку или
заднюю панель устройства во избежание поражения
электрическим током. Для сервисного обслуживания
обратитесь в авторизованный сервисный центр.
9. ПОВРЕЖДЕНИЯ НУЖДАЮЩИЕСЯ В РЕМОНТЕ
Отключите устройство от сетевой розетке и обратитесь
в авторизованный сервисный центр в следующих
случаях:
Сетевой шнур поврежден.
Устройство было подвержено воздействию какойлибо
жидкости.
В случае резкого изменения нормальной работы
устройства.
10. ЗАМЕНА ЧАСТЕЙ Устройство не содержит частей
требующих внимания пользователя. Для сервисного
обслуживания пользуйтесь услугами авторизованного
сервиса.
УХОД ЗА ДИСКАМИ
Не прикасайтесь к рабочей поверхности диска.
Не наклеивайте на диск какиелибо наклейки или
стикеры.
Не делайте какихлибо надписей на сторонах диска.
Не подвергайте диск воздействию нагревательных
приборов прямых солнечных лучей.
Храните диск в его оригинальной упаковке.
РУССКИЙ
13
Внимание: для снижения риска удара
электрическим током не снимайте крышку (или
заднюю панель). Внутри Устройства нет частей
требующих внимания пользователя. Пользуйтесь
услугами квалифицированного персонала.
ВНИМАНИЕ
Опасность удара
электрическим током.
Не вскрывать!
4014.qxd 16.06.2005 14:29 Page 13
All manuals and user guides at all-guides.com

ПОДГОТОВКА К ЭКСПЛУАТАЦИИ
ОСНОВНЫЕ ВОЗМОЖНОСТИ
1. РАЗРЕШЕНИЕ ЭКРАНА
Способность воспроизводить диски формата DVD/MPEG2 с разрешением экрана до 500 линий.
2. ДОПОЛНИТЕЛЬНЫЕ ФУНКЦИИ
Режимы изменения ракурса изображения выбор языка звукового сопровождения а также функция родительского
контроля воспроизведения.
3. ФОРМАТЫ ВОСПРОИЗВОДИМЫХ ДИСКОВ
Плеер может воспроизводить диски форматов DVD VCD SVCD MP3 CD JPEG и Kodak Picture CD.
4. МАСШТАБИРОВАНИЕ ИЗОБРАЖЕНИЯ
Функция позволяет увеличить/уменьшить размер изображения на экране ТВ.
5. ВЫХОДЫ ВИДЕО СИГНАЛА
Композитный Svideo Компонентный чересстрочный (YСbCr) и Компонентный прогрессивный (YPbPr) видео выходы.
6. ВЫХОДЫ АУДИО
Выходы декодированного аудио а также цифровые оптический и коаксиальный аудио выходы для подключения к
усилителю со встроенным AC3/DTS декодером.
ИНФОРМАЦИЯ О ДАННОЙ ИНСТРУКЦИИ
ПРИНЦИПЫ НАПИСАНИЯ
В основном данная инструкция описывает функциональные кнопки передней панели плеера и пульта дистанционного
управления.
ТЕРМИНЫ СОДЕРЖИМОГО ДИСКОВ
РАЗДЕЛ
Содержимое DVD диска разделено на разделы которые имеют соответствующие номера.
ЭПИЗОД
Разделы DVD диска делятся на более мелкие части эпизоды которые имеют соответствующие номера.
ТРЕК
Содержимое компакт диска состоит из треков которые имеют соответствующие номера.
ПУЛЬТ ДИСТАНЦИОННОГО УПРАВЛЕНИЯ
1. Откройте отсек для батареек.
2. Установите две батарейки в отсек для батареек ("+" and "") соблюдая при этом полярность.
3. Закройте отсек для батареек.
4. Направьте пульт ДУ в сторону передней панели плеера управляйте функциями плеере на расстоянии не более 8
метров. Убедитесь в том что между плеером и пультом ДУ нет никаких препятствий.
ПРИМЕЧАНИЕ:
1. Время непрерывной работы батареек обычно не превышает 6 месяцев. Замените батарейки когда пульт перестанет
работать или снизится радиус его действия.
2. Извлеките батарейки из отсека при долгом не использовании пульта ДУ.
РУССКИЙ
14
4014.qxd 16.06.2005 14:29 Page 14
All manuals and user guides at all-guides.com

ПЕРЕДНЯЯ ПАНЕЛЬ
ЗАДНЯЯ ПАНЕЛЬ
ИНСТРУКЦИЯ ПО ПОДКЛЮЧЕНИЮ
РУССКИЙ
15
1. КНОПКА ВКЛЮЧЕНИЯ/ВЫКЛЮЧЕНИЯ ("STANDBY/ON")
2. РАЗЪЕМ ДЛЯ МИКРОФОНА
3. РУЧКА РЕГУЛИРОВКИ ГРОМКОСТИ МИКРОФОНА
4. ДАТЧИК ПУЛЬТА ДУ
5. КНОПКА ОТКРЫТИЯ/ЗАКРЫТИЯ ЛОТКА ДИСКА
("OPEN/CLOSE")
6. КНОПКА ВОСПРОИЗВЕДЕНИЯ ("PLAY")
7. КНОПКА ПАУЗЫ ВОСПРОИЗВЕДЕНИЯ ("PAUSE")
8. КНОПКА ОСТАНОВКИ ВОСПРОИЗВЕДЕНИЯ ("STOP")
9. КНОПКА ПЕРЕХОДА К ПРЕДЫДУЩЕМУ ЭПИЗОДУ/ТРЕКУ
("PREV")
10. КНОПКА ПЕРЕХОДА К СЛЕДУЮЩЕМУ ЭПИЗОДУ/ТРЕКУ
("NEXT")
11. ОКНО ДИСПЛЕЯ
1. ОПТИЧЕСКИЙ РАЗЪЕМ ЦИФРОВОГО АУДИОВЫХОДА
2. АУДИО ВЫХОД САБВУФЕРА
3. АУДИО ВЫХОД ЗАДНЕГО ПРАВОГО КАНАЛА
4. АУДИО ВЫХОД ПЕРЕДНЕГО ПРАВОГО КАНАЛА
5. КОАКСИАЛЬНЫЙ ЦИФРОВОЙ АУДИОВЫХОД
6. ВИДЕО ВЫХОД SVIDEO
7. КОМПОНЕНТНЫЙ ВИДЕОВЫХОД (Cb/Pb)
8. SCARTвыход
9. КОМПОНЕНТНЫЙ ВИДЕОВЫХОД (Cr/Pr)
10. КОМПОНЕНТНЫЙ ВИДЕОВЫХОД (Y)
11. КОМПОЗИТНЫЙ ВИДЕОВЫХОД
12. АУДИОВЫХОД ПЕРЕДНЕГО ЛЕВОГО КАНАЛА
13. АУДИОВЫХОД ЗАДНЕГО ЛЕВОГО КАНАЛА
14. АУДИОВЫХОД ЦЕНТРАЛЬНОГО КАНАЛА
4014.qxd 16.06.2005 14:29 Page 15
All manuals and user guides at all-guides.com

ПОДКЛЮЧЕНИЕ DVD ПЛЕЕРА
ПОДГОТОВКА К ВОСПРОИЗВЕДЕНИЮ ДИСКА
1. На телевизоре и усилителе (если используется) нажмите кнопку включения питания (POWER) после чего выберете
соответствующий видео вход телевизора с помощью кнопки TV/VIDEO на передней панели или пульте ДУ телевизора.
2. Нажмите кнопку включения/выключения питания (STANDBY/ON) на передней панели плеера или пульте ДУ.
3. Нажмите кнопку открытия/закрытия лотка диска (OPEN/CLOSE) на передней панели плеера или пульте ДУ. Установите
диск в лоток и еще раз нажмите кнопку открытия/закрытия лотка диска (OPEN/CLOSE). Чтение диска начнется
автоматически.
РУССКИЙ
16
4014.qxd 16.06.2005 14:29 Page 16
All manuals and user guides at all-guides.com
all-guides.com

КНОПКИ УПРАВЛЕНИЯ
ПРИМЕЧАНИЕ: Эта глава описывает основные кнопки управления пульта ДУ. Управление функциями воспроизведения
плеера также возможно используя аналогичные кнопки расположенные на передней панели плеера.
РУССКИЙ
17
1. Кнопка включения/выключения
2. Кнопка меню настроек (SETUP)
3. Кнопка выбора ракурса изображения (ANGLE)
4. Кнопка выбора раздела/управление воспроизведением
VCD (TITLE/PBC)
5. Кнопка отображения состояния воспроизведения (DIS
PLAY)
6. Кнопки перемещения курсора (UP/DN/L/R)
7. Кнопка выбора системы цветности видео (SYSTEM)
8. Кнопка поиска (SEARCH)
9. Кнопка паузы воспроизведения (PAUSE)
10. Кнопка покадрового воспроизведения (STEP)
11. Кнопки регулировки громкости (VOLUME UP/DOWN)
12. Кнопка выбора языка субтитров (SUBTTILE)
13. Кнопка выбора канала аудио (AUDIO)
14. Кнопка выбора режима повтора воспроизведения
(REPEAT)
15. Кнопка выбора видео выхода (VMODE)
16. Кнопка выбора фрагмента для повторного
воспроизведения (AB)
17. Кнопка замедленного воспроизведения (SLOW)
18. Кнопки ускоренного воспроизведения назад/вперед
19. Кнопки перехода к предыдущему/ следующему
эпизоду/треку
20.Кнопка остановки воспроизведения (STOP)
21. Кнопка масштабирования изображения (ZOOM)
22.Кнопка выбора канала выхода аудио (CHANNEL)
23.Кнопка включения воспроизведения (PLAY)
24.Кнопка вывода на экран меню диска (MENU)
25.Кнопка возврата (RETURN)
26.Кнопки набора цифр
27.Кнопка отключения звука (MUTE)
28.Кнопка открытия/закрытия лотка диска (OPEN/CLOSE)
4014.qxd 16.06.2005 14:29 Page 17
All manuals and user guides at all-guides.com

СИСТЕМНЫЕ НАСТРОЙКИ
В зависимости от системы цветности подключаемого
телевизора выберете соответствующую систему видео
выхода плеера
1. Если подключаемый телевизор работает в системе PAL
выберете соответствующую установку в меню настроек:
НАСТРОЙКА ПРЕДПОЧТЕНИЙ >> ТИП ТВ >> PAL
2. Если подключаемый телевизор работает в системе
NTSC выберете соответствующую установку в меню
настроек:
НАСТРОЙКА ПРЕДПОЧТЕНИЙ >> ТИП ТВ >> NTSC
3. Если подключаемый телевизор является мульти
системным выберете соответствующую установку в
меню настроек:
НАСТРОЙКА ПРЕДПОЧТЕНИЙ >> ТИП ТВ >>
МУЛЬТСИСТЕМНЫЙ
УСТАНОВКА РЕЖИМА ВИДЕО ВЫХОДА
В зависимости от способа подключения видео выхода
плеера к телевизору выберете соответствующий режим
видео выхода плеера с помощью кнопки VMODE
расположенной на пульте ДУ.
ИНФОРМАЦИОННЫЙ ДИСПЛЕЙ
Во время воспроизведения дисков формата DVD нажатие
кнопки DISPLAY расположенной на пульте ДУ выведет на
экран телевизора информацию о статусе воспроизведения:
Первое нажатие кнопки DISPLAY выведет на экран ТВ
информацию о прошедшем времени воспроизведения
диска:
РАЗДЕЛ ** / ** ЭПИЗОД ** / ** **: ** : **
Второе нажатие кнопки DISPLAY выведет на экран ТВ
информацию об оставшемся времени воспроизведения
диска:
РАЗДЕЛ** / ** ЭПИЗОД ** / ** **: ** : **
Третье нажатие кнопки DISPLAY выведет информацию на
экран ТВ о прошедшем времени воспроизведения
раздела/эпизода:
РАЗДЕЛ** / ** ЭПИЗОД ** / ** **: ** : **
Четвертое нажатие кнопки DISPLAY выведет информацию
на экран ТВ об оставшемся времени воспроизведения
раздела/эпизода:
РАЗДЕЛ ** / ** ЭПИЗОД ** / ** **: ** : **
Пятое нажатие кнопки DISPLAY выключит отображение
информации о воспроизведении диска на экране ТВ
РЕГУЛИРОВКА УРОВНЯ ГРОМКОСТИ
Нажмите кнопку регулировки уровня громкости VOLUME
расположенную на пульте ДУ плеера.
На экране ТВ появится надпись:
VOL 20
Нажмите кнопку VOLUME "+" или "" для установки
желаемого уровня громкости.
МЕНЮ ВОСПРОИЗВЕДЕНИЯ DVD ДИСКА
Большинство DVD дисков записаны с меню разделов и
основным меню. Нажмите кнопку TITLE/PBC на пульте ДУ
для отображения на экране ТВ меню раздела (если данная
функция имеется на диске). Нажмите кнопку MENU на
пульте ДУ для отображения на экране ТВ основного меню
диска.
КНОПКИ НАБОРА ЦИФР
После установки диска и считывания плеером его
содержания наберите номер желаемого трека/эпизода с
помощью кнопок набора цифр для начала его
воспроизведения.
1. Если номер трека/эпизода не превышает цифру 10
наберите номер нужного трека/эпизода нажатием одной
из кнопок набора цифр (110).
2. Если номер трека/эпизода превышает цифру 10
наберите номер нужного трека/эпизода нажатием
кнопки 10+ с последующим нажатием одной из кнопок
набора цифр (110).
ВЫБОР ЯЗЫКА ЗВУКОВОГО СОПРОВОЖДЕНИЯ
Для воспроизведения DVD диска записанного с более чем
одной дорожкой звукового сопровождения нажмите кнопку
AUDIO на пульте ДУ для выбора желаемого языка звукового
сопровождения.
ПРИМЕЧАНИЕ:
1. DVD диск должен быть записан с более чем одной
дорожкой звукового сопровождения.
2. VCD/SVCD диск должен быть записан с более чем одной
дорожкой звукового сопровождения.
ВЫБОР КАНАЛА АУДИО ВЫХОДА
Во время воспроизведения диска выберите режим аудио
выхода с помощью нажатия кнопки CHANNEL на пульте ДУ.
С очередным нажатием кнопки CHANNEL на экране ТВ
появится следующая информация:
Л. Моно (Левый)
П. Моно (Правый)
Смешанное Моно
Стерео
ОСТАНОВКА ВОСПРОИЗВЕДЕНИЯ
Нажатие кнопки STOP остановит воспроизведение диска.
Воспроизведение возобновится при нажатии кнопки PLAY.
ПАУЗА ВОСПРОИЗВЕДЕНИЯ
Нажмите кнопку PAUSE для паузы воспроизведения.
Воспроизведение возобновится при нажатии кнопки PLAY.
УСКОРЕННОЕ ВОСПРОИЗВЕДЕНИЕ
Во время воспроизведения диска возможно включение
функции ускоренного воспроизведения вперед/назад.
1. Нажмите кнопку ускоренного воспроизведения вперед
расположенную на пульте ДУ. С очередным нажатием
кнопки изменится скорость воспроизведения с
отображением текущей скорости на экране ТВ.
1. 2X
2. 4X
3. 8X
4. 16X
5. 32X
2. Нажмите кнопку ускоренного воспроизведения назад
расположенную на пульте ДУ. С очередным нажатием
кнопки изменится скорость воспроизведения с
РУССКИЙ
18
4014.qxd 16.06.2005 14:29 Page 18
All manuals and user guides at all-guides.com

отображением текущей скорости на экране ТВ.
1. 2X
2. 4X
3. 8X
4. 16X
5. 32X
ЗАМЕДЛЕННОЕ ВОСПРОИЗВЕДЕНИЕ
Используйте данную функцию для замедленного
воспроизведения изображения.
С очередным нажатием кнопки SLOW расположенной на
пульте ДУ изменится скорость воспроизведения с
отображением текущей скорости на экране ТВ.
1. 1/2
2. 1/4
3. 1/8
4. 1/16
ПОКАДРОВОЕ ВОСПРОИЗВЕДЕНИЕ
Во время воспроизведения диска возможно включение
функции покадрового воспроизведения изображения
последовательным нажатием кнопки STEP расположенной
на пульте ДУ. Воспроизведение возобновится в
нормальном режиме нажатием кнопки PLAY.
ПОВТОР ВОСПРОИЗВЕДЕНИЯ
Во время воспроизведения диска возможно включение
функции повтора воспроизведения раздела или эпизода.
Нажмите кнопку REPEAT расположенную на пульте ДУ для
включения функции повтор с отображением на экране
телевизора следующей информации.
РАЗДЕЛ
ЭПИЗОД
ДИСК
Во время воспроизведения диска возможен выбор
фрагмента для его повторного воспроизведения. Дважды
нажмите кнопку AB расположенную на пульте ДУ для
выбора начала/окончания фрагмента для его повторного
воспроизведения. Экран ТВ отобразит следующую
информацию:
• A (означает начало выбора фрагмента)
• AB (означает окончание выбора фрагмента)
Для отмены функции повтора выбранного фрагмента еще
раз нажмите кнопку A B.
ВЫБОР ЯЗЫКА СУБТИТРОВ
Во время воспроизведения диска возможен выбор языка
субтитров (если данная функция записана на
воспроизводимый диск).
1. Нажмите кнопку SUBTITLE расположенную на пульте ДУ
для выбора языка субтитров.
2. Для отключения отображения субтитров на экране ТВ
нажимайте кнопку SUBTITLE до появления на экране ТВ
надписи "Субтитры Выкл.".
• При воспроизведении некоторых дисков функция
отключения субтитров невозможна.
• Изменение языка субтитров возможно только при
наличии данной функции воспроизводимого диска.
ИЗМЕНЕНИЕ РАКУРСА ИЗОБРАЖЕНИЯ
Некоторые диски могут быть записаны с функцией
переключения угла ракурса изображения. Например при
воспроизведении диска DVD возможно переключение
ракурса изображения идущего поезда под различными
углами снимающей камеры.
Например:
Диск DVD записан с функцией переключения четырех углов
изображения. Нажмите кнопку ANGLE расположенную на
пульте ДУ. При каждом нажатии изменится угол ракурса
изображения на экране ТВ появится следующая надпись:
1/4 (ВЫБОР УГЛА 1)
2/4 (ВЫБОР УГЛА 2)
3/4 (ВЫБОР УГЛА 3)
4/4 (ВЫБОР УГЛА 4)
МАСШТАБИРОВАНИЕ ИЗОБРАЖЕНИЯ
Данная функция может быть включена как при
воспроизведении фильмов так и при воспроизведении
изображений формата JPEG.
1. Во время воспроизведения нажмите кнопку ZOOM
расположенную на пульте ДУ для выбора желаемого
масштаба изображения при этом на экране ТВ
отобразится следующая информация:
2X
3X
4X
2. Нажмите одну из кнопок перемещения курсора
ВВЕРХ/ВНИЗ/ВЛЕВО/ВПРАВО расположенных на
пульте ДУ для перемещения по экрану ТВ увеличенного
изображения.
РУССКИЙ
19
4014.qxd 16.06.2005 14:29 Page 19
All manuals and user guides at all-guides.com

3. Для выключения функции масштабирования нажимайте
кнопку ZOOM до тех пор пока на экране ТВ не появится
надпись "МАСШТАБ ВЫКЛ.".
ВОСПРОИЗВЕДЕНИЕ CD, МР3, VCD и SVCD ДИСКОВ
ПРИМЕЧАНИЕ: Воспроизведение CD MP3 VCD и SVCD
дисков отличается от воспроизведения DVD дисков.
ИНФОРМАЦИОННЫЙ ДИСПЛЕЙ (для VCD или SVCD
дисков)
• При включенной функции управления
воспроизведением (PBC) нажмите кнопку DISPLAY
расположенную на пульте ДУ для отображения
следующей информации на экране ТВ:
Воспроизведено
Осталось
Дисплей Выкл.
• При выключенной функции управления
воспроизведением (PBC) нажмите кнопку DISPLAY
расположенную на пульте ДУ для отображения
следующей информации на экране ТВ:
Воспроизведено
Осталось
Всего воспроизведено
Всего осталось
Дисплей Выкл.
Функция PBC (VCD или SVCD)
Включите функцию управления воспроизведением
нажатием кнопки PBC расположенной на пульте ДУ.
• При включенной функции PBC нажмите кнопку набора
цифр например 8 для воспроизведения трека под
номером 8.
• При выключенной функции PBC если нажата кнопка
набора цифр например 8 на экране ТВ появилась бы
надпись "Трек 08/15" (цифра 15 означала бы количество
треков на диске) и началось воспроизведения трека под
номером 8.
ЗАМЕДЛЕННОЕ ВОСПРОИЗВЕДЕНИЕ (VCD или SVCD)
• Нажмите кнопку SLOW расположенную на пульте ДУ
для включения функции замедленного воспроизведения
и изменения скорости замедленного при этом на
экране ТВ отобразится следующая информация:
1/2
1/4
1/8
1/16
• Для возобновления воспроизведения в обычном режиме
нажмите кнопку PLAY.
ФУНКЦИЯ ПОВТОРА ВОСПРОИЗВЕДЕНИЯ (VCD SVCD или CD)
Во время остановки воспроизведения возможно включение
функции повтора воспроизведения трека или всего диска
нажатием кнопки REPEAT. С очередным нажатием кнопки
REPEAT на экране ТВ отобразится следующая информация:
Трек
Диск
ВОСПРОИЗВЕДЕНИЕ ДИСКОВ MP3 И JPEG
ПРИМЕЧАНИЕ: Воспроизведение MP3 JPEG дисков
отличается от воспроизведения DVD дисков.
ВОСПРОИЗВЕДЕНИЕ MP3 ДИСКОВ
• По завершения чтения плеером содержимого MP3 диска
на экране ТВ отобразится следующая информация:
• Для воспроизведения выберите желаемую папку/трек
кнопками перемещения курсора с последующим
нажатием кнопки PLAY или с помощью кнопок набора
цифр.
ПРИМЕЧАНИЕ:
Используйте кнопки перемещения курсора для выбора
нужной папки и трека с последующим нажатием кнопки
PLAY для начала воспроизведения. Также используйте
кнопку NEXT и PREV для перемещения по страницам меню.
• ФУНКЦИЯ ПОВТОРА ВОСПРОИЗВЕДЕНИЯ
Выберете желаемый режим повтора воспроизведения
нажатием кнопки REPEAT в следующем порядке:
РУССКИЙ
20
4014.qxd 16.06.2005 14:29 Page 20
All manuals and user guides at all-guides.com
Table of contents
Languages:
Other Vitek DVD Player manuals

Vitek
Vitek VT-4008 User manual

Vitek
Vitek VT-4106 SR User manual

Vitek
Vitek VT-4101 BK User manual

Vitek
Vitek VT-4119SR User manual

Vitek
Vitek VT-4119 SR User manual

Vitek
Vitek VT-4015 GY User manual

Vitek
Vitek VT-4073 SR User manual

Vitek
Vitek 4015 User manual

Vitek
Vitek VT-4106 SR User manual

Vitek
Vitek VT-4076 SR User manual