Vitek VT-4076 SR User manual

АУДИО-ВИДЕО И
БЫТОВАЯ ТЕХНИКА
Инструкция по эксплуатации
GB
RUS
UA
KZ
UZ
Manual instruction
Инструкция по эксплуатации
Інструкція з експлуатації
Пайдалану нұсқасы
Фойдаланиш қоидалари
www.vitek.ru
2
15
29
43
57
VT-4076 SR
DVD player
DVD плеер
4076new.indd 1 29.10.2008 10:39:45
Downloaded From DvDPlayer-Manual.com Vitek Manuals

ENGLISH
VT- 4076SR
CAUTION! IN ORDER TO AVOID ELECTRICAL SHOCK, FIRST
CONNECT THE CORD TO THE PLAYER, AND THEN INSERT PLUG
INTO THE ELECTRICAL OUTLET.
CAUTION! This device contains a DVD player that uses a laser system.
Do not open the case in order to avoid exposure to laser radiation.
Invisible laser radiation is present when the case is open. DO NOT LOOK
AT THE LASER RAYS. Furthermore, use of the control system or making
adjustments or completing operations, other than those described in
these instructions, can lead to dangerous exposure to radiation.
We urge you to carefully study these operating instructions and save
them for future use. Contact a service center (if necessary) for service
and repairs.
CAUTION! DO NOT OPEN THE UPPER HOUSING OF THE DEVICE DUE
TO RISK OF ELECTRIC SHOCK. THERE ARE NO USER-SERVICEABLE
PARTS INSIDE. EMPLOY THE SERVICES OF QUALIFIED PERSONNEL.
ATTENTION
IN ORDER TO AVOID ELECTRICAL SHOCK, THE WIDE PRONG OF THE
PLUG SHOULD BE FIRMLY AND COMPLETELY INSERTED INTO THE
OUTLET. WATER MUST NOT SPILL INTO THE DEVICE. DO NOT PLACE
CONTAINERS OF LIQUIDS, LIKE VASES, ONTO THE DEVICE.
WARNING:
IN ACCORDANCE WITH THE RULES OF THE FEDERAL
COMMUNICATIONS COMMISSION OF THE USA, THE INTRODUCTION
OF ANY CHANGES INTO THE DEVICE IN A WAY OBVIOUSLY NOT
INTENDED BY THE MANUFACTURER OR GOVERNMENT AGENCIES
GRANTING PERMISSION FOR THE DEVICE’S MANUFACTURE, CAN
LEAD TO THE CANCELLATION OF THE CONSUMER’S RIGHTS TO USE
THE DEVICE.
IMPORTANT SAFETY INFORMATION
1. Read the instructions
It is important to read all of the instructions for the safe use of the device
before first using the device.
. Save the instructions
The safety and user instructions should be saved for future reference.
3. Heed the warnings
It is important to heed all safety warnings and usage instructions
indicated in this manual.
4. Follow the instructions
It is important to follow the device usage instructions.
5. Cleaning
Before cleaning the device, remove the electrical plug from the outlet.
Do not use liquid or aerosol cleaners. Clean with a damp, wringed-out
cloth.
6. Extension cords
Do not use extension cords that are not permitted by the device
manufacturer, as that may be dangerous.
7. Water and moisture
Do not use the device in high-moisture conditions – do not place it near
bath tubs, buckets of water, kitchen sinks, washing machines; do not
use the device in humid basements, in swimming pools, or other such
places.
8. Stands
Do not place this device on furniture with non-fixed legs, unstable
stands, three-legged stands or tables. The device could fall, which could
harm children and adults and damage the device. Use only those stands,
three-legged stands and tables that are either sold with the device, or
recommended by the device’s manufacturer. When placing the device
on a stand, follow the manufacturer’s instructions, using only fastening
tools recommended by the manufacturer.
9. Stands with wheels
Stands with the device installed on them should be moved extremely
carefully. Upon sudden stops, cracks or when moving the stand along
uneven surfaces, it is quite probable that the stand will slip from under
the device and cause it to fall.
10. Ventilation
The device’s housing has grills and openings for ventilation. They ensure
proper functioning of the device and prevent it from overheating; these
openings must not be closed or covered. When the device is placed
on beds, couches, sofas, carpets or on other similar objects, you must
make sure that these openings are not blocked. This device should
not be placed on built-in furniture, for example, on bookshelves or in
wall closets, if it is not possible to ensure proper ventilation or it is not
recommended in the user instructions.
11. Electrical power
The electrical power for this device should only come from the source
indicated on the sticker located on the device itself. If you are not
sure whether or not the power source in your home matches these
requirements, contact the store where you purchased the device or
contact an electrician. If the device uses batteries or other power
sources, follow the instructions in the user’s manual.
1. Grounding
This device may include a cable with a grounded plug (one of the
contacts is wider than the other). This plug can only be inserted into the
outlet in a certain way. This is done to ensure safety. If you cannot get
the plug to go into the outlet, try inserting the plug the opposite way. If
you still cannot insert the plug into the outlet, contact an electrician and
have the outlet replaced. Do not alter the plug yourself.
13. Be careful with the power cable
The power cable not be tangled or have any other objects place on it;
special attention should be given to the connection of the plug to the
outlet – access to the outlet should not be blocked by furniture and the
cord should not be stretched where it connects to the device.
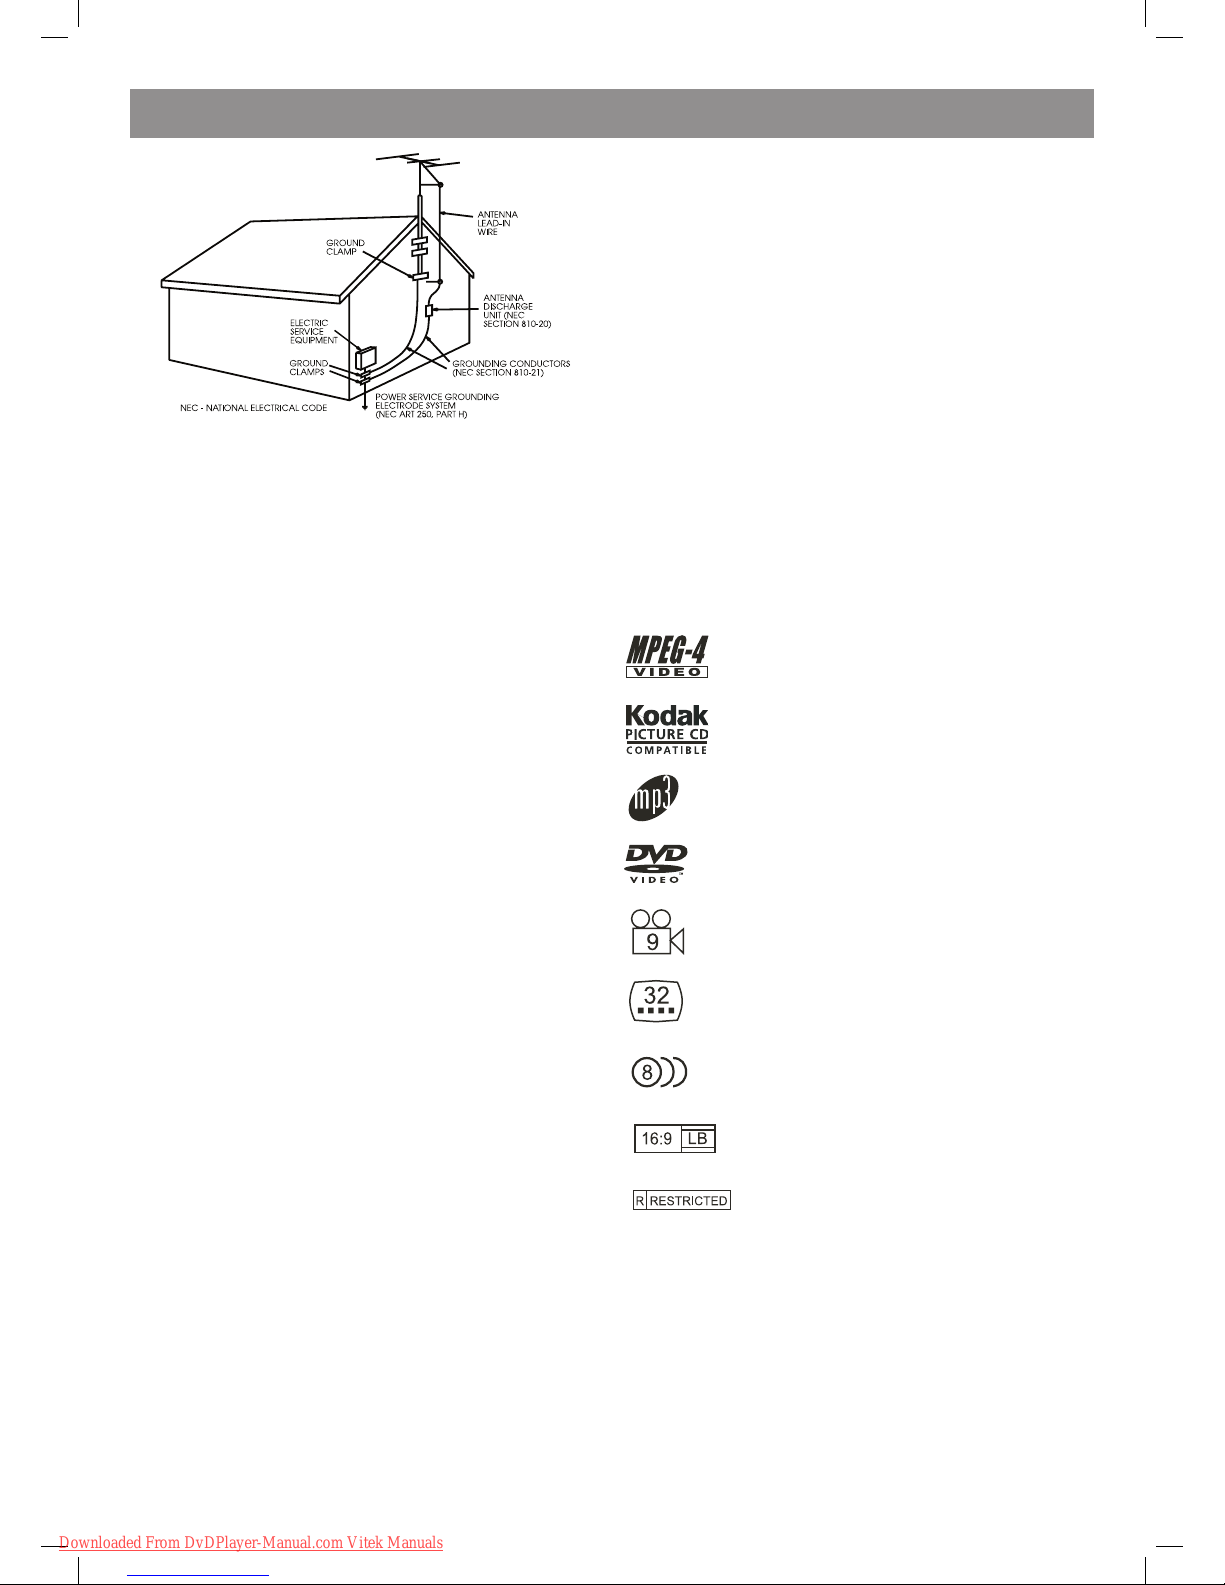
14. Grounding of external antenna
If an external antenna or cable television system is connected to the
device, make sure that the cable is grounded; this will protect the
device from voltage spikes in the electrical system and static electricity.
In article 810 of the National Electric Code ANSI/NFPA 70 (USA)
information is given regarding the correct grounding of antenna masts
and poles, the connection of the antenna lead-in wire to the device, the
place of connection and length of the grounding wire, placement of the
antenna discharge unit, connection to the grounding electrode system
and requirements thereto (see the figure below).
The lightning bolt in a triangle symbol indicates to the
user that there are dangerous voltages inside the device
that can result in electrical shock.
The exclamation point in a triangle symbol indicates to
the user important operating instructions and technical
service information in the accompanying literature.
Indicates a device using a laser. This symbol
must be located on the rear panel of a
device, indicating that the device contains a
Class 1 laser and that laser rays are in use.
The possibility of laser exposure does not
exist without opening the device.
CLASS 1
LASER PRODUCT
CAUTION
Risk of electric shock
DO NOT OPEN
WARNING: In order to reduce the risk of fire or electrical shock,
do not remove the device panels. Contact qualified personnel for
service and repairs.
4076new.indd 2 29.10.2008 10:39:45
Downloaded From DvDPlayer-Manual.com Vitek Manuals

ENGLISH
3
15. Protection from thunderstorms
For additional protection of the device during thunderstorms, when
the device will be left unattended for long periods of time – remove
the power plug from the electrical outlet and disconnect the external
antenna or cable television system. This will ensure the device will not be
harmed by lightning strikes or voltage spikes in the electrical system.
16. Outdoor wires and electrical lines
The external antenna should not be located near street lighting wires,
electrical transmission lines or other electrical supply devices; the
antenna must not fall onto these types of objects. Extreme caution must
be exercised when installing an external antenna so that the antenna
wire does not come into contact with electrical transmission lines or
electrical supply devices – this could lead to fatal consequences.
17. Current overloads
Do not overload electrical wall outlets with extension cords and adapters
– this can lead to fires or electrical shock.
18. Foreign objects and liquids
Never stick any foreign objects into openings in the device housing
– they could come into contact with high-voltage devices within the
device or cause short circuits of internal components – this could cause
the device to catch fire or result in electric shock. Do not ever pour any
liquids onto the device.
19. Service
Do not attempt to repair the device yourself – upon opening the housing
and removing the lid, you could expose yourself to dangerous voltages
and other dangers. Contact an authorized service center specialist for
repair.
0. Servicing the device if it is damaged
Remove the device’s power plug from the electrical outlet and contact a
qualified service center specialist in the following situations:
А) if the power cord or plug is damaged
В) if any liquid or other foreign objects falls into the device;
С) if the device has been exposed to rain or submersed in water,
D) If the device fails to operate as indicated in the user’s manual. Use
only those control elements described in the user’s manual, as the use
of control elements not described in the manual can lead to damage of
the device and may require extended repairs by qualified serve center
personnel to restore the device to proper working order.
Е) If the device falls from a high place or has been damaged in any way.
F) if the devices characteristics have changed noticeably – in this case
the device must be serviced..
1. Replacing components and pats
In cases that require the replacement of parts, make sure that the
service center specialists use only parts and components that
are recommended by the manufacturer. Installation of parts and
components not recommended by the device manufacturer can lead to
fire, electrical shock or other dangers.
. Verifying safety
After completing service work or repairs on the device, ask the specialist
to conduct a verification of the safety of the device in order to be sure
that it is functioning normally.
3. Attaching to wall or ceiling
Attaching the device to a wall or ceiling should be done only in
accordance with the manufacturer’s instructions.
4. Heat sources
This device must not be placed near heat sources like radiators, electric
heaters, ovens or other devices that produce heat (including amplifiers).
Measures for careful use of the device
• When transporting the device, use the box and packing materials
that came with the device.
• After the player has been used for long periods of time, the front and
rear panels may heat-up slightly – this is normal.
• Do not move the player during disc playback. This may damage the
laser head and the disc.
• Press the OPEN/CLOSE button on the front panel in order to open
and close the disc tray. Do not touch or push the tray when it is
opening or closing.
Functions
• Full compatibility with the following disc formats: MPEG4, DVD, CD,
MP3, Kodak Picture CD, CD-R and CD-RW (finalized)
• Screen saver
• Several playback modes including Program and Search modes
• Digital coaxial audio output
• Video outputs: S-Video, composite video and component video (Y,
Pb, Pr)
This player supports the following disc formats:
MPEG4/DivX files on discs
Compact discs (CD) with image files (KODAK
company formats)
МР3 files on CD-R/CD-RW discs
DVD video
Various camera angle settings
Subtitles
Multiple audio tracks
Modes with various relationships between the sides
of images on the screen
Parental lock
This device uses technology to protect copyrights for methods
protected by several US patents and other intellectual property rights
belonging to the Macrovision Corporation and other copyright holders.
Use of this copyright protection technology is allowed only with the
permission of the Macrovision Corporation, which only allows it to
be used for home viewing and other types of limited viewing, unless
permission is obtained from the Macrovision Corporation. It is illegal to
copy the device or take it apart.
The device supports compact discs (CD) with image files (KODAK
Picture CD format) and will always play discs in the KODAK Picture
CD format. The KODAK Picture CD Compatible logo is the registered
trademark of the Eastman Kodak Company and is used by permission.
Manufactured by license of the Dolby Laboratories, Inc. “Dolby”
and the double D symbol are the registered trademarks of the Dolby
Laboratories, Inc. © 1992 – 1997 Dolby Laboratories, Inc. All rights
reserved.
4076new.indd 3 29.10.2008 10:39:46
Downloaded From DvDPlayer-Manual.com Vitek Manuals

ENGLISH
4
Front and rear panel control elements
Front panel
1 2 3 4 5 7
8 109
11 126
Rear panel
VFD display
1. DVD disc
. SVCD/VCD/CD disc
3. Play time
4. Dolby digital
5. Play/Pause
6. Mp3 disc
7. DTS
1. POWER
. CABIN DOOR
3. SENSOR
4. VFD SCREEN
5. CARD PORT
6. MIC
7. USB PORT
8. PREV BUTTON
9. PLAY/PAUSE BUTTON
10. NEXT BUTTON
11. STOP BUTTON
1. OPEN/CLOSE BUTTON
1. SCART OUT
. 5.1CH Audio output (FL, FR, SL, SR,CEN,SW )
3. COMPOSITE VIDEO output jack
4. S-VIDEO output jack
5. Component Video output (Y, Pb, Pr)
6. Digital Audio COAXIAL output jack
4076new.indd 4 29.10.2008 10:39:46
Downloaded From DvDPlayer-Manual.com Vitek Manuals

ENGLISH
5
Remote control
1. Standby
. Subtitle
3. Audio
4. Title
5. Angle
6. Goto
7. Vol(+)
8. Vol(-)
9. Stop
10. Play
11. Display
1. Enter
13. V-Mode
14. Next
15. Prev
16. Return
17. Random
18. USB/Card
19. Karaoke
0. Open/Close
1. 0-9 Number Key
. Clear
3. Zoom
4. Slow
5. Pause
6. Menu
7. Move
8. Setup
9. REV
30. FWD
31. A-B
3. Repeat
33. Prog
34. Mute
Note:
1. Please note that reference numbers for the remote are described beginning on backend of this manual.
. In this manual, will be used to represent different NAVIGATION ARROWS on the remote respectively.
3. In order to operate any of the remote functions, you must first press the Power button on the DVD player.
4076new.indd 5 29.10.2008 10:39:46
Downloaded From DvDPlayer-Manual.com Vitek Manuals

ENGLISH
6
Connections
CONNECT DVD PLAYER TO TV SET BY AV CABLE
Connect the DVD players FR and FL jack to the audio input jack on the TV
CONNECT DVD PLAYER TO TV SET BY S-VIDEO SOCKET
Use the S-VIDEOcable ( not supplied) to connect DVD player and your TV. Set the [Video Out] to [S-Video].
4076new.indd 6 29.10.2008 10:39:46
Downloaded From DvDPlayer-Manual.com Vitek Manuals

ENGLISH
7
CONNECT DVD PLAYER TO TV SET WITH SCART SOCKET
Use the SCART cable (not supplied) to connect DVD player and your TV. Set the [Video Out] to [RGB].
CONNECT THE DVD TO A TV USING THE Y/Pb/Pr JACKS
Use the COMPONENT Cable(not supplied) to connect DVD player to your TV. Set the [Video Out] to [Component]. For Progressive Scan, set to [P-
Scan]. Component and P-Scan signal is transfe red through same jack. If the TV set supports P-scan function,you can set [Video Out] to [P-Scan]. If
not, you can set [Video Out] to [Component].
4076new.indd 7 29.10.2008 10:39:46
Downloaded From DvDPlayer-Manual.com Vitek Manuals

ENGLISH
8
Connecting to an AV Amplifier with 5.1 Channel Analog Audio Input
Notes:
1. Set the TV to the AV input connected to the DVD player.
. Set the Amplifier to the AV input connected to the DVD player.
4076new.indd 8 29.10.2008 10:39:46
Downloaded From DvDPlayer-Manual.com Vitek Manuals

ENGLISH
9
Connecting to an AV Amplifier with Digital Audio Input
Notes:
1. Select the Coaxial digital audio output.
. Set the player’s Audio out to Raw or PCM mode .
3. Set the digital Amplifier to the AV input connected to the DVD player.
4076new.indd 9 29.10.2008 10:39:47
Downloaded From DvDPlayer-Manual.com Vitek Manuals

ENGLISH
10
FUNCTION OPERATION
Function Buttons On the Front Panel
These buttons, function is the same as the corresponding buttons on the
remote control. For the detail information, please see the following texts.
Function Buttons Onthe Remote Control
STANDBY
Press the button to switch the power between normal work mode and
standby mode..
OPEN/CLOSE
To open the disc tray, press OPEN/CLOSE; To close the disc tray, press
OPEN /CLOSE again.
SUBTITLE
Press the button to choose different captions(Requires support from
disc)
GOTO
For DVD discs, press the button to choose the desired title and chapter
and search the desired title time and chapter time.
For Super VCD, VCD,CD discs, press this button to search the desired
disc time and track time and choose the desired track.
Note: During VCD playback, the PBC mode must be set to OFF.
0-9 keys
These keys are used to input the time, as well as title, chapter and track
numbers.
When a numeric item is displayed on the screen, press the 0-9 keys to
select the desired entry, and press ENTER to confirm.
When a VCD is playing(with PBC off), press the 0-9 keys to select a track
directly.
CLEAR
Press CLEAR to delete numbers you have entered.
MENU
During DVD playback, press MENU to display the disc menu of the
current title.
Note: This function is subject to the disc.
During VCD/SVCD playback, press MENU to control PBC ON/OFF.
SETUP
Press the button to enter the system setting menu. Press the button
again to exit the menu.
FUNCTION OPERATION
DISPLAY
Press the button to show the information of the current playing disc.
TITLE
Press the button to enter the appointed title.(Requires disc support)
Direction key(UP/DOWN.RIGHT/LEFT)
Press the keys to move the highlighted bar or cursor on any menu to
your selection.
ENTER
Press the button to confirm your choice on screen.
REV:
During DVD, CD or VCD playback, press REV to scan in reverse.
The player will review the disc at different times speed. Press PLAY/
PAUSE
to resume normal playback.
FWD
During DVD, CD, or VCD playback, press FW to scanD forward.
The player will cue the disc at different speed. Press PLAY/PAUSE to
resume normal playback.
PREV
During DVD, CD or VCD playback, press PREV to play the previous
chapter, title or track.
NEXT
During DVD, CD or VCD playback, press NEXT toplay the next chapter,
title or track.
STOP
Press the button once and the player will be in memory stop state.
Continuously press this button twice and the player will be in complete
stop state.
Play
In pause state or stop state, press the button, the player will be in playing
state.
Pause
In play state, press the button for the first time and the player will be in
pause state.
VOLUME+/-
Press VOL+ to increase volume and press VOL-to decrease volume.
REPEAT
Each press of the REPEAT button will change the repeat mode.
During VCD, CD playback, there are three modes: repeat Single, repeat
ALL and Off.
During DVD, playback, there are three modes: Repeat Chapter, Repeat
Title and OFF.
Note: During VCD playback, the PBC mode must be set to Off
A-B
During playback, press A-B to select point A, press it again to select
point B. The player will repeat the section from A to B automatically.
Press A-B a third time to cancel A-B repeat and clear points A and B.
Note: During CD/VCD/S VCD playback, points A and B must be within
the same track. During DVD playback, points A and B can be selected
from different chapters.
ANGLE
Press the button to view scenes shot from ANGLE DIFFERENCE
ANGLES. (Disc support is required)
MUTE
Press MUTE to turn off the audio, press MUTE again to resume normal
sound.
SLOW
During DVD, VCD or SVCD playback, press SLOW for slow motion
playback. One you press SLOW, the disc will play at different speed.
Press PLAY to resume normal playback.
V-MODE
In the STOP/OPEN TRAY/NO DISC state, Press V-MODE key, you can
select different video output mode.
AUDIO
During DVD/SVCD playback, press AUDIO can select different audio
language. During DVD/SVCD playback, AUDIO key acts as L/R key to
switch LEFT/RIGHT/ MIX/STEREO.
RETURN
When SVCD/VCD disc playing,press RETURN button to the main
menu(PBC ON only).
PROGRAM (valid only while DVD/VCD/SVCD playback)
The Program Playback option allows entering the order in which the
chapters or tracks will be played, up a maximum to 16.
Press Program button to display the Program Menu. According to the
highlight, move the cursor to the chapters/tracks you want to play,
then press ENTER to confirm. Then press Play or use arrow buttons to
highlight the PLAY Item and press Enter. The chapters/tracks will play
in the programmed order. During Program Playback, if Program button
pressed, the programmed order and the contents will be displayed on
the screen, and the Program Playback will be stopped. Also Stop
and Play can be pressed to resume normal playback. To clear the
programmed order, use arrow buttons to highlight the CLEAR Item,
then press Enter to modify the programmed order, use arrow buttons to
highlight the modifying item and enter the new chapter/track you want to
program directly.
ZOOM
As you press the button you view the different ZOOM magnifications of
the picture.
Note: This function may differ for different types of discs
RANDOM
During DVD, VCD or CD playback, press RANDOM button for random
sequence playing.
4076new.indd 10 29.10.2008 10:39:47
Downloaded From DvDPlayer-Manual.com Vitek Manuals

ENGLISH
11
MP3/WMA/MPEG4 PLAYING
The MP3/WMA/MPEG4 disc has such a directory structure as shown in
the up picture.
Press Direction key to choose the root directory and then press ENTER
button to enter into the sub directory. Press Direction key to choose the
desired track and then press ENTER or PLAY to enjoy the music or movie.
If you want to return to the upper menu, press Direction key to choose
Hd the icon and press ENTER button.
Filter: Allows selecting the categories of files displayed in the browser
list. This selection is done among the 3 categories: Audio, Photo and
Video.
Repeat: To switch different repeat playing mode Mode: Select different
playing mode
Normal: Shuffle mode is cancelled
Shuffle: Shuffle mode enabled. When playback reaches the end of the
current chapter/track, playback jumps to a random chapter/track. As the
end of each chapter/track is reached, another random chapter/track will
be played until all tracks/chapters have been played or the Shuffle mode
is cancelled by toggling to a different Mode Option.
Music Intro: In this mode, the media will play 10 seconds then skip to
next media
Edit Mode: To enable programmed playback mode. When you select the
mode, press LEFT Direction key to directory and press ENTER to choose
the desired track and press Add to program to start program playback.
Program view: Display program track
Brower view: Display track directory
Add to program: Choice the track press Add to program to add the track
of the program play directory
Clear program: In the complete stop state(press the STOP button twice),
choose the track press Clear program to delete the track of the program
play directory.
PICTURE CD PLAYBACK
The PICTURE CD disc has such a directory structure structure as shown
in the foloowing picture.
Press Direction key to choose the root directory and then press ENTER
button to enter into the sub directory. Press Direction key to choose the
desired picture and then press ENTER or PLAY to enjoy the picture. If you
want to return to the upper menu, press Direction keyto choose [¥r] the
icon and press ENTER button.
Image rotation
In picture play state, press Direction key to rotation the picture, press
ANGLE button to change the picture scan mode.
SYSTEM SETUP
DVD menu setup
Press the SETUP button on the remote control, the SETUP
MENU(main)will be displayed.
After accessing the setup menu, press the direction buttons for up and
down movement to select an item desired, then press the ENTER button
to confirm.
Press LEFT direction button return to the menu of upper level.
To exit the setup, press the SETUP button again. In the SETUP MENU,
you may choose any of the following options as you like.
8.1 LANGUAGE SETUP
Select Language in the setup menu, and display the Langusge
submenu:
8.1.1 OSD Language
Use this item to select the language of the setup menu and screen
display.
8.1. Subtitle
This option provides the preset subtitle language.
Follow the operating instructions stated in DVD MENU SETUP In
combination with the desired option.
8.1.3 Divx Subtitle
Choice different DivX subtitle encoding option
8.1.4 Audio
Follow the operating instructions stated in DVD MENU SETUP In
Combination with the desired option.
This option provides the built-in disc dubbing language options.
4076new.indd 11 29.10.2008 10:39:47
Downloaded From DvDPlayer-Manual.com Vitek Manuals

ENGLISH
1
8.1.5 DVD Menu
This option provides the film s menu language options.
Follow the operating instructions stated in DVD MENU SETUP In
combination with the desired option.
8.2 VIDEO SETUP
Select Video in the setup menu, and display the Video submenu:
8..1 Aspect Ratio
4:3PS/4:3LB : Choosing this setting if your DVD player is connected to
a normal ratio TV. You can fill the movie to the entire screen of your TV.
This might mean that parts of the picture(the left and right edges)won t
be, seen.
16:9 : Choose this setting if your DVD player is connected to a wide
screen TV.
If you choose this setting and you don t have, a side screen TV, the
images on the screen may appear distorted due to vertical compression.
Notes:
The image display ratio is related to the recorded disc format. Some disc
can not display images in the aspect ratio you choose. If you play a disc
recorded in 4:3 format on a wide screen TV, black bars will appear on
the left and right side of the screen. You must adjust the screen setting
depending on the type of the television you have.
8.. TV System
This product supports output of various system, including Multi, NTSC,
PAL.
If your TV set has only NTSC or PAL system, the screen will blink and
become colorless when a wrong system is selected.
Note: For more information of output format, refer to the instructions or
your TV set.
8..3 Video Output
Selecting the Video Output setting to switch between different
video outputs S-VIDEO : Set the video output to S-VIDEO output.
COMPONENT: Set the video output to YUV output. P-SCAN: If your TV is
progressive TV, please select the option. You can
get better picture quality. RGB: Set the video output to SCART output. If
you select SCART connection,you should set up the play mode as RGB
state, then it will output normally.
8..4 Smart picture
Adjust display effect for video output:
Standard: default effect.
Bright: internal setting for bright view effect.
Soft: internal setting for soft view effect.
Dynamic: user adjuct brightness, contrast, color ect.
8.3 Audio setup
Select Audio in the setup menu, and display the Audio submenu.
8.3.1 Analog output
Analog out select5.1CH or .0 CH(select down mix)audio output.
8.3. Digital output
Selecting the Digital Output setting allows the user to adjust the audio
output on S/PDIF ports to work in harmony with the audio equipment(e.
g.receiver, speakers)connected to the player.
Off Digital audio output is disabled.
PCM Select this option when you are going to use stereo signals(
channels). You should combine this option with the option Lower
sampling rate, Which we explain further on
ALL If you select this option the player will use the DVD original audio
track. Use this option when you want to use the Dolby Digital Ac3 signals
through the coaxial audio output.
4076new.indd 12 29.10.2008 10:39:47
Downloaded From DvDPlayer-Manual.com Vitek Manuals

ENGLISH
13
8.3.3 Test Tones
Selecting the Test Tone setting allows the user to test the player s audio
output on each speaker. When you select channel, a short burst of pink
noise will be sent to corresponding channel
8.3.4 Down sampling Down sampling:
ON: system will down sampling rate for high sampling rate audio(more
than 96K)
OFF: as normal, may be can play high sampling rate audio
8.3.5 Smart sound
Smart sound select different music effect whiling listening music.
8.4 RATING SETUP
Select Rating in the setup menu, and display the Rating submenu:
Note: Not all DVD support ratings.
8.4.1 Parental Control
Selecting a Rating allows the user to set the parental control feature of
the player
Select Parental Control, and press ENTER to change the different mode.
Note: Unlock the password before setting Parental Control
8.4. Set Password
Use the 0-9 keys to input four digits(password), then press ENTER to
confirm.
Note: If you forget your password, please use the universal password
6666 to unlock.
8.5 MISC SETUP
Select MISC in the setup menu, and display the submenu:
* Use Default Settings
Reset setup data to factory default and re-load disc.
FUNCTION OF KARAOKE, USB CARD READER
Advanced Features
3 In 1 Card Reader Function
1. This unit have a 3 in1 card ja ck, when no disc in the player. You can
insert (MMC, SD ,MS) three k inds of card with card port interface to
play the mp3 music or MPEG4 mov ie and JPGE files. All the function is
the same to play a disc.
USB interface
This unit have a USB jack,when no disc in the player, you can insert a
USB DISC or a Mp3 Player with USB Interface to play the Mp3 music or
and JPEG files. All the function is the same to play a disc.
When the disc is in the player at the stop state, user can enjoy USB by
selecting USB in the remote controller USB/CARD. Not all USB Device
can be supported by this system.
NOTE:
When using USB function. Please do not insert in the wrong
direction, or it will be corrupted.
Function of Karaoke
1. Connecting to microphone Please insert your microphone to the MIC
jack on the front panel.
. Start
A. Put the DVD or VCD disc in the cabin door.
B. Press the KARAOKE button on the remote control to select function.
Note: please set karaoke off if you want 5.1 CH output when you play
5.1CH disc.
Troubleshooting
If you have any questions, please consult the trouble shooting guide
below.
NO PICTURE OR SOUND
• Ensure the power button is on.
• Ensure the power outlet is operational.
• Ensure the power cord is not damaged.
• Ensure the power plug is connected firmly to the outlet.
“BAD DISC” DISPLAYED
• Ensure the disc is not warped, damaged or deformed.
• Ensure the disc is not badly stained or damaged.
• Ensure the disc format is compatible with the player
• Please check whether you have tried to play a software CD. If so,
please restart the player
REMOTE NOT WORKING
• Make sure the Main unit s POWER button is on.
• Ensure the remote batteries are working.
• Point the remote control directly at the player IR
4076new.indd 13 29.10.2008 10:39:47
Downloaded From DvDPlayer-Manual.com Vitek Manuals

ENGLISH
14
• Remote any obstacles between the remote and the IR sensor
PICTURE BUT NO SOUND
• Ensure the audio jacks are securely connected.
• Ensure the audio connector is not damaged.
• Ensure the volume is turned up in VOL/CH setup.
• Ensure you have set the player AUDIO settings correctly. sensor.
• Ensure you have entered the correct AV input for your TV.
• Ensure the audio is not set to mute.
SOUND BUT NO PICTURE
• Ensure the video jacks are securely connected.
• Ensure you have entered the correct AV input for you TV.
• Ensure the video connector is not damaged.
• Ensure you have set the player VIDEO settings correctly.
POOR PICTURE OR SOUND
• Ensure you have set the player AUDIO settings correctly.
• Ensure the disc is not scratched or stained.
• Ensure the AV connector or the output terminal is not damaged.
UNIT NOT WORKING
• Turn off the power, and then turn it on again.
“NO DISC” DISPLAYED
• Ensure you have put the disc on the tray.
• Ensure the disc is not upside down.
• Ensure the disc is not distorted, stained or scratched.
Remote Control Preparation
Battery installation
1. Open the cover
. Install batteries
3. Close the cover
Using the remote
Point the remote control at the remote sensor. (The pictures below are
for reference only.)
Notes:
• Point the remote control directly at the player’s remote sensor.
• Do not leave the remote control in an extremely hot or humid place.
• Do not spill water or put anything wet on the remote control.
Specifications
Power requirements: AC 100-40 Volt, 50/60Hz
Power consumption: 15W
Video standard: NTSC/PAL/Multi
Unit Weight: .06kg
Disc s COMPATIBILITY: MPEG4,DVD,DVD+/-R/RW,VCD,
JPEG.CD-DA,CD-R, CD-RW, USB 1.1
Video out
Video out: 1.0V(p-p)/75Ohm, sync, negative polarity,
RCA pin jack x 1
S-video output connector(separate Y C signal output connector):
Y output: 1.0V(p-p)/75Ohm, sync, negative polarity
C output: 0.86V(p-p)/75
Audio out
5.1 channel out: RCA pin jackx6
Coaxial out: 0.5V(p-p)75 ,RCA pin Jack x l
Frequency response: 0Hz to 0kHz
S/N ratio:>90dB
Total harmonic distortion: <0.005%
[Accessories]
Video/ Audio cable x 1 Remote Control x 1 User s Manual x 1 Battery x
Specifications are subject to change without notice. Weight and
dimensions are approximate.
Weight and size data are approximated.
The manufacturer reserves the right to make changes to the
characteristics of the device without prior notice.
The service life of the device is no less than five years.
Guarantee
Details regarding guarantee conditions can be obtained from the dealer
from whom the appliance was purchased. The bill of sale or receipt must
be produced when making any claim under the terms of this guarantee.
This product conforms to the EMC-Requirements as laid
down by the Council Directive
89/336/EEC and to the Low Voltage Regulation (3/73 EEC)
4076new.indd 14 29.10.2008 10:39:47
Downloaded From DvDPlayer-Manual.com Vitek Manuals

РУССКИЙ
15
Инструкция по эксплуатации
VT-4076SR
Для правильной эксплуатации данного устройства внимательно
прочитайте и сохраните руководство для пользователя.
ВНИМАНИЕ!
ВИДЕОПЛЕЕР DVD-ДИСКОВ ЯВЛЯЕТСЯ ЛАЗЕРНЫМ УСТРОЙСТВОМ
КЛАССА 1. ИСПОЛЬЗОВАНИЕ ОРГАНОВ УПРАВЛЕНИЯ ИЛИ
РЕГУЛИРОВКИ, НЕ УКАЗАННЫХ В ЭТОМ РУКОВОДСТВЕ,
ВЫПОЛНЕНИЕ ПРОЦЕДУР, КОТОРЫЕ В НЕМ НЕ ОПИСАНЫ, МОЖЕТ
ПРИВЕСТИ К ПОПАДАНИЮ ПОД ОПАСНОЕ ИЗЛУЧЕНИЕ. ТАК
КАК ЛАЗЕРНЫЙ ЛУЧ, ИСПОЛЬЗУЕМЫЙ В ЭТОМ ВИДЕОПЛЕЕРЕ
DVD-ДИСКОВ ОПАСЕН ДЛЯ ГЛАЗ, НЕ ВСКРЫВАЙТЕ КОРПУС.
ОБСЛУЖИВАНИЕ УСТРОЙСТВА ДОЛЖНО ВЫПОЛНЯТЬСЯ ТОЛЬКО
КВАЛИФИЦИРОВАННЫМИ СПЕЦИАЛИСТАМИ СЕРВИСНОГО
ЦЕНТРА.
ПРЕДУПРЕЖДЕНИЕ
СОГЛАСНО ПРАВИЛАМ ФЕДЕРАЛЬНОЙ КОМИССИИ ПО СВЯЗИ США,
ВНЕСЕНИЕ ЛЮБЫХ ИЗМЕНЕНИЙ В УСТРОЙСТВО, В ЯВНОЙ ФОРМЕ
НЕ РАЗРЕШЕННЫХ ИЗГОТОВИТЕЛЕМ ИЛИ ГОСУДАРСТВЕННЫМИ
ОРГАНИЗАЦИЯМИ, ВЫДАВШИМИ ЕМУ РАЗРЕШЕНИЕ НА
ПРОИЗВОДСТВО ИЗДЕЛИЯ, МОЖЕТ ПРИВЕСТИ К ПРЕКРАЩЕНИЮ
ПРАВ ПОЛЬЗОВАТЕЛЯ НА ЭКСПЛУАТАЦИЮ УСТРОЙСТВА.
Важные инструкции по технике безопасности
1. Прочитайте инструкции
Прежде чем начать пользоваться устройством, необходимо вни-
мательно прочитать все инструкции по технике безопасности
устройства и его эксплуатации.
. Сохраните инструкции
Инструкции по технике безопасности и эксплуатации устройства
необходимо сохранить для использования в будущем.
3. Соблюдайте предупреждения
Необходимо соблюдать все предупреждения и инструкции по
пользованию устройством, приведенные в этом руководстве.
4. Следуйте инструкциям
Необходимо соблюдать все инструкции по пользованию уст-
ройством.
5. Чистка
Перед чисткой устройства выньте вилку кабеля питания из
розетки электросети. Не используйте жидкие очистители или
очистители-аэрозоли. Чистку производите влажной, хорошо
отжатой тканью.
6. Сетевые удлинители
Не используйте сетевые удлинители, которые не разрешены
изготовителем устройства, так как это может быть опасным.
7. Вода и влажность
Не используйте это устройство в условиях повышенной влаж-
ности (не размещайте его около ванн, тазов с водой, кухонных
раковин, стиральных машин, рядом с плавательным бассей-
ном); не пользуйтесь устройством в сырых подвалах и т.д.
8. Подставки
Не размещайте это устройство на предметах мебели с
нефиксируемыми колесиками, на неустойчивых подставках,
треногах, кронштейнах, столах, так как изделие может упасть и
привести к травмам детей, взрослых, а также к неисправности
самого устройства. Используйте только те подставки, треноги,
кронштейны, столы, которые либо продаются вместе с
устройством, либо рекомендованы изготовителем устройства.
При установке устройства на подставке соблюдайте инструкции
изготовителя, применяйте только крепежные изделия, которые
рекомендуются изготовителем.
9. Подставки с колесиками
Подставку с установленным на ней устройством следует
перемещать с крайней осторожностью. При резкой остановке,
рывках или при перемещении подставки по неровной
поверхности весьма вероятно опрокидывание подставки и
падение устройства.
10. Вентиляция
В корпусе устройства имеются щели и отверстия для
вентиляции. Они обеспечивают надежную работу устройства
и защищают его от перегрева; эти отверстия нельзя закрывать
или накрывать. При размещении устройства на кровати, диване,
софе, ковре или на других подобных предметах обстановки
необходимо проследить за тем, чтобы эти отверстия не были
закрыты. Это устройство не следует размещать во встроенной
мебели (в книжных полках или стенных шкафах), если в ней
нельзя обеспечить достаточной вентиляции, либо это не
рекомендуется в инструкциях изготовителя.
11. Электропитание
Электропитание этого устройства должно осуществляться
только от источника, указанного на этикетке, имеющейся на
устройстве. Если вы не уверены, что в вашем доме имеется
именно этот источник питания, обратитесь в магазин, где вы
приобрели это устройство, или к электрикам, обслуживающим
дом. Если устройства питаются от батарей или других
источников питания, то просто соблюдайте инструкции,
приведенные в руководстве пользователя.
1. Заземление
Это устройство может комплектоваться кабелем с вилкой
для питания от электросети, имеющей нулевой провод (один
из контактов на такой вилке шире другого). Эту вилку можно
вставить в розетку только одним единственным способом. Это
сделано для обеспечения безопасности. Если вам не удается
вставить такую вилку в розетку, попробуйте вставить вилку,
сориентировав ее контакты наоборот. Если вам по-прежнему
не удается вставить вилку в розетку, обратитесь к электрикам и
замените розетку. Самостоятельно не изменяйте конструкцию
вилки.
13. Бережно обращайтесь с кабелем питания
Кабели питания необходимо прокладывать так, чтобы они не
запутывались, чтобы на них не были установлены какие-либо
предметы; особое внимание нужно обратить на подключение
вилок к розеткам - доступ к розеткам не должен преграждаться
предметами мебели, кроме того, кабели питания не должны
быть натянуты там, где они выходят из устройства.
14. Заземление внешней антенны
Если к устройству подключен кабель внешней антенны или
системы кабельного телевидения, удостоверьтесь в том, что
эти кабели заземлены; это обеспечивает защиту от пиков
напряжения в электросети и статического электричества. В
статье 810 Директив по электробезопасности ANSI/NFPA 70
(США) приведена информация по правильному заземлению
антенных мачт и растяжек, подключению проводника
заземления антенны к разрядному устройству, сечению и длине
проводников заземления, размещению разрядного устройства,
подключению к электродам заземления и требования к ним (см.
рисунок ниже).
ВНИМАНИЕ!
Опасность удара электрическим током!
НЕ ВСКРЫВАТЬ!
ПРЕДОСТЕРЕЖЕНИЕ: для снижения риска возгорания или
поражения электрическим током не снимайте панели устройства.
Для сервисного обслуживания обращайтесь только к
квалифицированному персоналу
Значок молнии в равностороннем треугольнике указывает
пользователю на наличие опасного напряжения внутри
корпуса изделия, способного привести к поражению
электрическим током.
Значок восклицательного знака в равностороннем
треугольнике указывает пользователю на наличие важных
инструкций по эксплуатации и техобслуживанию в
сопутствующей изделию литературе.
Обозначение устройства, в котором
используется лазер. Маркировка должна
находиться на задней панели устройства;
означает, что устройство принадлежит
к Классу 1 и использует лазерные лучи.
Возможность лазерного облучения
отсутствует без вскрытия прибора.
CLASS 1
LASER PRODUCT
4076new.indd 15 29.10.2008 10:39:47
Downloaded From DvDPlayer-Manual.com Vitek Manuals

РУССКИЙ
16
15. Защита от грозы
Для дополнительной защиты этого устройства во время грозы,
в тех случаях, когда оно долгое время остается без присмотра
- выньте вилку кабеля питания из розетки электросети, отсо-
едините кабели внешней антенны или кабельной системы. Это
исключит выход устройства из строя из-за ударов молнии или
пиков напряжения в электросети.
16. Уличные провода и линии электропередачи
Внешняя антенна не должна находиться в непосредственной
близости от проводов уличного освещения, линий электропере-
дачи, других контуров электроснабжения; недопустимо падение
антенны на такие объекты. При установке внешней антенны не-
обходимо соблюдать крайнюю осторожность, чтобы не коснуть-
ся проводниками антенны линии электропередачи или контуров
электроснабжения - это может привести к смертельному исхо-
ду.
17. Перегрузка по току
Не перегружайте по току стенные розетки электросети, удлини-
тели переходники - это может привести к пожару или пораже-
нию электротоком.
18. Посторонние предметы и жидкости
Никогда не проталкивайте какие-либо посторонние предметы
через отверстия в корпусе устройства, они могут коснуться то-
чек, в которых действуют опасные для жизни напряжения, либо
могут привести к короткому замыканию внутренних компонен-
тов – это, в свою очередь, может повлечь за собой возгорание
устройства и поражение электротоком. Никогда не проливайте
никаких жидкостей на устройство.
19. Обслуживание
Запрещается самостоятельно обслуживать устройство - при
вскрытии корпуса и снятии крышек можно попасть под опасное
для жизни напряжение, есть и другие опасности. Для ремонта
устройства обратитесь к квалифицированным специалистам
сервисного центра.
0. Обслуживание устройства, если оно получило повреждения
Отсоедините вилку кабеля питания устройства от стенной ро-
зетки электросети и обратитесь к квалифицированным специа-
листам сервисного центра при следующих условиях:
А) Если поврежден кабель питания или его вилка.
В) Если внутрь устройства попала жидкость, либо в него попали
посторонние предметы.
С) Если устройство находилось под дождем или в воде.
D) Если устройство не работает так, как описано в руководстве
пользователя. Пользуйтесь только теми органами управления,
которые описаны в руководстве пользователя, так как пользо-
вание органами управления, в нем не описанными, может при-
вести к неисправности устройства, и потребует большой работы
квалифицированных специалистов сервисного центра по вос-
становлению нормальной работы устройства.
Е) Если устройство упало с высоты, либо имеет какие-либо пов-
реждения.
F) Если характеристики устройства заметно изменились - в этом
случае необходимо обслуживание.
1. Замена компонентов и деталей
В тех случаях, когда требуется замена деталей, удостоверьтесь,
что специалисты сервисного центра использовали для замены
только те детали и компоненты, которые рекомендованы изго-
товителем. Установка деталей и компонентов, не рекомендо-
ванных изготовителем устройства, может привести к пожару,
поражению электротоком или другим опасностям.
. Проверка безопасности
После завершения работ по обслуживанию или ремонту этого
изделия попросите специалиста выполнить проверку безопас-
ности работы устройства, чтобы удостовериться в том, что уст-
ройство функционирует нормально.
3. Крепление к стене или потолку
Крепление устройства к стене или потолку следует осущест-
влять в соответствии с инструкциями изготовителя устройства.
4. Источники тепла
Это устройство необходимо размещать вдалеке от источников
тепла, например, радиаторов, электрообогревателей, духовок
или других устройств, являющихся источниками тепла (в том
числе и усилителей).
Меры по бережному обращению с устройством
• При транспортировке устройства используйте коробку и детали
упаковки, которые были получены вами при покупке устройства.
• Если плеер работал продолжительное время, то его передняя и
задняя панели могут быть слегка нагретыми - это нормальное
явление.
• Не перемещайте это устройство во время воспроизведения
диска. В противном случае может быть повреждено считываю-
щее устройство и диск.
• Чтобы открыть или закрыть лоток установки диска, нажмите
кнопку OPEN/CLOSE на передней панели. Не касайтесь лотка и
не толкайте его во время открытия или закрытия.
Функции
• Полная совместимость с форматами дисков MPEG4, DVD, CD,
MP3, Kodak Picture CD, CD-R и CD-RW (финализированных).
• Заставка экрана.
• Несколько режимов воспроизведения Program (Программа),
Search (Поиск).
• Коаксиальный цифровой аудиовыход.
• Видеовыходы: S-Video, композитный видео и компонентный (Y,
Pb, Pr).
Форматы дисков, которые поддерживает плеер:
* файлы MPEG4/DivX на дисках
* компакт-диски (CD) с файлами изображений
(формат компании KODAK)
* файлы МР3 на дисках CD-R/CD-RW
* DVD video
* Разные углы установки камеры
* Выбор субтитров
* Выбор звукового сопровождения
* Режимы с различным соотношением сторон
изображения на экране
* Блокировка от детей
В этом устройстве используется технология
4076new.indd 16 29.10.2008 10:39:48
Downloaded From DvDPlayer-Manual.com Vitek Manuals

РУССКИЙ
17
защиты авторских прав для методов, защищенных некоторыми патентами США и другими правами на интеллектуальную собственность,
принадлежащих корпорации Macrovision и другим правообладателям. Использование этой технологии защиты авторских прав допускается
только с разрешения корпорации Macrovision, которая разрешает использовать ее только для домашнего просмотра и других видов
ограниченного просмотра, если от корпорации Macrovision не получено иного разрешения. Запрещается копировать устройство или
разбирать его.
Устройство поддерживает формат компакт-дисков (CD) с файлами изображений (формат компании KODAK – KODAK Picture
CD) и всегда будет воспроизводить диски в формате KODAK Picture CD. Логотип KODAK Picture CD Compatible является
зарегистрированной торговой маркой компании Eastman Kodak Company и используется с ее разрешения.
Производится по лицензии компании Dolby Laboratories. “Dolby” и символ в виде двух букв D являются зарегистрированными
торговыми марками компании Dolby Laboratories. © 1992 – 1997 Dolby Laboratories, Inc. Все права защищены.
Органы управления на передней и задней панелях
Передняя панель
1 2 3 4 5 7
8 109
11 126
Задняя панель
1. РАЗЪЕМ SCART
. Аудиовыход формата 5.1 (левая фронтальная колонка, правая фронтальная колонка, левая колонка пространственного звучания, пра-
вая колонка пространственного звучания, центральная колонка, сабвуфер)
3. Гнездо разъема выхода композитного видеосигнала
4. Гнездо разъема выхода S-VIDEO
5. Компонентный видеовыход (Y, Pb, Pr)
6. Гнездо разъема коаксиального цифрового аудиовыхода
1. ВКЛЮЧЕНИЕ/ВЫКЛЮЧЕНИЕ ПИТАНИЯ
. ДВЕРЦА ЛОТКА DVD
3. ДАТЧИК
4. ЭКРАН ДИСПЛЕЯ ВИДЕОФУНКЦИЙ
5. ПОРТ CARD
6. МИКРОФОН
7. ПОРТ USB
8. КНОПКА ПЕРЕХОДА НАЗАД
9. КНОПКА ВОСПРОИЗВЕДЕНИЕ/ПАУЗА
10. КНОПКА ПЕРЕХОДА ВПЕРЕД
11. КНОПКА ОСТАНОВА
1. КНОПКА ОТКРЫТЬ/ЗАКРЫТЬ ЛОТОК
4076new.indd 17 29.10.2008 10:39:48
Downloaded From DvDPlayer-Manual.com Vitek Manuals

РУССКИЙ
18
Люминесцентный экран
1. DVD-диск
. VCD/SVCD/CD-диск
3. Время с начала воспроизведения
4. Dolby Digital
5. Пуск/Пауза
6. MP3-диск
7. DTS (Digital Theater Surround) - окружающий звук цифрового домашнего театра (ранее AC-3)
Пульт дистанционного управления
1. Standby – спящий режим
. Subtitle - субтитры
3. Audio - аудио
4. Title - заголовок
5. Angle – выбор угла просмотра
6. Goto – перейти к
7. Vol(+) - увеличить громкость
8. Vol(-) - уменьшить громкость
9. Stop - стоп
10. Play - пуск
11. Display - дисплей
1. Enter - ввод
13. V-Mode – видеорежим
14. Next - следующий
15. Prev - предыдущий
16. Return - возврат
17. Random – случайный порядок воспроизведения элементов содер-
жимого диска
18. USB/Card – считывание данных с USB-устройства или карты
19. Karaoke – включение/выключение функции караоке
0. Open/Close - Открыть/Закрыть
1. 0-9 Number Key – кнопки с цифрами
. Clear - очистить
3. Zoom – изменение масштаба изображения
4. Slow – замедленное воспроизведение
5. Pause - пауза
6. Menu - меню
7. Move – кнопки навигации, кнопки со стрелками
8. Setup - настройки
9. REV - назад
30. FWD - вперед
31. A-B – задание и включение режима повтора фрагмента
3. Repeat - повтор
33. Prog – включение/выключение режима запрограммированного вос-
произведения элементов содержимого диска
34. Mute – выключить звук
Замечания
1. Обратите внимание, что номера ссылок, приведенные на рисунке,
расшифровываются в самом начале, на обложке данного руководс-
тва.
. В данном руководстве стрелки ( ) используются для обозначения кнопок навигации пульта дистанционного управления.
3. Чтобы иметь возможность управления различными функциями плеера с помощью пульта дистанционного управления, необходимо
предварительно включить питание плеера с помощью кнопки POWER (питание).
4076new.indd 18 29.10.2008 10:39:48
Downloaded From DvDPlayer-Manual.com Vitek Manuals

РУССКИЙ
19
Подключение DVD-плеера к телевизору с помощью кабеля AV (аудио-видео)
Соедините аудиовыходы DVD-плеера FR (передний правый) и FL (передний левый) с аудиовходом телевизора.
TV – телевизор
Audio cable – аудиокабель (звуковой)
Video cable – видеокабель
Подключение DVD-плеера к телевизору с помощью S-видеоразъема
Для подключения плеера к телевизору используйте S-видеокабель (в комплект поставки не входит). Установите значение параметра [Video
Out] (видеовыход) равным [S-Video] (S-видео).
TV – телевизор
S-Video IN – S-видеовход
Audio IN – аудиовход
Video IN – видеовход
S-Video cable – S-видеокабель
Audio cable - аудиокабель (звуковой)
4076new.indd 19 29.10.2008 10:39:48
Downloaded From DvDPlayer-Manual.com Vitek Manuals

РУССКИЙ
0
Подключение DVD-плеера к телевизору с помощью SCART-разъема
Для подключения DVD-плеера к телевизору используйте SCART-кабель (в комплект поставки не входит). Установите значение параметра
[Video Out] (видеовыход) равным [RGB]*.
*RGB расшифровывается как «красный-зеленый-синий», это обозначение цветовой системы вывода изображения на экран.
Подключение DVD-плеера к телевизору с помощью разъемов Y/Pb/Pr
Для подключения DVD-плеера к телевизору используйте компонентный кабель (в комплект поставки не входит). Установите значение пара-
метра [Video Out] (видеовыход) равным [Component] (покомпонентный). Для включения режима построчной развертки выберите значение
[P-Scan] (построчная развертка). Покомпонентный сигнал и сигнал построчной разверстки передаются через один и тот же разъем. Если
телевизор поддерживает функцию построчной развертки, можно установить параметр [Video Out] (видеовыход) равным [P-Scan] (построч-
ная развертка). В противном случае можно выбрать только значение [Component] (покомпонентный).
TV – телевизор
Audio IN – аудиовход
Vide IN – видеовход
Scart – Scart-кабель
Audio cable - аудиокабель (звуковой)
TV – телевизор
Audio IN – аудиовход
Vide IN – видеовход
Component cable – компонентный кабель
Audio cable - аудиокабель (звуковой)
4076new.indd 20 29.10.2008 10:39:48
Downloaded From DvDPlayer-Manual.com Vitek Manuals
Table of contents
Languages:
Other Vitek DVD Player manuals

Vitek
Vitek 4015 User manual

Vitek
Vitek VT-4008 User manual

Vitek
Vitek VT-4101 BK User manual

Vitek
Vitek VT-4015 GY User manual

Vitek
Vitek VT-4119 Simple manual

Vitek
Vitek VT-4014-SR User manual

Vitek
Vitek VT-4010 User manual

Vitek
Vitek VT-4079 BK User manual

Vitek
Vitek VT-4110 B User manual

Vitek
Vitek VT-4008 User manual