VMI X-Viber User manual

Version 1.00
VMI AB 28 August 2006
Manual
with X-Viber
Single Plane Balancing

Single Plane Balancing
2

Single Plane Balancing
3
Press firmly the ON/OFF or ESCAPE or OK button until the instrument starts.
Move the black line with the Up or Down buttons to Measurements and press the
OK button.
Move the black line with the Up or Down buttons to Single plane bal. and press the
OK button.
Before we start to balance we have to make some settings in the Set Up window.
Move the black line with the Up or Down buttons to Balancing Setup and press the
OK button.

Single Plane Balancing
4
Move the black line to Unit:
Press the side arrow buttons to select the
preferred unit.
METRIC: mm/s, um, mm, m/s, g
IMPERIAL: in/s, mils, thou, g
Move the black line to Frequency:
Press the side arrow buttons to select the
preferred unit RPM or HZ.
Move the black line to Weight(gr):
Here you can select the default size
of the trial weight.
Press the side arrow buttons to
increase or decrease the value. The weight
can also be changed at a later stage.
Move the black line to Weight angle:
Here you can select the angular position of
the trial weight.
Press the side arrow buttons to
increase or decrease the value. Note, you must
place the trial weight in the selected angle.
Move the black line to Auto-save:
Press the side arrow buttons to
select ENABLE or DISABLE. In Enable mode
the X-Viber will automatically finish and store
the measured value.
Move the black line to Auto-advance:
Press the side arrow buttons to
select YES or NO.
If YES is selected X-Viber will automatically
move to the next step in the balancing procedure.
Single Plane Balancing
5
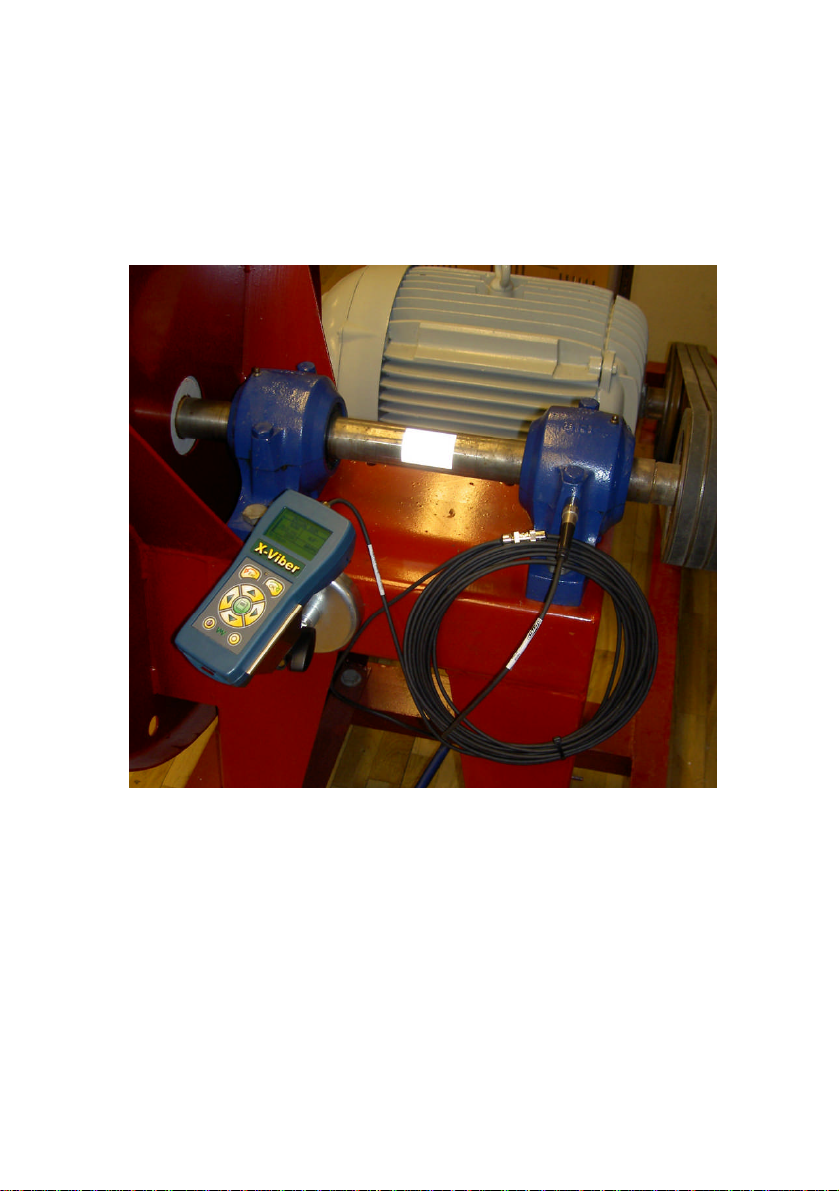
Hardware installation
1. Put a piece of the reflective tape on the shaft.
2. Insert X-Viber into the magnetic holder and direct the rpm sensor towards the
reflective tape. The distance between the X-Viber and the reflective tape should
at least be 200mm. Tighten the locking screw.
3. Mount the vibration transducer on the bearing and in the direction where you
have the highest vibration caused by unbalance.
4. Use the extension cable if the measuring distance is longer than 1m.
5. If the X-Viber has difficulties to measure the speed then put the instrument in an
angle towards the reflective tape as in the picture above and try to increase the
distance between the X-Viber and the tape.
If the instrument is measuring the speed at low but not at high speeds the reflex
tape is probably too small.

Single Plane Balancing
6
Move the line to New balancing
and press the OK button.
Note!
This message will appear.
If you answer NO you cannot start
a new balancing.
Press the side arrow buttons
to change from NO to YES then
press the OK button.
Note! When you select YES the
existing ongoing balancing will be
deleted.
The new balancing round has started.
Start the machine and select your
balancing speed.
Press the OK button and
X-Viber starts to measure.
Adjust the X-Viber on the magnet holder
until you get a stable rpm value and
tighten the locking screw again.
This window is shown, when X-Viber
is measuring.
This black bar is showing
the stability of the
measurement.
Do not press the OK button
until it is low.
This
message is showing
the same thing. In Auto-
Advance mode X-Viber will
move to the next step
when this message
disappear
s
.

Single Plane Balancing
7
This window is shown when X-Viber has finished and stored the measurement.
Press the OK button, if you want to repeat this measurement.
Press the right Side arrow button if you want to continue balancing.
Now it is time to tell the X-Viber about
the size of the trial weight.
You can increase or decrease the size of the trial weight with the Up or Down
buttons.
Start the machine and press the OK button to start the measurement.
This
part shows
the vibration level.
This
part shows the
angle of
the vibration.
This
part
shows the
machine speed.
This
part shows the
angle for the trial
weight.
This value comes from the default
values you made in the Settings menu.
This
part sho
ws the
size of
the trial weight.
This value comes from the
default values you made in
the Settings menu.
If you select to mount the trial weight at 0 (zero) then
y
ou can mount
the trial weight wherever you want, but you must name this direction
0 (zero). All new angles will refer to this direction.

Single Plane Balancing
8
X-Viber starts to measure.
If the speed deviation is too large the
message “Incorrect speed” will appear.
If the Auto-save function is activated
X-Viber will automatically save the
measurement, when the value is
sufficiently stable.
X-Viber is now presenting all the
data for this measurement.
Press the right Side arrow button if you want to continue.
When the measurement is finished
and saved this message will appear.
First, make a mark in the rotor close to
the trial weight indicating 0 (zero)
degrees.
Second, remove the trial weight!!!!!!!
This
part
shows
the machine
speed at the
Initial run.
This
part shows
the present
machine speed.
You
must adjust the
machine speed to be close
to the speed at the initial
run, because the speed
itself will influence the
vibration level.
If
the
message “Weight
too small” appears, you
must stop the machine
and increase the trial
weight and measure
again.

Single Plane Balancing
9
X-Viber is now showing the size and
angular position of the balancing weight.
Mount the balancing weight in the rotor.
Start the machine and press the
OK button to start the measurement
with the balancing weight installed.
Press the right Side arrow
buttons or the OK button,
if you want to continue.
This window shows the additional weight
you have to install in the rotor if you like
to further improve the balancing status.
This procedure can be repeated several
times.
The improvement shows how much lower
the vibration is now compared with the
Initial values
This
part shows
the size of the
balancing weight.
The unit can be
changed with
AUX button.
This
part shows
the angular
position for the
balancing weight.
Note!
The angle is always
measured against rotation
starting at 0 (zero).
Note
!
The radius the balancing
weight must be the same as
for the trial weight.
Note!
The unit for weight in X-Viber is grams but you can disregard this unit.
If you for example enter the size of the trial weight in ounce you will
also get size of the balancing weight in ounce.
Single Plane Balancing
10
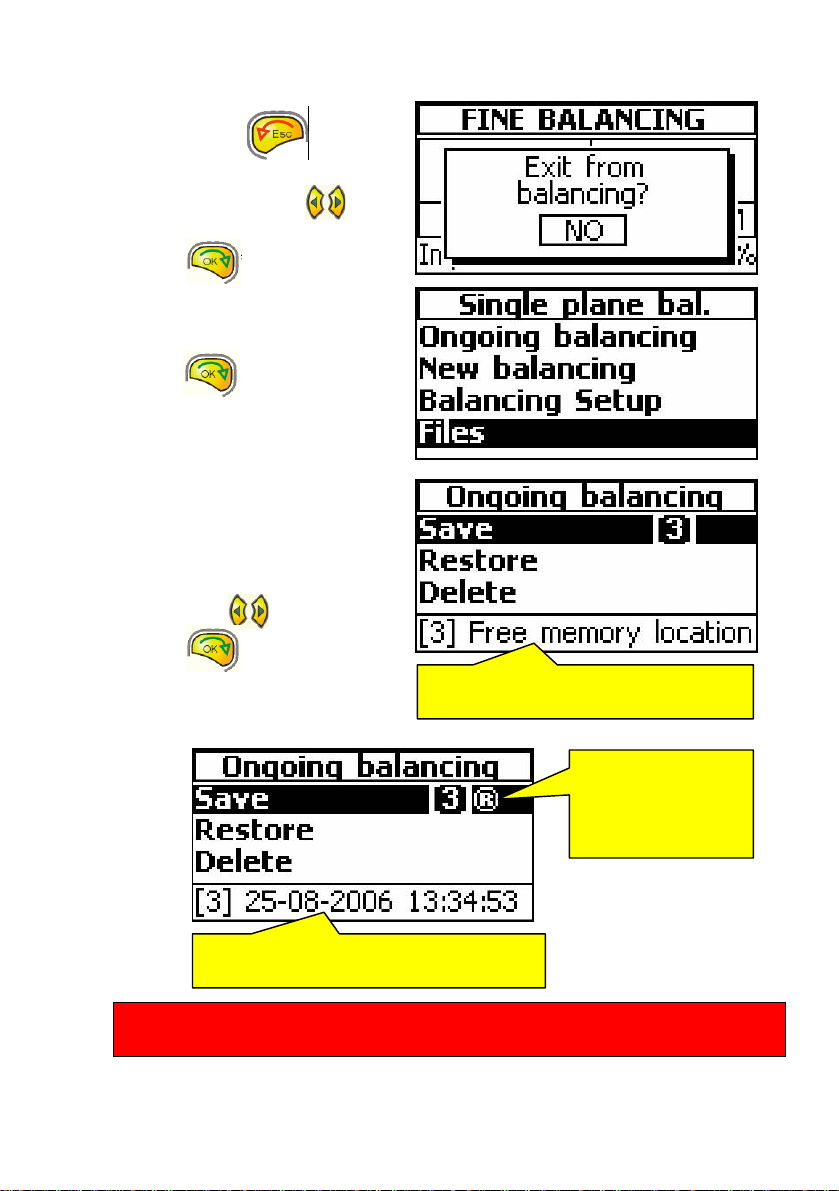
Saving the balancing
Press the Escape button to
exit the balancing function or
press the right Side arrow
button to change to Yes and then
press the if OK button.
Move the black marker line to Files and
press the OK button.
There are 10 memory locations 0-9 where
You can save a balancing route.
X-Viber is automatically selecting the
first available free location in the memory.
You can change to another number with
the Side arrow buttons.
Press the OK button to save the
balancing.
This
information
shows th
at the
selected location is free for storage.
This
information
shows
the date and time
when this balancing round was stored.
This
mark
®
shows
that this location is
reserved and
contains balancing
information.
Note!
When storing a new balancing on an ocupied location the old balancing will be lost.

Single Plane Balancing
11
Viewing a stored balancing
Move the black marker line to Files and
press the OK button.
Move the black marker line to Restore.
You can change to another number with
the Side arrow buttons.
Press the OK button to view the
balancing.
Change to Yes with one of the
Side arrow buttons and
press the OK button
Go back to Ongoing balancing to view details in the selected balancing procedure.
You can only view locations marked with an
®
.
Note!
All information about the existing Ongoing balancing will be lost if it is not
previusly stored.

Single Plane Balancing
12
Deleting a stored balancing
Move the black marker line to Files and
press the OK button.
Move the black marker line to Delete.
You can change to another number with
the Side arrow buttons and
press the OK button
Change to Yes with one of the
Side arrow buttons and
press the OK button
This information shows that this
location is now free for storage.

Single Plane Balancing
13
SAVING A BALANCING FILE IN THE X-TREND SOFTWARE
Transferring a Balancing file to the X-TREND software
Select the “Communication” menu in the X-VIBER Instrument
Start the X-TREND software and select the command “Transfer / X-VIBER”.
Click on the line “Show Balancing” on the lower part of the virtual “X-VIBER” instrument
and a new window will appear:
Click here
Single Plane Balancing
14
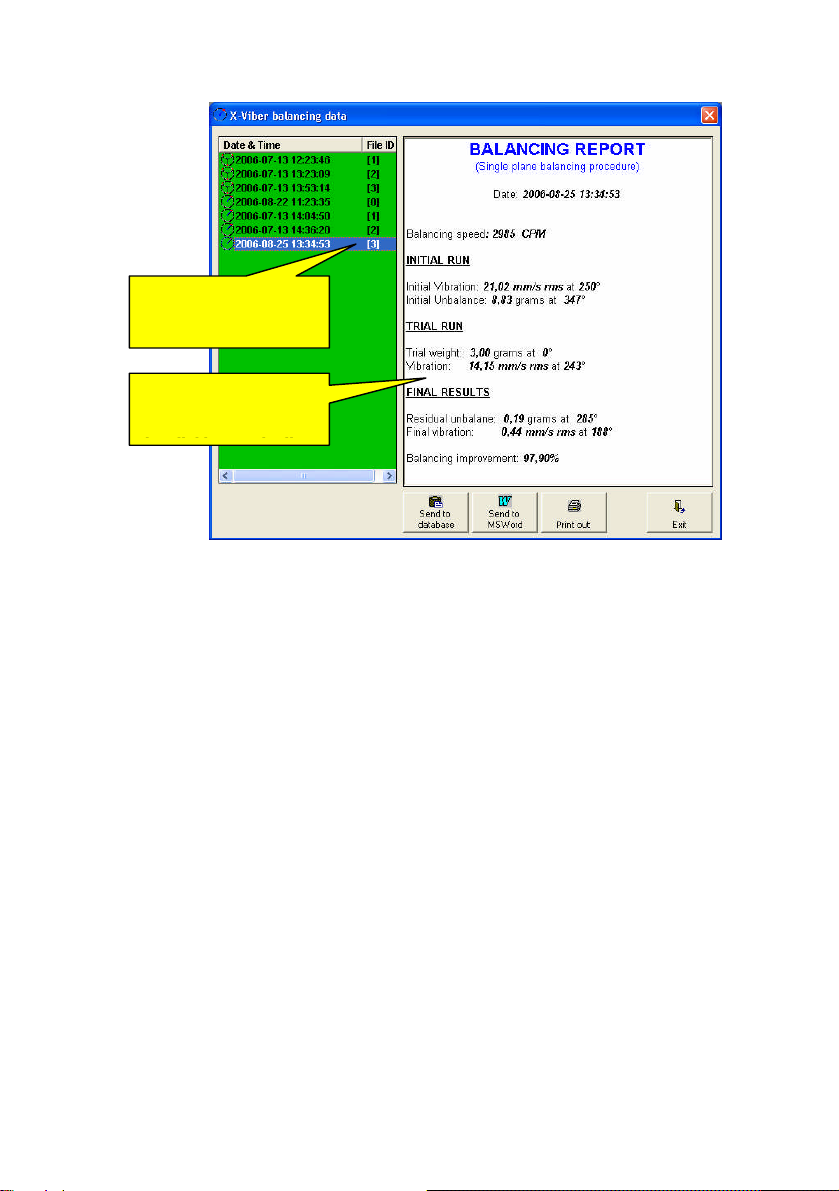
Both “Single Plane Balancing” and “3-Point Balancing” files will appear in the list but with
different icons.
A “Balancing report” will appear on the right side of the window.
Now you can
-send the contents of the “Balancing Report” to the X-TREND machine database.
The destination will be a Notepad associated with the machine.
-send the “Balancing Report” to a MS Word document where you can edit the
content.
-print the “Balancing Report” directly to the system printer.
Select the balancing
you want to transfer
by clicking the line
You will then see
information about the
balancing.
by clicking on the line

Single Plane Balancing
15

Single Plane Balancing
16
Other manuals for X-Viber
1
Table of contents
Other VMI Measuring Instrument manuals


