Vollrath Stoelting CBE117-37 User manual

Operator’s Manual
Stoelting®Granita Frozen Beverage Dispensers
©2017 The Vollrath Company L.L.C. Part No. 350465-1 ml 1/19/17
Please register your product at Vollrath.com/Warranty
SAFETY PRECAUTIONS
To ensure safe operation, read the following statements and understand
their meaning. This manual contains safety precautions which are
explained below. Please read carefully.
Warning is used to indicate the presence of a hazard that will or can
cause severe personal injury or death.
Caution is used to indicate the presence of a hazard that will or can
cause minor or major personal injury if the caution is ignored.
NOTICE: Notice is used to note information that is important but not
hazard-related.
• Know the machine. Read and understand the Operating Instructions.
• Notice all warning labels on the machine.
• Wear proper shoes and clothing. Avoid loose fitting garments, and
remove watches, rings or jewelry that could cause a serious
accident. Do not operate with wet hands or feet.
• Plug only into grounded electrical outlets matching the nameplate
voltage. Vollrath recommends each machine be on a dedicated
circuit.
• Do not allow children to use the machine.
• Maintain a clean work area. Avoid accidents by cleaning up the area
and keeping it clean.
• Stay alert at all times. Know which switch, push button or control
you are about to use and what effect it is going to have.
• Unplug the machine before performing maintenance. Never attempt
to repair or perform maintenance on the machine until the main
electrical power has been disconnected. Unplug the machine at the
plug. Do not pull the electrical cord to disconnect the machine from
the power source.
• Do not operate under unsafe operating conditions. Never operate the
machine if unusual or excessive noise or vibration occurs.
FUNCTION AND PURPOSE
The Stoelting®Granita Frozen Beverage Dispensers is designed to chill,
freeze and serve beverages. This equipment is not intended for
household, industrial or laboratory use.
Table of Contents
Unpack the Machine ................................................... page 2
Clearance and Environment Requirements .................. page 2
Install The Legs (Two/Three Bowl Machines) ............. page 2
Features and Controls Overview ................................. page 3
Before First Use - Required Steps............................... page 4
Operation..................................................................... page 5
Disassemble the Machine............................................ page 8
Reassemble the Machine and Lubricate Components. page 10
Advanced Settings and Features.................................. page 12
Maintenance................................................................ page 13
Troubleshooting.......................................................... page 14
WARNING
CAUTION
Item No. Model Description Voltage Amps Plug
CBE117-37
CBE
Single Bowl
115
11 NEMA
5-15P
CBE127-37 Double Bowl 12
CBE167-37 Triple Bowl

2 Stoelting®Granita Frozen Beverage Dispensers Operator’s Manual
UNPACK THE MACHINE
Unpack the Machine
NOTICE: Do not lay the machine on its side or back.
NOTICE: Do not lift the machine by the tank, auger, or handles. Only
lift by grasping the bottom of the machine.
NOTICE: The machine must sit in the upright position for 24 hours
before turning it on. This will allow the oil in the
compressor to settle into place following shipping.
1. Remove all packing material and tape, as well as any protective
plastic from the equipment.
2. Clean any glue residue left over from the plastic or tape.
3. Save the original packaging. Use this packing to ship the product if
repairs are needed.
CLEARANCE AND ENVIRONMENT REQUIREMENTS
NOTICE: Vollrath recommends a dedicated circuit.
Clearance and Environment Requirements
INSTALL THE LEGS (TWO/THREE BOWL MACHINES)
NOTICE: Legs must be installed to meet agency certification.
NOTICE: Two people are needed to install the legs.
1. Identify front and rear legs.
2. Twist the locking nut on each rear leg into place.
3. Remove the shipping legs.
4. Install the rear and front legs on one side of the machine.
5. Install the front and rear legs on the other side of the machine.
ATTACH THE ADA COMPLIANT HANDLE (OPTIONAL)
1. The ADA handle attaches over the standard handle. No tools are
needed to attach the handle.
CONNECT THE DRIP TRAY TO A DRAIN (OPTIONAL)
Tools:
• Screw driver
• Tubing
1. Punch out the holes located on the back of each tray.
2. Connect the drain hoses.
Item No. Description Clearance
Max.
Ambient
Temp Location
CBE117-37 Single bowl
10" (25.4 cm)
on the sides
12" (30.5 cm)
at the back
85°F Indoor only.
CBE127-37 Double bowl 95°F Indoor or outdoor.
Outdoor must
have an overhead
covering.
CBE167-37 Triple bowl 85°F
Front legs
Rear legs

Stoelting®Granita Frozen Beverage Dispensers Operator’s Manual 3
FEATURES AND CONTROLS OVERVIEW
.
B
A
C
D
E
F
G
H
I
H
A Power Button.Turns the machine On and Off.
B High Pressure Indicator Light. Illuminates when the machine
has a pressure condition that needs attention.
C Minimum Tank Level Sensor. Senses when the mix level in the
tank is too low.
D Spigot Lock. Locks the spigot in either the open or closed
position.
E High Pressure Reset Button. Resets the compressor after a
high pressure situation. Older two and three bowl machines
have an internal reset. Refer to the Technical Field Information
document on Vollrath.com for instructions on how to access the
reset.The Machine must be on when the reset button is pressed.
F Menu Button. Access to the machine settings.
LAMP. Turns the light under the lid ON or OFF
BYPASS. Enables the augers to rotate when the cover is
removed.
LOWLEVEL. Automatically changes the slush setting to 1 when
the amount of mix in the tank drops below the minimum fill
point. This prevents the product from over-freezing. Vollrath
recommends turning on this setting.
KEYBOARD. Locks the keyboard to prevent accidental changes.
WASHING. Use for cleaning the machine. Turns off refrigeration,
turns on auger rotation and locks all keyboard functions except
MENU.
TIME. Sets the local time.
DEFROST ON. Sets the time at which the machine enters the
defrost mode. 24 hour format, no AM/PM.
DEFROST OFF. Sets the time at which the machine exists defrost
mode. 24 hour format, no AM/PM.
MAX TEMP. Displays a warning on the screen if the temperature
of the product is warmer than the setting. For food safety,
Vollrath recommends enabling this setting when using milk-
based mixes.
CLEANING. Sets a schedule for cleaning the machine and
displays a message when it is time to clean the machine.
AUTOFILL. Displays a warning if the tank is not automatically
refilled.
G Mode Button
SLUSH. Nine density settings.
COLD DRINK. Five cold settings.
STANDBY. Pauses the machine.
H Arrow Buttons. Change settings.
I Auger Button. Starts and stops auger rotation. Also a navigation
button for some menu options.

4 Stoelting®Granita Frozen Beverage Dispensers Operator’s Manual
BEFORE FIRST USE - REQUIRED STEPS
Turn on the Machine
1. Press the power button. The display shows:
Set the Local Time
NOTICE: You must set the machine to the correct local time. If the
time is not correct, the machine will defrost at the wrong
time.
1. Enter the machine settings mode by pressing and holding for
approximately 2 seconds.
2. Press and release until the display shows:
3. Press to move the cursor to right. Press to move cursor
to left.
4. Press to change the time.
5. Press to confirm the setting.
Set the Defrost ON and OFF Times
NOTICE: The machine ships with the defrost feature disabled.You
must set the ON and OFF times to enable the defrost
feature. For proper operation, the machine must have a
defrost cycle.
Defrost On
Sets the time at which the machine will enter into DEFROST mode.
During Defrost Mode the product in the tank will be kept at
approximately 35ºF.
1. Press and release until the display shows:
2. Press to move the cursor to right. Press to move cursor
to left.
3. Press to change the time.
4. Press to confirm the setting.
Defrost Off
The Defrost Off setting determines when the defrost mode stops and the
machine returns to regular operation. Vollrath recommends a minimum
defrost time of 4 hours.
1. Press and release until the display shows:
2. Press to move the cursor to right. Press to move the
cursor to left.
3. Press to change the time.
4. Press to confirm the setting.
Turn on the Low Level Setting
The LowLevel setting will automatically change the mode to
Slush 1 when the product in the tank falls below the minimum fill
level. This prevents the product from over-freezing, which could
damage the machine.
1. Press and release until the display shows:
2. Press to confirm the setting.
Clean and Sanitize the Machine
Before you use the machine for the very first time, Vollrath recommends
washing and sanitizing the components in the machine.
1. Disassemble the machine. See page 8.
2. Clean and sanitize the components. See page 7.
3. Re-assemble and lubricate the components. See page 10.
4. Sanitize the machine. See page 5.

Stoelting®Granita Frozen Beverage Dispensers Operator’s Manual 5
OPERATION
Sanitize the Machine
NOTICE: The United States Department of Agriculture and the Food
and Drug Administration require that all cleaning and
sanitizing solutions used with food processing equipment
be certified for this use.
NOTICE: Refer to local sanitary regulations for applicable codes and
recommended sanitizing products and procedures. The
frequency of sanitizing must comply with local health
regulations.
Sanitizing must be done after the machine is cleaned and just before the
machine is filled with mix. Sanitizing the night before is not effective.
However, you should always clean the machine and parts after using it.
1. Read the instructions for Stera-Sheen®Green Label Sanitizer or
equivalent product for creating a 100 ppm strength solution.
2. Mix the sanitizer in quantities of no less than 2 gallons (7.6 liters) of
warm, approximately 90° to 110°F (32° to 43°C) water.
3. Check the strength of the sanitizing solution. Use a chlorine test strip
and color chart to make sure the solution has 100 ppm.
4. Pour the sanitizing solution into the top of the tank.
5. Place the cover onto the tank.
6. Turn on the machine.
7. Press until the display shows:
8. Press or until the display shows:
This setting turns off refrigeration, but keeps the augers rotating.
9. Monitor the machine for leaks. If sanitizer is leaking, the gasket
under the clear bowl is not installed correctly.
10.After five minutes, place a container under the spigot. Open the
spigot to drain the sanitizing solution. Do not discard the solution.
11.Use a new test strip to test the solution. A reading of 100 ppm or
more is acceptable. If the reading is less than 100 ppm, sanitize the
machine again.
NOTICE: If the reading is less than 100 ppm after sanitizing the
second time, disassemble and wash the machine again.

6 Stoelting®Granita Frozen Beverage Dispensers Operator’s Manual
OPERATION (CONTINUED)
Mix and Recipe Guidelines
NOTICE: Amount of Sugar
The sugar level of the mix or recipe must be between
13-17%. Mixes with sugar levels outside of this range will
not freeze properly.
Less than 12%, the machine may over-freeze the mix.
Greater than 18%, the machine will have difficulty freezing
the mix.
NOTICE: Custom Recipes
When using a custom recipe instead of a commercial mix,
Vollrath strongly recommends using a refractometer to
measure the sugar content.
NOTICE: Using Alcohol
Alcohol is an anti-freeze. Replace NO more than ¼ of the
water required in the recipe with alcohol.
NOTICE: Using Milk-Based Mix
For food-safety turn on the Max Temp setting in the Menu
options. See “Max Temp” on page 12.
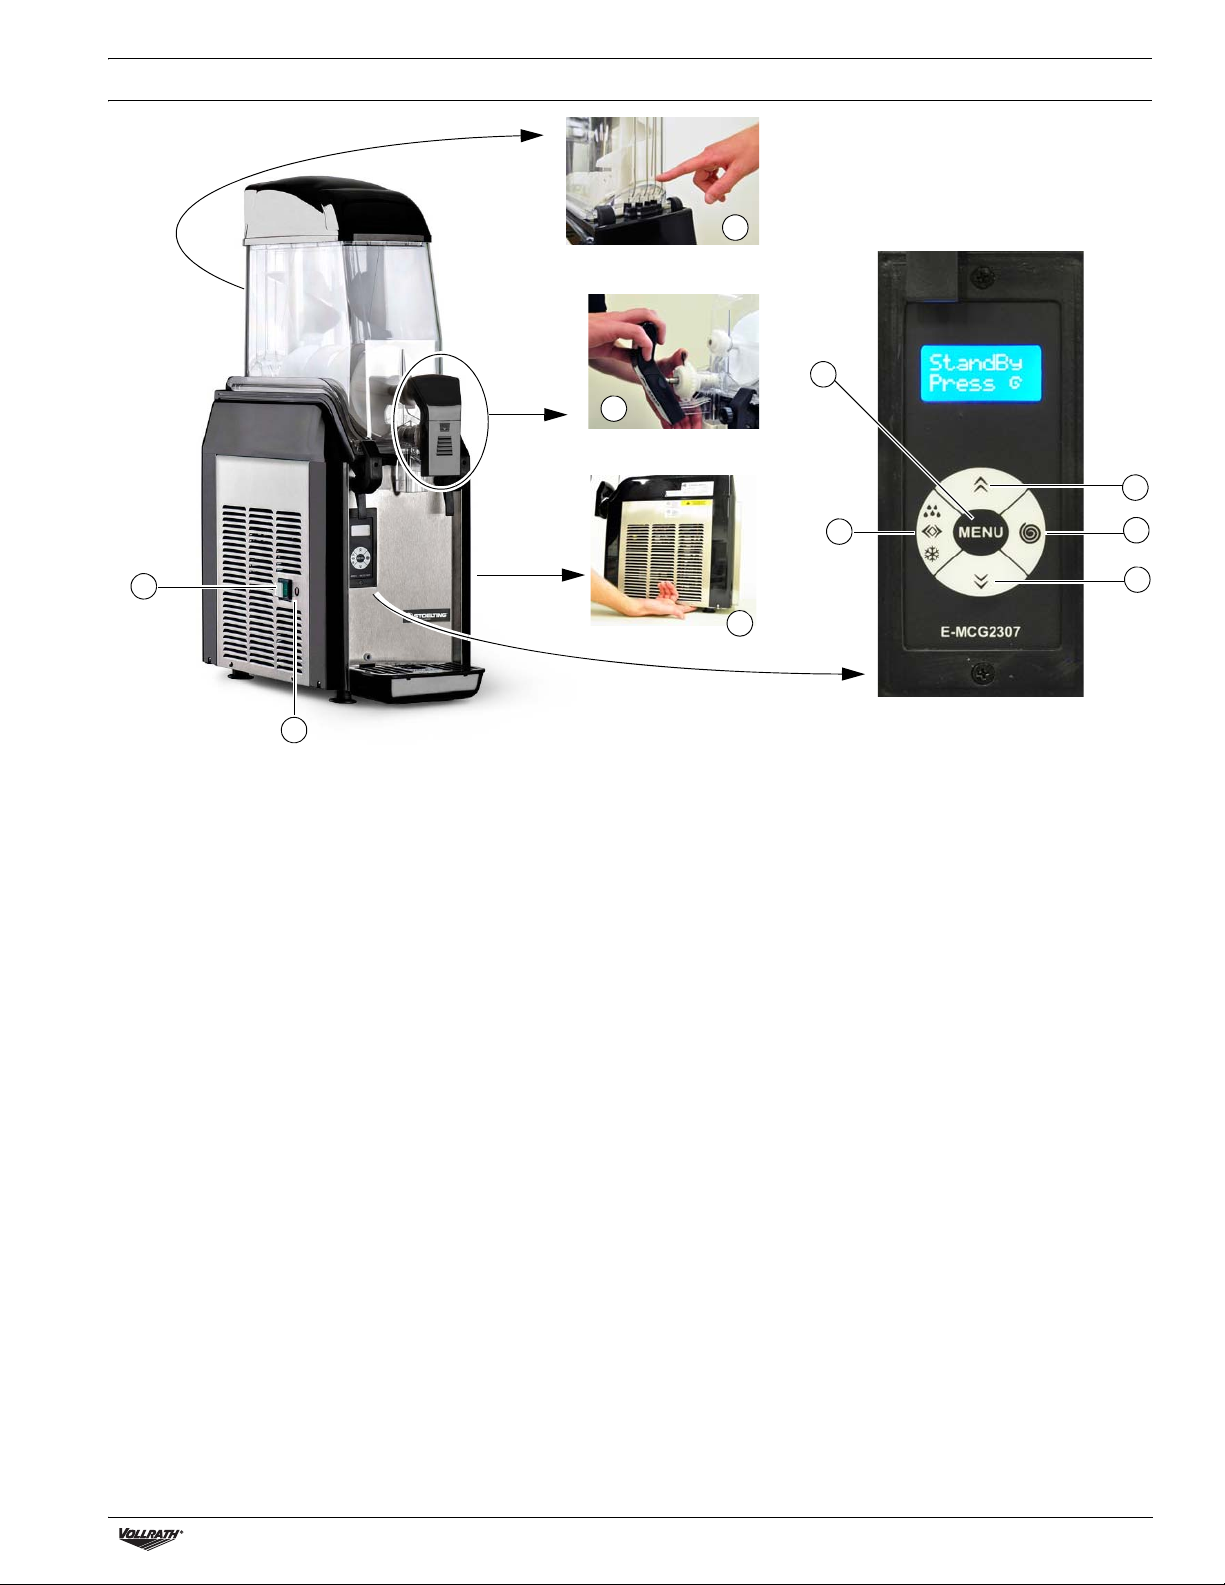
Set Refrigeration
1. Turn on the machine.
2. Press to start the augers.
3. Press to select SLUSH or COLD DRINK.
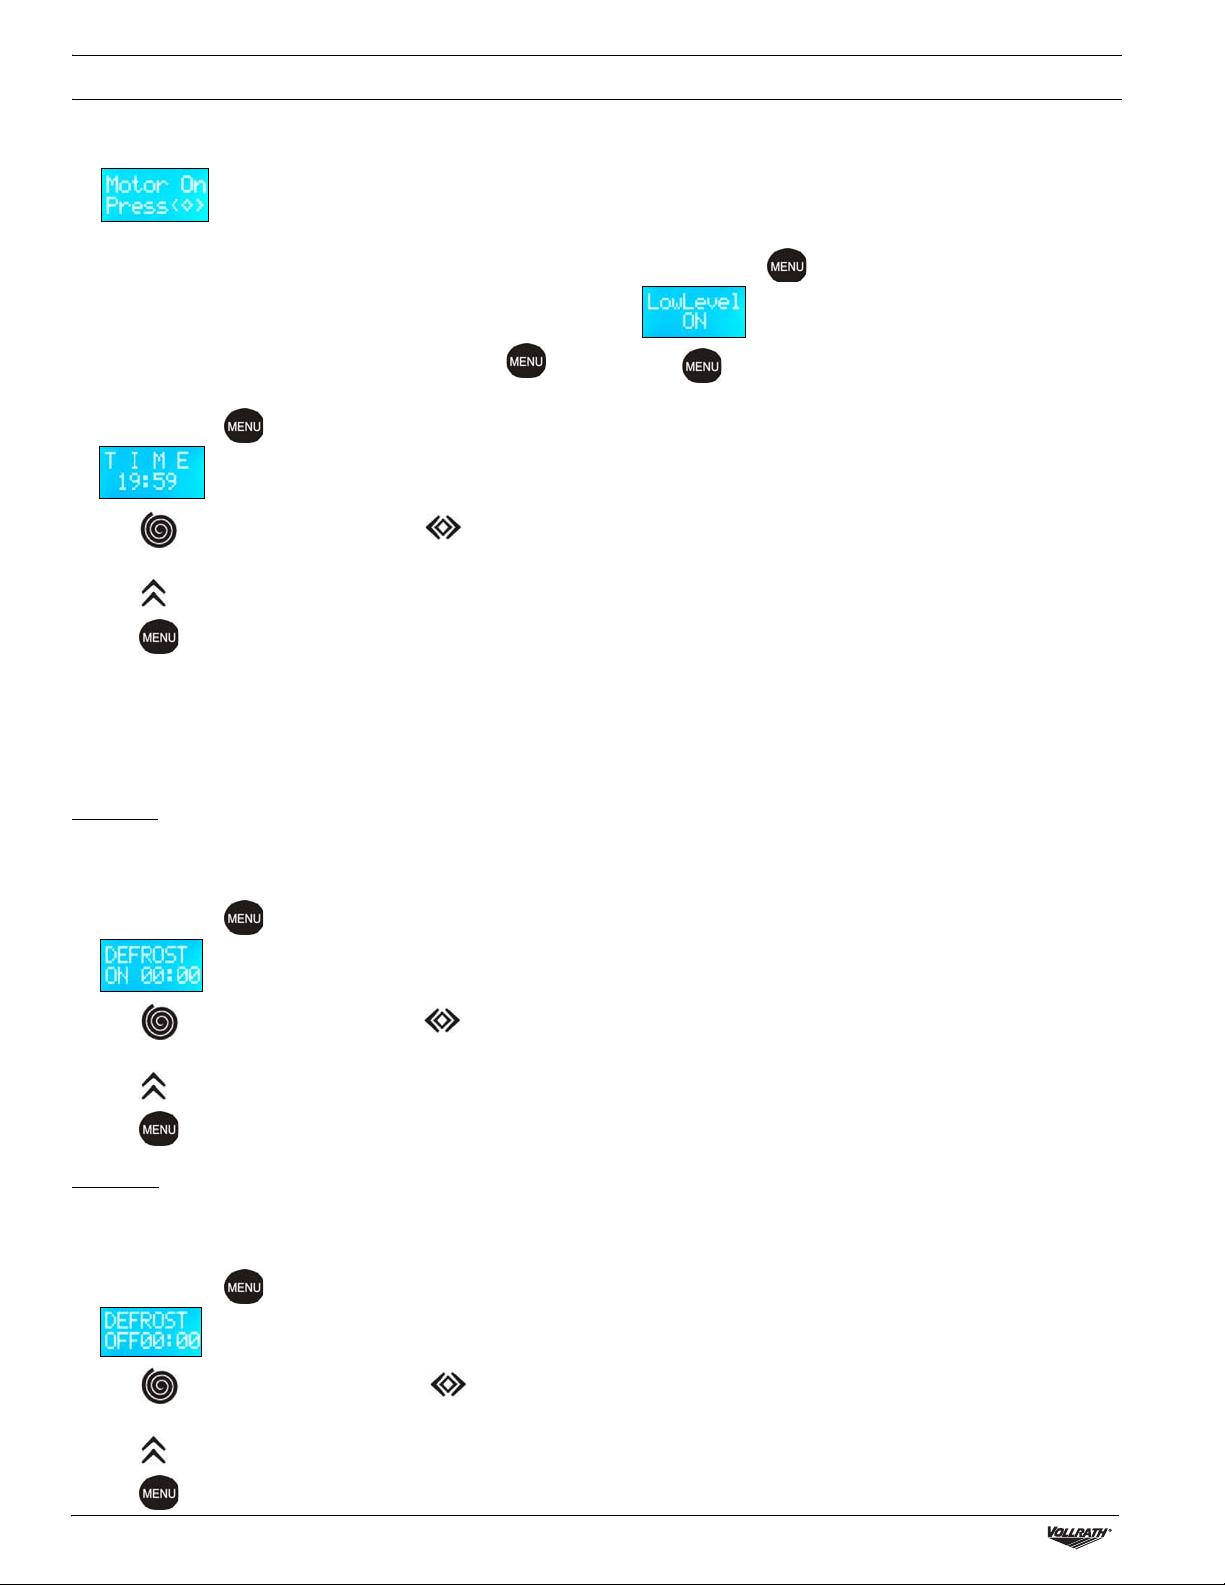
Slush Mode
1. Press or select a density setting.
2. The machine will enter a calibration mode.
NOTICE: Machine will not enter calibration mode with chilled mix,
Vollrath recommends calibrating with an empty bowl
prior to pouring in mix.
The display will alternate between:
3. The machine will calibrate for approximately one minute. Calibration
is complete when the display shows the selected slush setting. For
example:
Cold Drink Mode
1. Press or to select a temperature setting. The lower the
setting, the colder the temperature.
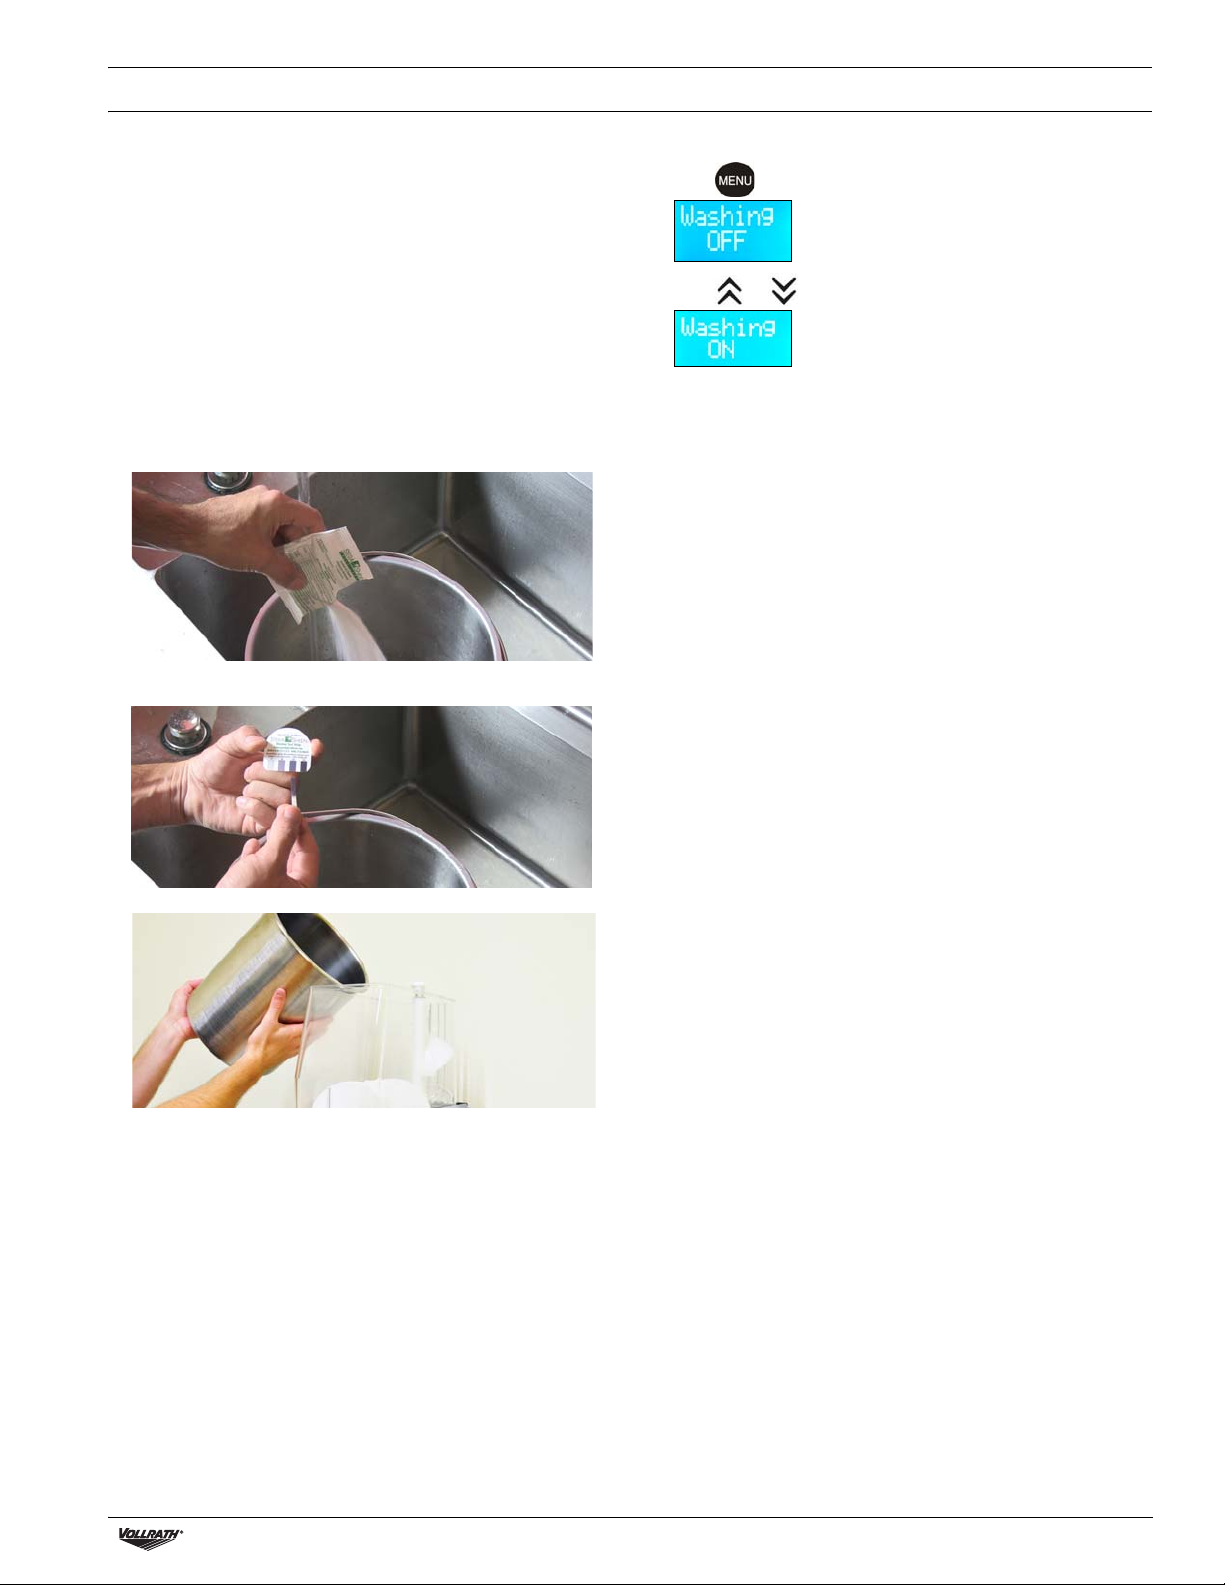
Add Mix
1. Remove the cover. Pour 3 gallons (11.4 liters) of mix into the tank.
NOTICE: Do not overfill the tank. The mix level must be below the
top of the blade on the vertical auger.
2. Place the cover on the tank. Make sure the metal contacts at the
back of the cover are on the outside of the tank. The contacts must
make a circuit with the contact wires for the auger and refrigeration
system to operate.
Serve
1. Product will be ready to serve in approximately 60 minutes. The time
it takes to be ready is dependent upon many variables including the
mix temperature when poured into the tank, the amount of sugar
and alcohol in the mix, and the SLUSH or COLD setting.
2. The product is ready when the icon disappears from the
display:
3. Pull the spigot handle open to serve.
NOTICE: Do not operate the machine when the mix level is below
the minimum fill sensor (See page 3).
Slush Cold Drink
Slush, granita, smoothie Cold lemonade
Frozen coffee, frapuccino, frozen
mochas, frozen French vanillas Iced coffee
Frozen margaritas, frozen
daiquiris, frozen pina coladas,
wine granitas
Margaritas on the rocks,
daiquiris.
Cold water
Less dense Denser
Cold Colder
Working Ready
Working Ready

Stoelting®Granita Frozen Beverage Dispensers Operator’s Manual 7
CLEAN THE MACHINE
Drain the Mix
For easier cleaning, allow the product to thaw before draining the
machine.
1. Press until the display shows:
2. Press or until the display shows:
This setting keeps the augers rotating but turns off refrigeration.
3. Place a container under the spigot.
4. Drain the product.
5. Fill the tank with 1 gallon of cool tap water.
6. After 30 seconds open the spigot to drain the water out of the
machine.
7. Press until the display shows:
8. Press or until the display shows:
9. Turn off the machine.
10.Use mild alkaline cleaner and a soft cloth to clean the stainless steel
tank bottom, the cover and the exterior of the machine.
Clean and Sanitize the Components
NOTICE: Local and state health codes dictate the procedure
required. Some health codes require a four-sink process
(pre-wash, wash, rinse, sanitize, and air-dry), while other
codes require a three-sink process (without the pre-wash
step). The following procedure is a general guideline only.
Consult your local and state health codes for procedures
required in your location.
NOTICE: Do not use abrasive materials, scratching cleansers or
scouring pads. These can damage the finish.
1. Disassemble the machine. See page 8.
2. Place the parts shown below in warm, 90° to 110°F (32°C to 43°C)
mild detergent water and wash thoroughly.
NOTICE: Do not soak the tank cover.
3. Rinse the parts with clean 90° to 110°F (32°C to 43°C) water.
4. Place the parts shown below in a sanitizing solution for at least one
minute.
5. Remove the parts and let them air dry completely.
6. Sanitize the steel tank bottom. Dip a brush into the 90° to 110°F (32°
to 43°C) sanitizing solution. Use the brush to wipe the tank.
WARNING
Electrical Shock Hazard
Do not spray water or cleaning products. Liquid could contact
the electrical components and cause a short circuit or an
electrical shock.

8 Stoelting®Granita Frozen Beverage Dispensers Operator’s Manual
DISASSEMBLE THE MACHINE
1. Turn off and unplug the machine.
2. Inspect the machine for worn or broken parts. All worn or broken
parts should be replaced to ensure safety, to maintain good machine
performance and a quality product.
3. Remove the cover.
4. Remove the handle cover.
5. Push down to remove the upper handle.
6. Turn auger support knob counter-clockwise to loosen
7. Remove the auger support knob.
8. Turn the spigot assembly counter-clockwise.
9. Remove the spigot assembly.
10.Remove the o-rings from spigot assembly.
11.Remove the o-rings from the auger support knob.
O-rings
O-rings

Stoelting®Granita Frozen Beverage Dispensers Operator’s Manual 9
DISASSEMBLE THE MACHINE (CONTINUED)
12.Remove the spigot splash guard.
13.Loosen and remove the bowl clamp screws.
14.Open the bowl clamps.
15.Remove the tank.
16.Remove the gasket from the tank.
17.Remove the horizontal auger.
18.Remove the gear from horizontal auger.
19.Loosen and remove the nut at the top of vertical auger.
20.Remove the gear from the bottom of the vertical auger.
21.Remove the drip tray(s).

10 Stoelting®Granita Frozen Beverage Dispensers Operator’s Manual
REASSEMBLE THE MACHINE AND LUBRICATE COMPONENTS
All parts should be cleaned, sanitized and allowed to air dry before
assembling.
NOTICE: Total Blend, Petrol-Gel or equivalent food-safe lubricant
must be used when lubrication of machine parts is
specified.
NOTICE: The United States Department of Agriculture and the Food
and Drug Administration require that lubricants used on
food processing equipment be certified for this use. Use
lubricants only in accordance with the manufacturer’s
instructions.
1. Turn off and unplug the machine.
2. Press the gear into the bottom of the vertical drive shaft.
3. Lubricate the gear teeth with food-safe lubricant.
4. Insert the vertical auger into the machine and tighten the nut.
5. Verify the bushing is in place. Press the gear onto the back of the
horizontal auger.
6. Lubricate the gear teeth with food-safe lubricant.
7. Install the horizontal auger into the machine.
8. Lubricate the metal tip of the auger with food-safe lubricant.
9. Install the gasket into the groove on the bottom of the tank. Make
sure the joint of the gasket is placed on one of the rear corners of the
tank.
Joint

Stoelting®Granita Frozen Beverage Dispensers Operator’s Manual 11
REASSEMBLE THE MACHINE AND LUBRICATE COMPONENTS (CONTINUED)
10.Install the tank onto the machine.Take care to align the cover with
the hinges and terminals at the back of the machine.
NOTICE: Do NOT force the cover into place. This will damage the
machine.
11.Secure the tank with the bowl clamps and screws.
12.Install the o-rings onto the horizontal auger support knob.
13.Apply a thin film of food-safe lubricant to the o-rings.
14.Insert the horizontal auger support knob. Firmly press the knob in
and turn it clock-wise.
15.Install the o-rings onto the spigot assembly. Make sure the neck of
the larger gasket is facing the smaller gasket.
16.Apply a thin film of food-safe lubricant to the o-rings.
17.Insert the spigot assembly. Turn the ring clock-wise, until you hear a
click, to lock in place.
18.Install the handle and handle cover.
19.Install the drip tray(s).
O-rings
O-rings

12 Stoelting®Granita Frozen Beverage Dispensers Operator’s Manual
ADVANCED SETTINGS AND FEATURES
Lock the Control Panel
The control panel can be locked
to prevent accidental changes to
the machine settings.
Cleaning Reminder
The machine can be set to display
a reminder message to clean the
machine. Consult your local
health codes for cleaning
requirements.
Max Temp
Turn on this setting to display a
message if the product
temperature is warmer than 39°F
(4°C).
Auto-fill
Turn on this setting if the auto-fill
option is installed to the machine.
For installation and operation,
see the documentation included
with the auto-fill.
????
1. Press and release until
the display shows:
3. Press or to select:
4. To unlock the keyboard, repeat
the procedure.
1. Press and release until
the display shows:
3. For example:
007d = clean every 7 days
006 = 6 days to next cleaning
3. moves cursor to right.
moves cursor to left.
4. Press to change a setting.
5. Press to save the
setting.
1. Press and release until
the display shows:
3. Press .
3. Press . The display
shows:
4. Press to save the
setting.
1. Press and release until
the display shows:
3. Press or to select:
4. Press to save the
setting.
interval
setting countdown to
the reminder

Stoelting®Granita Frozen Beverage Dispensers Operator’s Manual 13
MAINTENANCE
Clean the Condenser (Monthly)
NOTICE: Keep the condenser clean. A dirty condenser will cause the
machine to operate inefficiently.
Tools Required
• Phillips head screwdriver
• Can of compressed air
• Damp towel
1. Turn off and unplug the machine.
2. Remove the access panel(s).
3. Place a damp towel over the condenser.
4. Spray the backside of the condenser with compressed air. This will
clean the condenser fins and push dirt into the damp towel.
Replace the O-rings (Every 6 months)
Tools Required
• Replacement o-rings (Contact Vollrath to order.)
• Food-safe lubricant
1. Turn off and unplug the machine.
2. Replace the two o-rings on the auger support knob and the two
rings on the spigot assembly. See “Reassemble the Machine and
Lubricate Components” on page 10.
3. Apply a food-grade lubricant to the o-rings.
4. Sanitize the machine and components before using the machine.
One Bowl - Back Panel Two/Three Bowl - Non-power
Side and Back -Left Panels
One Bowl Two and Three Bowl

14 Stoelting®Granita Frozen Beverage Dispensers Operator’s Manual
TROUBLESHOOTING
Control Alarms
A blinking display indicates the machine is an alarm condition.
1. Press . The display will show the alarm condition.
Display Machine Condition Might be Caused By Course of Action
Thermal
Operating the machine with an empty tank. Fill the machine with mix.
An electrical problem with the thermostat probe
connection the control panel. Contact Vollrath Technical Services..
Motor Auger is turning.
Machine does not freeze. A problem with the magnetic reader. Contact Vollrath Technical Services.
Auger is not turning.
Machine does not freeze. A problem with the gear motor.
Voltage
A fluctuation in the supply voltage. Plug machine into a dedicated circuit. Do not use extension cords.
Change the LAMP setting to OFF.
Note: If an auto-fill is connected to the machine, shut down the
machine and the auto-fill before connecting machine and auto-fill
to dedicated circuits.
Level Tank is full. Note: LOW
LEVEL option in the
MENU must be ON for
this message to appear.
The low mix probe may not be properly
connected. Make sure the probe in the correct slot on the back of the tank.
Check the metal tabs in the tank cover and make sure they contact
the probe.
Refill Tank is low on mix.
Dispensing product until tank is low on mix. Add mix to the machine.
The auto-fill system is not refilling the tank. Check the Bag-in-Box to make sure there is mix.
Check the connections between the machine and the auto-fill.
Date There is a problem with the DATE setting. Contact Vollrath Technical Services.
T>4°C MAX TEMP setting in
MENU is enables. The temperature of the product in the machine is
warmer than the MAX TEMP setting.
Clean the condenser. See “Clean the Condenser (Monthly)” on
page 13.
Solved An alarm condition has been solved. None.
Machine Performance
Problem Machine Condition Might be Caused By Course of Action
Machine does not
freeze the product.
Light near the main
power switch is
illuminated.
The condenser is dirty.
1. Clean the condenser. See “Clean the Condenser (Monthly)” on
page 13.
2. Reset high pressure switch. See “Features and Controls
Overview” on page 3.
Adjacent equipment or walls are
blocking air flow to the machine or
blowing hot air into the machine.
1. Ensure proper clearance. See page 2.
2. Reset the high pressure switch. See “Features and Controls
Overview” on page 3.
Problem with the fan.
1. Turn off the machine.
2. Remove the back panel.
3. Verify the fan’s blades are not blocked by the condenser or a
loose wire.
4. Reset the high pressure switch. See “Features and Controls
Overview” on page 3.
Contact Vollrath Technical Services if the problem persists.
Machine does not freeze
product in SLUSH mode,
but works properly in
COLD/DEFROST mode.
The control board needs to be
calibrated or re-calibrated.
1. Turn the machine OFF.
2. Fill the machine with 1 gallon of cool tap water (65-75° F).
3. Turn the machine back ON. Set to a SLUSH mode. The auto
calibration process begins. Display shows WAIT AUTO.
4. After approx.30 seconds calibration process ends and
machine goes into SLUSH mode.

Stoelting®Granita Frozen Beverage Dispensers Operator’s Manual 15
Density of Prepared Product
Machine does not
freeze the product. The solenoid light is not
illuminated, augers rotate There may be an issue with control
board.
Contact Vollrath Technical Services.
Solenoid light is
illuminated. There may be an issue with the 315 mA
fuse or solenoid valve.
Refer to the Fuse Replacement Technical Field Instructions
document on Vollrath.com or contact Vollrath Technical Services.
Product in all tanks is at
room temperature.
A problem with the compressor. Contact Vollrath Technical Services.
A refrigerant leak.
The control panel
functions, one bowl
remains at room
temperature and the
other bowl(s) are
freezing mix.
One of the 315 mA fuses may be
burned out. Refer to the Fuse Replacement Technical Field Instructions
document on Vollrath.com.
Augers do not
turn. Lamp does not turn on. The cover is not properly installed. Adjust the cover so that prongs on the back of the tank are in
contact with the stainless steel connectors on the back of the lid.
Refrigeration is ON and is
working. The cotter pin may be broken. Refer the Cotter Pin Replacement Technical Field Instructions
document on Vollrath.com
Product in
machine over-
freezes and
prevents augers
from turning
Machine in COLD,
SLUSH or DEFROST
mode.
A problem with the thermostat probe. Contact Vollrath Technical Services.
Control panel is not working. Contact Vollrath Technical Services.
Control panel is off
and lights under
the cover are off.
Machine is plugged in
and receiving power,
compressor and
condenser fan are
working.
The 5 amp fuse may be burned out. Refer to the Fuse Replacement Technical Field Instructions
document on Vollrath.com.
Transformer malfunction. Contact Vollrath Technical Services if replacing the fuse does not
fix the problem.
Auger is making load noises and skipping.
Components are not installed properly Make sure the auger support knob is fully inserted and firmly
holding the horizontal auger in place.
Auger or shaft gears are worn. Replace the worn parts.
Bushing is missing from end of auger. Install the bushing.
Squeeking noise inside of the tank. No lubricant on the auger. Apply food-grade lubricant to the auger. See “Reassemble the
Machine and Lubricate Components” on page 10.
Tank is leaking.
The gasket is not properly installed. Remove and re-install the gasket.
The gasket is worn out. Inspect the gasket for wear. Replace worn gasket with a new one.
Bowl clamps are worn out and no
longer hold the tank firmly in place. Replace the bowl clamps.
Product drips from the spout while it is in the
closed position. The spigot assembly gasket is worn. Replace the o-ring.
Condensation on the tank.
Difference between ambient air
temperature and temperature of the mix
in the bowl creates condensation on the
bowl.
Relocate machine to a cooler environment.
Ice on lower half of
tank exterior.
Two and three bowl
machines.
Legs installed incorrectly. The legs with
the locking nut are slightly taller and
allow condensation to flow down the
channels on the bowl and to the drip
tray.
See “Install the front and rear legs on the other side of the
machine.” on page 2.
All machines. Machine may need to be defrosted. Change the DEFROST ON setting to place the machine into
defrost mode. See “Set the Defrost ON and OFF Times” on
page 4.
Machine Performance (Continued)
Problem Machine Condition Might be Caused By Course of Action
Problem Mix Might be Caused By Course of Action
Product is too thick. Incorrect setting. See “Set Refrigeration” on page 6.
Product is not thick
enough.
There is alcohol in
the mix. Too much alcohol in the mix. See “Mix and Recipe Guidelines” on page 6.
There is no alcohol in
the mix. Incorrect setting. See “Set Refrigeration” on page 6.
Percentage of sugar in the mix is
outside the recommended range. See “Mix and Recipe Guidelines” on page 6.

©2017 The Vollrath Company L.L.C. Part No. 350465-1 ml 1/19/17
www.vollrath.com
The Vollrath Company, L.L.C.
1236 North 18th Street
Sheboygan, WI 53081-3201 U.S.A.
Main Tel: 800.624.2051 or 920.457.4851
Main Fax: 800.752.5620 or 920.459.6573
Customer Service: 800.628.0830
Canada Customer Service: 800.695.8560
Technical Services
techservicereps@vollrathco.com
Induction Products: 800.825.6036
Countertop Warming Products: 800.354.1970
All Other Products: 800.628.0832
SERVICE AND REPAIR
Serviceable parts are available on Vollrath.com.
To avoid serious injury or damage, never attempt to repair the unit or replace a damaged power cord yourself. Do not send units directly to
The Vollrath Company LLC. Please contact Vollrath Technical Services for instructions.
When contacting Vollrath Technical Services, please be ready with the item number, model number (if applicable), serial number, and proof of
purchase showing the date the unit was purchased.
WARRANTY STATEMENT FOR THE VOLLRATH CO. L.L.C.
This warranty does not apply to products purchased for personal, family or household use, and The Vollrath Company LLC does not offer a written
warranty to purchasers for such uses.
The Vollrath Company LLC warrants the products it manufactures or distributes against defects in materials and workmanship as specifically
described in our full warranty statement. In all cases, the warranty runs from the date of the end user’s original purchase date found on the receipt.
Any damages from improper use, abuse, modification or damage resulting from improper packaging during return shipment for warranty repair will
not be covered under warranty.
For complete warranty information, product registration and new product announcement, visit www.vollrath.com.

Manuel de l'opérateur
Distributeurs de granité et boissons fraîches
©2017 The Vollrath Company L.L.C. Num. d'art. 350465-1 ml 1/19/17
Veuillez enregistrer votre produit sur Vollrath.com/Warranty
CONSIGNES DE SÉCURITÉ
Pour garantir un fonctionnement sûr, lisez les avertissements suivants
et comprenez leur signification. Ce manuel contient des consignes de
sécurité, présentées ci-dessous. Lisez-les attentivement.
Un avertissement permet d'indiquer la présence d'un danger qui
causera ou peut causer des blessures personnelles graves ou la mort.
Une mise en garde indique la présence d'un danger qui causera ou
pourra causer des blessures mineures ou majeures si elle est ignorée.
AVIS : Un avis met en évidence des informations qui sont
importantes mais sans rapport avec un danger.
• Familiarisez-vous avec la machine. Lisez et comprenez le mode
d'emploi.
• Prêtez attention à toutes les étiquettes d'avertissement apposées sur
la machine.
• Portez des chaussures et des vêtements adéquats. Évitez les
vêtements lâches, enlevez les montres, bagues ou bijoux
susceptibles de causer un grave accident. N'utilisez pas avec les
mains ou les pieds mouillés.
• Branchez seulement sur des prises de terre correspondant à la
tension indiquée sur la plaque signalétique. Vollrath recommande de
brancher chaque machine sur un circuit qui lui est propre.
• Ne laissez pas les enfants utiliser la machine.
• Gardez la zone de travail propre. Évitez les accidents en nettoyant la
zone et en la gardant propre.
• Restez vigilant à tout moment. Sachez quel interrupteur, quel
bouton-poussoir ou quelle commande vous allez utiliser et l'effet
résultant.
• Débranchez la machine avant toute maintenance. N'essayez jamais
de réparer ni d'effectuer une maintenance sur la machine avant
d'avoir coupé l'alimentation électrique secteur. Débranchez la
machine au niveau de la fiche. Ne tirez pas sur le cordon électrique
pour débrancher la machine de l'alimentation.
• N'utilisez pas dans des conditions d'utilisation dangereuses.
N'utilisez jamais la machine en cas de bruits ou de vibrations
inhabituels ou excessifs.
FONCTION ET OBJET
Le Distributeurs de granité et boissons fraîches Stoelting®sont conçus
pour tenir au frais, congeler et servir des boissons. Cet équipement
n'est pas destiné à une utilisation ménagère, industrielle ou en
laboratoire.
Table des matières
Déballage de la machine ................................................ .page 2
Exigences en matière de dégagement et
de conditions ambiantes ................................................ page 2
Installation des pieds (machines à deux/trois cuves)...... page 2
Présentation des fonctions et commandes .................... page 3
Avant la première utilisation - Procédure requise............ page 4
Mode d'emploi................................................................ page 5
Démontage de la machine............................................... page 8
Remontage de la machine et lubrification
des composants. .......................................................... page 10
Paramètres et fonctions avancés.................................... page 12
Entretien......................................................................... page 13
Dépannage..................................................................... page 14
AVERTISSEMENT
ATTENTION
Num. art. Modèle Description V A Fiche
CBE117-37
CBE
Une cuve
115
11 NEMA
5-15P
CBE127-37 Deux cuves 12
CBE167-37 Trois cuves

2 Manuel de l'opérateur des distributeurs de granité et boissons fraîches Stoelting®
DÉBALLAGE DE LA MACHINE
Déballage de la machine
AVIS : Ne posez pas la machine sur le côté ou l'arrière.
AVIS : Ne soulevez pas la machine par la cuve, la tarière ou les
poignées. Soulevez-la seulement en la saisissant par en
dessous.
AVIS : La machine doit rester en position verticale pendant 24
heures avant sa mise en marche. Ceci permet à l'huile
dans le compresseur de se stabiliser en place après
l'expédition.
1. Enlevez tout le matériel d'emballage et le ruban adhésif, ainsi que le
plastique de protection.
2. Nettoyez les résidus de colle du plastique ou du ruban adhésif.
3. Conservez l’emballage d’origine. L'emballage devra être réutilisé
pour expédier la machine si une réparation est nécessaire.
EXIGENCES EN MATIÈRE DE DÉGAGEMENT ET DE
CONDITIONS AMBIANTES
AVIS : Vollrath recommande l'utilisation d'un circuit spécifique
pour chaque machine.
Exigences en matière de dégagement
et de conditions ambiantes
INSTALLATION DES PIEDS
(MACHINES À DEUX/TROIS CUVES)
AVIS : Les pieds doivent être installés conformément à la
certification d'agence.
AVIS : Il faut s'y prendre à deux pour installer les pieds.
1. Identifiez les pieds avant et arrière.
2. Mettez en place le contre-écrou sur chaque pied arrière en vissant.
3. Enlevez les pieds d'expédition.
4. Installez les pieds avant et arrière sur un côté de la machine.
5. Installez les pieds avant et arrière sur l'autre côté de la machine.
FIXATION DE LA POIGNÉE CONFORME À L'ADA
(FACULTATIF)
1. La poignée ADA s'attache sur la poignée standard. Aucun outil n'est
nécessaire pour attacher la poignée.
RACCORDEMENT DU PLATEAU D'ÉGOUTTAGE À
UNE CONDUITE DE VIDANGE (FACULTATIF)
Outils :
• Tournevis
• Tubulure
1. Défoncez les trous préparés à l'arrière de chaque plateau.
2. Nettoyez le tuyau de vidange.
Num. d'art. Description Dégagement
Temp.
ambiante
max. Emplacement
CBE117-37 Une cuve
10" (25,4 cm)
de tous les
côtés
12" (30,5 cm)
à l'arrière
85°F Uniquement à
l'intérieur.
CBE127-37 Deux cuves 95°F À l'intérieur ou
à l'extérieur.
À l'extérieur,
l'em-placement
doit être sous
couvert.
CBE167-37 Trois cuves 85°F
Pieds avant
Pieds arrière

Manuel de l'opérateur des distributeurs de granité et boissons fraîches Stoelting®3
PRÉSENTATION DES FONCTIONS ET COMMANDES
.
B
A
C
D
E
F
G
H
I
H
ABouton Marche.Permet la mise en marche et l'arrêt de la machine.
BVoyant de haute pression. S'allume quand la machine a un
problème de pression exigeant une intervention.
CCapteur de niveau minimum dans la cuve. Détecte un niveau de
mélange trop bas dans la cuve.
DVerrouillage du robinet. Verrouille le robinet en position ouverte ou
fermée.
EBouton de réarmement du compresseur. Réarme le compresseur
après une haute pression. Les anciennes machines à deux et trois
cuves ont un réarmement interne. Pour les instructions d'accès au
réarmement, reportez-vous au document « Technical Field
Information » sur Vollrath.com. La machine doit être sous tension
lorsque vous appuyez sur le bouton de réarmement.
FTouche Menu. Accédez aux paramètres de la machine.
LAMP (Lampe). Permet d'allumer et d'éteindre la lampe sous le
couvercle.
BYPASS (Ignorer). Permet la rotation des tarières lorsque le
couvercle est enlevé.
LOWLEVEL (Niveau bas). Règle automatiquement le réglage de
granité (SLUSH) à 1 quand le volume de mélange dans la cuve
chute en dessous du point de remplissage minimum. Ceci empêche
le produit de trop congeler. Vollrath recommande l'activation de ce
réglage.
KEYBOARD (Clavier). Verrouille le clavier pour empêcher toute
modification accidentelle.
WASHING (Lavage). Utilisez pour le nettoyage de la machine. Coupe
la réfrigération, active la rotation des tarières et verrouille toutes les
fonctions du clavier, sauf MENU.
TIME (Heure). Permet de régler la machine à l'heure locale.
DEFROST ON (Marche dégivrage). Permet de régler l'heure à
laquelle la machine passe en mode Dégivrage. Format 24 h, pas
d'AM/PM.
DEFROST OFF (Arrêt dégivrage). Permet de régler l'heure à laquelle
la machine quitte le mode Dégivrage. Format 24 h, pas d'AM/PM.
MAX TEMP. (Temp. max.) Affiche un avertissement sur l'écran si la
température du produit est à une température plus élevée que le
réglage. Pour la sécurité des aliments, Vollrath recommande
l'activation de ce réglage avec des mélanges à base de lait.
CLEANING (Nettoyage). Permet de définir un calendrier pour le
nettoyage de la machine et affiche un message quand il est temps
de nettoyer la machine.
AUTOFILL (Remplissage automatique). Affiche un avertissement si
la cuve ne se remplit pas automatiquement.
GTouche Mode
SLUSH (Granité). Neuf réglages de densité.
COLD (Boisson fraîche). Cinq réglages de température.
STANDBY (Attente). Met la machine en pause.
H Touches flèches. Pour modifier les réglages.
ITouche Tarière. Démarre et arrête la rotation des tarières. Sert
également de bouton de navigation pour certaines options de menu.

4 Manuel de l'opérateur des distributeurs de granité et boissons fraîches Stoelting®
AVANT LA PREMIÈRE UTILISATION - PROCÉDURE REQUISE
Mise en marche de la machine
1. Appuyez sur le bouton Marche. L'affichage est le suivant :
Réglage de l'heure locale
AVIS : Vous devez régler la machine à l'heure locale correcte. Si
l'heure n'est pas correcte, la machine dégivrera à la
mauvaise heure.
1. Accédez au mode Réglages machine en appuyant sur pendant
2 secondes environ.
2. Appuyez brièvement sur jusqu'à ce que l'affichage indique :
3. Appuyez sur pour déplacer le curseur à droite. Appuyez sur
pour déplacer le curseur à gauche.
4. Appuyez sur pour changer l'heure.
5. Appuyez sur pour confirmer le réglage.
Définition des heures d'activation et de
désactivation du dégivrage
AVIS : La machine est expédiée avec la fonction de dégivrage
désactivée. Vous devez définir les heures d'activation et de
désactivation pour activer la fonction de dégivrage. Pour
fonctionner correctement, la machine doit avoir un cycle de
dégivrage.
DEFROST ON (Marche dégivrage)
Permet de régler l'heure à laquelle la machine passe en mode
Dégivrage. Durant le mode dégivrage, le produit dans le réservoir est
maintenu à 35 ºF (1,6 ºC) environ.
1. Appuyez brièvement sur jusqu'à ce que l'affichage indique :
2. Appuyez sur pour déplacer le curseur à droite. Appuyez sur
pour déplacer le curseur à gauche.
3. Appuyez sur pour changer l'heure.
4. Appuyez sur pour confirmer le réglage.
Defrost Off (Arrêt dégivrage)
Le réglage Defrost Off détermine quand le mode dégivrage s'arrête et
quand la machine reprend son fonctionnement normal. Vollrath
recommande un temps minimum de dégivrage de 4 heures.
1. Appuyez brièvement sur jusqu'à ce que l'affichage indique :
2. Appuyez sur pour déplacer le curseur à droite. Appuyez sur
pour déplacer le curseur à gauche.
3. Appuyez sur pour changer l'heure.
4. Appuyez sur pour confirmer le réglage.
Activation du réglage Low Level
Le réglage LowLevel fait automatiquement la bascule vers le
mode Slush 1 (Granité 1) lorsque le produit dans la cuve chute
en dessous du niveau de remplissage minimum. Ceci empêche
le produit de trop congeler, ce qui risque d'endommager la
machine.
1. Appuyez brièvement sur jusqu'à ce que l'affichage indique :
2. Appuyez sur pour confirmer le réglage.
Nettoyage et désinfection de la machine
Avant d'utiliser cette machine pour la première fois, Vollrath
recommande de laver et désinfecter les composants dans la machine.
1. Démontez la machine. Voir page 8.
2. Nettoyez et désinfectez les composants. Voir page 7.
3. Remontez et lubrifiez les composants. Voir page 10.
4. Désinfectez la machine. Voir page 5.
This manual suits for next models
2
Table of contents
Languages:
Other Vollrath Dispenser manuals

Vollrath
Vollrath LidSaver LS02MS18B User manual

Vollrath
Vollrath LidSaver 2 User manual

Vollrath
Vollrath SLC-1 User manual

Vollrath
Vollrath LidSaver 3 Manual

Vollrath
Vollrath CADJ-1 User manual

Vollrath
Vollrath STOELTING A118-102 User manual

Vollrath
Vollrath LidSaver 3 User manual

Vollrath
Vollrath STOELTING Ready Flavor Burst Stripe User manual

Vollrath
Vollrath Stoelting O111-I2F User manual

Vollrath
Vollrath STOELTING CW 5 Plus - 37b User manual