WABECO D2400 User manual

Please read before start-up!
Operating instructions
Universal Lathes
Version of 09/2009
D2000
D2400 D3000
Walter Blombach GmbH
Tool and Machine Factory
D-42899 Remscheid Am Blaffertsberg 13 Phone: 0049 (2191) 597-0 Fax: 0049 (2191) 597-40 E-Mail: [email protected]
D-54673 Neuerburg WABECO Str. 1-10 Phone: 0049 (6564) 9697-0 Fax: 0049 (6564) 9697-25 E-Mail: [email protected]
www.wabeco-remscheid.de

2
Dear customer!
Congratulations on choosing the WABECO Universal Lathe. We have taken great care in its
manufacture and we have given it a thorough quality control test.
These operating instructions are to help you to work with it safely and properly.
Therefore, please read the respective instructions carefully and pay attention to them.
After unpacking the machine please check to see if any kind of damage has occurred during
transportation. Any complaints must be made immediately. Complaints made at a later date cannot
be accepted.
If you have any questions or need any spare parts, please quote the machine number located on
the front of the motor (see nameplate).
Duplications or copies of this document of any kind, or of exerts, require a written approval
by WABECO
Disposal of the lathe
The transport and protective packagings are made up of the following materials:
- corrugated cardboard
- polystyrene free of freon
- polyethelene foil
- non-returnable wooded pallet (untreated)
- Euro pallet (deposit)
If you have no further need of these articles or do not wish to use them again, please dispose of them
at the public recycling facilties.
The lathe consists of up to 98% of recyclable materials, i.e. steel, cast iron, aluminium and 2% of
chemical materials, e.g. the coating of electrical leads, printed circuits.
If you have trouble disposing of these parts in a proper manner, we would be pleased to help you.
Upon mutual agreement we will take the complete machine back and dispose of it. However, the costs
for transporting the machine to our plant must be at your expense.

3
Index
EC Conformity declaration 4
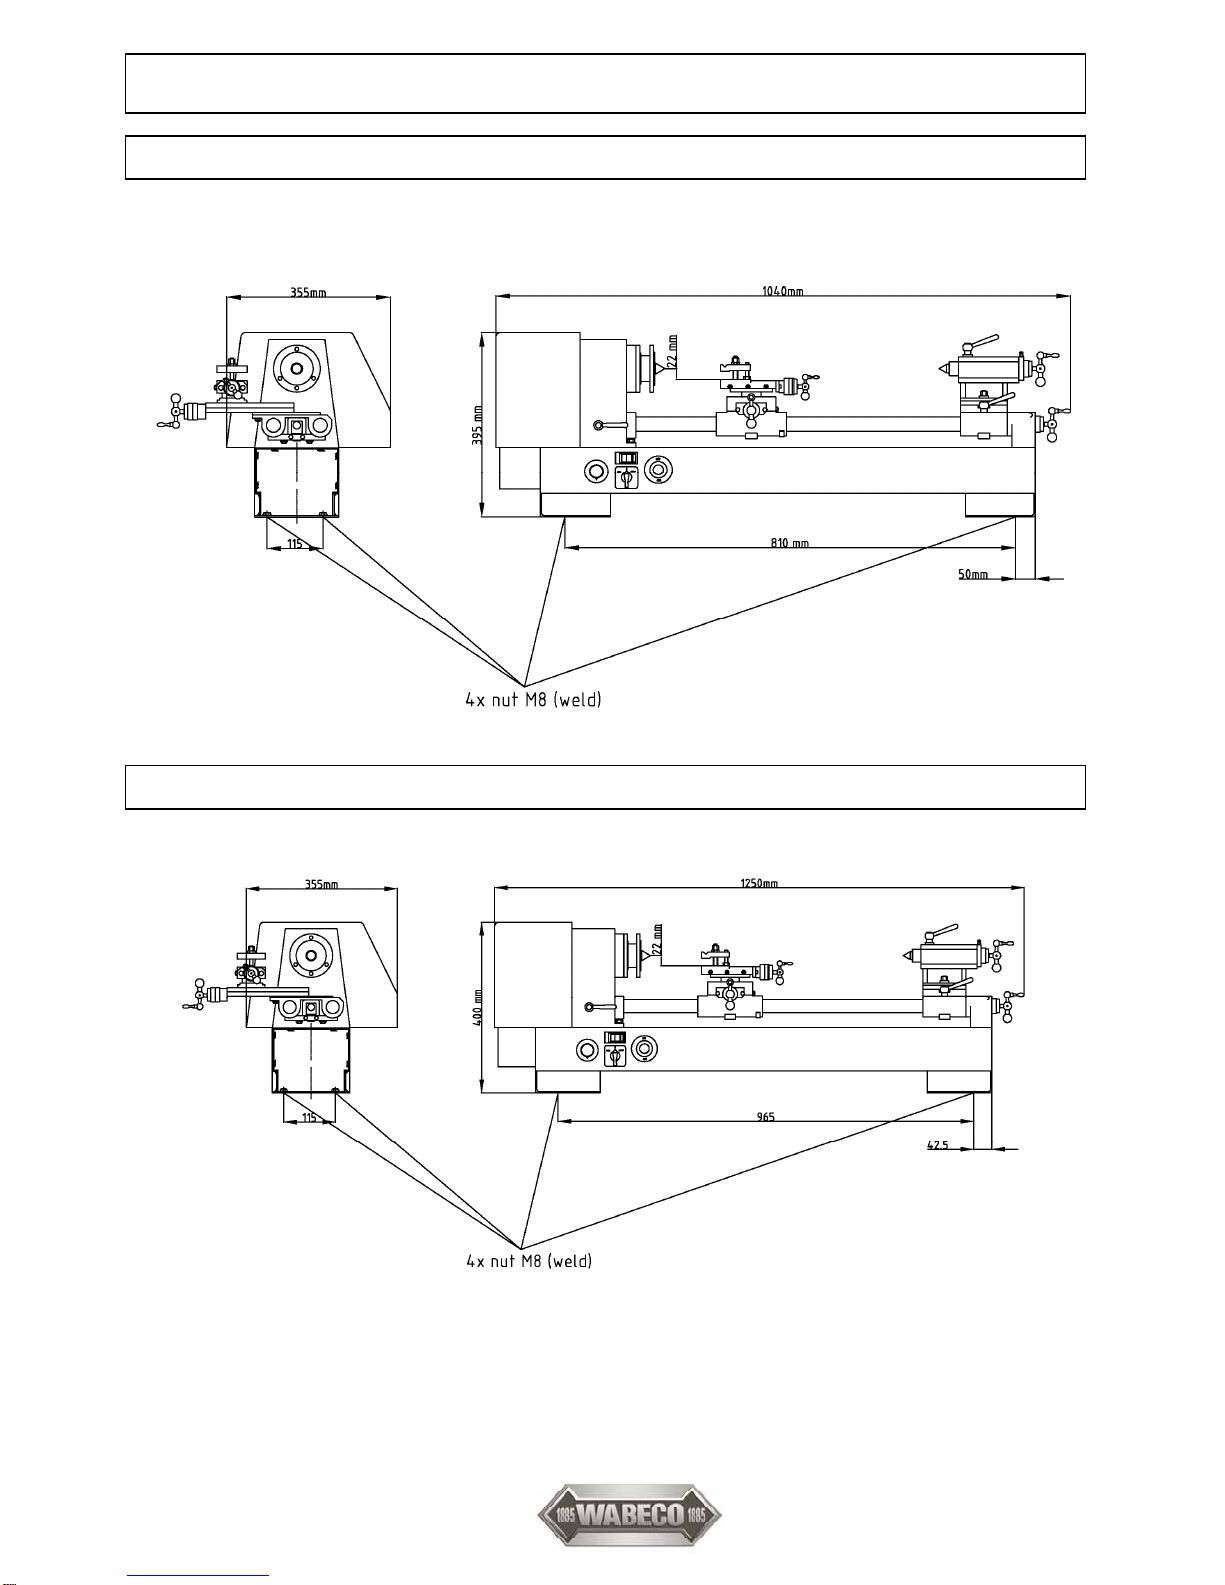
1. Machine dimensions 5
1.1 D2000 5
1.2 D2400 5
1.3 D3000 6
2. Delivery and installation 7
3. Conditions for best results 7
4. Overload protection 8
5. Safety instructions 8
6. Start-up and maintenace 9
6.1 Electronical equipment 9
6.2 Start-up 9
6.3 Maintenance 9
6.4 Lubrication 10
6.5 Initial cleaning of the machine 10
6.6 Headstock 11
6.7 Cross support 11
6.8 Tailstock 12
7. Speed regulation 13
7.1 Speed selection 13
7.1.1 Speed setting for working with aluminium 13
7.1.2 Speed setting for working with steel 13
7.1.3 Speed setting for working with brass, copper 14
7.2 Speed change 14
8. Applications 15
8.1 Longitudinal and transverse turning 15
8.2 Thread cutting with automatic feed 16
8.2.1 General note 17
8.2.2 Application of change gears 17
8.2.3 Altering the feeds or thread pitches for D2000, D2400 19
8.2.4 Altering the feeds or thread pitches for D3000 21
9. Pair of toothed wheels for left-hand thread cutting 22
10. Angle plate with milling table 23
11. Lubrication coolant unit 24
12. Declaration of noise levels 25
13. Drawings and list of parts 26
13.1 Headstock 26
13.2 Support with motor and protective cover for D2400 und D3000 27
13.3 Lead screw drive for D2000 and D2400 28
13.4 Lead screw drive for D3000 30
13.5 Drive with gear transmission for D2000 32
13.6 Cross support 34
13.7 Tailstock 36
13.8 Rear bearing with guide rods 37
13. Circuit diagram 38
13.1 Circuit diagram for D2000 and D2400 38
13.2 Circuit diagram for D3000 39

4
EC – Conformity Declaration
Version 07.2010
In the name of the manufacturer
Walter Blombach GmbH
Tool and Machine Factory
based in Remscheid and Neuerburg
D-42871 Remscheid Postfach 12 01 61 Phone: 0049 (2191) 597-0 Fax: 0049 (2191) 597-40
D-54673 Neuerburg WABECO Str. 1-10 Phone: 0049 (6564) 9697-0 Fax: 0049 (6564) 9697-25
We hereby declare that the universal milling and drilling machines specified below
Universal Lathes Typ:
D2000 – D2400 – D3000
meet the following regulation requirements for standard series production
- directive for machines 2006/42 EG
- EMV directive 89/336/EWG
In order to meet / implement the requirements of the above mentioned directives, the following
applicable and previously published standards have been adhered to:
EN ISO 12100-1
EN ISO 12100-2
EN 12840
EN 60204-1
D-54673 Neuerburg
________________________________
City
Technical Director

5
1. Machine dimensions
1.1 D2000
1.2 D2400

6
1. Machine dimensions
1.3 D3000

7
2. Delivery and installation
The lathes are carefully packed in our factory.
Please check the following on delivery:
1. whether the packaging has been damaged and/or:
2. whether the lathe shows signs of damage in transit or if there is any other reason for
complaint. In this case we request your immediate notification. Claims made at a later
date cannot be accepted.
The lathe must be installed on appropriate, plain and firm ground.
This would be, for example:
a base cabinet such as to be found in our accessories programme
a work bench strong enough to carry the weight of the machine without warping with an even
surface (see technical data and check with spirit level).
a steel plate
The lathe must be screwed to the base. Use the 9 mm holes in the machine base. Good results
and a minimum of vibration during operation can only be guaranteed if the above mentioned
requirements for secure mounting are observed.
The machine should be installed in a well lighted area and electrical cables with earthed sockets
and O-conductors must be installed close to the machine so that the mains cable is not subject to
any tension whatsoever. The mains cable should be such that, for example, by means of a multiple
socket, a coolant unit can also be connected.
3. Conditions for best results
i
Fix the machine to a sturdy, level support.
Use sharp processing tools.
Adjust speed setting and feed to fit the material and diameter of the tool.
The clamping position of the tools is to be as close as possible to the workpiece.
Clamp the workpieces tightly and without vibrations.
Long pieces are to be supported by the tailstock or a stay.
Apply coolant and lubricant for better surface quality (finish) and dimensional
accuracy.
The clamping surfaces for clamping tools and workpieces must be clean.
Grease the machine sufficiently.
Use the correct machining tools for removing the material from the workpieces.
Set the correct bearing clearances and align guides.

8
4. Overload protection
i
Wait approx. 1 second after switching off the machine manually or after an
automatic switchdown following an overload before switching it on again. This will
ensure that the motor is protected effectively in all work situations. Otherwise the
machine may not run up again because the electronics relay could did not have
enough time to react.
5. Safety Instructions
1. The feed line for the motor must be connected to a sealed contact socket or junction box.
(Have the socket or junction box checked by an electrician beforehand; protection against
children being able to put into operation).
2. The socket or junction box must be close enough to the equipment, so that the live cable is
subjected to no tensile strain whatsoever.
3. When maintenance or cleaning work is done, the machine must be shutdown and the mains
plug pulled out.
4. Do not slow down workpieces or chucks by hand or any other objects.
5. Wear safety goggles when working with the machine.
6. Do not remove the chips with the hand. Use corresponding aids (hand brush, hook, paint
brush).
7. Always keep the protective hood of the drive closed.
8. The turning tools must be tightly clamped at the correct height and as short as possible.
9. The turning tools must never be replaced when the machine is running.
10. Never leave the clamping chuck key in (even when not in operation).
11. Always pay attention to the clamping width of the lathe chuck. (lathe chucks ∅max. 40mm,
drill chucks max. 100mm ∅).
12. Never take measurements on work pieces during the lathing process (risk of accidents
and damage to the measuring gauges)
13. Do not wear loose clothing (ties, shirt sleeves, jewellery etc.).
14. When working between centres, always centre well in order to prevent the workpiece from
being slung away. In addition, make sure that the locking screw of the tailstock is tightened.
15. When using the automatic feed always take care that the cross support does not get in contact
with the chuck or the tailstock.
16. Never leave the machine alone when in operation.
17. When machining wood, use the lathe centre instead of the lathe chuck to support the
work piece.
18. The machine must be secured so that it cannot be switched on by children. Make sure that
other people do not operate the machine.
19. Always keep the machine dry.
20. Frequently check the machine for damage. Any damaged parts must be replaced by original
parts and are to be fitted by an expert or by us.

9
6. Start-up and Maintenance
6.1 Electronical equipment
The lathes are fitted with a main switch with undervoltage release, i.e. this switch must be
turned on before turning on the reserving switch. The main switch must also be switched on again
following a power failure.
i
All lathes can only be switched on with closed plexiglass bonnet.
When changing the sense of rotation by turning the right-left switch, the switch must remain for 1
sec. on 0-position for the reason that the relay of the potentiometer has enough time to switch.
6.2 Start up
iPrior to the initial operation, the machine must once more be cleaned with great care
and all lubrication points have to be lubricated with grease. Thoroughly oil the cross
support, lead screws, guiding rods and spindle sleeve.
Check all spindles by hand in order to ensure they run smoothly.
Run in the lathe on the lowest speed. A full load to start with must be avoided.
6.3 Maintenance
The working life is vitally dependent upon appropriate care. The lathe needs to be cleaned after
every turning job.
i In case the lathe is to be installed in a moist cellar room, all bare parts need to be
oiled after use to avoid corrosion.
All moving parts must constantly lubricated with grease.
In case of backlash inside the bearings or inside the guideways of the slides,
readjust in time to avoid the bearing or the guideways of the slides being destroyed.

10
6. Start-up and Maintenance
6.4 Lubrication
Prior to every putting into operation all lubricating points of the lathe must be lubricated with grease
for roller bearings of commercial quality.
Both guiding bars have to be greased before every putting into operation. The two dovetail guides
of the cross support, the threaded spindles accessible from below, the feed shaft as well as the
tailstock sleeve have to be greased with lubricating oil every 100 service hours.
When greasing make sure to put the slide of the cross support to its hindmost position while moving
the tailstock sleeve to its foremost position. The tailstock spindle is to be greased via the hollow
bore in the sleeve.
app
l
y grease pr
i
or to
every putting into operation
6.5 Initial cleaning of the machine
Prior to the initial operation all bare parts have to be cleaned by applying petroleum or benzine,
because these parts were covered with antirust oil before leaving the factory.

11
6. Start-up and Maintenance
6.6 Headstock
The headstock is firmly attached to the guide bars. Inside the headstock, the work spindle is run on
two adjustable precision tapered roller bearings.
adjustment nut
ON -OFF lever
for automatic feed
If the bearings need to be readjusted, please proceed in the following manner:
1. Loosen the stud bolt in the adjustment nut. The adjustment nut is located at the rear end of the
work spindle.
2. Turn the adjustment nut clockwise until the bearings run free of play again (the work spindle can
easily be turned by hand).
3. Re-Tighten the stud bolt.
i
Roller bearings adjusted too tightly become useless after a short period
Automatic feed:
There is an on-off lever for the automatic feed on the front of the headstock. The machine is
delivered with the wheels for feed 0.085 mm/rev. attached.
6.7 Cross support
The cross support consists of a longitudinal and a transversal support. It is equipped with ajustable
dovetail guides.

12
6. Startup and Maintenance
6.7 Cross support
If adjustment becomes necessary, please proceed in the following manner:
1. Loosen the lock nuts.
2. Tighten the readjustment screws by using a socket head wrench until the slides can easily be
moved to and fro by means of the crank.
3. Re-tighten the lock nuts after the adjustment.
Longitudinal support:
The longitudinal support which is mounted to the transversal support is pivotable by 360°. Thus, it is
suitable for the turning of tapers. Adjust the position by loosening the two screws located on the
outer sides of the transverse support with a 4 mm allen key. The arrow on the transversal support
indicates the position of the longitudinal support in degrees. There is a degree scale on the
longitudinal support. The distance between two graduation marks represents one degree.
Graduated collars:
The support spindles are provided with graduation collars with graduation marks used for setting
the turning tools. One graduation mark represents a 0.05 mm feed adjustment which corresponds
to a 0.1 mm chip removal from the workpiece at the transversal slide and a 0.05 mm chip removal
at the longitudinal slide. The hexagon socket screw serves for locking the cross support to the
guide bars (e.g. in face turning.) The screw pulls the block at the bottom of the transverse support
against the two guide bars.
6.8 Tailstock
The tailstock is attached to the guide bars in such a way that it is slidable. It can be be locked in any
position by actuating the lower T-handle (4251). It can be separated into barrel and base. By
loosening the hexagon bolt (424), the tailstock barrel can be pushed to either side by up to 10 mm
and is, therefore, suitable for the machining of slight tapers. After completion of the taper
machining, move the tailstock to its home position.
The lateral mark indicates the central position of the tailstock. Find out by doing some trial turning if
the workpiece is cylindrical and correct the tailstock position if necessary.
Solid tailstock sleeve:
The solid tailstock sleeve, which is provided with a millimetre scale, is designed in such a way that
the lathe centre, drill barrel or chuck are automatically ejected during the backward motion.
Tool clamping:
An inner taper MT 2 is available for holding the tool. It is integrated in the sleeve. By tightening the
upper T-handle (4251), the tailstock sleeve can be clamped easily in any position. The sleeve can
be moved axially by the crank (31212) located at the rear end via the threaded spindle.
spanner bolt (424)
T-handle (4251)
T-handle (4251)
crank (31212)
to move the tailstock sleeve
for tightening the tailstock
for tightening the
tailstock

13
7. Speed regulation
7.1 Speed selection
The spindle speed is to be selected according to material type and the diameter of the work piece:
Small diameter ⇒relatively high speed
Large diameter ⇒low speed
The cutting speed is the result of rotational speed and diameter.
With a known and required cutting speed, the necessary spindle speed can be calculated in the
following way:
Example: An aluminium workpiece which has a diameter of 20 mm is to be turned
with a cutting speed of 100 m/min.
Now, from those speeds available, the one which is closest to the ideal
speed of 1592 1/min. is selected (in our case 1600 1/min.).
7.1.1 Speed setting for working with Aluminium
workpiece- Ø approx. r.p.m. cutting speed m/min
10 mm 2300 75
20 mm 1600 100
40 mm 800 100
60 mm 530 100
80 mm 400 100
100 mm 320 100
7.1.2 Speed setting for working with steel
workpiece- Ø approx. r.p.m. cutting speed m/min
10 mm 1600 50
20 mm 800 50
40 mm 400 50
60 mm 270 50
80 mm 200 50
100 mm 160 50
s
p
eed
(
n
)
= cutting speed (V) x 1000
diameter of workpiece (d) x 3,14
100 x 1,000
20 x 3.14 =100,000
62.8 = 1592
1
/min

14
7. Speed regulation
7.1.3 Speed setting for working with Brass, Copper
workpiece- Øapprox. r.p.m.. cutting speed m/min
10 mm 2300 80
20 mm 1270 80
40 mm 640 80
60 mm 425 80
80 mm 320 80
100 mm 250 80
7.2 Speed change
Rotational speed range 45 - 2300 min-1:
The rotational speed of the work spindle is infinitely variable between 45 and 400 r.p.m. in the 1st
step or in the 2nd step between 200-2300 r.p.m using the potentiometer on the front side of the
machine.
speed setting at the potentiometer 1. step r.p.m. 2. step r.p.m.
10 45 200
20 105 350
30 175 740
40 260 1050
50 325 1440
60 360 1650
70 400 1860
80 460 2120
90 490 2160
100 500 2300
Rotational speed 45 - 400 r.p.m.:
The drive belt must be relocated if the lower speed level with a minimum speed of 45 r.p.m. is
required.
Proceed as follows:
Remove the protective cover and release the drive belt by unscrewing the clamping nut and turning
the star handle clockwise until the drive belt can be relocated. Then re-tighten the drive belt in the
reverse sequence of steps.
clamping nut
star handle
potentiometer
rotational speed 45-400 rpm

15
8. Applications
8.1 Longitudinal and transverse turning
Longitudinal turning:
In the case of longitudinal turning the tool moves parallel to the axis of the workpiece. For
longitudinal rough turning it is recommended to use either a straight or an arcuated turning tool. For
finishing it is best to use pointed or wide turning tools.
Transverse turning:
The maching of the end faces is known as transverse turning. In the case of transverse turning, the
turning tool is moved at 90 degrees to the turning axis of the piece being turned. In so doing the
cross support is to be locked. The main cutting lip of the turning tool is to be exactly centred, so that
no lug remains in the workpiece centre. The arcuated tool is used for transverse turning.
6
54
32
1
to 1+2: Roughing tools arcuated to the left and/or to the right: By using them a maximum of
material is removed in as short a time as possible (without paying attention to the finish
on the surface of the work piece). They can be used for longitudinal and transverse
turning.
to 3: Offset side turning tool: Used for finishing (smooth surface) in the case of longitudinal
and transverse turning.
to 4: Outside thread turning tool: Used for cutting outside threads.
to 5: Parting tool: Used for the cutting of grooves and slicing of workpieces.
iWhen inserting the parting tool No. 5, pay careful attention to the exactness
of the centre height of the turning tool. Work on low speed and cool the tool
(use soluble oil or emulsion for cooling: serves to lubricate and for the
removal of chips.) The parting tool is to be clamped as short as possible and
at 90° degrees to the workpiece.
to 6: Inside turning tool: Used for the hollowing-out boreholes. Clamp as short as possible in
order to avoid vibrations of the turning tool which might otherwise occur (uneven surface).

16
8. Applications
8.1 Longitudinal and transverse turning
iFor the reason of the force effect at the turning tool take care that the tool is short
and tightly clamped. If the lever arm is to long the turning chisel curves and
springs back. The cutting part enters uneven into the workpiece and is producing
a waved surface.
Take care that the turning tool is directed to the centre of the work piece.
The height position in the workpiece centre is regulated via the live lathe centre
inside the tailstock.
The height position of the turning tool is achieved by straight sheet steel.
8.2 Thread cutting with automatic feed
8.2.1 General note
The thread cutting tool is a shape turning tool with the profile of the thread to be cut. It is ground
according to jigs (diagram 1) and must be adjusted exactly to the workpiece centre as, otherwise,
the profile of the thread would be distorted.
In order to obtain the correct position of the thread flanks to the axis of the workpiece, the grinding
jig is put against the work piece and the turning tool is adjusted in accordance with it (diagram 1).
For this purpose the jig is put successively on to both flanks of the turning tool. The feed of the
thread cutting tool is effected over the lead screw and must correspond to the thread pitch.
Setting the thread cutting tool
90°
Change gears:
The connection between the feed gear and the lead screw is made by the change gear wheels
(optional for D2000, D2000 and D2400). By putting on various combinations of gear wheels it is
possible to cut a metric right-hand thread with a pitch of 0.4 mm - 3 mm and an inch-system right-
hand thread with a pitch of 10Z/1" - 32 Z/1" (see table “table for thread cutting and automatic feed”).
The various distances between the gear axes can be adjusted by swiveling the quadrant and by re-
adjusting the quadrant bolts.

17
8. Applications
8.2.1 General note
Feed:
The feed is switched on by means of the T-handle on the front side of the headstock.
i When cutting threads it must be remembered that the feed remains on throughout
to ensure that the turning chisel always returns to the same positon when repeating
the thread cutting process. For this reason, the turning chisel is cammed out with
the transversal support after completing the cut, as otherwise, the flanks and cutting
edges could be damaged, and is returned to its original position by altering the
turning direction of the motor via the reversing switch. It is advisable to make a 4-5
mm wide groove at the end of the thread in order to facilitate the camming out of
the thread cutting tool.
Long threads:
In the case of long threads always use a live lathe centre in order to prevent the work piece from
being pushed away.
Overload clutch:
To avoid damage to the feed system, the lead screw and the lead screw drive are connected to an
overload clutch.
8.2.2 Application of change gears for D2000 and D2400
For the purpose of automatic longitudinal turning there are two feed rates available: 0.085 mm and
0.16 mm/revolution. (The machine is delivered with the gears producing a feed of 0.085
mm/revolution put on). Putting on different combinations of gears enables you to cut metric threads
ranging from 0.35 to 6.0 mm in pitch. The same applies to inch thread ranging from 10 threads/" to
36 threads/" in pitch.
Table on thread cutting * = optional accessories
mm 0.35 0.4 0.5 0.7 0.75 0.8 1.0 1.25 1.5 1.75
A 40 48 48 48 48 48 48 48 48 48
B 14 16 20 14 18 16 14 20 36 28
C 48 40 40 20 24 20 14 16 24 16
C1 32 32 32 32 32 32 32 32 32 32
D 120 120 120 120 120 120 120 120 120 120
E 140 140 140 140 140 140 140 140 140 140
mm 2.0 2.5 3.0 3.5 3.75 4.0 4.25 4.5 5.0 6.0
A 48 48 48 48 32 24 24 24 24 24
B 40 40 48 28 40 32 34 36 40 48
C 20 16 16 16 16 16 16 16 16 16
C1 32 32 32 32 32 32 32 32 32 32
D 120 120 120 120 120 120 120 120 120 120
E 140 140 140 140 140 140 140 140 140 140

18
8. Applications
8.2.2 Application of change gears for D2000 and D2400
Table for thread cutting * = optional accessories
Z/1“ 10 11 12 13 14 16 18 19 20 22
A 34 34 34 34 34 34 34 34 34 34
B 36 36 36 36 36 36 14 34 18 18
C 20 22 24 26 28 32 14 36 20 22
C1 32 32 32 32 32 32 32 32 32 32
D 120 120 120 120 120 120 120 120 120 120
E 140 140 140 140 140 140 140 140 140 140
Z/1“ 24 26 28 30 32 34 36
A 34 34 34 34 34 34 34
B 24 18 18 24 18 18 14
C 32 26 28 40 32 34 28
C1 32 32 32 32 32 32 32
D 120 120 120 120 120 120 120
E 140 140 140 140 140 140 140
mm 0,25 0,30
A1 48 40
A2 22 22
B1 40 40
B2 22 22
C 48 48
D 120 120
E 120 120
F 140 140
A2 and B2 front toothed wheel!
A1 and B1 rear toothed wheel!
Table for automatic longitudinal feed
mm/σ0,085 0,16
A1 48 48
A2 14 18
B1 48 48
B2 14 20
C 48 48

19
8. Applications
8.2.3 Altering the feeds or thread pitches
for D2000 and D2400
When altering the feeds or thread pitches, proceed as follows:
1. Changing the feed from 0.085 mm to 0.16 mm
a. Loosen fixing screw D of the change gear quadrant.
b. Loosen and remove the hexagon nuts and washers from the bolts A and B.
c. Loosen the hexagon bolts A and B. Remove the toothed belt connecting A and B. Unscrew
bolt B together with the two tooth belt pulleys from the quadrant and remove it by slightly
tilting the bolt upwards (this at the same time leaves free the toothed belt from B to C).
Remove the toothed belt connecting the main spindle with A by placing the toothed belt onto
driving pulley E.
d. Remove both tooth belt pulleys Z 14 from bolts A and B and replace them by toothed belt
pulley Z 18 or toothed belt pulley Z 20, respectively. Mount and tighten the washers and nuts
to A and B.
e. Mount bolt B together with both tooth belt pulleys to the change gear quadrant again by
slightly tilting the bolt and screwing it into the square nut located behind the quadrant. Put on
the toothed belt connecting B and C, pull bolt B upwards imparting tension to the toothed
belt. Then, tighten bolt B. Put on toothed belt from main spindle to bolt A and from bolt A to
bolt B.
f. Pull bolt A upwards until the toothed belt is strained, then tighten bolt A. Strain the belt
between main spindle and bolt A by means of the change gear quadrant and tighten the
quadrant with screw D.
g. Close the cover and re-tighten the hexagon socket screw.
fixing screw D
bolt A
bolt B
driving pulley E
C

20
8. Applications
8.2.3 Altering the feeds or thread pitches for D2000 and D2400
2. Changing the feed from 0.085 mm to a metric pitch of 1.5 mm
a. - c. Start the procedure exactly as already described under pos. 1, a-c, with the exception that
the hexagon nut must be removed from the quadrant bushing C, too, as additional step of the
procedure described under pos. 1 b.
d. Pull the bushing and the tooth belt pulley Z 48 off the quadrant bushing C. Put the bushing
and the tooth belt pulley Z 24 onto the quadrant bushing C, but make sure that the bushing
precedes the tooth belt pulley. Bolt B with toothed belt is not needed for thread cutting!
e. Pull off tooth belt pulley Z 14 from bolt A and put on tooth belt pulley Z 36. Put on the toothed
belt from the main spindle to bolt A as well as the belt between A and C.
f. - g. Proceed as described under pos. 1, f-g!
iOnly the two short toothed belts (1145) are required for cutting metric threads as well
as the slightely longer toothed belt (1146), which connects the main spindle with
wheel A. The toothed belt (1145) connects wheel B with wheel C.
3. Changing the feed from 0.085 mm to thread pitch 12 threads/"
Proceed exactly as already described under pos. 2. The procedure differs merely in
additionally replacing the tooth belt pulley Z 48 running on bolt A by the tooth belt pulley Z 34.
bolt B escape
to change Z 48 against Z 34
iAs when cutting metric threads, in most cases only the two shorter toothed belts
(1145) are required. Exception: For a lead of 13. 14. 16 or 19 threads/inch. In this
case, the longer toothed belt (1146) is required to connect wheels A and C.
This manual suits for next models
2
Table of contents
Other WABECO Lathe manuals
Popular Lathe manuals by other brands

Southbend
Southbend MODEL SB1016 owner's manual

Micromark
Micromark MicroLux 7x14 Operating and maintenance instruction

Far Tools
Far Tools TBF1000 Original manual translation

Southbend
Southbend SB1311 instruction sheet

Southbend
Southbend SB1051 owner's manual

HOLZMANN MASCHINEN
HOLZMANN MASCHINEN D 510F User Manual translation