Wagner Ewar WP 121 User manual

Seifen- und Desinfektionsmittelspender
Dispenser for soap and disinfectant
Edelstahl-Bedienhebel
Stainless steel lever
Auslaufblende
Face shield
Behälter
Container
Clip
Wichtig! Important!
Vor der Verwendung neuer Füllgüter ist stets die Kompatibilität von Füllgut und Spendersytem zu prüfen, um eine
einwandfreie Funktionalität gewährleisten zu können. Der Hersteller übernimmt keine Haftung für etwaige Schäden oder
Kosten, die durch Inkompatibilitäten von Füllgut und Spendersystemen entstehen können.
The compatibility of lling material and dispenser system must be checked prior to the use of new lling materials,
in order to be able to guarantee fault-free functionality. The manufacturer assumes no liability for any damages or costs
which arise due to the incompatibility of lling material and dispenser systems.
Bedienungsanleitung • Instruction manual
WP 120 · WP 121

Technische Änderung vorbehalten.
Technical modications reserved.
82
245
82
245 ca.50
ca. 130
215
40
51 169
500 ml
WP 120
Maße in mm
Dimensions in mm
Wandhalter
Wall plate
92
290
90
290 ca.50
ca. 170
225
40
51 203
1000 ml
WP 121
Maße in mm
Dimensions in mm
Wandhalter
Wall plate

1
2
1. Vorbereitung
Bei Verwendung als Seifenspender das Gerät über oder in unmittelbarer Nähe des Wasch-
tisches anbringen, damit Flüssigkeit nicht von den Händen auf den Boden tropft.
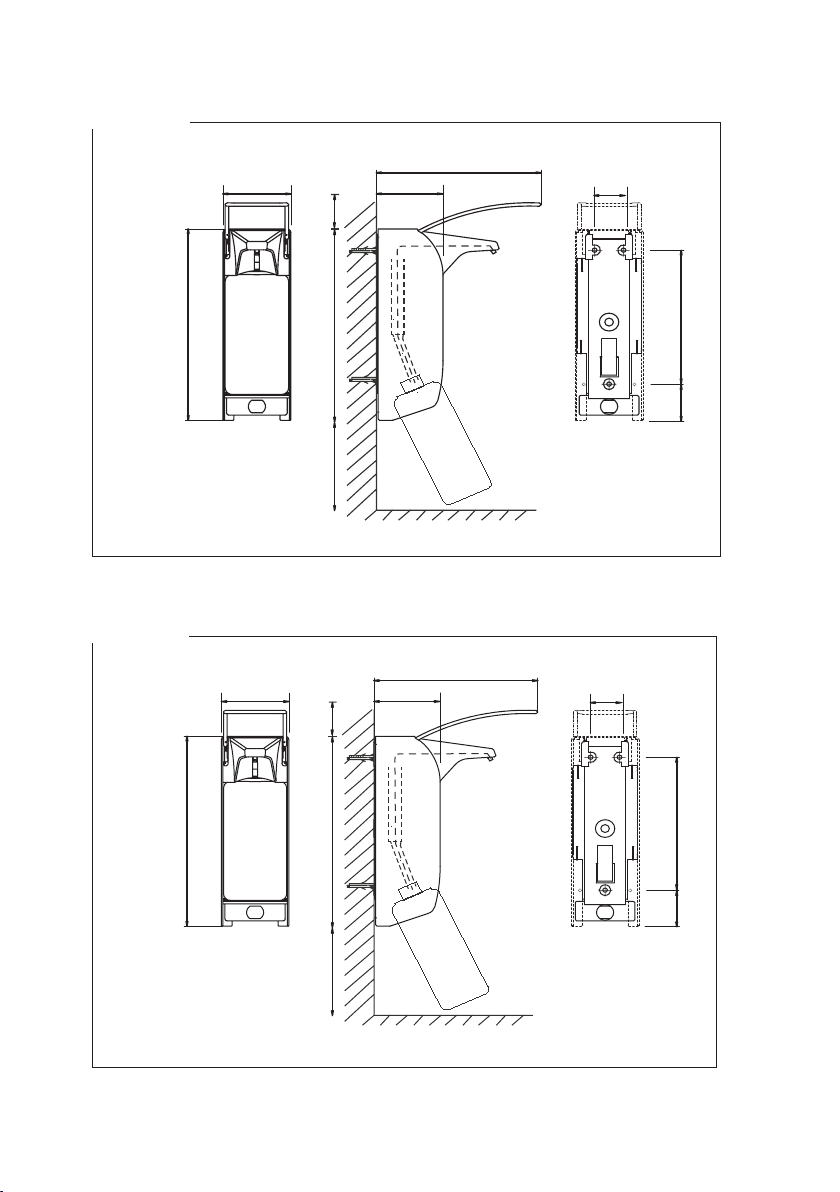
Benötigter Platz oberhalb des Spenders: 50-70 mm für den Bügel sowie zum Aufsetzen
und Abnehmen des Spenders, weitere 100 mm für Betätigung. Benötigter Platz unterhalb
des Spenders zur Flaschenentnahme: ca. 130 mm bei 500ml Ausführung, ca. 170 mm bei
1000ml Ausführung.
Ergonomisch günstige Montagehöhe: 130–135 cm, gemessen vom Fußboden bis Ober-
kante des Spendergehäuses.
1. Preparation
When using as a soap dispenser, install the dispenser as close as possible to the sink to
prevent wet hands from dripping onto the oor.
Required space above the dispenser: 50-70 mm for the lever, and for dispenser removal and
placement, as well as an additional 100 mm for operation. The required room below the
dispenser, necessary for bottle removal, is about 130 for the 500ml version and 170 mm for
the 1000ml version.
Optimal mounting height for use: 130-135 cm, measured from the oor to the upper edge
of the dispenser housing.
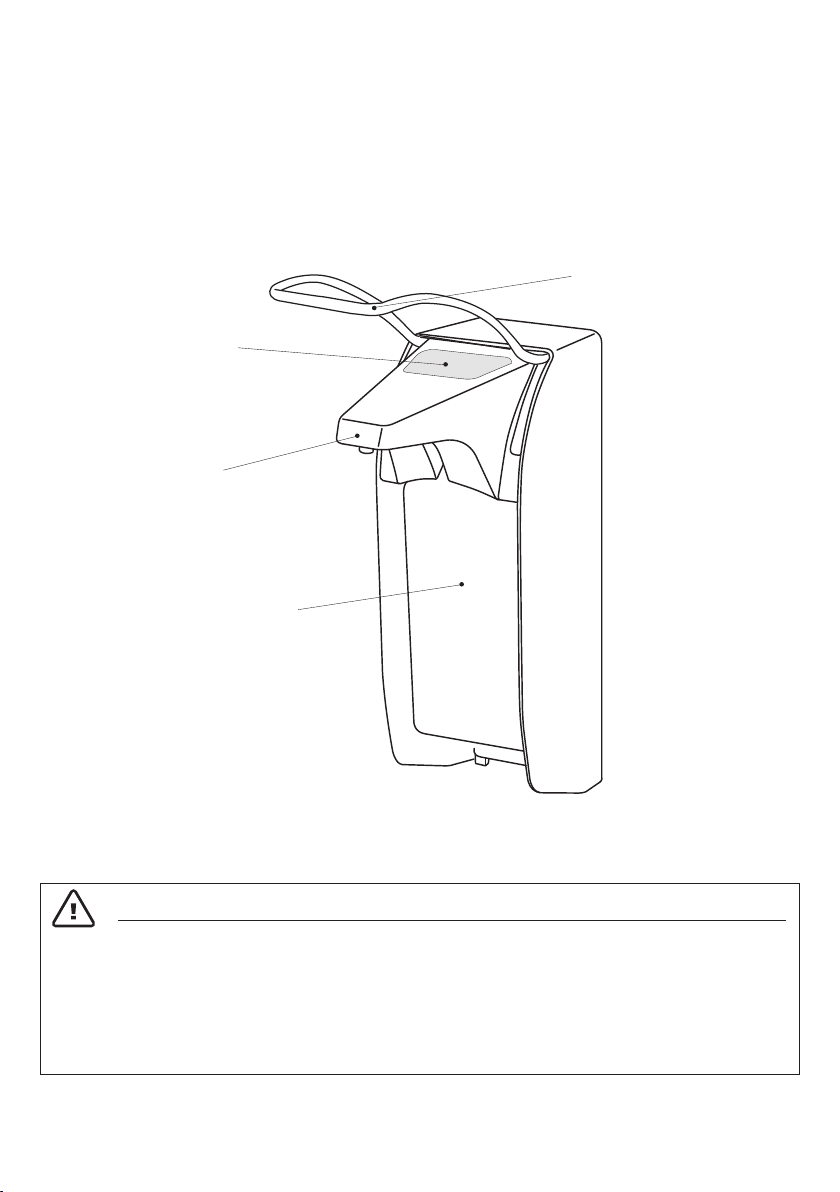
2. Spendermontage
Zunächst Flasche entfernen: Dazu Unterseite der eingesetzten Flasche leicht nach vorn
kippen und Flasche aus dem Spender entnehmen.
Spender von Rückwand abnehmen: Dazu die Verriegelungszunge an der Rückwand drücken
und Spender nach oben schieben.
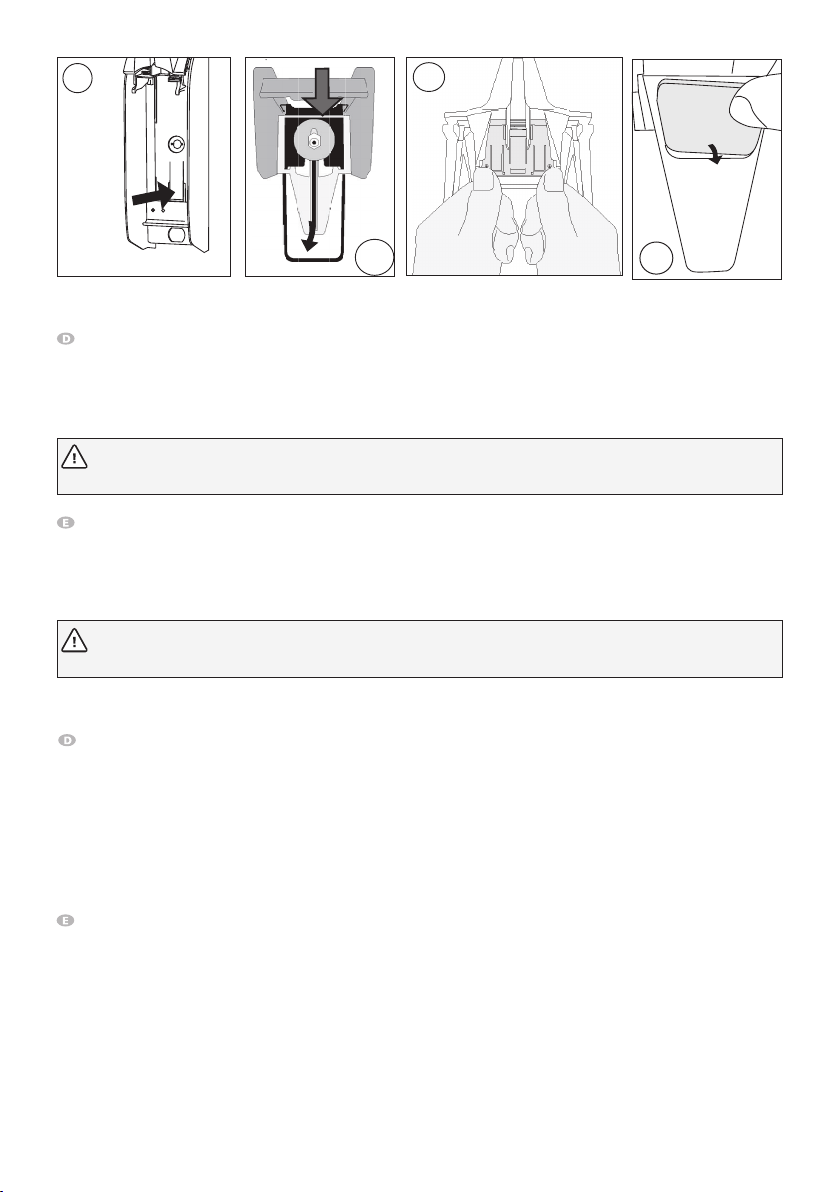
Mit beiliegendem oder entsprechend geeignetem Befestigungsmaterial die Rückwand an der
Wand befestigen. Den Spender von oben auf die Rückwand aufschieben, bis die Verriege-
lungszunge einrastet (siehe Abbildung 2).
Optional: Befestigung des Spenders mit einer Schraube (siehe Abbildung 2.1).
Bereits vorhandene Rückwände können weiter verwendet werden!
Falls Montage erforderlich, Wand vorher auf Eignung prüfen!
Wall plates already in use may continue to be used.
If mounting is necessary, please test wall for suitability before mounting.
2. Mounting of the dispenser
First remove the bottle: to do this tilt the bottom of the bottle forwards and then pull the
bottle out of the dispenser.
Remove the dispenser from the wall plate: press the latch on the back wall of the dispenser
and slide the dispenser upwards, off the plate. With the enclosed, or other suitable attach-
ment materials, attach the wall plate to the wall. Slide the dispenser onto the wall plate
from the top until the latch clicks into place (see image 2).
Optional: Fixation of dispenser wih one screw (see image 2.1).
Schraube
screw
vis
2
.1

3
3. Flexible Dichtungskappe
Die im Lieferumfang enthaltene exible Dichtungskappe sorgt für optimalen Andruck bei verschiedenen Flaschengrößen und
verhindert das Entweichen von Alkohol aus dem Desinfektionsmittel. Diese kommt nur zum Einsatz bei Seifen- und Desinfektions-
mittelpumpen.
3. Flexible Sealing Cap
The included exible sealing cap ensures optimal sealing for various bottle sizes and prevents the loss of alcohol from the disin-
fectant solution. Use for soap- and disinfectant pumps only.
5. Einsetzen / Austausch der Flasche
Gefüllten Behälter von unten in den Spender einsetzen, bis der Behälter einrastet.
5. Bottle Placement / Exchange
Insert the lled bottle into the dispenser from the bottom, until snaps into place.
6. Inbetriebnahme
Bei der ersten Inbetriebnahme sowie nach dem Austausch der Pumpe oder
des Behälters den Hebel einige Male bis zum Anschlag betätigen, bis der
Spender dosiert. Dabei die Hand unter den Auslauf halten.
6. Initial Operation
For rst use hold your hand under the nozzle and operate the lever several
times until solution is dispensed.
45
4.Pumpe
28er Edelstahl-Pumpe mit Kunststoffansaugrohr, autoklavierbar.
4.Pump
Pump 28 stainless steel with plastic suction tube, autoclavable.
6

7
The dosage can be changed to 1.2 ml/1.0 ml/0.75 ml (dosage dependent on the viscosity of the lling solution) by turning the
adjustable wheel. With rst use, the wheel may be hard to turn; if necessary use a pair of at-nose pliers. The set dosage can be read
from the wheel, when looking at it from the front, right side. The upper indication of the dosage volume is relevant (see image 7).
Important! Do not take apart the housing! Use only original replacement parts issued from the manufacturer. Only for
the dosage of suitable solutions such as soaps, lotions and disinfectants. Caution notice! The use of unsuitable solutions
can inuence the function of the dispenser and may cause the solution to spray into eyes.
7. Dosage
The dispenser is preset to dispense the maximum dosage of 1.5 ml/stroke. To change the dosage, rst remove the pump from
the dispenser (see step 8).
Die Dosierung kann durch Drehen des Einstellrades auf ca. 1,2 ml/1,0 ml/0,75 ml (in Abhängigkeit von der Viskosität des Füll-
gutes) reduziert werden. Bei erstmaliger Einstellung kann das Einstellrad schwergängig sein. Dann gegebenenfalls eine kleine
Flachzange zum drehen des Einstellrades verwenden. Die aktuell eingestellte Dosiermenge ist am Einstellrad abzulesen, wenn
man von vorn rechts auf die Pumpe blickt. Maßgebend ist hier die obere Angabe der Dosierung (siehe Abbildung 7).
Wichtig! Keinesfalls das Gehäuse zerlegen! Nur Originalersatzteile verwenden.Der Spender ist nur für die Dosierung ge-
eigneter Medien wie Flüssigseife (ohne Reibemittel), dünnüssige Lotionen oder Desinfektionsmittel geeignet. Vorsicht! Die
Verwendung nicht geeigneter Medien kann die Funktion des Spenders beeinträchtigen und Flüssigkeit kann in die Augen spritzen!
7. Dosierung
Der Spender ist auf die maximale Dosierleistung von ca. 1,5 ml/Hub voreingestellt. Zur Änderung der Dosierung zunächst Pumpe aus
dem Spender entnehmen (siehe Punkt 8)..
8. Pumpenausbau / Pumpenwechsel
Auslaufblende zuerst leicht nach vorn ziehen und dann nach oben schwenken.
Pumpensperre mit dem Finger gedrückt halten und Pumpe nach vorne herausziehen (siehe Abbildungen 8.1-8.3).
8. Pump Removal / Exchange
Gently pull face shield forward and then lift upwards. Next, press down on the pump lock with a nger, and pull the pump
forwards (see images 8.1-8.3).
8.1
1.
2. 8.2
7.3
8.3

9
10.1
10.2
9. Reinigen/Sterilisieren
Spender von Rückwand abnehmen: Dazu die Verriegelungszunge an der Rückwand drücken und Spender nach oben
herausschieben.
Der Spender und die Edelstahlpumpen (Auslaufrohr aus Edelstahl) sind mit Heißdampf (134 °C, 2 bar, max. 20 Min.
Haltezeit) autokalvierbar.
9. Cleaning / Sterilization
Remove the dispenser from the wall plate: to do this, press the latch on the back wall of the dispenser and slide the
dispenser upwards, off the plate.
The dispenser and stainless-steel pumps (outlet pipe made from stainless steel), are autoclavable with superheated steam
(134 °C, 2 bar, max. 20 min dwell time).
Wichtig! Kunststoff-Rückwand, Flasche, Kunststoffpumpen (K-Pumpen) sind nicht autoklavierbar!
Ausbau der Pumpe siehe unter Punkt 8.
Nach dem Autoklavieren Spender und Pumpe mindestens eine Stunde bis zur nächsten Benutzung auskühlen lassen!
Important! Wall plate, bottle, plastic pumps (K pumps) are not autoclavable! For pump removal see step 8.
After autoclaving, let dispenser and pump cool for at least one hour prior to next use !
10.3
10. Ausbau des Clips
Sofern vorhanden, zuerst Veschluss-blende entfernen.
Flasche entfernen (siehe Punkt 5.).
Pumpe entfernen (siehe Punkt 8.).
Spender auf den Kopf drehen, so dass Sie von unten in das Gehäuse blicken (siehe Abbildung 10.1).
Die gefederte Metallachse an der oberen Rückseite des Spenders mit dem Daumen in Richtung der Pumpe drücken,
gleichzeitig mit der anderen Hand die Auslaufblende an der Frontseite vorsichtig aushängen und abnehmen.
Clip vorsichtig von innen nach außen aus der Fassung drücken (siehe Abbildung 10.2).
Zusammenbau in umgekehrter Reihenfolge (siehe Abbildung 10.3).
10. Removal of Clip
If present, rst remove the locking plate.
Remove the bottle (see point 5.).
Remove the pump (see point 8.).
Turn the dispenser on its head, so you look into the housing through the bottom (see image 10.1).
Using your thumb, press the spring-loaded metal pin, located on the upper, back-side of the dispenser, in the direction of
the pump. At the same time, use your other hand to carefully unhinge and remove the face shield from the front side of the
dispenser.
Carefully press on the clip from the inside outwards, to release it from its socket (see image 10.2).
Assemble in reverse order (see image 10.3).

11. Allgemeine Pegehinweise
Das Robert Koch-Institut empehlt: „Bei beiden Spenderarten (Anm.: Händedesinfektionsmittel- und Seifenspender) müs-
sen die xen Außen- und Innenteile aufbereitbar sein. Das ist auch maschinell möglich. […] Sichtbare Verunreinigungen
des äußeren Gehäuses und aller ohne weitere Manipulation zugänglichen Teile sowie Tropfnasen am Auslass sind durch
Wischdesinfektion zu beseitigen. Für Bedienhebel empehlt sich eine tägliche Wischdesinfektion durch den Reinigungs-
dienst. Umfang und Frequenz der Kontrollen und der Innenaufbereitung von Spendern sollten im hauseigenen Hygiene-
plan festgelegt werden, z.B. halbjährig.“ [Quelle: Robert Koch-Institut, Empfehlungen zur Händehygiene, 2016]
Um eine einwandfreie Funktion des Spenders zu gewährleisten, ist eine regelmäßige Reinigung von Hand oder im RDG
erforderlich.
Manuelle Reinigung: Anhaftende Produktreste regelmäßig entfernen. Spülung des Spendergehäuses und der Pumpe
mit heißem Wasser, Durchspülung der Pumpe mit heißem Wasser. Desinfektion des Spendergehäuses mit geeignetem
Flächendesinfektionsmittel möglich.
Aufbereitung im RDG: ist im dafür vorhergesehenen Programm „Spenderreinigung” mit pH-neutralem Reiniger möglich.
Achtung, Kunststoffpumpen können bei max. 65 °C aufbereitet werden!
Aufbereitung im Autoklav: der Spender und die Edelstahlpumpe sind autoklavierbar (134 °C, 2 bar, max. 20 Min. Halte-
zeit).
Dies gilt nicht für die Kunststoffrückwand, Flasche, Kunststoffpumpe.
11. Information for General Care
The Robert Koch-Institute recommends: “For both dispenser types (note: hand disinfectant and soap dispenser), the xed
outer and inner parts must be able to be reprocessed. This is also possible by machine. [...] Visible contamination of the
outer housing and all accessible parts without further manipulation as well as soilings at the outlet must be removed by
wipe disinfection. Daily wipe disinfection is recommended for operating levers. The scope and frequency of checks and
the reprocessing of dispensers should be specied in the internal hygiene plan, e.g. every six months.” [Source: Robert
Koch Institute, recommendations for hand hygiene, 2016]
In order to guarantee proper functioning of the dispenser regular manual cleaning or processing in cleaning-disinfection
devices is necessary.
Manual cleaning: Regularly remove adherent product residual. Cleaning of the dispenser housing and the pump with hot
water. Rinsing the pump with hot water. Disinfection of shroud is possible with appropriate surface disinfectants.
Processing in cleaning-disinfection devices: choose program „Dispenser cleaning” and use pH-neutral cleaning solutions.
Important: Cleaning of plastic pumps up to max. 65 °C!
Processing in autoklave: the dispenser and stainless steel pump are autoclavable with superheated steam (134 °C, 2 bar,
max. 20 min dwell time).
Plastic wall plate, bottle, plastic pumps (K pumps) are not autoclavable.

1416350 • 160124 • 1.1
Ernst Wagner GmbH & Co. KG
Ernst-Abbe-Str. 21
D-72770 Reutlingen
www.wagner-ewar.de
info@wagner-ewar.de
+49 7121 515390 www.wagner-ewar.de/service
This manual suits for next models
1
Table of contents
Other Wagner Ewar Dispenser manuals
Popular Dispenser manuals by other brands

Hewi
Hewi SENSORIC 950.06.102XA Installation and operating instructions

Kimberly-Clark PROFESSIONAL
Kimberly-Clark PROFESSIONAL 4980 installation guide

Hagleitner
Hagleitner XIBU 2WIPE hybrid manual

Hilti
Hilti HDE 500-A22 Operating instruction

Bestway
Bestway 58699 manual

Narvon
Narvon SLUSHY 378SM2 Service manual