WAGNER POWER STEAMER 915e User manual

1219 • Form No. 2411829A
915e POWER STEAMER™
OWNER‘S MANUAL • GUIDE D‘UTILISATION •
MANUAL DEL PROPIETARIO
READTHIS MANUAL FOR COMPLETE INSTRUCTIONS •
LIRE CE MANUEL POUR OBTENIR DES DIRECTIVES COMPLÈTES •
LEA ESTE MANUAL PARA OBTENER LAS INSTRUCCIONES COMPLETAS
wagner-group.com
EN ES
F
ENGLISH P. 2
FRANÇAIS P. 14
ESPAÑOL P. 26
915e POWER STEAMER™

2
EN
IMPORTANT SAFETY INFORMATION
TABLE OF CONTENTS
IMPORTANT SAFETY INFORMATION ______________2-4
Explanation of Symbols __________________________ 2
Grounding Instructions __________________________ 3
Extension Cords ________________________________ 3
Safety Hazards _________________________________ 3
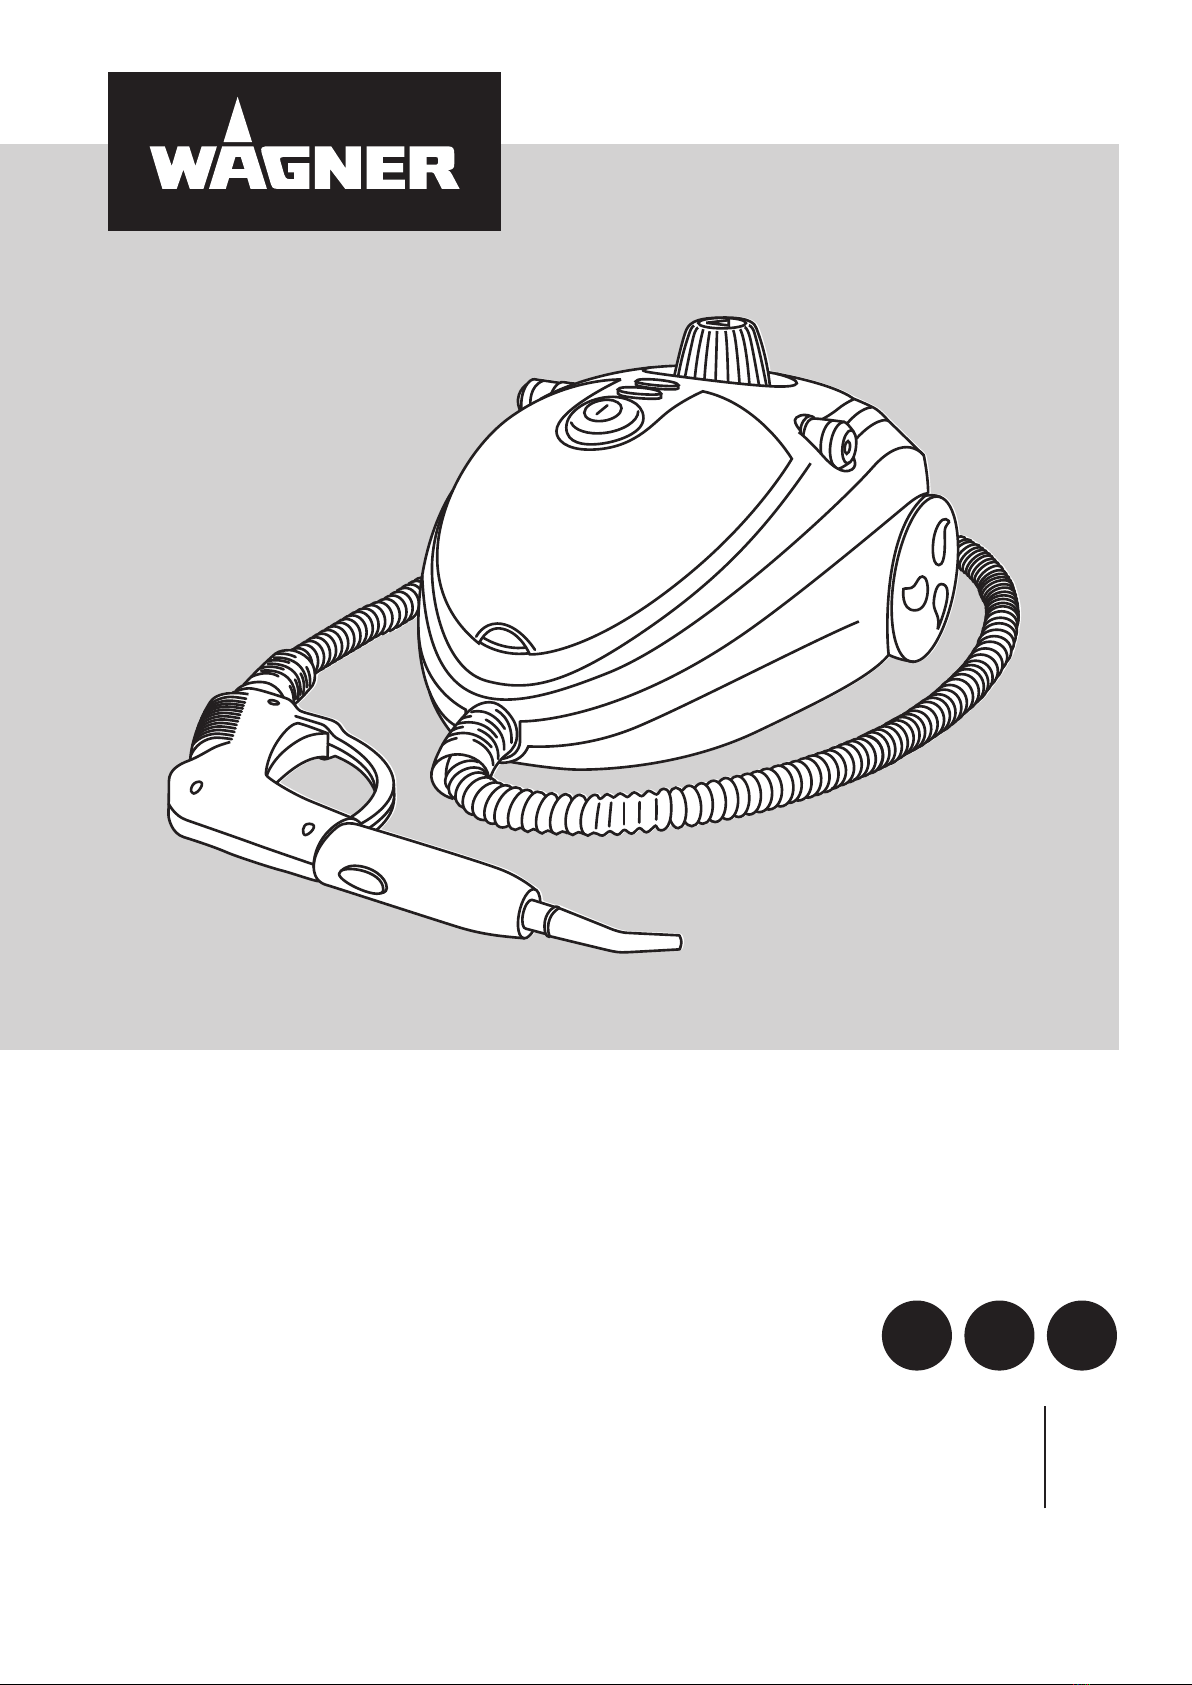
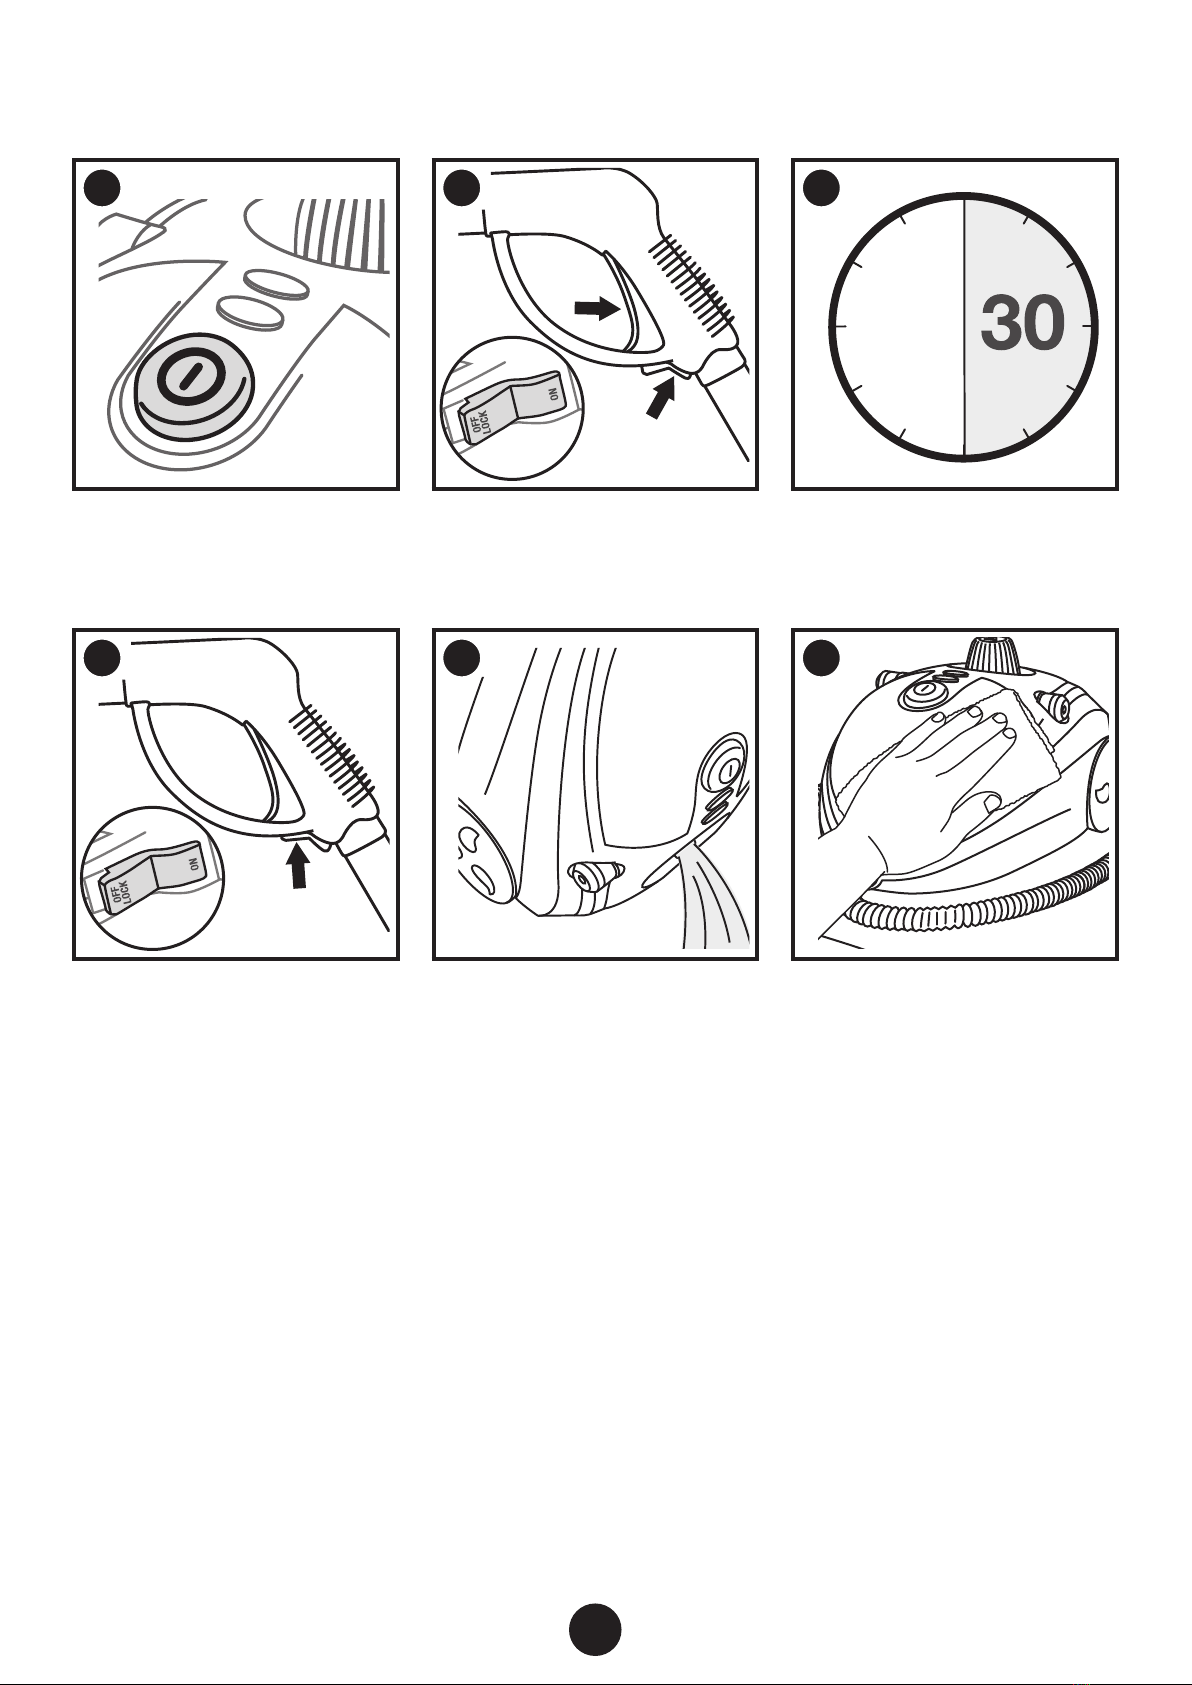
QUICK START REFERENCE GUIDE__________________ 4
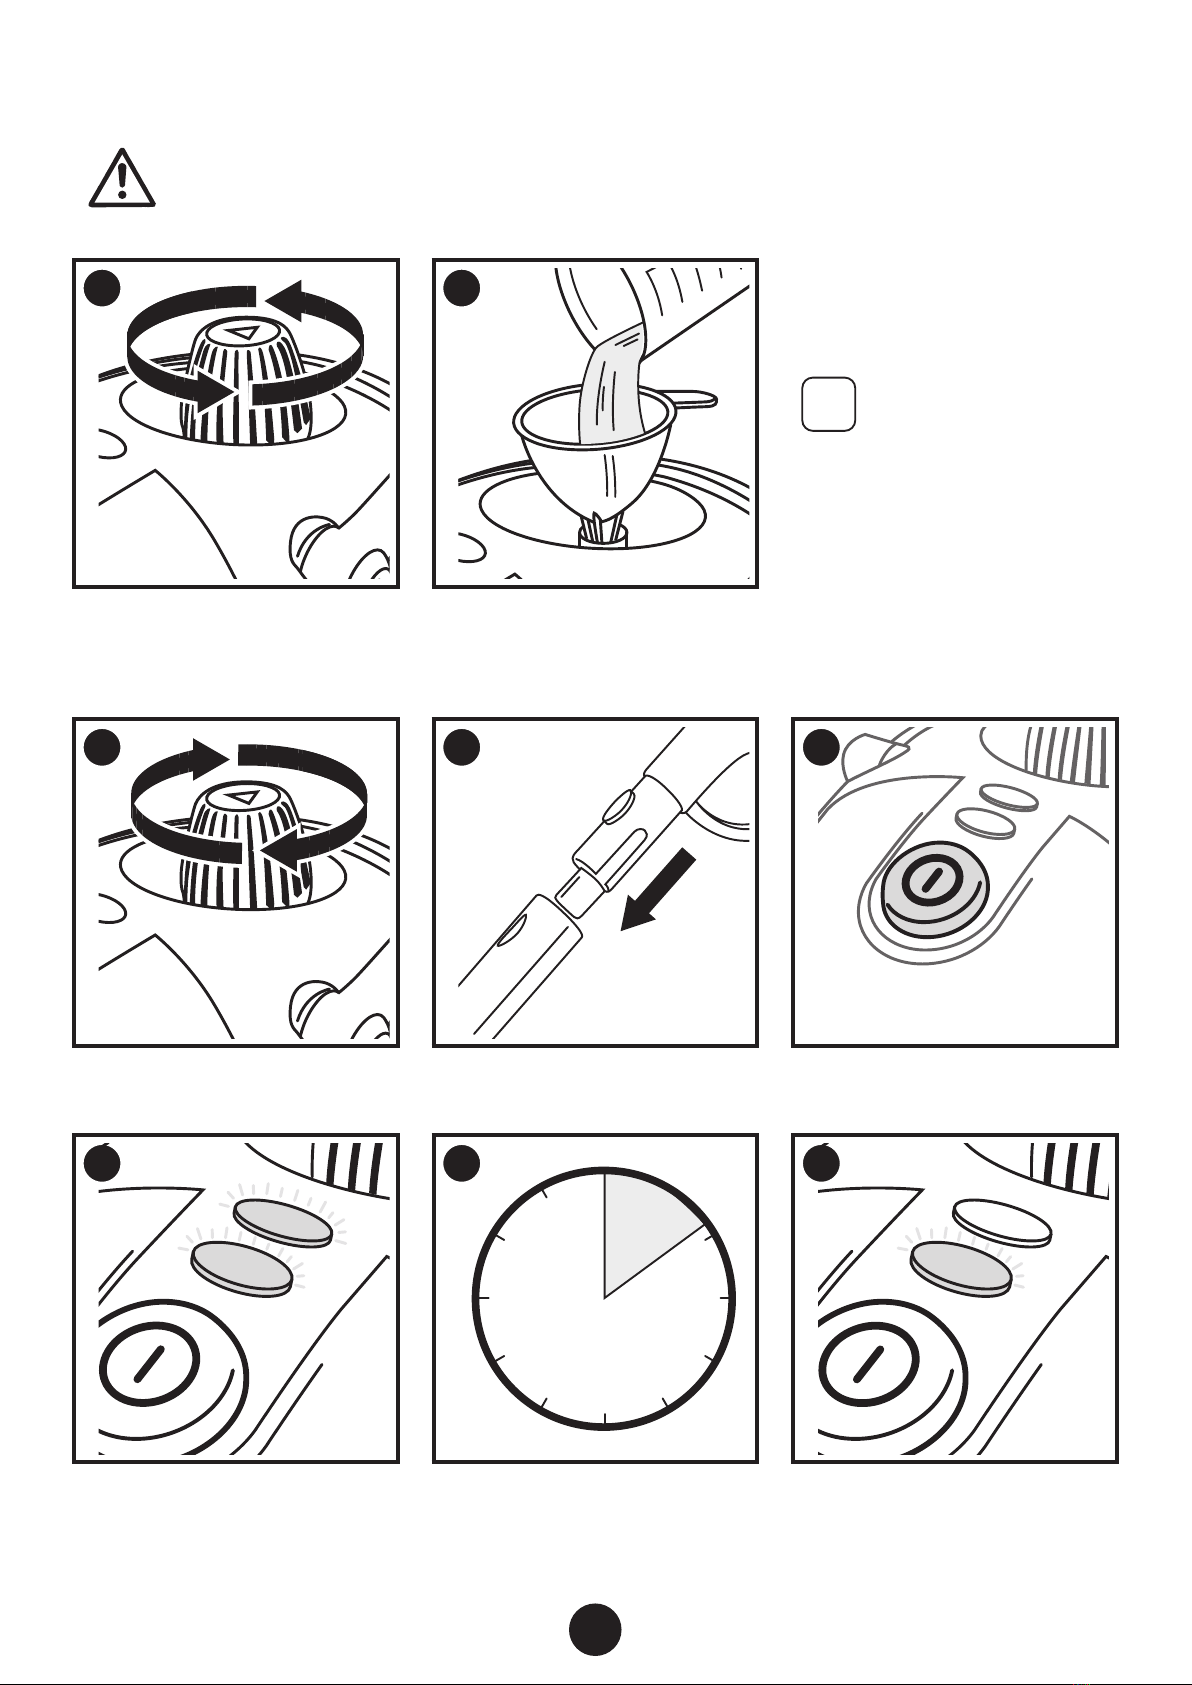
FILLING THE WATER TANK________________________ 5
STEAM GUN OPERATION _________________________ 6
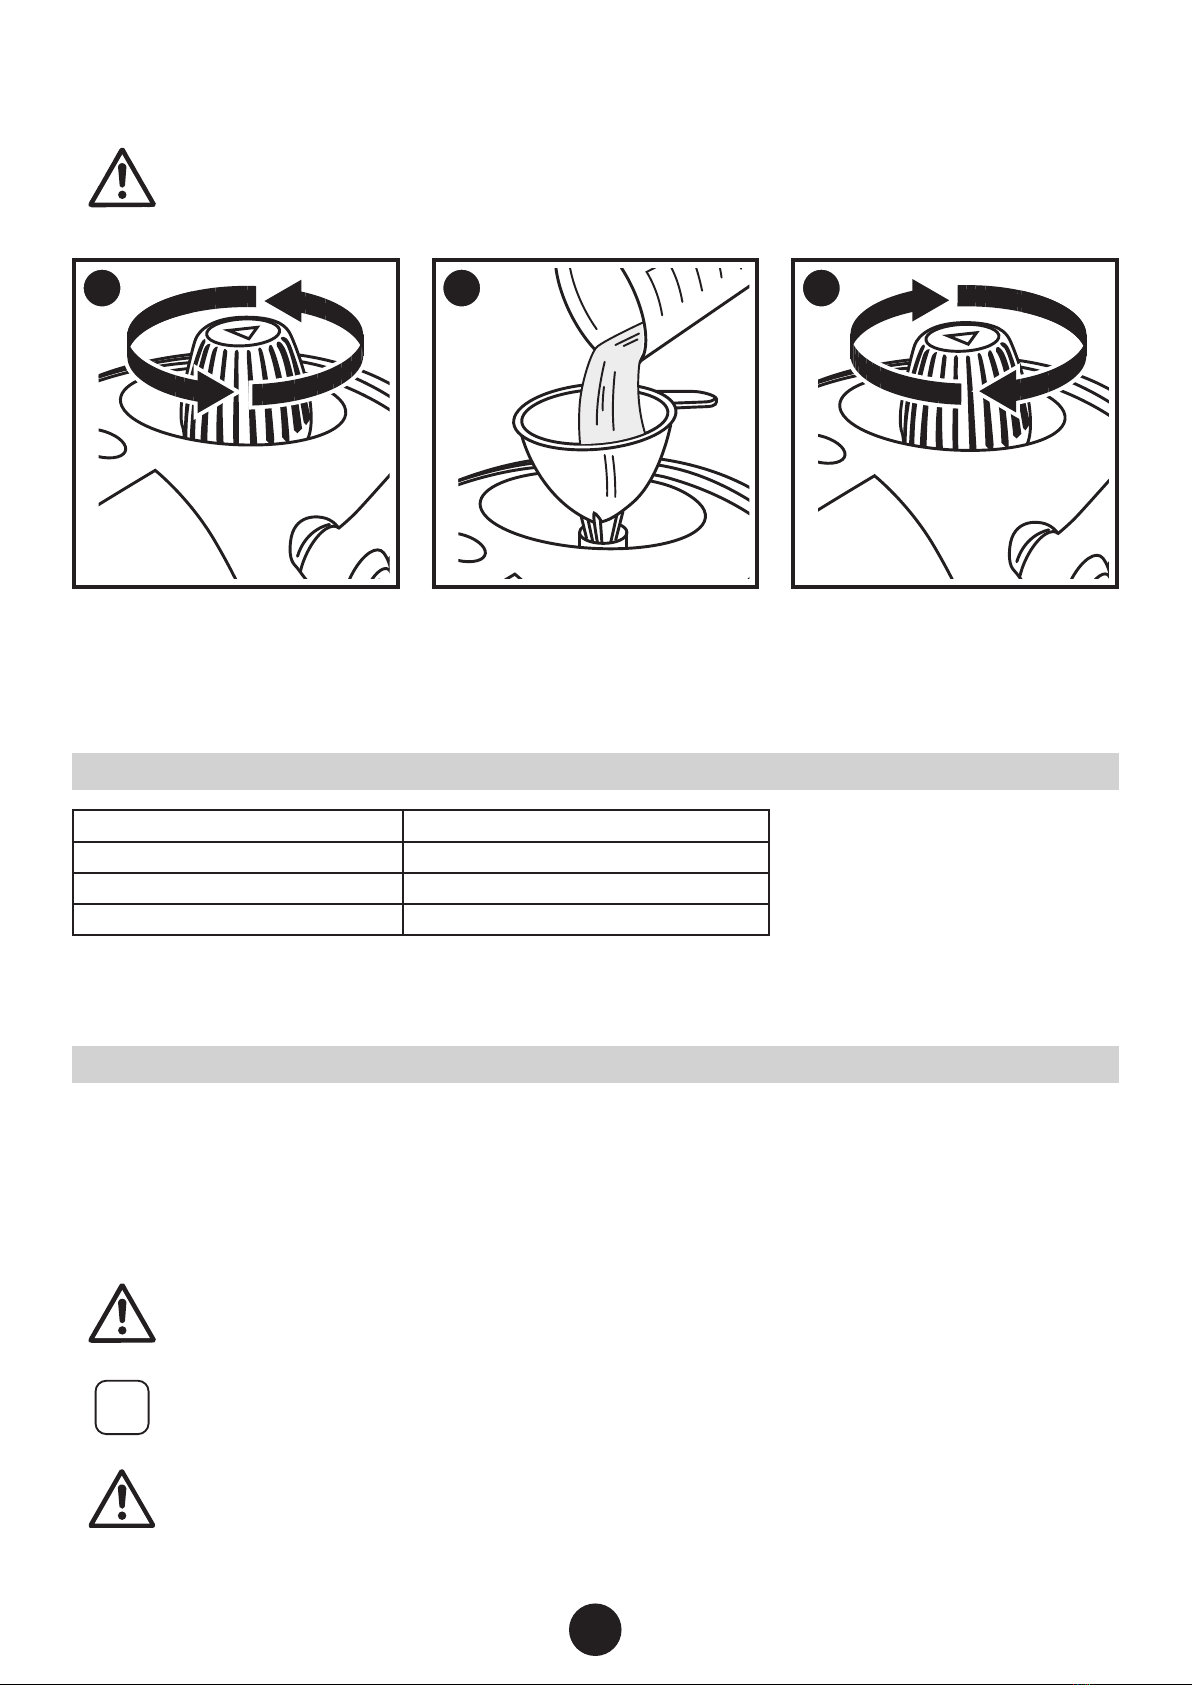
ASSEMBLING AND ATTACHING ACCESSORIES ______ 7
STRAIGHT ADAPTER ACCESSORIES ________________ 8
ANGLED ADAPTER ACCESSORIES _________________ 9
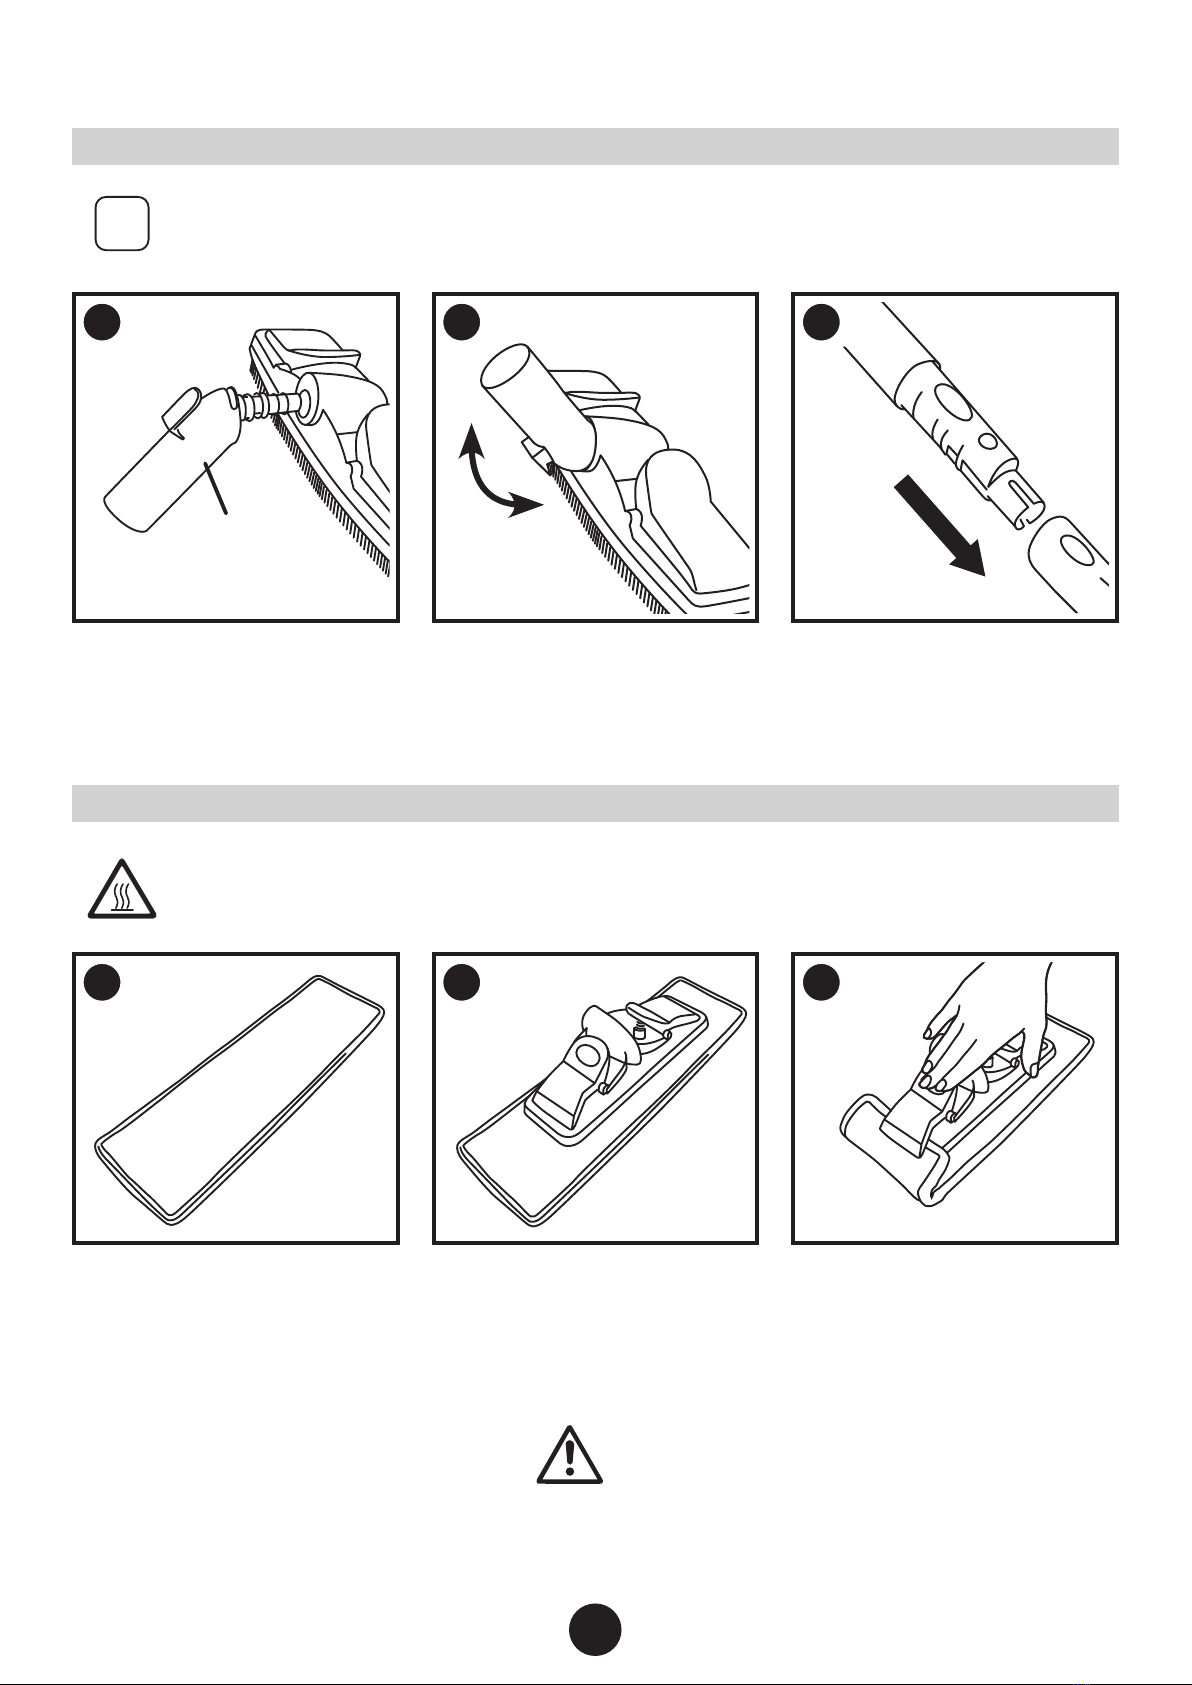
CLEANING AND STORAGE _______________________ 10
MINERAL DEPOSITS ____________________________ 11
TROUBLESHOOTING ____________________________ 12
WARRANTY____________________________________ 13
PARTS LIST _________________________________ 38-40
EXPLANATION OF SYMBOLS
Read all safety information before operating the equipment.
Save these instructions.
To reduce the risks of re or explosion, electrical shock and
the injury to persons, read and understand all instructions
included in this manual. Be familiar with the controls and
proper usage of the equipment.
This symbol indicates a potential hazard
that may cause serious injury or loss of life.
Important safety information will follow.
At
tention
This symbol indicates a potential hazard
to you or to the equipment. Important
information that tells how to prevent
damage to the equipment or how to avoid
causes of minor injuries will follow.
HOT STEAM AND PARTS. May cause
injury, including skin burns or property
damage. Temperatures exceed 212˚ F
(100˚ C).
FIRE.May cause severe injury and/or
property damage
ELECTRIC SHOCK. May cause severe
injury.
i
Notes give important information which
should be given special attention.
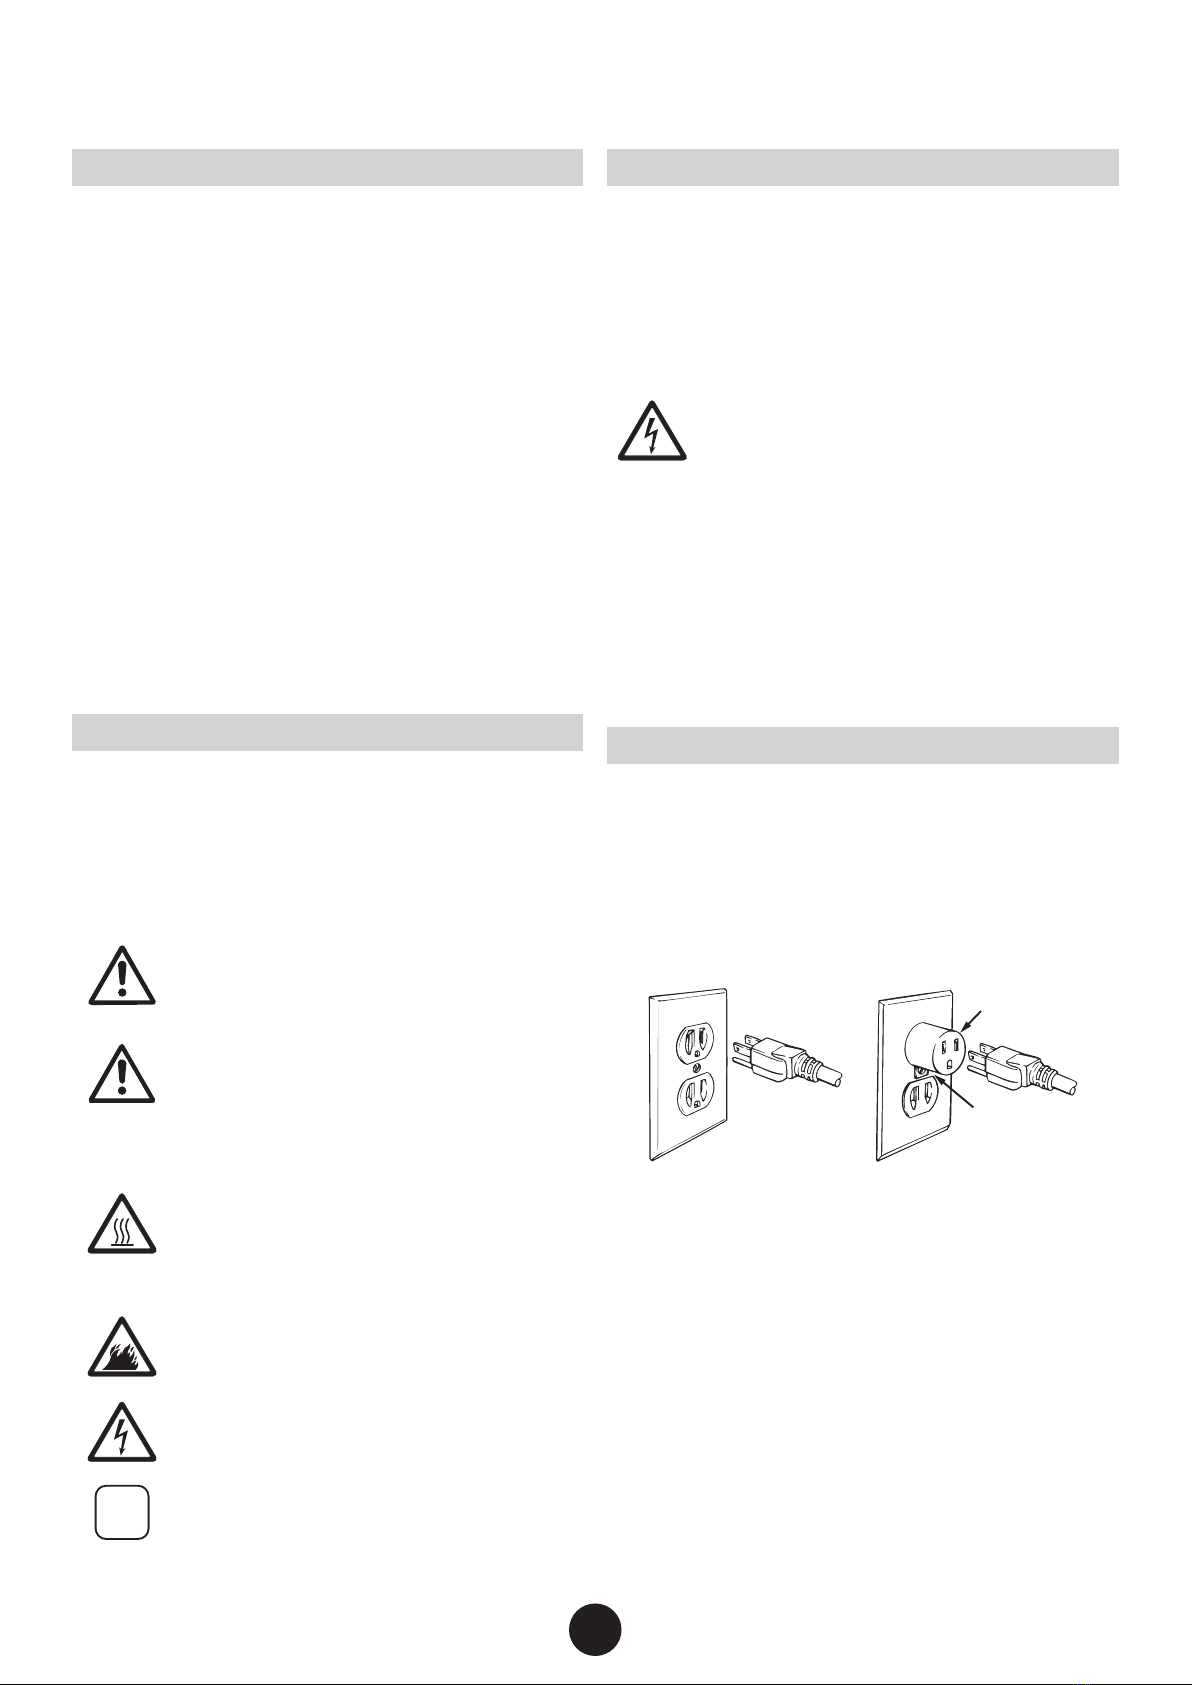
GROUNDING INSTRUCTIONS
This product should be grounded. In the event of an electrical
short circuit, grounding reduces the risk of electric shock by
providing an escape wire for the electric current. This product
is equipped with a cord having a grounding wire with an
appropriate grounding plug. The plug must be plugged into
an outlet that is properly installed and grounded in accordance
with all local codes and ordinances.
WARNING - Improper installation of the
grounding plug can result in a risk of electric
shock.
If repair or replacement of the cord or plug is necessary, have
your nearest Wagner Authorized Service Center replace it.
Check with a qualied electrician or serviceman if the
grounding instructions are not completely understood, or if in
doubt as to whether the product is properly grounded. Do not
modify the plug provided; if it will not t the outlet, have the
proper outlet installed by a qualied electrician.
EXTENSION CORDS
Use only a 3-wire extension cord that has a 3-blade grounding
plug, and a 3-slot receptacle that will accept the plug on the
product. Make sure your extension cord is in good condition.
When using an extension cord, be sure to use one heavy
enough to carry the current your product will draw. An
undersized cord will cause a drop in line voltage resulting in
loss of power and overheating. For lengths up to 100 feet, use
14 AWG extension cords.
Grounded
Outlet Grounded
Outlet Box
Adapter
Tab and
Grounding
Screw

EN
3
IMPORTANT SAFETY INFORMATION
SAFETY HAZARDS
WARNING: HOT STEAM AND
PARTS
May cause injury, including skin burns or
property damage. Temperatures exceed
212° F (100ºC).
PREVENTION:
• Stay clear of steam and steam plate surface. DO NOT place
hand in front of steam plate.
• Water drops are hot and may burn skin. Use extreme
caution when using steam plate overhead, and routinely
empty water from steam plate. Wear eye protection and
gloves when using this steamer.
• Steam handle may become warm to the touch during
usage.
• Allow parts to cool before changing accessories and /or
opening ll cap.
• Never point steam plate or accessories at anyone.
• Hot water may eject from accessories when trigger is
activated.
• DO NOT over ll water container.
• DO NOT strain or kink hose. Never repair a damaged hose.
WARNING: FIRE
May cause severe injury and/or property
damage.
PREVENTION:
• DO NOT allow water to boil dry. Boiling dry may cause
overheating and re.
• DO NOT allow water or steam to enter light switches or
sockets.
WARNING: ELECTRICAL SHOCK
May cause severe injury.
PREVENTION:
• Power cord must be connected to grounded (3 prong)
outlet.
• DO NOT use the unit if the power cord is worn or damaged.
Never repair a power cord.
• DO NOT pull water container by power cord.
• DO NOT allow water or steam to enter light switches or
sockets.
WARNING: GENERAL
Can cause severe injury or property damage.
PREVENTION:
• DO NOT modify parts or components. Never repair
damaged or worn parts.
• Water container must rest on a sturdy, level surface and in
upright position.
• Keep power steamer away from children.
• NEVER leave power steamer unattended.
• Read all instructions and warnings before each use.
CLEANING FABRICS
A number of materials and fabrics are NOT suitable to be
cleaned by steam:
DO NOT use on leather, wax polished furniture or oors,
synthetic fabrics, velvet, Dralon® or other delicate, steam
sensitive materials.
Whensteaminganysurfaceforthersttime,itisrecommended
that you consult the manufacture’s guidelines for cleaning.
CLEANING GLASS/MIRRORS
Thermal shock can also shatter glass. Do not apply steam to
glass surfaces that are cooler than 32°F.
ELECTRICAL CONNECTIONS
• DO use a three-pronged extension cord that is at least 18
gauge.
• DO only plug the cord or extension cord into a three-
pronged grounded power supply.
• To prevent electrical shock, NEVER immerse the Power
Steamer into water or other liquids
PROP 65 WARNING
• Handling multiple components in this product exposes
you to lead, a chemical known to the State of California
to cause birth defects or other reproductive harm. Wash
hands after use.
STORAGE
Make sure unit is clean and dry before storing and always
follow cool down instructions. Store in a dry location. To
prevent damage, the electrical cord should not be crimped
during storage.

4
EN
QUICK START REFERENCE GUIDE
1 2
Unscrew the safety cap by turning
counter clockwise.
Fill the tank using the funnel provided.
The tank holds up to 40 oz. /1200ml of
water. DO NOT overll the water tank or
damage to the product may occur.
345
Once full replace the safety cap by
turning clockwise, fasten tightly.
Attach the necessary cleaning adaptor
and accessory to the steam gun nozzle.
Plug the machine into the outlet and
press the ON/OFF button to ON.
6
Red
Orange
7
9
8
Red
The Red power light and Orange steam
light, indicating that the machine is
building steam, should both illuminate.
Allow approximately 9 minutes for the
machine to build up steam pressure.
Once the orange steam pressure light
turns o, the machine is ready to use.
This is only a quick reference. Read the entire instruction manual prior to using the product.
Read all warnings and safety instructions in the instruction manual before use.
i
Only use distilled water,
mineral build-up from
tap water can shorten
the life of the steamer.

REFILLING THE WATER TANK
If the unit has been in use, ALWAYS follow these safety precautions before removing the water tank safety cap:
• Switch the unit to the OFF position and unplug the unit. Allow at least 30 minutes for the unit to cool.
• Release all the steam pressure in the unit by pressing the steam nozzle ow trigger (the red safety switch must be in
the ON position).
Failure to follow these precautions may result in burns from escaping
steam when the water tank safety cap is removed.
i
Safety Cap will rotate but will not unscrew until unit is cool and pressure is
released.
At
tention
For household use only. Do not overll reservoir as it may cause damage to
the unit. Allow a 30 minute cool down period before relling the reservoir.
EN
5
FILLING THE WATER TANK
123
Unscrew the safety cap. Fill the tank using the funnel
provided. The tank holds up to 40 oz.
/1200ml of water DO NOT overll the
water tank.
Fasten the safety cap tightly into
place.
NEVER ll the tank while the machine is plugged in.
WATER USAGE AND STEAM TIME GUIDELINES
AMOUNT OF WATER DURATION OF STEAM
13 oz. / 400ml Approximately 15 min.
26 oz. / 800ml Approximately 30 min.
40 oz. / 1200ml Approximately 40 min.

STEAM GUN OPERATION
REBUILDING STEAM PRESSURE WHILE IN USE
6
EN
1
ON
TRIGGER
2
The steam output is controlled
through the steam handle. The
handle has both a steam trigger and
red safety switch.
For intermittent steam generation
press the red safety switch to the ON
position. Pull the trigger to release
steam.
For continuous steam generation:
(A) Start by pressing the red safety switch to the ON position, pull the trigger
and then press the safety switch to LOCK. The trigger is now locked into
continuous steam mode.
(B) To unlock from continuous steam mode, release the trigger and press the red
safety switch back to the ON position.
1
Red
Orange
If the orange steam light comes on
during use, it indicates the machine
needs to re-build pressure in the
tank. The machine may still be used
while pressure rebuilds.
HOT STEAM AND PARTS.
May cause injury, including skin burns or
property damage. Temperatures exceed 212˚
F (100˚ C).
Burns can occur from hot water or steam.
DO NOT touch the steam nozzle or attempt
to connect accessories while unit is in use.
NEVER direct the steam at a person, pet or
electrical device.

EN
7
ASSEMBLING AND ATTACHING ACCESSORIES
1 2
The Steam Plate adaptor will attach
to either the steam gun nozzle or
extension wand.
Slide the adaptor over the nozzle,
aligning the oval hole with the lock/
release button on the nozzle. Push
the button to allow the attachment
to slide into place.
ATTACHING THE STEAM PLATE TO THE STEAM GUN
WALLPAPER REMOVAL
Hold steam plate at against wallpaper for 20 -30 seconds. Remove steam plate
and scrape steamed section of wallpaper.
i
For best results it may be helpful to score wallpaper before
steaming.

8
EN
STRAIGHT ADAPTOR ACCESSORIES
ATTACHING THE SQUEEGEE, JET NOZZLE AND UTILITY BRUSHES TO THE STEAM NOZZLE
CLEANING WITH THE ATTACHMENTS
1 2
Squeegee
/ Fabric
Steamer
Jet Nozzle
Nylon / Brass
Brushes
Straight
adaptor
Slide the straight adaptor over the steam
gun nozzle, align the oval hole with the
lock/release button and push the button
to allow the attachment to slide into
place.
Slide the accessory onto the straight adaptor.
See below for details on the dierent attachments.
SQUEEGEE FABRIC STEAMER JET NOZZLE
The squeegee is an excellent tool for
cleaning bathroom shower doors and
walls, replace doors and windows. Do
not use on glass when temperature is
below 32˚ F (0˚ C). Glass may crack in
cold temperatures.
Remove the rubber lip and use for
garment steaming and for killing dust
mites in matresses.
The jet nozzle can be used to disinfect
bathroom and kitchen xtures and hard
to reach places.
STIFF NYLON BRUSHES BRASS BRUSHES ATTACHMENT STORAGE
The nylon brushes can be used in
hard to reach areas around sink and
bathroom faucets.
The brass brushes can be used to
remove grease and grime found on grills
and ovens.
i
The straight adaptor is used to attach all accessories to the steam gun with the exception of the Large Brush.
ALWAYS attach accessories before turning the unit on.

EN
9
ANGLED ADAPTOR ACCESSORIES
ATTACHING LARGE BRUSH, ANGLED ADAPTOR, EXTENSION WANDS AND MICROFIBER MOP PAD
MICROFIBER MOP PAD
1
Angled
adaptor
2
90º
3
Slide the angled adaptor into the
large brush receptacle. The adaptor
must be angled down.
Rotate the adaptor 90° to set into place.
Align the brush adaptor with the end
of the extension wand so that the oval
hole on the adaptor aligns with the lock/
release button on the wand.
Press down on the lock/release button.
While continuing to hold button down,
slide brush head adaptor onto extension
wand. Press rmly until button snaps into
hole.
123
Lay microber mop pad on a at
surface.
Place the large brush over the mop
pad.
Press down on a clip on the brush
and fold the end of the pad beneath
the clip. Release the clip to fasten
the pad into place. Repeat for the
opposite side.
i
The angled adaptor is used to attach the Large Brush.
ALWAYS attach accessories before turning the unit on.
Never remove the mop pad while the machine is in
operation or warm to the touch.
Attention
Do not use on unsealed hard wood, laminate ooring or
unglazed ceramic surfaces.
Surfaces that are not properly sealed may be warped or
damaged by exposure to heat and moisture. Always test
a small area before beginning.
The large brush and mop pad are perfect for
use on these hard oor surfaces:
• Stained Concrete
• Linoleum
• Marble
• Granite
• Ceramic Tile
• Vinyl

10
EN
CLEANING AND STORAGE
1 2
ON
TRIGGER
3
Set the ON/OFF switch to o and
unplug the power cord from the
electrical outlet.
Release all remaining steam from
tank by pressing the steam nozzle
ow trigger (the Red safety switch
must be in the ON position).
Allow the unit to completely cool
(at least 30 minutes).
4
OFF/LOCK
5 6
Lock the steam nozzle ow trigger
into the o position and remove all
accessories from the trigger.
Drain any remaining water from the
tank. NEVER store the unit with water
in the tank.
Wipe the unit with a cloth and store
in a cool, dry location.

EN
11
MINERAL BUILD-UP
123
Use a measuring cup to mix 8 oz. of
vinegar an 8 oz of water.
Use the funnel to pour the solution
into the water tank.
Allow to stand for 30 minutes.
456
Drain the water-vinegar solution
from the tank.
Rinse water tank with fresh water and
repeat steps 1 though 5 until vinegar
odor dissipates.
Replace the water tank safety cap
and store in a cool, dry location.
i
If your municipal water supply contains high mineral content it is HIGHLY RECOMMENDED to use distilled or de-
mineralized water when using your Power Steamer. If you are unable to use distilled water it is recommended
to employ the following cleaning procedure prior to storing the unit.
NEVER clean the water tank while the unit is plugged into an outlet.

12
EN
TROUBLESHOOTING
PROBLEM CAUSE REMEDY
A. Unit fails to heat up. Red Power
light DOES NOT illuminate when
ON/OFF switch is set to ON.
1. Unit is not plugged in.
2. Loose electrical connection.
3. Unit is damaged or in need of repair.
1. Check wall outlet.
2. Discontinue use and call Customer Service.
3. Discontinue use and call Customer Service.
B. Unit fails to heat up. Red Power
light DOES illuminate when ON/
OFF switch is on.
1. Water tank is empty.
2. Mineral build-up in unit.
3. Unit is damaged or in need of repair.
1. Refer to Filling Water Tank procedure on Page
5.
2. Refer to Mineral Build-up section on page 11
for cleaning procedure.
3. Discontinue use and call Customer Service.
C. Steam output is weak or
intermittent
1. Water level in tank is running low.
2. Steam hose may be kinked internally.
3. Mineral build-up in unit.
1. Refer to Filling Water Tank procedure on Page
5.
2. Remove kinks from steam hose. Rotating the
steam gun around may help remove kinks.
3. Refer to Mineral Build-up section on page 11
for cleaning procedure.
D. Excessive amounts of water in
steam
NOTE: The Power Steamer produces
a great deal of steam. The steam may
condense as water or water droplets
in the steam hose and tools and
nozzle, which are then expelled when
used after a period of cooling. This is
normal and not a cause for concern.
1. Water condensation in steam hose.
2. Water tank has been over lled.
3. Unit has not heated to full operating
temperature.
1. Point nozzle towards sink, and shake while
pressing steam trigger.
2. Filling the water tank with more than 40
oz/ 1200 ml of water interferes with steam
production resulting in water condensation.
Turn unit o, let it cool and drain some water
out of tank.
3. Wait until Orange steam pressure indication
light has turned o.
E. Accessories do not stay rmly
connected to main nozzle
1. Accessories are not properly installed. 1. Refer to accessory installation on pages 7-9.
F. Floor surfaces appear to have
streaks after cleaning
1. Cleaning pad is dirty.
2. Hard water residue on the oor.
1. Replace the cleaning pad with a clean one.
2. Switch to distilled or de-mineralized water.

EN
13
WARRANTY
WAGNER ONE YEAR LIMITED WARRANTY
KEEP ON FILE
This product manufactured by Wagner Spray Tech Corporation (Wagner), is warranted to the original retail purchaser against
defects in material and workmanship for one year from date of purchase if operated in accordance with Wagner’s printed
recommendations and instructions. This product is designed for home use only. If this product is used for professional/rental
purposes, this warranty applies only for 30 days from date of purchase.
This warranty does not cover damage resulting from improper use, accidents, user’s negligence or normal wear. This warranty
does not cover defects or damages caused by service or repair performed by anyone other than a Wagner Authorized Service
Center. This warranty does not apply to accessories.
ANY IMPLIED WARRANTY OF MERCHANTABILITY OR FITNESS FOR A PARTICULAR PURPOSE IS LIMITED TO ONE YEAR FOR
HOME USE AND 30 DAYS FOR PROFESSIONAL/RENTAL USE FROM DATE OF PURCHASE.
WAGNER SHALL NOT IN ANY EVENT BE LIABLE FOR ANY INCIDENTAL OR CONSEQUENTIAL DAMAGES OF ANY KIND,
WHETHER FOR BREACH OF THIS WARRANTY OR ANY OTHER REASON.
Ifany product isdefective inmaterial and/or workmanshipduring the applicablewarranty period,return it withproof of purchase,
transportation prepaid to any Wagner Authorized Service Center. Contact Wagner Technical Service at 1770 Fernbrook Lane,
Plymouth, MN 55447 or telephone 1-800-727-4023 for authorized service center locations. Wagner’s Authorized Service Center
will either repair or replace the product (at Wagner’s option) and return it to you, postage prepaid.
Some states do not allow limitations on how long an implied warranty lasts or the exclusion of incidental or consequential
damages, so the above limitation and exclusion may not apply to you.
This warranty gives you specic legal rights and you may also have other rights which vary from state to state.

14
F
CONSIGNES DE SÉCURITÉ IMPORTANTES
TABLE DE MATIÈRES
CONSIGNES DE SÉCURITÉ IMPORTANTES ______ 14-15
Explication des symboles utilisés__________________ 14
Directives de mise à la terre ______________________ 14
Rallonge électrique_____________________________ 14
Dangers pour la sécurité ________________________ 15
GUIDE DE RÉFÉRENCE POUR DÉMARRAGE RAPIDE _ 16
REMPLISSAGE DU RÉSERVOIR D’EAU _____________ 17
UTILISATION DU PISTOLET À VAPEUR ____________ 18
ASSEMBLAGE ET FIXATION DES ACCESSOIRES_____ 19
ACCESSOIRES UTILISÉS AVEC L’ADAPTATEUR DROIT____ 20
ACCESSOIRES UTILISÉS AVEC L’ADAPTATEUR DÉVIÉ ____ 21
NETTOYAGE ET ENTREPOSAGE __________________ 22
DÉPÔTS MINÉRAUX_____________________________ 23
DÉPANNAGE___________________________________ 24
GARANTIE _____________________________________ 25
LISTE DES PIÈCES____________________________ 38-40
EXPLICATION DES SYMBOLES UTILISÉS
Lire toutes ces consignes avant d’utiliser l’appareil. Garder ces
consignes.
Pour réduire les risques d’incendie ou d’explosion, de choc
électrique et de blessure, vous devez lire et comprendre les
directives gurant dans ce manuel. Familiarisez-vous avec les
commandes et l’utilisation adéquate de l’équipement.
Ce symbole indique un risque potentiel
pouvant entraîner des blessures graves ou
même mortelles. Vous trouverez ci-après
d’importantes consignes de sécurité.
At
tention
Ce symbole indique un risque
potentiel pour vous ou pour l’appareil.
D’importantes informations sur la manière
d’éviter tout dommage de l’équipement
ou d’éviter des blessures légères sont
indiquées ci-après.
VAPORISATEUR À VAPEUR CHAUDE ET
PIÈCES.
Peut causer des blessures, des brûlures et
des dommages matériels. Température
supérieure à 100 ˚C.
INCENDIE.
Peut causer des blessures graves et des
dommages matériels.
Risque de décharge électrique
i
Les notes contiennent des informations
qui doivent être consciencieusement
respectées.
DIRECTIVES DE MISE À LA TERRE
Cet appareil doit être mis à la terre. En cas de court-circuit, cette
précaution réduit les risques de choc en procurant un parcours
au courant électrique. Le cordon de l’appareil est doté d’un l
de terre relié à la troisième broche de sa che. Cette dernière
doit être branchée dans une prise correctement câblée et
mise à la terre conformément aux codes et règlements locaux.
MISE EN GARDE - Le fait de ne pas brancher
correctement la che trilaire de l’appareil
peut entraîner des risques de choc électrique.
S’il est nécessaire de réparer ou de remplacer le cordon ou
la prise, conez cette tâche à un Centre de service agréé de
Wagner.
Si vous ne comprenez pas toutes les instructions de mise à la
terre, ou en cas de doute sur la mise à la terre de l’appareil,
veuillez consulter un électricien ou un technicien qualié. Ne
modiez pas la che de mise à la terre. Si vous n’arrivez pas à
l’insérer dans la prise de courant, faites installer une prise de
courant adéquate par un électricien qualié.
RALLONGE ÉLECTRIQUE
Utilisez seulement une rallonge électrique trilaire pourvue
d’une prise avec mise à la terre (trois tiges) et d’une connexion
femelle à trois trous convenant au cordon de l’appareil.
Assurez-vous que la rallonge électrique est en bon état.
Lorsque vous utilisez une rallonge, assurez-vous qu’elle a un
calibre assez élevé pour transmettre le courant nécessaire
au fonctionnement de l’outil. L’utilisation d’une rallonge de
calibre trop faible entraîne une chute de tension sectorielle
se traduisant par une perte de courant et une surchaue
de l’appareil. Pour une distance de plus de 30,5 m (100 pi),
employez une rallonge de calibre 14.
Prise de courant
à contact
de mise à la terre
Coret de prise
de courant à contact
de mise à la terre
Adaptateur
Vis de raccord et
de mise à la terre

F
15
CONSIGNES DE SÉCURITÉ IMPORTANTES
DANGERS POUR LA SÉCURITÉ
MISE EN GARDE : VAPORISATEUR
À VAPEUR CHAUDE ET PIÈCES
Peut causer des blessures, des brûlures et
des dommages matériels. Température
supérieure à 100 ˚C.
PRÉVENTION :
• Tenez-vous à l’écart de la vapeur et de la surface de la
plaquette de décollage. NE placez PAS votre main devant
cette dernière.
• Les gouttes d’eau sont chaudes, elles peuvent provoquer
des brûlures. Soyez très prudent quand vous vous servez
de la plaquette de décollage au-dessus de votre tête ou
que vous en videz l’eau. Portez des lunettes protectrices
et des gants lorsque vous utilisez cet appareil.
• Pendant l’utilisation, la poignée de vaporisation peut
devenir chaud au toucher.
• Laissez refroidir les pièces avant de changer des
accessoires ou d’ouvrir le bouchon de remplissage.
• Ne pointez jamais la plaquette de décollage ou les
accessoires vers quelqu’un.
• De l’eau chaude peut s’échapper des accessoires et couler
lorsque la gâchette est actionnée.
• NE remplissez PAS trop le réservoir d’eau.
• N’étirez PAS le tuyau de façon excessive et NE l’entortillez
PAS. Ne réparez jamais un tuyau endommagé.
MISE EN GARDE : INCENDIE
Peut causer de graves blessures ou des
dommages matériels.
PRÉVENTION :
• NE laissez PAS l’appareil chauer s’il n’y a pas d’eau
dans le réservoir. Cela pourrait causer une surchaue et
provoquer un incendie.
• NE laissez AUCUNE eau ou vapeur pénétrer dans les
douilles ou interrupteurs d’éclairage.
MISE EN GARDE : CHOC ÉLECTRIQUE
Peut causer de graves blessures.
PRÉVENTION :
• Il faut brancher le cordon d’alimentation dans une prise
mise à la terre (à 3 broches).
• N’employez PAS l’appareil si le cordon d’alimentation
est usé ou endommagé. Ne réparez jamais un cordon
d’alimentation.
• NE déplacez PAS le réservoir d’eau en tirant sur le cordon
d’alimentation.
• NE laissez AUCUNE eau ou vapeur pénétrer dans les
douilles ou interrupteurs d’éclairage.
MISE EN GARDE: GENERAL
Peut causer des blessures ou des dommages
matériels.
PRÉVENTION :
• NE vous tenez PAS debout et NE vous asseyez PAS sur le
réservoir d’eau. (Employez un escabeau.)
• NE modiez PAS les pièces ou composants. Ne réparez
jamais des pièces usées ou endommagées.
• Le réservoir d’eau doit se trouver sur une surface solide et
plane, en plus d’être en position verticale.
• Tenez le nettoyeur à vapeur hors de la portée des enfants.
• NE laissez JAMAIS l’appareil branché en votre absence.
• Lisez toutes les directives et les avertissements avant
chaque emploi.
NETTOYAGE DES TISSUS
Certains matériaux et tissus NE doivent PAS être nettoyés à la
vapeur:
NE PAS utiliser sur le cuir, les meubles ouplanchers cirés, les
tissus synthétiques, levelours, le Dralon ou d’autres matériaux
délicatset sensibles à la vapeur.
Avant de nettoyer une surface à la vapeur pour la première
fois, nous vous recommandons deconsulter les consignes du
fabricant concernant le nettoyage.
NETTOYAGE DU VERRE ET DES MIROIRS
Le choc thermique peut également fendre le verre. Ne pas
nettoyer à la vapeur des surfaces de verre dont la température
est inférieure à 0°C.
CONNEXION ÉLECTRIQUE
• UTILISER uniquement une rallonge tripolaire detaille18
ou supérieure.
• BRANCHER uniquement le cordon ou la rallonge dans un
bloc d’alimentation à contact de mise àlaterre.
• Pour prévenir les chocs électriques, NE JAMAIS immerger
l’appareil Power Steamer dans l’eau ouautres liquides.
PROPOSITION65
Ce produit peut vous exposer à des agents chimiques, y
compris Lead and Phthalates, identiés par l’État de Californie
comme pouvant causer le cancer et des malformations
congénitales ou autres troubles de l’appareil reproducteur.
Pour de plus amples informations, prière de consulter www.
P65Warnings.ca.gov.
ENTREPOSAGE
S’assurer que l’appareil est propre et sec avant de le ranger et
toujours suivre les instructions de refroidissement. Le ranger
dans un lieu sec. Pourprévenir les dommages, le cordon ne
devrait pasêtre entortillé durant l’entreposage.

1 2
Dévisser le couvercle de sécurité en
tournant dans le sens contraire des
aiguilles d’une montre.
Remplir le réservoir à l’aide de l’entonnoir fournis. Le réservoir peut contenir jusqu’à 1
200 ml d’eau (40 oz) d’eau. NE PAS remplir exagérément le réservoir d’eau parce que cela
pourrait endommager le produit.
345
Une fois plein, remettre le couvercle de
sécurité enplace en vissant dans le sens
des aiguilles d’une montre, en le serrant
bien.
Attacher l’adaptateur de nettoyage et
les accessoires nécessaires au pistolet à
vapeur.
Brancher la machine à une prise de
courant etappuyer sur le bouton ON.
6 7
9
8
Le voyant d’alimentation rouge et le
voyant de vapeur orange s’allument,
indiquant que la machine produit de la
vapeur.
Laisser environ 9 minutes à la machine
pour accumuler la pression de vapeur.
Une fois que le voyant de vapeur orange
s’éteint, la machine est prête à être
utilisée.
16
F
GUIDE DE RÉFÉRENCE POUR DÉMARRAGE RAPIDE
Ceci est seulement un guide de référence rapide. Lire le manuel d’instruction complet avant d’utiliser le produit.
Lire tous les avertissements et les instructions de sécurité du manuel d’instruction avant l’utilisation.
i
Utiliser seulement de l’eau
distillée; l’accumulation
de minéraux provenant
de l’eau du robinet peut
diminuer la durée de vie
du vaporisateur.

F
17
REMPLISSAGE DU RÉSERVOIR D’EAU
REMPLISSAGE SUPPLÉMENTAIRE DU RÉSERVOIR D’EAU
Si l’appareil a été utilisé, TOUJOURS suivre ces précautions de sécurité avant de retirer le couvercle de sécurité du réservoir d’eau :
• Éteindre l’appareil en mettant à la position OFF et éteindre l’appareil. Attendre au moins 10 minutes pour que l’appareil
puisse refroidir. Attendre au moins 30 minutes pour que l’appareil puisse refroidir.
• Laisser sortir toute la pression de vapeur de l’appareil en appuyant sur la gâchette du gicleur de vapeur (le commutateur
rouge de sécurité doit être en position ON).
NE PAS suivre ces précautions pourrait entraîner des brûlures causées par
la vapeur s’échappant lorsque le couvercle de sécurité du réservoir d’eau
est retiré.
i
Le couvercle de sécurité tournera, mais ne pourra pas être dévissé avant que
l’appareil soit refroidi et que la pression soit relâchée.
At
tention
Pour usage domestique seulement. Ne surchargez pas le réservoir car elle
peut causer des dommages à l’unité. Permettre une période avant de le
remplir le réservoir de refroidissement de 30 minutes.
123
Dévisser le couvercle de sécurité. Remplir le réservoir à l’aide de
l’entonnoir fournis. Le réservoir peut
contenir jusqu’à 1 200 ml (40 oz)
d’eau. NE PAS remplir exagérément
le réservoir.
Serrer le couvercle de sécurité pour
qu’il tienne bien en place.
NE JAMAIS remplir le réservoir lorsque la machine est branchée.
CONSIGNES POUR L’UTILISATION DE L’EAU ETLADURÉE DE NETTOYAGE À LA VAPEUR
QUANTITÉ D’EAU DURÉE DU JET DE VAPEUR
400ml Environ 15 min.
800ml Environ 30 min.
1200ml Environ 40 min.

18
F
UTILISATION DU PISTOLET À VAPEUR
NOUVELLE ACCUMULATION DE LA PRESSION DEVAPEUR PENDANT L’UTILISATION
1
Si le voyant de vapeur orange
s’allume durant l’utilisation, cela
indique que la machine a besoin
d’accumuler à nouveau de la pression
dans le réservoir. La machine peut
être utilisée pendant l’accumulation
de pression.
VAPORISATEUR À VAPEUR CHAUDE ET PIÈCES.
Peut causer des blessures, des brûlures et des
dommages matériels. Température supérieure à
100 ˚C (212 ˚F).
L’eau chaude et la vapeur peuvent causer des
brûlures.
NE PAS
toucher au gicleur de vapeur ou
essayer de connecter des accessoires lorsque
l’appareilestenmarche.
NE JAMAIS envoyer de la vapeur vers des
gens,desanimaux oudesappareilsélectriques.
1
ON
GÂCHETTE
2
La sortie de vapeur est contrôlée
par la poignée à vapeur. La poignée
comporte une gâchette devapeur et
un interrupteur de sûreté rouge.
Pour produire de la vapeur de façon
intermittente, placer l’interrupteur
de sécurité rouge à la position ON.
Tirer sur la gâchette pour libérer la
vapeur.
Pour générer de la vapeur de façon continue :
A Commencer en appuyant sur le commutateur rouge de sécurité pour le
mettre à la position ON. Tirer sur la gâchette et appuyer sur le commutateur
de sécurité pour le mettre en position LOCK. La gâchette est maintenant
bloquée pour rester en mode de vapeur continue.
B Pour la déverrouiller du mode de vapeur continue, relâcher la gâchette et
appuyer sur le commutateur rouge de sécurité pour le remettre à la position
ON.

F
19
ASSEMBLAGE ET FIXATION DES ACCESSOIRES
1 2
L’adaptateur de la plaque à vapeur
s’attachera au gicleur du pistolet à
vapeur ou à la rallonge.
Glisser l’adaptateur par-dessus le
gicleur, en alignant le trou ovale
avec le bouton de verrouillage /
déverrouillage du gicleur. Pousser le
bouton pour permettre à l’accessoire
de glisser en place.
ATTACHER LA PLAQUE À VAPEUR AU PISTOLET À VAPEUR
DÉCOLLAGE DU PAPIER PEINT
Tenir la plaque à vapeur à plat contre le papier peint pendant 20 à 30 secondes. Retirerlaplaqueàvapeur et racler la section
passée à la pression du papier peint.
i
Pour obtenir des résultats optimaux, il peut être utile d’entailler le
papier peint avant d’appliquer la vapeur

20
F
ACCESSOIRES UTILISÉS AVEC L’ADAPTATEUR DROIT
FIXER LA RACLETTE, LE GICLEUR À JET ET LES BROSSES UTILITAIRES AU GICLEUR À VAPEUR
NETTOYAGE DE L’APPAREIL AVEC ACCESSOIRES
RACLETTE VAPORISATEUR À VAPEUR POUR TISSU GICLEUR À JET
La raclette est un excellent outil pour
nettoyer les portes et les murs de la
douche, les portes de foyer et les fenêtres.
Ne pas utiliser sur du verre lorsque la
température est inférieure à 0 ˚C (32 ˚F).
Le verre peut éclater lorsque soumis à
des températures froides.
Retirer la languette de caoutchouc et
l’utiliser pour passer les vêtements à la
vapeur et éliminer les acariens présents
dans les matelas.
Le gicleur peut être utilisé pour
désinfecter les appareils de la salle de
bains et de la cuisine et les endroits
diciles à atteindre.
BROSSES EN NYLON RIGIDE BROSSES EN LAITON SAC DE RANGEMENT POUR ACCESSOIRES
La brosses de nylon peut être utilisée
pour nettoyer les endroits diciles à
atteindre autour des robinets et lavabos
de la salle de bains.
Les brosses en laiton peuvent être
utilisés pour enlever la graisse et la crasse
sur les fours et les grils.
i
Ll’adaptateur droit est utilisé pour attacher tous les accessoires au pistolet à vapeur, àl’exception de la grosse brosse.
TOUJOURS xer les accessoires avant d’allumer l’appareil.
1 2
Raclette /
vaporisateur
à vapeur
pour tissu
Adaptateur
droit
Gicleur à jet
Brosses de
nylon / laiton
Glisser l’adaptateur droit par-dessus le
gicleur du poignée à vapeur, aligner le
trou ovale avec le bouton verrouiller /
déverrouiller et pousser le bouton pour
permettre à l’accessoire de glisser en
place.
Glisser l’accessoire sur l’adaptateur droit.
Voir ci-dessous pour plus de détails sur les diérentes accessoires
jointes.
Table of contents
Languages:
Other WAGNER Kitchen Appliance manuals