WAGNER W 14 User manual

DE GB NL
FR
wagner-group.com
IT
DAMPF-TAPETENABLÖSER
STEAM WALLPAPER STRIPPER
DECOLLEUSE À PAPIERS PEINTS
BEHANGSTOMER
VAPORELLA STACCAPARATI
W14 / W15 / W16
OWNER’S MANUAL

2
W14/W15/W16
1.
1.
2. 2.
A
15
1 2 3 4
5 6 7 8
9 10
70
11
2
. . . . . . . . . . . . . . . . . . . . . . . . . . . . . . . . . . . . . . . . . . . . . . . . . . . . . . . . . . . 44
. . . . . . . . . . . . . . . . . . . . . . . . . . . . . . . . . . . . . . . . . . . . . . . . . . . . . . . . . . . . . . . . . . . . . 3 - 9
DE
. . . . . . . . . . . . . . . . . . . . . . . . . . . . . . . . . . . . . . . . . . . . . . . . . . . . . . . . . . . . . . . . . . 10 - 17
EN
. . . . . . . . . . . . . . . . . . . . . . . . . . . . . . . . . . . . . . . . . . . . . . . . . . . . . . . . . . . . . . . . . . 18 - 25
FR
. . . . . . . . . . . . . . . . . . . . . . . . . . . . . . . . . . . . . . . . . . . . . . . . . . . . . . . . . . . . . . . . . . 26 - 32
NL
. . . . . . . . . . . . . . . . . . . . . . . . . . . . . . . . . . . . . . . . . . . . . . . . . . . . . . . . . . . . . . . . . . 33 - 39
IT

3
W14/W15/W16
EN
MANY THANKS FOR PLACING YOUR TRUST IN US
The operating instructions are part of the unit. Keep them in a safe place! Read these
operating instructions carefully and in full before using the unit.
Scope of delivery
1Boiler
2Steam hose
3Steamplates (A) large/(B) small
(W15 + W16 only)
4Scraper (W16 only)
5Cordset (not shown)
6Operating manual
Explanation of symbols used
This symbol indicates a potential danger to you or for
the tool. Under this symbol you can nd important
information on how to avoid injuries and damage to the
power tool.
IMPORTANT! Descale unit after every 6 uses to keep
your unit operational.
Caution: Steam may escape from edges of steamplate
i
Indicates tips for use and other particularly useful
information.
Risk of scalding: When working overhead, beware of hot
dripping water
Keep unit at. Do not tilt.
DE GB NL
FR
wagner-group.com
IT
STEAM WALLPAPER STRIPPER
W14 / W15 / W16
OWNER’S MANUAL
0116• Form No. 2358534
1
4*
6
2
3A 3B*

4
W14/W15/W16 EN
General Safety Instructions
CAUTION! Read all the instructions. Non-observance of the instructions below can cause
electric shock, re and/or serious personal injuries.
a) Keep your workplace clean and well lit. Disorderly or unlit workplaces may
result in accidents.
b) Keep children, unauthorised persons and animals out of reach of
the steamer. You can lose control of the appliance if you are distracted.
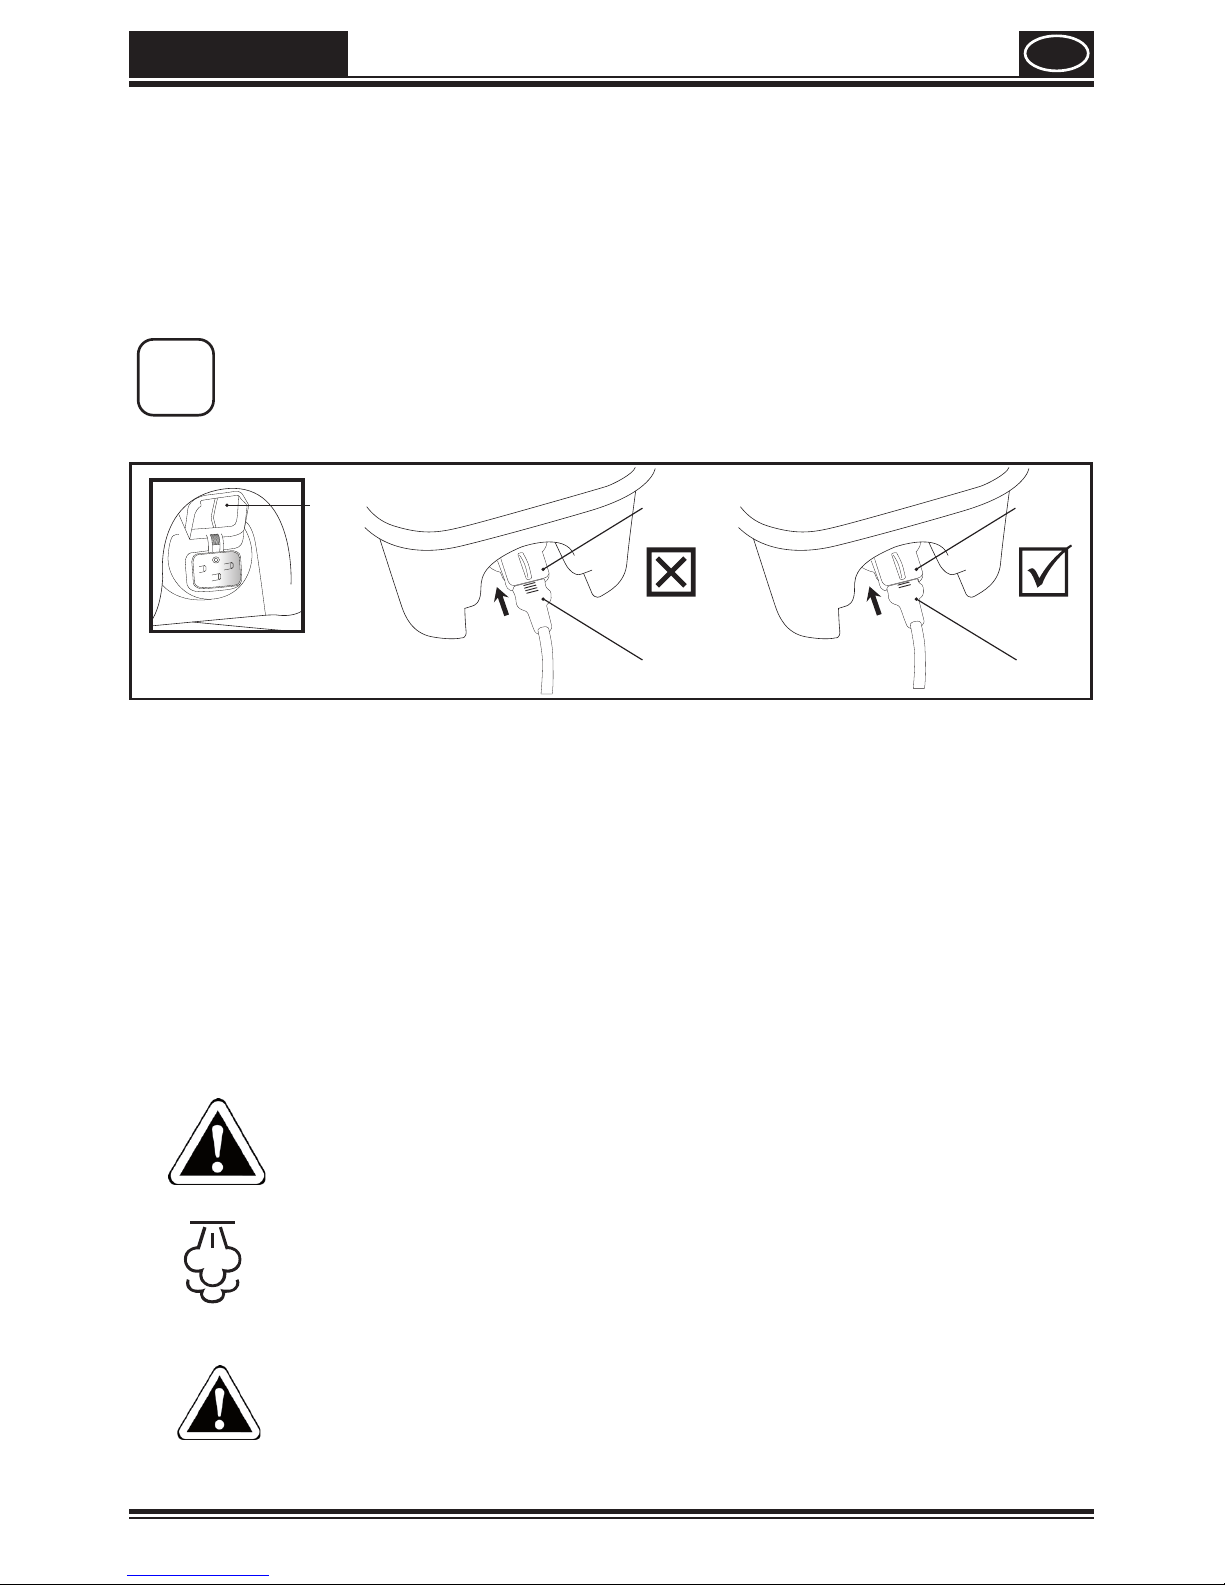
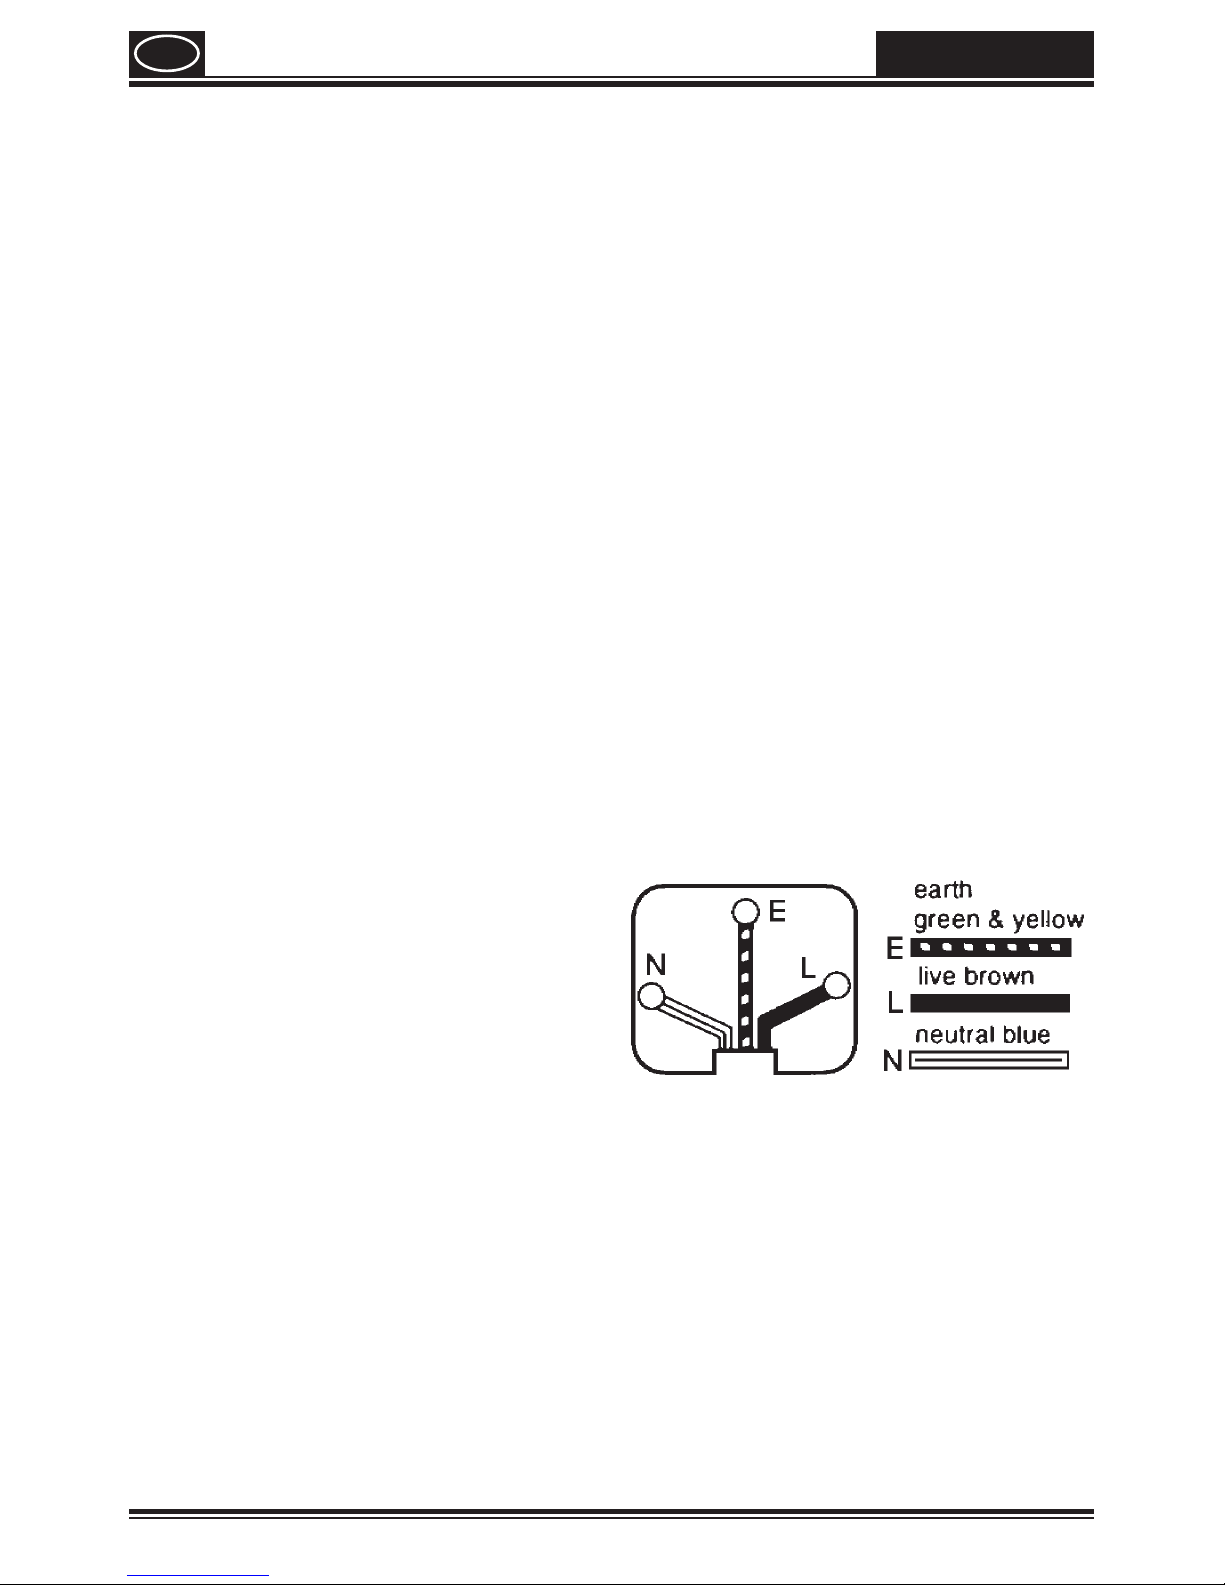
c) The steamer plug must t into the socket-outlet. The plug may not
be modied in any form. Do not use adaptor plugs together with
protective-earthed tools. Unmodied plugs and suitable sockets reduce the risk
of an electric shock.
d) Avoid physical contact with earthed surfaces such as pipes,
heating elements, stoves and refrigerators. The risk through electric shock
increases if your body is earthed.
e) This appliance can be used by persons with reduced physical,
sensory or mental capabilities or lack of experience and
knowledge if they have been given supervision or instruction concerning use of the
appliance in a safe way and understand the hazards involved.
f) Children shall not play with the appliance. Risk of scalding or shock.
Safety Instructions for Steam Wallpaper Strippers
ATTENTION! When working with hot steam (min.100°C), there is a risk of serious
scalding. Hot steam and boiling water can emit when the safety valve is
activated due to overpressure in incorrect operation of the unit.
Only change position during use, with care. The steam unit, hose and
steamplate can be very hot. Always wear suitable protective clothing /
gloves.
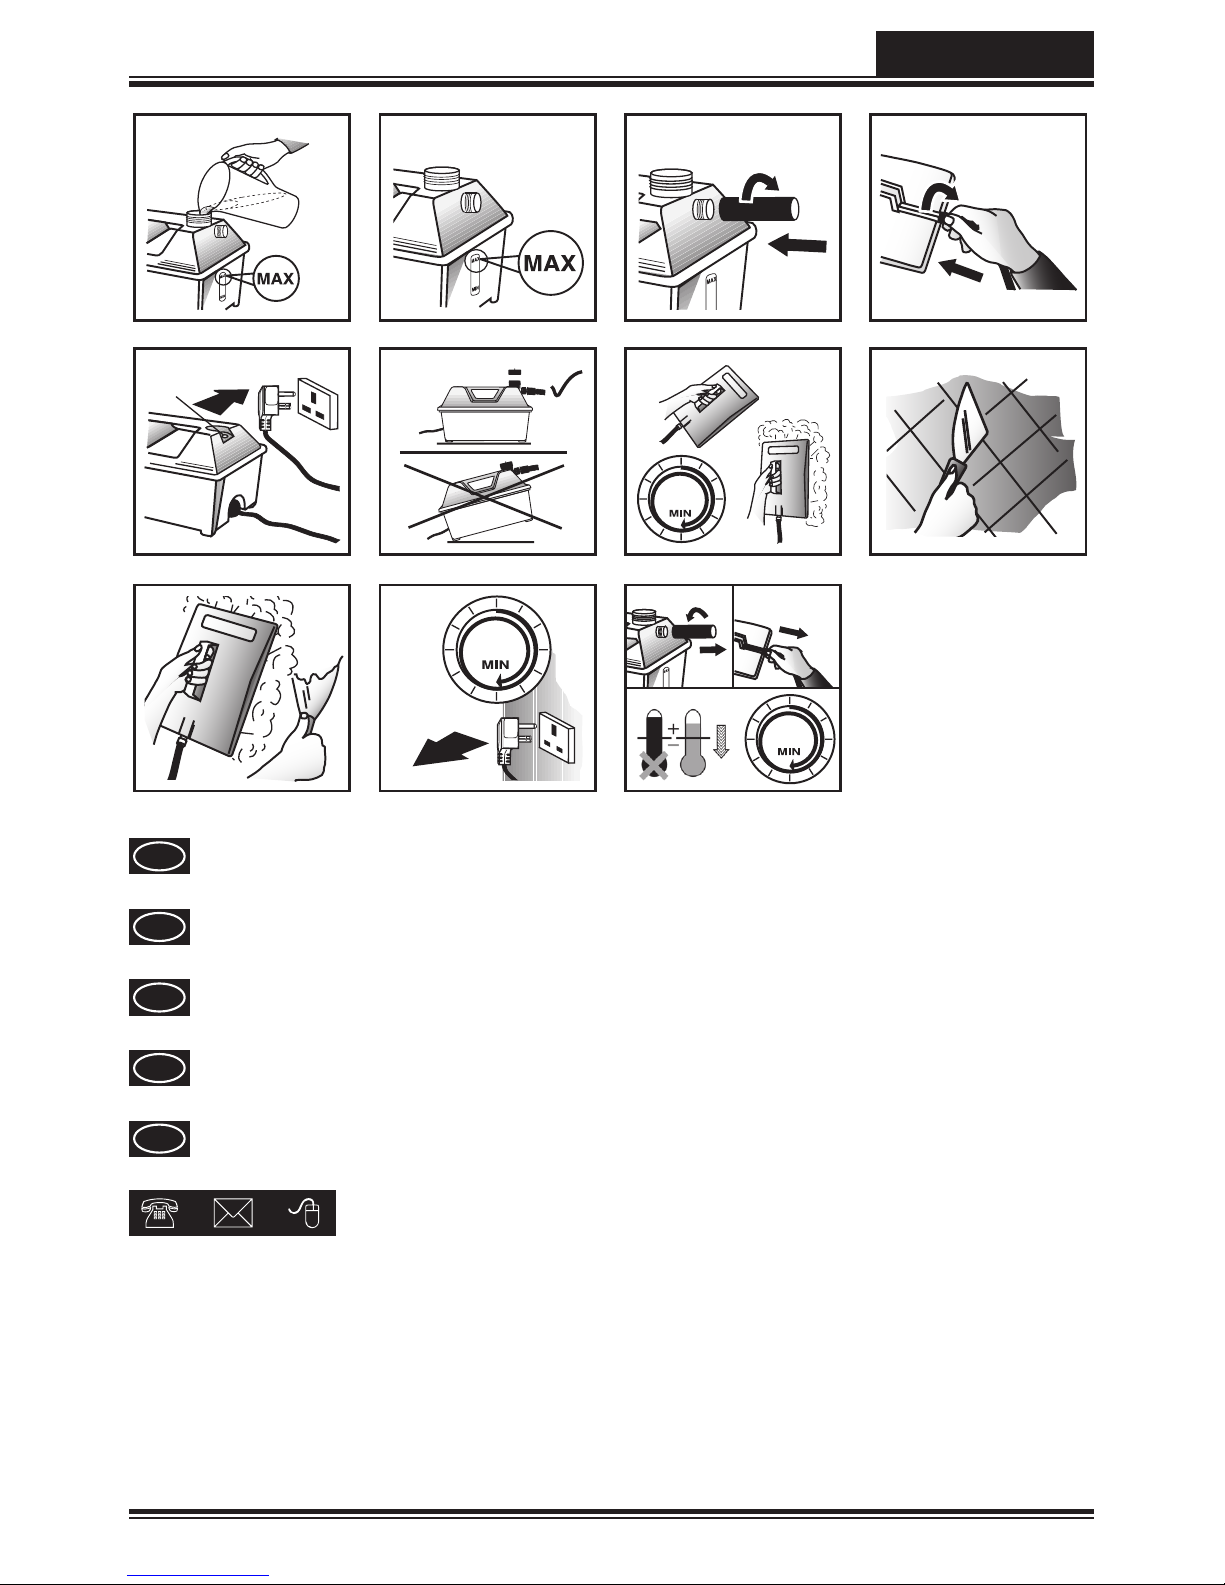
Operate the unit only with pure water without agents or additives.
DO NOT switch the unit on when empty.
NEVER point the steamplate / bar at people, animals or at objects sensitive to
temperature. Always ensure that the unit is standing securely in a horizontal position
(on the oor) (Fig. 6).
DO NOT stand on or place objects onto the unit or steam hose.
NEVER over-twist or make kinks in the steam hose, and never block the valve. Only carry

5
W14/W15/W16
EN
the unit by its handle.
NEVER pull on the steam hose or supply cord. Do not use if supply cord or any other part
is visibly damaged, particularly if unit has been known to have been dropped.
NEVER submerge the unit in liquid. Every time the accessory is changed for lling /
relling and emptying or when the steam unit is not in use (including work pauses), pull the
mains plug out of the socket-outlet.
NEVER overll the unit. Unplug the mains plug in the event of overlling or a fault. Use
only WAGNER original spare parts and accessories!
CAUTION! Danger of short-circuits! Cover socket-outlets and switches and do not
subject them to steam. When using an extension cable: max.10m long – the cord cross-
section must be at least 3 x 1 mm2. Avoid damage! When working in the vicinity of wood /
gypsum bases and coated materials these can be impaired by heat or steam. Remedy: Use a
heat / steam shield made of cardboard or metal. The unit switches o automatically in case
of overheating. After approx.10 minutes, the unit switches itself back on automatically. The
steam time is approximately 70-80 minutes.
NEVER leave a unit unattended if switch is on. Keep the unit away from children and
animals.
NEVER let the container steam until it is completely empty.
Intended use
The Steam Wallpaper Stripper is solely suited to removing wallpaper.
To ensure long life of the steam wallpaper stripper, unplug and clean your unit
immediately and thoroughly after each use.
CAUTION! - Steam can loosen weak, cracked, porous or poorly bonded plaster. Check
a small area before starting work. Do not hold the steamplate in one position too long
and stop if plaster starts to break.
PROTECT YOUR HOME- To prevent marks from steam on carpets and soft furnishings it
is recommended the unit be place on a hard at board. Ensure the unit will not slip or
tilt. Dust sheets and newspapers are not suitable.
Preparation
Gently score the areas to be stripped using a proprietary perforator
tool or the edge of a wall scraper in a criss-cross pattern.

6
W14/W15/W16 EN
Operation
•
Remove ller cap and ll unit with clean water to the MAX level line indicator. Replace
cap (Fig. 1+2).
•
Screw hose onto threaded outlets of boiler and steamplate, securely by hand.
DO NOT overtighten (Fig. 3+4). Check regularly during use to ensure secure t.
•
Connect supply cord from unit to power socket-outlet and switch on (Fig. 5).
i
When connecting the cordset to the unit, make sure the ap is fully open and
does not prevent the plug being fully inserted. Refer to diagram below.
If the ap touches the ribs on the cordset it may prevent the cordset inserting
fully into the unit.
FlapFlapFlap
Cordset Cordset
•
lt can take up to 15 mins (approx.) before steam is produced - depending on ll water
quantity and temperature (Fig. 7).
•DO NOT leave unattended and keep children and pets out of the room.
•
Just before full steam production a small amount of bubbling and water will occur at
the steamplate.
•BEWARE of hot water discharge prior to steam emission.
•
Hold the steamplate at against the wallpaper for approx. 10 seconds - from which
the paper should now easily come away using a wallpaper scraper (Fig. 9).
•
Some papers may need more steam than others. Operate steamer until water level is
low, then unplug unit and allow to cool for at least 2 minutes (Fig. 11).
CAUTION! WARNING:Hot liquid or steam can burn.
Danger of scalding. Steam may also condense into boiling
droplets. Steam should not be directed towards electrical appliances.
Danger of scalding appears on the cap as either symbol.
Beware of steam - before removing the ller cap and relling unit.
When nished, allow to cool completely and empty unit. Always store
unit empty.
CAUTION! Before loosening the ller cap always allow the unit to cool
down for at least 2 minutes. Risk of scalding! Heated water can
leak from the steamplate during the heating-up phase. Hot water
can drip during overhead work.

7
W14/W15/W16
EN
Model Boiler Capacity Steam Time
W16 5L 80 Minutes*
W14/W15 3.5 - 4L 70 Minutes*
*Approximate steam time before the safety cut-out operates.
Descaling
iDescale Unit after every 6 uses. Lime scale build up will damage your
unit. Regular descaling is essential in keeping your unit operational.
Units which are defective due to a lack of descaling are excluded from
the guarantee!
•
Using standard descaling liquid or tablets, ll a jug with 1.5 lites of water
•
Add correct amount of descaler following manufacturer's guidelines and mix thoroughly.
•
Pour the descaling solution into unit.
•
Switch the steam wallpaper stripper on for 10 minutes.
•
Switch the steam wallpaper stripper o again and disconnect the mains plug.
•
Leave the descaling solution to work for 30 minutes.
•
Then fully empty the steam wallpaper stripper.
•
Thoroughly rinse the unit two to three times with clear water to remove all descaling
solution residue.
Storage
Store emptied, upright and dry.
Technical Data
Power source: 220-240 V ~ Power consumption: 2000W/2300W
Steaming time: 70/80 min. Hose length: 3.65 m
Boiler capacity: 3,5 L/5 L Large steamplate weight: 220 g
Unit weight: 2.5kg/2.9kg Small steamplate weight: 50 g

8
W14/W15/W16 EN
Correction of Malfunctions
Malfunction Cause Remedy
The steam
wallpaper stripper
is not working
•
Heating element covered in
limescale
•
Too little water in tank. A safety cut
out is tted to prevent overheating
of element if there is little water in
tank
•
Unit at an angle, heating element is
not in water
➞Clean
➞Fill with more water.
Wait 2 minutes. Rell
will reset the cut-out
element
➞Move unit into
horizontal position
Spare Parts
Pos. Name Order No.
1 Mains lead UK 2353930
2 Mains lead AUS/NZ 2354141
3 Steam hose 2352913
4 Steamplate 2353928
5 Steamplate small 2354013
6 Scraper 2354142
7 Filler cap 2382323
Environmental protection
The appliance and all accessories and packaging have to be recycled in
an environmentally friendly manner. Do not dispose of the appliance with
household waste. Support environmental protection by taking the appliance
to a local collection point or obtain information from a specialist retailer.
Please pay special attention to the instructions on the product packaging.
Important Note regarding Product Liability!
In accordance with an EC directive, the manufacturer is liable for this product only
if all parts originate from or were approved by the manufacturer and the tools are
assembled and operated correctly. The use of other accessories and spare parts can
partially or completely invalidate the liability.

9
W14/W15/W16
EN
WARNING UK ONLY
Your unit has been supplied with a supply cord and a tted plug. This is identied by the
fuse holder in the base of the plug. Please read the following safety instructions before use.
1. If the tted plug is cut o from the supply cord then the plug must be disposed of safely.
2.
NEVER under any circumstances insert such a plug into a 13 Amp socket-outlet.
3. NEVER under any circumstances use the appliance or supply cord without the fuse
cover tted. This is the little cover xed into the base of plug to hold the fuse in place.
4. If you lose the fuse cover then please contact any electrical dealer for a replacement or
ring our helpline above.
5. A replacement fuse must be rated at 13 Amps and approved to BS1362.
IF IN ANY DOUBT PLEASE CONSULT A QUALIFIED ELECTRICIAN.
If you need to t a plug to the supply cord, this should be tted in accordance with the
wiring instructions below, and will need to be used with a 13 Amp fuse. If in doubt consult a
qualied electrician.
WARNING - THlS APPLIANCE MUST BE EARTHED. If you are using an extension
lead it must be rated a minimum of 10 Amps and fully unwound. Do not operate with a
cord rated less than 10 Amps as this will cause premature failure of the element which is not
covered by the guarantee. As the colours of the wires in the supply cord of this appliance
may not correspond with the coloured markings identifying the terminals in your plug,
proceed as follows:
The wire which is coloured green and yellow
must be connected to the terminal in the
plug which is marked with the letter E or by
the earth symbol, or coloured green.
The wire which is coloured blue must be
connected to the terminal which is marked
with the letter N or coloured black.
The wire which is coloured brown must be connected to the terminal which is marked with
the letter L or coloured red.

10
W14/W15/W16 EN
3+1 years guarantee
The guarantee runs for three years, counting from the date of sale (sales slip). The
guarantee is extended by a further 12 months if the device is registered online within
4 weeks of the purchase at www.wagner-group.com/3plus1. Registration is only
possible if the buyer is in agreement with the data being stored that is entered during
registration. The guarantee covers and is restricted to free-of-charge rectication
of faults which are demonstrably attributable to the use of faulty materials in
manufacture, or assembly errors; or free-of-charge replacement of the defective parts.
The guarantee does not cover incorrect use or commissioning or tting or repair work
which is not stated in our operating instructions. Wearing parts are also excluded from
the guarantee. The guarantee excludes commercial use. We expressly reserve the right
to full the guarantee. The guarantee expires if the tool is opened up by persons other
than WAGNER service personnel. Transport damage, maintenance work and loss and
damage due to faulty maintenance work are not covered by the guarantee. Under
any guarantee claim, there must be proof of purchase of the tool through submission
of the original receipt. Wherever legally possible, we exclude all liability for injury,
damage or consequential loss, especially if the tool has been used for a purpose other
than that stated in the operating instructions, commissioned or repaired other than
in accordance with our operating instructions or if repairs are performed by someone
who is unqualied. We reserve the right to perform any repairs in excess of those
stated in our operating instructions. In case of guarantee or repair, please refer to your
point of sale.

11
W14/W15/W16
EG Konformitätserklärung
Wir erklären in alleiniger Verantwortung, dass dieses Produkt den folgenden
einschlägigen Bestimmungen entspricht:
2014/35/EU; 2014/30/EU; 2011/65/EU; 2012/19/EU
Angewandte harmonisierte Normen:
EN 60335-1:2012, EN 60335-2-54:2008 + A11:2012, EN 62233;
EN 55014-1:2006 + A1:2009 + A2:2011, EN 55014-2:1997 + Corrigendum 1997 +
A1:2001 + A2:2008, EN 61000-3-2:2014, EN 61000-3-3:2013
PDE
CE Déclaration de conformité
Nous déclarons sous notre responsabilité que ce produit est en conformité avec les
réglementations suivantes :
2014/35/EU; 2014/30/EU; 2011/65/EU; 2012/19/EU
Conforme aux normes et documents normalisés :
EN 60335-1:2012, EN 60335-2-54:2008 + A11:2012, EN 62233;
EN 55014-1:2006 + A1:2009 + A2:2011, EN 55014-2:1997 + Corrigendum 1997 +
A1:2001 + A2:2008, EN 61000-3-2:2014, EN 61000-3-3:2013
PFR
EC Declaration of Conformity
We declare under sole responsibility that this product conforms to the following
relevant stipulations:
2014/35/EU; 2014/30/EU; 2011/65/EU; 2012/19/EU
Applied harmonised norms:
EN 60335-1:2012, EN 60335-2-54:2008 + A11:2012, EN 62233;
EN 55014-1:2006 + A1:2009 + A2:2011, EN 55014-2:1997 + Corrigendum 1997 +
A1:2001 + A2:2008, EN 61000-3-2:2014, EN 61000-3-3:2013
PGB

12
W14/W15/W16
EG Conformiteitsverklaring
Wij verklaren dat dit product voldoet aan de volgende normen:
2014/35/EU; 2014/30/EU; 2011/65/EU; 2012/19/EU
En normatieve dokumenten:
EN 60335-1:2012, EN 60335-2-54:2008 + A11:2012, EN 62233;
EN 55014-1:2006 + A1:2009 + A2:2011, EN 55014-2:1997 + Corrigendum 1997 +
A1:2001 + A2:2008, EN 61000-3-2:2014, EN 61000-3-3:2013
PNL
Dichiarazione di conformità CE
Dichiariamo sotto la nostra esclusiva responsabilità, che il presente prodotto corrisponde
alle relative disposizioni seguenti:
2014/35/EU; 2014/30/EU; 2011/65/EU; 2012/19/EU
Norme armonizzate:
EN 60335-1:2012, EN 60335-2-54:2008 + A11:2012, EN 62233;
EN 55014-1:2006 + A1:2009 + A2:2011, EN 55014-2:1997 + Corrigendum 1997 +
A1:2001 + A2:2008, EN 61000-3-2:2014, EN 61000-3-3:2013
PIT
ppa. T. Jeltsch i. V. J. Ulbrich
CTO Decorative Finishing Vice President Engineering
Global Product Strategy & Planning
Dokumentationsverantwortlicher
Responsible person for documents
Responsable de la documentation
Documentatieverantwoordelijke
Responsabile della documentazione
Ansvarlig for dokumentation
Produktgodkännande och överensstämmelsekontrollant
J. Wagner GmbH Otto-Lilienthal-Str. 18 D-88677 Markdorf

Material No. 2358534 D
04/2017
© Copyright by J.Wagner GmbH
Irrtümer und Änderungen vorbehalten.
Not responsible for errors and changes.
Sous réserves d’erreurs et de modifications.
Fouten en wijzigingen voorbehouden.
J. WAGNER GMBH
Otto-Lilienthal-Str. 18
88677 Markdorf
T +49 0180- 55 924637
F +49075 44-505 11 69
WAGNER SPRAYTECH (UK) LTD
Opus Park
Moorfield Road
Guildford Surrey GU1 1SZ
T +44 (0)1483 -454666
F + 44 (0)1483 -454548
WAGNER FRANCE S.A.R.L.
12 Avenue des Tropiques
Z.A. de Courtaboeuf
91978 Les Ulis Cedex
T +33 0825 011 111
F +33 (0)1 69 81 72 57
MAKIMPORT
HERRAMIENTAS, S.L.
C/ Méjico nº 6
Pol. El Descubrimiento
28806 Alcalá de Henares (Madrid)
T 902 199 021 / 91 879 72 00
F 91 883 19 59
ORKLA HOUSE CARE DANMARK A/S
Stationsvej 13
3550 Slangerup
Danmark
T +45 47 33 74 00
F +45 47 33 74 01
WAGNER SPRAYTECH
AUSTRALIA PTY. LTD.,
14-16 Kevlar Close
Braeside, VIC 3195
T +61 3 95 87- 20 00
F +61 3 95 80 -91 20
J. WAGNER AG
Industriestraße 22
9450 Altstätten
T +41 71 -7 57 22 11
F +41 71 -7 57 23 23
HONDIMPEX KFT.
Kossuth L. u. 48-50
8060 Mór
T +36 (-22)- 407 321
F +36 (-22) -407 852
E-CORECO SK S.R.O.
Kráľovská ulica 8/7133
927 01 Šaľa
T +42 1948882850
F +42 1313700077
PUT WAGNER SERVICE
ul. E. Imieli 27
41-605 Swietochlowice
T +48/32/346 37 00
F +48/32/346 37 13
D
F
DK
SCH
AUS
H
PL
GB
E
SK
P
ORKLA HOUSE CARE AB
Box 133
564 23 Bankeryd
Sweden
T +46(0)36 37 63 00
ROMIB S.R.L.
str. Poligonului nr. 5 - 7
100070 Ploiesti ,judet Prahova
T +40-344801240
F +40-344801239
ROM
ORKLA HOUSE CARE NORGE AS
Nedre Skøyen vei 26,
PO Box 423, Skøyen
0213 Oslo
T +47 22 54 40 19
NOR
E-CORECO S.R.O.
Na Roudné 102
301 00 Plzeň
T +42 734 792 823
F +42 227 077 364
CZ
EL-ME-HO
Horvatinčićev put 2
HR-10436 Rakov Potok
T +385 (-1)65 86 - 028
F +385 (-1)65 86 - 028
HR
OOO МЕФФЕРТ ПОЛИЛЮКС
142407 Россия, Московская обл,
Ногинский р-н, территория
«Ногинск-Технопарк» д.14
T +7 495 221 6666
F +7 495 99 55 88 2
RUS
ROMIB S.R.L.
str. Poligonului nr. 5 - 7
100070 Ploiesti ,judet Prahova
T +40-344801240
F +40-344801239
ROM
TEHOMIX OY
Telekatu 10
20360 TURKU
T +385 (0) 2 2755 999
F +385 (0) 2 2755 995
SF
FHC SRL
Via Stazione 94,
26013 Crema (CR)
T 0373 204839
F 0373 204845
I
DELOS S.A.
Gonetsa area
Markopoulo Mesogaias 190 03
Attiki, Greece
P.O. BOX 293
T 22990 41056
F 22990 41059
GR
Other manuals for W 14
2
This manual suits for next models
2
Table of contents
Other WAGNER Kitchen Appliance manuals