wallas 3008 User manual

Advanced Control Panel 3008

- 2 -
Control Panel - Control Panel 3008 Installation 1 ...................................................................................
Control Panel - Control Panel 3008 basic features 2 .............................................................................
Control Panel - Software update 10 ..............................................................................................................
Control Panel - Wallas Remote application and Control Panel connection 11 ...........................
Control Panel - Error Codes 17 .........................................................................................................................

- 1 -
Control Panel 3008 Installation
Control Panel 3008 cable connection can be assembled in surface mount or through hole.
Surface, cable visible Hole, cable hidden inside the wall
Install the assembly plate and mark places for the
screws. Pre-drill 3*1 mm holes for screws. Install the
wall plate.
Cut the cable opening in bottom of the panel.
Slide the panel in place top-down.
Remove the display protection tape.
Install the assemply plate.
Drill 12 mm hole for the cable. Draw and check hole
place before drilling, it should not be visible when panel
is on its place.
Slide the panel in place top-down.
Remove the display protection tape.
Cable connection
Please note that cable connector release pin is as in
the picture, when connecting cable into panel. (Silent
click sound can be heard when cable is connected.)
Cable release
Press connector release clip (shown in the picture)
before pulling the cable off.

- 2 -
Control Panel 3008 basic features
Advanced Control Panel
Before using the Control Panel ensure it is assembled correctly with the assembly plate (see assembly instructions from
sales package) and connected with the Wallas unit. This manual refers to Control panel SW 1.2.75. and heater SW
1.6.64
Starting the heater for the first time
Prior to starting the heater, choose the operation mode; Manual Mode, Thermo Control Mode, or Ventilation Mode.
Use the arrow buttons to choose the mode and press the Select Button.

- 3 -
Starting the heater for the first time
If Thermo Control Mode is chosen, use
Arrow buttons to choose the desired
mode. Press the Select Button. Press
and hold the Select Button down again
for 3 seconds to start the heater (safety
feature).
Use Arrow Buttons to set the desired
temperature and press the Select
Button. Main display will appear.
Note: Wallas unit's starting procedure takes approx. 12 minutes.

- 4 -
Digital Panel Legend:
1 Main Menu Bar
2 Target Temperature / Power Level / Blower Speed
3 Room Temperature
4 Heater Status
5 Start/Stop Icon
6 Air Boost Icon
7 Info Bar: Power On/Off, Combustion, Info, Lock, Heater power %
Operation modes (Main Menu Bar)
Manual control mode
- heater power is manually
controlled with 6 power
levels (1-6)
Thermo control mode
- set a target temperature
(C°/F°)
- heater controls the power
level automatically
Ventilation mode
- set the desired blower
speed (speed levels 1-6)
- blows fresh air without
heating
Settings
- get familiar with the control
panel's functionality
- read more under Settings

- 5 -
Ignition
To start, use the Arrow
Buttons (left or right) to
move the orange selection
square to the Start/Stop
Icon and press the Select
Button.
Confirm the selection by
holding the Select Button
down for 3 seconds (safety
feature).
Starting will appear on the
screen.
The light orange combustion
light will light up when the
burner flame has been
ignited and the combustion
has stabilized (in about 5
min). Heater will be fully
operational about 10
minutes later.
Temperature/Power setting
In Thermo Control Mode,
move the selection square
to the Target Temperature
and press the Select
Button.
Press Arrow Buttons (left
or right) to set the desired
target temperature.
In Manual Mode, move the
selection square to the
Power Level and press
the Select Button.
Use Arrow Buttons to set
the desired power level
(1-6). Confirm by pressing
the Select Button.

- 6 -
Air Boost
Air Boost maximizes the air volume for quick defrosting and drying, but does not change the set temperature, power
level of fuel rate. Air Boost can be activated either in Manual or Thermo Control Mode, while the system is heating.
Use Arrow Buttons to
move the
selector to the Air
Boost icon
and press the Select
Button.
The orange Air Boost On
icon will appear.
To go back to normal air
volume, choose the Air
Boost icon again and press
the Select Button.
The Air Boost icon will
change to white.
Ventilation mode
Ventilation Mode blows fresh air without heating at 6 blower speeds. Choose Ventilation Mode prior to starting the
device.
Use the Arrow Buttons to
move the selection square to
the Main Menu Bar and
press the Select Button to
activate it. Use Arrow
Buttons to choose
Ventilation Mode and press
the Select Button.
Move the selection square to
the Start/Stop Icon and
press the Select
Button once. Press the
Select Button down again
for 2 seconds to confirm and
start the heater. Yellow
Power On
light will appear in the Info
Bar.
Choose the blower speed
(1-6) by moving the
selection square to
the Blower Speed and
press Select Button to
activate the field.
Press Arrow Buttons to the
desired power and press the
Select Button to choose.
To deactivate ventilation,
turn the heater off. Re-start
in the desired mode.

- 7 -
Pause Mode (in Thermo Control Mode only)
Pause Mode automatically turns the heater off if the temperature remains +2 C° (3,6 F°) above the set level for 1/2 hour
due to local ambient conditions. Pause Mode can be delayed temporarily by slightly increasing the target temperature.
Power can be turned on by increasing the target temperature in the Pause Mode.
If the heater is in Pause Mode,
Paused
will appear on the screen.
Heater will re-start heating again
automatically, if the cabin temperature
falls 2 degrees C (3,6 F°) below the set
target temperature.
Shut down
Option 1 Quick shut down: Press
and hold the Select Button down for
more than 4 seconds.
Stopping
will
appear and the Power Icon light will
change to white indicating the unit is
off.
Option 2 Alternatively use
the Arrow Buttons to move
the selection square to the
Start/Stop Icon and press
the Select Button.
Press and hold the Select
Button down for more than
2 seconds.
Stopping will appear and the
Power Icon light will change
to white indicating the unit is
off.

- 8 -
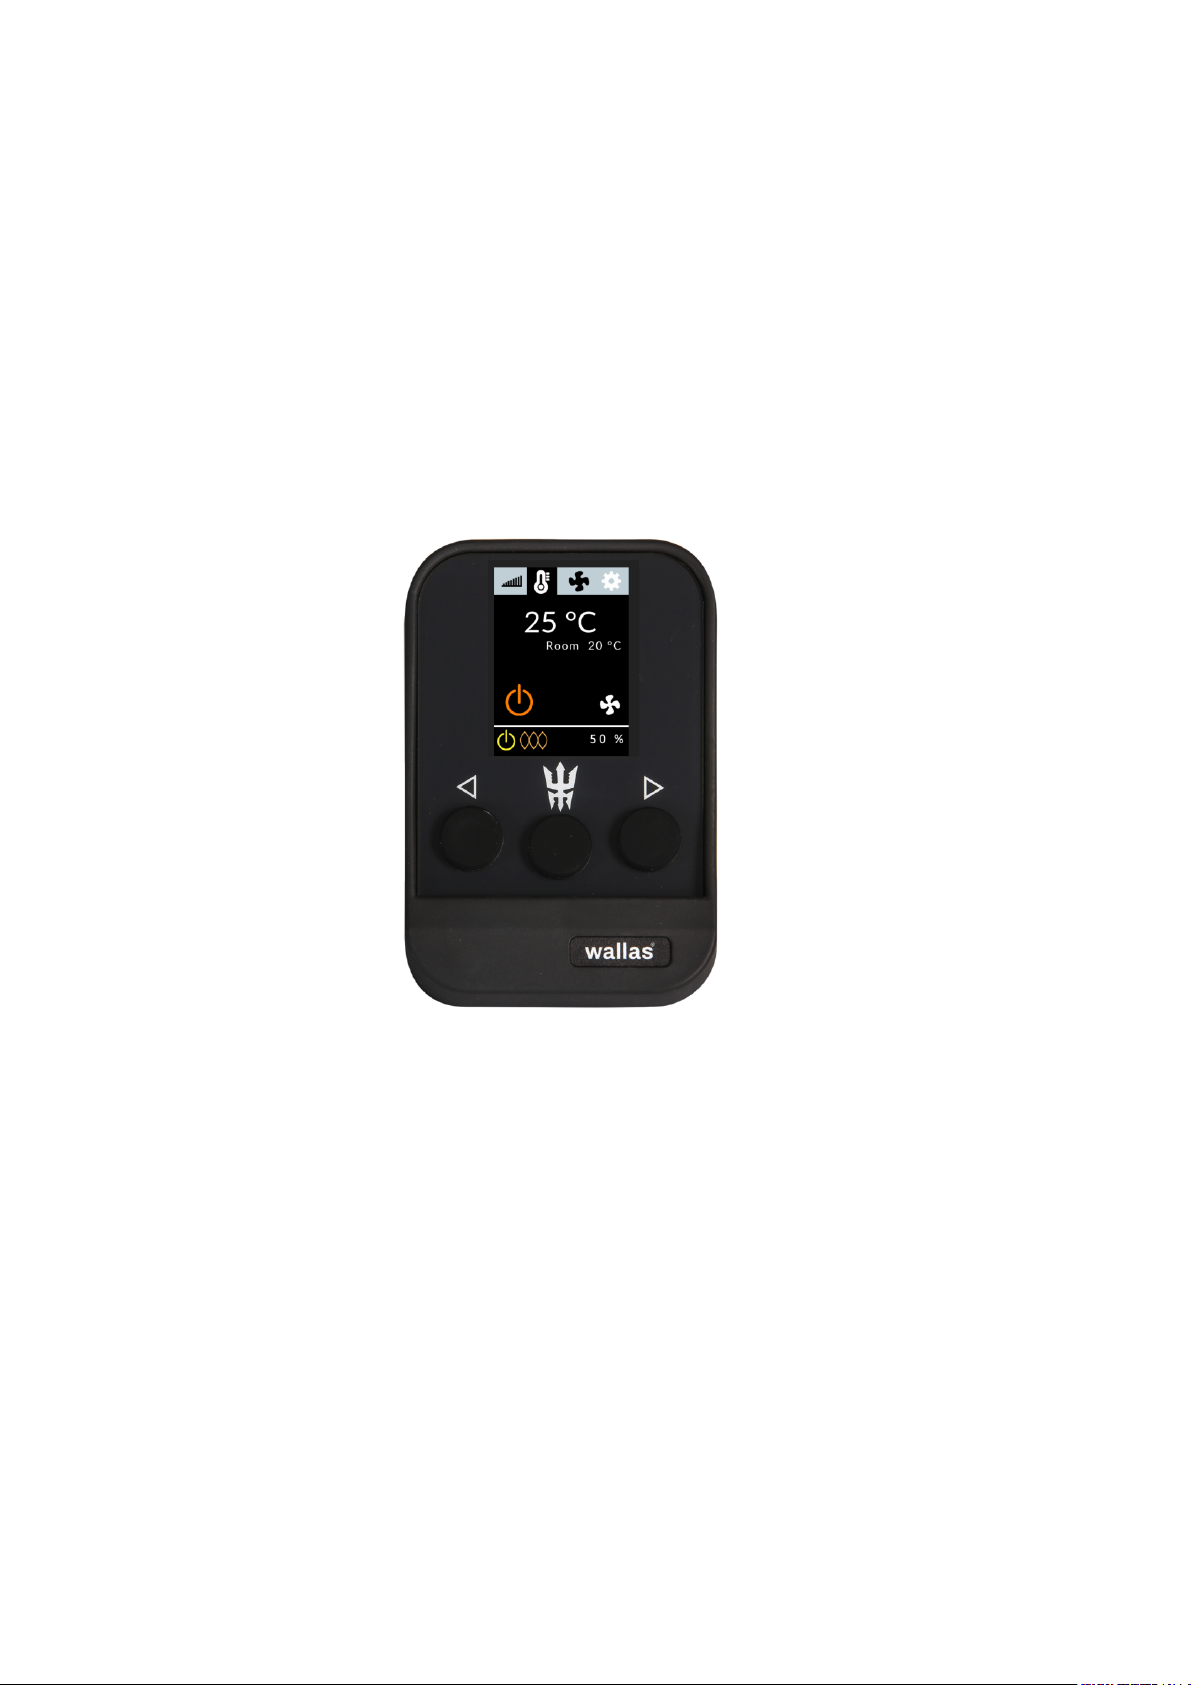
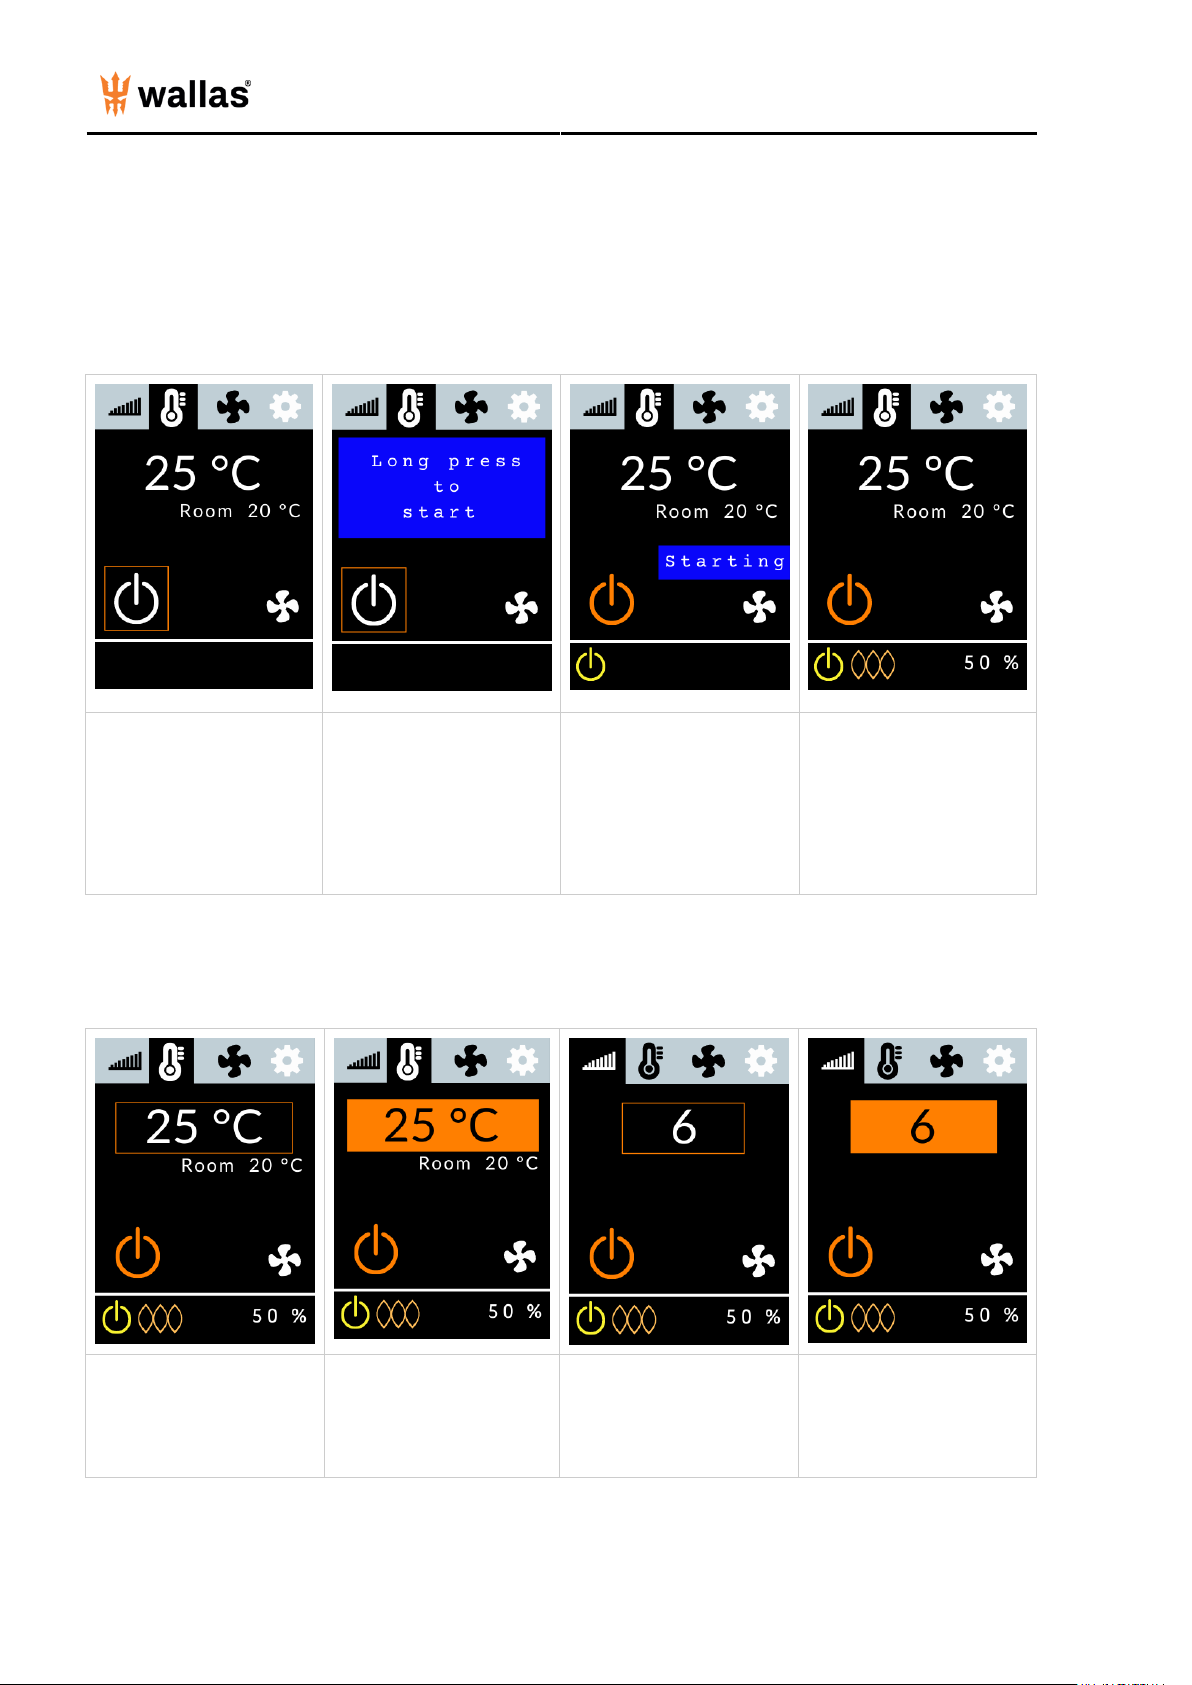
Note: The system mode that was used last upon shutdown will be the same mode when the heater is turned on again.
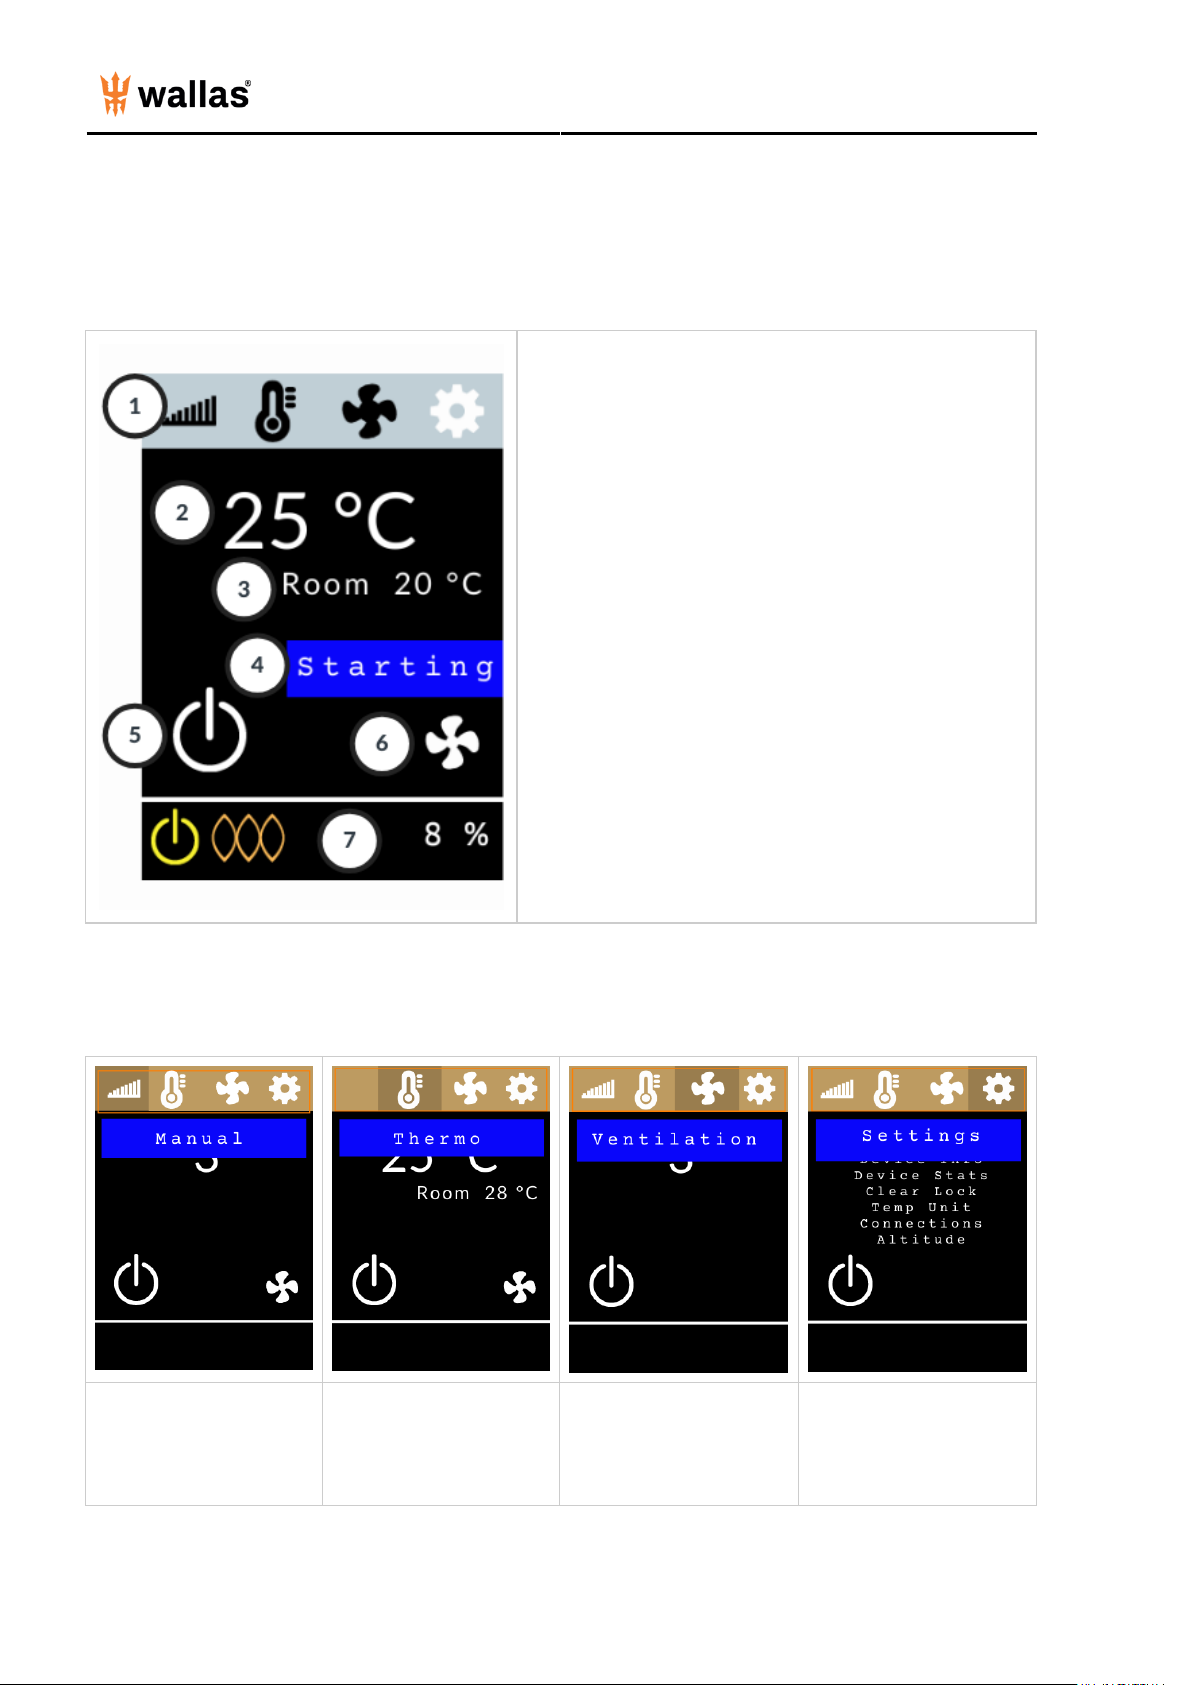
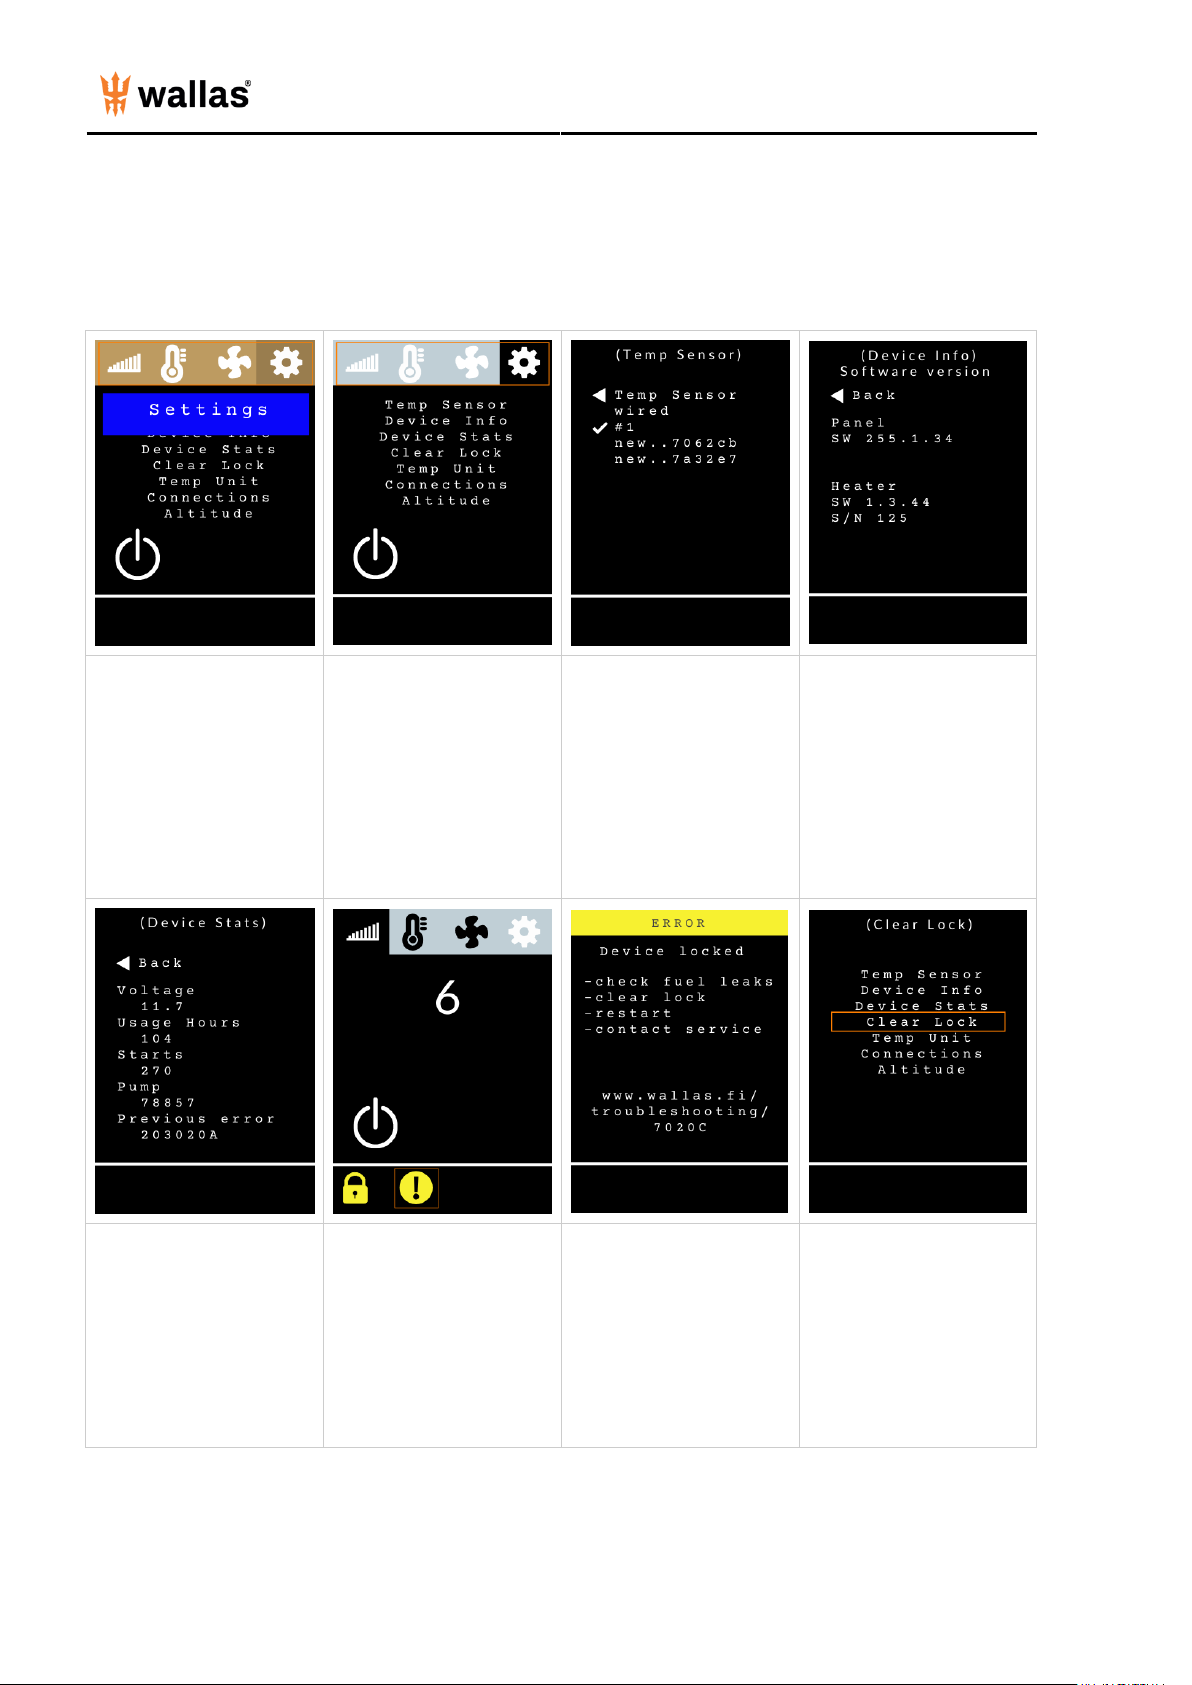
Settings:
Move the selection square to
the Main Menu Bar and
press the Select Button.
Use the Arrow Buttons to
choose Settings. Press the
Select Button.
Use the Arrow Buttons to
move the selection square
down and press the Select
Button to choose.
Temp Sensor
- Choose the desired sensor
to measure the indoor
temperature with.
- Wired is the hardwired
sensor in the heater unit
- Wireless sensors are listed
by sensor numbers
- When a wireless sensor is
selected, it gets a running
number ID
Device Info
- Control panel and heater
software versions (needed
for customer service/tech
help)
- Heater unit serial number
(needed for customer
service/tech help)
Device Stats
- Check there is enough
voltage to start the unit
(must have at least 10 V)
- Check usage hours (units
must be serviced every 2000
hours/3 years)
If a Lock Icon is displayed,
the heater has locked itself
for safety. The heater will
also lock after 3
unsuccessful starts. Move
the selection square to the
Exclamation Point Icon
and press the Select
Button. An error Page will
appear.
If the heater has locked
itself, there may have been a
failure that should be
investigated and resolved
prior to futher use. The error
page will display a check list
and a website for further
information.
If you need help, reach out
to a professional.
To remove the lock, move
the selection square to the
Main Menu Bar and press
the Select Button, choose
Settings, and press the
Select Button. Choose
Clear Lock from the
Settings Menu and press the
Select Button.

- 9 -
Temp Unit
- select temperature unit
Celcius / Fahrenheit.
Connections
- clear all paired mobile
phone devices.
Adjust combustion in high
altitudes. Heater operation
can be optimized to different
altitudes.

- 10 -
Software update
It is recommended to check software updates and perform software updating annually to ensure optimal heater
performance.
Before updating the software:
check that the heater and the cell phone have sufficient level of power in battery
check that the WiFi signal is strong and the internet connection is reliable
be prepared to disconnect control panel cable, or heater power to make master reset to the system if necessary
Software update is a complicated process, and something may happen during the update, for example :sudden network
failure, which can effect to your boat heating.
Therefore it is forbidden to start software update for control panel if the Wallas heater is the only heat source and being
unable to start heater would create a danger.
For software update make sure that
• WiFi signal is strong and the internet connection is reliable
• WiFi HotSpot name (SSID) is visible in application page and the status is
"Connected"
• the heater is "OFF" before starting the update
Updating may take up to 6 minutes, depending on network and connection.
If new software version is available
Update link
will appear on the screen.
Select update.
Do not close application or heater power while update is ongoing.
Control panel display will close and start a few times during the update.
After the update is done, control panel will start and application will reconnect
to panel.
Note that in some phone models you may have to do the pairing again after
software update.
Possible problems/errors:
If the software update is not successful
if
File error
message appears, start update again after few minutes
If the software update stops during download
close the application
restart the short-range wireless connection from your mobile device
start update again
Tip! find different place, where wifi signal is better or wifi hotspot has better connection
If control panel is jammed during update:
disconnect panel cable and try again after few minutes

- 11 -
Wallas Remote application and Control Panel
connection
Local Connection
Advanced Control Panel can be connected into the mobile application with local connection.
You can then operate your heater with the "Wallas Remote" application.
First, download the Wallas Remote application to your mobile device from your application store.
Pairing the app with the heater
Mobile Device Advanced Control Panel Mobile Device Advanced Control Panel
Turn the short range wireless
connection on your mobile
device for pairing the app
with the control panel.
When you open the app for
the first time, it will search for
a Wallas heater nearby.
When a heater is found , a
pin code will appear on the
screen of the Advanced
Control Panel.
Type the pin code in the
app and press Pair to
continue.
Once the pairing has been
successful, it is confirmed
on the Control Panel with
Device Added
.

- 12 -
Advanced Control Panel Advanced Control Panel Advanced Control Panel Advanced Control Panel
If the connection was not
successful,
Connection
Denied
will appear on the
Control Panel.
Use Arrow Buttons to go to
the Main Menu Bar and
press the Select Button.
Go to the Settings and
press the Select Button.
Choose Connections and
press the Select Button.
Select Remove All and
press the Select Button.
Turn the app off, open it
again and repeat the
pairing process.

- 13 -
Operating Mode Ignition Temperature Air Boost
Heater can be started
remotely in two modes:
Heating/Thermo Control:
Set a target room
temperature C°/F°
Ventilation: Blow fresh air
without heating
Prior to starting the heater,
choose mode by swiping
the screen to the 2nd page
and tap Change under
Operating Mode to set the
desired mode (Heating or
Ventilation).
Due to safety, heater
cannot be sarted remotely
in Manual Mode.
To switch between the
modes, turn the heater off
and start in the desired
mode.
Press and hold the
Start/Stop Icon down for 2
seconds to start the heater.
Starting
will appear on the
screen. Orange combustion
light will light up when the
burner flame has been
ignated and the combustion
has stabilized (approx. in 5
min). Heater will be fully
operational about 10 min
later.
In Heating/Thermo Control
Mode the thermostat can
be set to a target room
temperature.
Press the Minus or Plus
Icons to adjust the
temperature to the desired
level.
Air Boost maximizes the air
volume for quick defrosting
and drying, but does not
change the set
temperature.
While the system is heating,
press the Air Boost Icon
until the orange Air Boost
light appears.
To go back to normal air
volume, press the Air
Boost Icon again. The light
will turn off.

- 14 -
Ventilation Ventilation Pause Shutdown
Ventilation mode blows
fresh air without heating
with 6 blower speeds.
Swipe the screen to the
2nd page and tap on
Change under Operating
Mode until you see
Ventilation. It is now set and
you can start the heater as
usual (see ignition).
Press and hold the
Start/Stop Icon down for 2
seconds to start the heater.
Press Minus or Plus icons
to set the desired power for
the fan (1-6).
To deactivate Ventilation
Mode turn the heater off.
Re-start in the desired
mode.
Pause Mode automatically
turns the heater off if the
temperature remains +2° (3
F°) above the set level for
1/2 hour due to local
ambient conditions.
If the heater is in Pause
Mode,
Paused
will appear
on the screen.
Pause Mode can be turned
off temporarily by slightly
increasing the target
temperature.
Heater will re-start heating
again automatically, if the
cabin temperature falls 2
degrees (3 F°) below the
set target temperature.
Press and hold the
Start/Stop Icon down for 2
seconds.
Stopping
will appear and
the Start/Stop icon will turn
white indicating the unit is
off.
Note: The heating mode
that was used last upon
shutdown will be the same
mode when the heater is
turned on again.
WiFi Connection
Control panel can be connected to the internet with WiFi connection.
You can then operate your heater with the " Wallas Remote" application through the Internet.
Wifi connection is created through the Wallas Remote application. ( Local connection between application and Control
Panel must be available before setup)
The first time selecting Connect, the application will ask for SSID and Password. Application will share this information
with Control Panel.
NOTE! If you sell your heater or give it away, you need to clear WiFi settings. ( SSID="empty", password="empty") and
you should remove the Wallas application from your device.

- 15 -
Feed your internet
connection details.
When internet connection
is finalized status will be
"connected".
After few minutes "
REMOTE LINK" will appear
.
"REMOTE LINK " display
will connect to internet
panel. You can :
- set room temperature
target
- start /stop your heater
Note: heater start and
stop takes several
minutes.
You can see when heater
was last connected into
internet, and what is the
heater state.
You can see some
statistics of your heater.
Available graphs will
vary depending of your
heater model.
Note! Before you can
operate heater,
you need to read safety
warnings and agree.
When you start
application and heater is
not in range you can
operate heater by
opening the "Remote
Link".
Wallas-Marin reserves the right to develop usability and features of the application.

- 16 -
Connections tips:
1. Read from your mobile device user guide how connections and WiFi connections are managed in your device.
2. Make sure that local connections and WiFi are allowed in you mobile device (flight mode is OFF).
3. Your mobile device is not in power save mode and location permission is given to Wallas application.
4. Check that heater is connected into power and Control panel is connected into heater.
5. Distance between Mobile device and Control Panel is not too long.
6. Control Panel is not in used by other person. Only one local connection is possible at a time.
7. If your mobile device has already connection into heater it can not create new before old connection is removed from
your device. In some phone models this has to be made manually. Remove "WALLAS OP" from your phones paired
short range wireless connection devices list (note there might be several OP pairings in mobile device list, remove all)
and restart short range wireless connection before new pairing is possible. This may be the case if control panel pairing
code only blinks fast and your mobile device is repeating the connection requests.
8. Change connection to other Wallas heater.
close Wallas remote application
remove old connections from your mobile device short range wireless connection paired devices list. Restart
your devices short range wireless connection
if there is no other users for new Wallas heater you can select Control panel menu
Settings/Connections/Remove all
restart application
when/if "Change Device " link appears (30-60 sec) press the link
wait connection procedure to finalize
9. In some phone models Pairing request will open in background info window. ( See your mobile devices user guide.)

- 17 -
Error Codes
Possible error codes are listed on the table below.
Combined
Code
Error message Problem Troubleshooting
10A06 Ignition failed Ignition failed, maximum allowed
number of pump pulses
Check the fuel, check the fuel filter,
tighten all joints.
10A06 Ignition failed Preheating failed, residual fuel burning
for too long
Try to start again, if same fault, contact
service.
1020B Low voltage Supply voltage is below minimum Renew/charge the battery.
10001 System error Contact service
10003 System error Contact service
10201 System error Unexpected flame-out Check the fuel level, check the fuel filter.
20005 System error Contact service
20A0207 System error Water thermostat is missing water
temperature data Contact service
20B0205 System error Analog control (potentiometer) is
missing
Connect the controller, check contropanel
wiring.
203020A Ignition failed No fuel was detected, maximum
allowed number of pump pulses
Check the fuel, check the fuel filter,
tighten all joints.
2010204 Combustion fan Burner fan is not working (no
tachometer signal) Contact service
2020204 System error Ventilation fan is not working (no
tachometer signal) Contact service
2030204 System error Fuel pump output short-circuit Fuelpump wires are in shortcut, check the
wiring.
2030205 System error Fuel pump not connected (no current
detected on output)
Fuel pump is missing, connect fuel pump
connector.
2040205 Water pump Water pump is missing (no load on
output) Connect the waterpump connector.
2050204 System error Burner or ventilation fan power short-
circuit Contact service
2060204 Glow plug Glow plug short-circuit Renew the glow plug.
2060205 Glow plug Glow plug missing (no current detected
on output)
Renew the glow plug, check that the glow
plug connector is connected to the ECU.

- 18 -
2070005 System error Contact service
2080001 System error Contact service
2080006 System error Contact service
2080008
System error Contact service
2080208 System error Contact service
3000007 Burner temp
sensor Burner temperature is missing/invalid Contact service
3010007 Air temp sensor Air temperature is missing/invalid Connect air temperature sensor.
3010202 Air overheat Air temperature is too high Check air vent´s and warm air hoses for
blockages.
3020007 Water temp
sensor Water temperature is missing/invalid Contact service
3020202 Water overheat Water temperature is too high Water is not circulate, bleed the air out of
the system, check the waterpump.
50001 System error CAN bus other errors Contact service
50006 System error CAN bus timeout error Contact service
50008 System error CAN bus busy error Contact service
7020B Low voltage Cannot start, low voltage Renew/charge the battery
7020C System error Cannot start, device locked Open locking mode from the control
panel, check control panel user manual.
7020D System error Cannot start, enable input not asserted Enable wire is missing, connect the
enable wire or set the main power ON
7020E System error Cannot start, burner temperature
missing or too high
Powercut during the operation, Wait that
unit cools down and try to start again.
Other manuals for 3008
4
Table of contents
Other wallas Control Panel manuals
Popular Control Panel manuals by other brands

Harvia
Harvia Xenio WiFi user manual

Bentel
Bentel academy 4 user manual

Carrier
Carrier Aritech Reliance XR Series Installation and programming guide

Harris
Harris NUCLEUS Installation and operation manual

IGD
IGD TOCSIN 750 Series Operation and maintenance

HST
HST Addressable fire alarm MN-300 operating instructions

EDM
EDM Solution-8 Operator's manual

Slant/Fin
Slant/Fin VICTORY II VHS Series manual

Rockwell Automation
Rockwell Automation Allen-Bradley OptixPanel 2800C AS Series user manual

Kramer
Kramer RC-76M user manual

Matrix Switch Corporation
Matrix Switch Corporation MSC-CP16X1E product manual

fadini
fadini Elpro 15 Plus instructions