Warn ProVantage Manual

WARN INDUSTRIES * BASIC GUIDE TO PLOWING
1
Plow Operator's Guide - Basic
Guide to Plowing
TABLE OF CONTENTS:
General safety precautions ............................................................................... 2-5
Plow Basics ...................................................................................................... 6-9
How the Plow Works..................................................................................... 10-11
Plow Accessories & Enhancements ................................................................. 12
Before you Plow ............................................................................................13-16
Plowing .........................................................................................................17-18
Maintenance/Storage ......................................................................................... 19
Final Comment .................................................................................................. 19
WARN INDUSTRIES OFF-ROAD PRODUCTS
12900 S.E. Capps Road
Clackamas, OR 97015-8903 USA
Customer Service: 1-800-543-WARN (9276)
Fax: 1-503-722-3000
www.warn.com
Every plowing situation has the potential for personal injury. In order to minimize that risk, it
is important that you read this Basic Guide carefully, familiarize yourself with the operation of
your plow before having to use it, and be constantly safety oriented. In this Guide, we will set
forth many of the basic rules of safe plow operation. However, because every plowing
situation is different, your constant good judgment and consistent focus on safety are of
great importance.

WARN INDUSTRIES * BASIC GUIDE TO PLOWING
2
GENERAL SAFETY PRECAUTIONS
As you read these instructions, you will see
WARNINGS, CAUTIONS, NOTICES and NOTES.
Eachmessagehasaspecificpurpose.WARNINGS
aresafetymessagesthatindicate a potentially
hazardoussituation, which,ifnot avoidedcouldresult
inseriousinjuryor death. CAUTIONS are safety
messagesthat indicatea potentiallyhazardous
situationwhich,if not avoided, couldresultinminor or
moderate injury. ACAUTION may also be used to
alertagainstunsafe practice.CAUTIONSand
WARNINGSidentify the hazard,indicatehow to avoid
thehazard, andadviseof theprobable consequence
ofnotavoidingthe hazard. NOTICES aremessages
toavoidproperty damage. NOTESareadditional
informationtohelp youcompletea procedure.
PLEASE WORK SAFELY!
WARNING
WARNING
CHEMICALAND FIRE HAZARD
Failureto observe theseinstructions could
lead to severe injury or death.
•Always remove jewelry and wear eye
protection.
•Never lean over battery while making
connections.
•Always verify area is clear of fuel lines, fuel
tank, brake lines, electrical wires, etc. when
drilling.
•Never route electrical cables:
- Across any sharp edges.
- Through or near moving parts.
- Near parts that become hot.
•Always insulate and protect all exposed
wiring and electrical terminals.
•Always install terminal boots as directed in
installation instructions.
Warnings and Cautions
WARNING
FALLING OR CRUSHING HAZARD
Failure to observe these instructions could
lead to severe injury or death.
•Never use winch to lift or move persons.
•Never use winch as a hoist or to suspend a
load.
•Never operate winch with less than 5 wraps of
rope around the drum. Rope could come loose
from the drum, as the rope attachment to the
drum is not designed to hold a load.
MOVING PARTS ENTANGLEMENT
HAZARD
Failure to observe these instructions could
lead to severe injury or death.
To avoid injury to hands or fingers:
•Always keep hands clear of rope, hook loop,
hook and fairlead opening during installation,
operation and when spooling in or out.
•Always use extreme caution when handling hook
and rope during spooling operations.
•Always use supplied hook strap whenever
spooling rope in or out, during installation, and
during operation.
•Always keep vehicle in sight during winching
operation.
•Always wear heavy leather gloves when handling
rope.
• Always plow cautiously, impact with hidden or
stationary object may cause the vehicle to stop
suddenly or go out of control.
• Never operate the vehicle on slopes greater than
10 degrees with the plow installed.
• Never stand or ride on the plow.
• Never remove the springs and hard fixture the
blade to the plow base or vehicle. Doing so will
prevent the plow from tripping (rollover) during an
impact with a low-lying object and possibly
damage the plow, vehicle, or eject the rider from
the vehicle causing serious injury or death.

WARN INDUSTRIES * BASIC GUIDE TO PLOWING
3
GENERAL SAFETY PRECAUTIONS
MOVING PARTS ENTANGLEMENT
HAZARD
Failure to observe these instructions could
lead to severe injury or death.
• Always stay clear of moving parts and joints.
• Always keep others away when operating or
adjusting plow.
• Always perform regular inspections and
maintenance on the plow mechanism, fasteners,
rope and related hardware.
• Always replace all worn or damaged parts before
operating.
• Never operate this WARN product with damaged
or missing parts.
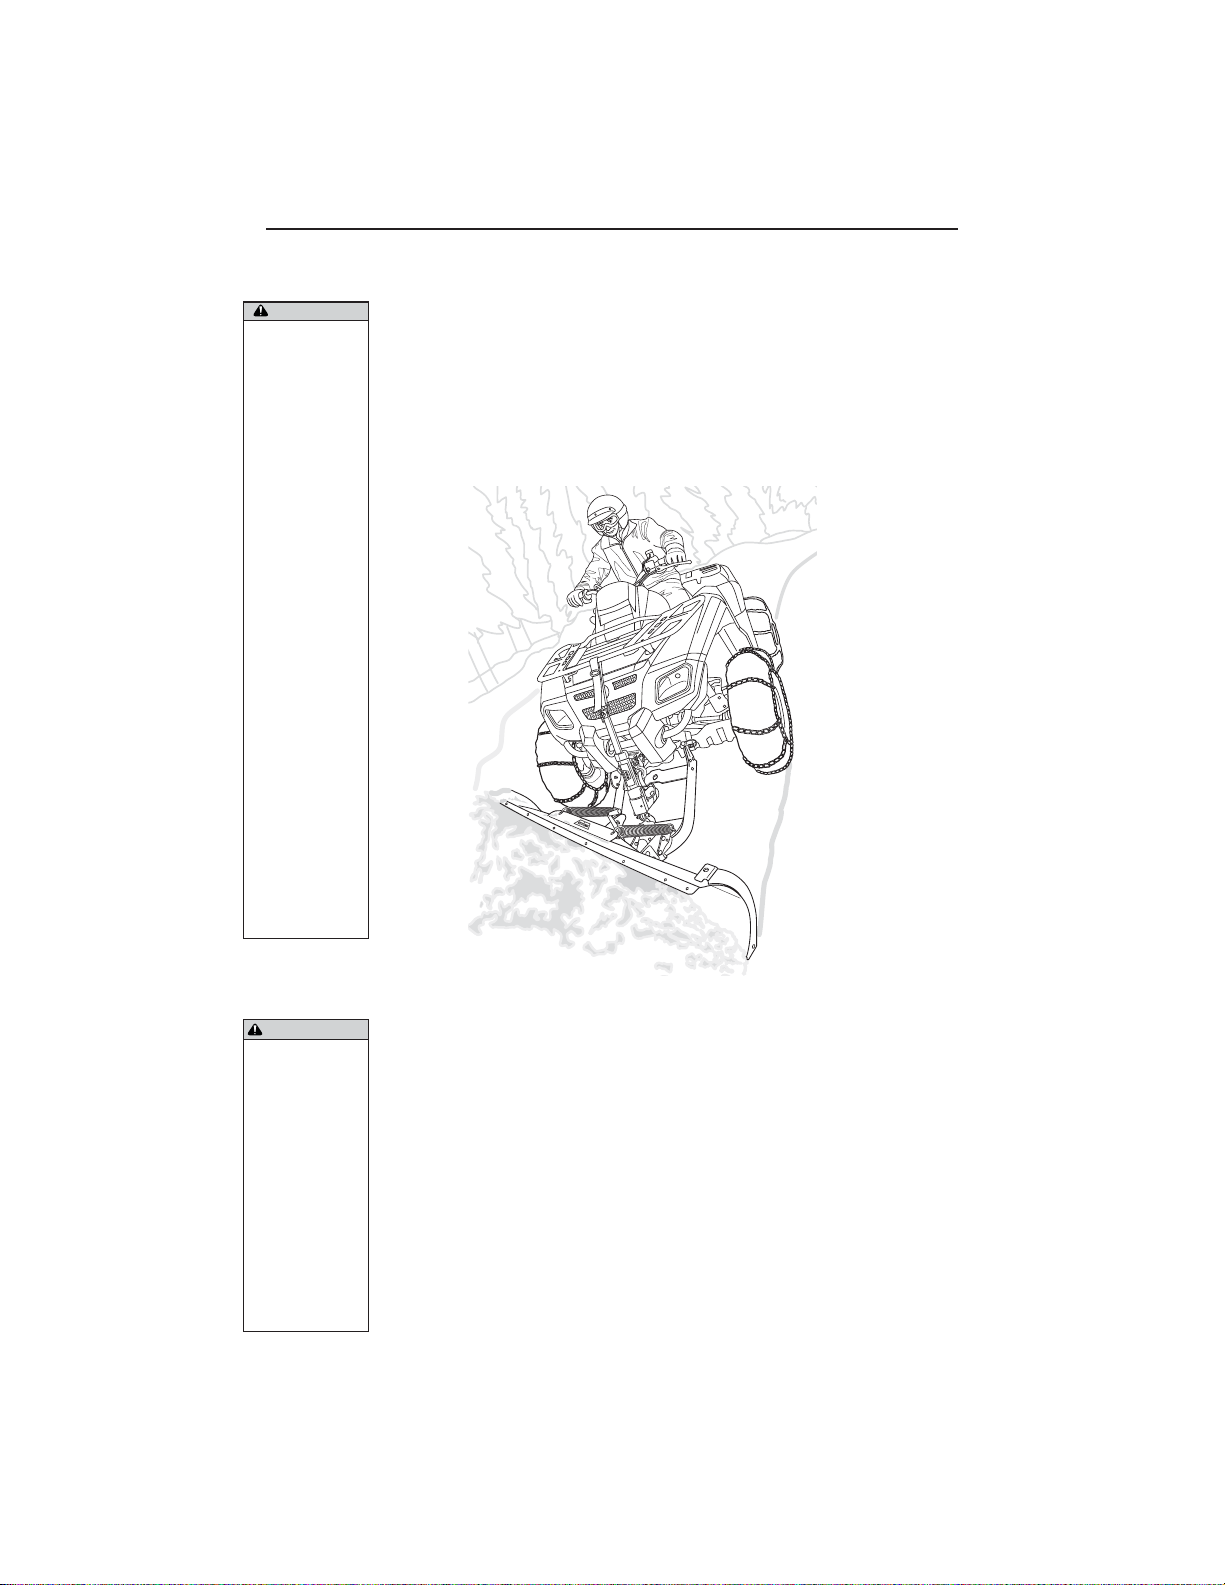
• Always drive slowly over bumpy and rough
terrain. Driving at speeds that cause the plow to
bounce while in the up position may cause the lift
system to back-drive, lowering the plow down.
This may result in the plow impacting a stationary
object and cause damage to the vehicle and
operator injury or death.
• Always drive at speeds such that the plow does
not bounce and be aware of the plow position
while driving at all times.
• Never raise the plow to a solid (stall/lock) position
against vehicle, as it may damage the vehicle lift
device and plow.
•Always wear a helmet and appropriate riding
gear when operating the vehicle.
• Always store the plow system in a dry place
when not in use.
• Always lower the plow to the down position
before leaving the vehicle unattended.
• Never operate the plow near bystanders.
• Never be near or contact the plow or lifting
device while the plow is being raised or
lowered.
• Always operate plow vehicle with care. Vehicle
weight balance and stability can be greatly
changed when a plow is attached and when the
vehicle is pushing a loaded plow. With this
change, steering and vehicle control will be
different.
• Always use appropriate and adequate care in
lifting components into place.
• Always insure components will remain secure
during installation and operation.
• Always tighten all nuts and bolts securely, per the
installation instructions.
WARNING WARNING
MOVING PARTS ENTANGLEMENT
HAZARD
Failure to observe these instructions could
lead to severe injury or death.
To avoid injury to hands or fingers:
•Never remove the hook from the end of the winch
rope. The hook prevents the end of the winch
rope from being pulled into the roller-fairlead.
Removal of the hook increases the chance that
fingers or other extremities may be pulled into the
roller-fairlead causing personal injury. Leave the
winch hook on and always follow safe winching
techniques as described in the Winching Guide
included with your winch.
•Never winch with the rope outside of the roller-
fairlead. Doing so can result in severe vehicle
damage and rope wear that can cause the winch
rope to break suddenly and potentially cause
destructive vehicle damage and major injury or
death to riders and bystanders. Always route the
rope through the roller-fairlead before winching.
• Always check the winch for back-driving and rope
nesting before plowing. Failure to do so may
cause the plow to creep downward when in the up
position. If the plow creeps down low enough, the
blade may hit a stationary object ejecting the rider
from the vehicle and causing serious injury or
death.
• Always check lift mechanism, straps or winch
rope integrity before plowing. Failure to do so
may cause the plow to drop suddenly from the up
position and impact a low-lying object, potentially
ejecting the rider from the vehicle and causing
serious injury or death.
• Always replace winch rope if appears worn or
frayed before plowing.
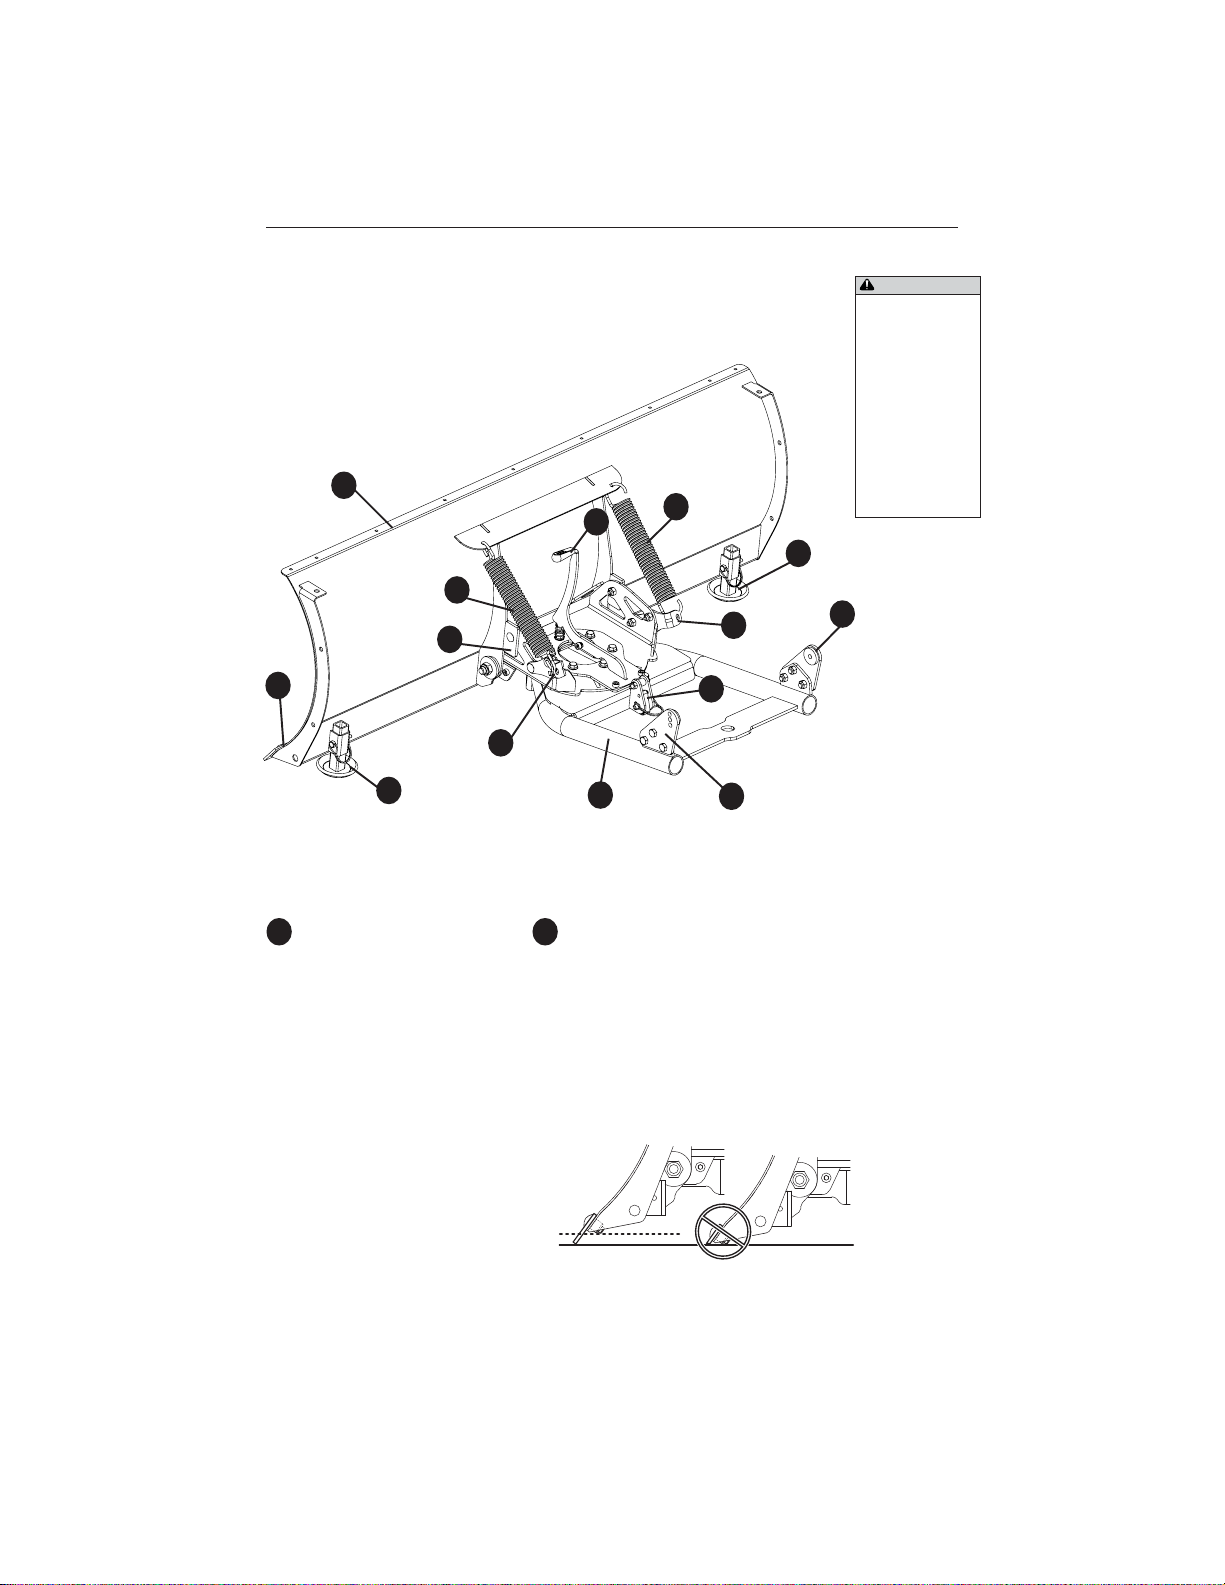
• Always be sure the latch lever handle is fully
engaged before plowing. In some instances it
may be necessary to push the handle to engage it
into the plow base. Failure to properly engage the
plow may result in loss of vehicle control which
can lead to vehicle damage, personal injury, or
even death.
• Always operate the vehicle at a low speed with
the blade installed. Never exceed 5 mph (8 km/h),
even with blade up. Use low range if vehicle is
equipped.

WARN INDUSTRIES * BASIC GUIDE TO PLOWING
4
GENERAL SAFETY PRECAUTIONS
CAUTION
MOVING PARTS ENTANGLEMENT
HAZARD
Failure to observe these instructions could
lead to minor or moderate injury.
General Safety:
•Always know your winch.Take time to fully read
the Installation Guide and the Basic Guide to
Winching Techniques in order to understand
your winch and its operation.
•Never operate this winch if you are under 16
years of age.
•Never operate this winch when under the
influence of drugs, alcohol or medication.
•Never exceed winch or rope capacity listed on
product data sheet. Double line using a snatch
block to reduce winch load.
Installation Safety:
•Always choose a mounting location that is
sufficiently strong to withstand the maximum
pulling capacity of your winch.
•Always use factory approved mounting
hardware, components, and accessories.
•Always use grade 5 (grade 8.8 metric) or better
mounting hardware.
•Always power winch with only the
recommended electrical system voltage. See
the winch specification sheet for details.
•Never weld mounting bolts.
•Always use care when using longer bolts than
those supplied from factory. Bolts that are too
long can damage winch and/or prevent the
winch from being mounted securely.
•Always mount the winch and attach the hook to
the rope’s end loop before connecting the
electrical wiring.
•Always position fairlead with WARNING label
on top.
•Always spool the rope onto the drum in the
direction specified by the winch warning label on
the winch and/or documentation. This is
required for the automatic brake (if so equipped)
to function properly.
•Always prestretch wire rope and respool under
load before use. Tightly wound wire rope
reduces chances of “binding”, which can
damage the rope.
CAUTION
MOVING PARTS ENTANGLEMENT
HAZARD
Failure to observe these instructions could
lead to minor or moderate injury.
Winching Safety:
•Always inspect, rope, hook, and slings before
operating winch. Frayed, kinked or damaged rope
must be replaced immediately. Damaged
components must be replaced before operation.
Protect parts from damage.
•Never leave remote control plugged into winch
when free spooling, rigging, or when the winch is
not being used.
•Never hook rope back onto itself. This damages
the rope.
•Always use a choker chain, choker rope, or tree
trunk protector on the anchor.
•Always remove any element or obstacle that may
interfere with safe operation of the winch.
•Always take time to use appropriate rigging
techniques for a winch pull.
•Always be certain the anchor you select will
withstand the load and the strap or chain will not
slip.
•Never engage or disengage clutch if winch is
under load, rope is in tension or drum is moving.
•Always select an anchor point as far away as
possible. This will provide the winch with its
greatest pulling power.
•Never touch rope or hook while in tension or
under load.
•Never touch rope or hook while someone else is
at the control switch or during winching operation.
•Always stand clear of rope and load and keep
others away while winching.
•Always be aware of stability of vehicle and load
during winching, keep others away. Alert all
bystanders of any unstable condition.
•Never use winch to secure a load.
•Always keep wired remote control lead clear of
the drum, rope and rigging. Inspect for cracks,
pinches, frayed wires or loose connections.
Replace remote control if damaged.
•Always pass wired remote control through a
window to avoid pinching lead in door, when using
remote inside a vehicle.
•Never leave remote control where it can be
activated during freespooling, rigging, or when the
winch is not being used.
•Always require operator and bystanders to be
aware of vehicle and or load.

WARN INDUSTRIES * BASIC GUIDE TO PLOWING
5
GENERAL SAFETY PRECAUTIONS
AVOID WINCH AND EQUIPMENT
DAMAGE
•Always avoid side pulls which can pile up rope at
one end of the drum. This can damage rope or
winch.
•Always ensure the clutch is fully engaged or
disengaged.
•Never use winch to tow other vehicles or objects.
Shock loads can momentarily exceed capacity of
rope and winch.
•Always avoid “powering out” for extended
distances. This causes excess heat and wear on
the winch motor and brake.
•Always use care to not damage the vehicle
frame when anchoring to a vehicle during a
winching operation.
•Never “jog” rope under load. Shock loads can
momentarily exceed capacity of rope and winch.
•Never use winch to secure a load during
transport.
•Never submerge winch in water.
•Always store the remote control in a protected,
clean, dry area.
•Always double line or pick distant anchor point
when rigging. This maximizes pulling power and
avoids overloading the winch.
NOTICE
CAUTION
CUTAND BURN HAZARD
Failure to observe these instructions could
lead to minor or moderate injury.
To avoid injury to hands and fingers:
•Always wear heavy leather gloves when
handling a rope.
•Never let rope slip through your hands.
•Always be aware of possible hot surface at
winch motor, drum or rope during or after winch
use.
CAUTION
MOVING PARTS ENTANGLEMENT
HAZARD
Failure to observe these instructions could
lead to minor to moderate injury.
•Always use a hook with a latch
•Always ensure hook latch is closed and not
supporting load.
•Never apply load to hook tip or latch.Apply load
only to the center of hook.
•Never use a hook whose throat opening has
increased, or whose tip is bent or twisted.

WARN INDUSTRIES * BASIC GUIDE TO PLOWING
6
PLOW BASICS
WARNINGWARNING
WARNINGWARNING
WARNING
Always perform
regular inspections
and maintenance
on the plow
mechanism,
fasteners, rope and
related hardware.
Always operate
the vehicle at a low
speed with the
blade installed.
Never exceed 5
mph (8 km/h), even
with blade up. Use
low range if vehicle
is equipped.
The WARN ProVantage plow system is divided into four separate
kits. This allows the user to build a plow system per his/her liking
and for the specific vehicle they own. A user must have one of each
kit in order to have a working plow system. A complete plow
system is made up of four kits :
1. PLOW BLADE
2. PLOW BASE ASSEMBLY
3. VEHICLE PLOW MOUNT
4. PLOW LIFT MECHANISM
1.
2.
3.
4.
1.
4.
3.
2.

WARN INDUSTRIES * BASIC GUIDE TO PLOWING
7
PLOW BASICS
Before You Begin:
To start, you should familiarize yourself with your WARN
ProVantage plow and each of its components:
The Plow Blade is the primary
component in the plow system.
It is sold in various sizes and
styles for different applications
and vehicle sizes. The “Mold
Board” is the curved face of the
blade. The mold board is
specifically designed to roll
snow or plowed material. The
ribs on the back and the
structure on the bottom of the
blade provide strength and
rigidity.
1.
CACA
CACA
CAUTIONUTION
UTIONUTION
UTION
Never operate or
install a winch
without reading or
understanding the
operator’s
manuals.
Always read and
understand product
manuals and
warnings prior to
installation and
use.
1.
2.
3.
4.
6.
5.
9.
4.
5.
7.
3.
8.
10.
10.
2. The Wear Bar is the rectangular
metal bar that is bolted to the
bottom of the plow blade. This bar
is the cutting edge and takes the
brunt of the force and wear
involved in plowing. It is a wear
item and should be replaced if worn
back to the adjacent mold board
edge.

WARN INDUSTRIES * BASIC GUIDE TO PLOWING
8
PLOW BASICS
WARNINGWARNING
WARNINGWARNING
WARNING
Never remove the
hook from the end
of the winch rope.
The hook prevents
the end of the
winch rope from
being pulled into
the roller-fairlead.
Removal of the
hook increases
the chance that
fingers or other
extremities may be
pulled into the
roller-fairlead
causing personal
injury. Leave the
winch hook on and
always follow safe
winching
techniques as
described in the
Winching Guide
included with your
winch.
The Plow Skid is used to control
the cutting/plowing height of the
blade. It is designed to hold the
blade wear bar off the ground at
a user-selected height. These
are also wear items and should
be inspected often and replaced
as needed.
The Plow Blade Return Spring
restrains the plow blade in an
upright position during plowing.
If the blade wear bar contacts a
very low non-movable object, the
blade will roll over (forward)
against the force of this spring.
The Spring Tension Bracket is
used to tension the return spring
and secure the spring end to the
swivel base assembly. Be sure
the left and right are on the
same setting.
The Stop Block is used to set
the plow blade attack angle.
Rotating the stop blocks changes
the scraping or cutting action of
the blade. It provides three
positions, to match plowing
conditions. Be sure to set right
and left blocks in the same
position.
The Plow Latch Lever secures
the plow blade pivot angle.
Pressing this lever will release
the latch and allow the blade to
be rotated about a vertical axis.
This lever is spring loaded so it
will automatically engage when
the base assembly slots align.
5.
7.
4.
6.
3.

WARN INDUSTRIES * BASIC GUIDE TO PLOWING
9
PLOW BASICS
WARNINGWARNING
WARNINGWARNING
WARNING
Always perform
regular inspections
and maintenance on
the plow
mechanism,
fasteners, rope and
related hardware.
8. The Plow Rope Guide is
used to route the winch rope
to the rear cross-member of
the plow tube assembly. The
rope guide is pinned at the
lower hole to allow the rope to
be easily removed from the
plow. Use of the rope guide
prevents the rope end loop
and swage from hanging up
on the fairlead when the plow
is fully raised.
The Plow Tube Assembly is
the main frame of the plow
and attaches the plow blade
to the vehicle by way of the
plow mount. The tubes in this
assembly transfer the pushing
power of the vehicle into the
plow blade. The front part of
this assembly is the swivel or
pivot platform. This platform
supports the blade and allows
the blade to pivot from side to
side as selected by the
operator. It also provides lift
points for raising the plow
blade with a winch or plow lift.
9.
WARNINGWARNING
WARNINGWARNING
WARNING
Never remove the
hook from the end
of the winch rope.
The hook prevents
the end of the
winch rope from
being pulled into
the roller-fairlead.
Removal of the
hook increases
the chance that
fingers or other
extremities may be
pulled into the
roller-fairlead
causing personal
injury. Leave the
winch hook on and
always follow safe
winching
techniques as
described in the
Winching Guide
included with your
winch.
10. The Plow Mounting Tabs are
supplied in the plow mounting kit.
These are designed specific to
each vehicle and attach the plow
tube assembly to the plow mount.
Each tab has a pivot disk or round
piece of steel. This pivot disk fits
into the mount cradle that provides
alignment, allowing easy insertion
and removal of the connecting
pins.

WARN INDUSTRIES * BASIC GUIDE TO PLOWING
10
HOW THE PLOW WORKS
Plow Mechanics
Now that you are familiar
with your WARN plow and its
components, we can begin
reviewing how it works. The plow
wear bar contacts the surface to
be plowed and scrapes the
material from the surface. The
material is then pushed into the
blade by the material on the plow
surface and slides along the mold
board. The material rolls over and
falls on top of the material in front
of the plow as it reaches the top of
the mold board.
When the blade is set at a
pivot angle, the plowed material
will roll over and flow to the side of
the vehicle, leaving the area
plowed.
As the material rolls over in
front of the plow blade it will
become deeper. The deeper the
material the harder the vehicle will
need to work to move the material.
If the material is too deep or the
vehicle has no traction, the plow
The operator must
be in good health
and free of joint
problems if using
the manual lift. The
manual lift is
intended for
occasional and
light duty plowing.
WARN encourages
persons who do
heavy or frequent
plowing to use a
winch or electric
actuator for a plow
lifting device.
CACA
CACA
CAUTIONUTION
UTIONUTION
UTION
WARNINGWARNING
WARNINGWARNING
WARNING
Always check the
winch for back-
driving and nesting
before plowing.
Failure to do so may
cause the plow to
creep downward
when in the up
position. If the plow
creeps down low
enough, the blade
may hit a stationary
object ejecting the
rider from the
vehicle and causing
serious injury or
death.
Always check winch
rope integrity before
plowing. Failure to
do so may cause
the plow to drop
suddenly from the
up position and
impact a low-lying
object, potentially
ejecting the rider
from the vehicle and
causing serious
injury or death.
Always replace
winch rope if
appears worn or
frayed before
plowing.
will not be effective as the material
will not be able to roll over in front
of the blade.
The blade attack angle can be
adjusted and will change the blade
cutting action. Generally, the blade
should be set with the top lip in the
back position (see page 15).
The plow gravel skids may be
used to control how deep the blade
will cut into the material on the plow
surface. The skids may be set to
raise the wear bar the maximum
distance off the surface. The area
may be plowed to remove the top
layer of material. Asecond pass
may be made with the skids in a
raised position that will allow the
blade to remove all material down
to the ground surface. Operating
with the skids at maximum position
may be optimal when grading
material onto the surface or when
trying to keep the wear bar from
damaging the surface.

WARN INDUSTRIES * BASIC GUIDE TO PLOWING
11
HOW THE PLOW WORKS
Single Line Rigging
Double Line Rigging
WARNINGWARNING
WARNINGWARNING
WARNING
Vehicle weight
balance and stability
can be greatly
changed when a
plow is attached and
when the vehicle is
pushing a loaded
plow. With this
change, steering
and vehicle control
will be different.
Always operate the
vehicle at a low
speed with the blade
installed. Never
exceed 5 mph (8
km/h), even with
blade up. Use low
range if vehicle is
equipped.
Plow Lift
The plow requires a lifting
device. The lifting device maybe a
winch, a plow lift actuator or a
manual device. If a winch is used,
it is recommended that the
operator replace the winch rope
with the plow lift rope listed in the
accessories section of the WARN
Powersports catalog
(www.warn.com). It is also
recommended, that the standard
winch roller fairlead be replaced
with the plow roller fairlead. This
fairlead has a large bottom roller
that will reduce rope wear. Using a
winch to raise and lower a plow will
cause rope wear. Always replace
a damaged or worn rope. Consult
the WARN Basic Guide to
Winching booklet.
A winch rope may be rigged
single or double line. Adouble line
requires a pulley to be attached to
the plow. The winch rope is then
routed from the roller fairlead,
around the pulley, and then back to
the vehicle. This method reduces
the load on the winch rope and
reduces the plow lift speed. A
slower lift speed provides better
control of blade height and
minimizes lifting plow up against
vehicle or stalling lift mechanism.
For single line rigging, route
the rope though the guide and to
the back of the plow basetube
assembly.
Plow lift
The plow lift is another method
for lifting the plow. This device is
specifically designed to lift the plow
blade and does not use a rope.
The actuator has internal parts that
prevent it from extending due to
plow weight. It also contains
internal switches that automatically
stop the device when fully extended
or retracted.

WARN INDUSTRIES * BASIC GUIDE TO PLOWING
12
PLOW ACCESSORIES AND ENHANCEMENTS
Alone the plow is an effective
tool, but when used with certain
accessories and enhancements
your WARN plow can become even
more versatile and productive. In
this section we will review several
of these items. Contact your local
dealer or visit www.warn.com to
purchase your accessories.
Plastic Wear Bar an ultra high
molecular weight plastic bar that
replaces the steel bar. This bar
prevents wear of the blade and will
minimize plow scraping on concrete
or brick surfaces.
Blade Side Wall controls run off of
material as it is piled in front of
blade. The heavy duty steel
construction will prevent material
from escaping and better allow you
to move the material off to one
side.
Snow Control Flap is a flexible
rubber flap that bolts to the top of
the plow blade. This accessory
keeps the snow (or light material)
from flowing up over the blade,
keeping the snow in front of the
blade out of the operator’s vision.
Plow lift is another method for
lifting the plow. This device is
specifically designed to lift the plow
blade and does not use a rope.
Plow Lift Rope is a durable,
syntheticrope thatreplacesthe
winchrope. Thisrope stands up to
therepeatedsharpanglepullsused
tolifta heavy plow blade. Use this
ropewiththePlowRoller Fairlead
formaximumrope life.
Roller Fairlead for Plow Lifting
designedforuse with Warn
winches that raise and lower the
plowblade. Thelargerdiameter
lower roller reduces wear of the
rope.
Power -Pivot replaces the pivot
latchingsystem ontheplow. This
heavyduty electric devicewill pivot
theplowbladeineitherdirection
with the push of a button. It is
powerfulenoughto rotate your
bladewhile plowing. Plowloadsare
transmittedtothebasethougha
pawlsystem, protectingthe4 stage
planetarydrivetrain. This accessory
greatlyimprovesproductivity.
Plow Markers clearly mark the
cornersofyourblade. These
markersare flexibleandtwo feet
highto improveplowvisibilitywhen
plowingclose toobjectsin deep
snow.
1.
2.
3.
4.
5.
6.
7.
8.
1.
2.
3.
4. 5.
6.
7.
8.

WARN INDUSTRIES * BASIC GUIDE TO PLOWING
13
BEFORE YOU PLOW
Install the Plow
Make sure that the plow and
vehicle are on flat, level surface
before attempting to attach the
plow to the vehicle mount. The
vehicle engine should be off,
transmission should be in park
and/or the parking brake set. The
front wheels should be straight and
the plow blade pivot angle should
be set to the straight position
before installing the plow.
Debris such as rocks, dirt, and
branches can become lodged in
the plow mount while operating the
vehicle without the plow. Inspect
the mount for any debris, damage
and to make sure fasteners are
properly torqued before installing
or using the plow.
The plow retaining pins are
secured to the mount by a bail.
This bail can become damaged
with use. Inspect the bail to make
sure that it locks firmly to the
mount. Remove the pin and bend
the bail wire as needed to insure
that it fits tightly to the mount.
CACA
CACA
CAUTIONUTION
UTIONUTION
UTION
WARNINGWARNING
WARNINGWARNING
WARNING
Always inspect,
rope, hook, and
slings before
operating winch.
Frayed, kinked or
damaged rope must
be replaced
immediately.
Damaged
components must
be replaced before
operation. Protect
parts from damage.
Always be sure the
latch lever handle is
fully engaged before
plowing. In some
instances it may be
necessary to push
the handle to
engage it into the
plow base. Failure
to properly engage
the plow may result
in loss of vehicle
control which can
lead to vehicle
damage, personal
injury, or even death.
Mold Board Preparation
The mold board surface has a
nonstick material in the coating
from the factory. However, like all
nonstick surfaces, this coating will
wear out over time. Asurface
modifier such as wax or nonstick
spray may be applied to the mold
board surface periodically to
produce the best material roll.

WARN INDUSTRIES * BASIC GUIDE TO PLOWING
14
BEFORE YOU PLOW
Setting Spring Tension
The spring brackets on the
WARN plow have two specifically
designed positions. The stiff
setting will position the bracket in a
lower position with the end of
spring closer to vehicle. The softer
setting will position the bracket
more upright.
The stiff setting will produce
the highest blade rollover force.
Using the stiff spring position with
the most aggressive (forward)
blade attack angle position will
produce the highest scraping
action, useful for gravel driveway
maintenance or plowing ice and
snow clean.
The softer spring setting will
lower the blade rollover force and
should be used with lighter
vehicles and typically the most
aggressive (forward) blade attack
angle.
Both spring brackets on the
plow base will need to be rotated
and set to the same position. Use
a 17mm wrench to loosen the
lower M10 lock nut securing each
bracket. Use a 17mm wrench to
remove the M10 lock nut and
carriage bolt near the top of the
bracket. Insert a 3/8" drive ratchet
or breaker bar into a square
bracket hole that will not be used
for the bolt. Press the bracket
down to align the holes in bracket
and base. Secure each bracket
with a M10 carriage bolt and lock
nut. Torque all M10 nuts to 42 N-
m (31 ft-lbs).
Never remove the
springs and hard
fixture the blade to
the plow base or
vehicle. Doing so
will prevent the
plow from tripping
(rollover) during an
impact with a low-
lying object and
possibly damage
the plow, vehicle, or
eject the rider from
the vehicle causing
serious injury or
death.
Loosen M10 lock nut and carriage bolt
securing brackets.
Remove M10 nut and carriage bolt.
Press bracket down to align holes in
bracket and base.
Secure each bracket with M10 carriage
bolt and lock nut.
WARNINGWARNING
WARNINGWARNING
WARNING

WARN INDUSTRIES * BASIC GUIDE TO PLOWING
15
BEFORE YOU PLOW
Setting Blade Attack Angle
Usually one angle setting will
work fine for most situations. The
most aggressive attack angle (top
of blade tipped forward) is
recommended for use when
moving sand and gravel. This
setting will also produce better
scraping action on ice or hardpack
snow covered surfaces.
The middle attack angle
setting will provide a good all
around performance. This setting
should be used with heavy or wet
snow.
The least aggressive attack
angle (blade tipped back) is
recommended for use with deep
snow. This setting allows the wear
bar to slide under the snow and
produce the most blade down
force.
Both stop blocks on each side
of the plow base will need to be
rotated and set to the same
position. Use a 17mm wrench to
loosen the M10 nut. Release the
spring tension by placing a 3/8"
square drive ratchet into the spring
bracket, loosen the bracket
adjustment bolts, and apply force
to the ratchet to relieve the upper
adjustment bolt. Remove the bolt
and allow the spring tension to go
to zero. Repeat on the other side.
Always wear
heavy leather
gloves when
handling rope.
Always follow
adjustment
procedure. Doing
so will minimize
potential for hand
injury.
ABC
CACA
CACA
CAUTIONUTION
UTIONUTION
UTION
Use a 17mm wrench to loosen the
M10 nut securing each block. Push
the top edge of the blade away
from the base until the block can be
rotated to the desired position.
Secure each block with lock nut
and torque it to 42 N-m (31 ft-lbs).
Reset the spring tension as desired
and install, then tighten the spring
bracket bolts.

WARN INDUSTRIES * BASIC GUIDE TO PLOWING
16
BEFORE YOU PLOW
Setting Vehicle Height
For best plow performance
the plow platform and base must
be parallel to the surface being
plowed. The vehicle height should
be adjusted prior to plowing to set
the plow in the correct position.
This can be done by adjusting the
vehicle spring settings, adjusting
tire pressure, and adding or
removing weight from the vehicle.
Be sure to include the weight of
the driver on the vehicle when
setting up the machine.
WARNINGWARNING
WARNINGWARNING
WARNING
Vehicle weight
balance and stability
can be greatly
changed when a
plow is attached and
when the vehicle is
pushing a loaded
plow. With this
change, steering
and vehicle control
will be different.
Always operate the
vehicle at a low
speed with the blade
installed. Never
exceed 5 mph (8
km/h), even with
blade up. Use low
range if vehicle is
equipped.

WARN INDUSTRIES * BASIC GUIDE TO PLOWING
17
PLOWING
Every plowing situation is
different. Always plan ahead
before you start. It is up to you to
analyze the situation and make the
decisions necessary for the proper
use of your WARN products.
Some key things to remember
when using your WARN plow:
√√
√√
√Vehicle weight balance and
stability can be greatly
changed when a plow is
attached and when the
vehicle is pushing a loaded
plow. With this change,
steering and vehicle control
will be different.
√√
√√
√5 MPH (8 KPH) maximum.
Keep your speed low and
pay attention to how the
machine is responding to
your control. The plow may
impact unseen and
immovable objects, causing
a sudden change in vehicle
control. Use low range and
4WD if the vehicle is so
equipped.
√√
√√
√Keep bystanders away from
the plowing route or path.
Steering and vehicle control
are different when plowing,
changing reaction time.
√√
√√
√Wear proper safety
equipment. Carefully
review your vehicle manual
and labeling.
√√
√√
√Inspectyourequipment
before and after each use.
Get it repaired if damaged.
This applies to the plow,
winch (if used) and vehicle.
√√
√√
√Set your plow up for the
conditions. Best perfor-
mance is obtained with the
right attack angle, spring
tension and pivot angle.
Too much cutting action will
slow or stop your progress.
Too little may not get the
job done.
√√
√√
√Never plow side hills
steeper than 10 degrees.
Step 1: PUT ON GLOVES &
INSPECT YOUR EQUIPMENT
Look for loose hardware, worn
components and inspect for
damage. Correct issues before you
plow. Set blade pivot to straight
position.
Step 2: POSITION THE BLADE
ASSEMBLYAND VEHICLE
Carefully move the vehicle and
plow assembly to a flat level area
and about 3’ (1m) apart. Slowly
move the vehicle towards the
mounting tabs of the tube assembly
until the push tube is between the
front tires.
Step 3: ENGAGE THE PLOW
ASSEMBLY TO THE VEHICLE
MOUNT
Lift the push tube at mounting
tab end and slide plow assembly on
wear bar, seating the alignment
pilot disks into the mount cradle. If
the plow is on a loose surface, you
may need to work on one side and
then the other.
Step 4: INSTALL THE CONNECT-
ING PINS AND LATCH THE PIN
BAILOn each side, install the
connecting pin. You may need to
wiggle the push tube assembly to
allow the pin to easily insert. If you
find difficulty, a tapered drift may
help align the holes.
Step 5: ATTACH THE LIFT
DEVICE
If you are using a winch, put
the winch in freespool and pull out
3 to 5 feet (1 to 2 meters) of wire
rope. Route the rope through the
rope guide and attach the hook to
the cross member of the tube
assembly as shown. Close the
rope guide and insert the locking
pin. When using another type of
lifting device, carefully review and
follow the instructions included with
that device.

PLOWING
WARN INDUSTRIES * BASIC GUIDE TO PLOWING
18
WARNINGWARNING
WARNINGWARNING
WARNING
Never operate the
plow near
bystanders.
Always operate the
vehicle at a low
speed with the
blade installed.
Never exceed 5
mph (8 km/h), even
with blade up. Use
low range if vehicle
is equipped.
Always plow
cautiously, impact
with hidden or
stationary object
may cause the
vehicle to stop
suddenly or go out
of control.
Always stay clear
of moving parts and
joints. Always keep
others away when
operating or
adjusting plow.
Plowing Pattern
Step 6: CHECK THE LIFT
DEVICE OPERATION
Lift and lower the plow. Note
how far you can lift without stalling
the lifting device or causing impact
between the plow assembly and
the vehicle. Do not over lift the
plow during use.
Step 7: SET THE BLADE
ATTACK ANGLE, SKID HEIGHT,
AND BLADE PIVOTANGLE
See the plow blade labeling
for tips on setting up the blade for
the job at hand. If the material is
deep, plow several thin layers at a
relaxed attack angle, minimizing
load on the plow and vehicle.
Finish the job with an aggressive
attack angle to leave a clean
surface.
Step 8: PLAN YOUR ROUTE
AND WORK SCOPE
Make sure you know what is
under the material you are
plowing. Avoid impacting hidden
objects. Be sure bystanders are
aware of your activities and that
they stay clear.
It is usually best to plow the
outer edge of the area to be
cleared. To plow a driveway, start
by plowing the shoulder first. Move
the material to either side of the
driveway. This will clear the
shoulder and allow for the material
in the center to be thrown onto the
shoulder or over the material
removed from the shoulder.
Step 9: SUIT UP TO OPERATE
YOUR VEHICLE
Follow all warnings and wear
the right safety equipment.
Step 10: WORK SMARTLY. KEEP
UNDER CONTROL AND PLOW
CAREFULLY
Plowing changes how a vehicle
handles (steering, stopping, and
stability). Plow with care and do not
rush. When you are done with your
job, be sure to park the vehicle on
flat level ground and set the brake
(put in “park”) prior to removing the
plow. Inspect and maintain your
equipment so that it is ready for
your next use.

WARN INDUSTRIES * BASIC GUIDE TO PLOWING
19
MAINTENANCE/STORAGEAND FINAL COMMENT
Maintenance
Inspect the plow before each
use. The mold board surface will
become scratched with use. It is
recommended to apply wax or a
nonstick spray to the surface
before plowing. This will prevent
the snow from sticking to the blade
and provide the best material roll.
Inspect the blade wear bar.
This steel or plastic bar on the
bottom of the blade will need to be
replaced periodically over the life of
the plow. The steel bar provides
about ¾” (19mm) of wear material
before requiring replacement.
Some blades have a reversible bar
that may be turned to double the
life of the bar. This bar must be
replaced before the retaining bolts
and nuts begin to contact the
ground.
The blade hinge bushings will
require lubrication periodically for
the best plow performance. Spray
a light lubricating oil on both sides
of the center blade ribs just above
the large hinge bolt. This lubrica-
tion should run down the rib and
into the bushing area. For better
results the blade retaining M16
nuts and retaining washers should
be removed to allow lubrication to
be applied directly to the bushing.
The blade pivot bushing is
located in the center of the plow
base. Remove the plow from the
vehicle and place the blade face
down so that the plow base and
bushing are vertical. Spray a light
lubricating oil around the base
retaining plate and then rotate the
tube assembly a few times to either
side. Repeating this a few times
will allow the oil to enter the pivot
bushing area. The base retaining
plate may need to be removed for
cleaning and thorough lubrication if
the pivot assembly does not turn
smoothly.
Inspect all fasteners to insure
that they are tight. The fasteners
on your plow must be torqued
periodically to insure that they are
tight. Torque the fasteners to the
following specifications:
- 13mm(M8)Bolts–17N-m(12
ft-lb)
- 17mm(M10)Bolts–42N-m(31
ft-lb)
- 24mm(M16)Bolts –138N-m
(100 ft-lb)
Storage
Always clean off your plow by
spraying with fresh water before
storage. This will minimize
corrosion from road salts or other
chemicals. Once the plow is clean
it should be removed from the
vehicle. Spray pivots and bushings
with light lubricating oil and place in
storage area. The storage area
should be clean and dry.
Always repair and lubricate
prior to storage, making the plow
ready for your next use.
Final Comment
The Plow Operator’s Guide
cannot cover all the possible
situations in which you may use
your plow. The decisions you make
will determine the final outcome.
So think through each situation
before you begin to move material.
Read and understand all manuals,
labels and tags. Always be mindful
of your own safety and the safety of
others.
Table of contents
Other Warn Automobile Accessories manuals