manuals.online logo
Brands
  1. Home
  2. •
  3. Brands
  4. •
  5. Waterdrop
  6. •
  7. Water Filtration System
  8. •
  9. Waterdrop WD-UB system User manual

Waterdrop WD-UB system User manual

Figure 1 Figure 2
3. Shut o the water supply and remove the faucet hose. (Figure 1)
4. Connect the feed water adapter and ensure that the rubber O-ring is loaded.
• If the angle valve outlet is 3/8”, connect it to the water supply and faucet hose directly.
• If the angle valve outlet is 1/2”, you need to remove the above two ttings before connection. (Figure 2)
Step 3: Install the faucet
Note: If there is no hole in your kitchen sink or countertop, you have to drill one (1")or use the hole for
the soap dispenser.
Installation of the lter system
Step 1: Fix the lter head and the lter
1. Paste the assistant label to nish drilling. (Note: Mount the
water lter at least 2 inches higher than the ground for easier lter
change.)
2. Install the screw and reserve enough space to hang the lter.
3. Hang the lter system on the screw.
Step 2: Connect the water supply (cold water only)
1. There is an existing mark at the end of the tubing for you to
conrm if the tubing is fully inserted into the tting.
2. Connect one end of the 1/4" PE tubing to the inlet of the lter
head. Until you reach the mark on the tubing.
Quick Connect Undersink Water Filtration System
WD-UB system | Installation Instructions
Note:
1. If using well water as the source, please make sure the feed water has been through a pre-ltration system, otherwise,
large particles in well water will clog the lter easily and shorten lter life.
2. The above form lists model numbers of only black lters. Please note that the white lter is dierent from the black
lter only in color. They have the same lter material and ltration capacity.
3. Actual lter life varies according to local water quality.
Precautions
• Do not use it with water that’s microbiologically unsafe or of unknown quality without adequate disinfection.
• For use only with cold water.
• Do not freeze the lter, as this can cause cracking and water leakage.
• Do not allow children under 3 years old to have access to small parts during installation of this product.
• This installation must comply with all applicable state and local regulations.
• Turn o the water supply while replacing the lter.
Operating temperature
Working pressure
Flow rate
Filter capacity
2-38℃/35-100℉
10-100psi (0.7-6.8bar)
0.75gpm (2.83lpm)
Specications
Parts list
Feed water requirement Municipal tap water
WD-RF10-UF/MZ: up to 11,000 gallons
WD-RF15-UF/MZ: up to 19,000 gallons
WD-RF17-UF/MZ: up to 24,000 gallons
Stainless faucet
Quick-connect tting
Filter head
Teon tape
1/4” tubing
Cartridge
3/8”-1/2” converter
3/8”-1/2” converter
Feed water adapter
Mark for
full insert
3/8" Cold water valve 1/2" Cold water valve
1. Insert the faucet spout into the faucet body.
2. Insert the faucet stem into the hole on the countertop.
Under the sink, slip on other parts in the order shown in
the picture.
3. Firmly insert the quick-connect tting onto the faucet stem.
4. Connect one end of the tubing to the quick-connect
tting of the faucet, then lock the clip. If you want to pull
out the tubing, remove the clip rst.
5. Connect the other end to the outlet of the lter head.
6. Push the tubing into the tting until you reach the
mark on the tubing.
Mounting washer
Countertop
Nut
Faucet spout
Quick-connect
tting
Faucet body
Faucet stem
Clip
Clip
210mm
140mm
Frequently asked questions
Q: What should I do if water leaks after installation?
A: In the event of water leakage, turn o the water supply. If the water leakage is occurring at the
thread, wrap Teon tape on the external thread. If the water leakage is occurring at the quick
connection position, insert the quick-connect tting to the end and make sure the hoses hit the
bottom of the tting. Contact us for solutions if the water leakage persists.
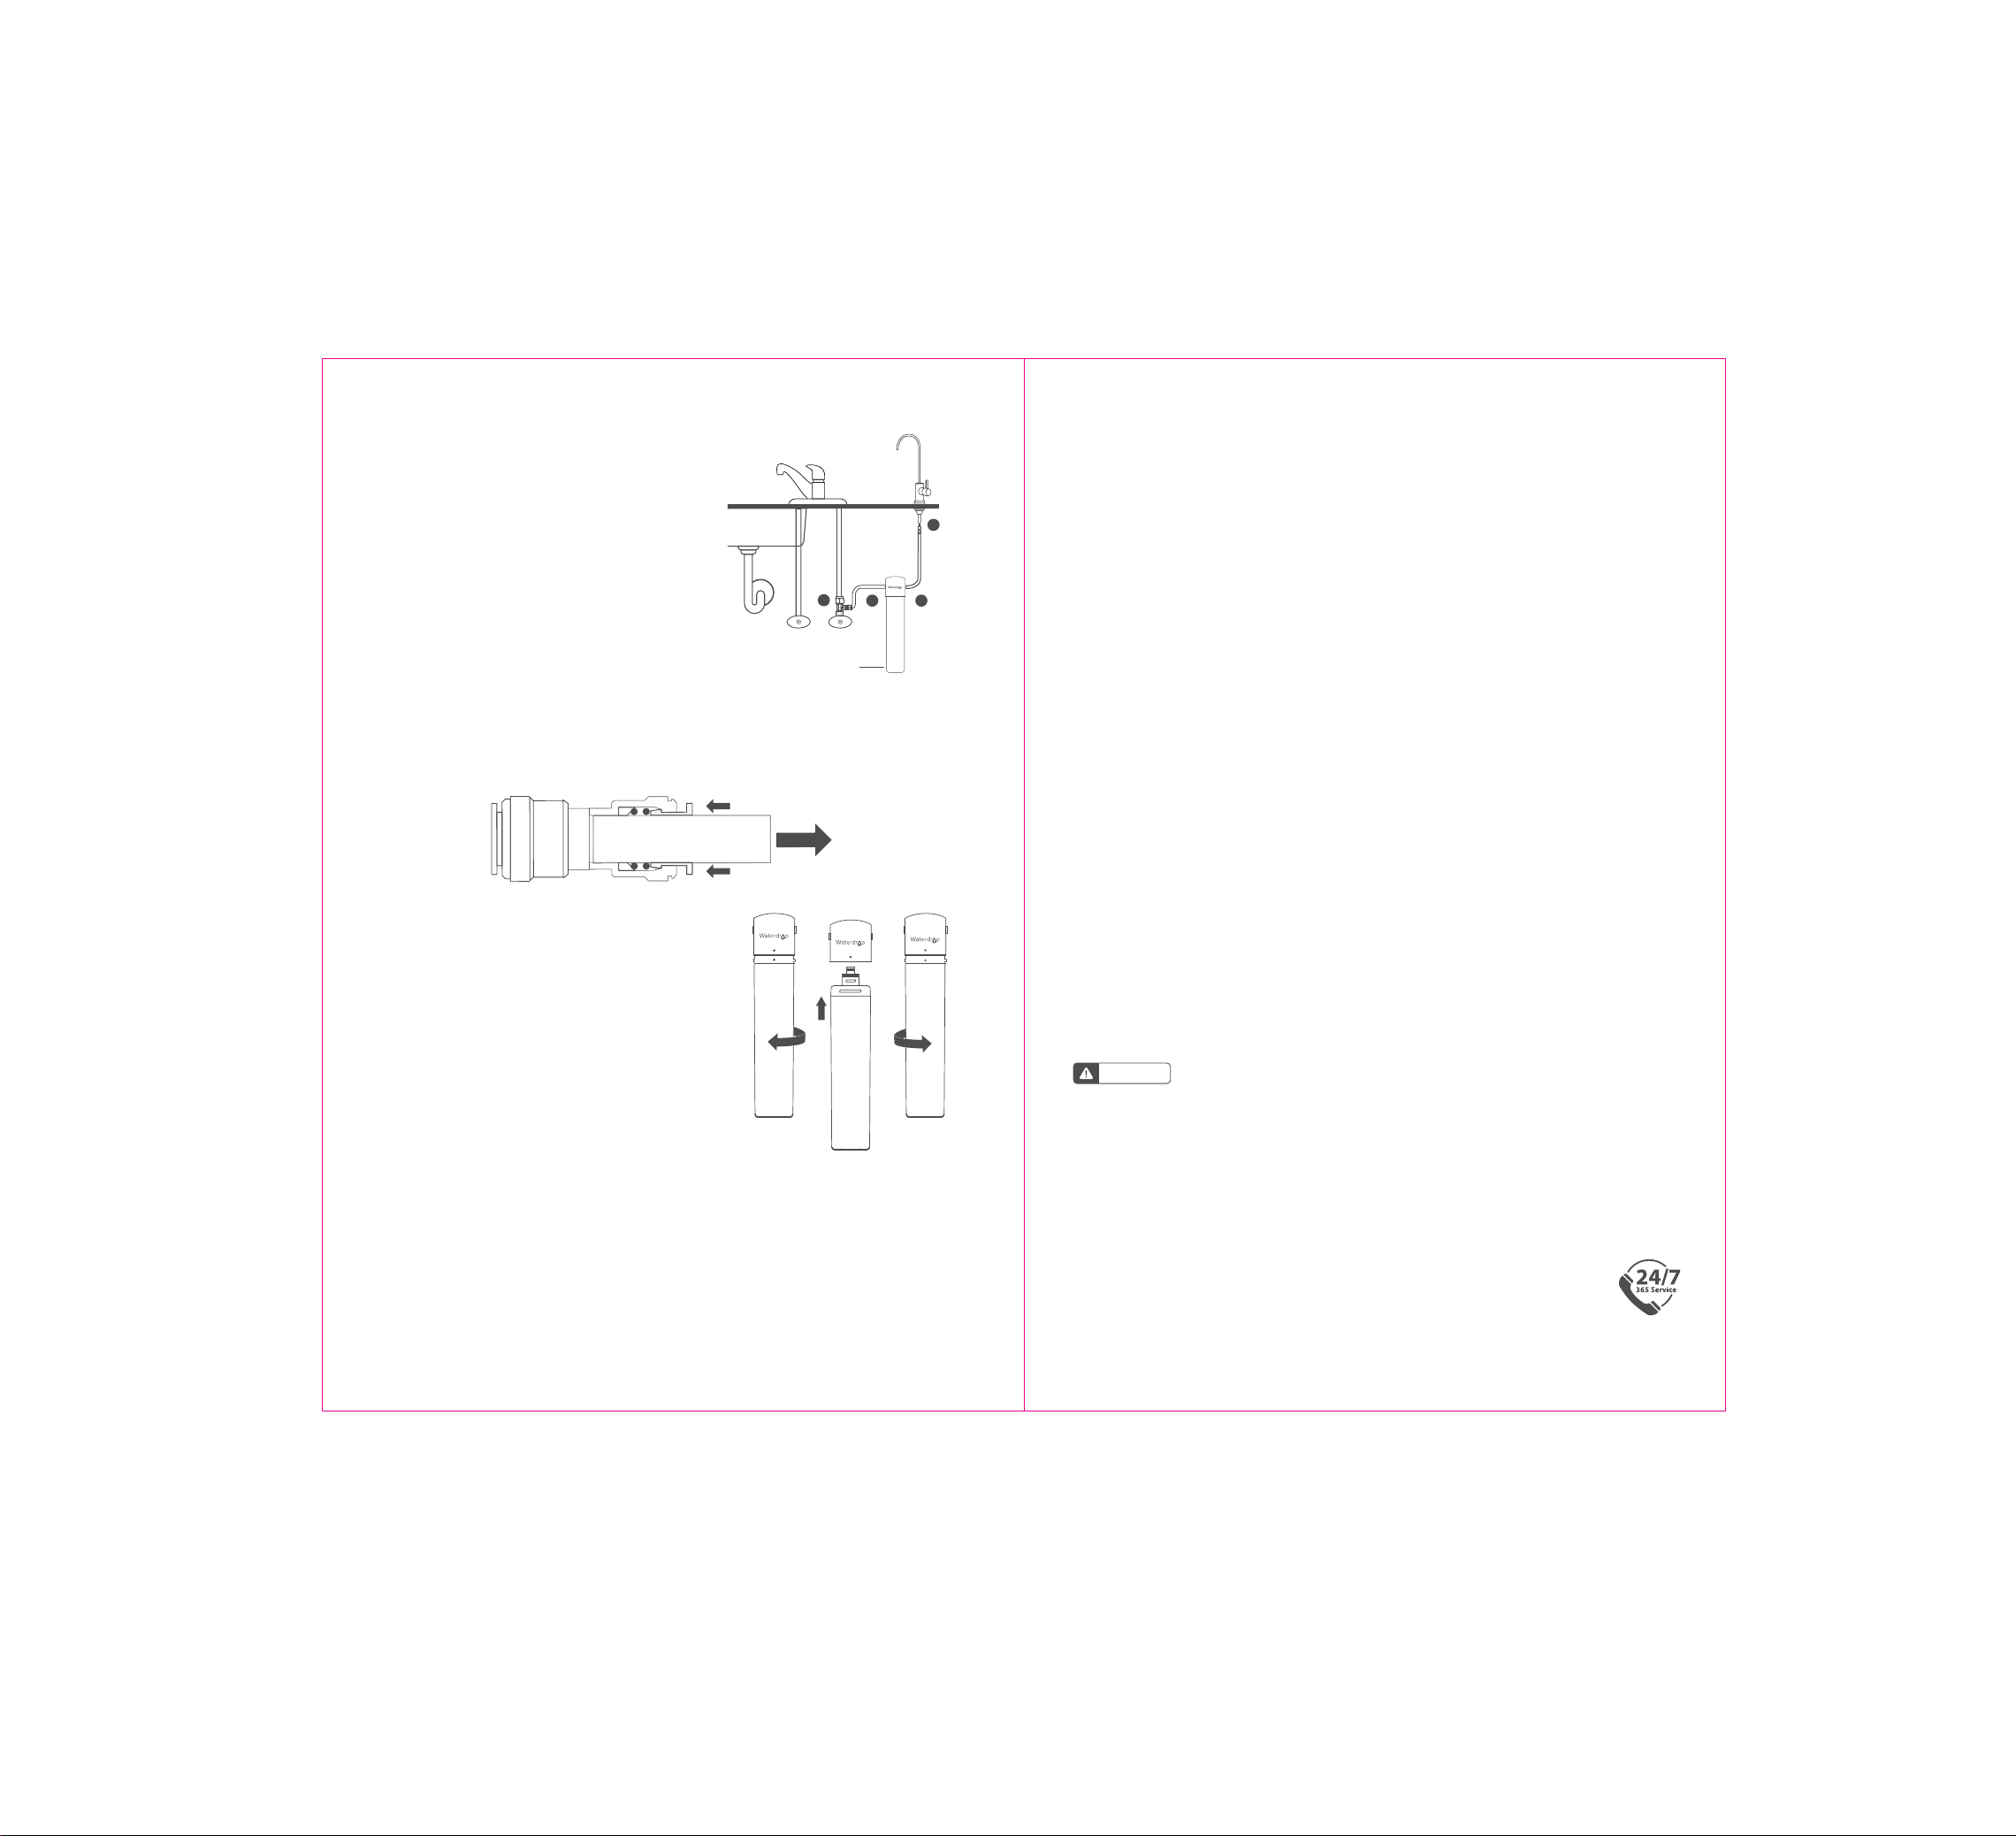
Step 4: Check the leaks and ush the lter
1. In the event of water leakage, turn o the water
supply. If the water leakage is occurring at position
1, wrap Teon tape on the external thread. If the
water leakage is occurring at position 2, 3 or 4,
check whether the tubing is fully inserted into the
ttings. If not, insert it again until you reach the
mark on the tubing.
2. Flush the lter for 5 minutes before use.
To disconnect
Use your thumb and index nger to press down on the lock sleeve. Use your other hand to pull out the
hose from the tting.
Note: Please do not pull out the tubing directly, or else it will damage the tting and cause leakage.
Press
Pull
Press
Hot Cold
Filter system
Inlet
Outlet
Filter replacement
1. It’s recommended to turn o the water supply and turn
on the faucet to release the water pressure.
2. Rotate 1/4 turn to the left to remove the lter.
3. Take out the new lter and remove the protective cap.
4. Rotate 1/4 turn to the right to install the lter. Ensure
that the lter’s triangle mark is aligned with the
connection mark.
5. Turn on the cold water valve and ush for 5 minutes.
Remove the lter Install the lter
13 4
2
Q: Why doesn’t the TDS value lower after ltration?
A: The main purpose of this waterdrop lter is not to remove TDS. TDS stands for total dissolved solids,
and it is basically composed of inorganic salts and a small amount of organic matter. The lter can
remove harmful substances while keeping benecial trace elements. Please choose Waterdrop RO
system if you are looking for physical removal of TDS.
Q: When should I replace the lter?
A: The lter's service life is related to water quality. If the ow rate is signicantly reduced or if the
water has a peculiar smell, we suggest that you replace the lter. The recommended service life of the
lter is as follows: 1 year for WD-RF10-UF, WD-RF10-MZ, 2 years for WD-RF15-UF, WD-RF15-MZ, 3 years
for WD-RF17-UF, WD-RF17-MZ.
Q: Why does black water come out during ushing?
A: It’s normal that black water comes out when ushing. The purpose is to remove carbon powder
remaining on the surface of lter materials. You can normally use it after ushing for 5 minutes.
1 -year quality assurance
All mechanical devices with moving parts have a normal life span and will need to be replaced periodically. For
this reason, mechanical devices such as water ttings, lter head, and faucets have a limited replacement
assurance of 1 year. No assurance is given as to the service life of any lter cartridge, as the service life will vary
based on local water conditions and water consumption.
If the product proves to be defective within 1 year from the date of purchase, please contact our customer
service department. During the assurance period, we will replace or repair any part that is deemed to be
defective if the product has not been subjected to tampering, alteration, or improper use after delivery, and
has not been repaired by the manufacturer.
We do not make any promises in the event of misuse, use in abnormal temperature conditions, conditions
outside those listed in the operating parameters, or use in commercial operations.
WARNING Please read it carefully before installation.
The system and installation shall comply with applicable state and local regulations.
Manufacturer Technical Support
Tel: 1-888-352-3558 (U.S.)
E-mail: service@waterdroplter.com
Made in China V001
Qingdao Ecopure Filter Co., Ltd.

Other Waterdrop Water Filtration System manuals

Waterdrop WD-TK User manual

Waterdrop

Waterdrop WD-TK User manual

Waterdrop M5PT User manual

Waterdrop

Waterdrop M5PT User manual

Waterdrop WD-TK User manual

Waterdrop

Waterdrop WD-TK User manual

Waterdrop G2 Series User manual

Waterdrop

Waterdrop G2 Series User manual

Waterdrop N1 User manual

Waterdrop

Waterdrop N1 User manual

Waterdrop WD-UA User manual

Waterdrop

Waterdrop WD-UA User manual

Waterdrop M5 User manual

Waterdrop

Waterdrop M5 User manual

Waterdrop WD-K19RF User manual

Waterdrop

Waterdrop WD-K19RF User manual

Waterdrop WD-TSA-10 User manual

Waterdrop

Waterdrop WD-TSA-10 User manual

Waterdrop WD-C05 User manual

Waterdrop

Waterdrop WD-C05 User manual

Waterdrop WD-FC-01 User manual

Waterdrop

Waterdrop WD-FC-01 User manual

Waterdrop WD-WHF21-PG User manual

Waterdrop

Waterdrop WD-WHF21-PG User manual

Waterdrop WD-TSB-10 User manual

Waterdrop

Waterdrop WD-TSB-10 User manual

Waterdrop WD-G3P800-W User manual

Waterdrop

Waterdrop WD-G3P800-W User manual

Waterdrop WD-AS08 User manual

Waterdrop

Waterdrop WD-AS08 User manual

Waterdrop WD-BS08 User manual

Waterdrop

Waterdrop WD-BS08 User manual

Waterdrop LUCY Filter Carafe User manual

Waterdrop

Waterdrop LUCY Filter Carafe User manual

Waterdrop WD-G3-B User manual

Waterdrop

Waterdrop WD-G3-B User manual

Waterdrop WD-UA system User manual

Waterdrop

Waterdrop WD-UA system User manual

Waterdrop WD-D6-B User manual

Waterdrop

Waterdrop WD-D6-B User manual

Waterdrop WD-G3-W User manual

Waterdrop

Waterdrop WD-G3-W User manual

Waterdrop WD-C01 User manual

Waterdrop

Waterdrop WD-C01 User manual

Waterdrop WD-PT-04-42 User manual

Waterdrop

Waterdrop WD-PT-04-42 User manual

Waterdrop WD-U8-FC User manual

Waterdrop

Waterdrop WD-U8-FC User manual

Popular Water Filtration System manuals by other brands

CAB MAESTRO 3E/450 Operator's manual

CAB

CAB MAESTRO 3E/450 Operator's manual

DAB DAB E.SYBOX Instruction for installation and maintenance

DAB

DAB DAB E.SYBOX Instruction for installation and maintenance

Fantech FB6 installation instructions

Fantech

Fantech FB6 installation instructions

Berkey Black Berkey Elements instructions

Berkey

Berkey Black Berkey Elements instructions

Milli-Q IQ Element user manual

Milli-Q

Milli-Q IQ Element user manual

Gregory FCS-D Operation manual

Gregory

Gregory FCS-D Operation manual

Kessel EasyClean free Instructions for installation, operation and maintenance

Kessel

Kessel EasyClean free Instructions for installation, operation and maintenance

controlair 330 Installation, operation and maintenance instructions

controlair

controlair 330 Installation, operation and maintenance instructions

SANUSLIFE ECAIA carafe S user manual

SANUSLIFE

SANUSLIFE ECAIA carafe S user manual

Pentair FLECK 5800 SXT Service manual

Pentair

Pentair FLECK 5800 SXT Service manual

amiad Filtomat MG-110P Installation, operation and maintenance instructions

amiad

amiad Filtomat MG-110P Installation, operation and maintenance instructions

Brita MAXTRA PRO Instructions for use

Brita

Brita MAXTRA PRO Instructions for use

Grohe Blue Pure manual

Grohe

Grohe Blue Pure manual

Dover HYDRO AquaBlend Xtreme user manual

Dover

Dover HYDRO AquaBlend Xtreme user manual

Velcon VF-61UL instructions

Velcon

Velcon VF-61UL instructions

GE GX1S01R installation instructions

GE

GE GX1S01R installation instructions

Aqua Salt Evo instruction manual

Aqua

Aqua Salt Evo instruction manual

UV Pure Technologies UPSTREAM instruction manual

UV Pure Technologies

UV Pure Technologies UPSTREAM instruction manual

manuals.online logo
manuals.online logoBrands
  • About & Mission
  • Contact us
  • Privacy Policy
  • Terms and Conditions

Copyright 2025 Manuals.Online. All Rights Reserved.