Wavetek 188 User manual

MODEL 188
4MHz SWEEP/
FUNCTION GENERATOR

INSTRUCTION MANUAL
MODEL 188
4MHz SWEEP/
FUNCTION GENERATOR
©- I960 -WAVETEK
THIS DOCUMENT CONTAINS INFORMATION PROPRIETARY TO
WAVETEK AND IS SOLELY FOR INSTRUMENT OPERATION AND
MAINTENANCE THE INFORMATION IN THIS DOCUMENT MAY
NOT BE DUPLICATED IN ANY MANNER WITHOUT THE PRIOR AP-
PROVAL IN WRITING OF WAVETEK
WAVETEK
SAN DIEGO
9045 Baeoa *• Sa"D*oc CA92123
“0 8o«6Si Si- D*gc Ca‘‘ 92U2
T* »«4>27*2200 TWX 910-33S-20C;
Manual Revision: 1/82
Instrument Release: D

WARRANTY
All Wavetek instrument* are warranted aga.nst defects mmateriel end workmanship for aperiod
of one year after date of manufacture Wavetek agrees to repair or replace any assembly or
component (except batteries) found to be defects, under normal use. during this period
Wavetek 's obligation under this warranty is limited sdefy to repaying any such instrument which ,n
Wavetek ssole opinion proves to be defective w.lh.n the scope of the warranty when returned
to the factory or to an authorized service center Transportation to the factory or service center
is to be prepaid by purchaser Shipment should not be made without prior authorization by
Wavetek.
This warranty does not apply to any products repa-red or altered by persons not authorized by
Wavetek, or not in accordance with instructions furnished by Wavetek If the instrument is
defective as aresult of misuse, improper repair, or abnormal conditions or operations, repairs will
be billed at cost
Wavetek assumes no responsibility for its product being used mahazardous or dangerous manner
either alone or in coniunction with other equipment High voltage used in some instruments may
bo dangerous If misused SpecaIdisclaimers apply to these instruments. Wavetek ossumes no
liability for secondary charges or consequential damages and. many event. Wavetek sliability for
brooch of warranty under any contract or otherwise, shall not exceed the purchase price of the
specific instrument shipped and agamst which aclaim is made
Any recommendations made by Wavetek for use of its products are based upon tests believed to be
reliable, but Wavetek makes no warranty of the results to be obtained This warranty is in lieu of
all other warranties, expressed or implied, and no representative or person is authorized to
represent or assume for Wavetek any liability mconnection with the sale of our products other
than set forth herein.

SAFETY
This instrument is wired for earth groundmg via me facility power wiring Do no bypass
earth grounding with two wire extension cords, plug adapters, etc
BEFORE PLUGGING IN the instrument, comply w.th installation instructions
MAINTENANCE may recuire power on witn the instrument covers removed This
should be done only by qualified personnel aware ot me electrical hazards
The instrument power receptical «connected to the instrument safety earth terminal
with agreen/yellow w.re Do not alter this connection (Reference 0or& stamped
inside tho rear panel near me safety earth terminal
)
WARNING notes call attention to possOlo mMiy or death hazards in subsequent
operations
CAUTION notes can attention to pos&We equipment damage msubsequent operations

CONTENTS
SECTION 1
SECTION 2
SECTION 3
SECTION 4
SECTION 5
SECTION 6
SECTION 7
GENERAL DESCRIPTION
1.1 THE MODEL 188 .1-1
1.2 SPECIFICATIONS M
1.2.1 Versatility 1-1
1.2.2 Frequency Precision 1-2
1.2.3 Amplitude Precision t-2
1.2.4 Waveform Characteristics 1-2
1.2.5 General 1-2
INSTALLATION
2.1 MECHANICAL INSTALLATION 2-1
22ELECTRICAL INSTALLATION 2-1
2.2.1 Power Connection 2-1
2.2.2 Signal Connections 2-1
2.3 ELECTRICAL ACCEPTANCE CHECK 2-1
24CHANGING THE OUTPUT IMPEDANCE 2-1
OPERATION
3.1 CONTROLS AND CONNECTIONS 3-1
3.2 OPERATION 3-2
3.2.1 Signal Termination 3-2
3.2.2 Manual Function Generator Operation 3-3
3.2.3 Voltage Controlled Function Generator Operation . . 3-3
3.2.4 Sweep Generator Operation 3-4
3.2.5 Waveforms 3-5
CIRCUIT DESCRIPTION
ALIGNMENT
5.1 FACTORY REPAIR 5-1
5.2 REQUIRED TEST EQUIPMENT 5-1
5.3 REMOVING GENERATOR COVERS 5-1
5.4 ALIGNMENT 5-1
TROUBLESHOOTING
6.1 FACTORY REPAIR 6-1
6.2 TROUBLESHOOTING TABLES 6-1
6.3 TROUBLESHOOTING INDIVIDUAL COMPONENTS 6-1
6.4 GENERAL INSTRUCTIONS 6-2
PARTS AND SCHEMATICS
7.1 DRAWINGS 7-1
7.2 ORDERING PARTS 7-1
7.3 ADDENDA 7-1

SECTION I
GENERAL DESCRIPTION
1.1 THE MODEL 188
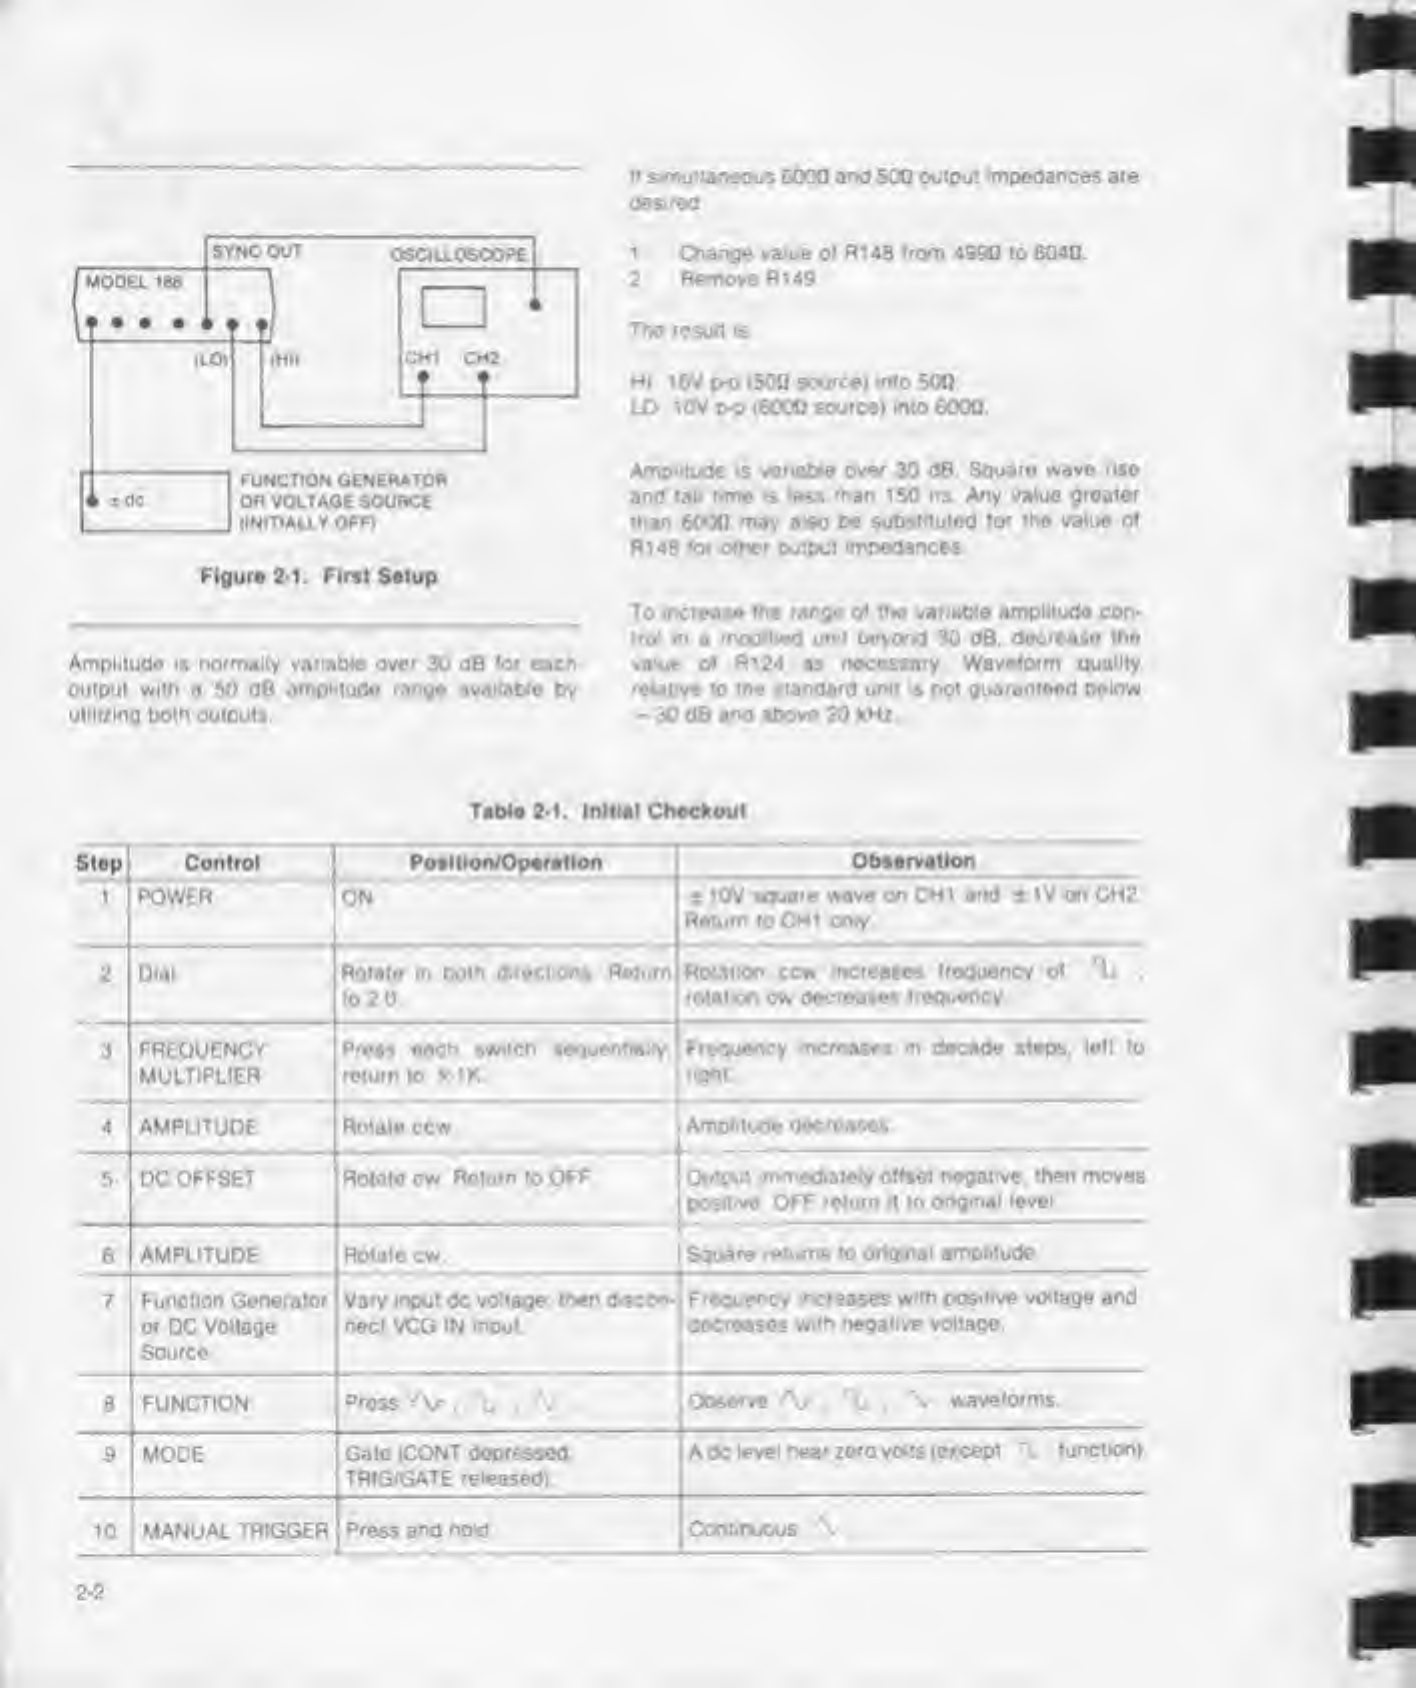
The Waveiek Model 188. 4MHz SweetVFunction
Generator, is aprecision source of sine, triangle and
square waveforms plus dc voltage Ail waveforms are
front panel variable from 4mHz to 4MHz and can be
internally or externally modulated Frequencies are
variable linearly or logarithmically within afrequency
range When used as a sweep generator, an internal
ramp generator provides arecurring sweep over a
1000:1 (linear) frequency range or 10.000:1
(logarithmic) frequency range Output can be con-
tinuous O' the generator can be triggered or gated by
an external signal or afront panel switch Amplitude
of the waveforms is variable form 10V peak-to-peak in-
to 500 down to 15 mV peak-to^eak. DC reference of
the waveform can be offset positively or negatively
The two selectable waveform outputs are a20V peak-
to-peak maximum and a2V peak-to-oeak maximum
(20 dB down from 20 Vp-p). both may be varied over a
30 dB range Auxiliary outputs are aTTL level sync, a
6000 sweep ramp and a6000 generator control
voltage signal whose level is proportional to the main
generator frequency
1.2 SPECIFICATIONS
1.2.1 Versatility
Waveforms
Sine %.triangle \.square 'L .TTl pulse n
and dc.
Operational Modes
Continuous: Generator runs continuously at selected
frequency
Triggered: Generator is quiescent until triggered by
external signal or manual trigger, then generates one
complete waveform cycle at selected frequency.
Gated As triggered mode, except output continues
for duration of gate signal Las: waveform started is
completed
Sweep An Internal ramp generator will sweep the
main generator from alower, start frequency to a
higher stop frequency, linearly (3 decades) or
logarithmically (4 decades)
Sweep Stop Frequency switches to high swoop limit.
Used to set high frequency limit.
Frequency Range
0004 Hz linear (0 0004 Hz k>g) to 4MHz In 7overlap-
ping decade ranges
xl
x10
x100
xIK
X10K
X100K
X1
M
Function Output
'K* .\selectable and variabio to 20 Vp-p
(10 Vp-p into 50Q) HI output, and to 2Vp-p (1 Vp-p into
50Q) LO output Both outputs varied with a30 dB ver-
nier. Poak output current is 100 mA maximum (HI out-
put) into 500 (200 mApeak into ashort circuit) Source
impedance is 50Q.
DC Offset and DC Output
Waveform offset and dc output selectable and variable
through HI and LO BNC outputs DC output selectable
by not selecimg awaveform function. HI output is
410V max (± 5V into 500) as offsot or Vdc output.
Signal-peak plus offset limited to ±10V (±5V into
500). LO output is 4IV max (±0.5V into 500) as is
signal-peak plus offset limit. DC offset plus waveform
attenuated proportionately at LO (-20 dB) output.
TTL Sync Output
TTL pulse (50% duty cycle) at generator frequency.
Drives up to 20 TTL loads.
GCV —Generator Control Voltage
0to 4.0V open circuit output from 6000 source im-
pedance Proportional to frequency of main
generator. For use as ahorizontal drive signal.
0004 (0 0004) to 4Hz
0 04 (0.004) to 40 Hz
04 (0 04) to 400 Hz
4(0.4) HZ to 4kHz
40 (4) HZ to 40 kHz
400 (40) Hz to 400 kHz
4(0 4)kHz 10 4MHZ
1-1

VCG —Voltage Controlled Generator
Up to 1000:1 frequency change (linear mode) o< up to
10.000:1 change (logarithmic mode) with external 0to
± 4V signal. Upper and lower frequencies limited to
maximum and minimum of selected range.
Slew Rate: 2% ot range per *s (linear); 0to 100% of
range In 20 ms (logarithmic).
Linearity. ±0.5% through x100K range; ±2% on
x1Mrange.
Input Impedance: 2kO.
Sweep
Main generator is frequency modulated by Internal
sweep generator Main generator Irequency
ropoatodiy rises from frequency set by dial and range
button to frequency set by sweep stop knob
Sweep Mode: Linear (3 decades max) or logarithmic
(4 decades max)
Sweop Rate 30 ms to 1min (nominal) continuously
adjustable
Swoep Width: Up to 1:1000 (linear) or 1:10.000
(logarithmic) continuously adjustable
Sweep Output
Ramp waveform output with 4V peak into open circuit
Source Impedance 600Q. For use as a horizontal drive
signal
Trigger and Gate
Input: TTL compatible levels.
Pulso Width: 50 ns minimum.
Repetition Rato: 4MHz maximum.
1.2.2
Frequency Precision
Dial Accuracy
±5% of full scale
Time Symmetry
Square wave variation from 0.2 to 4.0ondial less than:
±1% to 100 kHz; ±5% to 4MHz.
1.2.3 Amplitude Precision
Sine variation with frequency less than: ±0.2 dB on
all ranges through xiOOK; ±1.0 dB to 4MHz.
1.2.4 Waveform Characteristics
Sine Distortion
Less than: 0.5% on xIK and x10K ranges; 1% on
xi. x 10. x100 and x100K ranges All harmonics
25 dB below fundamental on x 1Mrange
Triangle Linearity
Greater than 99% to 200 kHz
Square Wave Rise and Fall Time
At HI output, less than 50 ns for 10 Vp^> output Into
500 termination.
1.2.5 General
Environmental
Specifications apply at 25*C ±5*C. Instrument will
operate from 0*C to 50*C ambient temporatures
Dimensions
28 6cm (11 Vi m)wide: 8 9 cm (3Vfc in )high 26.7
(10W In) deep
Weight
2.7 kg (6 lb) net. 45kg (10 lb) shipping
Power
90 to 128V or 198 to 264V (specify); 48 to 66 Hz. loss
than 15 watts
NOTE
All specifications apply lor dial between 0
2
and 4.0; amplitude at 10 Vp-p from HI out-
put into 500 termination.
1-2

2.1 MECHANICAL INSTALLATION
After unpacking the instrument visually inspect ail
external parts for possiBie damage to connectors, sur-
face areas, etc If damage is discovered. Me aclaim
with the carrier who transported the unit. The shipping
container and packing material should be saved m
case reshipment is required
2.2 ELECTRICAL INSTALLATION
2.2.1 Power Connection
WARNING
To preclude Injury or deeth due lo shock,
the third wire earth ground must be con-
tinuous to the facility power outlet.
Before connecting to the facility power
outlet, examine extension cords, auto-
transformers, etc., between the Instru-
ment and the facility power outlet for a
continuous earth ground path. The earth
ground path can be Identified at the
plug on the Instrument power cord; ol
the three terminals, the earth ground
terminal Is the nonmalching shape,
usually cylindrical.
CAUTION
To prevent damage to the instrument,
check for proper match of line and instru-
ment voltage and proper fuse type and
rating
NOTE
Unless otherwise specified at the time ot
purchase, this instrument was shipped
from the factory for operation on a 90 to
128 Vac line supply and with a1/4 amp slow
blow fuse. Instruments configured tor 180
to 256 Vac have a1/8 amp slow plow fuse.
2
SECTION
INSTALLATION
Select the appropriate fuse and 115 or 230
switch position at the rear panel when
changing power sources
2.2.2
Signal Connections
Use 3toot RG58U 500 shielded cables eouipped with
BNC connectors to distribute all input and output
signals
2.3 ELECTRICAL ACCEPTANCE CHECK
This chockout procedure is ageneral verification of
generator operation. Should amalfunction be found,
refer to the warranty in the front of this manual
Atwo channol oscilloscope, four 3foot 500 coax
cabios with BNC connectors, acoax teo connector
and an additional function generator are required for
this procedure.
Preset the generator front panel controls as follows:
Control Position
Dial
MODE
FUNCTION
DCOFFSET
AMPLITUDE
FREQUENCY MULTIPLIER
SWEEP
2.0
CONT(released)
^
OFF (ccw)
MAX (cw)
x1
K
CONT(released)
Set up the oscilloscope. Model 188 and external func-
tion generator as shown In figure 2-1 and perform the
steps in table 2-1.
2.4 CHANGING THE OUTPUT IMPEDANCE
The output impedance is normally.
HI 10V p-p (50Q source) into 500.
LO IV pp (500 source) Into 500
2-1

fl simultaneous 6000 ana 500 output impedances are
des»rea
*dc FUNCTION GENERATOR
OR VOLTAGE SOURCE
(INITIALLY OFF)
Figure 2*1. First Setup
Amplitude is normally variable over 30 dB for each
oulpul with a50 dB amplitude range available by
utilizing both outputs
1Change value ol Ri 48 Irom 4990 to 6040
2Remove Ri 49
The result is:
HI 10V p-o (500 source) into 500
LO 10V D-0 (6000 source) into 6000
Amplitude is variable over 30 dB Square wave rise
and tall time is less man 150 ns Any value greater
than 6000 may also be substituted lor the value of
R148 for other output impedances
To increase the range ot the variable amplitude con-
tro* In amodified unit beyond 30 dB. docroase the
value ot R124 as necessary Wavetorm quality
relative to the standard unit is not guaranteed below
-30 dB and above 20 kHz.
Table 2-1. Initial Checkout
Step
t
Control
POWER
Position/Operation
ON
Observation
110V square wave on CHI and *IV on CH2
Return to CHI only
2Dial Rotate mboth directions Return
to 20.
Rotation ccw increases frequency of 'L ;
rotation cw decreases frequency
3FREQUENCY
MULTIPLIER
Press each switch sequentially,
return to X1K.
i . -—
Froquoncy increases mdecade steps, left to
right
4AMPLITUDE Rotate ccw Amplitude decreases
5DC OFFSET Rotato cw Return to OFF Output immediately offset negative, then moves
positive OFF return it to o'rgmai level
6AMPLITUDE Rotate cw Square returns to original amplitude
7Function Generator
or DC Voltage
Source
Vary input dc voltage: then discon-
nect VCG IN input
Frequency increases with positive voltage and
decreases with negative voltage
8FUNCTION Press A/- .Tj .“V Observe -V .'L .\waveforms
9MODE Gate (CONT depressed
TRIG/GATE released) Adc level near zero volts (except rLfunction)
10 MANUAL TRIGGER Press and hold Continuous \.
2-2

Table 2-1. Initial Checkout (Continued)
Step|Control |PoaHkxWOpiatton |Observation
Set up trigger source as shown in figure 22Set trigger source for 100 Hz TTL signal.
tt
i—\gated on during positive portion ot TTL
signal on CH2
12 TRIG/GATE Trigger (depressed) One cycle per trigger cycle.
13 MODE Main generator continuous
(CONT released)
Setup connectors as shown in figure 2-3
Sync scope on channel 2input
14 Dial Full cw
15 SWEEP
Controls
Linear sweep (CONT depressed.
SWP/STOP depressed LOG/lIN
extended. STOP full cw. TIME
centered)
Output varios from low troquoncy to
high IreQuoncy
16 UN/LOG
Button
Press Logarithmic distributed sweep whon comparod
to stop 15 linear swoop
1TTl OUT FUNCTION
GENEBATOB
Figure 2-2. Second Setup
OSCILLOSCOPE
Figure 2-3. Third Setup
2-3

SECTION
OPERATION
3.1 CONTROLS AND CONNECTIONS
The generator front panel controls and connectors are
shown in figure 3-1 and keyed to the following descrip-
tions
1Frequency Dial —Settings unde* the d«ai index
mark summed with 21 and multiplied by 4
determine the output signal frequency and the
sweep start frequency wsweep mode The dial
Is engraved with both linear and logarithms
scales outer scale imear and inner scale
logarithmic
2POWER Button —Tumsgonerator ON andOFF
3STOP Knob —Sets the upper frequency limit
when CONT 5Is depressed and SWP/STOP 6it
extended
4FREQUENCY MULTIPLIERControls -Selects
one of seven frequency multipliers for dial 1 set-
ting.
5CONT Button —Selects swoop submode to
mam generator scontinuous mode. Extended is
continuous (nonsweep) mode while depressed is
swoop mode Sweep is from alow frequency set
by 1to ahigh frequency set by 3Mam generator
mode control 8must be in continuous mode (ex-
tended)
6SWP/STOP Button -When button is depress-
ed (and 5depressed and 8extended) selects
repetitive sweop of the main generator frequen-
cy When pulton is extended, the frequency is
stopped at the upper sweep limit with uppor fro-
Quoncy being set by STOP control 3
7LIN/LOG Button —Selects linear or
logarithmic frequency distribution of sweep.
Figure 3-1. Controls and Connectors
3-1

VCG and main dial within afrequency range.
Linear operation is selected when the button is
extended. Logarithmic operation is selected
when the button Is depressed.
8, SGenerator MODE Controls -Selects one of
the following three modes
CONT —8 released Continuous output at
501) OUT 15 and 16 and SYNC OUT (TTL)
17 connectors.
TRIG —8and 9pressed DC level output
until generator triggered by the MAN TRIG 11
or with asignal at the TRIG IN connector 18
When triggered, the generator output is one cycle
of waveform followed by adc level
GATE —8pressed and 9 released As for
TRIG except the output is continuous for the
duration of the manual or external trigger signal
The last cycle started is always completed
10 TIME Knob -Sots the swoop time by control-
ling tho period of the sweep ramo generator
11Manual Trigger Button —Triggers or gates the
output signals whon generator mode is TRIG or
GATE (8 pressed) In trigger mode, one
waveform cycle is output when the button is
pushed In gate mode, wavotorm cycles aro con-
tinuously output as long as the button is held m
12 FUNCTION Selector —Selects one of throe
wavoforms or when all three buttons are released,
adc lovol
13 DC OFFSET Control -Offsets the 500 OUT
waveforms or gives dc levels from -10V to
+lOV(-5Vto +5VInto 500) at 15 and from
-IV to +IV (-0.5V to + 0 5V into 500) at 16
An OFF position ensures no offset.
14 AMPLITUDE Control -Ccw rotation reduces
waveform amplitudes at 15 and 16 by
30 dB DC and offset voltages are not affected
by this control.
15 500 OUT HI Connector —The main output of
tho generator at the function selected Maximum
20 Vp-p (lOVpp into 500) with 30 dB continuous
amplitude control. 500 source impedance
16 500 OUT LO Connector —Same as 15 ex-
cept 20 dB (1/10) lower in amplitude.
17 TTL OUT Connector —ATTL square for each
cycle of the generator To be used for syn-
chronization or as aTTL signal capable of driv-
ing 20 TTL loads
18 TRIG IN Connector —Accepts aTTL signal to
trigger or gate the generator. Triggers on the ris-
ing (low to high) transition and gates during the
positive (high) portion of the triggering signal.
19 SWP OUT Connector —Supplies a ramp
waveform with an approximate 4V peak into an
open circuit. For use as ahorizontal drive signal
Source impedance is 6000
20 GCV OUT Connector -Provides a 0 to 4V
open circuit output proportional to the frequency
Of the main generator. For use as ahorizontal
drive signal Source impedance is 6000
21 VCG IN Connector —Accepts ac or dcvoitagos
to proportionately control frequency within the
range dotormined by the FREQUENCY
MULTIPLIER 4.Positive voltage increases the
frequency set by the d-ai 1 ;negative voltage
decreases the frequency The VCG IN will not
drive the generator frequency beyond the nor-
mal dial limits Of arango Input impedance is
2kO
3.2 OPERATION
Perform the initial checkout in Section 2tor the tool of
the instrument. Any questions concerning Individual
controls and connectors may be answered In
paragraph 31
3.2.1 Signal Termination
Proper signal termination, or loading, of the generator
connectors >s necessary for its specified operation.
For example, the proper termination of either of the
500 OUT connectors is shown in figure 3-2 Placing
the 500 terminator, or 50Q resistance, in parallel with
ahigher impedance, matches the receiving instru-
ment input impedance to the coax characteristic and
generator output impedance, thereby minimizing
signal reflection or power loss on the line due to im-
pedance mismatch.
The input and output impedances of the generator
connectors are listed below
3-2

Connector Impedance 5FUNCTION 12 Set to desired waveform.
500 OUT(HI) 500 6DC OFFSET 13 Set as desired. Limit wave-
500 OUT(LO) 500 form amplitude to prevent
SYNC OUT (TTL) •clipping (see figure 3-3).
TRIGIN •
VCG IN 2kO 7AMPLITUDE 14 Set for desired amplitude
SWPOUT 6000
GCVOUT 6000
•The TTl OUT connector is dode protected ano can
drive up to 20 Transistor-Transistor-Logic (TTL) loads
(low level between OV and 04V. and high level bet-
ween 2.4Vand 5V) It shooId not be connected to
resistive load less than 600Q The TRIG IN connector
accepts TTL logic levels, is diode protected, and re-
quires 500 j*A dnve from an.gh level output
RECEIVING
MOOEl IBS INSTRUMENT
OUTPUT
IMPEDANCE
ROM OR
EQUIVALENT
\“
LOAD_
EFFECTIVE
CIRCUIT
RESISTANCE
OUTPUT
AMPl IPIFR ,
r
<(SIGNAL
LOAD!
P50U
muruiritn f
V1,
Figure 3-2. Signal Termination
3.2.2 Manual Function Generator Operation
For basic operation, select the waveform frequency
and amplitude The following steps demonstrate
manual control o» the (unction generator (Bold
numbers are keyed to figure 3-1.)
Step Control/Connector Setting
3.2.3 Voltage Controlled Function Generator
Operation
Operation as a voltage controlled (unction generator
(VCG) is as (or amanually controlled (unction
generator, only the frequency within aparticular range
»s add'tionaily controlled by an external voltago (± 4V
excursions) mjocted at the VCG IN connector. Per-
form the steps given in paragraph 3.2 2. only set tho
frequency dial to determine areference from which
the frequency is to be voltage controlled
HE
0DC
OFFSET
POSITIVE NEGATIVE
OC OFFSET DC OFFSET
:.W"TAT
EXCESSIVE EXCESSIVE
POSITIVE NEGATIVE
OFFSET OR OFFSET OR
LOADING LOAOING
1500 OUT 15 16
2FREQUENCY
MULTIPLIER 4
3Frequency Dial 1
4SWEEP SCONT 5
Connect circuit to either
output (refer to para-
graph 321)
Set to desired range of fre-
quency
Set to desired frequency
within the range
Extended
Figure 3-3. DC OFFSET Control
1For frequency control with positive dc inputs at
VCG IN. set the dial for alower frequency limit
2 For frequency control with negative dc inputs at
VCG IN. set the dial for an upper frequency limit.
3 For modulation with an ac input at VCG IN. set
the dial at the desired center frequency. Do not

exceed the limits of the selected frequency
range
Figure 3-4 is anomograph with examples of dial and
voltage effects. Example 1shows that with OV VCG in-
put. frequency is determined by the main dial setting.
2(linear mode) or 04 (logarithmic mode) In this exam-
ple. Example 2shows that with a positive VCG input,
output frequency is increased Example 3snows that
with anegative VCG input, output frequency is
decreased (Note that the Output Frequency Factor
column value must be multiplied by afrequency range
multiplier to give the actual output frequency
)
MAIN DIAL VCO IN OUTPUT
SETTING VOLTAGE FREOUENCV
FACTOR
Figure 3-4. VCG Voltage-to-Frequency Nomograph
The up to 1000:1 (linear) or 10.000:1 (logarithmic) VCG
sweep of the generator frequencies available in each
range results from a4V excursion at the VCG IN con-
nector With the frequency dial set to 4.0. excursions
between -4V and 0V at VCG IN provide the up to
1000.1 (lm) or 10.000:1 (log) frequency sweep. With
the d>ai set to .004 (linear) or 0004 (logarithmic), ex-
curs ons between 0V and +4V at the VCG IN provide
up to 1000:1 (linear) or 10.000:1 (logarithmic sweep
within me set frequency range
3.2.4 Sweep Generator Operation
Operation as asweep generator is similar to manually
controlled generator operation except the main
generator can be repetitively swept between two
selected frequencies either linearly or logarithmicly at
aselected sweep rate The relationship of internal
ramp and mam generator is shown in figure 3*5.
The io*Ow»ng steps describe the sweep operation
setup
GCV
OUT
soo
OUT
8TOP
FREO
LEVEL
START
FREO
LEVEL
STOP FREQ
CONTROL
NOTE
Nonlinear operation may result when the
VCG input voltage is excessive, that is.
when the attempted generator frequency
exceeds the range limits. The upper limit is
four times the multiplier setting, and the
lower limit is 1/IOOOth (linear) or UtO.OOO
(logarithmic) of the upper limit
Figure 3-5. Effect of Sweep Time and Width
on Output Frequency
Step Control Setting
1MOOE: CONT 8Press to release
(Continuous mode of
main generator is
necessary for sweep
)

Step Control Setting
2Frequency dial 1Select sweep start
freaiency
3SWEEP SCONT 5Depressed. (Selects
sweep submode ol main
generator’s continuous
operation)
4SWP/STOP 6Press to release. (Ex-
tended allows setting of
stop frequency
)
5STOP 3Select the stop frequen-
cy (The stop frequency
will always be higher
than the start frequen-
cy)
6Time 10 Sets the internal sweep
rate
3.2.5 Waveforms
Waveform liming lor each mode ol operation is shown
In figure 3-5.
m
OFFSET PERIOD
IAMPLITUDE
ovac 1J L- 1
CONTINUOUS
MODE
SINE ^vwwyv
T«'ANGLEVVVVVVVV
souAREirumrijijw
sync \JTj^j-i_rLn_n_n_r
TRIGGERED
MODE
TRIG INZL
SINE—
TRIANGLE
lSQUARE—1J-
GATID
MODE
iS0UABi uiru in
Figure 3-5. Waveform Characteristics

4-0


SECTION T
CIRCUIT DESCRIPTION
This section describes the functions ot majw circuit
elements and their relationships to one another as
shown in figure 4-1. functional Block digram The fol-
lowing sections in this manual provide more detailed
information for maintaining the instrument
As shown in figure 4-1. the VCG (Voltage Control of
Generator) sums voltage inputs from the frequency
dial and the VCG IN connoctor This sum voltage con-
trots the magmtudo of acomplementary current
source and current sink This current vanes linearity
from approximately 2mA to 2|iA over a1000 1(4 0to
004) range or logarithmically from approximately
2ma to 0 2 »a over a 10,000 1(4 0to 0004) range of
each frequency multiplier Tho VCG also controls the
trigger Baseline compensation circuit, which consists
of another current sink at twice the current
magnitude.
Tho diode gate, controlled By the comparator output,
connects either the current source or the current sink
to Ihe timing capacitor selected By the frequency
multiplier When the current source is switched in. the
charge on tho timing capacitor will nse imeaniy. pro-
ducing the positive-going triangle slope. l*ew.se. the
current sink produces the negative-go^ triangle
slope.
The triangle amplifier is aunity gam amplifier whose
output is fed to the comparator and to the output cir-
cuits The comparator operates as awindow detector
with limit points set to the triangle peaks The tZV
output is sent Back to the diode gate and to the output
circuits. When the output is +2V. the triangle is
positive-gong until the +125V limit is reached and
the comparator output switches to -2V When the
output is -2V. the triangle is negatrve-gomg until the
-1.25V limit is reached and the comparator output
switches back to *2V. repeating the process in th«s
manner, the basic function generator loop, the Bold
path in figure 4-1. produces simultaneous generation
of triangle and square waves at the same frequency
The output frequency is determined By the magnitude
of the timing capacitor selected By tho frequency
multiplier switches and By the magnitude of the cur-
rents supplied to and removed from it. Since the cur-
rents are imeanly proportional to the sum ot the VCG
inputs, so will Be the output frequency.
To extend the lower frequency capability of the
generator, acapacitanco multiplier circuit divides
VCG currents By 10 (effectively multiplying the timing
capacitor By 10) tor each of the lower 3multiplier
ranges
The TTL squaro from the comparator is Buftorod and
sent to the SYNC OUT TTL connector The other side
is sent to the tnggor flip-flop and to alevel shifter to
produce the *2V bipolar square for the diodo gale
and the square shaper circuits Tho squaro shapor
converts the souare into acurrent signal and applios It
to the Tj FUNCTION switch The Buffered triangle is
applied to the \FUNCTION switch and to the sino
converter input The sine convertor, using the
nonlinear characteristics of its diodes, convorts tho
triangle into asinusoidal current for fhe %FUNC-
TION switch
The selected function is sent to the preamplifier,
where it is inverted and Buffered. The preamplifier out-
put goes to the output amplifier through the
AMPLITUDE control where it is summed wilh offset
voltage from the DCOFFSET control Here, waveform
and offset are inverted and amplified to a±10V peak
Signal which can drive a500 termination from a500
source 'mpedance The output amplifier drives the
500 OUT HI connector and aresistor divider produc-
ing the 500 OUT LO output.
Noncontmuous modes of operation (trigger and gate)
result from allowing or preventing the VCG current
source from charging the timing capacitor. Whenever
the trigger tiip-flop output is low. each of the two trig-
ger diodes conduct acurrent I, sourcing 21 to the
baseline compensation circuit This removes the cur-
rent Ifrom the VCG current source and forces aOV
Baseline at the triangle amplifier input.
4-1

When the CONT switch is releasee. trigger logic is in-
hibited from passing any trigger signals and the tug-
ger (lip-flop output is held high This prevents me trig-
ger diodes from conducting and the generator loop
operates continuously.
When the CONT switch is pressed, the generator looo
is held at the OV baseline. Pressing the TfliG/GATE
switch puts the instrument in triggered mode and any
external or manual trigger signals al the trigger logic
input will be transformed into anarrow pulse cor-
responding to the low-to-high transition oIthe trigger
input. This pulse sots the trigger flip-flop high and
allows Ihe generator loop to run When the tr.angle
negative peak is reached, the comparator low-to-high
transition clocks the trigger Hip-Hop low and. when the
OV baseline level is reached, the generator loop again
stops The result is asingle cycle generated after
the triggering signal corresponding to 0to 360* of
phase Successive triggered waveforms always start
at Ihe samo 0*point.
Roloasmg the TRIG/GATE switch puts the instrument
In the gated modo This is identical to tho triggered
mode, except tho trigger flip-flop is held high for the
full duration of the triggering signal Tho generator
produces continuous waveforms during the time the
external signal Is high or the manual lugger swilch is
held tn The last triggered cycle started is always com-
pleted and successive gated bursts always start at the
0#point
When sweep mode is selected by acombination of
the mam generator in continuous mode and the ramp
generator switches set to SWP. the ramp generator is
enabled and aramp voltage becomes part of the con-
trol voltage mme VCG circuit to control me main
generator frequency. Ramp period, variable from
30 ms to 1mmute. is set by me TIME Control. Ramp
generator output is buffered to drive the sweep output
and VCG circuit. The ramp magnitude suppling the
VCG input is controlled by the STOP potentiometer.
Selecting the stop switch position biases the buffer
amplifier to alevel equal to the positive peak of the
ramp (+V) In this static mode the upper sweep limit
can be set by me STOP Control
When the CONT position of the SWEEP switch is
selected the ramp generator is disabled and the buf-
fered ramp is disconnected from ihe VCG input
The GCV (Generator Control Voitago) from the VCG
ci'Cu't IS aresultant voltage from me throe VCG in-
puts: dai. VCG IN and sweep ramp This voltage is
buffered and made available at the GCV BNC
4-2

SECTION W
ALIGNMENT
5.1
FACTORY REPAIR 5.4 ALIGNMENT
Wavetok maintains afactory repair department tor
those customers not possessing the necessary per-
sonnel or test equipment to maintain the instrument If
an instrument is returned to the factory for alignment
or repair, adetailed description ot the specific
problem should be attacned to minimize turnaround
time,
5.2
REQUIRED TEST EQUIPMENT
Voltmeter Millivolt dc measurement (1 %accuracy)
Osoiloscopo *60 MHz bandwidth
Counter 4MHz (0 1% accuracy)
500 Feedthru si%accuracy. 2W
Distortion Anaiyzor To 400 kHz
RG58UCoax Cable 3ft length BNC male contacts
After referring to the following preliminary data, per-
form alignment, as necessary, per table 5-1 If per-
forming partial alignment, check previous settings
and adjustments for applicability Soo figures 5-1 and
5-2 for alignment control location
1Ail measurements made at the FUNCTION OUT
connector must be terminated Into a500 (±i%)
load
2Start the alignment by connecting the unit to an
appropriate ac power source and setting the
front panel switchos as follows
5.3
REMOVING GENERATOR COVERS
1. invert the instrument and remove the lou-
serews in the bottom cover.
2. Turn the Instrument upright: remove the too
cover for access to generator alignment con-
trols
3
When alignment is complete, secure the bottom
cove' with four screws
NOTE
Remove me cover only when it is neces-
sary to make adiostments or measure-
ments
POWER
Frequency Dial
FREO MULT(Hz)
MODECONT
FUNCTION
DC OFFSET
AMPLITUDE
LIN/LOG
SWEEP SCONT
SWP/STOP
ON
40
X1K
CONT (released)
a.
OFF
MAX
LIN (released)
CONT (released)
STOP (released)
3Allow the unit to warm up at least 30 minutes tor
final alignment Keep the instrument cover on to
maintain heat Remove cover only to make ad-
justments or measurements.
Other manuals for 188
1
Table of contents
Other Wavetek Portable Generator manuals

Wavetek
Wavetek 148A User manual

Wavetek
Wavetek 1001A User manual

Wavetek
Wavetek 3000 User manual

Wavetek
Wavetek 182A User manual

Wavetek
Wavetek 1001A User manual

Wavetek
Wavetek FG3B User manual

Wavetek
Wavetek 132 User manual

Wavetek
Wavetek 132 User manual

Wavetek
Wavetek 182A User manual

Wavetek
Wavetek 144 User manual
Popular Portable Generator manuals by other brands

Klein Tools
Klein Tools KTB5 instruction manual

Briggs & Stratton
Briggs & Stratton 204330GS Operator's manual

Pulsar
Pulsar PG7750B owner's manual

Westinghouse
Westinghouse WHXC8500E-AS Instruction manual supplement

Briggs & Stratton
Briggs & Stratton 14000 Series installation instructions

Baldor
Baldor PC32RI Installation & operating manual