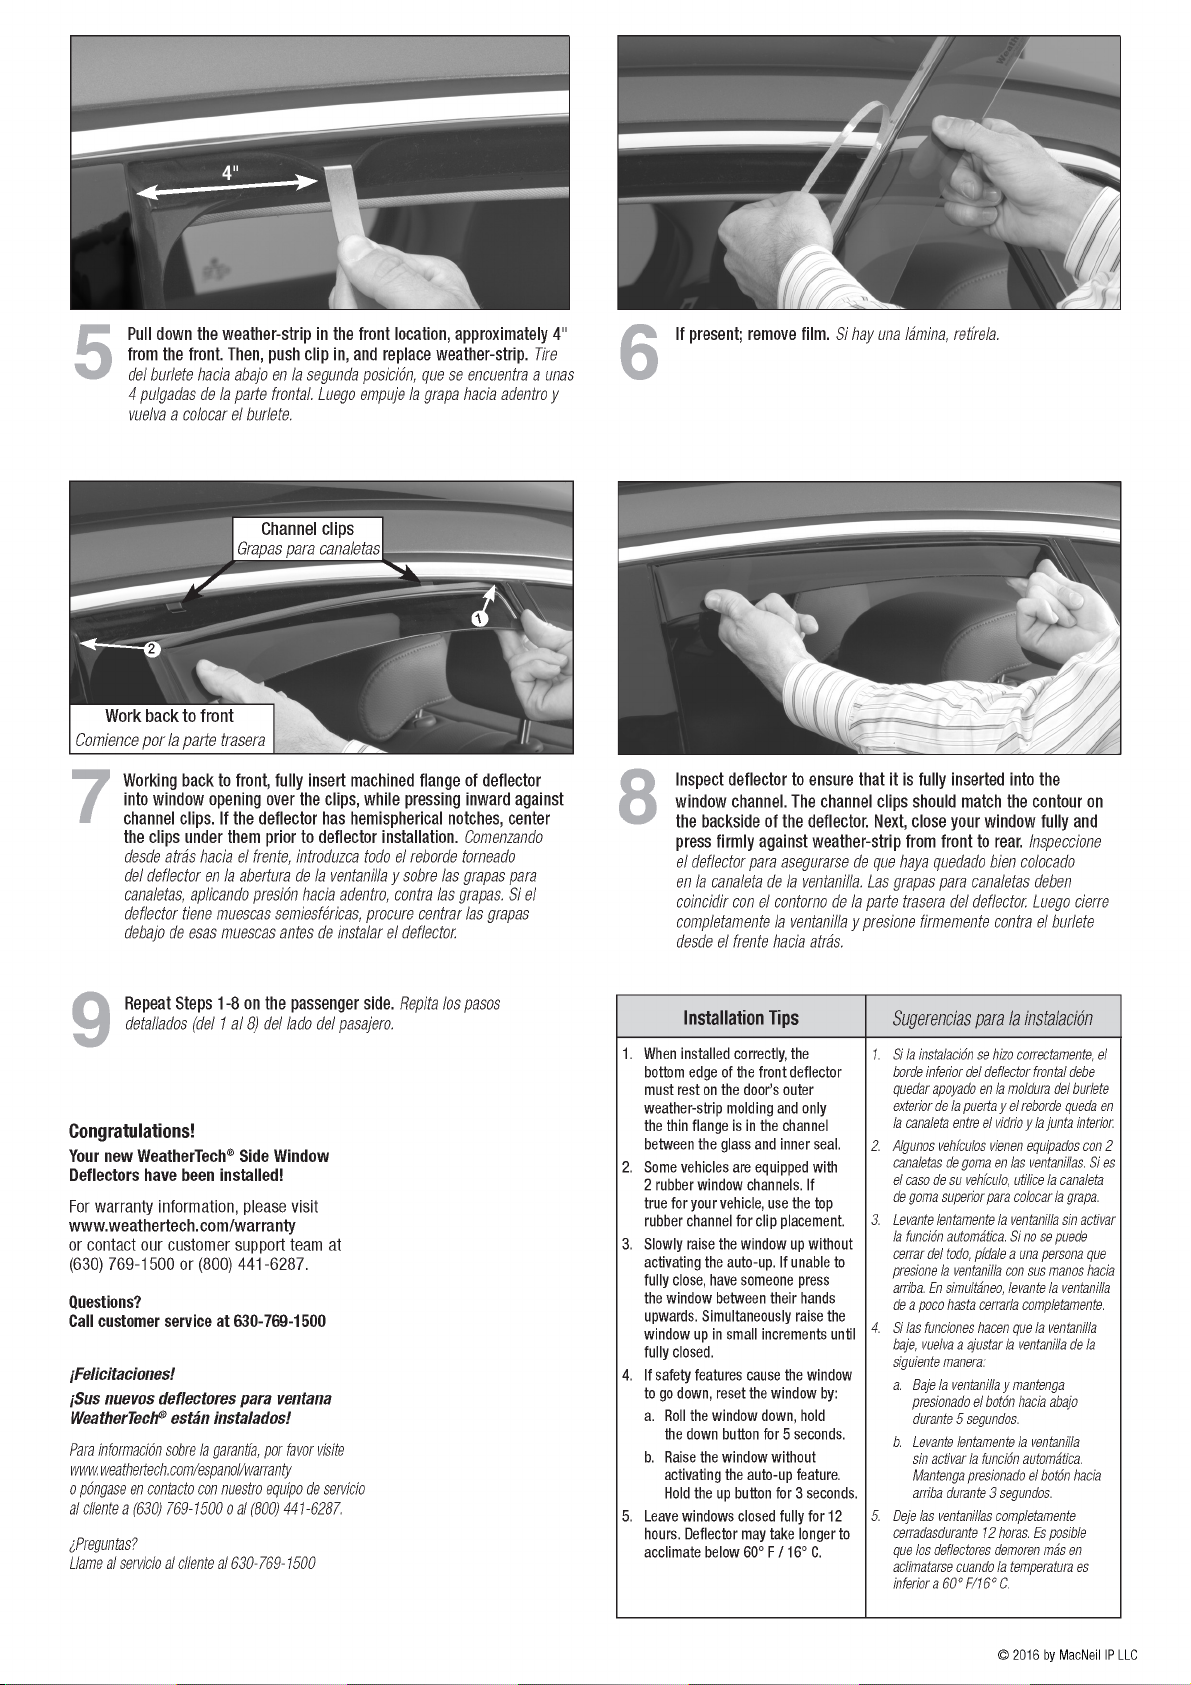
manuals.online logo
Brands
  1. Home
  2. •
  3. Brands
  4. •
  5. WeatherTech
  6. •
  7. Automobile Accessories
  8. •
  9. WeatherTech 82562 User manual

WeatherTech 82562 User manual

WeatherTech
Side
Window
Deflectors
-
Rear
with
Channel
Clips
Def
lectores
para
ventanillas
laterales
-
parte
trasera,
con
grapas
para
canaletas
Installation
Instructions
Instrucciones
de
instalación
Contents
Contenido
(2)
Rear
Side
Window
Deflectors,
(4)
Channel
Clips
and
(1)
Tool
included.
If
there
is
a
WeatherTech
®
label,
it
should
be
positioned
toward
the
rear
of
the
vehicle.
Se
Incluyen
(2)
delectares
para
ventanillas
laterales
traseras,
(4)
grapas
para
canaletas
y
(1)
herramienta.
SI
hay
una
etiqueta
de
WeatherTech
®
,
se
debe
orientar
hacia
la
parte
trasera
del
vehículo.
WARNING
AAAARHÉAAA
Accessories
which
are
not
properly
fitted
can
be
dangerous.
Read
the
instructions
carefully
before
installation,
and
comply
with
the
instructions
at
all
times.
If
in
doubt,
contact
WeatherTech
®
.
Las
accesorias
que
na
están
ajustadas
correctamente
pueden
ser
peligrosas.
Lea
las
instrucciones
cuidadosamente
antes
de
realizar
la
instalación
y
respételas
en
todo
momento.
SI
tiene
alguna
duda,
comuníquese
con
WeatherTech
®
.
1
Make
sure
that
the
window
is
clean
and
dry.
Then,
pull
down
the
weather-strip
with
the
provided
tool
approximately
3"
from
the
rear
edge.
Asegúrese
de
que
la
ventanilla
esté
limpia
y
seca.
Luego
tire
del
burlete
hacia
abajo
con
la
herramienta
provista,
aproximadamente
3
pulgadas
del
borde
trasero.
2
View
of
proper
installation.
Vista
de
la
Instalación
correcta.
3
Continue
pulling
down
the
weather-strip
to
insert
a
channel
clip.
Small/short
channel
clips
can
be
easily
installed
by
inserting
the
middle
flat
portion
upwards
into
the
channel
first.
Longer
channel
clips
can
be
installed
by
using
the
installation
tool
shown
in
Picture
3b.
Continúe
tirando
del
burlete
hacia
abajo
a
fin
de
insertar
una
grapa
para
canaletas.
Las
grapas
para
canaletas
pequeñas/cortas
se
pueden
instalar
fácilmente
insertando
primero
la
parte
plana
del
medio
hacia
arriba
en
la
canaleta.
Las
grapas
para
canaletas
más
largas
se
pueden
instalar
con
la
herramienta
de
instalación
que
se
muestra
en
la
imagen
3b.
4
Push
clip
in,
and
replace
weather-strip.
Empuje
la
grapa
hacia
adentro
y
vuelva
a
colocar
el
burlete.
5
Pull
down
the
weather-strip
in
the
front
location,
approximately
4
"
from
the
front.
Then,
push
clip
in,
and
replace
weather-strip.
Tire
del
burlete
hacia
abajo
en
la
segunda
posición,
que
se
encuentra
a
unas
4
pulgadas
de
la
parte
frontal.
Luego
empuje
la
grapa
hacia
adentro
y
vuelva
a
colocar
el
burlete.
6
If
present;
remove
film.
Si
hay
una
lámina,
retírela.
7
Working
back
to
front,
fully
insert
machined
flange
of
deflector
into
window
opening
over
the
clips,
while
pressing
inward
against
channel
clips.
If
the
deflector
has
hemispherical
notches,
center
the
clips
under
them
prior
to
deflector
installation.
Comenzando
desde
atrás
hacia
el
frente,
introduzca
todo
el
reborde
torneado
del
deflector
en
la
abertura
de
la
ventanilla
y
sobre
las
grapas
para
canaletas,
aplicando
presión
hacia
adentro,
contra
las
grapas.
Si
el
deflector
tiene
muescas
semiesféricas,
procure
centrar
las
grapas
debajo
de
esas
muescas
antes
de
instalar
el
deflector.
8
Inspect
deflector
to
ensure
that
it
is
fully
inserted
into
the
window
channel.
The
channel
clips
should
match
the
contour
on
the
backside
of
the
deflector.
Next,
close
your
window
fully
and
press
firmly
against
weather-strip
from
front
to
rear.
Inspeccione
el
deflector
para
asegurarse
de
que
haya
quedado
bien
colocado
en
la
canaleta
de
la
ventanilla.
Las
grapas
para
canaletas
deben
coincidir
con
el
contorno
de
la
parte
trasera
del
deflector.
Luego
cierre
completamente
la
ventanilla
y
presione
firmemente
contra
el
burlete
desde
el
frente
hacia
atrás.
9
Repeat
Steps
1-8
on
the
passenger
side.
Repita
los
pasos
detallados
(del
1
al
8)
del
lado
del
pasajero.
Installation
Tips
1.
When
installed
correctly,
the
bottom
edge
of
the
front
deflector
must
rest
on
the
door
’s
outer
weather-strip
molding
and
only
the
thin
flange
is
in
the
channel
between
the
glass
and
inner
seal.
2.
Some
vehicles
are
equipped
with
2
rubber
window
channels.
If
true
for
your
vehicle,
use
the
top
rubber
channel
for
clip
placement.
3.
Slowly
raise
the
window
up
without
activating
the
auto-up.
If
unable
to
fully
close,
have
someone
press
the
window
between
their
hands
upwards.
Simultaneously
raise
the
window
up
in
small
increments
until
fully
closed.
4.
If
safety
features
cause
the
window
to
go
down,
reset
the
window
by:
a.
Roll
the
window
down,
hold
the
down
button
for
5
seconds.
b.
Raise
the
window
without
activating
the
auto-up
feature.
Hold
the
up
button
for
3
seconds.
5.
Leave
windows
closed
fully
for
12
hours.
Deflector
may
take
longer
to
acclimate
below
60°
F
/
16°
C.
Sugerencias
para
la
instalación
1.
Si
la
instalación
se
hizo
correctamente,
el
borde
inferior
del
deflector
frontal
debe
quedar
apoyado
en
la
moldura
del
burlete
exterior
de
la
puerta
y
el
reborde
queda
en
la
canaleta
entre
el
vidrio
y
la
junta
interior.
2.
Algunos
vehículos
vienen
equipados
con
2
canaletas
de
goma
en
las
ventanillas.
Si
es
el
caso
de
su
vehículo,
utilice
la
canaleta
de
goma
superior
para
colocar
la
grapa.
3.
Levante
lentamente
la
ventanilla
sin
activar
la
función
automática.
Si
no
se
puede
cerrar
del
todo,
pídale
a
una
persona
que
presione
la
ventanilla
con
sus
manos
hacia
arriba.
En
simultáneo,
levante
la
ventanilla
de
a
poco
hasta
cerrarla
completamente.
4.
Si
las
funciones
hacen
que
la
ventanilla
baje,
vuelva
a
ajustar
la
ventanilla
de
la
siguiente
manera:
a.
Baje
la
ventanilla
y
mantenga
presionado
el
botón
hacia
abajo
durante
5
segundos.
b.
Levante
lentamente
la
ventanilla
sin
activar
la
función
automática.
Mantenga
presionado
el
botón
hacia
arriba
durante
3
segundos.
5.
Deje
las
ventanillas
completamente
cerradasdurante
12
horas.
Es
posible
que
los
deflectores
demoren
más
en
aclimatarse
cuando
la
temperatura
es
inferior
a
60°
F/16°
C.
Congratulations!
Your
new
WeatherTech
®
Side
Window
Deflectors
have
been
installed!
For
warranty
information,
please
visit
www.weathertech.com/warranty
or
contact
our
customer
support
team
at
(630)
769-1500
or
(800)
441-6287.
Questions?
Call
customer
service
at
630-769-1500
¡Felicitaciones!
¡Sus
nuevos
deflectores
para
ventana
WeatherTech
®
están
instalados!
Para
información
sobre
la
garantía,
por
favor
visite
www.weatheitech.com/espanol/warranty
o
póngase
en
contacto
con
nuestro
equipo
de
servicio
al
cliente
a
(630)
769-1500
o
al
(800)
441-6287.
¿Preguntas?
Llame
al
servicio
al
cliente
al
630-769-1500
©
2016
by
MacNeil
IP
LLC

This manual suits for next models

8

Other WeatherTech Automobile Accessories manuals

WeatherTech WindshieldFone User manual

WeatherTech

WeatherTech WindshieldFone User manual

WeatherTech No-Drill MudFlap User manual

WeatherTech

WeatherTech No-Drill MudFlap User manual

WeatherTech No-Drill MudFlap User manual

WeatherTech

WeatherTech No-Drill MudFlap User manual

WeatherTech No-Drill MudFlap 110107 User manual

WeatherTech

WeatherTech No-Drill MudFlap 110107 User manual

WeatherTech No-Drill MudFlap User manual

WeatherTech

WeatherTech No-Drill MudFlap User manual

WeatherTech No-Drill User manual

WeatherTech

WeatherTech No-Drill User manual

WeatherTech AlloyCover Quick start guide

WeatherTech

WeatherTech AlloyCover Quick start guide

WeatherTech 110071 User manual

WeatherTech

WeatherTech 110071 User manual

WeatherTech No-Drill MudFlap User manual

WeatherTech

WeatherTech No-Drill MudFlap User manual

WeatherTech No-Drill MudFlap User manual

WeatherTech

WeatherTech No-Drill MudFlap User manual

WeatherTech No-Drill MudFlap User manual

WeatherTech

WeatherTech No-Drill MudFlap User manual

WeatherTech No-Drill MudFlap User manual

WeatherTech

WeatherTech No-Drill MudFlap User manual

WeatherTech No-Drill MudFlap User manual

WeatherTech

WeatherTech No-Drill MudFlap User manual

WeatherTech No-Drill MudFlap User manual

WeatherTech

WeatherTech No-Drill MudFlap User manual

WeatherTech No-Drill MudFlap User manual

WeatherTech

WeatherTech No-Drill MudFlap User manual

WeatherTech No-Drill MudFlap User manual

WeatherTech

WeatherTech No-Drill MudFlap User manual

WeatherTech No-Drill MudFlap User manual

WeatherTech

WeatherTech No-Drill MudFlap User manual

WeatherTech No-Drill MudFlap User manual

WeatherTech

WeatherTech No-Drill MudFlap User manual

WeatherTech 8APB01 User manual

WeatherTech

WeatherTech 8APB01 User manual

WeatherTech No Drill MudFlap User manual

WeatherTech

WeatherTech No Drill MudFlap User manual

WeatherTech Child Car Seat Protector User manual

WeatherTech

WeatherTech Child Car Seat Protector User manual

WeatherTech No-Drill MudFlap User manual

WeatherTech

WeatherTech No-Drill MudFlap User manual

WeatherTech No-Drill MudFlap User manual

WeatherTech

WeatherTech No-Drill MudFlap User manual

WeatherTech No-Drill MudFlap User manual

WeatherTech

WeatherTech No-Drill MudFlap User manual

Popular Automobile Accessories manuals by other brands

Lippert Components Solera OEM INSTALLATION MANUAL

Lippert Components

Lippert Components Solera OEM INSTALLATION MANUAL

Menabo PRO TOUR INDOOR Fitting instructions

Menabo

Menabo PRO TOUR INDOOR Fitting instructions

DV8 OFFROAD TCTT2-01 Product installation manual

DV8 OFFROAD

DV8 OFFROAD TCTT2-01 Product installation manual

Jimu ZDrive ADAS user manual

Jimu

Jimu ZDrive ADAS user manual

iArmor EDGE IA-N179 manual

iArmor

iArmor EDGE IA-N179 manual

Kurgo DoorGuard Instructions and care

Kurgo

Kurgo DoorGuard Instructions and care

Macally MCUPPOWER user guide

Macally

Macally MCUPPOWER user guide

AMiO SSR-01L user manual

AMiO

AMiO SSR-01L user manual

Whispbar K568W Fitting instructions

Whispbar

Whispbar K568W Fitting instructions

WALMEC 40037 Mounting instructions

WALMEC

WALMEC 40037 Mounting instructions

Vortech Engineering GM 7.4 installation instructions

Vortech Engineering

Vortech Engineering GM 7.4 installation instructions

Dakota Digital VHX-53F-PU Instrument Installation

Dakota Digital

Dakota Digital VHX-53F-PU Instrument Installation

Tyger T3 quick start guide

Tyger

Tyger T3 quick start guide

Sunsky BC37 user manual

Sunsky

Sunsky BC37 user manual

Bushranger RRK08 owner's manual

Bushranger

Bushranger RRK08 owner's manual

NavLinkz RL4-MZD88 manual

NavLinkz

NavLinkz RL4-MZD88 manual

Emerald MB-NTG4-CP manual

Emerald

Emerald MB-NTG4-CP manual

Cruz Box 940-467U Assembly instructions

Cruz

Cruz Box 940-467U Assembly instructions

manuals.online logo
manuals.online logoBrands
  • About & Mission
  • Contact us
  • Privacy Policy
  • Terms and Conditions

Copyright 2025 Manuals.Online. All Rights Reserved.