LED
Brightness
Beam Angle
Battery
Burn Time
Depth Rated
LED Life
Material
Oxidation
Dimensions
Weight
COB LED x 5pcs
25000 Lumens/5700K/CRI:Ra98
160 Degrees
2 x (6*21700) Lithium-ion batteries (4500 mAh, 21.6V 97.2WH)
Approx. 50 min (100% flood)
100m / 330ft
Over 50,000 hours
Aviation aluminum
Hard anodic oxidation
110 (D) x 286 (L) mm
2.5kg on land (Including the battery)
1. Insert the DC charger plug into the battery (as shown in the diagram below).
2. Plug the charger into the wall outlet. When the battery starts to charge the
indicator light on the charger will be red. When the battery is fully charged
the indicator light on the charger will turn green.
There are two O-rings in the tail cap. Use silicone to keep the O-rings well lubricated. It is
important to lubricate the O-rings if the video light has not been used in a long time or if the
O-ring is hard. If the O-ring is damaged, broken or deformed it should be replaced with a
new O-ring. One spare O-ring is included when you purchase your torch.
NOTE:
Do not use a sharp tool to remove the O-ring.
Warnings
★Do not open the tail cap when the torch is in the water;
★Do not shine the light directly into your eyes or another person's eyes;
★Do not touch the battery or the charger with wet hands;
★Only use the manufacturer's battery and charger with this system;
★If the torch will not be used for a long period of time the battery should be removed.
Failure to comply with these warnings may result in damage to the video light and will nullify
the warranty.
Weefine provides a warranty against manufacturer defects for 1 year starting from the date of
purchase. Manufacturer defects occurring within 15 days of the date of purchase will result in an
exchange of product at the vendor. All other manufacturer defects occurring within 1 year of
the purchase will be repaired at no cost. Proof of purchase is required for warranty support.
The warranty does not cover failures or defects resulting from misuse (e.g.; modification; damage),
natural disasters, or battery issues, including incorrect battery installation.
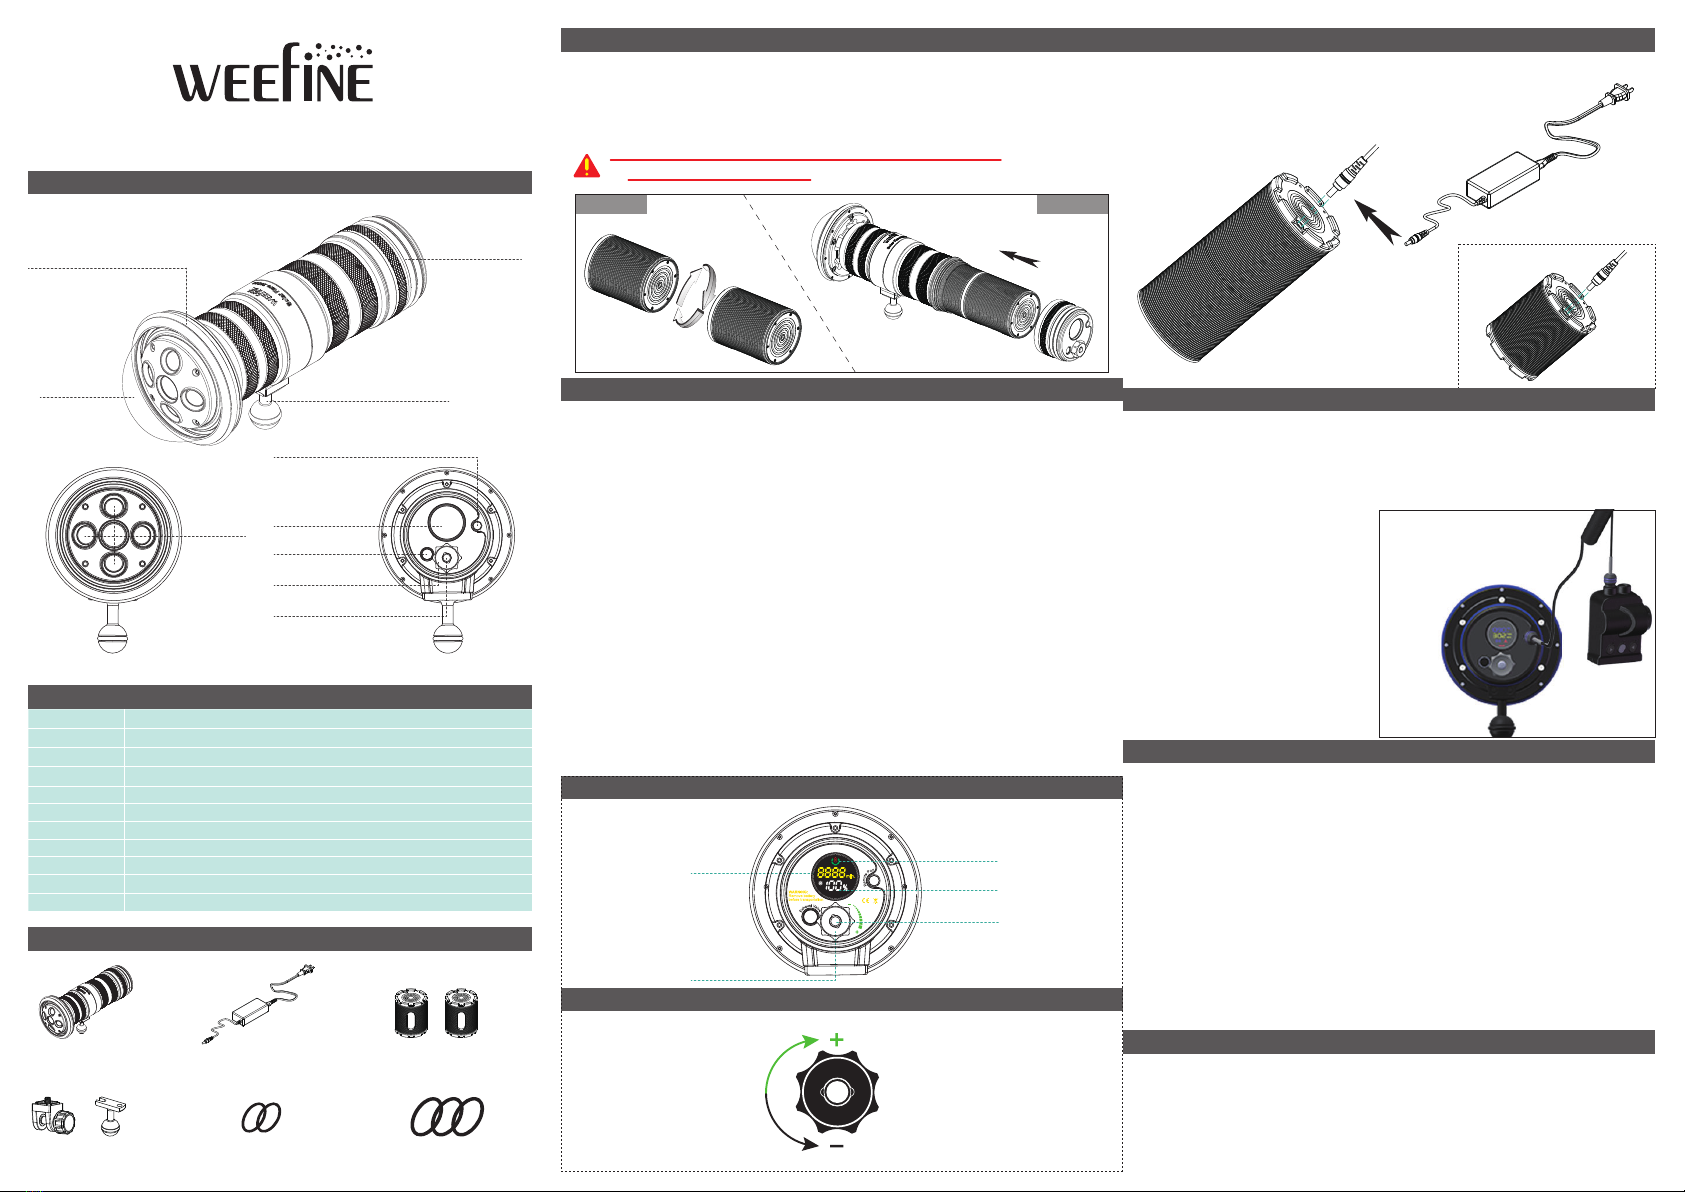
Wide lens
LCD display
Exhaust valve
Adjustment knob
Mode button
O-rings
(protect against bumps)
Ball mount
Light Head Tail cap
COB LED
Tail cap
Burn time
Adjustment
knob
Battery
indicator
min .Brightness
Mode button
①Solar Flare 25000
⑤Spare O-rings x 2pcs
③Lithium battery pack x2
②Charger
④YS Adapter + Ball mount ⑥Anti-collision O rings x 3pcs
Two batteries must be installed and used together,
one battery is forbidden
Remote control port
SOLAR FLARE 25000 USER MANUAL
Increase brightness
Reduce brightness
Direction
of rotation
Turn on / off
Long press the mode button for one second and then show the "Weefine" logo, and continue
to press and release immediately the mode button for one second to turn on the torch;
Long press the mode botton for more than two seconds to turn off the torch.
Brightness adjustment
By turning the knob left and right, the brightness can be adjusted from 0% to 100%, the left
rotation brightness decreases in 5% intervals, and the right rotation brightness increases
in 5% intervals; short press the button to adjust the light source:
full brightness→single warm light→full Bright cycle switching;
Strobe mode
The torch is turn on ,press the button for one second to enter strobe mode and then the
brightness will flash at a frenquency of two times per second. The brightness value of strobe
can be adjusted by rotating the knob from 0% to 100% , decreasing the brightness value by
turnning left the knob as 5% interval rate and increasing the brightness value by turning
right the knob as 5% interval rate. Finally,long press the botton for one second to exit the
strobe mode.
Mode memory function
When shutting down, the mode and brightness before shutting down will be stored (this
brightness mode is the mode before entering temperature protection or low power
protection), and the mode and brightness will be used the next time it is turned on.
1. Install the two lithium-ion batteries (see Figure 1) first;
2. Turn counterclockwise to open the tail cover; put the lithium-ion battery
into the battery canister (see Figure 2) (the two sides of the battery are the same)
3. Turn the tail cover clockwise to close the battery compartment
(that is, re-fix the tail cover to the lamp head).
Temperature protection:
In the non-low-power state, when the
flashlight continues to discharge
temperature reaches 60℃, it will enter
the temperature protection state,
and the display brightness will be
reduced to 10%.When the temperature
drops to 40℃, the original brightness
will be restored;
Low voltage alarm status:
The display shows a red countdown for
10 minutes to automatically shut down,
and the white light brightness is 10%.
It can only be shut down manually,
but cannot be adjusted;
The battery can be charged
in two or one section...
Remote control function:
(using WeeFine remote control)
The three-button remote control is for the middle
button to adjust the light source, left minus
(equivalent to turning the knob to the left) and
right plus (rotating the knob to the right).
Features
To Install The Battery To Charge The Battery
General Maintenance
Warranty
Specification
Standard Accessories
Function
Introduction to the tail area
Introduction of adjusting knob direction
Tips
Figure 1 Figure 2


