Warranty
Weefine provides a warranty against manufacturer defects for 1 year
starting from the date of purchase. Manufacturer defects occuring within
15 days of the date of purchase will result in an exchange of product at
the vendor. All other manufacturer defects occuring within 1 year of the
purchase will be repaired at no cost. Proof of purchase is required for
warranty support. The warranty does not cover failures or defects
resulting from misuse (e.g.; modification; damage), natural disasters, or
battery issues, including incorrect battery installation.
Trouble Shooting
Before returing the video light to the vendor, please try the following:
(Strobe Port)
Sleep Mode:
In the power-on state, long press the left button for more than 2 seconds to enter
(exit) sleep mode, and only the indicator light will be on.
To Charge the Battery
1. Insert the DC charger plug into the battery (as shown in the figure below).
2. Plug the charger into the wall outlet. When the battery starts to charge, the
indicator light on the charger will be red.
3. When the battery is fully charged, the indicator light on the charger will
turn green.
Thermal protection
If the inner temperature of the video light becomes too high, the video
light will automatically decrease the brightness of the light.
There are two waterproof O-rings on the transition piece and silicone oil
should be used to keep the O-rings well lubricated.
If the O-ring is cracked, hardened, damaged, deformed, etc., it should be
replaced in time.
Spare O-rings are included in the accessory kit, please contact your local
weefine distributor if necessary.
Strobe mode
Remote control
Emergency Mode
On/Off: In the case of power on, long press the left and right buttons for more
than 2 seconds to enter (exit) SOS mode; short press the right button to switch
between SOS mode and flash mode.
** Use weefine dedicated remote control (optional) **
* When the battery power is
low, the video light will
automatically reduce the
brightness to save power.
* * Note: Please use the special warping piece provided by the manufacturer to
remover the O-ring.
Select the focus light level (generally choose low light) and press the right button
for 1.5 seconds to enter (exit) the strobe mode; you can set the brightness of the
strobe, as shown in the figure below.
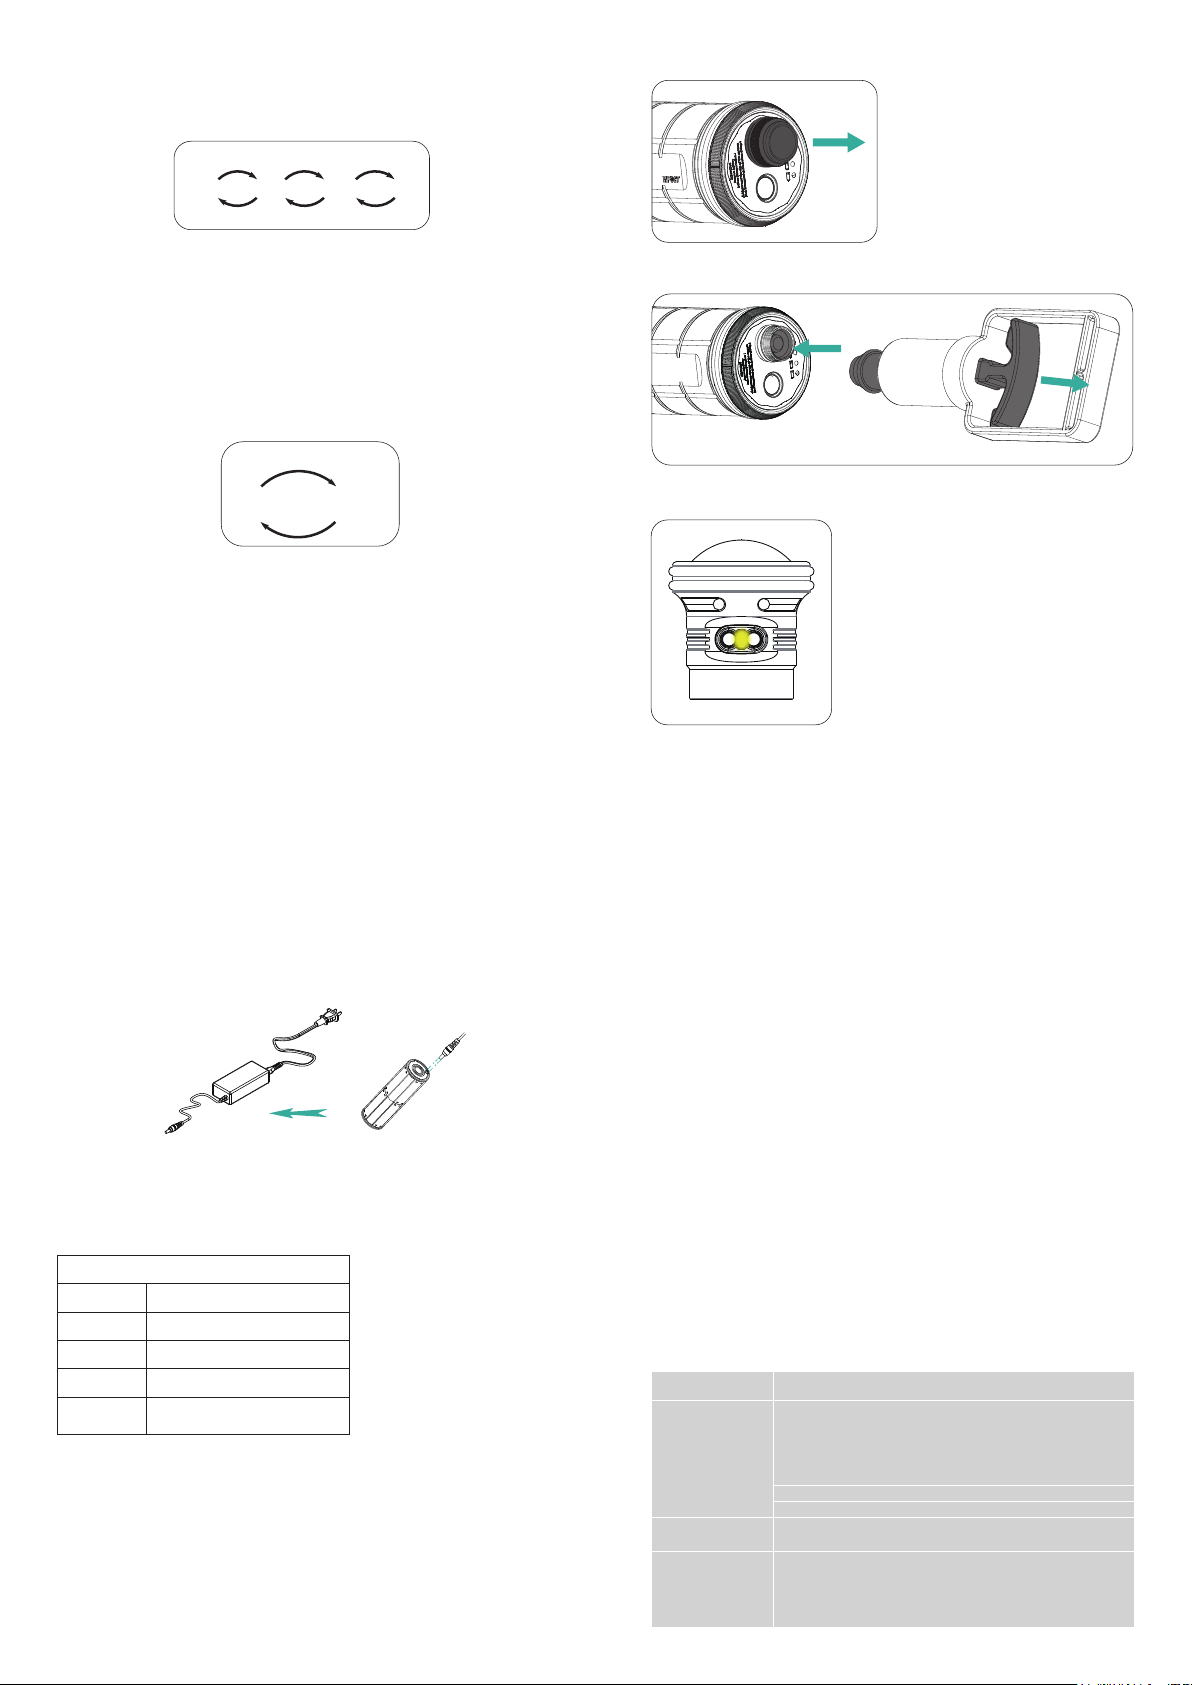
Step 1: Insert the battery, the power-on
indicator light is on, but do not turn on the
headlights;
Step 2: Open the air outlet of the sealing
cap;
Step 3: Align the special air pump with the
air extraction hole for air extraction, and the
indicator light will flash yellow at this time;
Step 4: Pumping until the yellow indicator
light is always on, indicating that the
pumping has been completed;
Step 5: Put the sealing cap on and tighten.
1. Flashes quickly when pumping (5Hz per
second);
2. The vacuuming is completed; the yellow
indicator light is always on;
3. The yellow indicator light flashes slowly,
which means air leakage or poor sealing;
** After the pumping is completed, it is
necessary to cover and tighten the sealing
cap **
* If the yellow indicator is flashing, the
sealing ring is bad, please check whether the
sealing position is normal;
* In normal use, if the yellow indicator light is
flashing, the seal is not good; it may be that
the lamp has entered the water, which needs
to be dealt with in time.
Connect the camera's flash port to the flashlight's strobe port with an optical fiber
cable. When the camera's flash signal transmitted by the optical fiber is detected,
the flashlight instantly switches to the set flashing brightness.
** Use weefine fiber optic cable for matching (optical fiber cable is optional) **
Warnings
1. Do not open the tail cap when the video light is in the water.
2. Do not direct light to human eyes.
3. Do not touch the battery and charger with wet hands.
4. Use only the manufacturer's battery and charger with this system.
5. If the video light will not be used for a long period of time,the battery
should be removed.
Failure to comply with these warnings may result in damage to the
video light and will nullify the warranty.
Symptom
Battery Level Indicator
Normal Maintenance
Solution
Water is leaking
into the light
The video light
does not work
Indicator light is green
when the battery
begins charging
Check the battery to make sure it is inserted so that the negative
end of the battery is aligned with the negative terminal in the
battery compartment and the positive end of the battery is
aligned with the positive terminal of the battery compartment.
Note: The battery compartment is in the tail cap
Ensure the battery is charged
Ensure the tail cap is attached tightly to the light head
Check the O-rings in the tail cap to make sure that they are not
broken and that nothing is preventing a proper seal
Check the battery to make sure that it is inserted into the charger
in the correct direction and that the battery has good contact with
the charging terminal.
Vacuum Operation
Air Extraction Indicator
Focus Light Out Function
In the strobe mode, adjust the brightness to 0% to realize the function of focusing
and turning off the lights.
When the light sensor of the lamp head detects the flash signal, the flashlight will
turn off the focus light, and the flashlight will turn on again after 1 second.
Press and immediately release the left button.
Press and immediately release the right button.
100% 75% 50% 0%
SOS Flash Mode
Short press right button to switch
Battery level indicator
Low power<15%, it will turn off
after 10min.
Capacity
>80%
>30%
>15%
State
Blue
Green
Red
Red flashing


