Español
ESP
TRADUCCIÓN INSTRUCCIONES ORIGINALES
10
mientos suaves. No pulverice en ángulo porque pro-
vocará que la pintura forme gotas sobre la supercie.
Cuando pulverice sobre grandes supercies siga un
esquema adecuado de trabajo (11). Realice los movi-
mientos para pintar con el brazo, no con la muñeca.
Controle la velocidad con la que mueve la pistola pin-
tar para lograr un movimiento uniforme. Un movimien-
to demasiado rápido conllevará que la capa de pintura
sea demasiado na. Un movimiento demasiado len-
to conllevará que la capa de pintura sea demasiado
gruesa. Aplique las manos de una en una, dejando
los tiempos de secado entre cada mano apropiados
según las recomendaciones del fabricante.
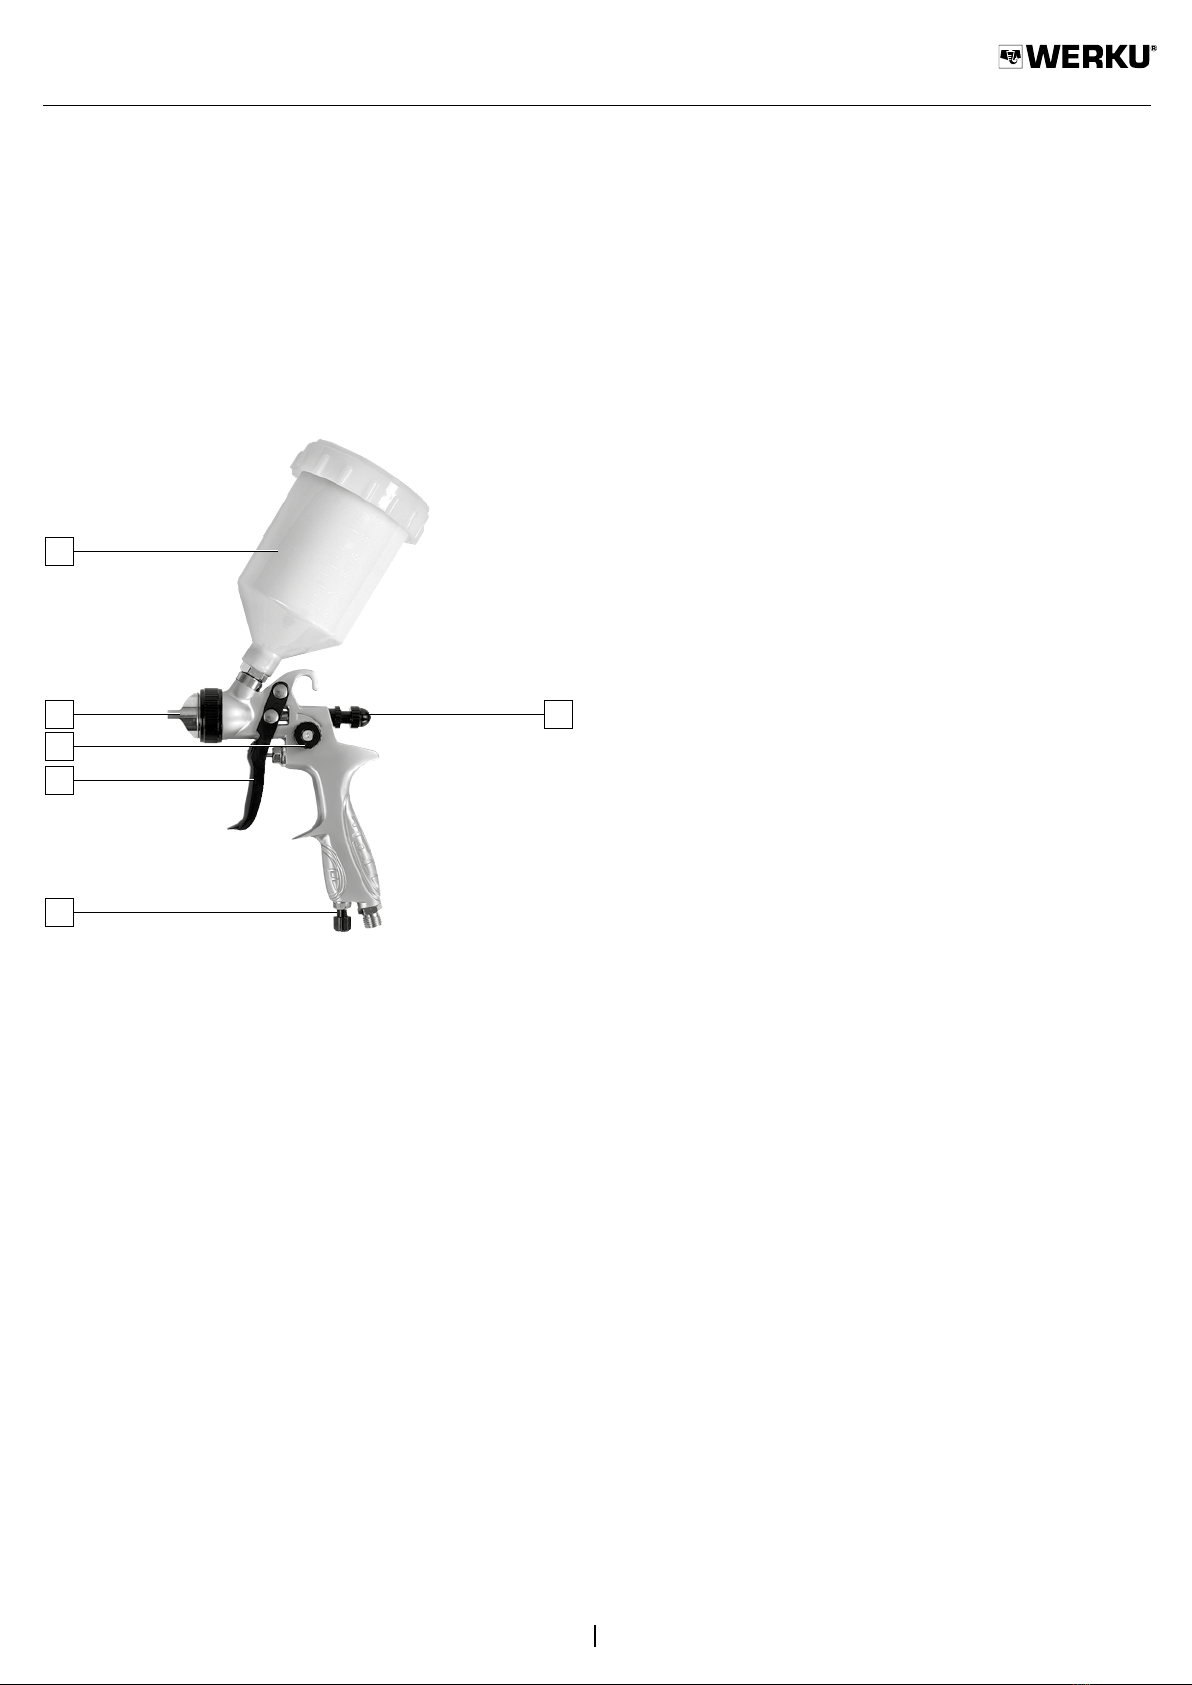
CAMBIO DE AGUJA, PICO Y REGULADOR
Desenrosque y retire el regulador de dirección de aba-
nico (A). Desenrosque y retire el regulador de paso
uido (E). Posteriormente, tire hacia atrás la aguja de
paso uido hasta haberla sacado en su totalidad. Con
la llave suministrada, desenrosque y retire del cabezal
el pico de paso de uido, posteriormente, enrosque
el nuevo pico de paso de uido. Introduzca la nueva
aguja de paso uido. Posteriormente enrosque el re-
gulador de paso uido (E). Enrosque el nuevo regula-
dor de dirección de abanico (A).
IMPORTANTE.
El uso de productos que contengan hidrocarburos ha-
logenados puede originar reacciones químicas en for-
ma de explosión. Al utilizar disolventes y detergentes
en base a hidrocarburos halogenados, como 1,1,1-tri-
cloroetano y cloruro de metileno, puede haber reaccio-
nes químicas en el vaso, la pistola y las piezas galva-
nizadas (el 1,1,1-tricloroetano en presencia de trazas
de agua produce ácido clorhídrico). Recomendamos el
uso de productos que no los contengan. Antes de la
puesta en servicio de la pistola de pintar y sus acce-
sorios deben limpiarse con disolvente de limpieza, con
el n de eliminar el tratamiento de protección aplicado
antes de su embalaje. En ningún caso utilizar ácidos,
sosa (álcalis, decapantes, etc.) para la limpieza.
MANTENIMIENTO.
Drene la condensación de los tanques compresores de
aire y las mangueras (12). Para ello, abra los grifos de
descompresión u otras válvulas de drenaje de los tan-
ques. La pistola de pintar ha sido diseñada para funcio-
nar durante mucho tiempo con un mínimo mantenimien-
to. El funcionamiento óptimo depende del buen cuidado
de la pistola de pintar y de una limpieza frecuente. La
pistola de pintar debe limpiarse de manera ecaz utili-
zando aire comprimido. Utilice siempre gafas protecto-
ras cuando trabaje con aire comprimido. Si no puede
utilizar aire comprimido, retire el polvo de la pistola de
pintar sirviéndose de un cepillo. Algunos productos de
limpieza y disolventes dañan los componentes de plás-
tico, entre los cuales se encuentran la gasolina, el te-
traclorometano, los disolventes de limpieza clorados, el
amoníaco y los productos de limpieza domésticos que
contienen amoníaco. No utilice ninguno de los produc-
tos mencionados para limpiar la pistola de pintar.
PROTECCIÓN DEL MEDIO AMBIENTE.
Los materiales y componentes que han sido uti-
lizados para fabricar este producto pueden ser
reutilizados y reciclados. Werku®está adherido a
un Sistema Integrado de Gestión que se encarga
de la correcta eliminación de los residuos de este
producto. No elimine este producto en la basura
doméstica. Werku®ofrece a sus clientes un servi-
cio gratuito de retirada de dichos residuos en cual-
quiera de sus puntos de venta, en los puntos de
recogida establecidos por el Sistema Integrado de
Gestión o en los puntos limpios de su localidad.
GARANTÍA Y SERVICIO TÉCNICO.
Werku®ofrece una garantía que cubre la reparación
de los defectos que se aprecian debido a fallos
en los materiales o en la fabricación. Para ello es
imprescindible que los defectos se produzcan dentro
del periodo de validez. El consumidor tiene derecho
a la reparación gratuita de los defectos (gastos de
envío, mano de obra y materiales incluidos), bien
mediante la reparación o mediante la sustitución (si
es necesario por un modelo posterior). En todo caso,
Werku®no aceptará sustituciones si estos suponen un
coste desproporcionado en comparación con el coste
de reparación. Esta garantía no afecta los derechos
del consumidor establecidos por leyes europeas o
nacionales. El periodo de validez de esta garantía es
de 3 años. El periodo de validez se inicia en la fecha
de compra por el primer consumidor. Esta fecha se
reeja en la factura o tique de compra. La reclamación
en virtud de esta garantía debe de presentarse al
distribuidor de Werku®o al Servicio de Asistencia
Técnica de Werku®. Para ello es imprescindible
presentar esta garantía debidamente cumplimentada
y sellada por el distribuidor, junto con la factura o tique
de compra. Para cualquier información referente a esta
garantía el comprador y/o el distribuidor puede ponerse
en contacto con el Servicio de Asistencia Técnica a
través del teléfono +34 981 648 119, o mediante correo