WERKU WK501360 User manual

1
WK501360
310 BAR -Ø 643 -NPS 3/8" -RAC-XHD
ENG ORIGINAL INSTRUCTIONS / AIRLESS PAINT SPRAY GUN
ESP INSTRUCCIONES ORIGINALES / PISTOLA PINTAR AIRLESS
DEU
ORIGINALANLEITUNGEN / AIRLESS FARBSPRITZPISTOLE
FRA INSTRUCTIONS ORIGINALES / PISTOLET PEINTURE AIRLESS
NED
ORIGINELE INSTRUCTIES / AIRLESS VERFSPUITPISTOOL
POR
INSTRUÇÕES ORIGINAIS / PISTOLA PINTAR AIRLESS

2
English
ENG
CE DECLARATION CONFORMITY.
►Werku®declares that the WK501360 airless
gun is in accordance with the European
Directives and Standards 2006/42/CE and
EN12621:2006+A1:2010.
La Coruña, 01/11/2020.
R Yáñez
Werku Tools SA
TECHNICAL CHARACTERISTICS.
►Airless pump >1 HP (750 W) ►Working pressure
90-210 bar ►Maximum pressure 310 bar ►RAC-
XHD tip ►Inlet thread NPS 3/8” ►Outlet thread
BSP 7/8” ►Working temperature 5-40ºC ►Material
temperature <43ºC ►Net weight 0.380 kg ►Acoustic
pressure LpA <89 dB(A) ►Acoustic pressure LwA
<90.82 dB(A) ►Vibration Ah <0.715 m/s².
SAFETY INSTRUCTIONS.
►Read all security warnings and all instructions
►Failure to follow all warnings and instructions
listed below may result in electrical shock, re
and/or serious injury ►Keep all warnings and
all instructions for future reference ►Accidents
can be avoided in many cases by recognizing a
potentially hazardous situation before it occurs and
by observing appropriate safety procedures ►Do
not use this airless gun for other applications than
those specied in this manual.
SAFETY PRECAUTIONS.
►Be safety-conscious ►All local and national
regulations governing ventilation, re prevention,
and operation must be observed ►Hazard:
Injection injury ►A high pressure stream produced
by this airless gun can pierce the skin and
underlying tissues, leading to serious injury and
possible amputation ►Do not treat an injection
injury as a simple cut ►Injection can lead to
amputation ►See a physician immediately
►Inform the physician of the type of coating
material or cleaning agent with which the injury
was caused ►The maximum operating range of
this airless gun is 310 bar uid pressure ►Never
aim the airless gun at any part of the body ►Never
allow any part of the body to touch the uid stream
►Do not allow body to touch a leak in the uid
hose ►Never put hand in front of the airless gun
►Gloves will not provide protection against an
injection injury ►Never point the airless gun at
anyone else ►Always lock the airless gun trigger,
shut the pump o and release all pressure before
servicing, cleaning the tip or guard, changing
tip, or leaving unattended ►Pressure will not be
released by turning o the motor ►The prime/
spray valve must be turned to prime to relieve the
pressure ►Refer to the pressure relief pressure
described in the pump manual ►Always keep the
tip guard in place while spraying ►The tip guard
provides some protection but is mainly a warning
device ►Always remove the spray tip before
ushing or cleaning the system ►The hose can
develop leaks from wear, kinking and abuse ►A
leak can inject material into the skin ►Inspect
the hose before each use ►Never use an airless
gun without a trigger lock and trigger guard in
place and in good working order ►All accessories
must be rated at or above the maximum
operating pressure range of the airless gun
►This includes spray tips, extensions and hose
►Hazard: Explosion hazard due to incompatible
materials will cause severe injury or property
damage ►Do not use materials containing
bleach or chlorine ►Do not use halogenated
hydrocarbon solvents such as bleach, mildewcide,
methylene chloride trichloroethane ►They are
not compatible with aluminum ►Contact your
coating material supplier about the compatibility
of material with aluminum ►Hazard: General
►This airless gun can cause severe injury or
property damage ►Read all instructions and
safety precautions before operating this airless
gun ►Never spray near sources of ignition; eg
open ames, cigarettes (also cigars and pipes
are sources of ignition), sparks, hot wires and
hot surfaces, etc ►Wear respiratory equipment
when spraying ►The operator must be provided
with a protective mask ►In order to prevent work
related illness, the manufacturer’s regulations
for the materials, solvents, and cleaning agents
used must be observed when preparing, working
with and cleaning the airless gun ►Protective

3
English
ENG
clothing, gloves, eyewear, and, in certain cases,
protective skin cream are necessary to protect
the skin ►Follow the coating material and
solvent manufacturer’s warnings and instructions
►Extraction equipment should be installed by the
user in accordance with local regulations ►The
objects being sprayed must be earthed ►Before
each use, check all hoses for cuts, leaks, abrasion
or bulging of cover ►Check for damage or
movement of couplings ►Immediately replace the
hose if any of these conditions exist ►Never repair
a hose ►Replace it with another grounded high-
pressure hose ►Pulling the trigger causes a recoil
force to the hand that is holding the airless gun
►The recoil force of the airless gun is particularly
powerful when the tip has been removed and a
high pressure has been set on the airless high-
pressure pump ►Therefore, when cleaning without
tip set the pressure control valve to the lowest
pressure ►Use only manufacturer authorized parts
►User assumes all risks and liabilities when using
parts that do not meet the minimum specications
and safety devices of the airless gun manufacturer
►Hazard: Any static-electricity discharge from the
airless gun is to be diverted to the grounded high-
pressure pump via the conductive high-pressure
hose as stipulated ►The maximum surface
temperature corresponds to the permissible
material temperature ►This and the permissible
ambient temperature can be found in the technical
data ►To avoid the generation of machine sparks,
prevent impact stresses and any work on the unit
with tools in the explosion-hazardous area.
RESIDUAL RISKS.
►Residual risks are risks, which cannot be
excluded, even when equipment is used for the
intended purpose ►In such cases the applicable
areas of the actual residual risks will be pointed out
using warning and/or prohibition signs.
Risk
Injection
injury
Explosion
or re
Hazaar-
dous
vapors
Can occur
during:
Setup,
operation
Operation
Operation
Impact
Severe
injury or
amputation
Severe
injury
Severe
injury
Source / Cause
Atomized, high
pressure stream
of uid
Static electricity
or sparks
Hazaardous
vapors from spray
material
Preventative
measures
NEVER aim the
gun at any part of
the body
Use well ventilated
area. Ground de
airless gun
Use well ventilated
area. Use mask
WORK AREA SAFETY.
►Keep work area clean and well lit ►Cluttered
and dark areas invite accidents ►Do not handle
airless tools in explosive atmospheres, such as in
the presence of ammable liquids, gases or dusts
►Keep away from children and curious while
operating a airless tool ►Distractions can cause
you to lose control.
PERSONAL SAFETY.
►Stay alert, watch what you are doing and use
common sense when operating a airless tool
►Do not use a airless tool while tired or under
the inuence of drugs, alcohol or medicines ►A
moment of inattention while operating airless tools
may cause damage serious personal.
USE PPE’S.
►Use protection glasses according EN166 ►Use
protection masks according EN149 ►If required by
the type of work, use other precise PPE.
DO NOT WORK ON TIPTOES.
►Keep your feet on the ground and balance at all
times ►This enables better control of the airless
tool in unexpected situations.
DRESS PROPERLY.
►Do not wear loose clothing or jewelry ►Keep
your hair, clothing and gloves away from moving
parts ►Loose clothes, jewelry or long hair can be
caught in moving parts ►If there are devices for
connecting means for extracting and collecting
dust, make sure they are connected and properly
used ►The use of these devices can reduce dust
related hazards.
STORE AIRLESS TOOLS.
►Store airless tools out of reach of children and
not allow the handling of airless tools to people
unfamiliar with the tools or these instructions
►Airless tools are dangerous in the hands of
untrained users.
MAINTENANCE.
►Check moving parts for misalignment or binding,
there are no broken parts or other conditions
that may aect the operation of airless tools
►Airless tools are repaired before use when they

4
English
ENG
are damaged ►Many accidents are caused by
poorly maintained airless tools ►Use airless tools,
accessories and tool tips, etc. according to these
instructions and in the manner provided for the
particular type of airless tool, taking into account
the conditions work and work to develop ►The use
of the airless tool for applications other than those
intended could result in a dangerous situation
►Please check your airless tool serviced by a
Werku® ocial repair service using only identical
replacement parts ►This will ensure the safety of
the airless tool is maintained.
CHECK THE GOOD CONDITION OF THE
AIRLESS GUN.
►Make sure that all the screws in the airless
gun are perfectly tightened ►Make sure that the
possible installed accessories are perfectly tted in
place.
BEFORE STARTING WORK.
►Make sure that the suction airless gun is rmly
supported before using ►Check that no one is
standing beneath you when using the suction
airless gun in high areas.
DURING THE OPERATION.
►
Do not leave the suction airless gun operating
without having it rmly xed ►Only turn it on when
you are sure you have full control over it ►Do not
point the suction airless gun at anyone while in
use ►When operating the suction airless gun will
produce vibrations ►The screws may gradually
come loose, and possibly cause faults or accidents.
AT FINISH WORKING.
►Do not touch the possible accessories installed
in the suction airless gun after use ►It may be
hot and cause burns ►Some materials worked
with may contain chemicals or toxic components
►Avoid inhaling these substances or allowing
them to come into contact with your skin ►Use
PPE designed to prevent and protect against
incidents of this kind.
DESCRIPTION OF THE PRODUCT.
►The airless gun has been designed for the high
pressure atomization of liquid coating materials
►Refer this plan to familiarize yourself with the
airless gun before use.
25
6
7
4
1
3
1. Tip.
2. Tip guard.
3. Trigger.
4. Trigger guard.
5. Trigger lock.
6. Handle.
7. Material inlet.
USE INSTRUCTIONS .
►
Before putting the airless gun into operation, it
is advisable to read all the indicated instructions
►Likewise, accident prevention rules, regulations
and guidelines for work centres and current laws and
restrictions must be taken into account ►The airless
gun must be used only by personnel who have been
trained adequately in their handling, and only for the
uses for which it has been designed.
PRODUCT COMPATIBILITY.
►Compatible with varnishes, lacquers, enamels,
primers, polyurethane paints, acrylic paints,
plastic paints, acrylic rubber paints, latex paints,
temperas, roof coatings, anticorrosive paints,
thick layers and putties.
USING TRIGGER LOCK.
►Always engage the trigger lock when the airless
gun is not in use (1) ►To lock the trigger, rotate
the trigger lock until it stops (2) ►To unlock the
trigger, rotate the trigger lock back (3).
SETUP.
►Never attempt to assemble, change, or clean
the airless gun, tip or tip guard without rst
relieving pressure from the spray system ►Follow
the pressure relief procedure in the sprayer’s
owner’s manual ►Always use a tip safety guard

5
English
ENG
for added protection against injection ►Beware
that the guard alone will not prevent injection
►Never cut o tip guard ►Always engage trigger
lock when the airless gun is not in use ►Before
servicing equipment, consult owner’s manuals
and follow all warnings ►Set up the sprayer
►Refer to the instructions in the sprayer’s
owner’s manual ►Attach a grounded hose to
the material inlet on the airless gun ►Using two
wrenches (one on the airless gun and one on
the hose), tighten securely (4) ►With the tip and
tip guard o the airless gun, start the sprayer
►Flush and prepare the spray system according
to the sprayer’s owner’s manual ►Inspect the
spray system to make sure that all ttings are
secure and that there are no leaks ►Perform
the pressure relief procedure described in the
sprayer’s owner’s manual ►Using a pen or
similar object, insert the tip seal and seal into
the back of the tip guard (5) ►Press in for nal
adjustment ►Insert the tip into the slot on the
tip guard (6) ►Thread the tip guard onto the
airless gun ►Position the tip guard in the desired
spraying position, then tighten securely.
OPERATION.
►Make sure the arrow on the tip handle is
pointing in the forward direction for spraying
►Start the sprayer ►Refer to the instructions
in the sprayer’s owner’s manual ►Adjust the
uid pressure on the sprayer until the spray is
completely atomized ►Always spray at the lowest
pressure necessary to get the desired results
►The spray tip determines the size of spray
pattern and coverage ►When more coverage is
needed, use a larger tip instead of increasing uid
pressure.
CLEAR CLOGGED TIP.
►Rotate the tip 180º so that the arrow on the tip
handle is pointing opposite the spray direction
(7) ►Trigger the airless gun once so that the
pressure can blow the clog out ►Never pull the
trigger more than once at time with the tip in the
reverse position ►Continue this procedure until
the tip is clear of the clog.
CHANGING TIP.
►Tips can be removed and replaced easily
without disassembling the airless gun ►Never
attempt to change or clean the tip or tip
guard without rst performing the pressure
relief procedure ►Perform the pressure relief
procedure described in the sprayer’s owner’s
manual ►Remove the tip from the slot on the tip
guard ►Insert the new tip into the slot on the tip
guard ►The arrow on the tip handle should be
pointing in the forward direction for spraying.
REMOVING SEAL AND TIP SEAL.
►Remove the tip and tip guard from the airless
gun ►Remove the seal and tip seal from the
back of the tip guard (8).
IDENTIFYING TIP SIZES.
►To identify tip sizes, use the following formula
►A 517 tip size will be used in this example
►The rst digit multiplied by two represents the
size of the spray pattern when spraying 12” (30
cm) away from the work surface: 5 x 2 = 10”
(25 cm) spray pattern ►The second two digits
represent the diameter of the orice on the tip:
17 = 0.017” (0.43 mm) orice ►Worn spray tips
will adversely aect the spray pattern and result
in reduced production, poor nish, and wasted
material ►Replace worn tips immediately.
CLEANUP.
►Maintaining a clean airless gun is important to
ensure trouble-free operation ►Flush the airless
gun after each use and store in a dry location
►Do not leave the airless gun or any of its parts
in water or solvents.
CLEANUP INSTRUCTIONS FOR USE WITH
FLAMMABLE SOLVENTS.
►Always ush airless gun preferably outside
and at least one hose length from spray pump
►If collecting ushed solvents in a 4 liter
metal container, place it into an empty 20 liter
container, then ush solvents ►Area must be
free of ammable vapors ►Follow all cleanup
instructions ►The sprayer, hose and airless
gun should be cleaned thoroughly after daily
use ►Failure to do so permits material to cake,
seriously aecting the performance of the unit
►Always spray at minimum pressure with the
tip and tip guard removed when using mineral
spirits or any other solvent to clean the sprayer,
hose or airless gun ►Static electricity buildup
may result in a re or explosion in the presence
of ammable vapors ►Hold the airless gun rmly
against a metal container while ushing.

6
English
ENG
MAINTENANCE.
►Follow all safety precautions as described in the
safety precautions section of this manual before
proceeding ►Refer to the parts list section in this
manual for part identication.
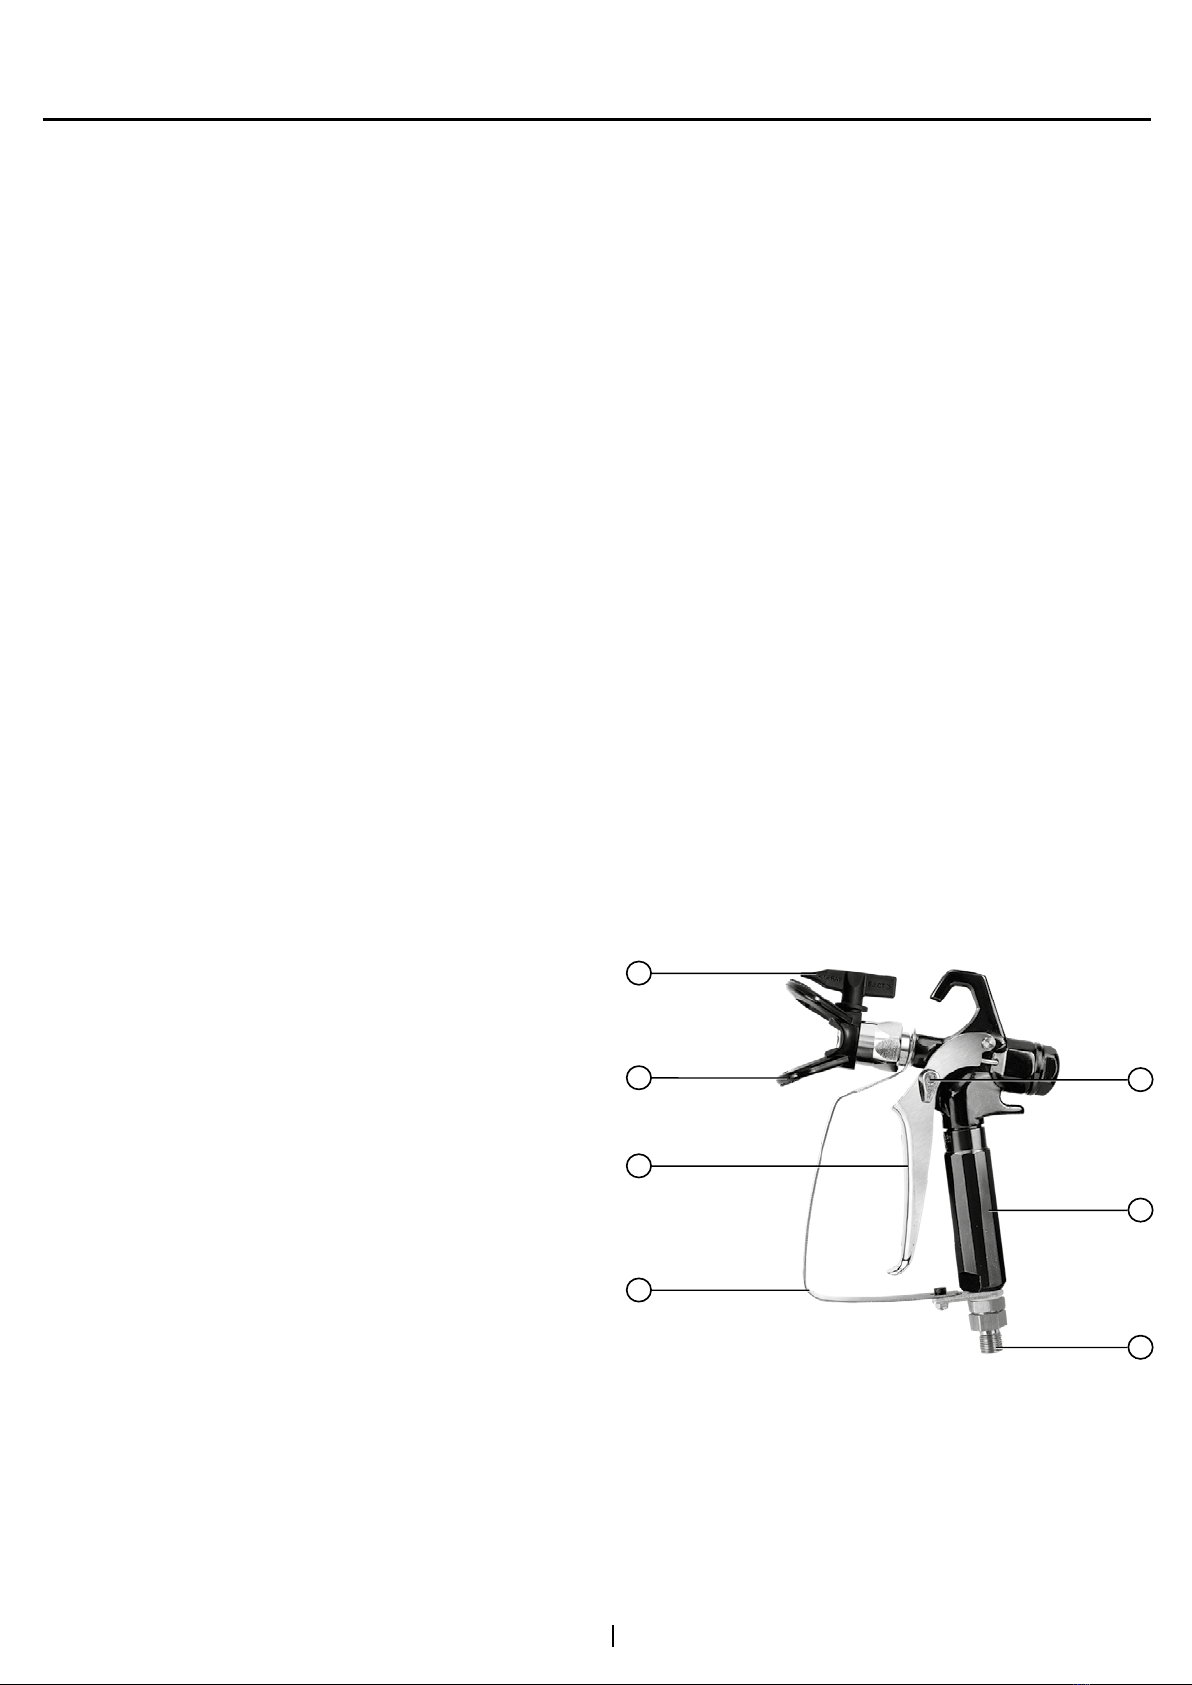
REPLACING/REMOVING FILTER.
►Pull the bottom of the trigger guard forward so
that it comes loose from the handle assembly (9)
►Loosen and remove the handle assembly from
the airless gun head (10) ►Pull the old lter out of
the gun head (11) ►Slide the new lter, tapered
end rst, into the airless gun head (12) ►Place
the handle seal into the airless gun head with the
at side of the seal toward the gun head ►Thread
the handle assembly into the airless gun head
until secure ►Snap the trigger guard back onto
the handle assembly.
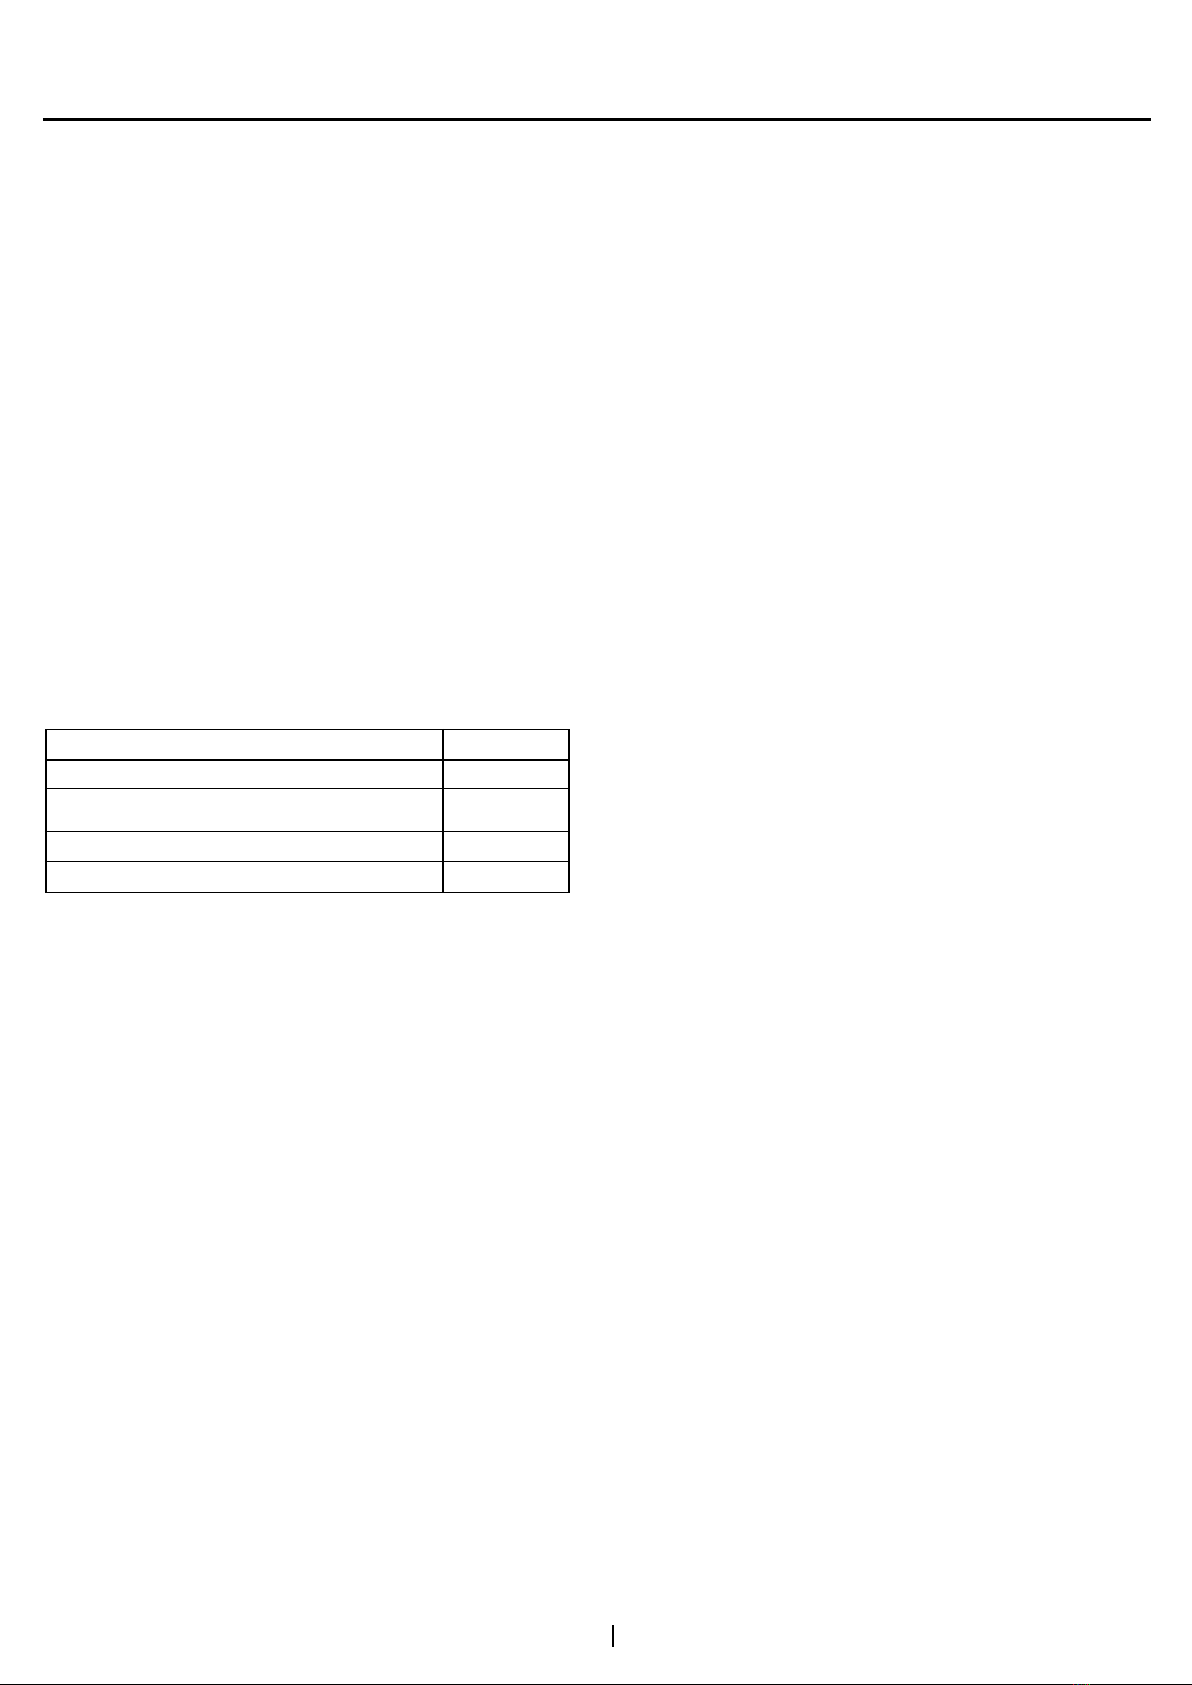
FILTER CHART.
Application
Synthetic resin, enamels, clean varnishes, stains, azures
Base coat enamels, primer enamels, llers, marking
paints, textured enamels
Filler paints, large area surfaces
Emulsions, latex paints, acrylic paints
Filter type
Extrane
Fine
Coarse
Medium
ENVIRONMENT PROTECTION.
►The materials and components that have
been used to manufacture this product can be
re-used and recycled ►Werku®is adhered to
an Integrated Management System that is in
charge of the correct elimination of the residues
of this product. ►Do not eliminate this product
with domestic residues ►Werku® oers to its
clients a free collection service of these residues
through any of its sale points, or in the collection
points established by the Integrated Management
System or in the recycling point of your locality.
WARRANTY AND TECHNICAL SERVICE.
►Apart from the legal guarantee, Werku® oers an
additional commercial guarantee ►This commercial
guarantee covers the repair of all defects found due
to faults in the materials or manufacture ►For this
cover to be eective it is necessary for these defects
to appear within the validity period ►The consumer
is entitled to free repair of all defects that Werku®
recognises as included in the commercial guarantee
(shipping costs, labour costs and materials included)
as chosen by Werku®, either via the repair or by
replacement (if necessary with a later model) ►This
commercial guarantee does not aect consumer’s
rights established by law according to Directive
1999/44/CE ►This commercial guarantee is valid
for 24 months ►If this product is destined for
professional or industrial use, the validity period is
12 months ►The validity period starts on the date of
purchase by the rst consumer ►This date is shown
on the invoice or receipt of purchase ►Actions for
claims against this commercial guarantee expire
six months from the end of the validity period ►Any
claims arising from this commercial guarantee must
be presented to the distributor or the Technical
Assistance Service ►To do so you must present this
guarantee correctly completed and stamped by the
distributor, together with the sale invoice or receipt
►In order to require any information in relation to this
commercial guarantee, the buyer and/or distributor
may contact the Technical Assistance Service by
telephone on +34 981 648 119, or by e-mail at info@
werku.com ►This commercial guarantee does
not cover defects caused by parts that have worn
out from use other types of natural wear, defects
caused by failure to observe the instructions for
use and operation, or for applications other than
those for which this product is intended, abnormal
environmental factors, overloading, or unsuitable
maintenance or cleaning, faults caused by the use
of spare parts, accessories or replacements that
are not original Werku®parts, if the product has
been totally or partially disassembled, modied
or repaired by personnel other than that of the
Technical Assistance Service or minimum and
irrelevant irregularities for suitable use or operation
►Repairs and replacements will not extend or renew
the validity period of this commercial guarantee
►The replaced parts will become the property of
Werku®►If the buyer sends the product to the
Technical Assistance Service, and it fails to comply
with the conditions of this commercial guarantee,
all expenses and transportation risks shall be paid
by the buyer ►This commercial guarantee is only
valid within the territory of the European Union ►The
company responsible for the compliance of this
Werku®commercial guarantee is Werku Tools SA.
TECHNICAL ADVICE.
►
The technical department of Werku®is at your
disposal to resolve any questions you may have
regarding to its products ►If you wish to contact our

7
Español
ESP
DECLARACIÓN CONFORMIDAD CE.
►Werku®declara que la pistola airless WK501360
cumple las Directivas y Normativas Europeas
2006/42/CE y EN12621:2006+A1:2010.
La Coruña, 01/11/2020.
R Yáñez
Werku Tools SA
CARACTERÍSTICAS TÉCNICAS.
►Bomba airless >1 HP (750 W) ►Presión trabajo
90-210 bar ►Presión máxima 310 bar ►Boquilla
RAC-XHD ►Rosca entrada NPS 3/8” ►Rosca
salida BSP 7/8” ►Temperatura trabajo 5-40ºC
►
Temperatura material <43ºC
►Peso neto 0.380
kg
►Presión acústica LpA <89 dB(A) ►Posible
variación KpA 3.0 dB(A) ►Presión acústica LwA
<90.82 dB(A) ►Posible variación KwA 3.0 dB(A)
►Vibración Ah <0.715 m/s² ►Posible variación Kh
1.5 m/s².
INSTRUCCIONES SEGURIDAD.
►Lea todas las advertencias de seguridad y
todas las instrucciones ►La no observación
de todas las advertencias e instrucciones
relacionadas a continuación puede dar como
resultado un choque eléctrico, fuego y/o una
lesión seria ►Guarde todas las advertencias y
todas las instrucciones para una referencia futura
►Los accidentes podrán evitarse en muchos
casos dándose cuenta de una situación peligrosa
antes de que se produzca, y observando
elmente los procedimientos de seguridad
apropiados ►No utilice nunca esta pistola airless
para aplicaciones que no sean las especicadas
en este manual.
PRECAUCIONES SEGURIDAD.
►Preocúpese por la seguridad ►Deben cumplirse
todos los reglamentos locales y nacionales
relativos a ventilación, prevención de incendios
y funcionamiento ►Peligro: Lesión causada
por inyección ►La corriente a alta presión que
produce esta pistola airless puede perforar la
piel y tejidos subcutáneos, pudiendo provocar
graves lesiones y posibles amputaciones ►Vea a
un médico inmediatamente ►No trate una lesión
causada por inyección como un simple corte
►La inyección puede provocar amputaciones
►Informe al médico del tipo de material o
producto de limpieza con el que se ha producido
la lesión ►La gama máxima de funcionamiento
de la pistola airless es de 310 bar de presión de
líquido ►Nunca dirija la pistola airless a ninguna
parte del cuerpo ►Nunca toque con ninguna
parte del cuerpo la corriente de líquido ►No
toque con ninguna parte del cuerpo ninguna
fuga en la manguera ►Nunca ponga la mano
delante de la pistola airless ►Los guantes no
serán protección suciente contra una lesión
por inyección ►Nunca apunte con la pistola
airless hacia nadie ►Ponga siempre el seguro
del gatillo de la pistola airless, cierre la bomba y
libere toda la presión antes de realizar labores de
mantenimiento y reparación, limpiar la boquilla o
el protector, cambiar la boquilla o dejar de usarla
►La presión no se descargará apagando el motor
►La válvula prime/spray (cebar/pulverizar) debe
estar en prime para liberar la presión ►Consulte
el procedimiento para liberar la presión descrito
en el manual de la bomba ►Mantenga siempre
el protector de la boquilla en su sitio mientras
pulveriza ►El protector de la boquilla ofrece
cierta protección pero principalmente se trata de
un dispositivo de advertencia ►Quite siempre
la boquilla pulverizadora antes de enjuagar
o limpiar la pistola airless ►En la manguera
pueden aparecer fugas a causa del desgaste,
de retorcimientos o de un mal uso ►Una fuga
puede proyectar material hacia la piel ►Revise
siempre la manguera antes de usarla ►Nunca
use una pistola airless si el seguro del gatillo no
funciona o si la protección del mismo no está en
su sitio ►Todos los accesorios deben cumplir
o superar las especicaciones nominales para
la gama de presiones de funcionamiento del
pulverizador a alta presión ►Esto incluye boquillas
pulverizadoras, extensiones y manguera ►Peligro:
El peligro de explosiones a causa de materiales
incompatibles puede provocar lesiones graves
o daños materiales ►No use materiales que
contengan lejía o cloro ►No use disolventes de
hidrocarburo halogenado, como, por ejemplo,
lejía, fungicida, cloruro de metileno y tricloroetano
►No son compatibles con el aluminio ►Contacte
con su proveedor para conocer la compatibilidad
del material con el aluminio ►Peligro: General
►Pueden producirse lesiones graves o daños

8
Español
ESP
materiales ►Lea todas las instrucciones y
precauciones de seguridad antes de utilizar la
pistola airless ►No pulverice nunca cerca de
fuentes de ignición, p. ej., llamas desnudas,
cigarrillos (los puros y pipas también son fuentes
de ignición), chispas, hilos y supercies calientes,
etc ►Utilice equipo respiratorio cuando pulverice
con la pistola airless ►Debe facilitarse al operario
una mascarilla protectora ►Con el n de evitar
enfermedades relacionadas con el trabajo,
debe cumplirse el reglamento del fabricante
relativo a los materiales, disolventes y productos
de limpieza utilizados al preparar, utilizar y
limpiar la pistola airless ►Es necesaria ropa
de protección, guantes, gafas protectoras y, en
ciertos casos, crema para proteger la piel ►Siga
las instrucciones y advertencias del fabricante del
material o disolvente ►El usuario debe instalar un
equipo de extracción con arreglo a las normativas
locales ►Deben ponerse a tierra los objetos
sobre los que se va a pulverizar ►Cada vez que
vaya a utilizar la pistola airless, compruebe antes
todas las mangueras en busca de cortes, fugas,
abrasión o bultos en la cubierta ►Compruebe
el movimiento de los acoplamientos y si están
dañados ►Sustituya inmediatamente una
manguera si descubre alguna de estas anomalías
►No repare nunca una manguera ►Sustitúyala
por otra manguera a alta presión puesta a tierra
►Al apretar el gatillo, la mano que sujeta la pistola
airless experimenta una fuerza de retroceso
►La fuerza de retroceso de la pistola airless es
especialmente fuerte cuando se quita la boquilla y
se selecciona una presión alta para la bomba de
alta presión ►Así pues, cuando vaya a limpiar la
boquilla, ponga la válvula de control de presión al
mínimo ►Emplee solamente piezas autorizadas
por el fabricante ►El usuario asumirá todos los
riesgos y toda la responsabilidad cuando utilice
piezas que no cumplan con las especicaciones
mínimas y dispositivos de seguridad del fabricante
de la pistola airless ►Cualquier descarga
electroestática de la pistola airless ha de desviarse
a la bomba de alta presión puesta a tierra por
medio de la manguera conductora de alta presión,
tal como está estipulado ►La temperatura máxima
de la supercie corresponde a la temperatura
admisible del material ►Ésta y la temperatura
ambiente admisible guran en el capítulo datos
técnicos ►Para que no se produzcan chispas de
la pistola airless, evite esfuerzos de impacto y
cualquier trabajo en el aparato con herramientas
si se encuentra en una zona con riesgo de
explosiones.
RIESGOS RESIDUALES.
►Los riesgos residuales son riesgos que no se
pueden excluir, incluso cuando la pistola airless
se usa para el propósito para el que fue diseñado
►En tales casos, las áreas correspondientes
a áreas de riesgos residuales se indicarán por
medio de señales de advertencia o de prohibición.
Riesgo
Lesión por
inyección
Explosión
o incendio
Vapores
peligrosos
Se puede
producir
durante:
Conguración,
funcionamiento
Operación
Operación
Impacto
Lesión
grave o
amputación
Lesión
grave
Lesión
grave
Fuente / causa
Corriente de
líquido atomizado
a alta presión
Electricidad
estática o chispas
Vapores peligrosos
del material de
pulverización
Medidas
preventivas
NUNCA apunte la
pistola a ninguna
parte del cuerpo
Use en área bien
ventilada. Conecte
la pistola a tierra
Use en área bien
ventilada. Use una
máscarilla
SEGURIDAD DEL AREA DE TRABAJO.
►Mantenga el área de trabajo limpia y bien
iluminada ►Las áreas desordenadas y oscuras
provocan accidentes ►No maneje herramientas
airless en atmósferas explosivas, tales como en
presencia de líquidos, gases o polvos inamables
►Mantenga alejados a los niños y curiosos mientras
maneja una herramienta airless ►Las distracciones
pueden causarle la pérdida del control.
SEGURIDAD PERSONAL
►Esté alerta, vigile lo que está haciendo y use el
sentido común cuando maneje una herramienta
airless ►No use una herramienta airless cuando
esté cansado o bajo la inuencia de drogas,
alcohol o medicamentos ►Un momento de
distracción mientras maneja herramientas airless
puede causar un daño personal serio.
USE EPIS.
►Use gafas de protección según EN166 ►Use
mascarilla de protección según EN149 ►Si el
tipo de trabajo a realizar lo requiere, utilice otros
EPIS precisos.
NO TRABAJE DE PUNTILLAS.
►Mantenga los pies bien asentados sobre el
suelo y conserve el equilibrio en todo momento
►Esto permite un mejor control de la herramienta
airless en situaciones inesperadas.

9
Español
ESP
VISTA ADECUADAMENTE.
►No vista ropa suelta o joyas ►Mantenga su
pelo, su ropa y guantes alejados de las piezas
en movimiento ►La ropa suelta, las joyas o el
pelo largo pueden ser cogidos en las piezas en
movimiento ►Si hay dispositivos para la conexión
de medios de extracción y recogida de polvo,
asegúrese de que éstos estén conectados y se
usen correctamente ►El uso de estos dispositivos
puede reducir los riesgos relacionados con el polvo.
ALMACENE LAS HERRAMIENTAS AIRLESS.
►Almacene las herramientas airless inactivas
fuera del alcance de los niños y no permita
el manejo de la herramienta a personas no
familiarizadas con las herramientas airless o con
estas instrucciones ►Las herramientas airless son
peligrosas en manos de usuarios no entrenados.
MANTENIMIENTO.
►Compruebe que las partes móviles no estén
desalineadas o trabadas, que no haya piezas
rotas u otras condiciones que puedan afectar el
funcionamiento de las herramientas airless ►Las
herramientas airless se reparan antes de su uso,
cuando están dañadas ►Muchos accidentes son
causados por herramientas airless pobremente
mantenidas ►Use la herramienta airless y
accesorios de acuerdo con estas instrucciones
y de la manera prevista para el tipo particular
de herramientas airless, teniendo en cuenta
las condiciones de trabajo y el trabajo a
desarrollar ►El uso de herramientas airless para
aplicaciones diferentes de las previstas podría
causar una situación de peligro ►Haga revisar
su herramienta airless por un servicio ocial de
reparación Werku®usando solamente piezas
de recambio idénticas ►Esto garantizará que la
seguridad de la herramienta airless se mantiene.
VIGILE EL BUEN ESTADO DE LA PISTOLA AIRLESS.
►Revise que todos los tornillos de la pistola airless
estén perfectamente apretados ►Asegúrese
de que los posibles accesorios instalados están
perfectamente asentados en su posición.
ANTES DE EMPEZAR A TRABAJAR.
►Asegúrese siempre antes de utilizar la pistola
airless que se encuentra rmemente apoyado
►Compruebe que nadie se encuentra bajo la
zona de inuencia de la pistola airless cuando
lleve a cabo trabajos en zonas elevadas.
DURANTE EL FUNCIONAMIENTO.
►No deje la pistola airless funcionando sin tenerla
bien sujeta ►Hágala funcionar cuando esté
seguro de que la tiene plenamente controlada
►No apunte con la pistola airless a nadie durante
su funcionamiento ►Durante la operación, la
pistola airless puede producir vibración ►Los
tornillos pueden ir aojándose progresivamente
pudiendo causar una avería o accidente.
AL TERMINAR DE TRABAJAR.
►No toque los accesorios instalados en la pistola
airless tras su uso ►Pueden estar muy calientes
y causar una quemadura ►Algunos materiales
sobre los que se trabaja pueden contener
químicos o componentes que pueden ser tóxicos
►Tenga cuidado para prevenir la inhalación de
estas sustancias o el contacto con la piel ►Utilice
los EPIs diseñados para prevenir y protegerse de
dichas incidencias.
DESCRIPCIÓN DEL PRODUCTO.
►La pistola airless ha sido diseñada para la
atomización a alta presión de materiales líquidos
para pintar ►Observe este esquema para
familiarizarse con la pistola airless antes de
utilizarla.
25
6
7
4
1
3
1. Boquilla.
2. Protector boquilla.
3. Gatillo.
4. Protector gatillo.
5. Seguro gatillo.
6. Empuñadura.
7. Toma material.

10
Español
ESP
INSTRUCCIONES DE USO.
►
Antes de efectuar la puesta en marcha de la
pistola airless, es aconsejable leer completa y
minuciosamente todas las instrucciones que se
indican ►Así mismo, deberán de tenerse en cuenta
las normas para la prevención de accidentes,
los reglamentos y directivas para los centros de
trabajo, y las leyes y restricciones vigentes ►La
pistola airless debe de ser utilizada únicamente por
personas instruidas adecuadamente en su manejo y
exclusivamente conforme a los nes previstos.
COMPATIBILIDAD PRODUCTO.
►Compatible con barnices, lacas, esmaltes,
imprimaciones, pinturas de poliuretano, pinturas
acrílicas, pinturas plásticas, pinturas de caucho
acrílico, pinturas al látex, temples, revestimientos
de tejados, pinturas anticorrosivas, películas
gruesas y masillas.
UTILIZACIÓN SEGURO DEL GATILLO.
►Ponga siempre el seguro del gatillo cuando no
esté usando la pistola airless (1) ►Para bloquear
el gatillo, gire el seguro hasta su tope (2) ►Para
desbloquear el gatillo, gire el seguro del gatillo
hacia atrás (3).
CONFIGURACIÓN.
►
No intente nunca montar, cambiar o limpiar la
pistola airless, ni la boquilla, ni el protector de la
boquilla sin liberar antes la presión del sistema de
pulverización ►Siga el procedimiento para liberar
presión descrito en el manual del pulverizador
►Use siempre un protector de seguridad para
tener mayor protección contra las inyecciones
►Tenga en cuenta que el protector solo no
impedirá la inyección ►No corte nunca el protector
de la boquilla ►Ponga siempre el seguro del gatillo
cuando no esté usando la pistola airless ►Antes
de realizar labores de mantenimiento y reparación
en el equipo, consulte los manuales de usuario y
tenga en cuenta todas las advertencias ►Congure
el pulverizador ►Consulte las instrucciones del
manual de usuario del pulverizador ►Conecte
una manguera de pulverización a alta presión
puesta a tierra en la toma de material de la pistola
airless ►Use dos llaves (una para la pistola y
la otra para la manguera) y apriete rmemente
(4) ►Con la boquilla y el protector quitados de
la pistola airless, ponga en funcionamiento el
pulverizador ►Enjuague y prepare el sistema
de pulverización de acuerdo con el manual de
usuario del pulverizador ►Inspeccione el sistema
de pulverización con el n de asegurarse de que
todos los racores estén jos y de que no haya
fugas ►Ejecute el procedimiento para liberar
presión descrito en el manual del pulverizador
►Con un bolígrafo u objeto similar, introduzca la
junta de la boquilla y colóquela herméticamente
en la parte posterior del protector de la boquilla (5)
►Presione para terminar de ajustarla ►Introduzca
la boquilla en la ranura del protector (6)
►Enrosque el protector de la boquilla en la pistola
airless ►Coloque el protector en la posición de
pulverización deseada y apriételo rmemente.
FUNCIONAMIENTO.
►Asegúrese de que la echa de la empuñadura
de la boquilla apunta directamente al punto que
se va a pulverizar ►Ponga en funcionamiento
el pulverizador ►Consulte las instrucciones del
manual de usuario del pulverizador ►Regule la
presión de líquido del pulverizador hasta que
se haya atomizado por completo la sustancia
►Pulverice siempre con la mínima presión
necesaria para conseguir el resultado deseado
►La boquilla de pulverización determina el
tamaño del patrón de pulverización y de su
alcance ►Si necesita un mayor alcance, utilice
una boquilla más grande en vez de aumentar la
presión de líquido.
LIMPIAR BOQUILLA TAPONADA.
►Gire la boquilla 180º de modo que la echa
de la empuñadura de la boquilla apunte hacia la
dirección contraria de pulverización (7) ►Apriete
una vez el gatillo de la pistola airless para que
la presión desatasque la obstrucción ►Nunca
apriete el gatillo más de una vez estando la
boquilla al revés ►Repita este procedimiento
hasta eliminar la obstrucción de la boquilla.
CAMBIO BOQUILLA.
►Las boquillas pueden quitarse y sustituirse
fácilmente sin tener que desmontar la pistola
►Nunca intente cambiar o limpiar la boquilla
o el protector de la misma sin realizar antes el
procedimiento para liberar presión ►Ejecute el
procedimiento para liberar presión descrito en
el manual de usuario del pulverizador ►Quite la
boquilla de la ranura de su protector ►Introduzca la
nueva boquilla en la ranura del protector ►La echa
de la empuñadura de la boquilla debe apuntar
directamente al punto que se va a pulverizar.

11
Español
ESP
DESMONTAJE JUNTA ESTANQUEIDAD Y
JUNTA BOQUILLA.
►Desmonte de la pistola airless la boquilla y
el protector ►Quite la junta de estanqueidad y
la junta de la boquilla de la parte posterior del
protector de la boquilla (8).
IDENTIFICACIÓN TAMAÑOS BOQUILLAS.
►Para identicar los tamaños de las boquillas,
use la siguiente fórmula ►En este ejemplo se
empleará un tamaño de boquilla 517 ►El primer
dígito multiplicado por dos representa el tamaño
del patrón de pulverización al pulverizar a 12” (30
cm) de la supercie de trabajo: 5 x 2 = 10” (25 cm)
►Los otros dos dígitos representan el diámetro del
oricio de la boquilla 17 = 0.017” (0.43 mm) ►Las
boquillas de pulverización desgastadas afectarán
negativamente al patrón de pulverización, lo que
reducirá la producción, empeorará los acabados
y desperdiciará material ►Sustituya las boquillas
desgastadas de inmediato.
LIMPIEZA.
►Para que la pistola airless funcione sin problemas,
es importante mantenerla limpia ►Enjuague la
pistola airless cada vez que la use y guárdela en un
lugar seco ►No deje la pistola airless ni ninguna de
sus piezas en agua o disolventes.
INSTRUCCIONES LIMPIEZA CON
DISOLVENTES INFLAMABLES.
►Enjuague siempre la pistola airless
preferiblemente fuera y, al menos, a la distancia de
una manguera respecto a la bomba de pulverización
►Si recoge disolventes ya usados en un recipiente
de metal de 4 litros, colóquelo en un recipiente
vacío de 20 litros, a continuación enjuague con
disolventes ►En la zona no debe haber vapores
inamables ►Siga todas las instrucciones de
limpieza ►El pulverizador, la manguera y la
pistola airless deben limpiarse a fondo cada día
después de haberse utilizado, de lo contrario
pueden acumularse materiales, lo cual afectará
al rendimiento del aparato ►Pulverice siempre a
una presión mínima con la boquilla y el protector
de la misma quitados cuando utilice alcoholes
minerales o cualquier otro disolvente para limpiar el
pulverizador, la manguera o la pistola airless ►La
acumulación de electricidad estática puede provocar
incendios o explosiones si hay vapores inamables
►Sujete la pistola airless con rmeza contra un
recipiente de metal mientras la enjuaga.
MANTENIMIENTO.
►Antes de continuar, siga todas las precauciones
de seguridad tal como se describe en el apartado
precauciones de seguridad del presente manual
►Consulte el apartado lista de piezas del presente
manual para identicar los componentes.
SUSTITUCIÓN/DESMONTAJE FILTRO.
►Tire de la parte inferior de la protección del
gatillo hacia abajo para que se desprenda
del conjunto de la empuñadura (9) ►Aoje el
conjunto de la empuñadura y desmóntelo del
cabezal de la pistola airless (10) ►Extraiga el
ltro viejo del cabezal de la pistola airless (11)
►Introduzca el nuevo ltro, con el extremo
cónico primero, en el cabezal de la pistola airless
(12) ►Coloque la junta de la empuñadura en el
cabezal de la pistola airless con el lado plano
de la junta mirando hacia el cabezal ►Enrosque
el conjunto de la empuñadura en el cabezal de
la pistola airless hasta que quede bien sujeto
►Vuelva a encajar el guardamonte en el conjunto
de la empuñadura.
TABLA DE FILTROS.
Aplicación
Resina sintética, esmaltes, barnices claros, tintes, azures
Esmaltes base, esmaltes de imprimación, tapaporos,
pinturas para señalización, esmaltes texturados
Pinturas de fondo, supercies de área extensa
Emulsiones, pinturas de látex, pinturas acrílicas
Tipo de ltro
Extrano
Fino
Grueso
Medio
PROTECCIÓN DEL MEDIO AMBIENTE.
►Los materiales y componentes que han sido
utilizados para fabricar este producto pueden
ser reutilizados y reciclados ►Werku®está
adherido a un Sistema Integrado de Gestión
que se encarga de la correcta eliminación de
los residuos de este producto ►No elimine este
producto en la basura doméstica ►Werku®ofrece
a sus clientes un servicio gratuito de retirada de
dichos residuos en cualquiera de sus puntos de
venta, en los puntos de recogida establecidos
por el Sistema Integrado de Gestión o en los
puntos limpios de su localidad.
GARANTÍA Y SERVICIO TÉCNICO.
►Además de la garantía legal, Werku®ofrece
una garantía comercial adicional ►Esta garantía
comercial cubre la reparación de los defectos
que se aprecian debido a fallos en los materiales

12
Español
ESP
o en la fabricación ►Para ello es imprescindible
que los defectos se produzcan dentro del periodo
de validez ►El consumidor tiene derecho a la
reparación gratuita de los defectos que Werku®
reconoce como incluidos en la garantía comercial
(gastos de envío, mano de obra y materiales
incluidos), a elección de Werku®, bien mediante
la reparación o mediante la sustitución (si es
necesario por un modelo posterior) ►Esta
garantía comercial no afecta los derechos del
consumidor establecidos por ley según la Directiva
1999/44/CE ►El periodo de validez de esta
garantía comercial es de 24 meses ►En caso
de destinar el producto a un uso profesional o
industrial, el periodo de validez es de 12 meses
►El periodo de validez se inicia en la fecha de
compra por el primer consumidor ►Esta fecha
se reeja en la factura o ticket de compra ►La
acción para reclamar el cumplimiento de esta
garantía comercial prescribe a los seis meses
desde la nalización del periodo de validez ►La
reclamación en virtud de esta garantía comercial
debe de presentarse al distribuidor o al Servicio de
Asistencia Técnica ►Para ello es imprescindible
presentar esta garantía debidamente
cumplimentada y sellada por el distribuidor, junto
con la factura o ticket de compra ►Para cualquier
información referente a esta garantía comercial el
comprador y/o el distribuidor puede ponerse en
contacto con el Servicio de Asistencia Técnica a
través del teléfono +34 981 648 119, o mediante
excluido de esta garantía comercial los defectos
que han sido causados por piezas desgastadas
por el uso u otro tipo de desgaste natural, los
defectos que han sido causados por inobservancia
o incumplimiento de las instrucciones de uso y
funcionamiento, o de aplicaciones no conformes
con el uso al que se destina este producto, o
de factores medioambientales anormales, o
de sobrecarga, de mantenimiento o limpieza
inadecuados, defectos que han sido causados
por el uso de accesorios, complementos o
repuestos que no son piezas originales Werku®,
si el producto ha sido total o parcialmente
desmontado, modicado o reparado por personal
ajeno al Servicio de Asistencia Técnica o las
irregularidades mínimas e irrelevantes para el uso
y funcionamiento adecuado ►Las reparaciones y
sustituciones no prolongan ni renuevan el plazo
de validez de esta garantía comercial ►Las piezas
sustituidas pasan a ser propiedad de Werku®
►Si el comprador remite el producto al Servicio
de Asistencia Técnica, no cumpliendo con las
condiciones de esta garantía comercial, los
gastos y riesgos del transporte corren a cargo del
comprador ►Esta garantía comercial es válida
dentro del territorio de la Unión Europea ►La
empresa responsable del cumplimiento de esta
garantía comercial Werku®es Werku Tools SA.
ASESORAMIENTO TÉCNICO.
►Werku®pone a su disposición su departamento
técnico para resolver cualquier duda que pueda
surgir sobre sus productos ►En caso de que
desee establecer contacto con nuestro equipo,
remita un correo electrónico a la dirección info@
werku.com.

13
Deutsch
DEU
CE KONFORMITÄTSERKLÄRUNG.
►Werku®erklärt dass die WK501360 airless-
Pistole in Übereinstimmung ist mit den
europäischen Richtlinien und Normen 2006/42/
CE und EN12621:2006+A1:2010.
La Coruña, 01/11/2020.
R Yáñez
Werku Tools SA
TECHNISCHE DATEN.
►Airless Pumpe >1 HP (750 W)
►Arbeitsdruck
90-210 bar ►Maximale Druck 310 bar
►RAC-XHD Düse ►Eingangsfaden NPS 3/8”
►Ausgangsfaden BSP 7/8” ►Arbeitstemperatur
5-40ºC ►
Materialtemperatur <43ºC
►Nettogewicht 0.380 kg
►Schalldruck LpA <89
dB(A) ►Schallleistung LwA <90.82 dB(A) ►Vibration
Ah
<
0.715 m/s².
SICHERHEITSHINWEISE
►Lesen Sie alle Sicherheitshinweise und
die gesamte Gebrauchsanleitung ►Die
Nichteinhaltung aller im Folgenden aufgeführten
Sicherheitshinweise und der Gebrauchsanleitung
kann zum Elektroschock, Brand und/oder
schweren Verletzungen führen ►Heben Sie
alle Sicherheitshinweise und die gesamte
Gebrauchsanleitung zum späteren Nachlesen
auf ►Unfälle können häug vermieden werden,
wenn man sich im Voraus der Gefährlichkeit einer
Situation bewusst ist und die angemessenen
Sicherheitsverfahren hundertprozentig einhält
►Verwenden Sie diese airless-Pistole niemals zu
anderen Zwecken, als zu den in dieser Anleitung
aufgeführten.
SICHERHEITSHINWEISE.
►Sicherheit ist oberstes Gebot ►Es müssen
alle lokalen und nationalen Vorschriften
zur Entlüftung, zum Brandschutz und zum
Arbeitsschutz eingehalten werden ►Gefahr:
Verletzung durch Flüssigkeiten unter Druck
►Der durch diese airless-Pistole erzeugte
Hochdrucküssigkeitsstrahl kann Haut und
Bindegewebe durchdringen und schwere
Verletzungen verursachen, die sogar zur
Amputation führen können ►Eine Verletzung
durch eine Injektion von Flüssigkeit unter Druck
nicht wie einen normalen Schnitt behandeln
►Eindringen von Flüssigkeiten unter Druck in
das Gewebe können Amputationen erforderlich
machen ►Sofort einen Arzt aufsuchen ►Der
Arzt muss über die Art des Überzugs oder
Reinigungsmittels informiert werden, der
bzw. das die Verletzung verursacht hat ►Der
maximale Betriebsdruck für die airless-Pistole
beträgt 310 bar ►Niemals die airless-Pistole auf
Körperteile richten ►Niemals mit Körperteilen
in den Flüssigkeitsstrahl kommen ►Niemals mit
dem Körper eine Leckstelle im Druckschlauch
berühren ►Niemals die Hand vor die Düse der
airless-Pistole halten ►Handschuhe stellen keinen
sicheren Schutz vor Verletzungen durch injizierte
Flüssigkeiten dar ►Niemals die airless-Pistole
auf Personen richten ►Stets den Abzug der
airless-Pistole verriegeln, die Pumpe ausschalten
und den Druck vollständig entspannen, bevor
Wartungs- und Reinigungsarbeiten an Düse und
Düsenschutz oder Düsenwechsel durchgeführt
werden oder das Gerät unbeaufsichtigt gelassen
wird ►Auch nach dem Ausschalten des Motors
steht das Gerät noch unter Druck ►Das Ventil
prime/ spray (Vorfüllen/Sprühen) muss auf
prime (Vorfüllen) gestellt sein, um den Druck zu
entspannen ►Der Ansprechdruck für das Ventil
ist im Pumpenhandbuch angegeben ►Stets den
Düsenschutz beim Sprühen aufsetzen ►Der
Düsenschutz stellt einen gewissen Schutz dar,
ist aber vor allem als Warnvorrichtung gedacht
►Stets die Spritzdüse entfernen, bevor das
System gereinigt oder gespült wird ►Der Schlauch
kann durch falsche Verwendung, Knicken und
durch Verschleiß undicht werden ►Durch eine
Leckstelle kann Flüssigkeit in die Haut injiziert
werden ►Vor Verwendung den Schlauch
gründlich prüfen ►Niemals eine airless-Pistole
ohne Abzugsicherung und funktionsfähigen
Abzugbügel verwenden ►Das gesamte
Zubehör muss mindestens für den maximalen
Betriebsdruck des airless-Pistole zugelassen
sein ►Dies betrit Spritzdüsen, Verlängerungen
und den Schlauch ►Gefahr: Explosionsgefahr
aufgrund inkompatibler Materialien Inkompatible
Materialien können schwere Personen-
und Sachschäden verursachen ►Keine
Materialien verarbeiten, die Chlor oder
Hypochlorid enthalten ►Keine halogenierten

14
Deutsch
DEU
Kohlenwasserstoe als Lösungsmittel
verwenden, beispielsweise Hypochloridlösung,
Schimmelbekämpfungsmittel, Methylenchlorid
und Trichlorethan ►Diese Lösungsmittel greifen
Aluminium an ►Informationen zur Verträglichkeit
des verwendeten Beschichtungsmaterials mit
Aluminium erhalten Sie vom Hersteller ►Gefahr:
Allgemeines ►Kann schwere Personen- oder
Sachschäden verursachen ►Alle Anweisungen
und Sicherheitshinweise durcharbeiten, bevor
das Gerät in Betrieb genommen wird ►Niemals in
der Nähe von Zündquellen sprühen, d. h. nicht in
der Nähe von oenen Flammen, Zigaretten (auch
Zigarren und Pfeifen sind Zündquellen), Funken,
heißen Drähten, heißen Oberächen usw ►Beim
Sprühen Atemschutz tragen ►Der Bediener muss
eine Schutzmaske tragen ►Um arbeitsbedingte
Erkrankungen zu vermeiden, die Vorschriften
des Herstellers zu den Farben bzw Lacken,
Lösungsmitteln und Reinigungsmitteln beachten,
wenn das Gerät vorbereitet, benutzt und gereinigt
wird ►Schutzkleidung, Arbeitshandschuhe,
Augenschutz und in bestimmten Fällen eine
besondere Hautschutzcreme verwenden ►Die
Warnhinweise und Anweisungen des Herstellers
von Farbe bzw Lack und Lösungsmittel beachten
►Die Absaugvorrichtungen müssen vom Benutzer
entsprechend den vor Ort geltenden Vorschriften
angeschlossen werden ►Die für den Überzug
vorgesehenen Gegenstände müssen geerdet
sein ►Vor jedem Einsatz alle Schläuche auf
Schnitt-, Leck- und Scheuerstellen sowie auf
Verformungen des Schlauchmantels kontrollieren
►Die Kupplungen auf Unversehrtheit und festen
Sitz kontrollieren ►Den Schlauch sofort ersetzen,
wenn einer der erwähnten Fehler festgestellt
wird ►Einen Schlauch niemals reparieren ►In
diesem Fall den Schlauch durch einen anderen
geerdeten Hochdruckschlauch ersetzen ►Bei
Betätigung des Abzugs zieht die airless-Pistole
zur Seite ►Diese Kraftwirkung der airless-Pistole
ist besonders stark, wenn die Düse entfernt
wurde und bei der Hochdruckpumpe hoher
Druck eingestellt wurde ►Bei der Reinigung mit
abgeschraubter Düse daher das Druckregelventil
auf den niedrigsten Druck einstellen Nur vom
Hersteller zugelassene Teile verwenden ►Der
Benutzer trägt alle Risiken und das gesamte
Haftungsrisiko bei Verwendung von Teilen, die
nicht die technischen Mindestdaten erfüllen, sowie
bei Verwendung von Sicherheitsvorrichtungen,
die nicht vom Hersteller der airless-Pistole
stammen ►Eine mögliche elektrostatische
Auadung der airless-Pistole ist über den nach
Vorschrift leitenden Hochdruckschlauch zur
geerdeten Hochdruckpumpe abzuleiten Die
max Oberächentemperatur entspricht der
zulässigen Materialtemperatur ►Diese und die
zulässige Umgebungstemperatur sind im Kapitel
technische Daten zu nden ►Um die Entstehung
von Funken an der airless-Pistole zu verhindern,
Schlagbelastungen vermeiden und an dem
Gerät in explosionsgefährdeten Bereichen keine
Werkzeuge einsetzen.
RESTRISIKEN.
►Restrisiken sind Risiken, die auch bei
bestimmungsgemässer Verwendung nicht
ausgeschlossen werden können ►Gegebenenfalls
weisen Warn- und Verbotsschilder an den
jeweiligen Risikostellen auf bestehende
Restrisiken hin.
Gefahr
Injektions-
verletzung
Explosion
oder
Feuer
Gefährliche
Dämpfe
Kann
auftreten
während:
Montage,
Betrieb
Betrieb
Betrieb
Auswirkung
Schwere Ver-
letzung oder
Amputation
Schwere
Verletzung
Schwere
Verletzung
Quelle/Ursache
Staubförmiger,
unter Hochdruck
stehender Flüssi-
gkeitsstrom
Statische
Elektrizität oder
Funken
Gefährliche
Dämpfe aus den
Spritzmaterialien
Vorbeugende
Maßnahmen
Richten Sie die
Pistole NIEMALS
auf Körperteile
Nur in gut durch-
lüfteten Bereichen
verwenden. Erden
Sie die airless Pistole
Nur in gut durch-
lüfteten Bereichen
verwenden
Verwenden Maske
EIN SICHERER ARBEITSPLATZ.
►Der Arbeitsplatz muss sauber und gut beleuchtet
sein ►Unordentliche und dunkle Stellen
verursachen Unfälle ►Verwenden Sie airless
Werkzeug niemals in einer explosionsfähigen
Atmosphäre, wie in der Nähe von brennbaren
Flüssigkeiten, Gasen und Stäuben ►Wenn Sie
mit einem airless Werkzeug arbeiten, müssen
Kinder und Neugierige fern bleiben ►Ablenkungen
können dazu führen, dass Sie die Kontrolle über
das Werkzeug verlieren.
PERSÖNLICHE SICHERHEIT.
►Seien Sie aufmerksam, achten Sie auf das, was
Sie gerade tun und setzen Sie Ihren gesunden
Menschenverstand ein, wenn Sie mit einem
airless Werkzeug arbeiten ►Verwenden Sie

15
Deutsch
DEU
kein airless Werkzeug, wenn Sie müde sind
oder unter dem Einuss von Drogen, Alkohol
oder Medikamenten stehen ►Ein Augenblick, in
dem Sie abgelenkt sind, während Sie mit einem
airless Werkzeug arbeiten, kann zu schweren
Personenschäden führen.
PSA VERWENDEN.
►Tragen Sie eine Schutzbrille gemäß der Norm
EN166 ►Tragen Sie eine Schutzmaske gemäß
der Norm EN149 ►Falls die Art der Arbeit, die Sie
ausführen, dies erforderlich macht, verwenden Sie
eine angemessene PSA.
NICHT AUF ZEHENSPITZEN STEHEND
ARBEITEN.
►Stehen Sie mit den Füßen fest auf dem Boden
und achten Sie darauf, das Gleichgewicht nicht zu
verlieren ►So kontrollieren Sie in unvorhergesehenen
Situationen das airless Werkzeug besser.
ANGEMESSENE KLEIDUNG.
►Tragen Sie weder lockere Kleidung noch
Schmuck ►Halten Sie Haare, Kleidung und
Handschuhe von beweglichen Teilen fern ►Lockere
Kleidung, Schmuck und lange Haare können von
den beweglichen Teilen eingeklemmt werden
►Falls Anschlüsse für Entstaubungsvorrichtungen
vorhanden sind, gewährleisten Sie, dass diese
korrekt angeschlossen sind und richtig verwendet
werden ►Die Verwendung dieser Geräte kann
Risiken im Zusammenhang mit Staub verringern.
AUFBEWAHRUNG VON AIRLESS WERKZEUG.
►Bewahren Sie die abgeschaltete airless
Werkzeuge außerhalb der Reichweite von Kindern
und Personen, die mit airless Werkzeugen und
dieser Gebrauchsanleitung nicht vertraut sind,
auf ►Airless Werkzeuge sind in den Händen
ungeübter Benutzer gefährlich.
WARTUNG.
►Stellen Sie sicher, dass die beweglichen
Teile nicht falsch ausgerichtet oder verklemmt
sind, dass es keine defekten Teile oder andere
Bedingungen gibt, die das Funktionieren airless
Werkzeuge beeinträchtigen könnten ►Wenn
ein airless Werkzeug beschädigt ist, muss es
vor seiner Verwendung repariert werden ►Viele
Unfälle werden von schlecht gewarteten airless
Werkzeugen verursacht ►Benutzen Sie das
airless Werkzeug sowie dessen Zubehör gemäß
dieser Gebrauchsanleitung und so, wie es für
den jeweiligen Werkzeugtyp vorgesehen ist.
Berücksichtigen Sie die Arbeitsbedingungen
und die Art der auszuführenden Arbeit ►Eine
zweckfremde Verwendung des airless Werkzeugs
kann gefährlich sein ►Lassen Sie Ihr airless
Werkzeug von einem qualizierten Reparaturdienst
von Werku
®
überprüfen und verwenden Sie nur
Originalersatzteile ►Das garantiert eine dauerhafte
Sicherheit Ihres airless Werkzeugs.
ÜBERWACHUNG DES ZUSTANDS DER
AIRLESS-PISTOLE.
►Prüfen Sie, ob alle Schrauben der airless-Pistole
fest angezogen sind ►Gewährleisten Sie, dass
möglicherweise montiertes Zubehör fest an seiner
Stelle sitzt.
VOR ARBEITSBEGINN.
►Vor Verwendung der airless-Pistole stellen
Sie sicher, dass diese fest auiegt ►Achten
Sie darauf, dass sich niemand unterhalb des
Einussbereiches der Pistole bendet, wenn Sie in
der Höhe arbeiten.
BEI BETRIEB.
►Wenn die airless-Pistole nicht fest in den
Händen liegt, lassen Sie sie ausgeschaltet
►Nehmen Sie sie nur in Betrieb, wenn Sie
sich sicher sind, dass Sie sie vollständig unter
Kontrolle haben ►Zielen Sie auf niemanden mit
eingeschalteter airless-Pistole ►Beim Arbeiten
kann die airless-Pistole vibrieren ►Die Schrauben
können sich nach und nach lösen und eine
Störung oder einen Unfall verursachen.
NACH ARBEITSENDE.
►Berühren Sie nach Gebrauch nicht das an der
Pistole angebrachte Zubehör ►Es kann sehr heiß
sein und Verbrennungen verursachen ►Einige
Materialien, mit denen gearbeitet wird, können
toxische chemische Substanzen enthalten
►Seien Sie vorsichtig und vermeiden Sie das
Einatmen dieser Substanzen und den Hautkontakt
damit ►Verwenden Sie die PSA, um sich vor
solchen Zwischenfällen zu schützen und diese zu
vermeiden.

16
Deutsch
DEU
PRODUKTBESCHREIBUNG.
►Die airless-Pistole wurde für die Hochdruck-
Zerstäubung von üssigen Beschichtungsstoen
vorgesehen ►Schauen Sie sich dieses Schema
an, um sich mit der airless-Pistole vertraut zu
machen, bevor Sie diese verwenden.
25
6
7
4
1
3
1. Düse.
2. Düsenschutz.
3. Abzugs.
4. Abzugbügels.
5. Abzugsicherung.
6. Gri.
7. Zulauf.
GEBRAUCHSANLEITUNG.
►V
or Inbetriebnahme der airless-Pistole sollten
Sie diese Gebrauchsanleitung vollständig und
aufmerksam lesen ►Außerdem müssen Sie die
Vorschriften zur Verhütung von Arbeitsunfällen, die
Betriebsvorschriften und die geltenden Gesetze und
Einschränkungen beachten ►Die airless-Pistole
darf ausschließlich von Personen, die angemessen
in ihre Handhabung eingewiesen wurden, und nur
zu den vorgesehenen Zwecken, verwendet werden.
PRODUKT KOMPATIBILITÄT.
►Kompatibel mit Lacken, Lackfarben, Emaille,
Grundierungen, Polyurethanfarben, Acrylfarben,
Kunststofarben, Acrylkautschukfarben,
Latexfarben, Temperas, Dachbeschichtungen,
Korrosionsschutzfarben, dicken Schichten und Kitt.
VERWENDUNG AIRLESS-PISTOLE
ABZUGSICHERUNG.
►Die airless-Pistole Abzugsicherung immer
einlegen, wenn die airless-Pistole nicht
verwendet wird (1) ►Zum Verriegeln des
Abzugs die Abzugsicherung bis zum Anschlag
drehen (2) ►Zum Entriegeln des Abzugs die
Abzugsicherung nach hinten drehen (3).
KONFIGURATION.
►Die airless-Pistole, die Düse oder den
Düsenschutz niemals zerlegen, wechseln oder
reinigen, wenn der Druck im Spritzsystem noch
nicht entspannt ist ►Den Druck entsprechend
den Anweisungen in der Betriebsanleitung des
Spritzgeräts entspannen ►Zum zusätzlichen
Schutz gegen eine Injektion stets den
Düsenschutz verwenden ►Der Düsenschutz allein
verhindert jedoch eine Injektion nicht ►Niemals
den Düsenschutz abschneiden ►Wenn die
airless-Pistole nicht verwendet wird, den Abzug
stets verriegeln ►Vor Wartungsarbeiten am
Gerät die Betriebsanleitung durcharbeiten und
alle Warnhinweise beachten ►Das Spritzgerät
vorbereiten ►Dazu die Anweisungen in der
Betriebsanleitung des Spritzgeräts befolgen
►Einen geerdeten airless-Schlauch am zulauf
der airless-Pistole anschließen ►Den Schlauch
mit zwei Schraubenschlüsseln (einem an
der airless-Pistole und einem am Schlauch)
festziehen (4) ►Düse und Düsenschutz von
der airless-Pistole abbauen und das Spritzgerät
in Betrieb nehmen ►Das Spritzsystem
entsprechend den Anweisungen in der
Betriebsanleitung des Spritzgeräts spülen und
vorbereiten ►Das Spritzsystem kontrollieren,
alle Verschraubungen müssen fest sitzen und es
dürfen keine Leckstellen vorhanden sein ►Den
Druck entsprechend den Anweisungen in der
Betriebsanleitung des Spritzgeräts entspannen
►Mit einem Stift oder einem ähnlichen
Gegenstand die Düsendichtung und die Dichtung
an der Rückseite des Düsenschutzes einsetzen
(5) ►Zur endgültigen Einstellung eindrücken
►Die Düse in den Schlitz am Düsenschutz
einsetzen (6) ►Den Düsenschutz in die airless-
Pistole einschrauben ►Den Düsenschutz in die
gewünschte Sprührichtung stellen und festziehen.
BETRIEB.
►Den Pfeil am Handgri der Düse in
Spritzrichtung drehen ►Das Airless-Gerät in
Betrieb nehmen (siehe auch Anweisungen der
Betriebsanleitung) ►Spritzdruck am Spritzgerät
so einstellen, dass der Strahl beim Austritt an
der Düse komplett zerstäubt wird ►Immer den

17
Deutsch
DEU
geringst möglichen Spritzdruck verwenden,
mit dem noch ein gutes Spritzbild erreicht
wird ►Die Spritzdüse bestimmt die Größe des
Sprühmusters und die Deckung ►Wenn eine
bessere Deckung erforderlich ist, eine größere
Düse verwenden, ohne den Druck zu erhöhen.
REINIGUNG VERSTOPFTEN DÜSE.
►Die Düse um 180° drehen, sodass der Pfeil am
Düsengri entgegen der Sprührichtung zeigt (7)
►Die airless-Pistole kurz auslösen, sodass die
Verstopfung durch den Druck beseitigt werden
kann ►Den Abzug immer nur kurz betätigen,
wenn die Düse in der verkehrten Richtung steht
►Diesen Schritt wiederholen, bis die Verstopfung
der Düse beseitigt ist.
DÜSE WECHSELN.
►Düsen können bequem entfernt und ersetzt
werden, ohne dass die airless-Pistole zerlegt
werden muss ►Niemals die Düse oder den
Düsenschutz wechseln oder reinigen, wenn
das System noch unter Druck steht ►Den
Druck entsprechend den Anweisungen in der
Betriebsanleitung des Spritzgeräts entspannen
►Düse aus dem Schlitz des Düsenschutzes
entfernen ►Die neue Düse in den Schlitz am
Düsenschutz einsetzen ►Der Pfeil am Düsengri
muss nach vorn in Sprührichtung zeigen.
DICHTUNG UND DÜSENDICHTUNG
ENTFERNEN.
►Düse und Düsenschutz von der airless-Pistole
abbauen ►Dichtung und Düsendichtung von der
Rückseite des Düsenschutzes entfernen (8).
DÜSENGRÖßE BESTIMMEN.
►Zur Bestimmung der Düsengröße dient folgende
Formel: Bei diesem Beispiel wird eine Düsengröße
517 verwendet ►Die erste Zier multipliziert mit
2 entspricht der Größe des Sprühbildes in einem
Abstand von 12” (30 cm) von der Arbeitsäche: 5
x 2 = 10” (25 cm) ►Sprühbild Die beiden anderen
Ziern geben den Durchmesser der Düsenönung
an: 17 = 0.017” (0.43 mm) Düsenönung
►Verschlissene Spritzdüsen haben ein
schlechteres Sprühbild und führen zu schlechterer
Oberächenqualität, geringerer Produktivität und
Vergeudung von Farbe bzw Lack ►Verschlissene
Düsen sofort ersetzen.
REINIGUNG.
►Die Reinhaltung der airless-Pistole ist für den
einwandfreien Betrieb unerlässlich ►Die airless-
Pistole nach jedem Gebrauch spülen und an
einer trockenen Stelle aufbewahren ►Niemals
die airless-Pistole oder Teile davon in Wasser
oder Lösungsmitteln liegen lassen.
REINIGUNGSHINWEISE BEI VERWENDUNG
ENTFLAMMBARER LÖSUNGSMITTEL.
►Die airless-Pistole stets im Freien und
möglichst eine Schlauchlänge von der
Spritzpumpe entfernt spülen ►Werden die zur
Spülung verwendeten Lösungsmittel in einem
Metallbehälter von 4 Liter Fassungsvermögen
aufgefangen, diesen in einen Behälter mit einem
Fassungsvolumen von 20 Liter stellen und erst
dann weiter spülen ►Im Arbeitsbereich dürfen
sich keine entzündlichen Dämpfe sammeln ►Alle
Reinigungshinweise beachten ►Das Spritzgerät,
der Schlauch und die airless-Pistole müssen
jeden Tag gründlich gereinigt werden, sonst
kann die Farbe bzw der Lack festbacken und die
Leistung des Geräts erheblich beeinträchtigen
►Immer mit dem niedrigstmöglichen Druck
sprühen, wenn Düse und Düsenschutz entfernt
sind, und zum Reinigen von airless-Pistole,
Schlauch und Spritzgerät Spiritus oder ein
Lösungsmittel verwenden ►Elektrostatische
Auadungen können zu Bränden oder
Explosionen führen, wenn entzündliche Dämpfe
vorhanden sind ►Die airless-Pistole beim Spülen
fest in einen Metallbehälter halten.
WARTUNG.
►Vor der Durchführung von Wartungs- arbeiten
alle Sicherheitshinweise entsprechend dem
Abschnitt Sicherheitshinweise in diesem
Handbuch beachten ►Die Teilenummern nden
Sie in der Teileliste dieses Handbuchs.
FILTER AUSTAUSCHEN UND AUSBAUEN.
►Den unteren Teil des Abzugbügels nach
vorn ziehen, sodass er sich vom Gri löst (9)
►Den Gri vom airless-Pistolenkopf lösen und
abnehmen (10) ►Den alten Filter aus dem
airless-Pistolenkopf ziehen (11) ►Den neuen
Filter mit dem konischen Ende zuerst in den
airless-Pistolenkopf einschieben (12) ►Die
Gridichtung mit der achen Seite zum airless-
Pistolenkopf einschieben ►Den Gri so weit
in den airless-Pistolenkopf einschieben, bis er
fest sitzt ►Den Abzugbügel wieder in den Gri
zurückschnappen lassen.

18
Deutsch
DEU
FILTERTABELLE.
Application
Résine synthétique, peinture laquée, bruts, vernis colorés, azurs
Peintures laquées d’apprêt, matières de remplissage,
peinture de marquage, laques texturées
Peintures de remplissage, grandes surfaces
Émulsions, peintures au latex, peintures acryliques
Type de ltre
Extra-n
Fin
Grossier
Moyen
UMWELTSCHUTZ.
►Die Materialien und Bauteile, die für die
Herstellung dieses Produkts verwendet wurden,
können recycelt und wiederverwertet werden
►Werku®arbeitet mit einem Integrierten
Abfallbewirtschaftungssystem, das die korrekte
Entsorgung der Rückstände dieses Produkts
abwickelt ►Werfen Sie dieses Produkt nicht
in den Haushaltsmüll ►Werku®bietet seinen
Kunden einen kostenlosen Service, um diese
Rückstände von einer der Verkaufsstellen, den
vom Integrierten Abfallbewirtschaftungssystem
eingerichteten Sammelstellen oder den
Abfallsammelstellen Ihrer Gemeinde abzuholen.
GARANTIE UND KUNDENSERVICE.
►Neben der gesetzlichen Garantie räumt Werku
®
Ihnen zusätzlich eine kommerzielle Garantie
ein ►Die kommerzielle Garantie umfasst die
Reparatur von Mängeln aufgrund von Material-
oder Fabrikationsfehlern ►Damit diese Garantie
gewährleistet wird, müssen diese Mängel innerhalb
des Gültigkeitszeitraums auftreten ►Der Verbraucher
hat das Recht auf kostenlose Reparatur von Mängeln,
die von Werku
®
als in der kommerziellen Garantie
eingeschlossen anerkannt werden (einschl. Versand-,
Verarbeitungs- oder Materialkosten); nach Wahl von
Werku
®
entweder durch Reparatur oder durch Ersatz
(falls erforderlich, durch ein späteres Modell) ►Diese
kommerzielle Garantie betrit nicht die in der EU-
Richtlinie 1999/44/EG festgelegten Verbraucherrechte
►Der Gültigkeitszeitraum dieser kommerziellen
Garantie beträgt 24 Monate ►Falls das Produkt
für den gewerblichen oder industriellen Gebrauch
bestimmt ist, beträgt der Gültigkeitszeitraum 12
Monate ►Der Gültigkeitszeitraum beginnt ab
dem Datum des Kaufes durch den erstmaligen
Verbraucher ►Dieses Datum ist auf der Rechnung
oder dem Kaufbeleg enthalten ►Die Zeit für
Gewährleistungsansprüche im Hinblick auf die
Erfüllung dieser kommerziellen Garantie ist auf
sechs Monate ab Ende des Gültigkeitszeitraums
festgelegt ►Eine Reklamation im Zusammenhang mit
dieser kommerziellen Garantie muss dem Händler
oder Kundenservice vorgelegt werden ►Hierzu
muss diese Garantie ordnungsgemäß ausgefüllt,
vom Händler gestempelt und zusammen mit der
Rechnung oder dem Kaufbeleg vorgelegt werden
►Für weitere Informationen zu dieser kommerziellen
Garantie können sich der Käufer oder der Händler
telefonisch über +34 981 648 119 oder über E-Mail
Verbindung setzen ►Ausgenommen von dieser
kommerziellen Garantie sind Mängel, die infolge von
verschlissenen Teilen durch den Gebrauch oder eine
andere Art von natürlichem Verschleiß verursacht
wurden, Mängel aufgrund von Unaufmerksamkeit
oder Nichtbefolgung der Bedienungsanleitung und
unsachgemäßem Betrieb, eine Benutzung, die
nicht dem Gebrauch entspricht, für den das Produkt
bestimmt ist, ungewöhnliche Umweltfaktoren,
Überlastung, unangemessene Wartung oder
Reinigung, Mängel aufgrund der Verwendung von
Zubehör, Ergänzungen oder Ersatzteilen, die keine
Originalteile von Werku
®
sind, wenn das Produkt
durch Personal, das nicht zum Kundenservice
gehört, ganz oder teilweise auseinander montiert,
verändert oder repariert wurde oder kleine und
für den Gebrauch und ordnungsgemäßen Betrieb
unwesentliche Unregelmäßigkeiten ►Durch
Reparaturen und Ersatz wird der Gültigkeitszeitraum
für diese kommerzielle Garantie weder verlängert
noch neu festgelegt ►Ersetzte Teile gehen in das
Eigentum von Werku
®
über ►Wenn der Käufer das
Produkt an den Kundenservice zurückgibt und dabei
nicht die Bedingungen dieser kommerziellen Garantie
erfüllt, gehen die Kosten und Gefahren zu Lasten
des Käufers ►Diese kommerzielle Garantie gilt auf
dem Gebiet der Europäischen Union ►Das für die
Erfüllung der kommerziellen Garantie verantwortliche
Unternehmen Werku
®
ist Werku Tools SA.
TECHNISCHE BERATUNG.
►Werku®stellt Ihnen seine technische Abteilung
zur Verfügung, damit Sie alle Fragen, die zu
unseren Produkten auftreten könnten, klären
können ►Wenn Sie sich mit unserem Team in
Verbindung setzten möchten, senden Sie eine

19
Français
FRA
DÉCLARATION DE CONFORMITÉ CE.
►Werku®déclare que le pistolet airless
WK501360 est en conformité avec les directives
et normes européennes 2006/42/CE et
EN12621:2006+A1:2010.
La Coruña, 01/11/2020.
R Yáñez
Werku Tools SA
CARACTERISTIQUES TECHNIQUES.
►Pompe airless >1 HP (750 W)
►Pression travail
90-210 bar ►Pression maximale 310 bar
►Duse
RAC-XHD
►Fil entrée NPS 3/8” ►Fil sortie BSP
7/8” ►Température trabail 5-40ºC ►Température
matériau
<43ºC ►Poids net 0.380 kg ►Pression
acoustique LpA <89 dB(A) ►Pression acoustique
LwA <90.82 dB(A) ►Vibration Ah <0.715 m/s².
CONSIGNES DE SÉCURITÉ.
►Veuillez lire toutes les consignes de sécurité
et tous les avertissements ►Le non respect de
l’ensemble des avertissements et des consignes
gurant ci-dessous peut être la cause d’un choc
électrique, d’un incendie et/ou de blessures graves
►Conservez tous les avertissements et toutes les
consignes pour vous y référer ultérieurement ►Les
accidents peuvent dans de nombreux cas être
évités en identiant les situations dangereuses
avant qu’un accident ne se produise et en
respectant dèlement les procédures de sécurité
adéquates ►N’utilisez jamais ce pistolet airless
dans les cas non spéciés dans ce manuel.
CONSIGNES SÉCURITÉ.
►Pensez toujours à votre sécurité ►Toutes
les réglementations nationales et locales
concernant l’aération, la prévention des incendies
et le fonctionnement doivent être observées
►Risque: Blessure par projection ►Un courant
de liquide à haute pression produit par cet
équipement peut percer la peau et les tissus
sous-cutanés, et entraîner des blessures graves
ou même une amputation ►N’essayez pas de
traiter une blessure par projection comme une
simple coupure ►Les blessures par projection
peuvent entraîner une amputation ►Consultez
immédiatement un médecin ►Indiquez à votre
médecin le type de peinture ou d’agent de
nettoyage par lequel la blessure a été provoquée
►La pression maximale de travail du pistolet
airless pulvérisateur est de 310 bar ►Ne dirigez
jamais le pistolet airless vers une partie du corps,
quelle qu’elle soit ►Ne laissez jamais une partie
du corps entrer en contact avec le ux de liquide
►Ne laissez jamais votre corps au contact d’une
fuite dans le tuyau de liquide ►Ne placez jamais
vos mains devant le pistolet airless ►Les gants
ne constituent pas un rempart susant contre les
blessures par projection ►Ne pointez jamais le
pistolet airless en direction d’une autre personne
►Bloquez toujours la gâchette du pistolet airless,
éteignez la pompe et vidangez toute la pression
avant toute opération d’entretien, avant de
nettoyer une buse ou une protection, avant de
changer une buse ou si vous laissez l’appareil
sans surveillance ►La pression ne s’évacue pas
simplement en éteignant le moteur ►La manette
d’amorceur/pulvérisateur doit être placée en
position amorçage pour vidanger la pression
►Consultez la procédure de décompression
décrite dans le manuel de la pompe ►Conservez
toujours la protection de la buse en place
lorsque vous pulvérisez ►La protection de la
buse fournit une certaine protection mais il
s’agit principalement d’un système d’alarme
►Enlevez toujours la buse de pulvérisation avant
de rincer ou de nettoyer le système ►Le tuyau
peut présenter des fuites dues à l’usure, aux
pincements et aux mauvaises utilisations ►Toute
fuite peut entraîner une projection de matériau
dans la peau ►Vériez soigneusement le tuyau
avant chaque utilisation ►N’utilisez jamais un
pistolet airless sans blocage de gâchette et sans
protection de gâchette ►Tous les accessoires
doivent pouvoir travailler à la pression de travail
maximale du pulvérisateur ou au-dessus ►Ceci
concerne les buses de pulvérisation, le pistolet
airless, les rallonges et le tuyau ►Risque: Risque
d’explosion dû à des matériaux incompatibles
- entraîne des blessures graves ou des
dégâts matériels ►N’utilisez pas de matériaux
contenant de l’eau de javel ou du chlore
►N’utilisez pas de solvants à l’hydrocarbure
hydrogéné tels que l’eau de javel, les produits
anti-moisissure, le chlorure de méthylène et le
trichloéthane ►Ils ne sont pas compatibles avec

20
Français
FRA
l’aluminium ►Prenez contact avec le fournisseur
d’enduits pour plus d’informations concernant
la compatibilité du matériau avec l’aluminium
►Risque: Généralités ►Peut entraîner des
blessures sévères ou des dégâts matériels
►Lisez attentivement toutes les instructions
et les consignes de sécurité avant de faire
fonctionner l’équipement ►Ne pulvérisez jamais
à proximité de sources d’ignition: ammes nues,
cigarettes (les cigares et pipes sont également
des sources d’ignition), étincelles, ls chauds et
surfaces chaudes, etc ►Portez un équipement
de protection des voies respiratoires lors de la
pulvérisation ►L’opérateur doit porter un masque
de protection ►Pour prévenir les accidents
de travail, il est indispensable de respecter
les instructions du fabricant concernant les
matériaux, les solvants et les agents nettoyants
lors de la préparation, du travail et du nettoyage
de l’appareil ►Il est nécessaire de porter des
vêtements de protection, des protections
oculaires et, dans certains cas, une crème de
protection de la peau ►Suivez attentivement
les avertissements et con-signes du fabricant
du matériau et du solvant ►Un équipement
d’extraction doit être installé par l’utilisateur
conformément aux réglementations locales en
vigueur ►Les objets à pulvériser doivent être
reliés à la masse ►Avant chaque utilisation,
vériez que les tuyaux ne présentent ni coupures,
ni fuites, ni signes d’abrasion ou de renement
du revêtement ►Vériez l’état et le mouvement
des raccords ►Remplacez immédiatement les
tuyaux s’ils sont en mauvais état ►Ne réparez
jamais un tuyau; remplacez-le par un tuyau
à haute pression relié à la masse ►Lorsque
vous appuyez sur la détente, il se produit un
mouvement de recul de la main qui tient le
pistolet airless ►Le recul du pistolet airless est
particulièrement puissant lorsque la buse a été
démontée et lorsque la pompe sans air à haute
pression a été réglée sur une pression élevée
►Par conséquent, lors du nettoyage sans buse,
réglez la valve de contrôle de la pression sur la
pression minimale ►N’utilisez que des pièces
de rechange d’origine ►L’utilisateur assume
tous les risques s’il utilise des pièces qui ne
correspondent pas aux spécications minimales
et aux dispositifs de sécurité du fabricant de la
pompe ►Toute décharge d’électricité statique
du pistolet airless doit être dérivée vers la
pompe à haute pression reliée à la masse par
le tuyau conducteur à haute pression, comme
indiqué ►La température supercielle maximale
correspond à la température admissible du
produit ►Ces dernières ainsi que la température
ambiante admissible sont indiquées au chapitre
caractéristiques techniques ►Pour être certain
que le pistolet airless ne produise d’étincelles,
évitez les chocs et tout travail sur l’unité avec des
outils dans la zone explosive.
RISQUES RÉSIDUELS.
►Les risques résiduels sont des risques qui ne
peuvent être exclus, même lorsque l’équipement
est utilisé aux ns prévues ►Dans de tels cas,
les endroits aectés par les risques résiduels
seront indiqués à l’aide d’avertissements et/ou de
panneaux d’interdiction.
Risque
Blessure
par
injection
Explosion
ou
incendie
Vapeurs
dangereuses
Peut
survenir
pendant:
Montage,
utilisation
Utilisation
Utilisation
Incidence
Blessure
grave ou
amputation
Blessure
grave
Blessure
grave
Source / Cause
Flot de produit
pulvérisé à
haute pression
Électricité
statique ou
étincelles
Vapeurs
dangereuses du
produit à pulvériser
Mesures
préventives
Ne JAMAIS pointer
le pistolet vers une
partie du corps
Utiliser le pistolet
dans un endroit bien
aéré. Mettre à la
terre le pistolet
Utiliser le pistolet
dans un endroit bien
aéré. Se servir d’un
masque
SÉCURITÉ DE LA ZONE DE TRAVAIL.
►Conservez la zone de travail rangée et bien
éclairée ►Les zones mal rangées et mal éclairées
sont sources d’accidents ►Ne manipulez
pas d’outils airless dans des environnements
explosifs comme en présence de liquides, de
gaz ou de poussières inammables ►Maintenez
les enfants et les curieux éloignés pendant que
vous manipulez un outil airless ►Les distractions
peuvent être sources d’une perte de contrôle.
SÉCURITÉ PERSONNELLE.
►Soyez vigilant et attentif à ce que vous faites
et faites appel à votre bon sens quand vous
manipulez un outil airless ►N’utilisez pas d’outil
airless si vous êtes fatigué ou sous l’inuence
de drogues, d’alcool ou de médicaments ►Un
moment de distraction pendant que vous
manipulez des outils airless peut vous causer de
graves blessures corporelles.
Table of contents
Languages:
Other WERKU Paint Sprayer manuals

WERKU
WERKU WK403040 User manual

WERKU
WERKU WK500740 User manual

WERKU
WERKU WK500470 User manual

WERKU
WERKU WK403040 User manual

WERKU
WERKU WK500600 User manual

WERKU
WERKU WK401210 User manual

WERKU
WERKU WK500480 User manual

WERKU
WERKU WK500730 User manual

WERKU
WERKU WK501090 User manual

WERKU
WERKU WK500490 User manual