PLEASE READ ALL OF THESE INSTRUCTIONS CAREFULLY
BEFORE USING THE
BRV1875 AIR HYDRAULIC RIVETER.
Safety Instructions
WEAR SAFETY GLASSES OR GOGGLES while using the riveter, rivets are
dispensed with force at high speed, and may cause damage or bodily harm.
DO NOT leave riveter plugged into air supply when not in use.
NEVER point riveter towards or at someone.
KEEP OUT OF REACH OF CHILDREN AT ALL TIMES.
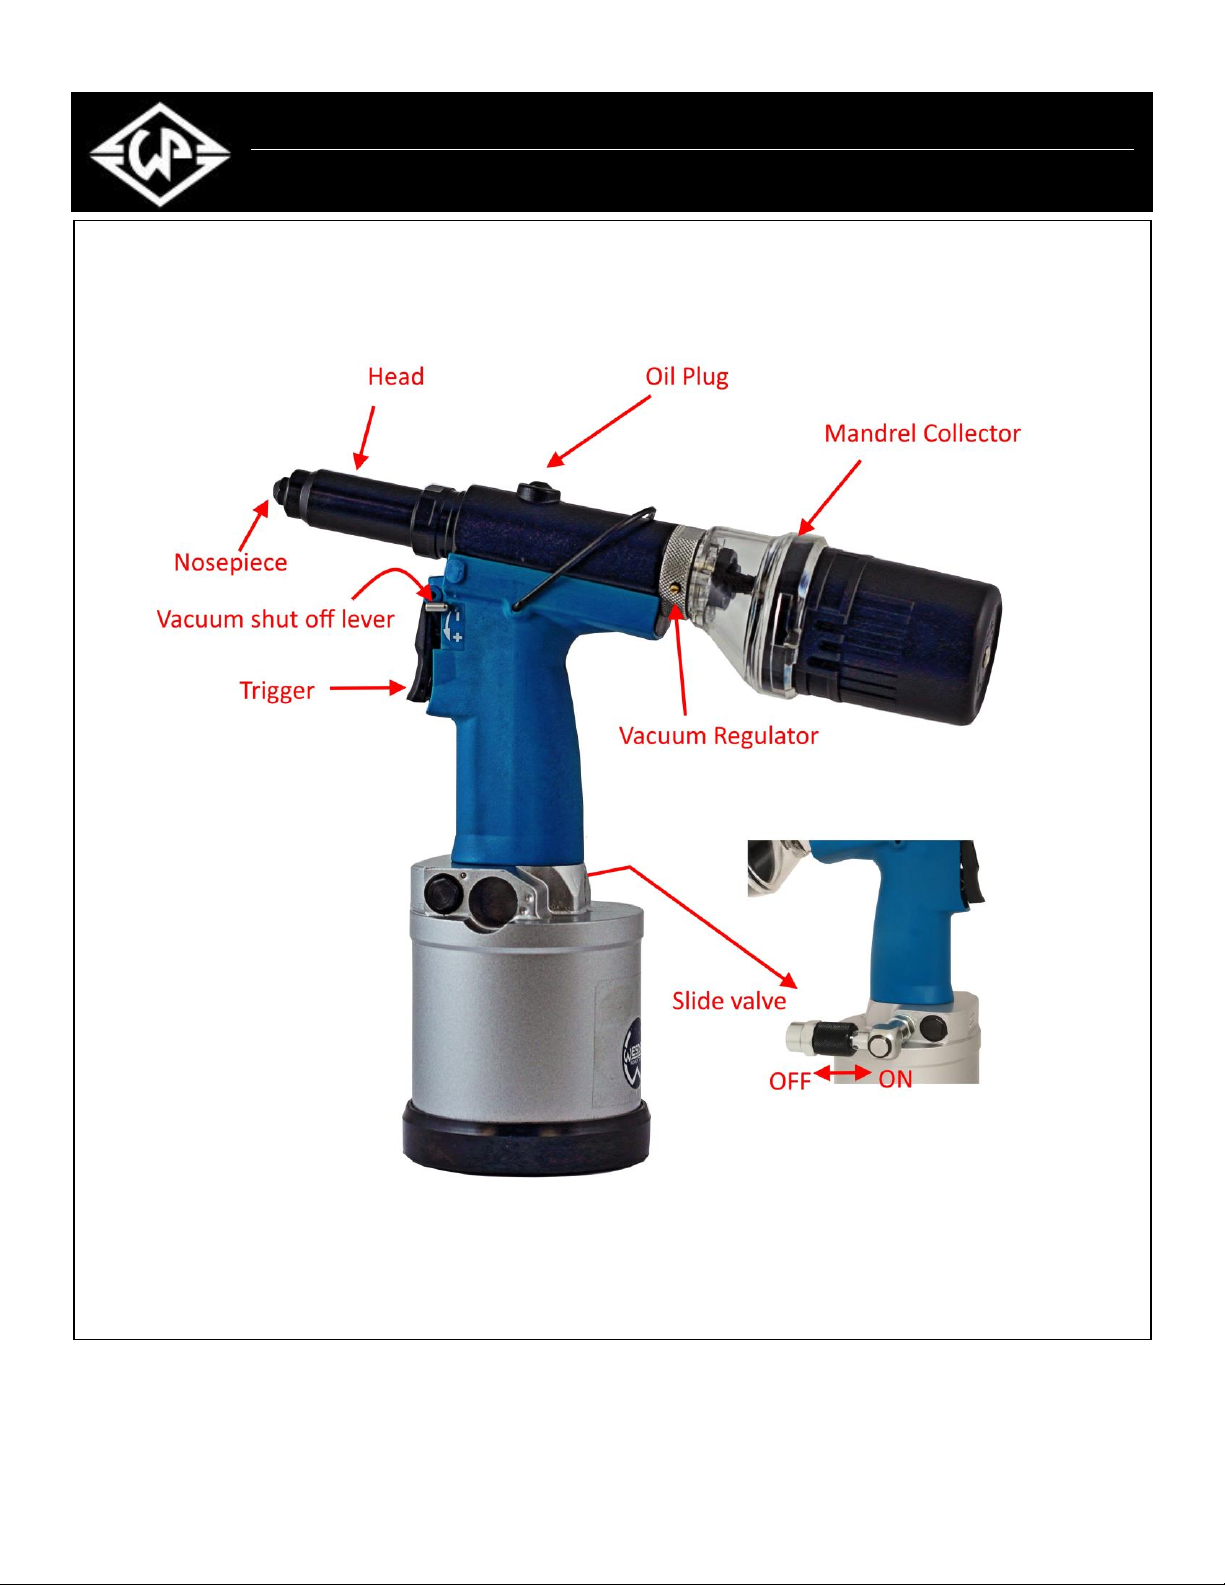
GENERAL INFORMATION
Features - Lightweight, with excellent power-to-weight ratio
-Ultra 3 piece of jaws for longer life
-Noise-reducing muffler
-Long stroke
-Integrated vacuum system with an easy
“ON-OFF” switch for mandrel retention and collection
The BRV1875 comes with 1/8”, 5/32” and 3/16” nosepieces for open-end rivets.
The 3/16” nosepiece is factory-installed on the tool; one each of the 1/8” and 5/32”
nosepieces are included in accessory bag.
NOTE: If setting 1/8” rivets, you must REMOVE (#5) Jaw Pusher and REPLACE
WITH (#22) Pusher Tube. (See Tool Preparation #2 for details.)
Specifications:
Tool weight: 3.4 pounds
Length of Tool: 260mm
Dynamic Air Pressure: 85-100 psi
Pulling Power (lbs): 2100
Stroke Length: 18mm
Hydraulic Oil: Texaco R&O-68 or any equivalent (36Cst=4.3EI 50゜C)
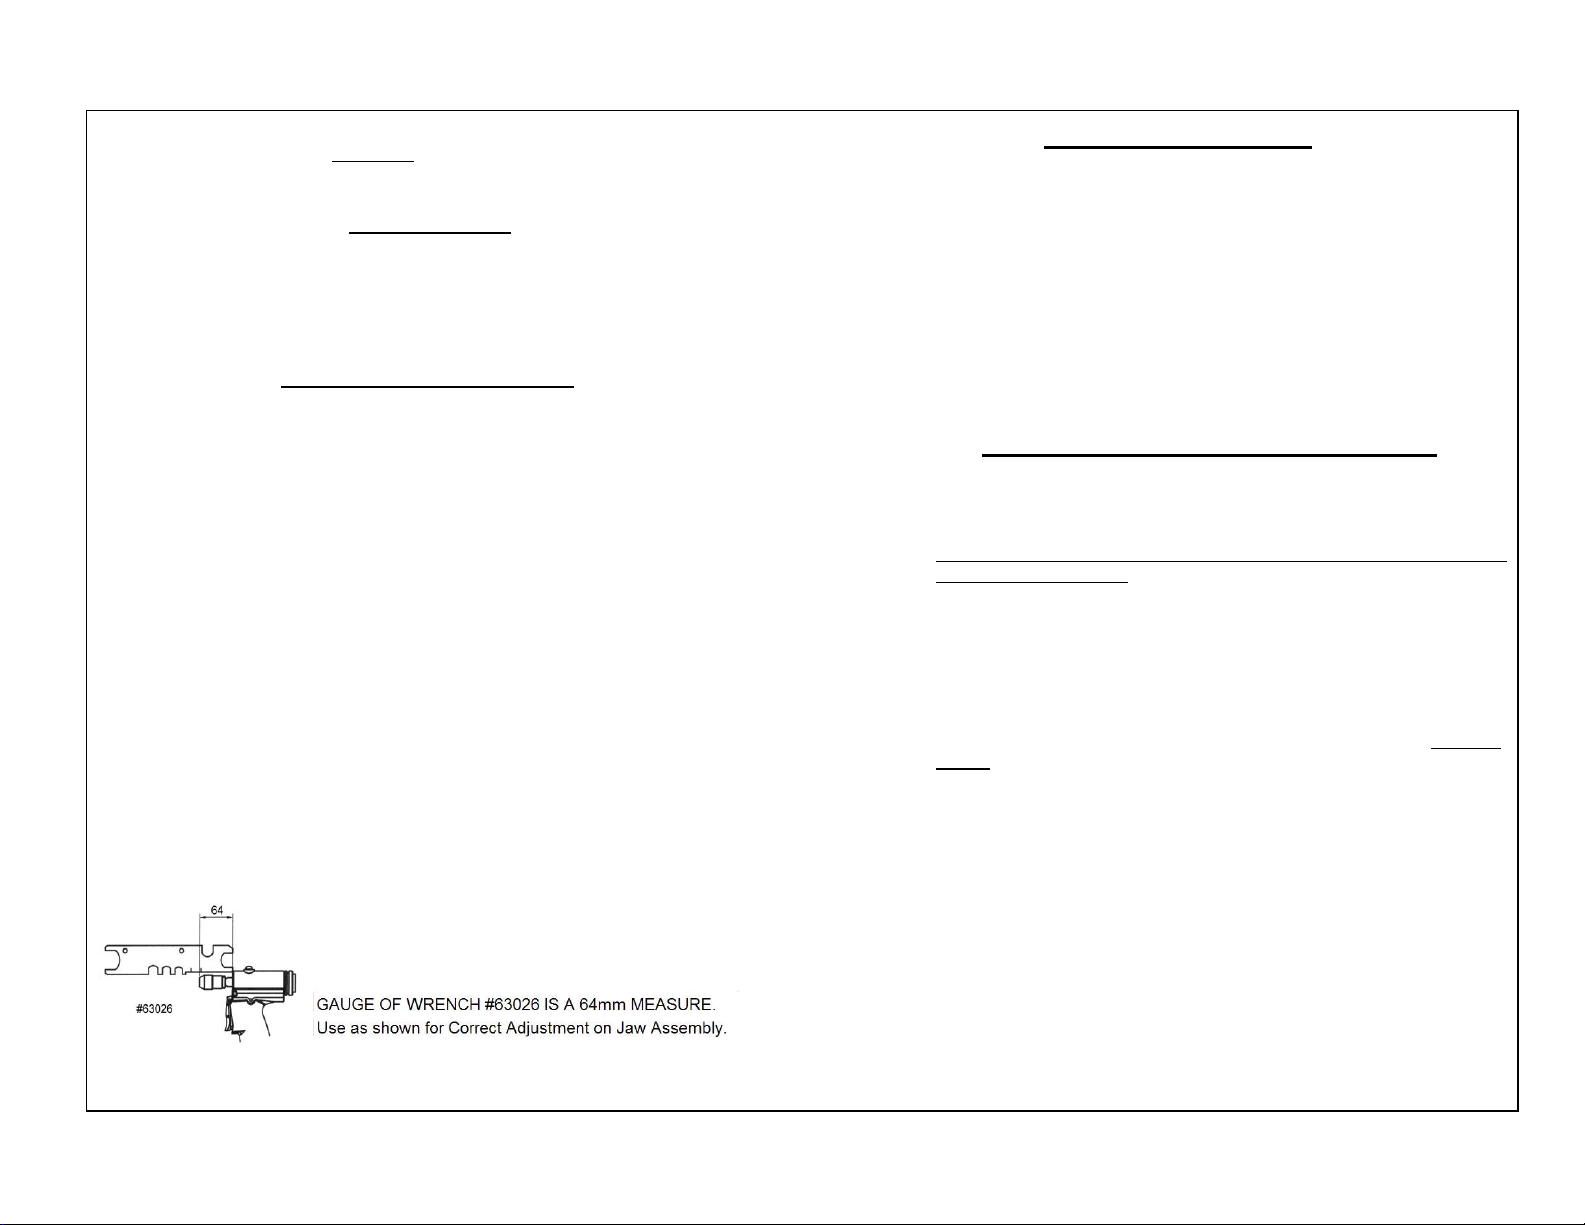
Measurement 64mm
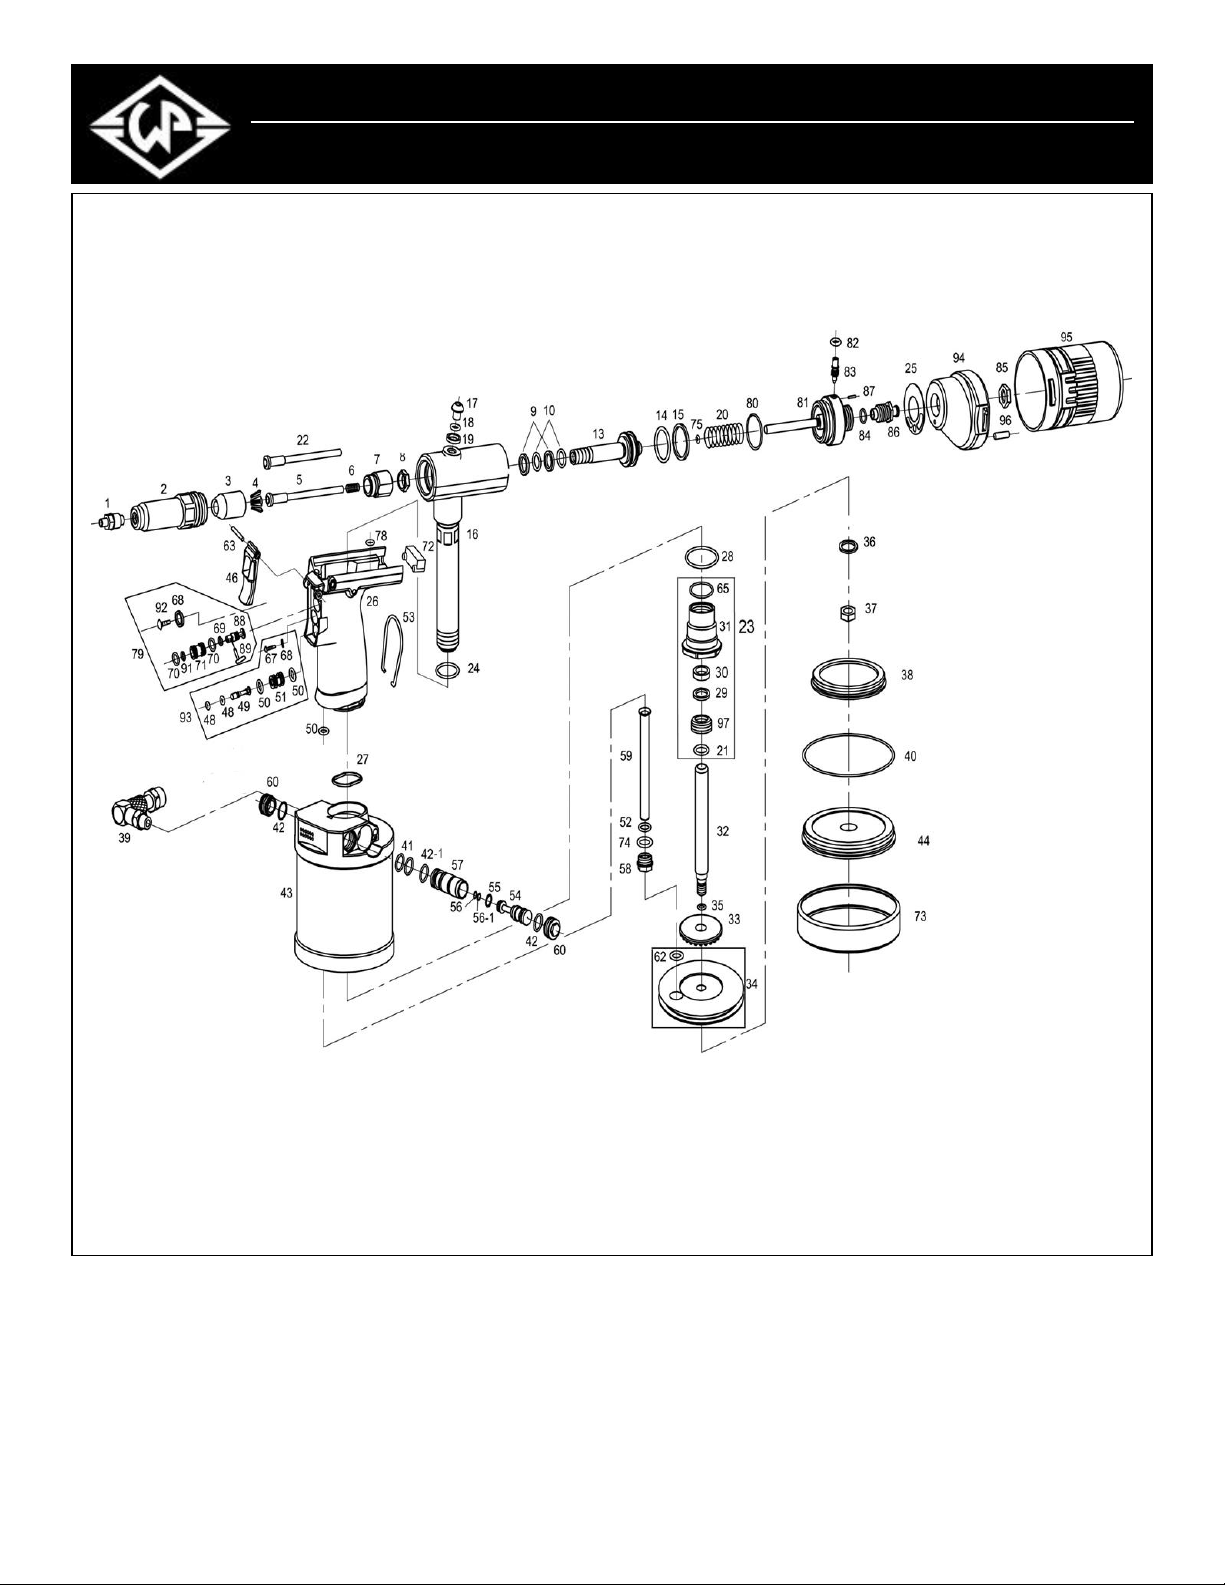
Riveter Accessories
Your BRV1875 Riveter comes with the following accessories:
-1/8” & 5/32” Nosepieces (#1) for open end rivets
-Pusher Tube (#22)
-Universal valve (#39)
-Tool Hanger (#53) attaches to top of Riveter
-Oil Syringe (no shown)
-Wrenches (#630HW3 , #14S17, #63026)
NOTE: If pull small rivets, 1/8"(3.2 mm) PLS Change (#5 / #55007T) Jaw
Pusher AND replace (#22 /#55080) Pusher Tube
Tool Preparation before Operation
1. Prior to each operation of the Riveter, you must choose the size rivet
you’ll be using. If setting 3/16”, 5/32” rivets, no changes to the tool are
necessary, (3/16” nosepiece is factory-installed on tool).
2. If setting 1/8” rivets, you need to remove Jaw Pusher (#5) and replace it
with Pusher Tube (#22). To do this, remove Nosepiece (#1) and Head
(#2) from Riveter. (Use 11mm wrench to loosen Nosepiece.) Unscrew
Jaw Housing (#3) from Jaw Housing Coupler #7; when Housing is
removed, Jaw Pusher #5 as well as 3 pieces of Jaws #4 will be loose
inside Housing. Remove Jaw Pusher #5 and set aside for use in setting
3/16” rivets only.
3. Place metal (tube) end of Pusher Tube #22 inside spring #6 that now
protrudes from tool. Replace Jaws back into Housing (as detailed in
step 4); screw Housing back onto Jaw Housing Coupler (#7). Securely
tighten Housing onto Coupler, using 14mm wrench (included in
Accessory bag). Hold Coupler securely with another 14mm wrench to
prevent it from turning while tightening Housing onto it.
4. NOTE:Jaws must be correctly positioned inside Housing for optimal
performance. Place 3 pieces of Jaws down into small end of Housing.
The narrow ends of jaws face downward and protrude out the small end
of Housing. The long serrated edges face inward toward each other.
MAKE SURE THE 3 JAW PIECES ARE IN THE CORRECT POSITION
–Riveter will not operate correctly if Jaw pieces are not properly
inserted. You may need to adjust how far each piece of Jaw protrudes
through small opening, to insure they are equally distributed.
5. Carefully screw Head (#2) back onto tool securely. Making sure the
Jaw pieces stay in place. Lastly, screw correct Nosepiece onto tool
(either 1/8” Nosepiece, corresponding to rivet size you are using). Note:
you will be pushing jaws back into tool slightly as you are attaching
Nosepiece. Use 11mm Wrench (included in Accessory bag) to tighten
Nosepiece onto tool