Scell-it E-649RP User manual

FR
PL
CZ
EN
IT
PNEUMATIC BLIND
RIVETS SETTING TOOL
E-649RP
OPERATION MANUAL
Ø4.8mm - Ø6.4mm
ALUMINIUM - STEEL - STAINLESS STEEL
ESSENTIAL RANGE

EN
FR
PL
CZ
IT
E-649RP / User manual
2
TOOL CAPACITY
Blind structural rivets Monobolts or equivalent dome head 4.8mm
Nosepiece K/3.1 art. code P09011-00
Blind structural rivets Monobolts or equivalent dome head 6.4mm
Nosepiece M/4.2 art. code P09013-00
Blind structural rivets Interlok or equivalent dome head 4.8 mm
Nosepiece J/3.2 art. code P09010-00
Blind structural rivets Interlok or equivalent dome head 6.4mm
Nosepiece L/4.5 art. code P09012-00
Blind structural rivets Monobolts / Interlok or equivalent countersunk head or
standard blind rivets 4.8mm – nosepiece P/3.3 art. code P03147-00
Blind structural rivets Monobolts / Interlok or equivalent countersunk head or
standard blind rivets 6.4mm – nosepiece L/4.3 art. code P03146-00
TOOL
SPECIFICATIONS
Air supply pressure:
0.5Mpa ~ 0.7Mpa
Output traction power:
14,225 N ~ 19,915 N
Stroke: 26 mm
Net weight: 1.80 kgs
GENERAL SAFETY INSTRUCTIONS AND PRINCIPLES
•This tool should be used exclusively
to apply blind rivet prescribed as
TOOL CAPACITY. It can’t be used
for other purposes, such as hammer,
etc…
•This tool must be used with treated
compressed air supply in a pressure
range 0.5MPa-0.7MPa.
•The tool must be, during any
kind of maintenance or repair,
DISCONNECTED from the source of
compressed air..
• DO NOT use the tool when you are
tired or under the influence of drugs,
alcohol or medication. One moment
of inattention when working with the
tool can result in serious injuries.
• DO NOT use the tool in the
environment described as below:
- fuel and combustion air.
- temperature rapidly rising.
- humidity, rain, water, storm and
thundering.
The tool is not designed for explosive
environment.
•When the tool is suspended by the
operation hook during use, be sure
the tool will not fall.
•When using the tool, always
carry safety shoes, protective
goggles, protective gloves, safety
helmet, ear protectors and other
necessary protections. It is highly
recommended for safety reason.
•Remove the setting tools or
wrenches before switching on the
pneumatic tool. A wrench connected
to a rotating part of the tool can
result in injuries.
•Do not allow persons who have not
read these instructions or who are
not familiar with the tool to use it.
•Keep children and other persons
away when you are working with
the tool. If distracted, you may lose
control over the tool.
•Have your tool repaired only by
qualified specialist personnel and
only with original spare parts. If in
doubt, always return the tool to the
distributor.
•Any alterations of the tool, its
accessories or spare parts remain in
sole responsability of the customer.
•The tool must be kept in top
condition and regularly tested for
damage and proper operation. Check
that moving parts function correctly
and do not jam and that parts are
not broken or damaged in such a
way that the function of the tool
is impaired. Have damaged parts
repaired before using the tool.
•Never aim with the tool at another
person.
•Oxygen or other flammable gasses
from pressure cylinders must not
serve as a driving agent.
•Avoid unnecessary contact with the
hydraulic fluid to prevent possible
allergy reaction of the skin.
•After the service life, discard the tool
according to the applicable disposal.
•The pressure regulator has to be
equipped with a filter to avoid
impurities and water.
READ THIS MANUAL CAREFULLY BEFORE USING THE TOOL !
It is IMPORTANT to follow the safety instructions for adequate
protection against injuries.
ENGLISH

EN
FR
PL
CZ
IT
E-649RP / User manual
3
Please refer to the TOOL EXPLOSIVE ILLUSTRATION and the PARTS LIST in this manual in order
to have a good understanding of the tool parts described. The descriptions of the tool parts
appear in this manual are in italics with the parts position numbers corresponding to the tool
explosive illustration.
1) This pneumatic powered tool should be worked with compressed air supply. It is recommended to use the air
hose with diameter bigger than 8 mm;
2) To check the compressed air pressure within the specified range between 0.5Mpa and 0.7Mpa, and to connect
the air hose adaptor onto the tool air adaptor (#50). The air adaptor has its different versions in different
countries and areas, normally the tools are equipped with the correct version as default, in case the air adaptor
does not apply in your air supply hose adaptor, contact the tool distributor(s);
3) To change and use correct nosepiece (#1) according to the type, head formation and size of the rivet to be
set. This tool is equipped with nosepieces as described in TOOL CAPACITY. Follow the steps below to change
the nosepiece (#1):
GETTING START TO WORK
a) To remove the air supply hose from air adaptor (#50).
b) To use the wrench (in accessories pack) to remove the
nosepiece (#1) from the tool.
c) To select the correct nosepiece in accessories pack and
screw on to the tool, using the wrench to fix it firmly
on the tool.
TOOL OPERATION FOR SETTING BLIND RIVETS
1) After start-up preparations, to put the rivet into the nosepiece with the rivet mandrel, and holding the tool to
insert the rivet into the pre-drilled hole of the work pieces where the work pieces needs to be fastened;
2) To pull the tool trigger (#46) to set the blind rivet in its position on work piece;
3) After setting the rivet, the rest mandrel of the rivets will be sucked into the mandrel collector (#25)
automatically. Be sure to empty the mandrel collector (#25) in time otherwise the tool can not release the
mandrel properly.
4) The air power of sucking the rest mandrel can be adjusted bigger or smaller, by the knob on back of the tool
visible when the mandrel collector removed:
5) On the air adaptor hose (#51)
equipped for this tool, there is
a sliding switch for pause the air
supply. To switch off for saving air.
4) To install the mandrel collector (#25, in accessories pack) on the back of the tool:

EN
FR
PL
CZ
IT
E-649RP / User manual
4
TOOL MAINTENANCE
5) To test the tool stroke. If the stroke still not enough as it should be, it means there could be some air in the oil
cylinder (#13) when you refilling the oil to the tool. Then the extra air needs to be released from the tool.
To connect the tool with air supply, to pull the tool trigger (#46) 6 or 7 times, then loosen the screw (#11), let
the extra air leaking out, then screw on the screw (#11) tight again.
1) To remove the screw (#11) by hexagon wrench.
3) To screw the oil inject adaptor (on oil injector set
in the accessories pack) into the hole where
screw (#11) removed.
4) To use the oil injector (in the accessories pack)
to inject the oil slowly until not able to refill
(approx. 15ml ), to remove the injector and its
adaptor, then clean the oil on the tool and tightly
screw on the screw (#11) back to the tool.
2) To connect the air supply and to cover some
cloth over the hole where the screw (#11)
removed, then to pull the trigger (#46) and the
oil will be leaked out from the tool.
If there is no lubricating device connected in the air distribution, daily and before starting work, for better
performance of the tool, add a few drops of hydraulic oil on the inlet of the air adaptor (#50) of the tool in order to
reduce the frictions of the tool parts since the oil will be blown inside the tool when tool operates.
After certain period of use, the tool stroke might be reduced, it shows the hydraulic oil of the pneumatic tool is
necessary to be refilled or changed:

EN
FR
PL
CZ
IT
E-649RP / User manual
5
After long time use of the tool, it could be possible that the metal chips from rivets setting remains in the nose
assembly of the tool and the tool efficiency will be influenced, therefore it is recommended to have the nose
assembly parts cleaned or the parts changed periodically.
1) To use the wrench (in accessories pack) and a spanner prepared by tool user:
2) To disassemble nosepiece (#1)
on the tool by wrench. 4) To disassemble clamping sleeve
(#3).
3) To disassemble front sleeve
(#2).
5) To take out the 3-jaw set (#4) from the clamping sleeve (#3), and take out the assembly pusher (#5) and the
pusher spring (#6) from the tool, and mandrel tube (#20), and clean them all. Meanwhile to check the parts,
if any worn or damaged, to change the new parts.
6) To re-assemble the cleaned parts or new parts
back to the tool. To put the pusher spring (#6)
onto the assembly pusher (#5), and insert it
back to the tool where assembly oil cylinder
(#13) located.
Wrench hole 1 for assembly rear adjustor (#22);
Wrench hole 2 for clamping sleeve (#3);
Wrench hole 3 for nosepieces (#1);
Wrench hole 4 for front sleeve (#2);
7) To put 3-jaw set (#4) into the clamping sleeve
(#3), be sure the 3 jaws are seated in it correctly in
the position.

EN
FR
PL
CZ
IT
E-649RP / User manual
6
8) To put the clamping sleeve (#3) with 3-jaw set
(#4) inside it onto the assembly pusher (#5) in
their position, to be sure it is assembled firmly.
9) To assemble the front sleeve (#2) and
nosepiece (#1) back to the tool.
TROUBLES SHOOTING
TROUBLES POSSIBLE CAUSES SOLUTIONS
Rivet mandrel does not break
•3-jaw set worn off or
damaged
•Hydraulic oil in tool not
sufficient
•Air supply with low pressure
•Change 3-jaw set
•Refill hydraulic oil
•Increase air supply pressure
within the specification range
Jaws slippery on rivet mandrel
•3-jaw set worn off
•Metal chips between jaws
•Pusher spring fatigued
•Change 3-jaw set
•Clean the jaws
•Change pusher spring
Rivet mandrel can not be put
into nosepiece
•Nosepiece size chosen not
correct
•Jaws get stuck by rest mand-
rel not released
•Change correct size of
nosepiece
•Take out the remained rest
mandrel by disassembling
front sleeve and clamping
sleeve
Rest mandrel can not be
sucked into mandrel collector
properly
•Mandrel release sucking
power not sufficient
•Air supply with low pressure
•Increase the mandrel sucking
power, ref. TOOL OPERATION
section 4
•Increase air supply pressure
within the specification range.

EN
FR
PL
CZ
IT
E-649RP / User manual
7
TOOL EXPLOSIVE ILLUSTRATION

EN
FR
PL
CZ
IT
E-649RP / User manual
8
The manufacturer :
Declares hereby that the following product :
Manual pneumatic hydraulic blind rivet setting tool type E-649RP
Complies with the following relevant conditions :
EC Machinery Directive 2006/42/EC Annex I
If the machine is modified without our knowledge and consent, this EC Declaration of
conformity will be voided
Most important applied harmonized standards :
EN ISO12100:2010 + EN ISO11148-1:2011
Name of documentation officer : Nadia FAYTRE
Address of documentation officer : see address of manufacturer
Lesquin, 30/07/2019
___________________________________________________________________
Franck DEBRUYNE
(Directeur général)
SCELL-IT
28 RUE PAUL DUBRULE
59810 LESQUIN
FRANCE
Tél.: +33(0) 320 329 818
EC CERTIFICATE OF CONFORMITY – EC DIRECTIVE
2006/42/EC ANNEX II 1A
WARRANTY CONDITIONS
During the warranty period, the customer must not perform any alterations other than those permitted by the
manufacturer (maintenance). The repairs must be done by an authorized service center.
To admit warranty repair, the customer must return the defective tool to the service center of the manufacturer
with the proof of purchase. Warranty is valid only if the tool is in its warranty period (12 months from the date of
purchase confirmed by the proof of purchase) and if the conditions of use have been respected.
Warranty is not valid if worn spare parts have to be replaced (further to a normal use of the tool).

E-649RP / Mode d’emploi
9
EN
FR
PL
CZ
IT
CE MANUEL D’UTILISATION DOIT ÊTRE LU ATTENTIVEMENT
AVANT TOUTE UTILISATION DE LA MACHINE !
Il est IMPORTANT de suivre les instructions de sécurité pour
une bonne utilisation de la machine sans prise de risque :
ATTENTION
CAPACITE DE LA MACHINE
Rivets de structure type Monobolts ou équivalent, tête plate, diamètre
4,8mm - nez K/3.1 art. code P09011-00
Rivets de structure type Monobolts ou équivalent, tête plate, diamètre
6,4mm – nez M/4.2 art. code P09013-00
Rivets de structure type Interlok ou équivalent, tête plate, diamètre
4,8mm – nez J/3.2 art. code P09010-00
Rivets de structure type Interlok ou équivalent, tête plate, diamètre
6,4mm – nez L/4.5 art. code P09012-00
Rivets de structure type Monobolts / Interlok ou équivalent, tête fraisée
ou rivets standards diamètre 4,8mm – nez P/3.3 art. code P03147-00
Rivets de structure type Monobolts / Interlok ou équivalent, tête fraisée
ou rivets standards diamètre 6,4mm – nez L/4.3 art. code P03146-00
CARACTERISTIQUES
DE LA MACHINE
Pression circuit d’air comprimé :
5 bar ~ 7 bar
Force : 14 225 N ~ 19 915 N
Course : 26 mm
Poids net :1,80 kgs
CONSIGNES GÉNÉRALES DE SÉCURITÉ ET PRINCIPES
•Cette machine ne doit être utilisée
que pour riveter des rivets qui
correspondent à la CAPACITE DE
LA MACHINE. Elle ne peut pas être
utilisée dans un autre but (marteau
etc…).
•Cette machine doit être utilisée avec
une alimentation en air comprimé
dans une plage de pression 0,5Mpa
~ 0,7Mpa.
• DECONNECTER l’alimentation en
air comprimé de la machine avant
le remplacement d’une pièce ou
pendant une réparation.
• NE PAS utiliser la machine en cas
de fatigue, ou sous l’influence de
substances telles que les drogues,
l’alcool ou encore les médicaments.
• NE PAS utiliser la machine dans
un environnement tel que décrit
ci-dessous :
- Carburant et air de combustion.
- Hausse rapide de température.
- Humidité, pluie, tempête et orage.
Cette machine n’est pas adaptée aux
environnements explosifs.
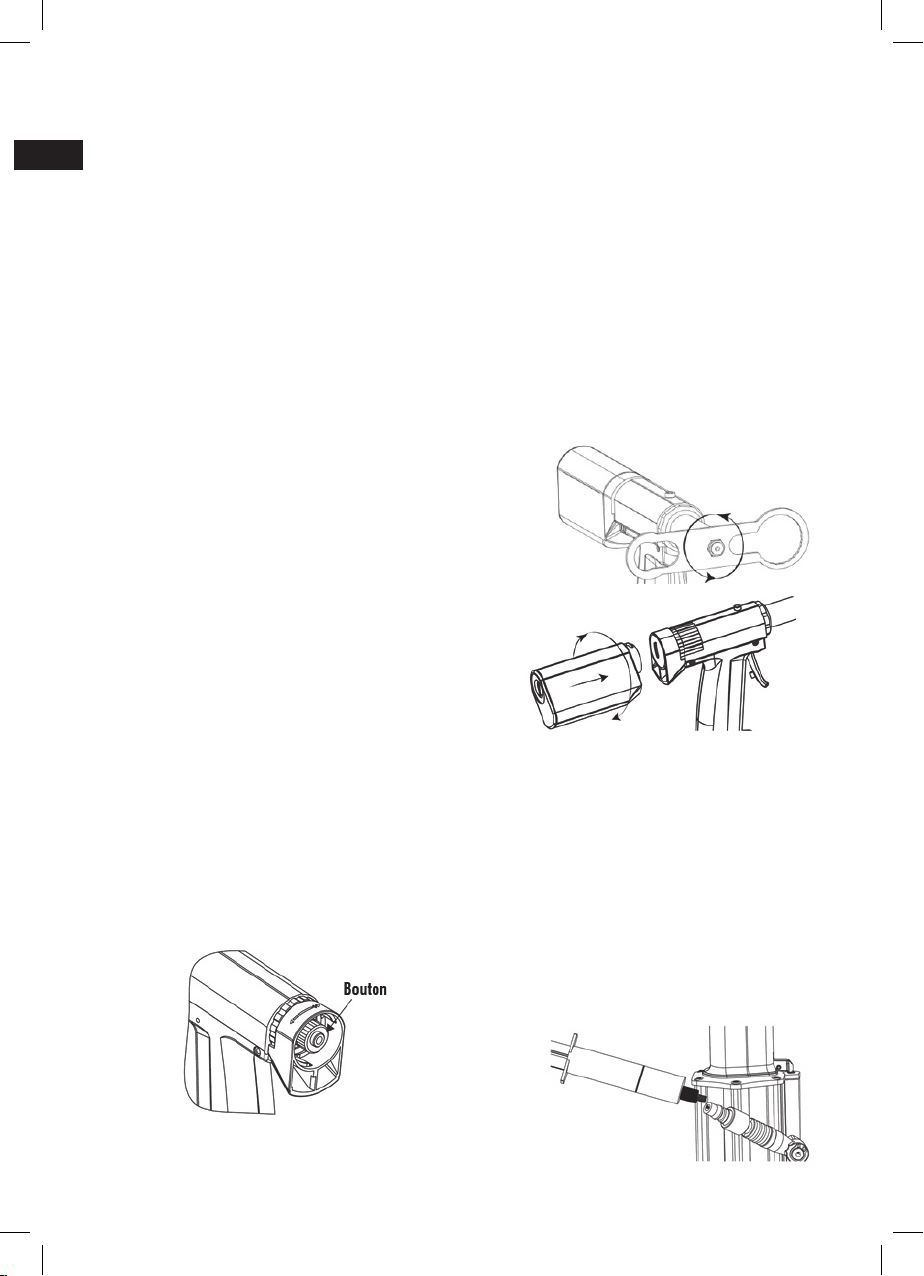
•Quand la machine est suspendue
par le crochet d’opération pendant
l’utilisation, s’assurer qu’elle ne
puisse pas tomber.
•N’utiliser la machine que sur des
supports pré-percés pour rivet.
•Le port de lunettes protectrices est
obligatoire. Il est recommandé de
porter des chaussures de sécurité,
des vêtements adaptés, des
gants, un casque de sécurité, des
protections auditives et toutes autres
protections nécessaires.
•Ne pas porter de vêtements amples
ni de bijoux. Et veiller à garder les
cheveux, vêtements et gants à l’écart
des pièces en mouvement. Les
vêtements amples, les bijoux ou les
cheveux longs pourraient s’emmêler
dans les pièces en mouvement.
•Retirer les éventuels accessoires ou
clés de réglage avant de mettre la
machine en marche. Une clé montée
sur une pièce rotative de l’outil peut
entraîner des blessures.
•Ne pas laisser les personnes non
familiarisées ou expérimentées
utiliser la machine.
•Tenir les enfants et toutes autres
personnes à l’écart pendant
l’utilisation de la machine. Un
moment d’inattention peut vous faire
perdre le contrôle de la machine.
•Toute modification de l’outil, de
ses accessoires ou de ses pièces
de rechange reste sous la seule
responsabilité du client.
•N’utiliser que les pièces de rechange
vendues par le fabricant.
•Les réparations doivent être
effectuées par une personne
habilitée. En cas de doute, toujours
retourner l’outil au distributeur.
•L’outil doit être entretenu
correctement et il doit être
régulièrement testé pour vérifier
son bon fonctionnement. Vérifier
que les pièces mobiles ne bloquent
pas le système. Vérifier également
qu’aucune pièce ne soit cassée
ou endommagées, cela pourrait
altérer le fonctionnement de l’outil.
Toujours faire réparer les pièces
endommagées avant d’utiliser l’outil.
•Ne jamais diriger la machine vers
soi, vers une autre personne ou vers
un animal.
•L’oxygène ou d’autres gaz
inflammables provenant de bouteilles
à pression ne doivent pas servir
d’agent d’entraînement.
•Éviter tout contact inutile avec le
fluide hydraulique afin d’éviter toute
réaction allergique de la peau.
•A la fin de sa durée de vie, jeter l’outil
dans un endroit adapté afin que les
pièces puissent être recyclées.
•Le régulateur de pression doit être
équipé d’un filtre pour éviter les
impuretés et l’eau.
FRANÇAIS

E-649RP / Mode d’emploi
10
EN
FR
PL
CZ
IT
Afin de bien comprendre les pièces de l’outil décrites dans ce mode d’emploi, veuillez-vous
reporter au schéma d’illustration de l’outil. Les descriptions des pièces de l’outil figurant dans ce
manuel sont en italique avec les numéros des pièces correspondant à la vue éclatée de l’outil.
1) Cet outil à moteur pneumatique doit être utilisé avec une alimentation en air comprimé.
Il est recommandé d’utiliser un tuyau d’air dont le diamètre est supérieur à 8 mm.
2) Vérifiez que la pression de l’air comprimé se situe entre 0,5 et 0,7 MPa, et connectez l’adaptateur du
tuyau d’air sur l’adaptateur de l’outil (#50). L’adaptateur d’air de l’outil existe en différentes versions selon les
pays et les régions. Normalement, les outils sont équipés par défaut de la bonne version. Si l’adaptateur
d’air de l’outil ne correspond pas à votre adaptateur du tuyau d’alimentation en air, veuillez contacter le
distributeur de l’outil.
3) Changez et sélectionnez le bon nez (#1) en fonction de la taille du rivet à poser. Cet outil est fourni avec des
nez de pose pour des rivets de structure (voir section CAPACITE DE LA MACHINE).
Suivez les étapes ci-dessous pour changer le nez de pose (#1) :
AVANT TOUTE UTILISATION
a) Retirez le tuyau d’air de l’adaptateur (#50).
b) Utilisez la clé fournie pour retirer le nez de pose (#1) de l’outil.
c) Sélectionnez le bon nez (#1) et vissez-le sur l’outil en utilisant
la clé pour le fixer correctement.
REGLAGE DE L’OUTIL POUR LA POSE DE RIVETS
1) Après avoir suivi les étapes de préparation préalables, insérer la tige du rivet dans le nez de pose puis tout en
maintenant l’outil, positionner la tête du rivet dans le trou préalablement percé du support de pose.
2) Appuyer sur la gâchette (#46) pour fixer le rivet.
3) Après la pose, la tige tombe automatiquement dans le bol récupérateur (#25). Assurez-vous de vider le bol
récupérateur (#25) régulièrement pour un bon fonctionnement de l’outil.
4) Vous pouvez régler la puissance à l’aide du bouton situé à l’arrière de l’outil.
5) Vous pouvez également suspendre
l’alimentation en air (#51) en faisant coulisser
la bague d’ouverture/fermeture du circuit
d’alimentation.
4) Installez le bol récupérateur (#25, fourni avec les accessoires)
à l’arrière de l’outil :

E-649RP / Mode d’emploi
11
EN
FR
PL
CZ
IT
ENTRETIEN DE L’OUTIL
5) Testez la course de l’outil. Si la course ne suffit toujours pas, cela signifie qu’il y a peut-être de l’air qui s’est
installé dans le cylindre d’huile (#13) lorsque vous le remplissiez. Il faut donc libérer l’air de l’outil.
Connectez l’outil à l’alimentation d’air, appuyez sur la gâchette (#46) de l’outil 6 ou 7 fois, puis desserrez la
vis (#11), laissez s’échapper l’air supplémentaire, puis revissez à nouveau la vis (#11) :
1) Retirez la vis (#11) à l’aide d’une clé hexagonale :
3) Vissez l’adaptateur d’injection d’huile (fourni avec
les accessoires) dans le trou où la vis (#11) a été
retirée :
4) Utilisez l’injecteur d’huile (fourni avec les
accessoires) pour injecter l’huile lentement
jusqu’à ce que vous ne puissiez plus remplir.
Retirez l’injecteur et son adaptateur, puis nettoyez
l’huile sur l’outil et vissez correctement la vis
(#11) à l’outil.
2) Connectez l’arrivée d’air et recouvrez le trou où
la vis (#11) a été retirée avec un chiffon puis
relâcher la gâchette (#46) pour que l’huile
s’échappe de l’outil :
Si la machine n’est pas équipée d’un dispositif de lubrification au niveau de la distribution d’air, il est
recommandé d’ajouter régulièrement quelques gouttes d’huile hydraulique à l’entrée de l’adaptateur d’air (#50)
afin de préserver performances de l’outil. Quand l’outil est en marche, l’huile est injectée à l’intérieur du système
et permet de réduire les frictions entre les différentes pièces.
Après une certaine période d’utilisation, la course de l’outil peut être réduite. Cela indique que vous devez remettre
de l’huile hydraulique dans l’outil pneumatique ou changer d’huile :

E-649RP / Mode d’emploi
12
EN
FR
PL
CZ
IT
Après plusieurs utilisations, il est possible que de petits bouts de métal soient coincés dans l’assemblage du nez
ce qui altère la performance de l’outil. C’est pourquoi il est recommandé de nettoyer ou de changer régulièrement
les pièces de l’assemblage.
1) Vous pouvez utiliser la clé fournie avec l’outil ou une clé de votre choix :
2) Démontez le nez de pose (#1)
de l’outil : 4) Démontez la douille de serrage
(#3) :
3) Démontez la partie avant (#2) :
5) Retirez toutes les pièces de l’assemblage, le jeu de 3 mors (#4) de la douille de serrage (#3), la tige
d’assemblage (#5), le ressort (#6), la tige (#20), pour les nettoyer.
Pensez également à vérifier si certaines pièces sont abimées afin de pouvoir les changer :
6) Pour assembler de nouveau les parties
nettoyées, mettez le ressort (#6) sur la tige
d’assemble (#5), et insérer cet ensemble dans
l’outil au niveau de la partie cylindrique huilée
(#13) :
Partie n°1 de la clé : pour l’ajusteur arrière (#22) ;
Partie n°2 de la clé : pour la douille de serrage (#3) ;
Partie n°3 de la clé : pour les nez de pose (#1) ;
Partie n°4 de la clé : pour la partie avant (#2) ;
7) Mettez le jeu de 3 mors (#4) dans la douille de
serrage (#3) et assurez-vous qu’ils soient bien
positionnés comme sur
le schéma ci-dessous :

E-649RP / Mode d’emploi
13
EN
FR
PL
CZ
IT
8) Mettez la douille de serrage (#3) avec le jeu de
3 mors (#4) correctement positionnés sur la tige
d’assemble (#5) et assurez-vous que tout soit
bien fixé :
9) Assemblez la partie avant (#2) et le nez de pose
(#1) sur l’outil :
EVENTUELS PROBLEMES RENCONTRES
PROBLÈMES CAUSES POSSIBLES SOLUTIONS
La tige du rivet ne se case pas
•Le jeu de 3 mors sont usés
ou abimés
•Le niveau d’huile n’est pas
suffisant
•La pression de l’air est trop
basse
•Changer les jeux de mors
•Remplir le réservoir d’huile
•Augmenter la pression de
l’air.
Les jeux de mors glissent sur
le mandrin.
•Le jeu de 3 mors sont usés
ou abimés
•Des bouts de métal sont
coincés entre les mors
•Le ressort est usé
•Changer les jeux de mors
•Nettoyer les mors
•Changer le ressort
Impossibilité de mettre la tige
du rivet dans le nez de pose.
• La taille du nez de pose
choisi n’est pas la bonne
•Les mâchoires sont bloquées
par une tige non libérée
•Sélectionner la bonne taille
de nez
•Retirez manuellement la tige
du rivet en démontant la
partie avant et la douille de
serrage
La tige du rivet n’est pas
aspirée correctement dans le
bol récupérateur.
•La puissance d’aspiration
n’est pas suffisante ;
•La pression de l’air est trop
basse.
•Augmentez la puissance
d’aspiration
•Augmenter la pression de
l’air

E-649RP / Mode d’emploi
14
EN
FR
PL
CZ
IT
VUE ÉCLATÉE

E-649RP / Mode d’emploi
15
EN
FR
PL
CZ
IT
Le fabricant :
Déclare par la présente que le produit suivant :
Riveteuse pneumatique hydraulique pour rivets de structure type E-649RP
Conforme aux conditions suivantes :
Directives européennes sur l’outillage 2006/42/CE, Annexe I
En cas de modifications sur la machine à notre insu et sans notre consentement, cette
déclaration de conformité CE sera annulée.
Principales normes harmonisées appliquées :
EN ISO12100:2010 + EN ISO11148-1:2011
Nom du responsable de la documentation : Nadia FAYTRE
Adresse du responsable de la documentation : voir l’adresse du fabricant
Lesquin, 30/07/2019
___________________________________________________________________
Franck DEBRUYNE
(Directeur général)
SCELL-IT
28 RUE PAUL DUBRULE
59810 LESQUIN
FRANCE
Tél.: +33(0) 320 329 818
CERTIFICAT DE CONFORMITÉ CE - DIRECTIVE CE
2006/42 / CE ANNEXE II 1A
CONDITIONS DE GARANTIE
Pendant la période de garantie, le client ne doit effectuer aucune modification autre que celles autorisées par le
fabricant (maintenance). Les réparations doivent être effectuées par un centre de service habilité.
Pour bénéficier d’une réparation sous garantie, le client doit renvoyer l’outil défectueux au centre de service du
fabricant avec la preuve d’achat. La garantie n’est valable que si l’outil est dans sa période de garantie (12 mois à
compter de la date d’achat confirmée par la preuve d’achat) et si les conditions d’utilisation ont été respectées.
La garantie n’est pas valable si les pièces de rechange usées doivent être remplacées (suite à une utilisation
normale de l’outil).

E-649RP / Instrukcja obsługi
16
EN
FR
PL
CZ
IT
WYDAJNOŚĆ NARZĘDZIA
Nit strukturalny Monobolts lub odpowiednik z kołnierzem standardowym 4.8mm
Nosek K/3.1 art. nr P09011-00
Nit strukturalny Monobolts lub odpowiednik z kołnierzem standardowym 6.4mm
Nosek M/4.2 art. nr P09013-00
Nit strukturalny Interlok lub odpowiednik z kołnierzem standardowym 4.8mm
Nosek J/3.2 art. nr P09010-00
Nit strukturalny Interlok lub odpowiednik z kołnierzem standardowym 6.4mm
nosek L/4.5 art. nr P09012-00
Nit strukturalny Monobolts / Interlok lub odpowiednik z kołnierzem stożkowym lub
standardowy nit zrywalny 4.8mm – nosek P/3.3 art. nr P03147-00
Nit strukturalny Monobolts / Interlok lub odpowiednik z kołnierzem stożkowym lub
standardowy nit zrywalny 6.4mm – nosek L/4.3 art. nr P03146-00
SPECYFIKACJA
NARZĘDZIA
Ciśnienie powietrza :
0.5Mpa ~ 0.7Mpa
Siła trakcyjna :
14,225 N ~ 19,915 N
Skok : 26 mm
Waga netto: 1.80 kgs
PRZECZYTAJ UWAŻNIE INSTRUKCJĘ
PRZED UŻYCIEM NARZĘDZIA!
WAŻNE jest przestrzeganie instrukcji bezpieczeństwa w
celu zapewnienia odpowiedniej ochrony przed obrażeniami.
OGÓLNE INSTRUKCJE I ZASADY BEZPIECZEŃSTWA
POLSKI
UWAGA
• To narzędzie powinno być używane
tylko i wyłącznie do aplikowania
nitonakrętek zgodnych z OPISEM
WYDAJNOŚCI URZĄDZENIA. Nie
może być używane do innych celów
takich jak np. młotek.
• To narzędzie powinno być zawsze
uruchamiane przy zasilaniu
sprężonym powietrzem w zakresie
ciśnienia powietrza 0,5Mpa ~
0,7Mpa;
• ODŁĄCZ dopływ sprężonego
powietrza od narzędzia przed
wymianą części narzędzia, takich
jak trzpień, itp.
• NIE UŻYWAJ narzędzia, gdy jesteś
zmęczony lub pod wpływem
narkotyków, alkoholu lub leków.
Chwila nieuwagi podczas pracy
z narzędziem może spowodować
poważne obrażenia.
• NIE UŻYWAJ narzędzia w
środowiskach opisanych poniżej :
- opary paliw i spalin
- gwałtowne skoki temperatur
- wilgoć, deszcz, burza i
wyładowania elektryczne
• Gdy narzędzie jest zawieszone
na haku operacyjnym podczas
używania, upewnij się, że nie
spadnie.
• Podczas używania narzędzia zawsze
nosić buty ochronne, okulary
ochronne, rękawice ochronne, kask
ochronny, ochraniacze na uszy i
inne niezbędne zabezpieczenia. Jest
to wysoce zalecane ze względów
bezpieczeństwa.
• Noś odpowiednią odzież. Nie noś
luźnej odzieży ani biżuterii. Trzymaj
włosy, odzież i rękawice z dala od
ruchomych części. Luźna odzież,
biżuteria lub długie włosy mogą
zaplątać się w ruchome części.
• Usuń narzędzia montażowe lub
klucze przed włączeniem narzędzia
pneumatycznego. Klucz podłączony
do obracającej się części narzędzia
może spowodować obrażenia.
• Nie należy zezwalać osobom, które
nie przeczytały tej instrukcji obsługi
lub nie są zaznajomione z obsługą
tego narzędzia na używanie go.
• Podczas pracy z narzędziem trzymaj
dzieci i inne osoby z dala. Jeśli
się rozproszysz, możesz stracić
kontrolę nad narzędziem.
• Wszelkie naprawy muszą być
wykonywane przez wykwalikowany
personel, w razie wątpliwości
zawsze należy zwrócić narzędzie do
dystrybutora.
• Wszelkie modykacje narzędzia,
akcesoriów lub części zamiennych
leżą w wyłącznej odpowiedzialności
klienta.
• Narzędzie musi być utrzymywane
w doskonałym stanie i regularnie
testowane pod kątem uszkodzeń i
prawidłowego działania. Sprawdzaj,
czy ruchome części działają
prawidłowo i nie zacinają się oraz
czy części nie są uszkodzone
lub uszkodzone w sposób, który
zakłóca działanie narzędzia. Napraw
uszkodzone części przed użyciem
narzędzia.
• Nie wolno celować narzędziem w
inną osobę.
• Tlen lub inne łatwopalne gazy z butli
ciśnieniowych nie mogą służyć jako
środek napędowy
• Unikaj niepotrzebnego kontaktu
z płynem hydraulicznym, aby
zapobiec możliwej reakcji
alergicznej skóry.
• Po okresie użytkowania wyrzuć
narzędzie zgodnie z obowiązującą
utylizacją.
• Regulator ciśnienia musi być
wyposażony w ltr, aby uniknąć
zanieczyszczeń i wody.

E-649RP / Instrukcja obsługi
17
EN
FR
PL
CZ
IT
OBSŁUGA NARZĘDZIA PODCZAS NITOWANIA
1) Po przygotowaniu do uruchomienia, włóż trzpień nitu do noska i przytrzymując narzędzie, włóż nit do
wstępnie wywierconego otworu elementów obrabianych, gdzie elementy robocze mają zostać
przytwierdzone.
2) Naciśnij spust narzędzia (# 46), aby zerwać nit na obrabianym przedmiocie.
3) Po zerwaniu nitu, trzpień nitu zostanie automatycznie zassany do pojemnika na trzpienie (# 25). Pamiętaj,
aby opróżnić pojemnik na trzpienie (# 25) w odpowiednim czasie, w przeciwnym razie narzędzie nie będzie w
stanie prawidłowo zassać trzpienia.
4) Moc zasysania powietrza można regulować, za pomocą pokrętła z tyłu narzędzia widocznego po zdjęciu
pojemnika na trzpienie.
5) Wąż adaptera powietrza (# 51)
wyposażony jest w przesuwny przełącznik
do wstrzymania dopływu powietrza. Aby móc
oszczędzać powietrze.
ROZPOCZĘCIE PRACY
Proszę zapoznać się ze SCHEMATEM NARZĘDZIA i LISTĄ CZĘŚCI ZAMIENNYCH
zamieszczonych w instrukcji obsługi, aby dobrze zrozumieć opisane części narzędzia.
Opisy części narzędzia pojawiają się w niniejszej instrukcji opisane kursywą, a numery
pozycji części odpowiadają numerom zamieszczonym na schemacie narzędzia.
1) To pneumatyczne narzędzie powinno być zasilane sprężonym powietrzem. Zaleca się stosowanie węża
powietrza o średnicy większej niż 8 mm.
2) Aby sprawdzić ciśnienie sprężonego powietrza czy jest w określonym zakresie pomiędzy 0.5Mpa a 0.7Mpa,
podłącz adapter węża powietrza do adaptera powietrza narzędzia (#50). Adaptery powietrza mają różne
wersje w różnych krajach i obszarach, zazwyczaj narzędzia są wyposażone w prawidłową wersję jako
domyślną, w przypadku, gdy adapter powietrza nie ma zastosowania w adapterze węża doprowadzającego
powietrze, należy skontaktować się z dystrybutorem narzędzi.
3) Wymień i używaj prawidłowego noska (#1) w zależności od typu, kształtu kołnierza i rozmiaru nitu, który na
myć zastosowany. To narzędzie jest wyposażone w zestaw nosków opisanych w WYDAJNOŚCI NARZĘDZIA.
Postępuj zgodnie z krokami poniżej aby wymienić nosek (#1):
a) Zdejmij wąż doprowadzający powietrze z adaptera powietrza
(# 50).
b) Użyj klucza montażowego (w zestawie akcesoriów) do zdjęcia
noska (#1) z narzędzia.
c) Wybierz właściwy nosek z zestawu akcesoriów i przykręć do
narzędzia, używając klucza, zamocuj go
mocno na narzędziu.
4) Zainstaluj pojemnik na trzpienie (#25, w zestawie akcesoriów) z tyłu
narzędzia:

E-649RP / Instrukcja obsługi
18
EN
FR
PL
CZ
IT
KONSERWACJA NARZĘDZIA
Jeśli nie ma podłączonego urządzenia smarującego w dystrybucji powietrza, codziennie i przed rozpoczęciem
pracy, dla lepszej wydajności narzędzia, należy dolać kilka kropli oleju hydraulicznego na wlocie adaptera
powietrza (#53) narzędzia, aby zmniejszyć kcję części narzędzia, ponieważ olej będzie wdmuchiwany do
wnętrza narzędzia, gdy narzędzie pracuje.
Po pewnym czasie użytkowania, skok narzędzia może zostać zredukowany, to pokazuje, że olej hydrauliczny
narzędzia pneumatycznego jest konieczny do uzupełnienia lub wymiany.
5) Przetestuj skok narzędzia. Jeśli skok nadal nie jest wystarczający, oznacza to, że w cylindrze oleju (#13)
może znajdować się trochę powietrza, które dostało się tam podczas uzupełniania oleju do narzędzia.
Dodatkowe powietrze musi zostać uwolnione z narzędzia.
Podłącz narzędzie do dopływu powietrza, pociągnij za spust (#46) narzędzia 6 lub 7 razy, a następnie poluzuj
śrubę (#11), wypuść dodatkowe powietrze, a następnie ponownie mocno dokręć śrubę (#11).
1) Odkręć śrubę (#11) kluczem sześciokątnym.
3) Wkręć adapter wtrysku oleju (w zestawie
akcesoriów) do otworu, z którego zdjęto śrubę
(#11).
4) Użyj wtryskiwacza oleju (w zestawie akcesoriów),
aby powoli wtryskiwać olej, aż do momentu
gdy nie będzie można więcej (około 15ml), usuń
wtryskiwacz i jego adapter, a następnie oczyść
z oleju narzędzie i mocno dokręć śrubę (#11) z
powrotem do narzędzia.
2) Podłącz dopływ powietrza i przykryj tkaniną
otwór, z którego zdjęto śrubę (#11), pociągnij za
spust (#46), olej wycieknie z narzędzia.

E-649RP / Instrukcja obsługi
19
EN
FR
PL
CZ
IT
Po długim okresie użytkowania narzędzia, możliwe jest, że wióry metalowe powstałe ze zrywania nitów
pozostaną w zespole przedniej tulei narzędzia, co wpłynie na wydajność narzędzia, dlatego zaleca się
czyszczenie zespołu przedniej tulei lub wymianę części cyklicznie:
1) Użyj klucza (z zestawu akcesoriów) i klucza przygotowanego przez użytkownika narzędzia:
2) Zdemontuj nosek (#1) z
narzędzia za pomocą klucza. 4) Zdemontuj tuleję zaciskową (#3).3) Zdemontuj przednią tuleję (#2).
5) Wyjmij szczęki (komplet 3 sztuki) (# 4) z tulei zaciskowej (# 3), wyjmij popychacz montażowy (# 5) i sprężynę
popychacza (# 6) z narzędzia oraz tubę trzpieniową (# 20) i oczyść wszystko. Sprawdź, czy części nie są
zużyte lub uszkodzone, wymień na nowe części jeśli zajdzie taka potrzeba.
6) Ponowne załóż oczyszczone części lub nowe
części do narzędzia. Umieść sprężynę
popychacza (# 6) na popychaczu montażowym
(# 5), i włóż z powrotem do narzędzia, w którym
znajduje się cylinder oleju montażowego (# 13).
Otwór na klucz 1 do montażu tylnego regulatora (# 22);
Otwór na klucz 2 do tulei zaciskowej (# 3);
Otwór na klucz 3 dla nosków (# 1);
Otwór na klucz 4 dla przedniej tulei (# 2);
7) Umieścić komplet szczęk (komplet 3 sztuki) (# 4)
w tulei zaciskowej (# 3), upewnij się, że szczęki są
prawidłowo osadzone.

E-649RP / Instrukcja obsługi
20
EN
FR
PL
CZ
IT
8) Umieść tuleję zaciskową (# 3) z kompletem szczęk
(# 4) na popychaczu montażowym (# 5), upewnij
się, że jest mocno zamontowane:
9) Zamontuj przednią tuleję (# 2) i nosek (# 1) do
narzędzia.
PROBLEMY Z NITOWANIEM
PROBLEMY MOŻLIWE PRZYCZYNY ROZWIĄZANIA
Nit nie może być zerwany
• Komplet szczęk zużyty lub
uszkodzony
• Niewystarczający poziom oleju
hydraulicznego
• Dopływ powietrza o niskim
ciśnieniu
• Wymień komplet szczęk
• Uzupełnij poziom oleju
hydraulicznego
• Zwiększyć ciśnienie dopływu
powietrza zgodnie ze
specykacją
Trzpień nitu ślizga się na
szczękach
• Szczeki zużyte
• Metalowe opiłki pomiędzy
szczękami
• Popychacz sprężyny zużyty
• Wymień szczęki
• Wyczyść szczęki
• Wymień popychacz sprężyny
Trzpień nitu nie może być
umieszczony w nosku
• Źle dobrany rozmiar noska
• Szczęki zablokowane przez
trzpień nitu, który nie wypadł
• Dobierz odpowiedni rozmiar
noska
• Wyjmij pozostały trzpień
poprzez demontaż przedniej
tulei i tulei zaciskowej
Trzpień nitu nie może być
prawidłowo zassany do
pojemnika na trzpienie
• Niewystarczająca moc
zasysania trzpienia
• Zbyt niskie ciśnienie dopływu
powietrza
• Zwiększ moc zasysania
trzpienia, patrz OBSŁUGA
NARZĘDZIA PODCZAS
NITOWANIA sekcja 4
• Zwiększyć ciśnienie dopływu
powietrza zgodnie ze
specykacją
Table of contents
Languages:
Other Scell-it Rivet Tools manuals
Popular Rivet Tools manuals by other brands

FAR
FAR RAC 2200 TRANSLATION OF ORIGINAL INSTRUCTIONS

Sumake
Sumake ST-66151 Original instructions

FAR
FAR K14 EXTRA TRANSLATION OF ORIGINAL INSTRUCTIONS

Würth
Würth ANG 14 Translation of the original operating instructions

Stanley
Stanley SB25PT-05 instruction manual

Bosch
Bosch GRG18V-3600C Operating/safety instructions