Whip Mix VeriBuild User manual

VeriBuild
LCD 3D Printer

This product, this document, and any items associated with this product or document
are the express property of Whip Mix Corporation. Replication or copying, in either partial
or complete form, of the product or the documentation without the express written
consent of Whip Mix Corporation is strictly prohibited.
Whip Mix Corporation reserves the right to make changes to this document and to the
product described herein without notice. Features of the product may change without
modification of this document, and this document may not describe every feature of the
product.
VeriBuild, Alpha 3D, Omega 3D, Whip Mix, and all associated logos are trademarks of Whip
Mix Corporation. Other company names or products mentioned herein are registered
trademarks of their owners.
Copyright ©2019. Whip Mix Corporation. All rights reserved.
Document Number: TM3M2EP0522
Document Version: 2.1
Product Version: VeriBuild, firmware version 1.1.8
Release Date: October 2019

UV Light Safety
This product uses a light engine that outputs ultraviolet light in the UV-A range, with possible trace amounts in the
UV-B range. This product is compliant with the international standard ISO 3059:2012 in accordance with non-destructive
penetration testing of UV irradiance. This product encloses the light engine in opaque and UV-filtered material to
prevent UV light exposure. However, incidental UV light may extrude from the machine due to any of the following:
• Leaving the door open during usage
• Gaps or holes in the sides of the machine
• Transparent or translucent resins
During operation, do not stand near this product for prolonged periods of time, and do not look directly into the lighted area. Improper
exposure to UV light can cause painful eye and skin injuries.
UV Protective Gear
Prolonged Exposure
UV light exposure has the most potential for causing damage to the eyes. Wear UV-filtered glasses,
goggles, or a face shield to protect your eyes from the damaging effects.
Eye Protection
Thick Clothing
Other areas of the skin may be exposed, especially if the product is used in cramped environments.
Wear long-sleeved shirts with collars, long pants, and even cloth hats to protect your skin from
incidental exposure.
Skin Protective
Substances
Topical agents such as sunblock, sun cream, or similar substances can protect against the effects of UV
light, but these are generally designed for outdoor use. Do not rely on such substances in lab
environments, but use them as an extra layer of protection if necessary.
Gloves Skin exposure is most often occurs on the hands, which are oftentimes closest to the product during
operation. Wear thick cloth or rubber gloves to protect your hands from UV exposure.
Direct UV-A light into the eye can lead to irritation, temporary blindness, and the forming of cataracts
on the lens of the eye. UV-B light can compound the cataract-forming effect, and can also lead to
photokeratitis and photoconjunctivitis.
Eye Exposure
Skin Exposure Direct UV-A and UV-B light on the skin can cause localized tanning, burning of the skin, and can lead
to skin cancer in extreme long-term situations.
Resin Safety
Resins provided by Whip Mix are non-carcinogenic acrylic-based photopolymer liquids that give off a light odor. These
resins may cause skin, eye and respiratory system irritation, and skin sensitivities or allergic reactions by skin contact.
Inhalation of a high-vapour concentration may cause headaches and nausea. Whip Mix recommends the following
protective gear when handling photopolymer resins, whether from Whip Mix or from another company.

Resin Protective Gear
The hands are the most likely affected area when handling resins. Wear rubber, nitrile, polyvinyl
chloride, or other chemical-resistant gloves.
Gloves
Face Mask or
Respirator
If the room does not have sufficient ventilation, wear a respirator or medical face mask to protect
against inhalation or accidental exposure to the mouth.
Thick Clothing
Prolonged exposure to resin may cause irritation or may cause allergies to develop where they
previously did not seem to occur. Wear long-sleeved shirts with collars, long pants, and even cloth
hats to protect your skin from incidental exposure.
Eye Protection While using air compressors or due to usage or handling, resin may splash into the eyes. Wear protective
goggles, safety glasses with side shields, or a face shield.
Acute Exposure
This product may cause skin irritation. Symptoms may include a slightly localized redness or rash and
swelling. Repeated exposure may cause sensitization and an allergic skin reaction in some individuals
resulting in contact dermatitis, severe irritation, dryness and cracking.
Skin Contact
Inhalation
This product may be a suspect slight respiratory tract irritation hazard, especially if used at an elevated
temperature or processes which may generate aerosols or mists. Symptoms of irritation may include
coughing, headaches and nausea, mucous production and shortness of breath.
Ingestion
This product may be harmful if swallowed. It may cause nausea, headaches, vomiting, diarrhoea,
and/or central nervous system effects. Keep all food in a separate area away from storage and use
locations. Prohibit eating, drinking and smoking in areas where there is the potential for significant
exposure to this material. Thoroughly wash hands before eating.
Eye Contact This product may cause eye irritation. Symptoms may include excessive tearing, itching, irritation,
blinking and redness.
Chronic Exposure
Prolonged contact may cause sensitivities and allergic reactions. People with pre-existing skin conditions
may incur more significant irritation. Repeated exposure may cause sensitization and allergic skin
reactions in some individuals resulting in contact dermatitis, severe irritation, dryness and cracking.
Skin Contact
Inhalation Prolonged or repeated overexposure may cause irritation, headaches, and nausea.
Ingestion Prolonged or repeated swallowing may be a slight ingestion hazard. Chronic ingestion of high doses
has shown damage to testes in studies with animals.
Eye Contact Prolonged contact may cause redness of eye tissue.
Resins provided by Ackuretta are not readily biodegradable. Releasing these resins into the environment may be illegal according to
the regulations in the usage area.
* Properly dispose of resins in accordance with all applicable federal, state, and local regulations.
For more information, please refer to the Material Safety Data Sheet for your particular resin.
Disposal
To clean prints, Whip Mix recommends using solutions of 95% ethylalcohol or 95-99% isopropyl alcohol (IPA). Both compounds are
colorless, transparent, and naturally give off strong odors. Both compounds have the following major safety concerns:
•Highly flammable and potentially explosive.
•Toxic and can cause adverse conditions from ingestion, inhalation, or direct contact.
•Evaporate quickly so they can become airborne toxins.
Adverse conditions may include:
Skin Contact This product may cause skin irritation. Symptoms may include skin discoloration, dryness, and cracking.
Eye Contact This product may cause eye irritation. Symptoms may include excessive tearing, itching, irritation,
blinking and redness.
Inhalation This product may be a slight respiratory tract irritation hazard. Symptoms may include nose, throat,
and lung irritation, coughing, and/or shortness of breath.
Ingestion This product may be harmful if swallowed. It may cause nausea, headaches, vomiting, and/or
unconsciousness. It can also affect concentration and vision.
Chronic Exposure
Skin Contact
Prolonged contact may cause sensitivities and allergic reactions. Repeated exposure may cause
sensitization and allergic skin reaction in some individuals, resulting in contact dermatitis, severe
irritation, dryness and cracking. Alcohol can be absorbed through the skin and may result in
symptoms similar to those listed under acute ingestion.
Eye Contact Prolonged contact may cause redness of eye tissue.
Inhalation Repeated high exposure may affect the liver and the nervous system.
Ingestion
Occupational exposure is unlikely to cause cancer, but direct and repeated ingestion may increase
the risk of liver, esophagus, breast, prostate, and colorectal cancers. Pregnant women should not
ingest alcohol, and repeated exposure may cause spontaneous abortions, birth defects, and other
developmental problems. Repeated ingestion may also reduce fertility in males.
To avoid these potential issues, do the following:
•Store in cool, dry, and well-ventilated areas.
•Label containers with instructions regarding handling and storage.
•Keep away from any sources of heat, fire, and sparks.
•Keep away from strong oxidizers, acetaldehyde, chlorine, ethylene oxide, acids and isocyanates.
•Close containers tightly with a strong seal immediately after use.
•Dispose of in accordance with all applicable federal, state, and local regulations.
Cleaning Alcohol Safety
Acute Exposure

TABLE OF CONTENTS

Chapter 1
About the VeriBuild
01 Specifications
01 Features
02 Package Contents
02 Machine Overview
03 Machine Console Interface
03 Web Console Interface
Chapter 2
Getting Started
04 Unboxing Your Machine
06 What You Need
07 Setup Environment
08 Connecting to Your Wi-Fi Network
11 Attach Your Vat
12 Fill Your Vat With Resin
13 Attach Your Build Platform
Chapter 3
Printing
15 Designing Your 3D Model
15 Making Your Print File
16 Printing Using a USB Device
19 Printing via the Web Console
21 Printing Process
Chapter 4
Finishing Your Print
23 Removing Your Print from the Printer
25 Separating Your Print from the Build Platform
27 Cleaning and Drying Your Print
29 Cutting Supports
30 Curing Your Print in a UV Oven
Chapter 7
Troubleshooting
59 Checking the LCD Panel for Problems
63 Replacing the LCD Panel
Chapter 5
Configuring Your Printer
31 Printer Settings
35 Updating the Settings
37 Material Settings
41 Connecting to Your LAN Network
42 Configuring a Static IP Address
44 Using the Clean Vat Function
47 Cleaning Your Vat
50 Checking the Vat Film for Problems
55 Replacing the Vat Film
Chapter 6
Vat Maintenance

Chapter 1: About the VeriBuild
Specifications
Machine Size 25 ×23 ×38 cm
Weight 9 kg
Printing Size 120 ×68 ×140 mm
XY Resolution 47 μm
Slice Thickness 30 - 200 μm
Resin Wavelength 405 nm
Power Supply 110-240VAC, 50-60Hz
LCD
3D Printing Technology
Resin-based 3D printing has advanced in several stages, starting from laser-based SLA machines to much faster
DLP printers. Whip Mix brings its technical expertise into the next stage of printing with the VeriBuild, a desktop
LCD printer that delivers high-resolution, smooth surface prints at a price point that is ideal for the entry-level
market.
VeriBuild LCD 3D Printer
01
Features
Open Material
System
High Resolution
47 µm
Complete Workflow
Solutions
Advanced
Software
Wi-Fi
Enabled
Smooth Surface
Printing
Auto
Calibration
02
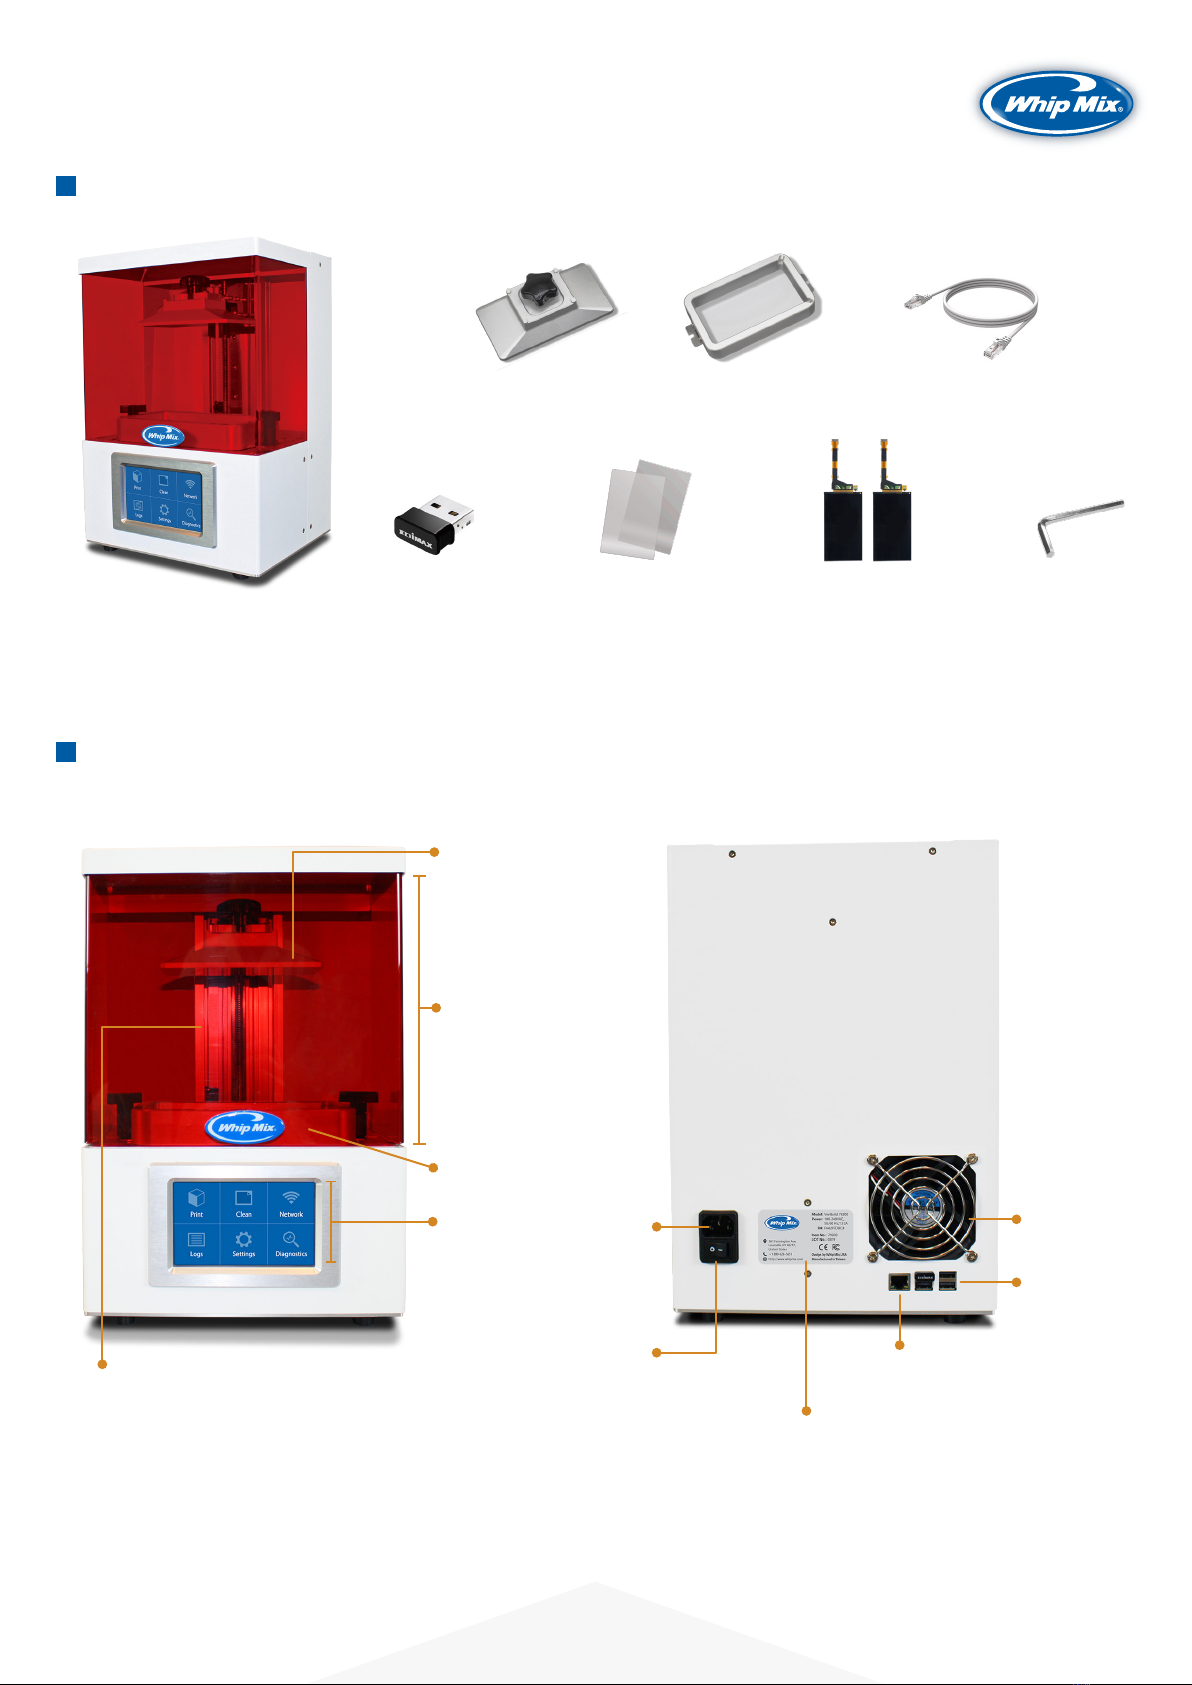
Package Contents
VeriBuild
Machine Overview
Front Side
Console
Build Platform
Vat
Hood
Back Side
Fan
USB Ports
Ethernet/LAN Port
Serial Number Sticker
Power
Port
Power
Switch
Guideway
Ethernet Cable
Vat (×2)
Build Platform
Wi-Fi Dongle LCD Panels (×2) Hex Key
Vat Film Sheets (×2)
VeriBuild LCD 3D Printer

Web Console Interface
The web console is very similar to the machine console interface, with the functions arranged in a browser-friendly
format. To access the web console, you will need to connect to a LAN or Wi-Fi network. For details, see
Connecting to Your Network.
03
Machine Console Interface
When you turn on your VeriBuild, the machine will spend a few seconds loading, and will then show the Home
screen. The Home screen has the following functions:
If your print fails, use the Clean function to remove pieces of prints that did not stick to
the build platform during printing. The Clean function cures one layer of resin at the
bottom of the vat, and then you can easily remove that cured layer and throw away any
other debris with it. For more information, see Using the Clean Vat Function.
Clean
Connect to a Wi-Fi network or a static IP address. For instructions on how to set up a
network connection, go to Connecting to a LAN or Wi-Fi Network.
Network
View the VeriBuild print, system, and error logs.
Log History
Configure your VeriBuild system settings, or update your printer firmware. For more
information, see Configuring Your Printer.
Settings
If your printer encounters a problem, use the Diagnostics functions to determine the
cause of the issue. For more information about VeriBuild diagnostics, please go to
https://whipmix.com/support/.
Diagnostics
The Print screen is the primary screen for uploading files and getting your printer start-
ed. For more information, see Printing.
Print
VeriBuild LCD 3D Printer
Table of contents
Other Whip Mix 3D Printer manuals


