Whitestone DOME GLASS Operation manual

DOME GLASS®
Seesaw Installation User Guide (EN)
User Guide Ultrasonic Fingerprint Model
• Please check all manual and attachment videos before using the product.
• Products damaged or damaged by user negligence cannot be exchanged or refunded.

Seesaw Installation Guide(Ultrasonic Fingerprint Model)
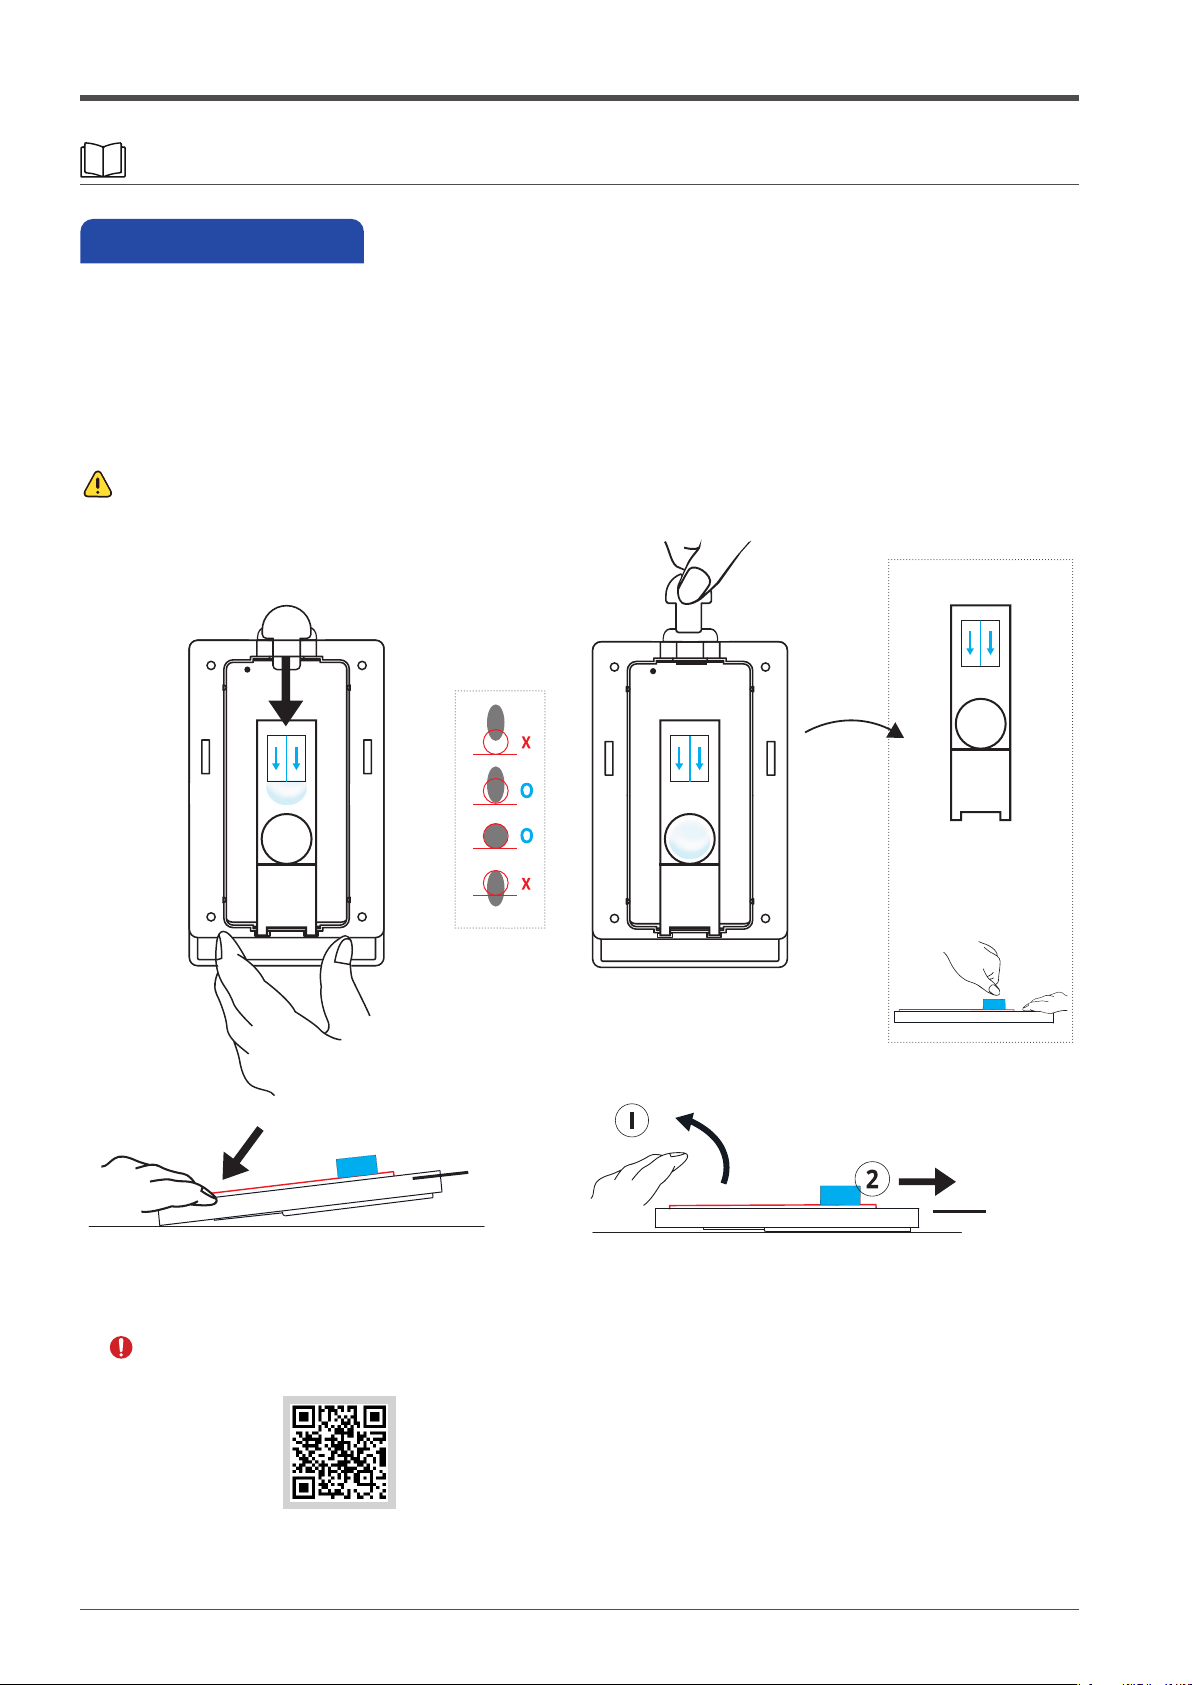
Please make sure to check manual and installation video before using the product.
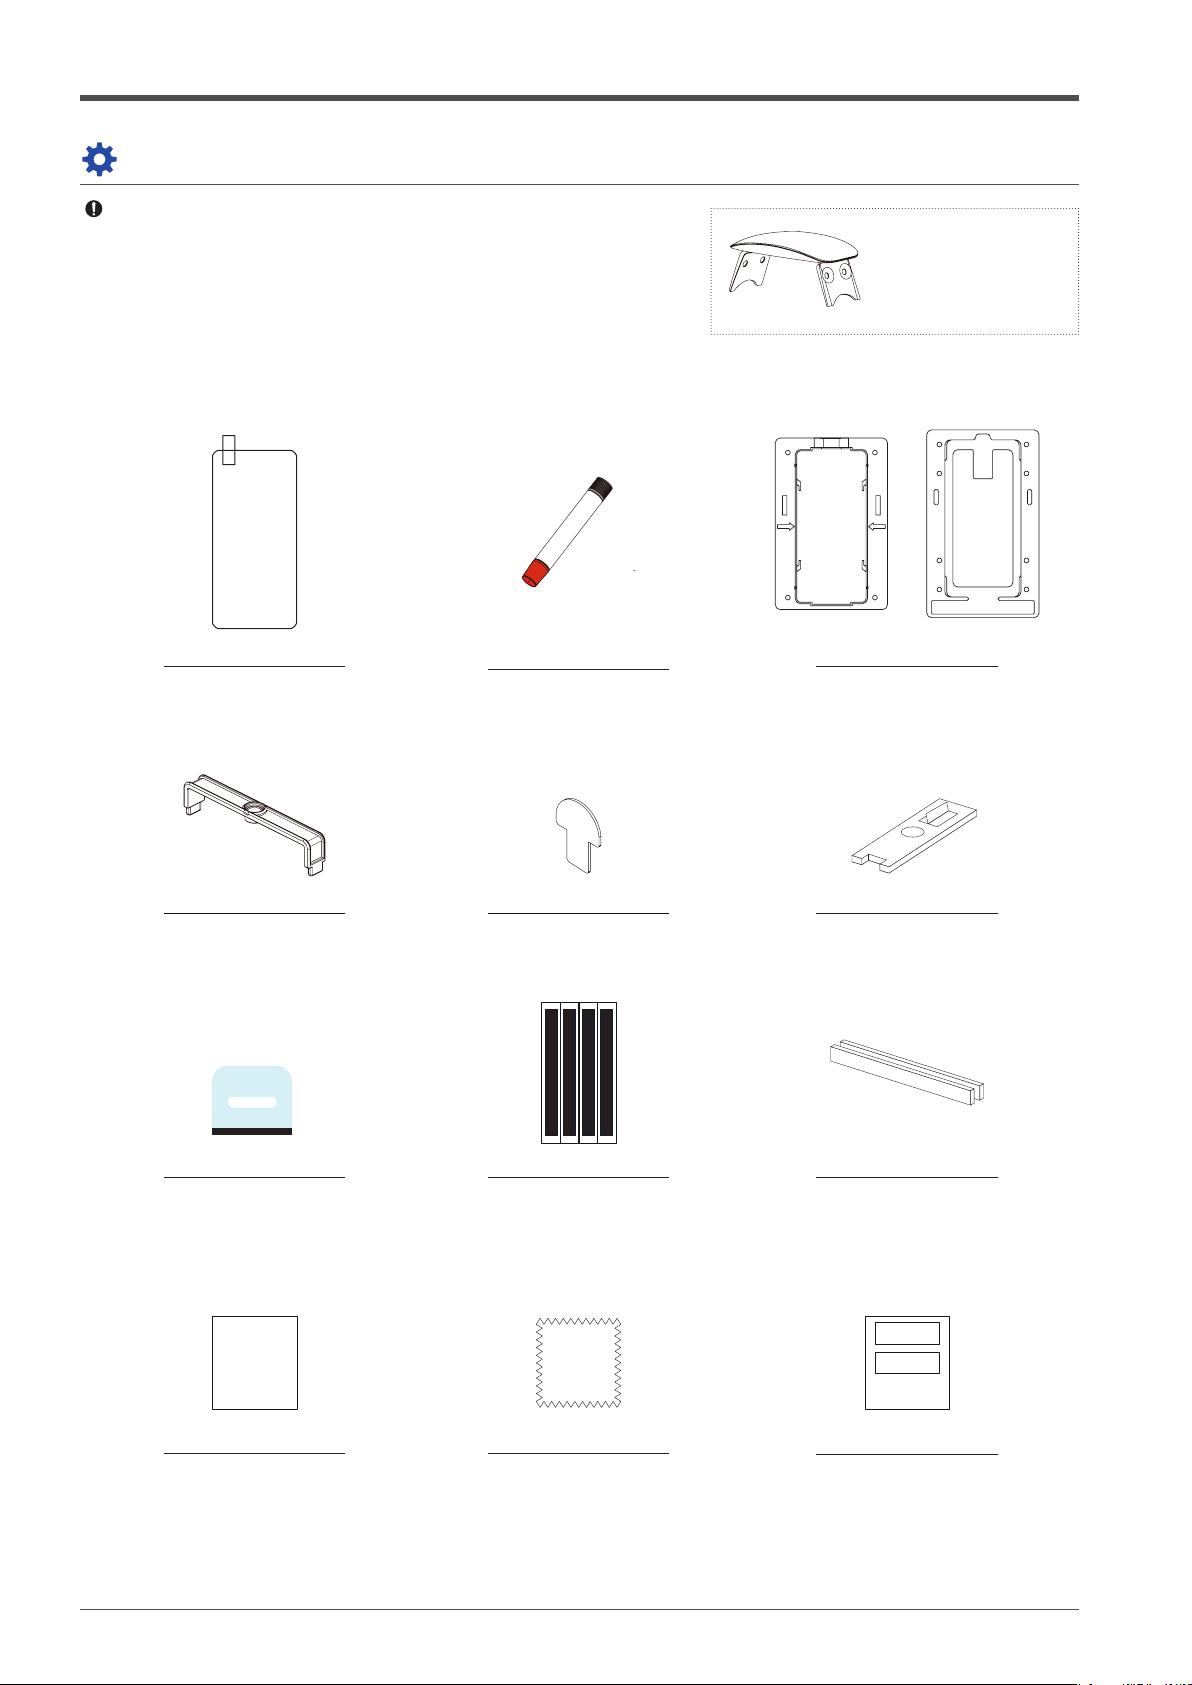
Please check the model and components before using the product.
Cautions before Dome glass installation
UV Curing Machine
Not included in the replacement kit.
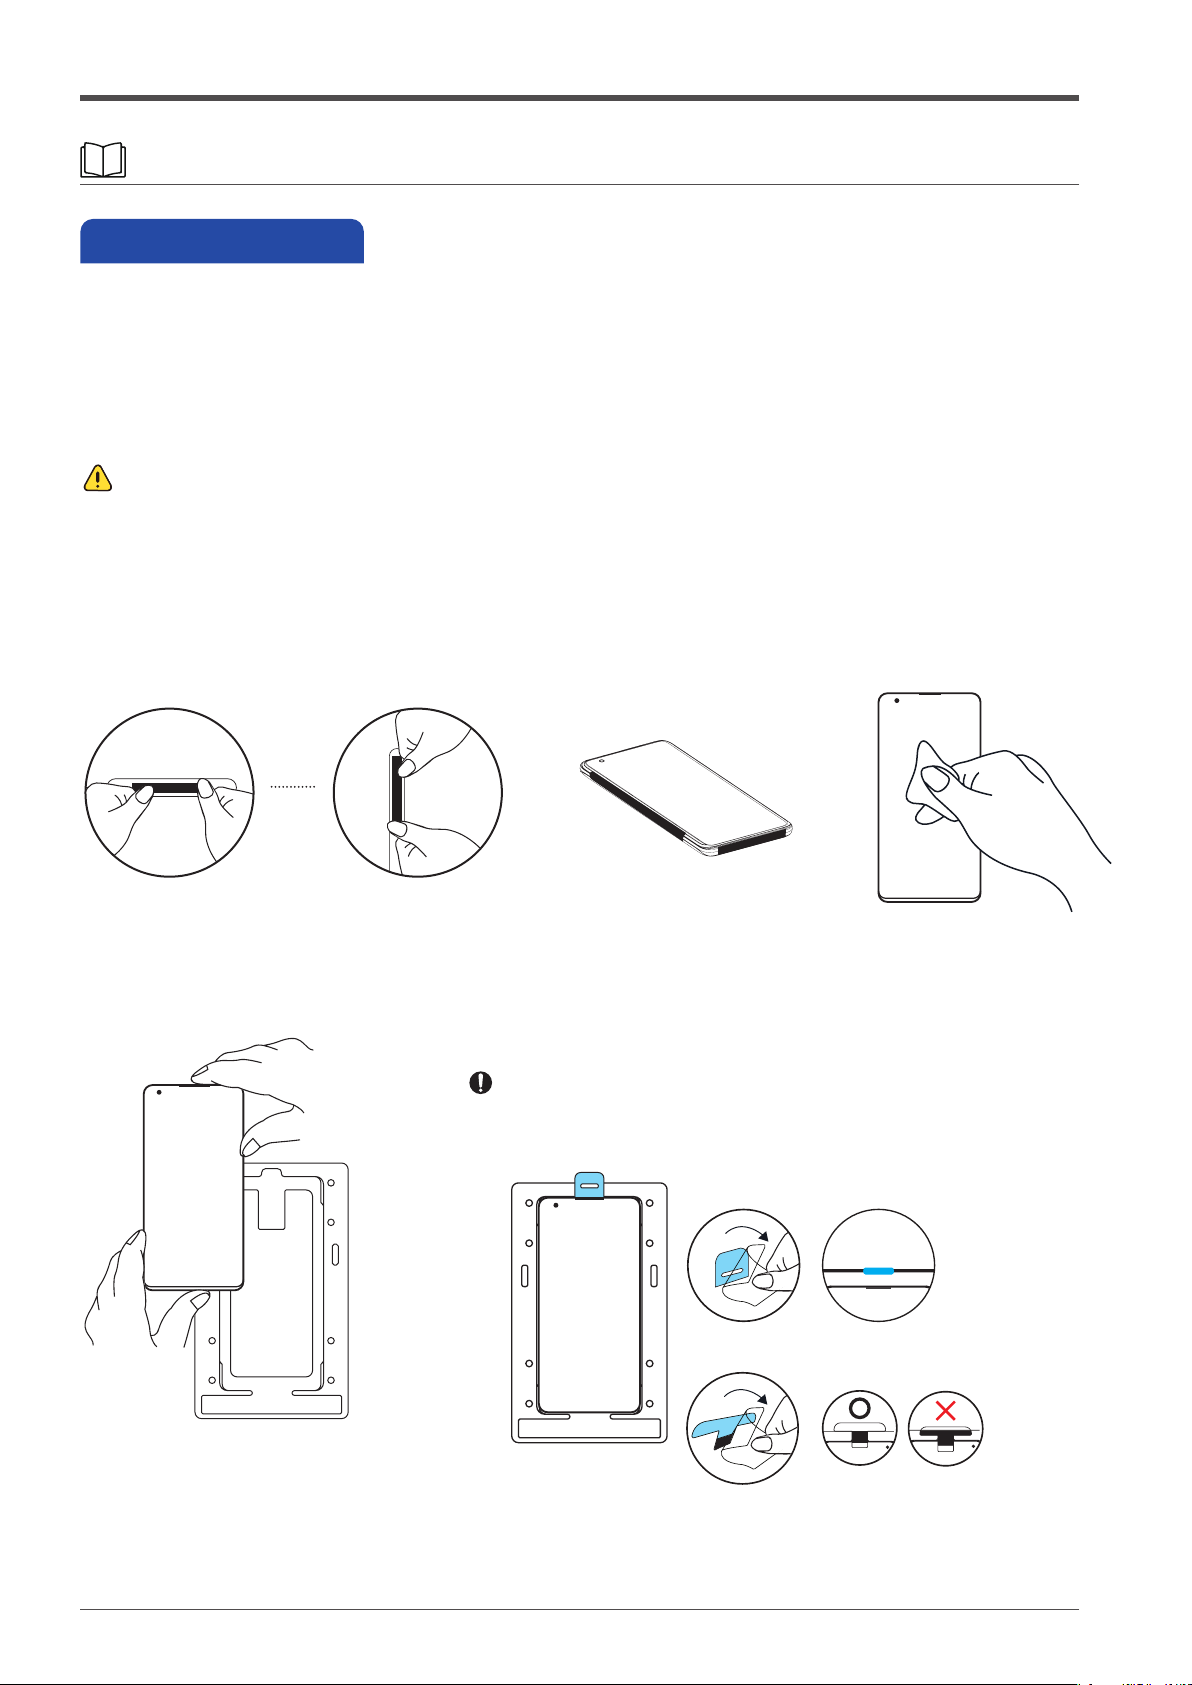
After checking the Quick guide, check the User guide.
<Quick guide / User guide>

Tempered Glass Jig
Speaker Masking
Film
Connector
Masking Film
Position Bridge Pin
Adhesive
Alcohol Wipes Cleaning Cloth
UV Curing Machine
Not included in the
replacement kit.
Liquid Guide
Dust Remover
Sticker
Absorption Pad
Components
Seesaw Installation Guide(Ultrasonic Fingerprint Model)
Reference

STEP1
[Figure1] Attach the connector masking lms to the any buttons or holes located on the
top/bottom/right/left sides. Make sure to cover hole or button thoroughly with
connect masking lm. Wipe the whole screen with alcohol wipes and cleaning clothes.
[Figure2] Insert device rmly into the bottom jig by pushing down on all four sides of your device.
[Figure3] Insert the hole of the speaker masking lm into the protruding part of the bottom jig
and attach it to the speaker part of the Device.
Installation
Top/Bottom [Figure 1]
[Figure 2] [Figure 3]
Right/Left
Seesaw Installation Guide(Ultrasonic Fingerprint Model)
2.General-Type
1. Hole-Type
Guide to speaker masking lm

STEP1
[Figure 1] Close it with the top jig.
[Figure 2] After placing absorption pads on the both side in the top.
[Figure 3] Please remove all dust with the dust removal sticker provided.
Installation
Seesaw Installation Guide(Ultrasonic Fingerprint Model)
Device
[Figure 1] [Figure 2]
[Figure 3]

STEP2
[Figure 1] Insert the pin in the hole in the top part of top jig.
Installation
Seesaw Installation Guide(Ultrasonic Fingerprint Model)
[Figure 1]

STEP3
[Figure 1] Place the black position bridge at the top og the jig.
Installation
Seesaw Installation Guide(Ultrasonic Fingerprint Model)
[Figure 1]

STEP4
[Figure 1] Open the color cap of the adhesive bottle and completely insert
into the position bridge.
[Figure 2] Then, open the black cap to release liquid and wait 30 secs.
[Figure 3] After all the adhesive is poured out, hold the center of the jig lightly and
remove the adhesive bottle and the position bridge together.
Installation
Remove the adhesive bottle
and the position bridge together.
Seesaw Installation Guide(Ultrasonic Fingerprint Model)
[Figure 1] [Figure 2]
[Figure 3]

STEP5
[Figure 1] After removing the liner lm of the Dome glass,
place the glass into the bottom part of the jig.
[Figure 2] Place tempered glass diagonally on bottom of jig and pin.
[Figure 3] Check the liquid guide direction as shown in image. Hold the handle sticker
and place the protrusion of the liquid guide in the groove of the jig.
Then slowly raise the liquid guide until it touches the glass.
Take o your hand from handle sticker after liquid guide touched the glass.
Installation
Seesaw Installation Guide(Ultrasonic Fingerprint Model)
[Figure 1] [Figure 2]
[Figure 3]

STEP6
[Figure 1] Tilt the jig by pressing down the bottom of the jig.
[Figure 2] Once the adhesive moves and touches the tempered glass and if the adhesive is
placed in the circle position of liquid guide, ① remove hands holding down the jig
and then ② remove pin of the jig. Then wait 100 seconds for the adhesive to spread.
Gently hold the jig and remove the liquid guide by holding the handle sticker.
Make sure the adhesive is completely spread out to the edge.
Installation
Seesaw Installation Guide(Ultrasonic Fingerprint Model)
Wait 100 seconds
and remove the
liquid guide
Adhesive doesn't spread completely on the screen!
<Re-installation Manual/Video>
before curing
[Figure 1] [Figure 2]

STEP7
Installation
Once the glass is successfully attached, use the UV light included to initially cure
your device for 15 seconds each on the bottom half and top half of the screen.
Take out the device from the jig and remove all the connector masking lms.
Wipe any liquid adhesive from the edges of the screen with alcohol wipes.
Bottom:15s Top:15s
Seesaw Installation Guide(Ultrasonic Fingerprint Model)

STEP8
Installation
After placing the wiped clean device on the floor, use the UV light for the secondary
curing process for 60 seconds for the bottom part and 60 seconds for the top part.
Repeat this and cure for 1 more minute on both the top and the bottom.
(Total curing time: top 135 seconds and bottom 135 seconds)
Bottom
60s
Top
60s
2st curing x 2
Seesaw Installation Guide(Ultrasonic Fingerprint Model)

Please check the installation Guide.
Precautions after installation
Precautions when removing the tempered glass
Seesaw Installation Guide(Ultrasonic Fingerprint Model)
CONTACT US
HOMEPAGE
GlobalA/S
WHITESTONE Ltd.

Copyright ⓒ 2021 Whitestone Ltd. All rights reserved.
Other manuals for DOME GLASS
5
Table of contents
Other Whitestone Protection Device manuals