Widex Bravo B2-CIC User manual

User’s instructions
The Bravo Series
B2-CIC
Completely-in-canal

3
Contents
Introduction ................................. 4
Getting to know the instrument . . . . . . . . . . . . . . . . . 5
Placing the battery in the battery drawer . . . . . . . . . 6
Recommended energy source:
Zinc Air battery type 10 . . . . . . . . . . . . . . . . . . . . . . . . 8
Turning the hearing aid on and off . . . . . . . . . . . . . . 10
Left/right identification . . . . . . . . . . . . . . . . . . . . . . . 12
Beginning to use the hearing aid . . . . . . . . . . . . . . . 13
Inserting the hearing aid . . . . . . . . . . . . . . . . . . . . . . 14
Removing the hearing aid . . . . . . . . . . . . . . . . . . . . . 16
Automatic adjustment of loudness . . . . . . . . . . . . . . 17
Keeping the hearing aid clean . . . . . . . . . . . . . . . . . . 18
Accessories .............................. 21
The sound outlet .......................... 22
The relief vent, short . . . . . . . . . . . . . . . . . . . . . . 23
The relief vent, full length . . . . . . . . . . . . . . . . . 25
The microphone opening . . . . . . . . . . . . . . . . . . . 26
The CeruSTOP wax guard . . . . . . . . . . . . . . . . . . . . . 27
Removing the used wax guard . . . . . . . . . . . . . . . 28
Inserting a new wax guard . . . . . . . . . . . . . . . . . 29
Important .................................. 31
When not in use .......................... 32
Caring for your hearing aid . . . . . . . . . . . . . . . . . . . . 33
There is only one way . . . . . . . . . . . . . . . . . . . . . . . . 35
Troubleshooting guide . . . . . . . . . . . . . . . . . . . . . . . . 36
Your hearing aid, earmould, cleaning accessories
and the like may not look exactly the same as in
these user’s instructions. We furthermore reserve
the right to make any changes considered neces-
sary.
Hearing aids and their accessories
should not be disposed of with normal
household waste. Please consult your
national Widex distributor for advice
on how to dispose of your hearing aid.

4 5
Introduction
Your Widex Bravo hearing aid is a very intricate,
high precision electronic unit. It has been careful-
ly designed to withstand years of wear, under the
varying conditions the typical user finds them-
selves in each day. However, your hearing aid
may be damaged if exposed to extreme condi-
tions, severe blows, or general neglect.
To get full satisfaction from the quality and the
performance we have built into your new Widex
hearing aid, please handle it with care, and read
and follow the instructions carefully.
At the back of this manual you will find a trouble-
shooting guide, which will help you in situations
where your hearing aid does not perform accord-
ing to your expectations.
Before placing the hearing aid in your ear, make
sure the battery is correctly inserted and that the
aid is switched on.
We hope you will be pleased with your new Widex
hearing aid!
Getting to know the
instrument
On the drawing you will find the most important
features and functions of the hearing aid.
1. Microphone opening
2. Battery drawer
3. Extraction cord
4. Nail grip on the battery drawer
5. Sound outlet
6. Relief vent – full length or short
Ask your hearing healthcare professional to
indicate below the type of vent used in your
hearing aid.
full length short
The right-ear hearing aid is red or has a red
nameplate.
The left-ear hearing aid is blue or has a blue
nameplate.

6 7
Placing the battery in the
battery drawer
Before inserting a new battery
in your hearing aid, remember
to remove the adhesive tab. Do
not use batteries on which there
is a sticky residue from the tab
or other unwanted substance
as this can block the battery
airholes.
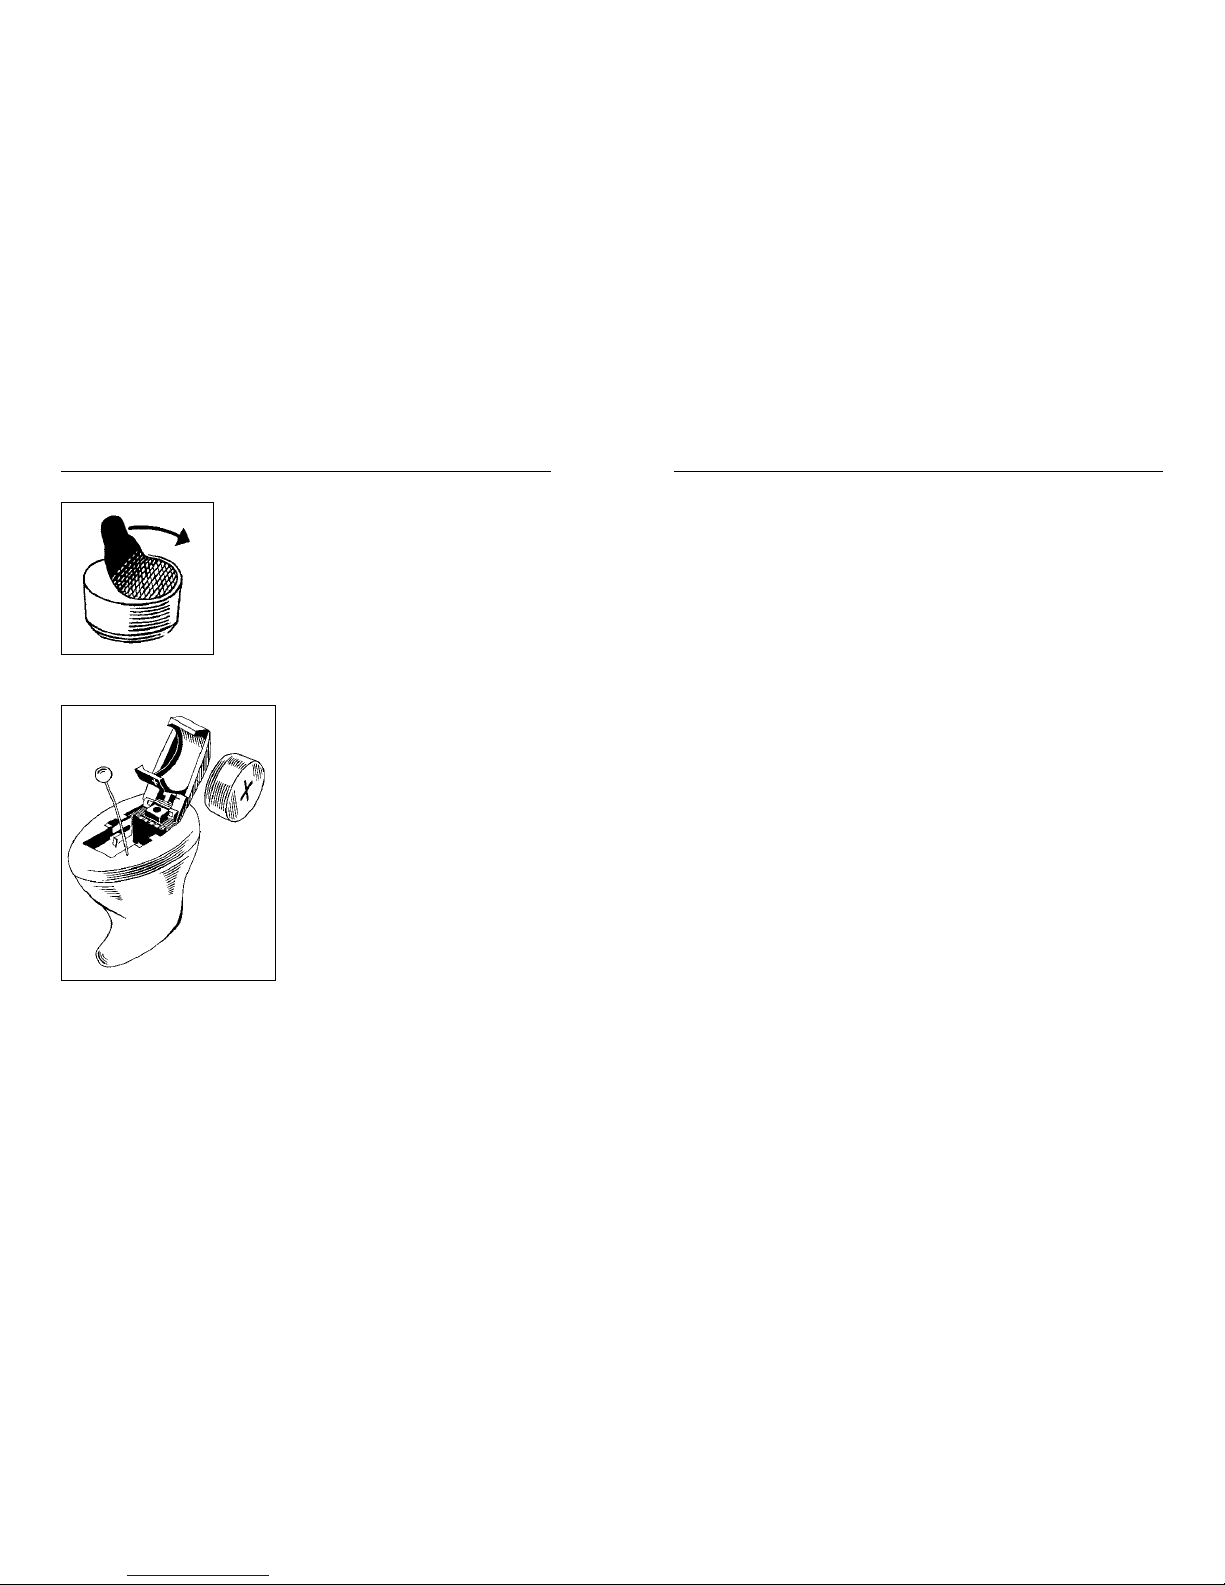
Insert the battery in the
special round holder built
into the battery drawer.
The battery is placed cor-
rectly when the flat side
with the little hole in the
middle is facing towards
the open face of the bat-
tery drawer. Most batter-
ies are marked with a
small plus (+). This plus
should face in the direc-
tion indicated by the
small plus (+) printed on the lower part of the
round battery holder.
Note: When opening the battery drawer, be care-
ful not to force it beyond the upright position (see
illustration).
If the battery drawer does not close easily, the
battery is incorrectly inserted.
Always place the battery in the actual battery
drawer and not in the open space inside the hear-
ing aid.
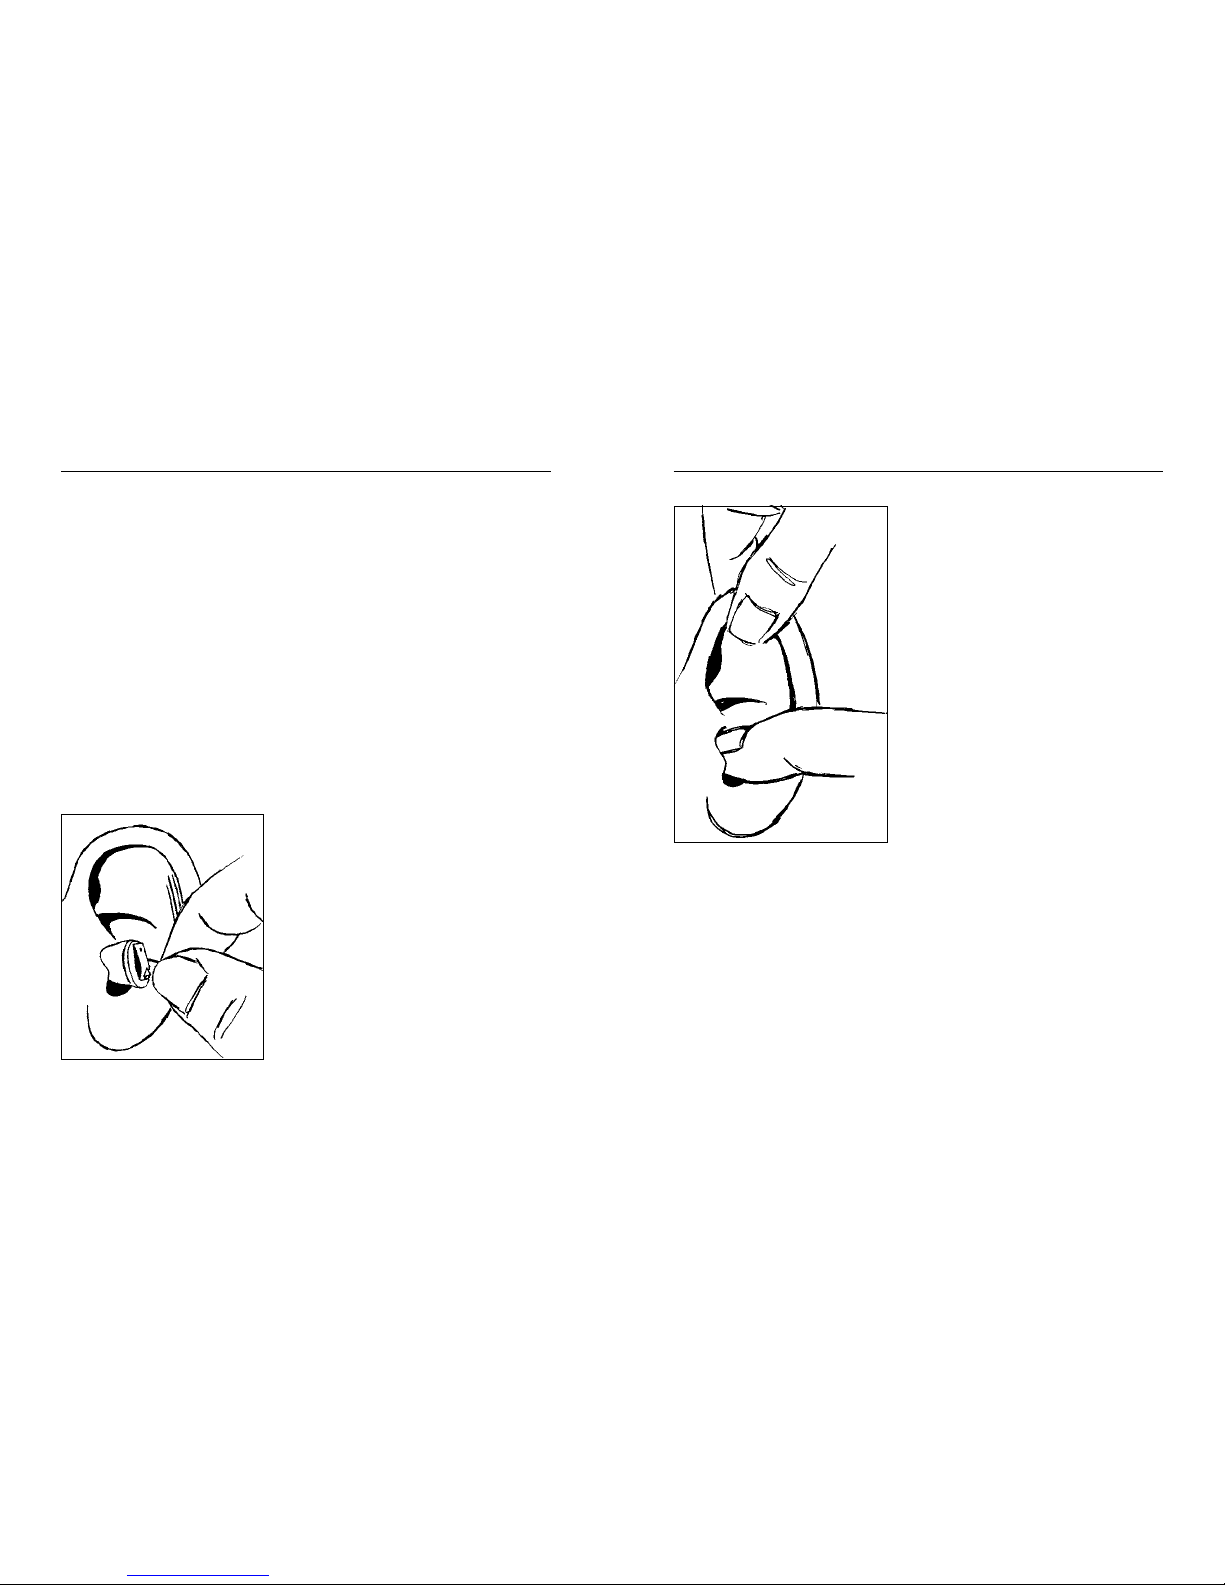
When changing batteries, hold the hearing aid
over a table or a carpet to make it easier to find a
dropped hearing aid or battery.
Exhausted batteries: If you hear four rapid
beep-tones while wearing your hearing aid, it is
an indication that you should exchange the bat-
tery as soon as possible as the battery is nearly
exhausted. Once the battery is totally exhausted,
the hearing aid will be completely silent.
Exactly how long the hearing aid will function af-
ter the beep-tones varies from one case to anoth-
er. We recommend that you always have a spare
battery with you.
The rate at which a battery loses power is depen-
dent upon the circumstances under which the
battery is used. In some circumstances, the bat-
tery can drain so suddenly that the beep-tones for
low battery warning will only be partially pro-
duced or not be produced at all.
Note: Never leave an exhausted battery in the
hearing aid. Leakage from exhausted batteries
may damage the hearing aid.

8 9
Recommended energy source:
Zinc Air battery type 10
This hearing aid uses an environmentally friend-
ly, type 10 Zinc Air battery, which provides a long
lifetime when treated correctly.
Please note the expiry date on the battery pack.
To ensure proper battery function, do not use bat-
teries past the expiry date. Because they are Zinc
Air type batteries, they need air to work. There-
fore, do not remove the adhesive tab until just be-
fore inserting the battery in the hearing aid.
Once inserted, the battery will start functioning
after a few seconds. Operate your hearing aid
with the same battery until it is exhausted.
The lifetime of the battery depends on a number
of factors, such as the setting of your hearing aid,
how many hours you use it daily and the listening
environments in which you use it.
On occasion, a new battery may be exhausted be-
cause it was not sealed properly. If your hearing
aid does not work after you have replaced the bat-
tery, try inserting a different new battery.

10 11
Turning the hearing aid on
and off
The battery drawer is used to switch your CIC
hearing aid on and off.
The hearing aid is turned on when a battery is
inserted correctly and the battery drawer is com-
pletely closed.
When the hearing aid is turned on, it will usually
whistle until it is placed correctly in the ear. This
whistling is quite normal, and is caused by an
acoustic feedback loop between the hearing aid
receiver and the microphone. To turn off the hear-
ing aid, you have to open the battery drawer.
Note: When opening the battery drawer, be care-
ful not to force it beyond the upright position.
Please remember to switch the hearing aid off
when it is not in use. Remove the battery if the
hearing aid will not be used again soon.

12 13
Left/right identification
Bravo B2-CIC shells are made in various colours;
they can be red for the right ear and blue for the
left ear, or they can both be beige, but have a red
Widex logo (right ear) or a blue Widex logo (left
ear).
Beginning to use the hearing
aid
At the beginning it is important that you do not
use your hearing aid for longer than it is comfor-
table. You need time to get used to having the in-
strument placed deep in the ear canal. At first, a
few hours a day may be enough, then you can in-
crease daily use slowly. The goal is of course to
use the hearing aid all day.

14 15
Inserting the hearing aid
Before inserting the hearing aid, you must place
a battery in the battery drawer and close the bat-
tery drawer.
The hearing aid will most probably begin to whis-
tle and will continue to do so until it is placed cor-
rectly in the ear canal. The whistling indicates
that the hearing aid and battery are functioning.
If the hearing aid does not whistle, please check
that the battery is correctly inserted, the battery
drawer is correctly closed and the battery is
fresh.
Hold your hearing aid by
the extraction cord with
your thumb and forefin-
ger. Red marking indi-
cates a right-ear hearing
aid and blue marking a
left-ear hearing aid.
Slowly guide the hearing
aid into your ear canal
until you feel resistance.
Let go of the extraction
cord and use the tip of
your forefinger to gently
push the hearing aid into
your ear until it rests com-
fortably in your canal.
To ease the final adjust-
ments it can be a help to
pull the outer ear up-
wards and backwards
with the opposite hand as
illustrated.
If the hearing aid still whistles after insertion, it
is most probably not correctly placed in the canal.
Pull out the hearing aid and try again.

16 17
Removing the hearing aid
Gently pull the extraction
cord with your thumb and
forefinger. If it is difficult
it may help to try to move
the hearing aid from side
to side while pulling the
cord. It may also help to
pull the outer ear up-
wards and backwards
while applying a little
pressure around the ear opening with the oppo-
site forefinger. This can help to loosen the hear-
ing aid. Then try to remove the hearing aid
again.
Automatic adjustment of
loudness
Your Bravo B2-CIC has no volume control. This is
because the computer inside the hearing aid has
been designed to adjust loudness automatically
in accordance with your sound environment. Sev-
eral thousand times per second, Bravo analyses
the surroundings and adjusts loudness accord-
ingly.
With Bravo you do not have to think about ad-
justing the volume – it happens quite automati-
cally.
Avoid prolonged use of a hearing aid at uncom-
fortably high sound levels – it might damage your
hearing. If the volume in your hearing aid is too
loud or too weak, or if you would like any further
information, consult the hearing healthcare pro-
fessional where you received your hearing aid.

18 19
Keeping the hearing aid clean
Because your Bravo B2-CIC hearing aid is worn
deep in your ear canal, it is very important for its
performance that you inspect and clean the in-
strument daily.
Clean your hearing aid daily with a soft cloth to
keep it dry and clean of residue, wax, etc. Never
wash your hearing aid with water, cleaning solu-
tions or other liquids. When the hearing aid is not
in use, it is a good idea to leave the battery draw-
er open, so as to ventilate the aid and allow it to
dry.
We recommend that every time you take the
hearing aid out of your ear, you inspect the sound
outlet, the microphone opening in the battery
drawer and the relief vent opening to ensure that
no dirt has gathered there.
Below is an example of how the sound outlet, re-
lief vent and microphone opening can be posi-
tioned. The hearing aid illustrated here is pro-
vided with a short vent. The positions can be
slightly different on your hearing aid.
1. Sound outlet
2. Relief vent (short)
3. Microphone opening

20 21
Below is another example of how the sound out-
let, relief vent and microphone opening can be po-
sitioned. The hearing aid illustrated here is pro-
vided with a full length vent. This means that
the vent runs the entire length of the hearing aid.
The positions can be slightly different on your
hearing aid.
1. Sound outlet
2. Relief vent outlet (full length)
3. Relief vent inlet (full length)
4. Microphone opening
Accessories
The following accessories are available for your
hearing aid. Ask your hearing healthcare profes-
sional which accessories you need for your hear-
ing aid:
A. Battery magnet to facilitate insertion of the
battery into the battery drawer.
B. Wax removing tool for cleaning the full
length vent.
C. Wax removing tool with a long end for
cleaning the short vent and a short end for
cleaning the microphone opening.
D. Wax removing tool for cleaning the micro-
phone opening.
E. Small brush for removal of earwax from the
area around the sound outlet.
F. Soft cloth for drying and cleaning the hear-
ing aid.
Widex

22 23
The sound outlet
If wax has gathered
around the sound out-
let this should be re-
moved with the small
brush or cloth. It is im-
portant that the sound outlet is never blocked.
Important: Do not insert anything into the sound
outlet as this could damage the hearing aid.
Your Bravo B2-CIC hearing aid may be equipped
with a CeruSTOP wax guard to prevent earwax
from working its way into the sound canal. See
page 27.
The relief vent, short
If your hearing aid has a short
vent, the vent does not go all the
way through the hearing aid.
If wax has accumulated in and/
or around the relief vent open-
ing, it must be removed. Use the
long end of wax removing tool
C.
Open the battery drawer and
remove the battery so that it does not fall out
when you turn the hearing aid. Turn the hearing
aid upside down, so the open battery drawer is
facing downwards to allow the earwax to come
out this way. Clean any wax from the vent as far
as the long end of the wax removing tool can
reach.

24 25
It is important for the performance of the hearing
aid that the relief vent is never blocked. Make it
a habit to clean the relief vent every day! In
rare cases so much earwax can accumulate in the
relief vent that the sound of the hearing aid
changes. In that case you should see your hearing
healthcare professional.
The relief vent,
full length
If your hearing aid
has a full length
vent, the vent goes
all the way through
the hearing aid, from one end to the other.
If wax has accumulated in and/or around the re-
lief vent opening, it must be removed. Use the
long wax removing tool (B).
Clean any wax from the vent by passing the long
wax removing tool all the way through the vent.
It is important for the performance of the hearing
aid that the relief vent is never blocked. Make it
a habit to clean the relief vent every day! In
rare cases so much earwax can accumulate in the
relief vent that the sound of the hearing aid
changes. In that case you should see your hearing
healthcare professional.

26 27
The microphone
opening
Sometimes dirt may also
gather around the micro-
phone opening on the
hearing aid front. Re-
move this with the short
end of wax removing tool
C or with wax removing
tool D (see page 21). Open
the battery drawer and
remove the battery so it
does not fall out. Turn
the hearing aid so the
open battery drawer is
facing downwards. Guide
the wax removing tool
through the microphone
opening on the battery
drawer from the inside
as illustrated.
Do not insert anything into the microphone
itself.
The CeruSTOP wax guard
The CeruSTOP wax guard system consists of the
following parts:
A. Holder
B. Removal hook
C. Wax guard
CeruSTOP wax guards come in
a carrying case. The wax guard
is mounted on one end of the
holder.
A.
B.
C.

28 29
Removing the used wax guard
Wipe away any visible wax from the shell of your
hearing instrument. The used wax guard is in the
stainless steel bushing around the sound outlet.
With the grey holder perpendicular to the sound
outlet, insert the removal hook into the used wax
guard so that the shaft of the holder is touching
the rim of the wax guard, then slowly pull the
wax guard straight out. There is no need to dig
or twist the wax guard from the bushing.
A. Vent opening
B. Sound outlet
C. Used wax
guard
A.
B.
C.
Inserting a new wax guard
Now turn the grey holder around so that the used
wax guard is away from the instrument and the
new one is in position to be inserted into your
hearing instrument.
Gently press the new wax guard straight into the
opening of the sound outlet. Do not force the wax
guard into the sound outlet. The outer ring of the
wax guard should sit flat on the stainless steel
bushing.

30 31
Then pull the holder straight out. Do not twist the
grey tool. The new wax guard will automatically
dismount from the holder and remain in place.
After inserting the new wax guard, discard the
holder with the used wax guard attached to the
removal hook. Never reuse a wax guard.
Note: If the wax guard fits loosely, discard it and
insert another.
The frequency with which the CeruSTOP wax
guard should be changed varies from one individ-
ual to another depending on, for example, the
type and amount of earwax produced.
If a medical condition exists, such as a perforated
eardrum, or if an ointment is used do not use the
wax guard.
If you have any questions regarding your wax
guard, please contact your hearing healthcare
professional.
The use of a CeruSTOP wax guard does not elim-
inate the need for daily cleaning procedures.
Warning: If the wax guard becomes dislodged
from the hearing aid while in the ear canal, please
contact your physician immediately. Do not try to
remove the wax guard from your ear canal your-
self.
Important
Please be sure to keep your hearing aid and its
accessories out of the reach of children, who
might place them in their mouths.
Keep batteries out of children’s reach and discard
used batteries carefully.
Do not change batteries in front of children or let
them see where you keep your supply.
Never put batteries in your mouth for any reason
and never let a child obtain a battery or place it in
his or her mouth.
In case of ingestion, contact your physician imme-
diately.
The hearing aid is made of modern non-allergen-
ic materials. Still, in rare cases skin irritation can
occur. If you notice skin irritation in or around
your ear or ear canal, contact your hearing
healthcare professional.
The use of hearing aids can lead to the formation
of earwax plugs in your ear canal, which can tem-
porarily reduce your hearing ability. If you sus-
pect that a plug has formed in your ear, contact
your ENT doctor/physician.

32 33
Please be aware that the use of any type of hear-
ing aid may involve a slightly increased risk of in-
fection in the ear canal. An infection can arise as
a result of inadequate ventilation of the ear or
scratches in the ear canal caused by the hearing
aid. Therefore, we recommend that you take off
your hearing aid at night to allow the ear canal to
be ventilated. Make sure that you clean and in-
spect your hearing aid as required. If an infection
occurs it is a good idea to clean your hearing aid
with a disinfecting tissue or the like. Do not un-
der any circumstances use alcohol, chlorine or
similar substances to clean your hearing aid.
When not in use
When your hearing aid is not in use, it should be
placed in the small case, which you can easily car-
ry in a pocket or purse.
Please do not expose your hearing aid to exces-
sive heat, such as leaving it on a window sill, near
a radiator or near a car window.
Caring for your hearing aid
With proper care, your hearing aid will give you
years of reliable service. Here are some things
you can do to prolong the life of your hearing aid:
• Treat your hearing aid as the valuable object
it is: with care.
• Keep it in its storage case in a cool, dry loca-
tion where it cannot be reached by children
or pets.
• Never expose it to extreme temperatures or
high humidity.
• Do not wear your hearing aid in the shower
or swimming, or when using a hair dryer,
hair spray, or other sprays.
· Do not wear your hearing aid during x-ray,
MR scans, CT scans, short-wave diathermy,
or similar radiation treatments. Some types
of radiation can damage your hearing aid.
Other types of radiation from, for exam-
ple, room surveillance equipment, burglar
alarms, and cellular telephones, are weaker
and will not damage your hearing aid.

34 35
• Widex hearing aids are not certified for use
in mines or other areas with explosive gases.
• Switch your hearing aid off when it is not in
use. Should you not use it for a day or more,
take out the battery to avoid battery leak-
age.
• Always insert the battery as described
on p. 6. If you feel the battery needs to be
forced into the battery drawer, check to see
if it is upside down.
Never try to open or repair
the hearing aid yourself
There is only one way
Your hearing aid does not restore normal hearing,
but it will help you to hear and understand what
other people are saying and to enjoy many other
sounds. So don’t give up. The learning process
will take time, but millions of experienced users
can testify that the results are worth the effort.
There are no tricks or short cuts by which you can
obtain immediate and full benefit from your hear-
ing aid. Only consistent and determined practice
will give you the maximum results from your
hearing aid.
It takes time getting used to “hearing” again and
to having “something” in your ear. Your ear may
even become a little sore at first, but that will
pass.
The sooner you become accustomed to wearing
the hearing aid every day and all day long, the
sooner you will succeed.
Take the time and effort. Hearing more out of life
is worth it!

36 37
Troubleshooting guide
The following pages include some quick advice to
follow if you experience problems. Before contact-
ing your hearing healthcare professional, please
follow the advice below.
The hearing aid is dead
The instrument is not turned on.
Insert a battery in the battery drawer and close
the drawer.
The battery is dead, or the voltage is too low.
Insert a new battery. Make sure the battery is
placed correctly. (See p. 6-7)
The battery contacts are dirty.
Clean the battery contacts with a cotton bud, be-
ing careful not to bend or deform the contacts.
The sound outlet is blocked.
Earwax is often the cause of a blocked sound out-
let. Clean the tip of the hearing aid with the en-
closed brush and soft cloth. (See p. 22). Do not in-
sert anything into the sound outlet, as this could
damage the hearing aid. If you cannot clean the
sound outlet completely, we recommend that you
contact your hearing healthcare professional to
have the instrument cleaned and serviced.
If your hearing aid is equipped with the
CeruSTOP wax guard, exchange the wax guard.
The microphone opening is blocked.
Wax may also block the microphone opening.
Clean the front of the hearing aid with the en-
closed soft cloth and see page 26 for cleaning in-
structions. Do not insert anything into the micro-
phone opening when the battery drawer is closed,
as this could damage the microphone.
The hearing aid volume is not powerful
enough
The sound outlet is blocked by earwax.
Clean the sound outlet as described on p. 22.
Your ear canal is blocked by earwax.
Contact your ENT doctor/physician to have your
ear canal cleaned.
Your hearing may have changed.
Contact your hearing healthcare professional to
have your hearing and hearing aid fit re-evaluat-
ed.
Your hearing aid may be damaged.
Contact your hearing healthcare professional.
The hearing aid performs intermittently
The battery contacts are dirty.
Clean the battery contacts in the open space un-
der the battery drawer.

38 39
The hearing aid whistles
The hearing aid is not correctly placed in the ear
canal.
Take the hearing aid out and reinsert it. It is im-
portant that the hearing aid fits snugly in the ear
canal without pressing uncomfortably anywhere.
Your ear canal is blocked by earwax.
Contact your ENT doctor/physician to have your
ear canal cleaned.
The hearing aid shell fit may be too loose.
Contact your hearing healthcare professional to
have the physical fit of the hearing aid evaluated.
The hearing aid is uncomfortable to wear
Your outer ear or ear canal is sore.
For first-time users it is important not to wear
the hearing aid for too long at the beginning. The
skin in the ear canal is very thin and may swell a
little because of the pressure from the hearing
aid. Take 2-3 weeks to get used to the hearing aid.
If the soreness continues, please contact your
hearing healthcare professional for further ad-
vice.
The hearing aid shell has a poor physical fit and
this can be the reason for irritation in the ear
canal.
Contact your hearing healthcare professional to
have the physical fit of the hearing aid evaluat-
ed.
Table of contents
Other Widex Hearing Aid manuals

Widex
Widex ME3-X User manual

Widex
Widex CROS-FS User manual

Widex
Widex C2-CIC User manual

Widex
Widex SUPER 440 SERIES User manual

Widex
Widex Evoke Series User manual

Widex
Widex dry-go uv User manual

Widex
Widex U-PA User manual

Widex
Widex DREAM440 THE DREAM SERIES User manual

Widex
Widex CROS FUSION User manual

Widex
Widex Menu series User manual

Widex
Widex MOMENT MBB2 User manual

Widex
Widex EVOKE ERB0 User manual

Widex
Widex CLEAR 440 SERIES User manual

Widex
Widex nEARCOM User manual

Widex
Widex Senso Diva SD-19M User manual

Widex
Widex Mind 330 Series User manual

Widex
Widex The mind 440 Series User manual

Widex
Widex Unique U-PA User manual

Widex
Widex M-DEX User manual

Widex
Widex Daily Series User manual