manuals.online logo
Brands
  1. Home
  2. •
  3. Brands
  4. •
  5. Wildridge
  6. •
  7. Indoor Furnishing
  8. •
  9. Wildridge LCC-104 User manual

Wildridge LCC-104 User manual

ASSEMBLY INSTRUCTIONS
heritage two-seat glider
330-893-4212 • www.wildridge.com LCC104
© 2017
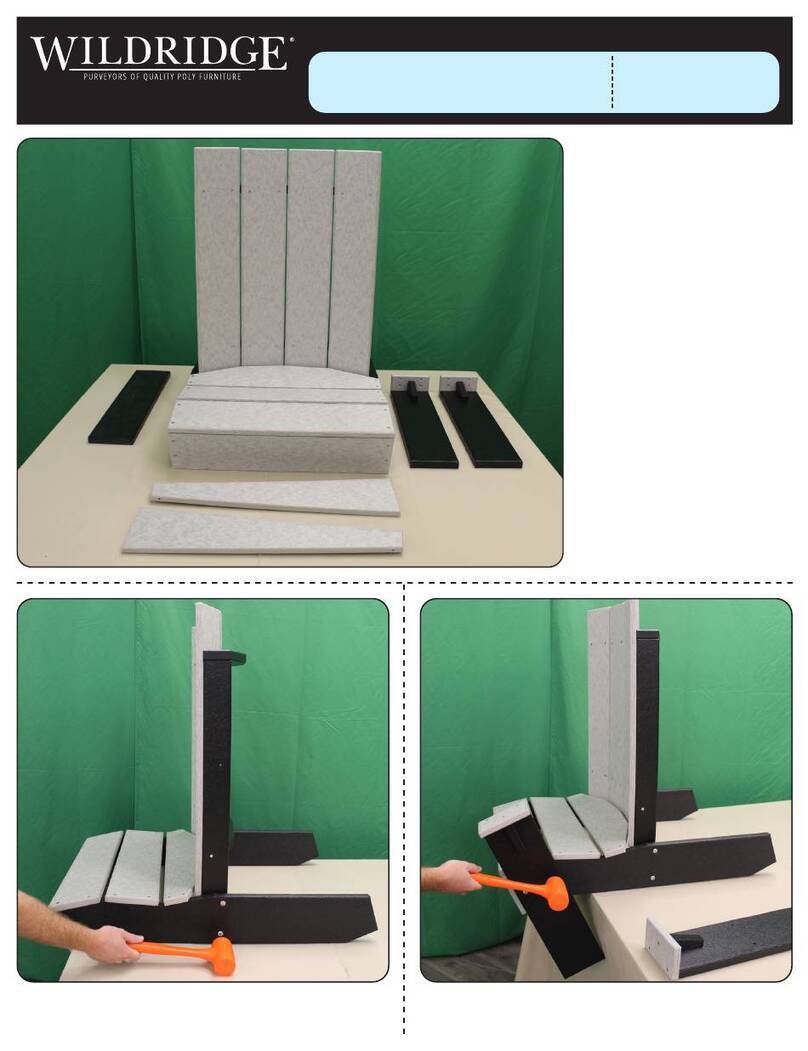
Step 1
On a level surface, place the backrest (A) and the seat (B) on its
side, butting them up against each other. Lay the right arm/leg
assembly (C) onto the backrest and seat and fasten them together.
For the front leg use (2) 5/16”x 3 1/2” bolts and (2) 5/16” ange
nuts. For the back leg use (2) 5/16” x 5” bolts & (2) 5/16” ange nuts,
and for the armrest use (1) 5/16”x 3 1/2” bolt & (1) 5/16” ange
nut. Repeat with the left arm/leg assembly (D) on the other side.
Step 2
Place the glider upright. On the backside, fasten the backrest to
the seat support using (2) 3” screws, as shown, through the
pre-drilled holes provided.
Required Tools:
-Mallet/Non Marring Hammer
(Do not use Metal Headed Hammer)
-Cordless Drill
-#2 Square Drive bit
-1/2” and 9/16“ Wrench or Socket
Hardware:
-(4) 5/16” x 5” Bolts
-(8) 5/16 x 3“ Lag Bolts
-(6) 5/16” x 3 1/2” Bolts
-(8) 5/16“ Washers
-(10) 5/16” Flange Nuts
-(8) 3/8” x 2 1/2” Machine Bolts
-(8) 3/8” Locknuts
-(16) 3/8”Washers
-(2) 3” Screws
-(4) Glider Brackets
Parts:
A = (1) Backrest
B = (1) Seat
C = (1) Right Arm/Leg Assembly
D = (1) Left Arm/Leg Assembly
E = (2) Base Pieces
F = (2) Cross Members
Fasten screws through the backrest into the seat support.
D
A
B
C
E
(1) 5/16” x
3 1/2” Bolt
& (1) 5/16”
Flange Nut
(2) 5/16”
x 5” Bolts
& (2) 5/16”
Flange
Nuts
(2) 5/16” x
3 1/2” Bolt
& (2) 5/16”
Flange Nuts
A
B
C
E
F F
ASSEMBLY INSTRUCTIONS
heritage two-seat glider
330-893-4212 • www.wildridge.com LCC104
© 2017
Step 4
Using the picture above as a reference, fasten the hardware
through the top holes on the two base pieces, using (1) 3/8” x 2
1/2” machine bolt, (2) 3/8” washers, (1) glider bracket and (1) 3/8”
locknut, per hole. Note: the glider bracket should be on the outside
of the base so you can attach it to the leg in step 5. For it to glide
correctly the hardware must be placed in the order that is pictured
above and with the curve on the glider bracket facing away from
the base. You will be doing this for all four glider brackets.
Step 5
Place the glider assembly onto the base assembly and attach each
leg to a glider bracket using (1) 3/8”x 2 1/2” bolts, (1) 3/8” ange
nuts, and (1) 3/8”washer.
Your glider is now complete.
Thank you for purchasing from Wildridge.
(1) 3/8” x 2 1/2”
Machine Bolt
(1) 3/8”Washer
(1) 3/8”
Locknut
Note:
The Glider
Bracket will
curve away
from base.
Base
Step 3
Pictured top left is a base piece (E)
for reference.
Please note
the hole placement
dierence in the ends of the
two base pieces. One end goes
towards the front of the glider
and the other end will go towards
the back of the glider. Both base
pieces will have the same hole
conguration - but on opposite
sides. The bolts will go through
the four holes that are to the left
and right of the pre-attached
board. Do not put the bolts in
the holes on the top of the base
pieces, those are for the glider
bracket hardware in step 4.
Turning the base pieces (E) so
the pre-attached board faces
outward, attach them to the two
cross members (F) with (8) 5/16”x
3” lag bolts and (8) 5/16” washers
(the washer should go onto the
bolt before attaching), through
the holes provided.
Note: The front of the base will
be the front of the glider when
you are assembling the base and
glider assembly in step 4.
E
F
E
F
This pre-attached board will face towards
the outside of the chair.
This End
Goes
Towards
Front Of
Glider
This End
Goes
Towards
Back Of
Glider
Top
Bottom
(1) 3/8”Washer
Other Wildridge Indoor Furnishing manuals

Wildridge LCC-226 User manual

Wildridge

Wildridge LCC-226 User manual

Wildridge Single Classic Glider LCC-206 User manual

Wildridge

Wildridge Single Classic Glider LCC-206 User manual

Wildridge LCC-112 User manual

Wildridge

Wildridge LCC-112 User manual

Wildridge LCC-314 User manual

Wildridge

Wildridge LCC-314 User manual

Wildridge LCC-314 User manual

Wildridge

Wildridge LCC-314 User manual

Wildridge LCC-203 User manual

Wildridge

Wildridge LCC-203 User manual

Wildridge heritage LCC-114 User manual

Wildridge

Wildridge heritage LCC-114 User manual

Wildridge Tete-a-Tete LCC-229 User manual

Wildridge

Wildridge Tete-a-Tete LCC-229 User manual

Wildridge LCC-153 User manual

Wildridge

Wildridge LCC-153 User manual

Wildridge LCC-305 User manual

Wildridge

Wildridge LCC-305 User manual

Popular Indoor Furnishing manuals by other brands

Regency LWMS3015 Assembly instructions

Regency

Regency LWMS3015 Assembly instructions

Furniture of America CM7751C Assembly instructions

Furniture of America

Furniture of America CM7751C Assembly instructions

Safavieh Furniture Estella CNS5731 manual

Safavieh Furniture

Safavieh Furniture Estella CNS5731 manual

PLACES OF STYLE Ovalfuss Assembly instruction

PLACES OF STYLE

PLACES OF STYLE Ovalfuss Assembly instruction

Trasman 1138 Bo1 Assembly manual

Trasman

Trasman 1138 Bo1 Assembly manual

Costway JV10856 manual

Costway

Costway JV10856 manual

moss DESIGN Caisson Credenza Assembly instructions

moss DESIGN

moss DESIGN Caisson Credenza Assembly instructions

Aquaglide FULL DECK 15.0 owner's manual

Aquaglide

Aquaglide FULL DECK 15.0 owner's manual

AREBOS AR-HE-SW30 user manual

AREBOS

AREBOS AR-HE-SW30 user manual

Till-Hilft Fulda 87005.330 Assembly instructions

Till-Hilft

Till-Hilft Fulda 87005.330 Assembly instructions

Twoey Outside 2010 quick start guide

Twoey Outside

Twoey Outside 2010 quick start guide

Hettich Easys 200 operating instructions

Hettich

Hettich Easys 200 operating instructions

The bedboss RELAX 404 Series owner's manual

The bedboss

The bedboss RELAX 404 Series owner's manual

Oeseder Möbelindustrie Bern 991 720 Assembly instructions

Oeseder Möbelindustrie

Oeseder Möbelindustrie Bern 991 720 Assembly instructions

Costway HW68469 user manual

Costway

Costway HW68469 user manual

Next ALIX A27743 Assembly instructions

Next

Next ALIX A27743 Assembly instructions

BROSA Hans Assembly guide

BROSA

BROSA Hans Assembly guide

Prodigg MINIKA PBA015T-FUR installation manual

Prodigg

Prodigg MINIKA PBA015T-FUR installation manual

manuals.online logo
manuals.online logoBrands
  • About & Mission
  • Contact us
  • Privacy Policy
  • Terms and Conditions

Copyright 2025 Manuals.Online. All Rights Reserved.