WillowWood Alpha Basic User manual

Failure to follow WillowWood instructions will void
the warranty.
Since WillowWood believes that the liners must
be fit and dispensed by a qualified professional,
please understand that WillowWood will not ship
liners directly to an amputee’s home.
PN-1191-AT 16 AUG 2016
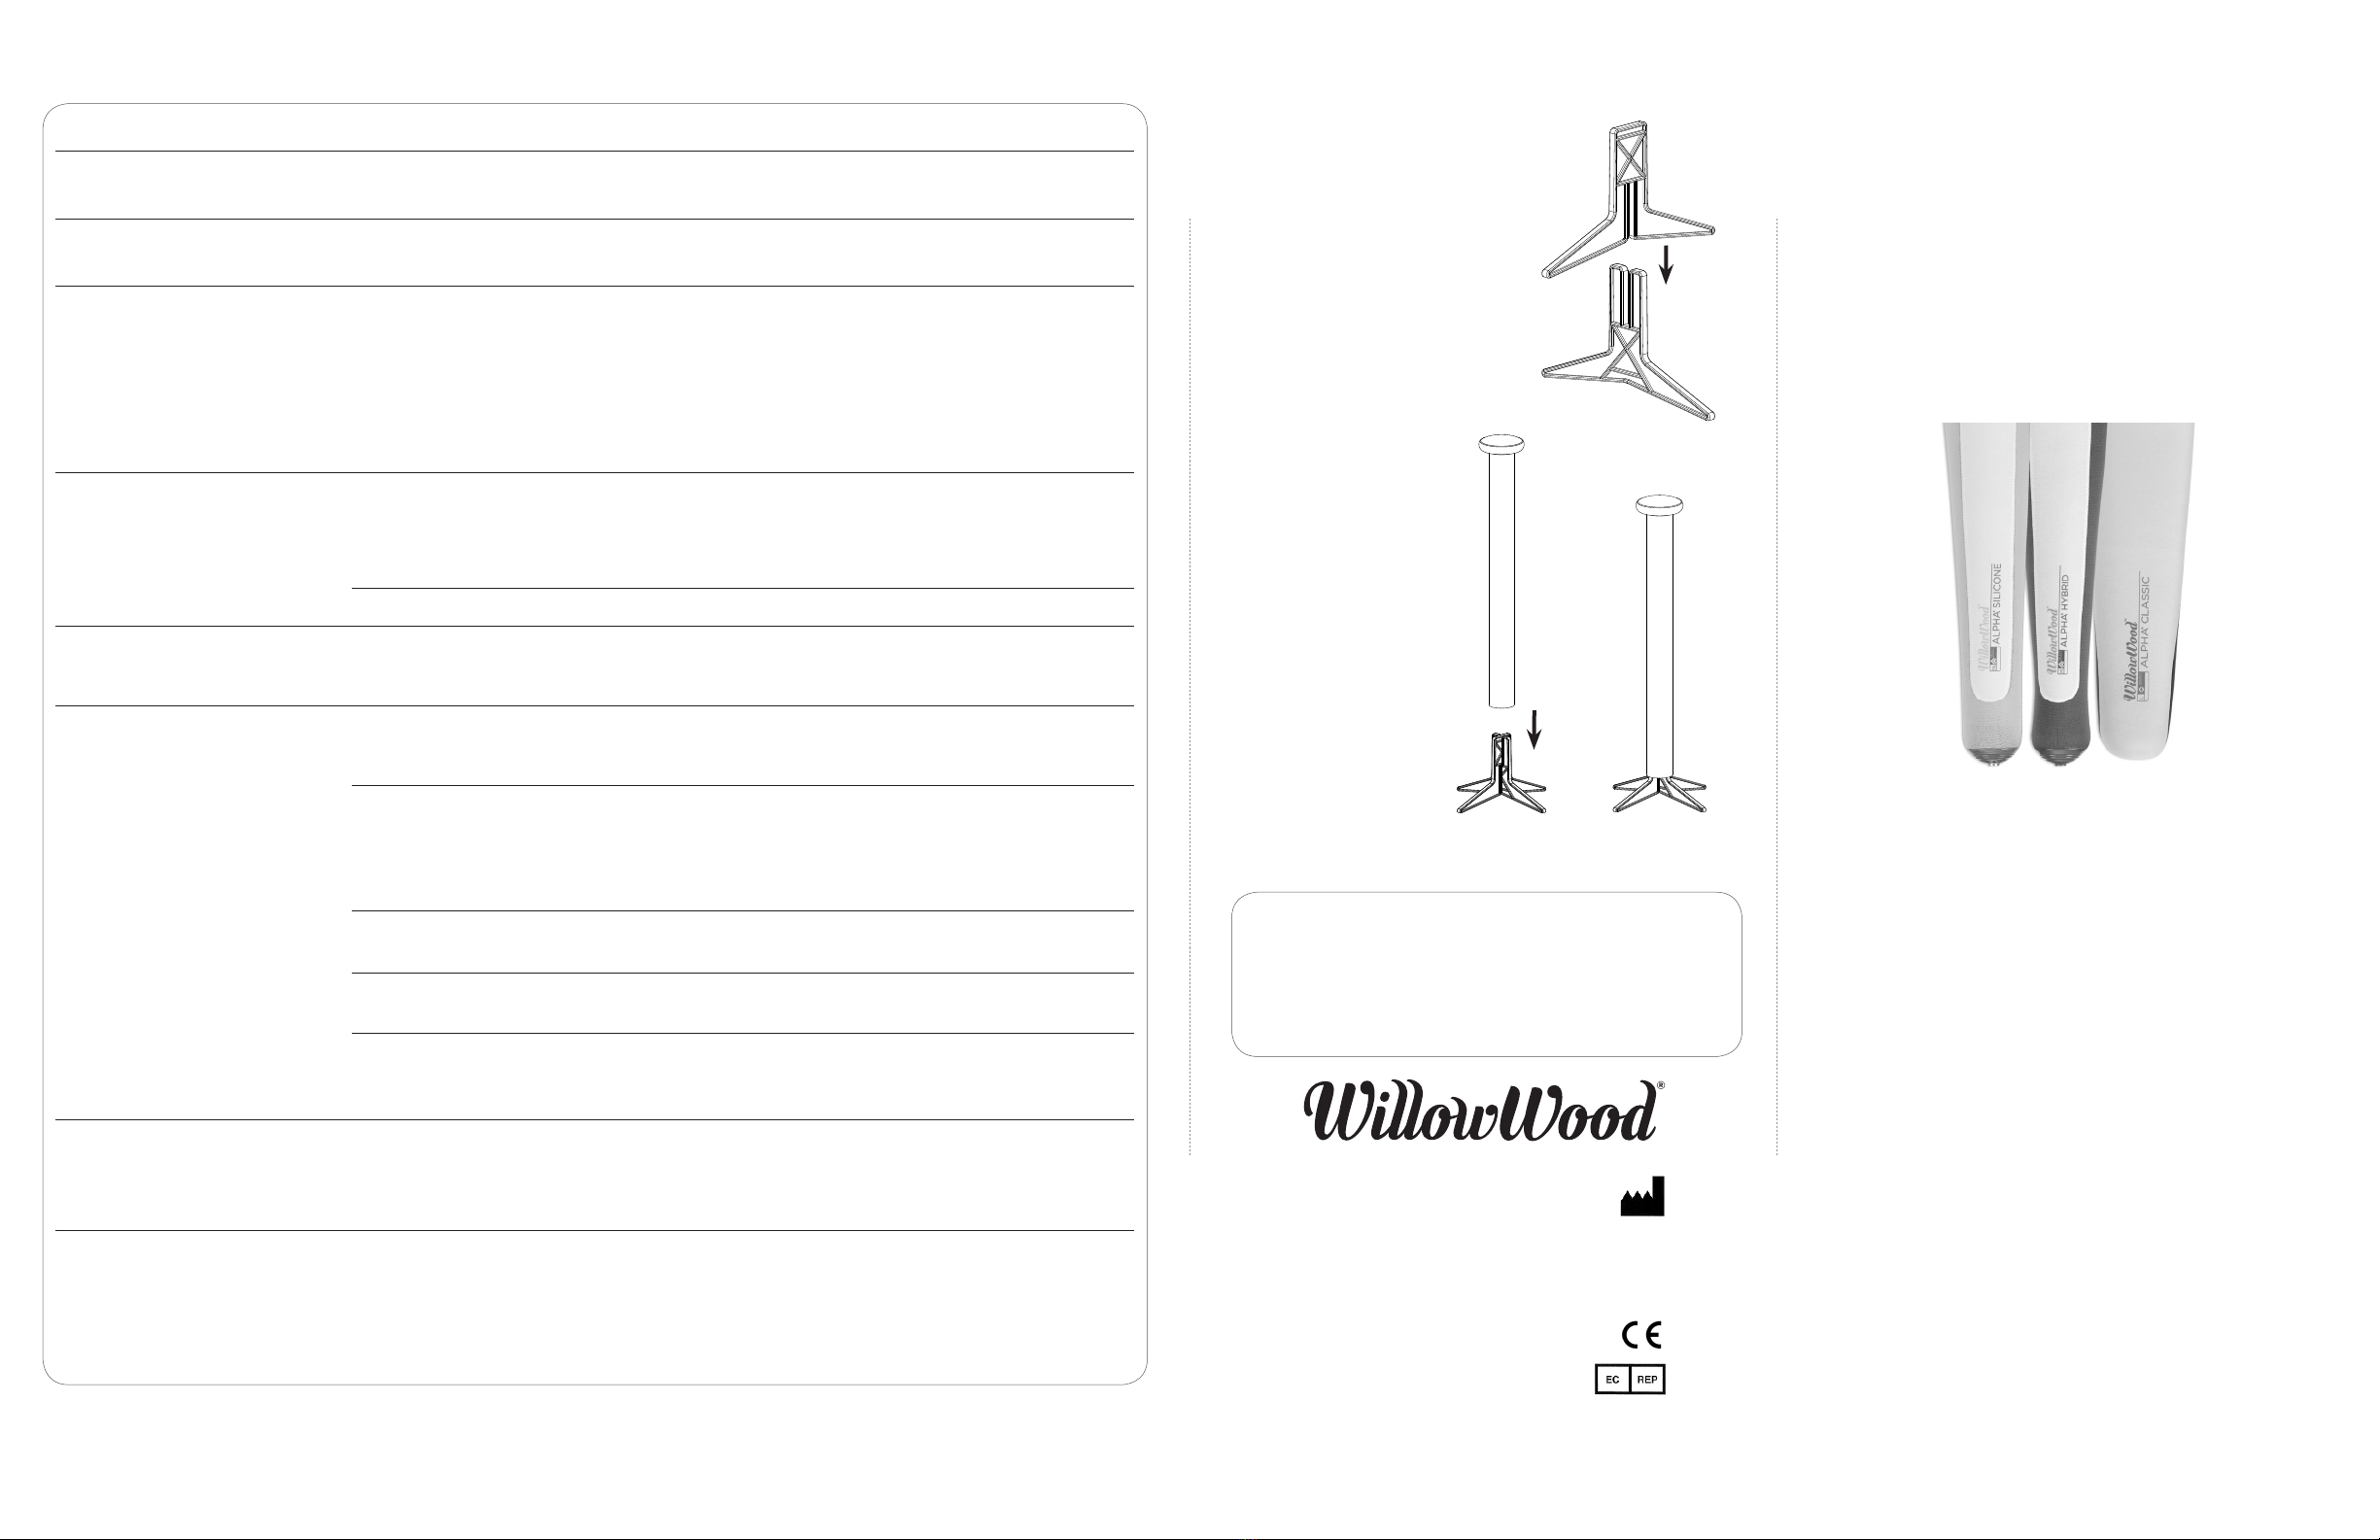
The Drying Stand must be
assembled from the two
base components and the
tube that are included in
the box. Begin by sliding
the notch on Part A into the
notch on Part B as shown.
ASSEMBLING THE DRYING STAND*
POSSIBLE LINER ISSUES
Then place the tube
onto the assembled
base.
If you wish to have a
shorter Drying Stand
to accommodate
shorter liners, simply
trim the tube to the
desired length before
placing the tube on
the base.
Thank you for using this liner. In order to
ensure the highest level of comfort and
longest possible life from your liner,
please take the following steps:
• Read the pamphlet and follow the
directions carefully.
• Inspect your liners after each day of use.
Unusual wear may indicate changes in
the prosthetic fit. In order to preserve
the warranty, be sure to contact your
prosthetist immediately if you notice
unusual wear.
• Consult this pamphlet for suggested
solutions to common issues related to
liner use.
• Contact your prosthetist if you have any
questions about your liners.
WARNING FOR LOCKING LINER USERS:
Each of your Locking Liners should have its
own pin, securely fastened to the liner by your
prosthetist. If you do not check the locking pin
each time you put on your prosthesis to make
sure that the pin is still secure, the pin could
come out of the liner, resulting in the potential
for you to fall and injure yourself.
WillowWood also recommends the use of
an auxiliary suspension method such as a
suspension sleeve.
A
B
The Ohio Willow Wood Company
15441 Scioto Darby Road
Mt. Sterling, OH 43143
phone 740.869.3377 / 800.848.4930
fax 740.869.4374
www.willowwoodco.com
Ohio Willow Wood Company B.V
Keizersgracht 62/64
1015 CS Amsterdam
The Netherlands
Patent www.willowwoodco.com/
education-and-resources/patents
Problem Probable Cause Solution
Locking Liner is “pistoning” up
and down in your socket.
Your limb may have shrunk. Contact your prosthetist
Top edge of liner is rolling down
your leg.
Liner is possibly too short or
too tight.
Contact your prosthetist.
Heavy sweating (if you have
just recently started wearing
the liner).
Your body has not yet
adjusted to the liner.
If you are still sweating after several weeks of liner use,
contact your prosthetist. Also, some amputees have
found that it helps to apply moderate amounts of
unscented alum-based antiperspirant to the residual
limb before putting on the liner. Always follow your
prosthetist’s instructions and the directions on the
product label. Note: non-alum-based products may
damage the liner.
Heavy sweating (if you had
been wearing the liner for a
long time without sweating,
and suddenly started sweating
again).
Air is getting between the
liner and the residual limb,
possibly because your limb
has shrunk.
Contact your prosthetist.
There is a hole in the liner. Contact your prosthetist.
Heavy sweating (if you are
wearing a SmartTemp Liner)
The SmartTemp Liner has
become saturated with body
heat.
Discharge the body heat in a cool environment.
Skin irritation all over your
residual limb.
Not cleaning or disinfecting
your liner correctly.
Make sure that you are following the proper cleaning,
rinsing, and disinfection procedures outlined in this
pamphlet.
Use of a harsh or irritation
lotion, cream, powder, or
soap.
Have you recently started using a dierent cleaning
product? (For some amputees, anti-bacterial soap has
caused skin irritations.) Have you recently started using
any products that contain hydrocarbon oils or animal
fats/oils? If so, discontinue using the product.
Washing the limb too
frequently.
Washing the limb more than once per day can result in
increased levels of skin irritation.
Fungal and/or bacterial
infection of the limb and liner.
Contact your prosthetist. You may also need to contact
a dermatologist.
The liner or the socket is loose,
possibly because your limb
has shrunk.
Contact your prosthetist.
Skin irritation along the top
edge of your liner.
The liner is being pulled onto
the limb instead of being rolled
onto the limb, or the liner is
too tight.
Refer to the instructions in this pamphlet for putting
on your liner. If the problem continues, contact your
prosthetist.
Open wounds and non-intact
skin.
Contact your prosthetist
immediately.
Always follow your prosthetist’s directions, and never
use a liner in direct contact with open sores or
non-intact skin. If the liner must be worn over open
sores or non-intact skin, wear a bandage or other
appropriate covering over the wound to prevent direct
contact between the wound and the liner.
Patient Instructions
• AlphaBasic™ Liners
• Alpha ClassicLiners
• Alpha Duo™ Liners
• Alpha HybridLiners
• Alpha SiliconeLiners
• Alpha SmartTempLiners
• WillowWoodExpress Liners
*not included with the Alpha Basic Liner.

PUTTING ON YOUR LINER DAILY CLEANING WHAT YOU SHOULD KNOW ABOUT
MANAGING VOLUME LOSS
It is completely normal for the volume of your
limb to change during the day. When your limb
shrinks, the socket no longer fits as snugly as it
should. As a result, your socket may slip down
your leg, and your limb may move around inside
of your socket, causing your liner to wear out
prematurely.
If you have experienced a volume change, ask
your prosthetist about the best solution for you.
WEEKLY DISINFECTING
Place a small amount
of ethyl or isopropyl
alcohol on a soft, clean
cloth. Lightly wipe the
side of the liner without
the logo with the cloth for
two minutes.
Rinse the alcohol from the
liner with water.
Place the liner on the
Drying Stand so that the
side with the logo is on
the outside.
Note: Do not soak
the liner in the ethyl
or isopropyl alcohol.
Extended contact with
large amounts of ethyl
or isopropyl alcohol will
stiffen the liner.
When the liner is not being worn, it should be stored
logo side out in a cool, dry place. If the liner will not
be used for an extended period, cover the dry liner
with a clean plastic bag.
STORING THE LINER
Thoroughly clean the side
of the liner without the
logo. Use lukewarm tap
water and a body soap
that does not irritate
your skin. Apply the soap
with a clean, soft cloth or
sponge.
Note: Do not scrub the
liner. Scrubbing can
roughen the surface of
the liner, which can then
irritate the skin.
Rinse all the soap residue
from the liner with water.
Dry the liner with a clean,
lint-free cloth.
Place the liner on the
Drying Stand so that the
side with the logo is on
the outside. Clean your
limb with soap and rinse
well.
side
without
the
logo
CAUTION: Drying the
liner with the logo
facing in will damage
the liner.
Proper hygiene is extremely important when using
the liner. The liner must be thoroughly cleaned at the
end of each day of wear and disinfected once each
week. WillowWood highly recommends having
two liners so that you can wear one while cleaning
and drying the other.
Invert the liner so that the
logo is on the inside, and
place the end of the liner
against the end of your limb.
If using a Locking Liner,
center the pin attachment
on the bottom of your limb.
Postition the liner as follows:
Carefully roll the liner up
onto your residual limb.
DO NOT PULL the liner
onto the limb. Pulling the
liner may stretch the skin
and result in an
uncomfortable fit.
Make sure that there are
no wrinkles or air pockets
between the limb and the
liner.
Before putting on your liner, make sure that your
limb is clean, dry, and free of soap residue. Cover
open wounds and non-intact skin with a gauze
patch. Do not apply any type of lotion or
powder to the residual limb or to the liner,
as these products could damage the liner.
If you engage in an activity that could result in
excessive perspiration, periodically remove the liner
and dry o the liner and residual limb to prevent
slippage of the liner on the limb.
PERSPIRATION
side with
the logo
side with
the logo
The Phase Change Materials (PCMs) in your
SmartTemp Liner work by storing your body heat
and preventing a rise in temperature until they
can no longer store any more body heat. Once
they have stored all the body heat they can,
they become saturated, and the temperature in
your liner will begin to behave like any other
prosthetic liner. In order to receive the benefits of
the PCMs in the liner again, this stored body heat
needs to be discharged from the liner as follows:
• Removethelinerfromyourlimb.
• Placethelinerinacoldorair-conditioned
environment for a few hours. Simply running
the liner under cold water for a brief time will
not completely discharge the stored heat
energy. Submerging the liner in a cold
basin of water for an extended period of
time would be more appropriate.
Note: the conditions required to discharge the
stored body heat will vary depending on how
much energy has been stored in the PCMs and
the environment used to discharge the PCMs.
ALPHA SMARTTEMP LINER
Alpha Products can melt or burn if exposed to high
temperatures or flame. Do not expose your Alpha
product to these conditions.
This Alpha product is intended for use on a single patient.
Use of the product with multiple patients could lead to
cross contamination between patients.
WARNING: To avoid danger of suffocation, keep this
product away from babies or children.
If you have an Alpha Duo Liner, you will also need to
put on a One Gel Sock.
After you have put on the liner, invert the One Gel
Sock so that fabric side is facing in. Place the end of
the inverted sock against the end of the liner.
Roll the sock up onto the limb so that the fabric
side is facing out. Make sure that there are no
wrinkles or air pockets between the One Gel Sock
and the liner.
Liner Type Logo Position
Classic AK Liner
AK DESIGN® Liner
Logo on lateral side
(outside).
Duo Liner
Basic LIner
Hybrid AK Liner
Silicone AK Liner
SmartTemp AK Liner
Express AK Liner
Logo position does not
matter, but varying the
orientation can prolong the
life of the liner.
All other liners Logo in front.
ALPHA DUO LINER
ALPHA DUO LINER
ADDITIONAL INFORMATION FOR
SPECIFIC LINER TYPES
This manual suits for next models
6
Other WillowWood Medical Equipment manuals