Wilson Electronics STADIUM GLASS BS7200 User manual

Wilson Sporting Goods, Inc.
STADIUM GLASS
OWNER’S MANUAL
BASKETBALL GOAL SYSTEM
MODEL NUMBER BS7200
BS6000
BS5400
BS4800
070312Stadium_Glass

Wilson Sporting Goods, Inc.
WARNING
FAILURE TO FOLLOW THESE
WARNINGS MAY RESULT IN
SERIOUS INJURYAND/OR
PROPERTY DAMAGE.
Owner must ensure that all
players know and follow these
rules for safe operation of the
unit.
Do not dunk on this unit
Do not hang from any part of the
unit, including the backboard, rim, or net.
Parts of this system are heavy. Work
with 3 or more people while installing
heavier components.
Do not slide, climb, or play on pole.
Keep organic material away from
pole base. Grass, litter, etc. may cause
corrosion and /or deterioration.
When adjusting height, keep hands
and fingers away from moving parts.
Check system twice a year for signs
of corrosion (rust, pitting, chipping).
Remove rust and/or loose paint
completely and repaint with exterior
enamel paint. If rust has
penetrated through the steel anywhere,
replace immediately.
Check unit before each use for loose
hardware, excessive wear, and signs of
corrosion and repair before using.
During play, use extreme caution
to keep players face away from the
backboard, rim, and net.
Wear a mouthguard when playing to
lessen or avoid dental injuries.
During play or adjusting height,
do not wear jewelry (rings, watches,
necklaces, bracelets, etc.). Objects may
entangle in net.
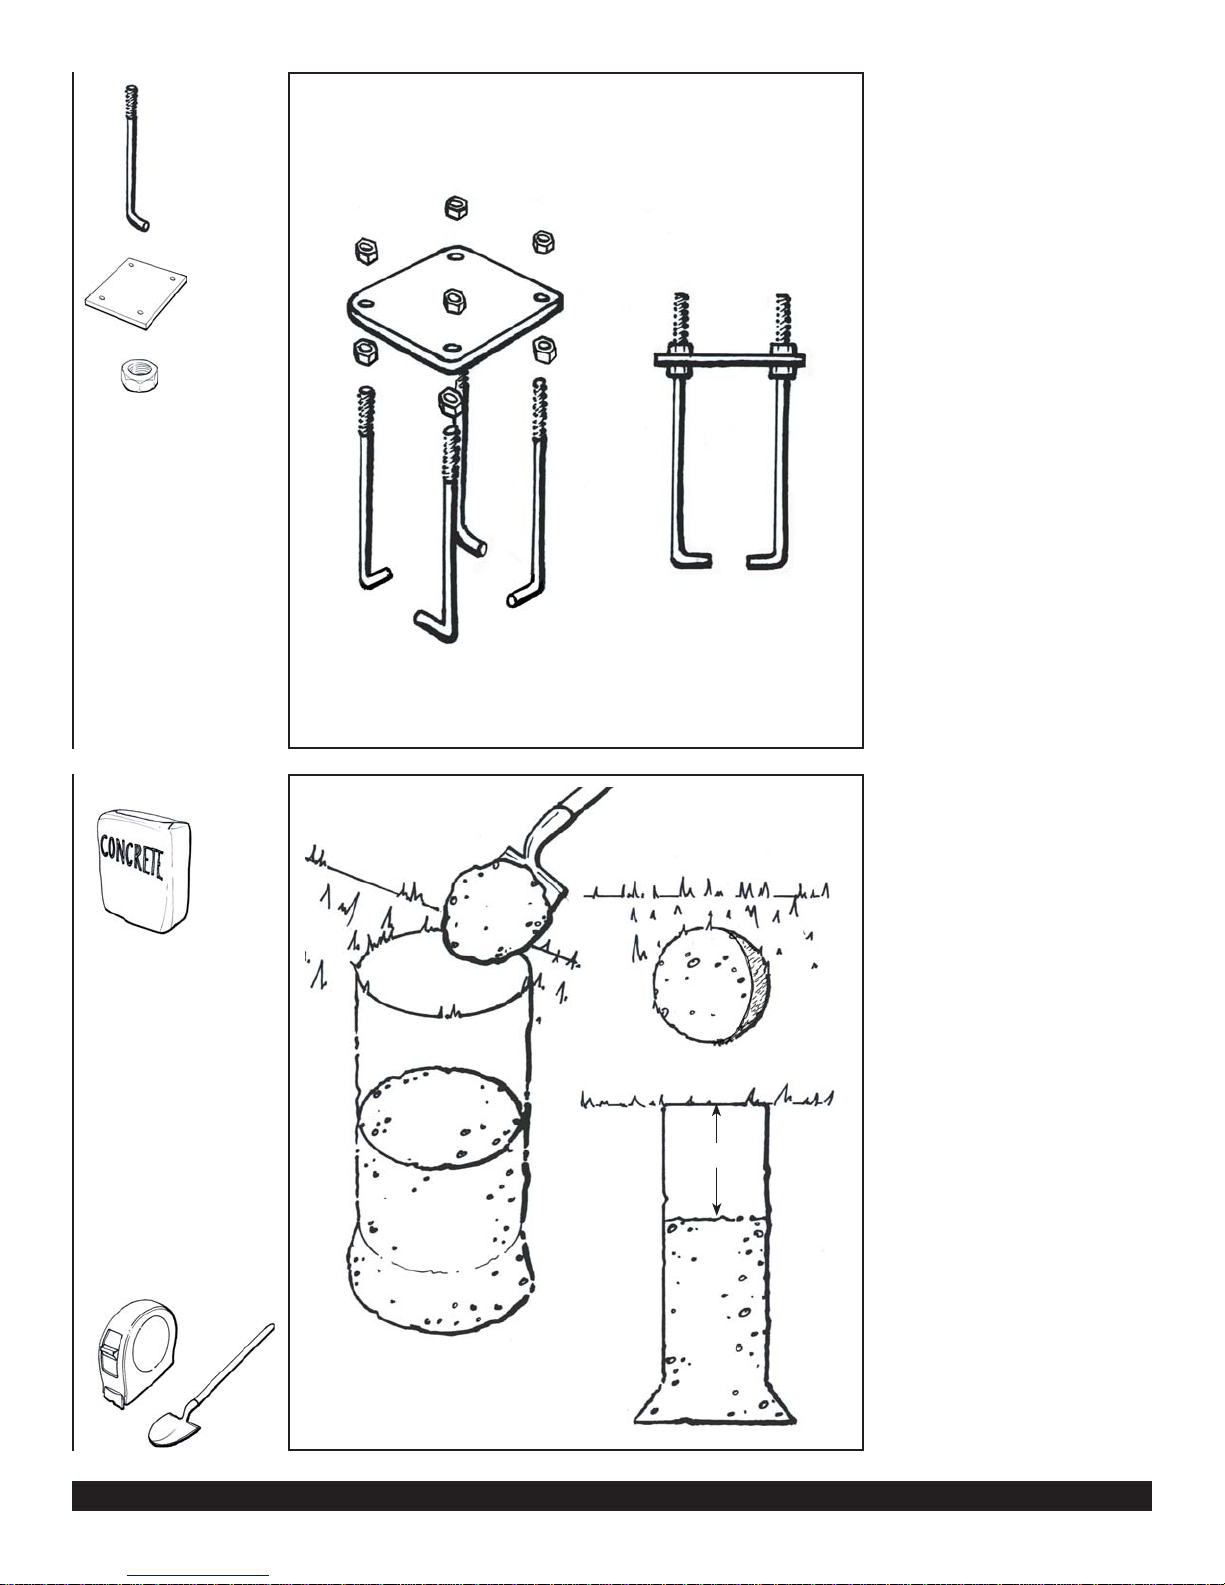
Do not tighten hardware until instructed to
do so. If hardware is tightened too soon,
mounting holes may not align properly and
parts may not fit together. Leave locknuts
slightly loose until you are instructed to
tighten them.
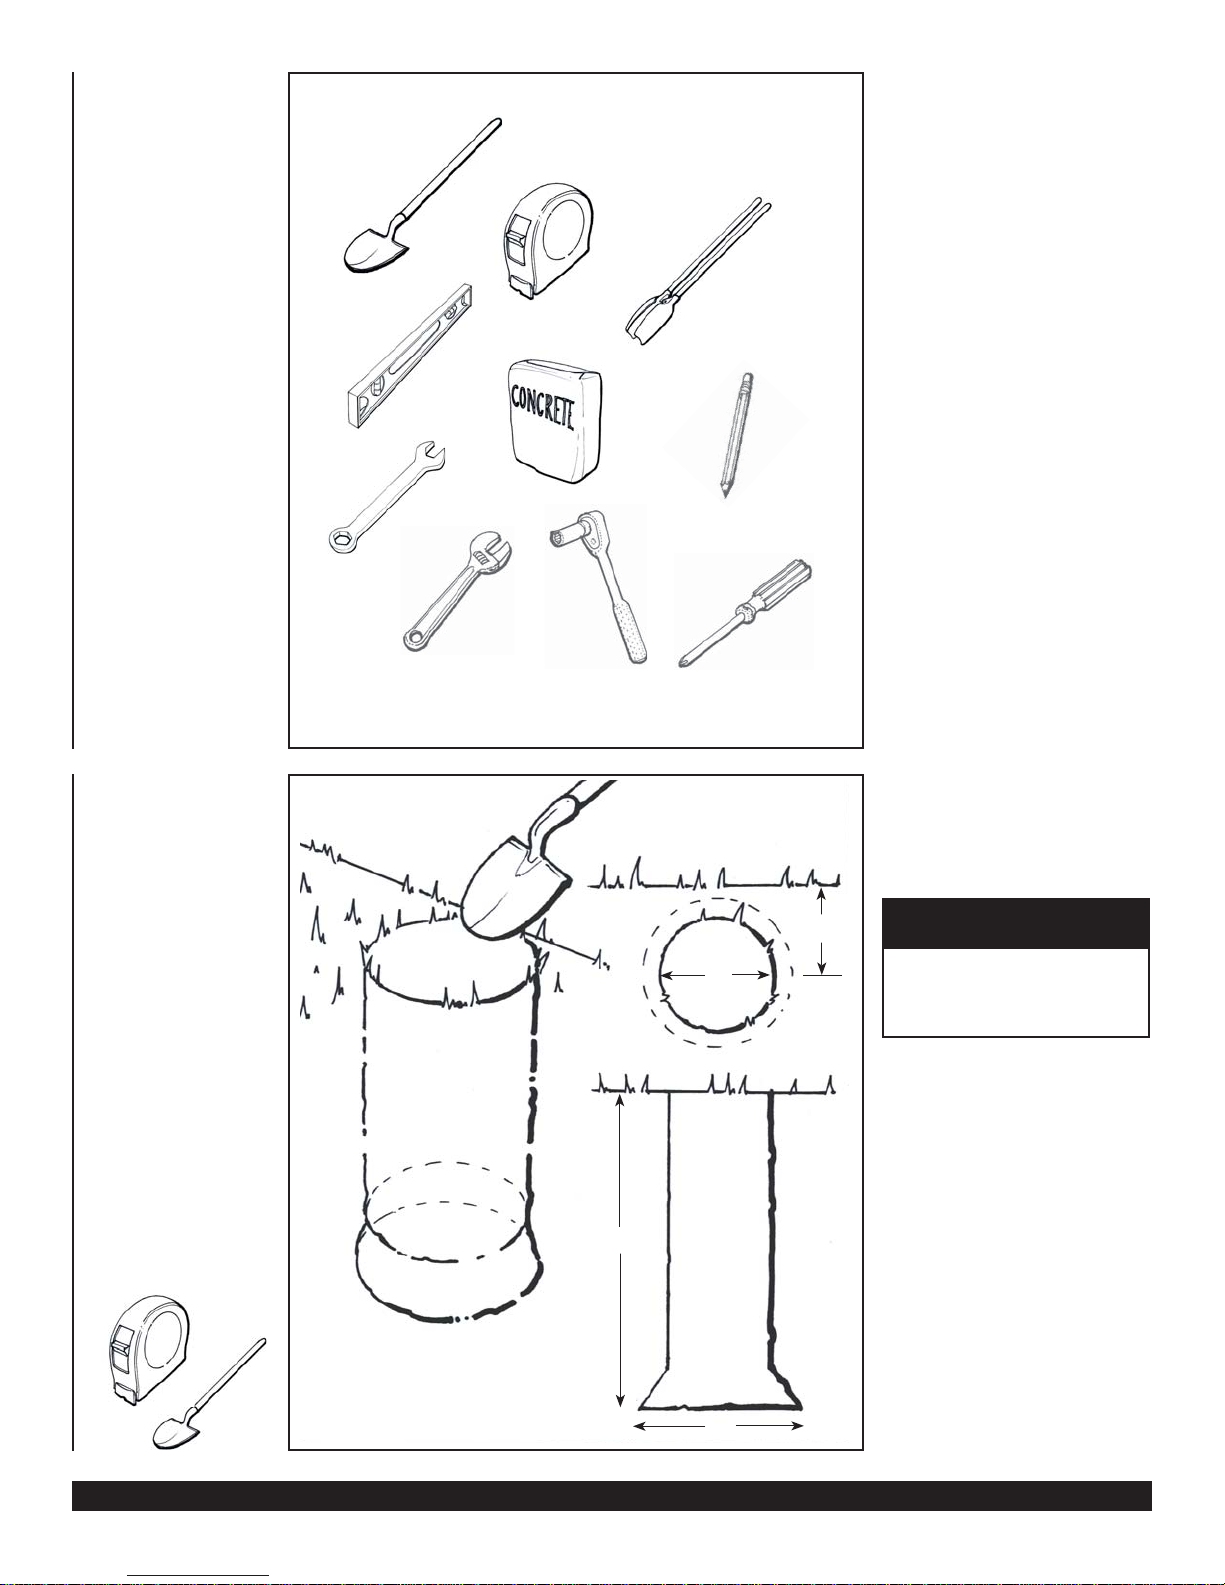
Some smaller parts may be shipped inside larger
tubes. Check inside tubes before assembling or
ordering parts.
Read this manual completely before starting to put up
your pole. Then read and understand each individual
step thoroughly before beginning each and every step.
All hardware has been packaged according to the step
being performed.
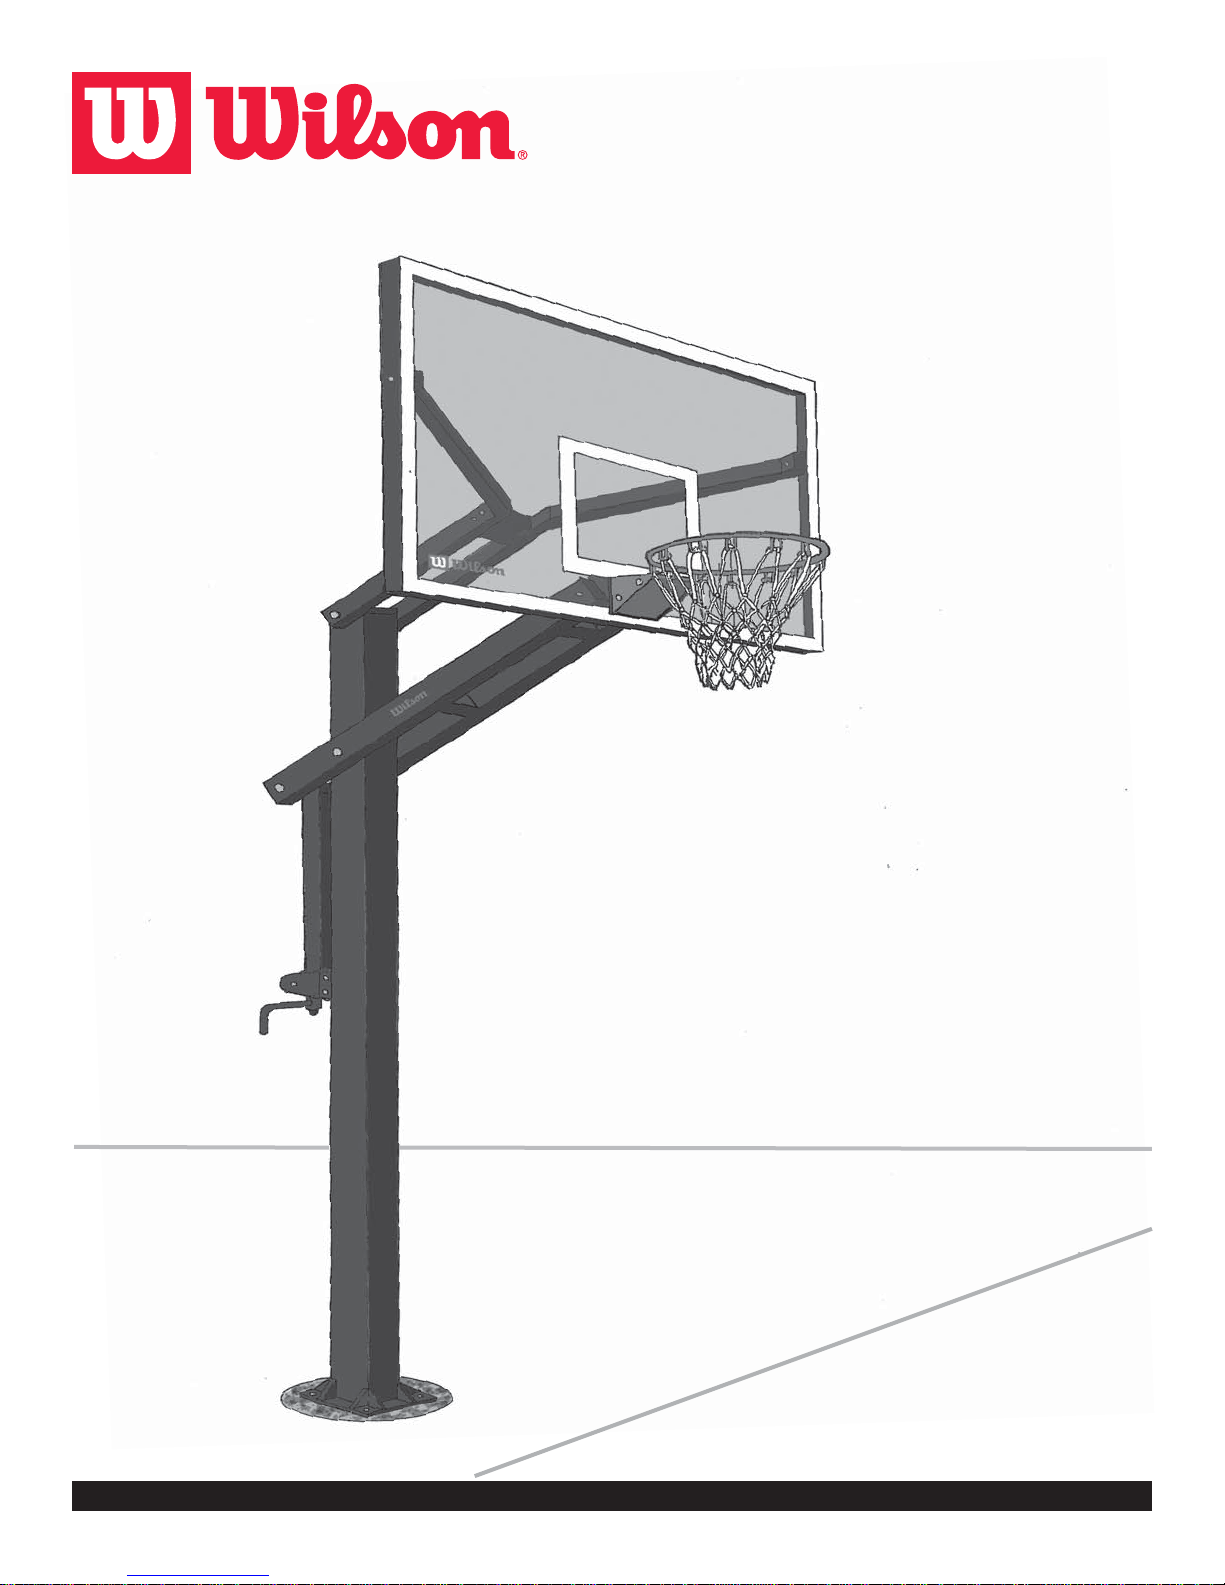
Thank you for purchasing the Wilson basketball
system. We have ensured that our products are of the
highest quality and free of manufacturing defects or
missing parts. However, if you have any problems with
your basketball system, please DO NOT RETURN IT
TO THE STORE. Call us at:
TOLL FREE 1-800-333-8326
(THIS IS A CONSUMER ONLY NUMBER)
Or write us at:
Wilson Sporting Goods, Inc.
CUSTOMER SERVICE DEPT. - TEAM SPORTS
8700 W. Bryn Mawr Ave. 11th Floor
Chicago, IL 60631
Please provide model number, serial number, and/or
part number of the product and/or part when you call or
write. These numbers may be found on the product,
packaging, or in this owner’s manual.
1
IMPORTANT

Wilson Sporting Goods, Inc.
1. Gather required tools:
Shovel
Tape measure - 8 ft. minimum
Post hole digger
Level
Concrete 8-12 bags (It is
generally better to have more
than enough concrete. It can
likely be returned if unused.)
Wrenches (Any combination
of box, socket, or crescent
wrenches can be used.)
Phillips Screwdriver
Pencil / Marker
1. Determine location of goal.
The hole should be as close
to the playing surface as
possible without touching.
2. Dig a hole 16” in diameter
and 48” below the playing
surface. The center of the
hole should be about 1.5’ to 2’
from the edge of the playing
surface. Flaring the bottom
of the hole as shown on the
left reduces the negative
effects of frost heave in colder
climates.
1
2
2
16”
20”
48”
WARNING
CHECK FOR BURIED
UTILITIES BEFORE
DIGGING
1.5’ - 2’

Wilson Sporting Goods, Inc.
1. Preassemble the pole
anchor system as shown.
The bottom nuts should be
threaded all the way onto the
bolts.
2. Finger tighten all nuts.
3
4STEPS 4 THROUGH 8
SHOULD BE COMPLETED
AS QUICKLY AS
POSSIBLE DUE TO THE
CURING SPEED OF THE
CONCRETE. PLEASE READ
AHEAD AND UNDERSTAND
THESE STEPS BEFORE
MIXING THE CONCRETE.
1. Mix concrete according
to the manufacturer’s
recommendations.
2. Fill the hole up to a level
18” below the playing surface.
3. Immediately proceed to
next step.
3
18”
X 4
X 1
X 8

Wilson Sporting Goods, Inc.
1. Insert four reinforcement
bars evenly into the middle of
the concrete 8” apart forming
a square. The tops of the bars
should be approximately 6”
below the playing surface.
2. Immediately proceed to
next step.
1. Fill hole with concrete up to
play surface.
2. Immediately proceed to
next step.
5
6
4
6”
X 4

Wilson Sporting Goods, Inc.
1. Push assembled pole
anchor system into concrete
and agitate to work out any air
pockets.
2. Clean off any concrete that
may have gotten on exposed
threads or top of plate.
3. Position top of anchor plate
so that it is approximately
1” above the surface of the
concrete and nuts rest on
top of concrete. Make sure
that anchor plate is parallel
to playing surface (refer to
picutre on page 7, step #11).
4. Immediately proceed to
next step.
1. Using a level, make sure
top of anchor plate is level. Be
sure to check for levelness in
both directions.
2. Recheck that anchor plate
is parallel to play surface.
WAIT 3 DAYS FOR
CONCRETE TO CURE
BEFORE PROCEEDING.
7
8
5
1”
¦
STOP

Wilson Sporting Goods, Inc.
NOTE: A MINIMUM OF 2
PEOPLE ARE REQUIRED
TO COMPLETE THIS STEP.
1. After concrete has cured
at least 3 days, unpack
remaining goal components.
2. Place washers on top of
nuts on anchor plate.
3. Place pole on top of
washers.
4. Make sure that the ears on
pole are pointing away from
the playing surface.
9
1. Using a wrench and a level,
adjust pole so that it is level
by turning the nuts below
pole. Make sure pole makes
contact with all four washers
at the same time.
2. Once pole is level apply the
hardware as shown.
3. Finger tighten nuts.
10
6
X 4
X 4
X 4
X 4

Wilson Sporting Goods, Inc.
1. Make sure front face of
pole is parallel to edge of
play surface. Reposition as
necessary.
2. Once pole is parallel
to edge of play surface,
completely tighten all 4 nuts
with a wrench.
3. Apply protective caps as
shown.
12
11
7
X 4
1. Assemble upper arm
using the hardware found in
packaging marked assembly
“F”. Do not tighten bolts
completely.
X 4
X 4
X 4
X 4
Hardware Assembly “F”
X 2
X 1
F

Wilson Sporting Goods, Inc.
1. Apply self stick nylon
washers to pole at the
locations shown.
1. Using hardware found in
package marked assembly
“A”, attach lower arm to pole
as shown.
2. Make sure that black
plastic washers are placed
against all painted surfaces to
guard against corrosion and
aid in movement of arm.
3. Finger tighten bolts.
NOTE: ARM WILL SWING
DOWNWARD.
14
13
8
X 2
X 2
X 2
X 4
X 1
X 2
Hardware Assembly “A”
Pivot Bar “A”
A

Wilson Sporting Goods, Inc.
NOTE: LADDER REQUIRED
TO COMPLETE THIS STEP.
1. Using hardware found in
package labeled assembly
“B”, attach upper arm to post
as shown.
2. Make sure plastic washers
are placed against all
painted surfaces to guard
against corrosion and aid in
movement of arm.
3. Finger tighten bolts.
4. Snap on top cap as shown.
X 2
X 2
X 2
X 1
X 2
X 1
Hardware Assembly “B”
Pivot Bar “B”
B
16
15
9
1. Place a piece of scrap
cardboard between lower
arm and front face of pole
to prevent the pieces from
rubbing together during the
remainder of the installation
process.

Wilson Sporting Goods, Inc.
1. Apply self stick plastic
washers to inside faces of
mounting tubes on back of
backboard.
1. With the aid of a
minimum of 4 helpers - lift
backboard into position
and attach arms with
hardware found in packages
labeled assemembly “C”
and assembly “D” at the 4
backboard attachment points.
CAUTION: BACKBOARD IS
HEAVY.
2. Finger tighten bolts.
17
10
X 4
X 8
X 8
X 8
X 2
X 8
Hardware Assembies
“C” & “D”
Pivot Bar “D” C & D
X 2
Pivot Bar “C”
“C”
“C”
“D”
“D”
18

Wilson Sporting Goods, Inc.
1. With the aid of three
helpers - push backboard
upward until top of lower arm
is below welded tube on back
of pole.
CAUTION: POTENTIAL
PINCH POINT.
2. Slide pin into tube and
apply caps as shown.
3. Insert bolt into back of tube
and tighten.
X 2
X 1
X 1
Solid Stop Bar
1. Remove cover plate from
rim assembly as shown.
2. Attach rim to backboard as
shown.
3. Level rim and tighten bolts
with 2 opposing wrenches.
4. Reattach cover plate to rim
assembly.
X 8
X 8
X 4
X 4
20
11
19

Wilson Sporting Goods, Inc.
1. Position triangular flange
on inside of welded bracket
on pole.
2. Apply hardware in the order
shown to both holes.
3. Repeat for opposite flange.
4. Finger tighten bolts.
1. Assemble handle to height
adjustment assembly as
shown.
2. Apply cap to height
adjustment assembly as
shown.
21
22
12
X 8
X 4
X 8
X 4
X 2
Steel
Plastic
Self-Locking with
Nylon Insert
X 1

Wilson Sporting Goods, Inc.
1. Using hardware found in
package labeled assembly
“E”, attach top of height
adjustment assembly to lower
arm as shown.
2. Make sure plastic washers
are placed against all
painted surfaces to guard
against corrosion and aid in
movement of arm.
3. Finger tighten bolts.
X 2
X 2
X 2
X 1
X 2
X 2
Pivot Bar “E”
Nylon
Steel
1. Using height adjustment
crank, align holes at bottom of
height adjustment assembly
with holes of triangular
flanges.
2. Apply hardware in order
shown. Make sure plastic
washers are placed against
all painted surfaces to guard
against corrosion and aid in
movement of arm.
3. Repeat on opposite side.
4. Finger tighten bolts.
23
24
13
X 2
X 2
X 2
X 4
Hardware Assembly “E”
E

Wilson Sporting Goods, Inc.
1. Go back and firmly tighten
all bolts.
2. Raise the backboard by
turning the height adjustment
handle so that the rim is 8 feet
off of the play surface.
3. Using a pencil or magic
marker, make a mark at the
bottom of the upper tube
of the height adjustment
assembly.
8’
1. Lower backboard using
handle.
2. Affix sticker so that its
8 foot mark lines up with
the mark you made in the
previous step.
25
26
14
X 1

Wilson Sporting Goods, Inc.
LIMITED LIFETIME WARRANTY
Subject to proper installation and normal use, Wilson Sporting Goods warrants, subject to the limitations below, to the original
retail purchaser all structural components of the Basketball Goal System to be free of defects in material and workmanship for the
duration of ownership by the original retail purchaser. Please call 1-800-333-8326 before returning any or all parts. Merchandise
must be shipped prepaid with a copy of proof of purchase to our distribution center for examination to see whether it needs to be
repaired or replaced. Any labor costs, travel expenses and any other changes involved in the removal, installation or replacement
of the defective/repaired parts from/to your Basketball Goal System will be your (the purchaser’s) responsibility. Shipping charges
for replaced or warranted merchandise being sent back to the customer from our distribution center must be prepaid by the
customer in advance. If not, the replacement shipment will be sent out collect. Wilson Sporting Goods reserves the right to examine
photographs or physical evidence of merchandise claimed to be defective, and to recover said merchandise, prior to authorization
of warranty claims. A “Returned GoodsAuthorization” number may be required, please call for details prior to the return of any
photographs or merchandise. This warranty is expressly in lieu of all warranties, expressed or implied, including warranties of
merchantability or fitness for use. Wilson Sporting Goods does not assume or authorize any person or representative to assume for
us, any other liability in connection with the sale of our products. The remedy of repair or replacement stated above is our exclusive
remedy. Wilson Sporting Goods will not be liable for any other damages or expenses which may incur, including but not limited to
incidental or consequential damages. Wilson Sporting Goods assumes no other obligations or liability on the part of the purchaser,
and Wilson Sporting Goods neither assumes nor authorizes any other person to assume for it any other liability in connection with
the goods sold.
What is Not Covered by This Warranty
Any merchandise subjected to abuse, negligence, improper installation, vandalism, acts of Nature, alteration of product, or any
other events beyond the control of Wilson Sporting Goods.
HANGING ON RIM WILL VOID YOUR WARRANTY: Rims are not warranted for any defects other than workmanship. Torn back
plates, damaged springs, bent rings, damaged eyebolts, and torn or distorted rim supports result from hanging on the rim and are
not warranted.
Shipping charges both ways. Note: Any merchandise shipped to Wilson Sporting Goods collect will be refused.
Dealer service charges, labor charges and travel expenses associated with replacement of repair of warranty item.
WARRANTY GUIDELINES
1. Keep your proof of purchase receipt (original retail purchaser). Without it, we will not be able to proceed with any warranty
service.
2. Call or write Wilson Sporting Goods to receive a Return Authorization # and allow us to better guide you with your specific needs.
1-800-333-8326 (Team Sports Customer Service)
Or Write us at:
Wilson Sporting Goods, Inc.
CUSTOMER SERVICE DEPT. - TEAM SPORTS
8700 W. Bryn Mawr Ave. 11th Floor
Chicago, IL 60631
WILSON BASKETBALL GOAL CARE INFORMATION
BACKBOARD
Items needed to clean backboard:
- 100% cotton soft cloth, (only)
- Mild dish washing liquid for soap
- Luke warm water
- Mild plastic polish to minimize scratches
Rinse backboard with lukewarm water. Wash gently with a 100% Cotton soft cloth,
lukewarm water and mild soap. Do not scrub. Rinse backboard with lukewarm water
again. Dry with 100% cotton soft cloth. To minimize scratches and minor abrasions to your
backboard, apply a mild polish such as Johnson’s Paste Wax, Novus Plastic Polish #1 or
Mirror Glaze Plastic Polish. Strong cleansers will damage backboard and void warranty.
RIM
HANGING ON THE RIM OR AGGRESSIVE PLAY WILL VOID YOUR WARRANTY. Rims
are not warranted for any defects other than workmanship. Torn back plates, damaged
springs, bent rings, damaged eye bolts, and torn or distorted rim supports result from
hanging on the rim and are not warranted. The goal should not be cranked under 7’ or
over 10’ for play. Adjustments of the goal should be done under adult supervision. When
attempting slam dunk activity, it is highly suggested that you always wear a mouth guard to
avoid or lessen dental injury.
This manual suits for next models
3
Table of contents
Other Wilson Electronics Fitness Equipment manuals
Popular Fitness Equipment manuals by other brands

SportTec
SportTec 3-in-1 Wooden Plyo Box manual

Life Fitness
Life Fitness CLUB SERIES SHROUD KIT 64 Inch Assembly instructions

Stage right
Stage right FR-36 Product information packet

Life Fitness
Life Fitness PFR-ROW-LCD owner's manual

Pro-Form
Pro-Form 225c Stepper user manual

Lifepro
Lifepro Waver Mini Press user manual