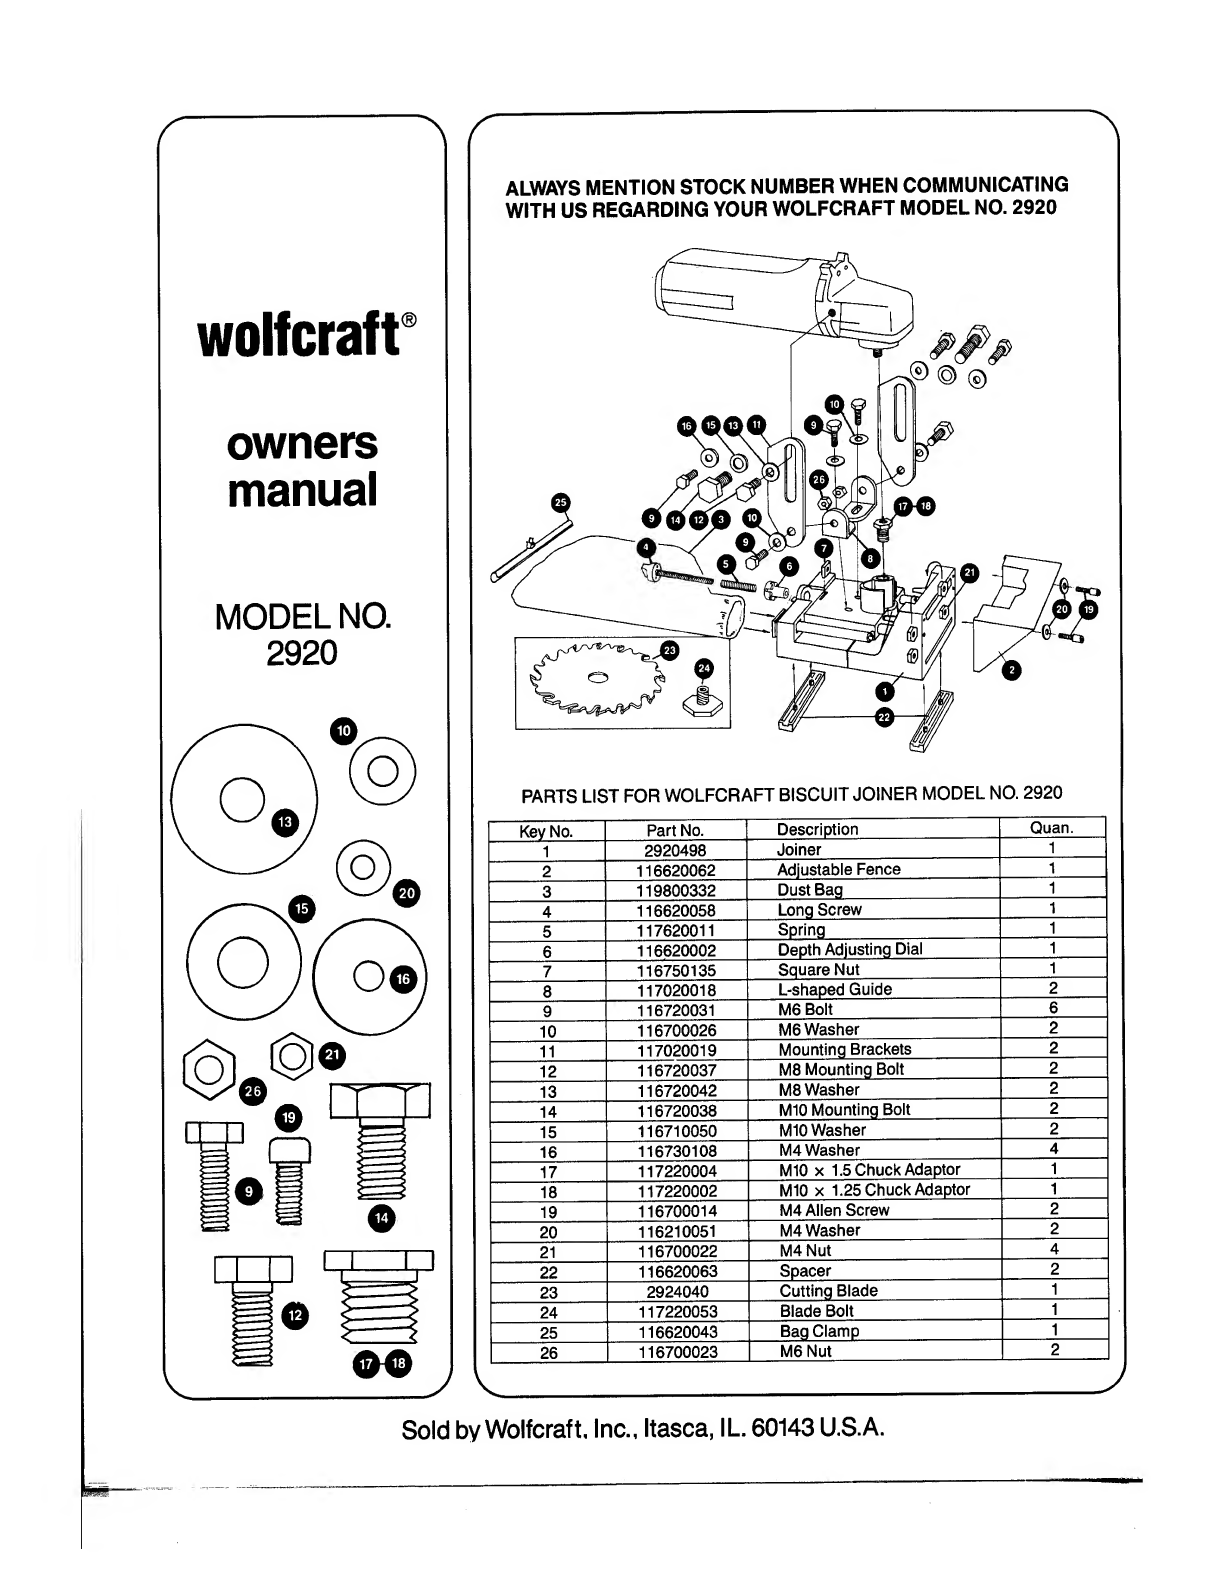
Wolfcraft 2920 User manual

Save
This
Manual
For
Future
Reference
wolfcraft
owners
manual
MODEL
NO.
2920
CAUTION:
READ
ALL
INSTRUCTIONS
CAREFULLY
wolfcraft®
BISCUIT
JOINER
assembly
operating

WARNING:
FAILURE
TO
HEED
ALL
SAFETY
AND
OPERATING
INSTRUCTIONS
AND
WARNINGS
REGARDING
USE
OF
THIS
PRODUCT
CAN
RESULT
IN
SERIOUS
BODILY
INJURY.
__
GENERAL
SAFETY
INSTRUCTIONS
FOR
POWER
TOOLS
1.
KNOW
YOUR
POWER
TOOL
Read
the
owner’s
manual
carefully.
Learn
its
application
and
limitations
as
well
as
the
specific
potential
hazards
peculiar
to
this
tool.
2.
GROUND
ALL
TOOLS
(UNLESS
DOUBLE
INSULATED)
If
tool
is
equipped
with
an
approved
3-conductor
cord
and
a
3-prong
grounding
type
plug
to
fit
the
proper
grounding
type
receptacle.
The
green
conductor
in
the
cord
is
the
grounding
wire.
Never
connect
the
green
wire
to
a
live
terminal.
3.
KEEP
GUARDS
IN
PLACE
In
working
order,
and
in
proper
adjustment
and
alignment.
4.
REMOVE
ADJUSTING
KEYS
AND
WRENCHES
Form
habit
of
checking
to
see
that
keys
and
adjusting
wrenches
are
removed
from
tool
before
turning
it
on.
5.
KEEP
WORK
AREA
CLEAN
Cluttered
areas
and
benches
invite
accidents.
Floor
must
not
be
slippery
due
to
wax
or
sawdust.
6.
AVOID
DANGEROUS
ENVIRONMENT
Don’t
use
power
tools
in
damp
or
wet
locations
or
expose
them
to
rain.
Keep
work
area
well
lighted.
Provide
adequate
surrounding
work
space.
7.
KEEP
CHILDREN
AWAY
All
visitors
should
be
kept
a
safe
distance
from
the
work
area.
8.
MAKE
WORKSHOP
KID-PROOF
—with
padlocks,
master
switches,
or
by
removing
the
starter
keys.
9.
DON’T
FORCE
TOOL
It
will
do
the
job
better
and
safer
at
the
rate
for
which
it
was
designed.
10.
USE
THE
RIGHT
TOOL
Don’t
force
tool
or
attachment
to
do
a
job
it
was
not
designed
for.
11.
WEAR
RIGHT
APPAREL
Do
not
wear
loose
clothing,
gloves,
neckties
or
jewelry
(rings,
wristwatches)
to
get
caught
in
moving
parts.
Nonslip
footwear
is
recommended.
Wear
protective
hair
covering
to
contain
long
hair.
Roll
long
sleeves
above
the
elbow.
12.
USE
SAFETY
GOGGLES
(Head
Protection)
Wear
Safety
goggles
(must
comply
with
ANSI
Z87.1)
at
all
times.
Also,
use
face
or
dust
mask
if
cutting
opera¬
tion
is
dusty,
and
ear
protectors
(plugs
or
muffs)
during
extended
periods
of
operation.
13.
SECURE
WORK
Use
clamps
or
a
vise
to
hold
work
when
practical.
It’s
safer
than
using
your
hand,
frees
both
hands
to
operate
tool.
14.
DON’T
OVERREACH
Keep
proper
footing
and
balance
at
all
times.
15.
MAINTAIN
TOOLS
WITH
CARE
Keep
tools
sharp
and
clean
for
best
and
safest
per¬
formance.
Follow
instructions
for
lubricating
and
changing
accessories.
16.
DISCONNECT
TOOLS
before
servicing;
when
changing
accessories
such
as
blades,
bits,
cutters,
etc.
17.
AVOID
ACCIDENTAL
STARTING
Make
sure
switch
is
in
“OFF”
position
before
plug¬
ging
in.
18.
USE
RECOMMENDED
ACCESSORIES
Consult
the
owner’s
manual
for
recommended
acces¬
sories.
Follow
the
instructions
that
accompany
the
accessories.
The
use
of
improper
accessories
may
cause
hazards.
19.
NEVER
STAND
ON
TOOL
Serious
injury
could
occur
if
the
tool
is
tipped
or
if
the
cutting
tool
is
accidentally
contacted.
Do
not
store
materials
above
or
near
the
tool
such
that
it
is
necessary
to
stand
on
the
tool
to
reach
them.
20.
CHECK
DAMAGED
PARTS
Before
further
use
of
the
tool,
a
guard
or
other
part
that
is
damaged
should
be
carefully
checked
to
ensure
that
it
will
operate
properly
and
perform
its
intended
func¬
tion.
Check
for
alignment
of
moving
parts,
binding
of
moving
parts,
breakage
of
parts,
mounting,
and
any
other
conditions
that
may
affect
its
operation.
A
guard
or
other
part
that
is
damaged
should
be
properly
repaired
or
replaced.
21.
DIRECTION
OF
FEED
Feed
work
into
a
blade
or
cutter
against
the
direction
of
rotation
of
the
blade
or
cutter
only.
22.
NEVER
LEAVE
TOOL
RUNNING
UNATTENDED
Turn
power
off.
Don’t
leave
tool
until
it
comes
to
a
complete
stop.

ADDITIONAL
SAFETY
INSTRUCTIONS
FOR
YOUR
WOLFCRAFT
BISCUIT
JOINER
1.
ALWAYS
USE
EYE
PROTECTION
The
operation
of
any
power
tool
can
result
in
foreign
objects
being
thrown
into
the
eyes,
which
can
result
in
severe
eye
damage.
Always
wear
safety
goggles
complying
with
ANSI
Z87.1
before
commencing
power
tool
operation.
2.
KEEP
TOOL
CLEAN
After
every
use,
clean
sawdust
off
the
Biscuit
Joiner
and
angle
grinder.
3.
WARNING:
Always
turn
“OFF”
the
angle
grinder
and
disconnect
the
power
cord
when
installing
the
cutter
and/or
adjusting
the
depth
of
cut.
INTRODUCTION
The
Wolfcraft
Biscuit
Joiner
is
designed
for
creating
joints
in
pressed
woods
and
other
soft
woods
that
do
not
accept
dowels,
dovetails
or
other
types
of
joints.
It
can
be
used
for
a
variety
of
purposes,
including
corners,
mitres
and
“T”
joints.
With
a
special
attach¬
ment
(included),
it
can
also
be
used
to
create
grooves
in
plywood
or
other
material.
The
Wolfcraft
Biscuit
Joiner
attaches
to
most
popular
angle
grinders.
It
can
be
used
to
cut
#0,
#10
and
#20
slots
at
45°
90°
and
180°
angles.
UNPACKING
AND
CHECKING
CONTENTS
Before
beginning
work,
separate
all
the
parts
from
the
packaging
materials
and
check
each
one
against
the
parts
list
on
page
8
to
be
sure
all
parts
are
there.
ASSEMBLY—
WOLFCRAFT
BISCUIT
JOINER
WARNING:
You
must
read
and
understand
all
the
instructions
of
your
Biscuit
Joiner
as
well
as
your
angle
grinder
owner’s
manual
before
attempting
to
assemble
and
operate
this
product.
ASSEMBLY
INSTRUCTIONS
ATTACHING
DEPTH
ADJUSTMENT
DIAL
1.
Slide
long
spring
over
threaded
end
of
long
screw.
2.
Slide
depth
adjusting
dial
over
threaded
end
of
long
screw
as
shown.
The
numbers
on
the
dial
should
be
facing
orange
knob.
3.
Place
square
nut
into
small
hole
on
moving
section
of
joiner.
4.
Insert
entire
long
screw
assembly
into
hole
in
back
of
joiner
and
turn
clockwise
until
it
is
held
by
the
nut.
DO
NOT
TIGHTEN
ALL
THE
WAY
TO
THE
DIAL.

ATTACHING
ANGLE
GRINDER
TO
JOINER
1.
Place
L-shaped
guides
over
holes
on
top
side
of
joiner
as
shown,
with
the
slotted
side
resting
on
the
joiner.
2.
Insert
medium-size
(M6)
washer
on
medium
(M6)
bolt
and
tighten
until
the
bolt
just
hits
the
guide.
The
guide
should
still
be
able
to
slide
back
and
forth
to
allow
for
the
width
of
your
angle
grinder.
Repeat
for
other
side.
3.
Place
angle
grinder
guide
on
the
outside
of
L-shaped
guide,
angled
side
toward
the
back.
Align
holes
on
both
guides
and
insert
medium
(M6)
bolt
and
washer
through
holes.
Place
nut
on
thread
ends
and
tighten
completely.
Repeat
for
other
side.
4.
Insert
angle
grinder
into
chuck
and
tighten
with
wrench.
(NOTE:
Supplied
size
is
5/8"
x
11.
If
your
angle
grinder
does
not
fit,
two
reducing
bushings
have
been
supplied
to
adapt
the
joiner
to
your
grinder—an
M10
x
1.5andM10
x
1.25.)
5.
Slide
angle
grinder
guides
into
sides
of
angle
grinder,
aligning
the
slots
with
the
mounting
holes
in
sides
of
angle
grinder.
Select
proper
size
bolt
and
washer,
insert
and
tighten
all
L-bracket
bolts.
6.
Place
small,
elastic
end
of
dust
bag
over
hole
on
right
back
side
of
joiner
until
snug.
You
are
now
ready
to
use
your
Wolfcraft
Biscuit
Joiner.
HOW
TO
SET
DEPTH
FOR
BISCUITS
1.
Determine
the
size
biscuit
you
wish
to
use—#0,
#10
or
#20.
2.
Make
sure
the
depth
adjusting
dial
is
properly
adjusted:
There
are
two
arrows
on
the
back
of
the
joiner.
Set
the
dial
so
those
arrows
point
to
0.
Then,
WITH
THE
POWER
DIS¬
CONNECTED,
hold
the
base
of
the
joiner
with
one
hand
and
push
the
blade
assembly
forward
with
the
other.
3.
Check
that
the
pointer
on
the
right
hand
side
of
the
joiner
points
to
0.
If
not,
turn
the
orange
knob
on
the
long
screw
until
it
does.
4.
You
can
now
set
your
joiner
for
the
size
biscuit
you
wish
to
use
by
simply
turning
the
dial
to
the
proper
reading.
5.
When
cutting,
push
joiner
forward
until
it
completely
butts
against
surface
of
wood
being
cut.
You
now
have
a
perfectly
cut
slot.
MARKING
SLOT
LOCATIONS
FOR
STANDARD
CUTS
1.
Always
begin
with
the
joiner
cutting
into
the
end
of
the
wood,
rather
than
the
face.
2.
Mark
center
of
slot
at
a
point
at
least
2Vz
"
from
the
outer
edge
of
the
board.
Allow
at
least
1
"
between
slots
in
multiple
biscuit
applica¬
tions
for
best
results.
Mark
all
slots
on
both
boards
at
the
same
time
to
assure
proper
alignment.
3.
Align
center
point
(thin
line)
of
joiner
with
your
pencil
mark.
4.
Turn
on
power
and
push
joiner
smoothly
in
line
with
your
mark.
When
joiner
has
butted
completely
against
surface
being
cut,
pull
back
and
then
release
power.
--1
1
r
O
1
1
II
M
IT
IO
|

HOW
TO
MAKE
CORNER
JOINTS
1.
Fit
the
two
pieces
of
wood
together
as
they
will
appear
in
the
final
joint.
Then
lay
the
vertical
piece
on
top
of
the
horizontal
piece
and
clamp
both
boards
to
work
bench.
2.
Mark
center
of
slots
on
top
board
as
detailed
on
Page
Three.
3.
Place
a
board
equal
to
the
thickness
of
the
boards
being
cut
under
the
joiner
for
support.
Align
the
center
mark
on
the
face
of
the
joiner
with
your
pencil
mark
and
make
your
cut
in
the
top
board.
Repeat
for
all
slots.
4.
Turn
joiner
so
cutting
wheel
is
facing
down
and
bottom
of
joiner
is
butted
against
top
board.
Align
thin
center
line
on
bottom
of
joiner
with
your
pencil
marks
and
cut
slot.
Repeat
for
all
slots.
5.
Insert
biscuits
dry
to
check
alignment
and
fit.
If
satisfac¬
tory,
apply
good
quality
carpenter’s
glue
to
both
sides,
insert
biscuit(s)
into
one
side
and
press
together.
HOW
TO
MAKE
T-BUTT
JOINTS
1.
Fit
the
two
pieces
of
wood
together
as
they
will
appear
in
the
final
joint.
Then
lay
the
vertical
piece
on
top
of
the
horizontal
piece
and
clamp
both
boards
to
work
bench.
2.
Mark
center
of
slots
on
top
board
as
detailed
on
Page
Three.
Then
set
biscuit
depth
as
detailed
on
Page
Three.
3.
Align
the
center
mark
on
the
face
of
the
joiner
with
your
pencil
mark
and
make
your
cut
in
the
top
board.
Repeat
for
all
slots.
4.
Turn
joiner
so
cutting
wheel
is
facing
down
and
bottom
of
joiner
is
butted
against
top
board.
Align
thin
center
line
on
bottom
of
joiner
with
your
pencil
marks
and
cut
slot.
Repeat
for
all
slots.
5.
Insert
biscuits
dry
to
check
alignment
and
fit.
If
satisfactory,
apply
good
quality
carpenter’s
glue
to
both
slots,
insert
biscuit(s)
into
one
side
and
press
together.
HOW
TO
MAKE
MITRE
JOINTS
1.
Attach
adjustable
fence
flat
side
up
using
the
M4
alien
head
screws,
washers
and
nuts
supplied
in
the
hard¬
ware
bag.
Use
top
holes
on
joiner.
Do
not
tighten
completely.
2.
Lay
joiner
flat
on
work
bench
and
slide
board
underneath
attachment
to
set
height.
Then
tighten
alien
screws
completely.
3.
Align
both
boards
with
angles
facing
away
from
you.
Top
board
should
be
back
far
enough
to
clear
the
joiner.
Clamp
boards
to
work
bench.
4.
Mark
center
of
slots
on
top
board
as
detailed
on
Page
Three.
Then
set
biscuit
depth
as
detailed
on
Page
Three.
5.
Align
the
center
mark
on
the
face
of
the
joiner
with
your
pencil
mark
and
make
your
cut
in
the
top
board.
Repeat
for
all
slots
on
both
boards.
6.
I
n
s
ert
biscuits
dry
to
check
alignment
and
fit.
If
satisfactory,
apply
good
quality
carpenter’s
glue
to
both
sides,
insert
biscuit(s)
into
one
side
and
press
together.

HOW
TO
MAKE
EDGE-TO-EDGE
JOINTS
1.
Align
all
boards
as
you
want
them
to
appear
when
fin¬
ished.
Mark
center
of
slots
on
all
boards
as
detailed
on
Page
Three.
Then
set
biscuit
depth
as
detailed
on
Page
Three.
2.
Clamp
boards
to
work
bench
one
at
a
time.
Align
center
mark
on
the
face
of
the
joiner
with
your
pencil
mark
and
cut
slot.
Repeat
for
all
slots
on
BOTH
SIDES
of
board.
3.
Insert
biscuits
dry
to
check
alignment
and
fit.
If
satisfactory,
apply
good
quality
carpenter’s
glue
to
both
slots,
insert
biscuit(s)
into
one
side
and
press
together.
HOW
TO
MAKE
LEG
AND
RAIL
JOINTS
3.
Clamp
or
hold
the
vertical
(butting)
board
still,
place
joiner
on
work
bench
and
align
center
mark
on
joiner
with
center
mark
on
board.
4.
Cut
slot
until
joiner
butts
against
board.
Turn
board
90°
and
repeat
until
all
four
slots
are
cut.
5.
Turn
joiner
so
cutting
edge
is
facing
down,
align
center
mark
on
joiner
with
mark
on
board,
and
make
cut.
Repeat
for
all
four
sides.
6.
Insert
biscuits
dry
to
check
alignment
and
fit.
If
satisfac¬
tory,
apply
good
quality
carpenter’s
glue
to
both
slots,
insert
biscuit(s)
into
one
side
and
press
together.
NOTE:
A
square
slot
pattern
is
preferred
for
best
results.
However,
a
side-by-side
pattern
can
also
be
used
in
low
stress
situations.
SQUARE
PATTERN:
1.
Fit
boards
together
as
you
would
like
them
to
appear
when
finished.
Make
a
small
mark
where
the
horizontal
and
vertical
boards
meet.
2.
Mark
the
center
of
the
slots
using
a
cross
pattern.
Be
sure
the
marks
on
both
boards
match.
(HINT:
Snap
a
chalk
line
on
one
set
of
marks,
press
the
other
board
on
top
of
it
to
get
an
impression,
then
remark
with
pencil.)
Set
biscuit
depth
as
detailed
on
Page
Three.
PARALLEL
PATTERN:
1.
Attach
adjustable
fence
to
joiner
with
angle
side
up
using
supplied
M4
alien
screws,
washers
and
nuts.
Do
not
tighten
completely.
2.
Fit
boards
together
as
you
would
like
them
to
appear
when
finished.
Make
a
small
mark
where
the
horizontal
and
vertical
boards
meet.
3.
Mark
center
of
slot
and
slot
locations
on
both
boards.
Be
sure
the
marks
on
both
boards
match.
(HINT:
Snap
a
chalk
line
on
one
set
of
marks,
press
the
other
board
on
top
of
it
to
get
an
impres¬
sion,
then
remark
with
pen¬
cil.)
Set
biscuit
depth
as
detailed
on
Page
Three.

4.
Align
center
mark
on
butt
edge
of
vertical
board
with
center
mark
on
joiner.
Set
angle
guide
so
cutting
edge
is
in
line
with
the
first
slot
mark
and
the
guide
rests
on
the
top
edge
of
the
board.
Tighten
alien
screws
and
make
first
cut.
5.
Reset
guide
height
until
it
matches
the
next
slot
mark
and
follow
Step
Four.
Repeat
for
all
marks.
6.
Turn
joiner
so
cutting
edge
is
facing
down,
align
center
mark
on
joiner
with
mark
on
board,
and
make
cut.
Repeat
for
all
four
slots.
7.
Insert
biscuits
dry
to
check
alignment
and
fit.
If
satisfactory,
apply
good
quality
carpenter’s
glue
to
both
slots,
insert
biscuit(s)
into
one
side
and
press
together.
HOW
TO
CUT
SLOTS
For
slots
less
than
2
3
/
16
"
from
edge:
1.
Attach
adjustable
fence
with
angle
side
up
as
de¬
tailed
in
#1
under
How
to
Make
Edge-To-Edge
Joints,
Parallel
pattern.
2.
Mark
pencil
line
where
you
would
like
slot
to
be.
With
blade
retracted,
align
center
line
on
side
of
joiner
with
pencil
line.
Butt
guide
against
side
of
board
and
tighten
alien
screws.
3.
Set
slot
depth
(in
milli¬
meters)
by
pushing
blade
assembly
forward
and
turn¬
ing
long
screw.
Use
scale
on
left
side
of
joiner
to
measure.
4.
Cut
slot
by
sliding
joiner
evenly
along
entire
length
of
board.
For
slots
more
than
2
3
/
16
"
from
edge:
1.
Mark
pencilline
where
you
would
like
slot
to
be.
Set
joiner
on
line,
aligning
center
line
on
side
of
joiner
with
pencil
line.
2.
Gently
slide
a
second
board
up
to
the
bottom
of
the
joi
ner
to
use
as
a
gu
ide.
Make
sure
board
is
parallel
to
your
pencil
line.
Clamp
both
ends
to
the
board
to
be
cut
and
work
bench.
3.
Set
slot
depth
(in
milli¬
meters)
by
pushing
blade
assembly
forward
and
turn¬
ing
long
screw.
Use
scale
on
left
side
of
joiner
to
measure.
4.
Cut
slot
by
sliding
joiner
evenly
along
entire
length
of
board.
CHANGING
BLADES
1.
IMPORTANT!
MAKE
SURE
POWER
IS
DISCON¬
NECTED
BEFORE
STARTING.
Remove
angle
grinder
from
joiner.
2.
Remove
alien
screws
on
face
of
joiner
using
wrench
provided.
3.
Turn
joiner
upside
down
so
large
bolt
is
showing.
Be
sure
to
note
which
way
blades
face.
4.
Hold
chuck
with
wrench
or
pliers.
Remove
bolt
with
wrench.
5.
Carefully
remove
old
blade
and
put
new
blade
in
its
place.
Reassemble
by
reinserting
and
tightening
bolt,
then
reinstalling
face
plate.
6.
Double
check
to
be
sure
blade
is
set
to
run
in
direc¬
tion
of
arrow
on
face
plate.

ALWAYS
MENTION
STOCK
NUMBER
WHEN
COMMUNICATING
WITH
US
REGARDING
YOUR
WOLFCRAFT
MODEL
NO.
2920
wolfcraft
owners
manual
MODEL
NO.
2920
PARTS
LIST
FOR
WOLFCRAFT
BISCUIT
JOINER
MODEL
NO.
2920
Key
No.
Part
No.
Description
Quan
1
2920498
Joiner
1
2
116620062
Adjustable
Fence
1
3
119800332
Dust
Bag
1
4
116620058
Long
Screw
1
5
117620011
Spring
1
6
116620002
Depth
Adjusting
Dial
i
7
116750135
Square
Nut
1
8
117020018
L-shaped
Guide
2
9
116720031
M6
Bolt
6
10
116700026
M6
Washer
2
11
117020019
Mounting
Brackets
2
12
116720037
M8
Mounting
Bolt
2
13
116720042
M8
Washer
2
14
116720038
M10
Mounting
Bolt
2
15
116710050
M10
Washer
2
16
116730108
M4
Washer
4
17
117220004
M10
x
1.5
Chuck
Adaptor
1
18
117220002
M10
x
1.25
Chuck
Adaptor
1
19
116700014
M4
Allen
Screw
2
20
116210051
M4
Washer
2
21
116700022
M4
Nut
4
22
116620063
Spacer
2
23
2924040
Cutting
Blade
1
24
117220053
Blade
Bolt
1
25
116620043
Bag
Clamp
1
26
116700023
M6
Nut
2
Sold
by
Wolfcraft.
Inc.,
Itasca,
IL.
60143
U.S.A.
Other manuals for 2920
2
Table of contents
Other Wolfcraft Biscuit Joiner manuals