WOLFF OMEGA Series Repair manual

Originalbedienungsanleitung /
Translation of the original manual / Traduction du mode d‘emploi original
Bodenschleif aschine OMEGA, 400 V D, F, A #036555
Bodenschleif aschine OMEGA, 230 V D, F, A #021341
Bodenschleif aschine OMEGA, 400 V CH #042293
Floor Grinder OMEGA, 400 V UK #036555
Floor Grinder OMEGA, 230 V UK #021341
Ponceuse onodisque OMEGA, 400 V D, F, A #036555
Ponceuse onodisque OMEGA, 230 V D, F, A #021341
Ponceuse onodisque OMEGA, 400 V CH #042293
WOLFF | Eine Marke der Uzin Utz Gruppe
WOLFF GmbH & Co. G | D-74360 Ilsfeld | Ungerhalde 1 | Tel. +49 (0)7062-91556-0 | Fax +49 (0)7062-91556-10 | E-Mail info@wolff-tools.com | Internet www.wolff-tools.de
Anleitung #035851

Betriebsanleitung Deutsch
Bodenschleif aschine OMEGA, 400 V D, F, A #036555
Bodenschleif aschine OMEGA, 230 V D, F, A #021341
Bodenschleif aschine OMEGA, 400 V CH #042293
vor Inbetriebnahme unbedingt durchlesen und aufbewahren
Inhalt
1. Technische Daten . . . . . . . . . . . . . . . . . . . . . . . . . . . . . . . . . . . . . . . . . . . . . . . . .Seite 3
2. EG-Konformitätserklärung . . . . . . . . . . . . . . . . . . . . . . . . . . . . . . . . . . . . . . . . . . Seite 3
3. Einsatzgebiete der Werkzeuge . . . . . . . . . . . . . . . . . . . . . . . . . . . . . . . . . . . . . . .Seite 4
4. Sicherheitsregeln für den Betrieb der Bodenschleifmaschine . . . . . . . . . . . . . . . .Seite 5
5. Inbetriebnahme und Schleifen . . . . . . . . . . . . . . . . . . . . . . . . . . . . . . . . . . . . . . . .Seite 6
6. Wechsel der Werkzeuge . . . . . . . . . . . . . . . . . . . . . . . . . . . . . . . . . . . . . . . . . . . .Seite 7
Bodenschleif aschine OMEGA 400 V, #
036555
2

Lieferumfang:
Bodenschleifmaschine OMEGA
Gehörschutz
Betriebsanleitung
Schutzbrille
Wasserwaage
1.0 Technische Daten
Arbeitsbreite . . . . . . . . . . . . . . . . . . . . . . . . . . . . . . . . . .29 cm
Maschinenbreite . . . . . . . . . . . . . . . . . . . . . . . . . . . . . . . .33 cm
Maschinenlänge . . . . . . . . . . . . . . . . . . . . . . . . . . . . . . . .75 cm
Maschinenhöhe . . . . . . . . . . . . . . . . . . . . . . . . . . . . . . . .95 cm
Gewicht 230 /400 Volt . . . . . . . . . . . . . . . . . . . . . . . . 55 /65 kg
Absaugstutzen . . . . . . . . . . . . . . . . . . . . . . . . . . . . . .Ø 50 mm
öhenverstellung . . . . . . . . . . . . . . . . . . . . . . . . . . . . . andrad
Versorgungsspannung 230 V, . . . . . . . . . . . . . . .2.2 kW, 16 A
Versorgungsspannung 400 V, . . . . . . . . . . . . . . . . . . . .3,0 kW
Drehzahl . . . . . . . . . . . . . . . . . . . . . . . . . . . . . . . .1.500 U/min.
Schwingungsgesamtwert ahv * . . . . . . . . . . . . . . . . . .10,2 m/s2
Schalleistungspegel Lwa * . . . . . . . . . . . . . . . . . . . . . .105 dB(A)
Dauerschallpegel Leq * . . . . . . . . . . . . . . . . . . . . . . . . .95 dB(A)
* Messwerte: VÜA Verein zur Überwachung technischer Anlagen e.V.
2.0 onformitätserklärung
Wir erklären in alleiniger Verantwortung, dass dieses Produkt mit den
folgenden Normen oder normativen Dokumenten überein-
stimmt: DIN EN 1037, EN ISO 12100, DIN EN 60204-1, DIN EN
60745-1, DIN EN 55014-1, DIN EN 55014-2
gemäß den Bestimmungen der Richtlinien: 2006/42/EG,
2004/108/EG, 2006/95/EG.
Dipl.-Ing. (FH) Dieter Hammel
Bevollmächtigter zur Ausstellung dieser Erkärung und zur
Zusammenstellung der technischen Unterlagen:
14.04.2015 i.V.
WOLFF Gmb & Co. KG | D-74360 Ilsfeld | Ungerhalde 1
Bodenschleif aschine OMEGA 400 V, #
036555
3

3.0 Einsatzgebiete der Werkzeuge
3.1 Allgemeine Einsatzgebiete
Werkzeug Diamant-Hartmetall- Fräs-
Anwendung segmente splitt werkzeug
Schleifen von ebenen Böden,
Abschleifen von Zementschlämme
- Glatte Oberfläche A C C
- Mittelrauhe Oberfläche A B C
- Rauhe Oberfläche A A C
Einebnen von unebenen Oberflächen
- Glatte Oberfläche A A C
- Mittelrauhe OberflächeA A A C
- Rauhe Oberfläche B A C
Einebnen von Übergängen,
Kanten und Fugen B A C
Renovierung A B A
Reparatur A B A
Fehler beim Einbringen A B A
Anschleifen von
- artem Beton A C B
- Öligen Böden A B A
- Gestrichenen Böden A A A
- Epoxy Beschichtungen A A A
Abtragen von Oberflächen
von 1 bis 5 mm tiefe A C A
Entfernen von Teppich-
und Fliesenklebern C A A
Asphalt-Schleifen B B A
A = Geeignet B = Weniger geeignet C = Nicht geeignet
3.2 Einsatzgebiete der Diamantscheiben
Bearbeitung von: Bezeichnung: Farbe:
ochverdichtete Böden CS16 silber
Epoxyd / PU Klebereste CS06 rot
4.0 Sicherheitsregeln
für den Betrieb der Bodenschleifmaschine
Die Bodenschleifmaschinen dürfen nur mit sämtlichen
Schutzvorrichtungen betrieben werden.
Bei Transport, der Reinigung, der Reparatur oder der
Wartung der Maschine muss der Netzstecker gezogen
werden. Dies gilt auch für den Werkzeugwechsel.
Der Maschinist darf sich während des Betriebs nicht von
der Schleifmaschine entfernen.
Vor dem Verlassen der Schleifmaschine hat der Maschinist
den Motor stillzusetzen und das Gerät gegen ungewollte
Bewegungen zu sichern. Außerdem muss der Netzstecker
gezogen werden.
Die aschine ist nur zu benutzen
für die bestimmungsgemäße Verwendung
in sicherheitstechnisch einwandfreiem
Zustand.
Zur bestimmungsgemäßen Verwendung gehört,
das Beachten aller Hinweise aus der
Betriebsanleitung und
die Einhaltung der Inspektions- und
Wartungsarbeiten.
Bodenschleif aschine OMEGA 400 V, #
036555
4

Achtung !
Die Bodenschleifmaschine O EGA ist unter der
Berücksichtigung geltender Sicherheitsstandards
entwickelt worden.
Die technischen Sicherheitsvorkehrungen dürfen auf
keinen Fall entfernt oder verändert werden. Beim
Betrieb der Schleifmaschine sollten außerdem folgende
Punkte beachtet werden:
Nach Wartungs- und Instandsetzungsarbeiten müssen die
Schutzvorrichtungen ordnungsgemäß angebracht werden.
Es müssen Schallschutzmittel getragen werden.
Es muss ein Augenschutz getragen werden.
Es müssen Sicherheitsschuhe mit Stahlkappen vom
Maschinisten getragen werden.
Bei größerer Staubentwicklung in geschlossenen Räumen
muss die Bodenschleifmaschine mit einer Absauganlage
betrieben werden.
Je nach Bodenart und Beschichtung können beim Schleifen
Gase freigesetzt werden. Es liegt in der Verantwortung
des Anwenders ob diese Gase gefährliche Stoffe enthalten
können und ob Schutzmassnahmen ergriffen werden müssen.
Speziell beim Schleifen von z.B. asbesthaltigen Böden
müssen Maßnahmen getroffen werden, welche die Atem-
luft des Maschinisten rein halten. Es müssen außerdem
geeignete Filter in die Absauganlagen eingesetzt werden.
Die zu schleifende Fläche sollte besenrein sein weil loses
Material von den Schleifwerkzeugen erfasst und wegge-
schleudert werden könnte. Außerdem können z.B. aus
dem Boden hervorragende Stifte , Schrauben und Bolzen
besser erkannt werden. Damit wird die Gefahr gebannt,
das Schleifwerkzeuge mit den Teilen kollidieren und Stücke
der Werkzeuge und/oder Teile weggeschleudert werden.
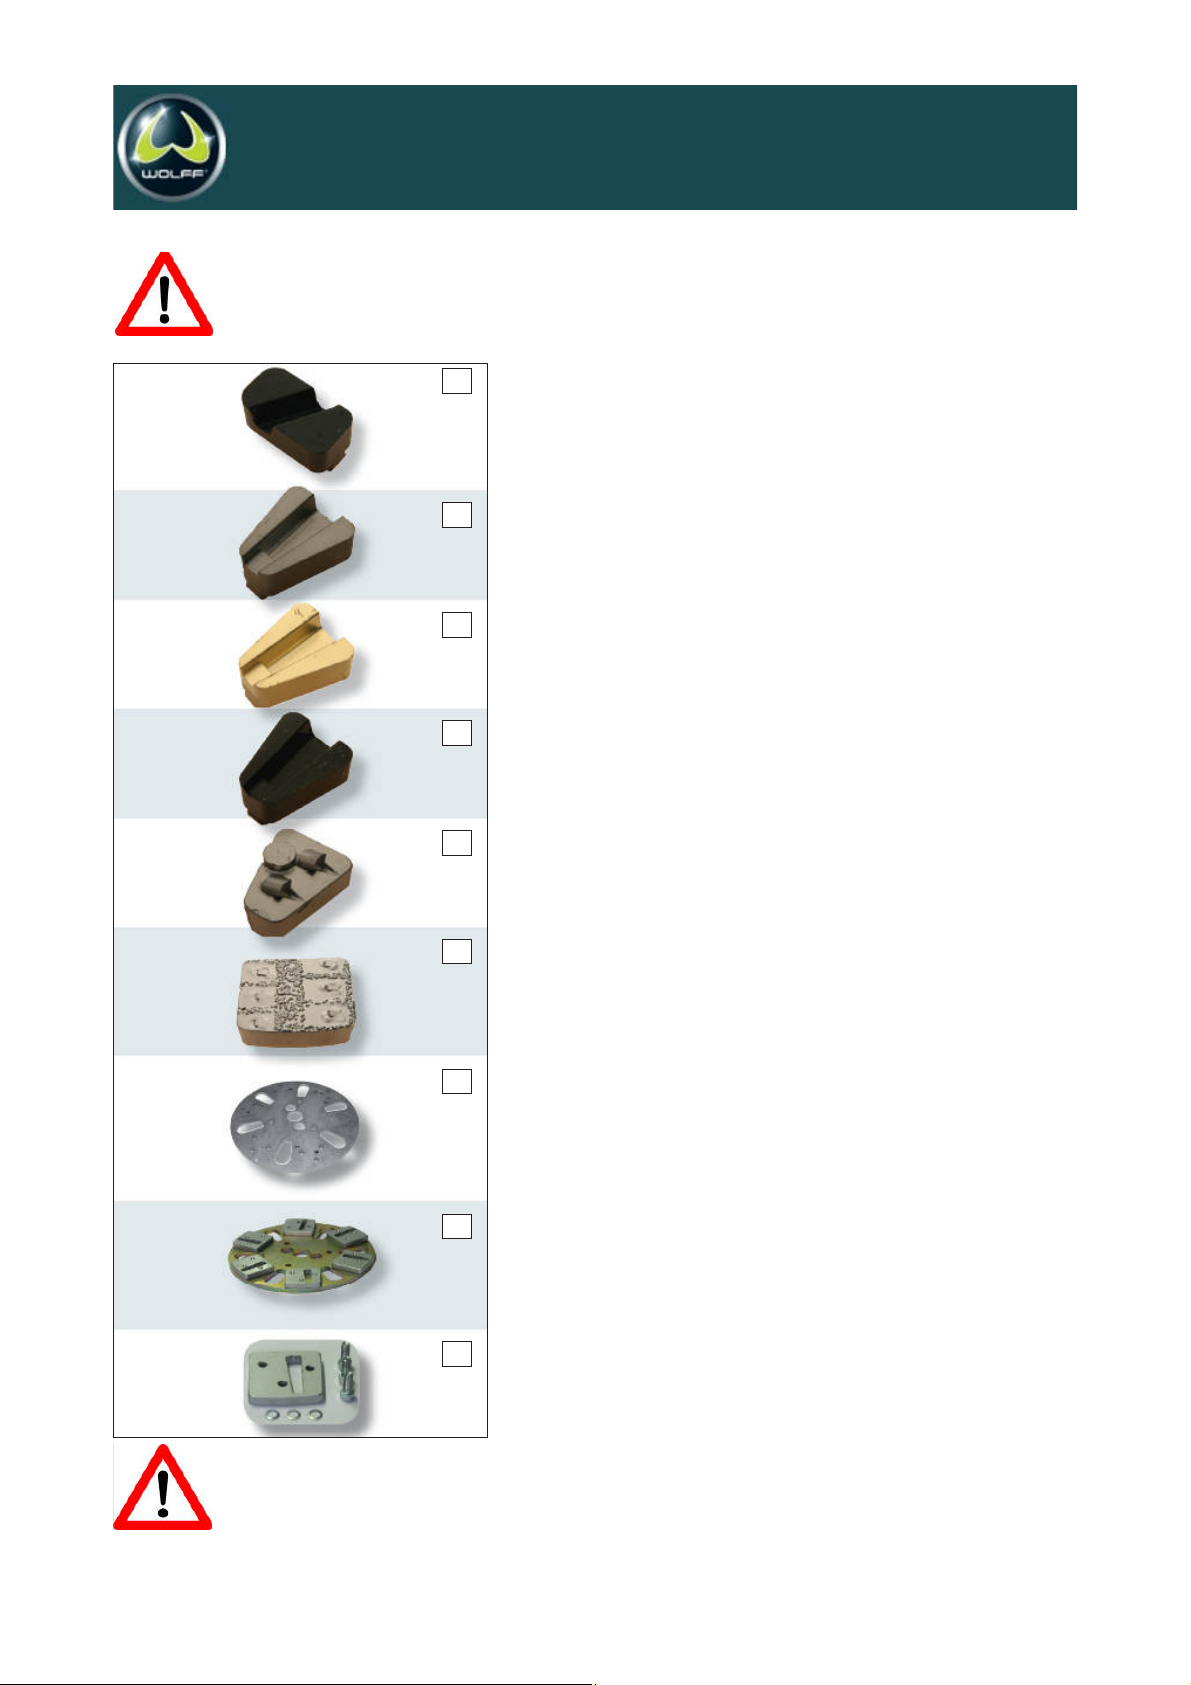
5.0 Inbetriebnahme und Schleifen
Nach Montage der für die Anwendung erforderlichen
Werkzeuge kann mit dem Schleifen begonnen werden.
Die Schleifmaschine mit dem andrad der öhenverstellung
(Anhang Skizze Pos. 35) so ausrichten, daß der Motor der
Maschine 90° zum Boden zeigt. Die Schleifwerkzeuge vom
Boden abheben, indem Sie die Maschine über die interräder
kippen. Motor einschalten.
Nachdem der Motor hochgefahren ist, setzen Sie die
Schleifwerkzeuge vorsichtig auf dem Boden auf. Wurde die
Maschine korrekt ausgerichtet (siehe oben), ist sie beim
Schleifen leicht zu führen. Falls die Schleifmaschine nach links
oder rechts zieht, muß die Maschine mittels des andrads der
öhenverstellung nachgeregelt werden.
Starke Staubentwicklung kann durch Anschluß einer
Absauganlage vermieden werden.
Bevor der Schleifvorgang beendet wird muss die Maschine
ausgeschaltet werden und die Schleifwerkzeuge durch Aufsetzen
auf den Boden zum Stillstand gebracht werden. Netzstecker ziehen.
5
Achtung, beim anfahren des otors die
aschine festhalten, da sie mit einem Ruck hochfährt.
Achtung: Der otor der Schleifmaschine
darf niemals eingeschaltet werden wenn die Werkzeuge
noch den Boden berühren. Immer erst über die
Hinterräder kippen und Werkzeuge damit vom Boden
abheben.
Bodenschleif aschine OMEGA 400 V, #
036555

Achtung: Vor Wartungsarbeiten otor
zum Stillstand bringen und Netzstecker ziehen.
TIPP
Absauganlage TORNADO (#15756) zur effektiven
Absaugung von Feinstäuben und Grobmaterialien
1.
2.
3.
4.
5.
6.
7.
8.
9.
Bodenschleif aschine OMEGA 400 V, #
036555
6
6.0 Wechsel der Werkzeuge
Maschine über die interräder kippen und umlegen.
Die Werkzeuge bzw. Werkzeugaufnahmen werden mit 3 Innen-
sechskant-Senkschrauben auf der alteplatte befestigt.Diese
mit einem 6 mm Innensechskantschlüssel lösen und entfernen.
Schleifwerkzeug abnehmen und auf Verschleiß überprüfen.
Werkzeug gemäss Anhang „Omega Werkzeuge“ anbringen.
Die verschiedenen öhen der Werkzeuge müssen mit dem
andrad der öhenverstellung angepaßt werden. Der Motor
der Schleifmaschine muß immer 90° zum Boden stehen.
Verschiedene Werkzeughöhen erfordern verschiedene
Breiten der Gummidichtungen um die Schleifglocke.
7.0 Werkzeuge und Zubehör
7.1 Werkzeuge
1. Diamant-Segment, kubisch . . . . . . . . . . . . . . . .#48037
Zum Entfernen von Kunstharz und
Dispersionsklebstoffen auf Beton.
2. Diamant-Segment, silber . . . . . . . . . . . . . . . . . .#48038
Zum schnellen Abtragen von PU-Beschichtungen,
Kunstharz und Dispersionsklebstoffen auf Beton.
3. Diamant-Segment, gold . . . . . . . . . . . . . . . . . . .#48040
Zum schnellen Abtragen von Beton und Estrichen
(schnelle Abnutzung / feines Schleifbild) und zum
effektiven Schleifen von Gussasphalt.
4. Diamant-Segment, schwarz . . . . . . . . . . . . . . . .#48041
Zum Schleifen von Beton und Estrichen (grob).
5. PKD-Segment . . . . . . . . . . . . . . . . . . . . . . . . . . .#48028
Zum aggressiven Entfernen von PU-Lackierungen,
Spachtelmassen und Fliesenklebstoffen.
6. PKD-Splitt-Segment . . . . . . . . . . . . . . . . . . . . . .#48036
Zum Entfernen von Altlasten auf allen
Untergründen (hoher Wirkungsgrad).
Sehr gut geeignet zum Entfernen von Vliesrücken.
7. Scheibenaufnahme . . . . . . . . . . . . . . . . . . . . . . .#33140
für Diamant-Segmente alt
Verwendbar mit 3 oder 6 einzelnen Diamant-Segmenten
8. Scheibenaufnahme . . . . . . . . . . . . . . . . . . . . . . .#49152
für Diamant-Segmente neu: Wie oben, jedoch für
Diamant-Segmente wie ab 04/08 ausgeliefert.
9. Umbausatz . . . . . . . . . . . . . . . . . . . . . . . . . . . . . .#48957
Für Diamant-Schleifteller bis 04/08 zur
Verwendung der neuen Segmente.
7.2 Zubehör
Schleiffeldabdichtung für Frässegmentteller . . . . . . . . .#33877
Vorderrad zum Anbau an Frässegmentteller . . . . . . . . .#33876
Schleiffeldabdichtung für Segment + . . . . . . . . . . . . . . .#33375
artmetallsplittscheibe
Absaugschlauch . . . . . . . . . . . . . . . . . . . . . . . . . . . . . . .#33847

Gewährleist ng
Der Gewährleistun szeitraum für neue Wolff Maschinen beträ t ein Jahr ab dem Zeitpunkt der Über abe /
Ablieferun an den Kunden, soweit nicht nach zwin enden esetzlichen Vorschriften etwas anderes ilt.
Bei der Geltendmachun von Gewährleistun sansprüchen hat rundsätzlich auch die Vorla e der Rechnun
bzw. des Kaufbele s zu erfol en.
Alle Reparaturen im Rahmen der Gewährleistun müssen durch eine von uns anerkannte Wolff Service-werk-
stätte aus eführt werden. Selbst durch eführte und/oder unsach emäße Reparaturen führen re elmäßi zum
Ausschluss von Gewährleistun sansprüchen. Dies ilt ebenso für unsach emäße Bedienun und/oder
Gebrauch.
Ersatz von Teilen, Z behör nd sonstige Änder ngen an Wolff Maschinen
Wolff Maschinen bieten für den Verwender ein hohes Maß an Sicherheit und Zuverlässi keit. Um diese zu
erhalten, darf der im Zeitpunkt der Auslieferun bestehende werkseiti e Zustand Ihrer Wolff Maschine nicht
ohne Beachtun der nachfol enden Re eln verändert werden. Diese Re eln elten sowohl für den Ersatz
von Teilen, die Ausstattun mit Zubehör als auch sonsti e technische Änderun en.
Je liche Arbeiten an Ihrer Wolff Maschine sind ausschließlich durch eine Fachwerkstätte, die über
entsprechend fachlich eschultes und erfahrenes Personal sowie die erforderlichen Arbeitsmittel
verfü t, durchzuführen. Wir empfehlen hierfür autorisierte Wolff Servicewerkstätten.
Im Falle des beabsichti ten Ersatzes von Teilen, der beabsichti ten Ausstattun mit Zubehör oder
beabsichti ten sonsti en technischen Änderun en sollte stets or Beginn der Arbeiten eine
Beratun durch eine autorisierte Wolff Servicewerkstätte oder uns als Hersteller erfol en.
Es wird drin end empfohlen, nur sicherheits eprüfte Ori inal Wolff-Ersatzteile und Ori inal Wolff-
Zubehörteile zu verwenden, die von uns als Hersteller frei e eben wurden.
Diese Ersatz- und Zubehörteile erhalten Sie bei Ihrer autorisierten Wolff Servicewerkstätte, die auch
erne die fach erechte Monta e für Sie durchführt. Ori inal Wolff-Ersatzteile und Ori inal Wolff
Zubehörteile wurden auf Sicherheit und Ei nun speziell für Wolff Maschinen eprüft.
Die Sicherheit und Eignung anderer als Original Wolff-Ersatz- und Zubehörteile können wir
nicht hinreichend beurteilen, und folglich auch nicht hierfür einstehen.
Zum Erhalt der Betriebssicherheit und zur Vermeidun von Schäden sind im Falle technischer
Änderun en - leich welcher Art - in jedem Falle unsere technischen Richtlinien zu beachten. Bitte
wenden Sie sich im Übri en auch jederzeit erne an uns, wenn Sie sonsti e Fra en zu Ihrer Wolff
Maschine haben.
Wir bitten m Verständnis, dass wir für Schäden keine Gewähr übernehmen können, soweit sie infolge nsach-
gemäßer Arbeiten bzw. infolge Verstoßes gegen die vorgenannten Regeln entstehen.
Bodenschleif aschine OMEGA 400 V, #
036555
7

Operating manual English
Floor Grinder OMEGA, 400 V UK #036555
Floor Grinder OMEGA, 230 V UK #021341
Read before use
Technical Data
1. Technical data . . . . . . . . . . . . . . . . . . . . . . . . . . . . . . . . . . . . . . . . . . . . . . . . . . . . . . . . . . . . . . . . . .Page 9
2. EU-Declaration of Conformity . . . . . . . . . . . . . . . . . . . . . . . . . . . . . . . . . . . . . . . . . . . . . . . . . . . . . .Page 9
3. Tool applications . . . . . . . . . . . . . . . . . . . . . . . . . . . . . . . . . . . . . . . . . . . . . . . . . . . . . . . . . . . . . . . .Page 10
4. Safety rules for the operation of the OMEGA floor grinder . . . . . . . . . . . . . . . . . . . . . . . . . . . . . . .Page 10
5. Operating . . . . . . . . . . . . . . . . . . . . . . . . . . . . . . . . . . . . . . . . . . . . . . . . . . . . . . . . . . . . . . . . . . . . .Page 11
6. Changing and replacing of the tools . . . . . . . . . . . . . . . . . . . . . . . . . . . . . . . . . . . . . . . . . . . . . . . .Page 12
7. Tools and Accessories . . . . . . . . . . . . . . . . . . . . . . . . . . . . . . . . . . . . . . . . . . . . . . . . . . . . . . . . . . .Page 12
Bodenschleif aschine OMEGA 400 V, #
036555
8

1.0 Technical Data
Width of grinding . . . . . . . . . . . . . . . . . . . . . . . . . . . . . . .29 cm
Width . . . . . . . . . . . . . . . . . . . . . . . . . . . . . . . . . . . . . . . .33 cm
Length . . . . . . . . . . . . . . . . . . . . . . . . . . . . . . . . . . . . . . .75 cm
eight . . . . . . . . . . . . . . . . . . . . . . . . . . . . . . . . . . . . . . . .95 cm
Weight 230 V /400 V . . . . . . . . . . . . . . . . . . . . . . . . . .55 /65 kg
ose . . . . . . . . . . . . . . . . . . . . . . . . . . . . . . . . . . . . . .Ø 50 mm
eight adjustment . . . . . . . . . . . . . . . . . . . . . . . . . . and wheel
Power Europe/USA 230 V, . . . . . . . . . . . . . . . . . .2.2 kW; 16 A
Rotation speed . . . . . . . . . . . . . . . . . . . . . . . . . . . .1.500 U/min.
Average value of acceleration ahv * . . . . . . . . . . . . . . .10.2 m/s2
Noise level Lwa * . . . . . . . . . . . . . . . . . . . . . . . . . . . . .105 dB(A)
Noise level Leq * . . . . . . . . . . . . . . . . . . . . . . . . . . . . . .95 dB(A)
* Data: VÜA Verein zur Überwachung technischer Anlagen e.V.
2.0 Declaration of Conformity
We declare under our sole responsibility that this product is in con-
formity with the following standards of standardization docu-
ments:DIN EN 1037, EN ISO 12100, DIN EN 60204-1, DIN EN
60745-1, DIN EN 55014-1, DIN EN 55014-2
according to the provisions of the: 2006/42/EC, 2004/108/EC,
2006/95/EC.
Dipl.-Ing. (FH) Dieter Hammel
Authorised to issue this declaration and for the
gathering of the technical documentation.
14.04.2015 i.V.
WOLFF Gmb & Co. KG | D-74360 Ilsfeld | Ungerhalde 1
Comes with:
Floor Grinder OMEGA
Ear Protection
Safety gloves
Operation manual
Spirit level
Bodenschleif aschine OMEGA 400 V, #
036555
9

3.0 Tool applications
3.1 General Applications
Tool Diamond Tungsten- Sand-
Application Carbide paper
Grinding of plain floors,
- Smooth surfaces A C C
- Semi rough surfaces A B C
- Rough surfaces A A C
Levelling of uneven surfaces
- Smooth surfaces A A C
- Semi rough surfaces A A C
- Rough surfaces B A C
Levelling of steps,
corners, joints etc. B A C
Renovation A B A
Repair A B A
Faults in concrete A B A
Grinding of
- ard concrete A C B
- Oily and greasy floors A B A
- Painted floors A A A
- Epoxy coatings A A A
Removal of floor
surfaces up to 5 mm A C A
Removal of carpet
and tile glue C A A
Grinding of asphalt B B A
A = Suitable B = Less suitable C = Not suitable
3:2 Application of diamond discs
Grinding of: Description: Colour:
ard floors CS16 silver
Normal concrete CS40 blue
Aggressive concrete CA1 brown
Terrazzo MBC1 purple
Epoxy CS06 red
4.0 Safety rules for the operation of the OMEGA
Intended application and operation:
Grinding of flat, horizontal, dry surfaces that are typically
concrete, asphalt or steel and with or without a coating. For
optimum performance and compatibility always use tools
supplied by CONTEC. Operation of the grinder outdoors is
only permitted if the weather is dry.
The floor grinder may only be operated by trained
professionals. The operators have read and be familiar the
contents of this manual. The floor grinder must not be operated
in areas where the hazard of explosion or fire exists.
The floor grinder can only be started when the tools are not
in contact with the floor. Do always start the machine in a
tipped position. The tools and discs may be hot after use.
Take care when changing them.
Bodenschleif aschine OMEGA 400 V, #
036555
10

The machine should always be stored in a warm, dry place
when not in use. The floor grinder may only be operated
with the dust guard (Appendix diagram No.3).
Only original tools and spare parts are to be used. The grinder
should only be operated with all safety guards in position.
When changing tools, during transportation, cleaning,
repair or maintenance the grinder must be disconnected
from the mains. The operator must never leave the machine
unattended during operation. Before leaving the machine
all rotary parts must be brought to a standstill. Electric
models must be disconnected from the power supply.
Ensure the machine cannot roll or move by itself.
After any maintenance and adjustment all safety guards must
be refitted. Ear protectors must be worn. Eye protectors
must be worn. Safety shoes with steel caps must be worn.
When operating the grinder produces large volumes of dust
the grinder should be connected to a suitable dust collector.
Depending on the floor (floor coating) grinding can produce
gases. The operator must be held responsible if the gases
generated are hazardous and whether protection is necessary.
Grinding floors containing asbestos is especially dangerous
and can cause health problems. Special masks must be
worn which keep the breathing air clean. A dust collector
must be used and should be equipped with filters suitable
for asbestos dust.
The floor must be brushed before grinding to prevent loose
material collecting in the tools and then being thrown out
with force. Anchor screws and bolts in the floor can also be
seen better if the area is clean. If the grinding head strikes
an anchor screw or bolt then serious damage can be caused
to the machine and grinding head.
5.0 Operating
After mounting the appropriate tools, the operation of the
OMEGA grinder can begin. Connect the hose of the dust collector
to the hose port of the grinder. Adjust the grinder by turning the
hand wheel of the height adjustment so that the motor axis is
90° level to the floor. Lift the tool from the floor by tilting the
machine onto it's back wheels. Switch the motor on.
After the motor has reached full rotation place the tools carefully
on to the floor. If the machine is correctly adjusted (see above)
it is easier to move across the floor. If the machine pulls to the
left or right, the machine has to be re-adjusted with the hand
wheel of the height adjustment.
6.0 Changing and replacing of the tools
Tilt the machine onto the back wheels and rest it on the
handlebar.
All tools are fixed with 3 screws on the tool bracket.
Loosen and remove the screws with a 6 mm Alan key.
Check the grinding tool for wear and tear for the next
application.
Fix a new tool with the 3 screws on the tool bracket.
Attention !
The O EGA floor grinders are constructed according to
existing safety rules and regulations.
These technical precautions must not be removed or
changed under any circumstances. While operating the
grinder the following points should also be kept in
mind:
Attention !
When switching on the motor the machine jumps slightly.
Never operate the floor grinder on a sloping surface.
Take care when moving the machine on a sloping
surface, substantial rolling forces can be produced.
Attention !
Never switch the motor on while the tools still touch the
floor.
Attention !
Before working on the grinder allow the motor to come
to a complete stand still and disconnect from the mains.
Bodenschleif aschine OMEGA 400 V, #
036555
11

TIPP
Suction system TORNADO . . . . . . . . . . .Item no. 15756
to efficiently suck off fine dusts or grits,
Adjust the different heights of the tools with the hand wheel
of the height adjustment. The motor axis of the grinder has
to be 90° level to the floor.
Different tools need different heights for the rubber sealing
around the discs.
7.0 Tools and Accessories
7.1 Tools
1. Diamond segment, cubic . . . . . . . . . . . . . . . . . .#48037
For removing synthetic resin and dispersion
adhesives on concrete.
2. Diamond segment, silver . . . . . . . . . . . . . . . . . .#48038
For a fast removal of PU coating, synthetic
resin and dispersion adhesives on concrete.
3. Diamond segment, gold . . . . . . . . . . . . . . . . . . .#48040
For a fast removal of concrete and screed
(fast wear/fi ne grinding pattern),
and for an effi cient grinding of mastic asphalt.
4. Diamond segment, black . . . . . . . . . . . . . . . . . .#48041
For a rough grinding of concrete and screed.
5. PCD segment . . . . . . . . . . . . . . . . . . . . . . . . . . . .#48028
For an aggressive removal of PU varnishes,
compounds and tile adhesives.
6. PCD splinter segment . . . . . . . . . . . . . . . . . . . . .#48036
For removing residues on any substrate
(high effi ciency). Well suited to
remove fl eece backing.
7. Disc holder for diamond . . . . . . . . . . . . . . . . . . .#33140
Segments of old type. Can be used with
3 or 6 individual diamond segments of the
type delivered up to 04/06.
8. Disc holder for diamond . . . . . . . . . . . . . . . . . . .#49152
Segments of new type. As above, but for diamond
segments of the type delivered as of 04/06.
9. Reversion kit . . . . . . . . . . . . . . . . . . . . . . . . . . . .#48957
Necessary for diamond grinding discs delivered
before 04/08 in order to use the new segments.
7.1 Accessories
Rubber sealing . . . . . . . . . . . . . . . . . . . . . . . . . . . . . . . .#33877
Front wheel to be mounted to milling
segment disc . . . . . . . . . . . . . . . . . . . . . . . . . . . . . . . . .#33876
Rubber sealing for disc with milling segments . . . . . . . .#33375
Flexible ose . . . . . . . . . . . . . . . . . . . . . . . . . . . . . . . . .#33847
1.
2.
3.
4.
5.
6.
7.
8.
9.
Bodenschleif aschine OMEGA 400 V, #
036555
12

Guarantee
The guaran ee period for new Wolff machines is one year from he ime of delivery/ ransfer o he cus omer,
unless ano her period applies pursuan o manda ory legal regula ions.
When making a claim under guaran ee, he invoice and/or proof of purchase mus be provided.
All repairs covered by he guaran ee mus be carried ou by a Wolff service shop recognised by us. Repairs
which are carried ou by he cus omer and/or improperly au oma ically lead o a disen i lemen from guaran-
ee claims. The same is rue of improper opera ion and/or use.
Replacement of parts, accessories and other changes to Wolff machines
Wolff machines provide users wi h a high degree of safe y and reliabii y. To main ain his, he condi ion of your
Wolff machine may no be changed from ha on he da e i was delivered from he fac ory wi hou observing
he following rules. These rules apply for he replacemen of par s, he addi ion of accessories and o her
echnical changes.
All work done on your Wolff machine mus be carried ou exclusively by a specialist workshop which
has sui ably rained and experienced s aff and he working ma erials required. For his, we recommend
an au horised Wolff service shop.
In he even ha par s are delibera ely replaced, accessories are delibera ely added or o her echnical
changes are delibera ely carried ou , he cus omer mus always consul an au horised Wolff service
shop or us, he manufac urer, before starting the work.
We urgen ly recommend only using safe y-checked original Wolff spare par s and original Wolff
accessories which have been cleared by us, he manufac urer. These spare par s and accessories can
be purchased from your au horised Wolff service shop, which will also be pleased o assemble hem
for you properly.
Original Wolff spare par s and Wolff accessories have been specially es ed for heir safe y and
sui abili y for Wolff machines.
We can not sufficiently judge the safety and suitability of spare parts and accessories which are
not original Wolff parts, and are thus unable to vouch for them.
To main ain opera ing reliabili y and avoid damage, in he case of echnical changes – of wha ever kind
– our technical guidelines are to be observed in every case. Please also con ac us a any o her
ime if you have any ques ions abou your Wolff machine.
We can not assume any liability for damages caused as a result of improper work and/or violation of the above
terms and conditions.
Bodenschleif aschine OMEGA 400 V, #
036555
13

Mode d'emploi Français
Ponceuse onodisque OMEGA, 400 V D, F, A #036555
Ponceuse onodisque OMEGA, 230 V D, F, A #021341
Ponceuse onodisque OMEGA, 400 V CH #042293
A lire impérativement avant la mise en service et à conserver
Contenu
1. Caractéristiques techniques . . . . . . . . . . . . . . . . . . . . . . . . . . . . . . . . . . . . . . . .Page 14
2. Déclaration de conformité CE . . . . . . . . . . . . . . . . . . . . . . . . . . . . . . . . . . . . . . Page 14
3. Domaines d'application des outillages . . . . . . . . . . . . . . . . . . . . . . . . . . . . . . . . Page 15
4. Règles de sécurité pour l'utilisation de la ponceuse monodisque . . . . . . . . . . .Page 15
5. Mise en service et utilisation . . . . . . . . . . . . . . . . . . . . . . . . . . . . . . . . . . . . . . . Page 16
6. Echange des outillages . . . . . . . . . . . . . . . . . . . . . . . . . . . . . . . . . . . . . . . . . . . .Page 17
7. Outillages et accessoires . . . . . . . . . . . . . . . . . . . . . . . . . . . . . . . . . . . . . . . . . .Page 17
Bodenschleif aschine OMEGA 400 V, #
036555
14

1.0 Caractéristiques techniques
Largeur utile . . . . . . . . . . . . . . . . . . . . . . . . . . . . . . . . . . .29 cm
Largeur machine . . . . . . . . . . . . . . . . . . . . . . . . . . . . . . .33 cm
Longueur machine . . . . . . . . . . . . . . . . . . . . . . . . . . . . . .75 cm
auteur machine . . . . . . . . . . . . . . . . . . . . . . . . . . . . . . .95 cm
Poids 230 /400 Volt . . . . . . . . . . . . . . . . . . . . . . . . . . 55 /65 kg
Tubulure d'aspiration . . . . . . . . . . . . . . . . . . . . . . . . . .Ø 50 mm
Réglage de la hauteur . . . . . . . . . . . . . . . . . . . . . . . . . . .Volant
Tension d'alimentation 230 V, . . . . . . . . . . . . . . . .2,2 kW, 16 A
Tension d'alimentation 400 V, . . . . . . . . . . . . . . . . . . . .3,0 kW
Vitesse . . . . . . . . . . . . . . . . . . . . . . . . . . . . . . . . . .1.500 tr/min.
Valeur totale des vibrations ahv * . . . . . . . . . . . . . . . . .10,2 m/s2
Niveau de puissance acoustique Lwa * . . . . . . . . . . .105 dB(A)
Niveau de bruit permanent Leq * . . . . . . . . . . . . . . . . .95 dB(A)
* Valeurs de mesure : Association VÜA (Association pour le contrôle technique des installations)
2.0 Déclaration de conformité
Nous déclarons sous notre propre responsabilité que ce produ-
it est en conformité avec les normes ou documents normalisés:
DIN EN 1037, EN ISO 12100, DIN EN 60204-1, DIN EN 60745-1,
DIN EN 55014-1, DIN EN 55014-2
conformément aux termes des réglementations 2006/42/CE,
2004/108/CE, 2006/95/CE.
Dipl.-Ing. (FH) Dieter Hammel
Donneur d’ordre chargé de délivrer cette déclaration
et de collecter les documents techniques :
14.04.2015 i.V.
WOLFF Gmb & Co. KG | D-74360 Ilsfeld | Ungerhalde 1
Matériel fourni :
Ponceuse monodisque OMEGA
Protection de l'ouïe
Mode d'emploi
Lunettes de protection
Niveau à bulle
Bodenschleif aschine OMEGA 400 V, #
036555
15

3.0 Domaines d'application des outillages
3.1 Domaines d'application généraux
Outil Segments Gravillon Outil de
Application diamantés métal dur fraisage
Ponçage de sols égaux,
Ponçage de laitances
- Surface lisse A C C
- Surface moyennement rugueuse A B C
- Surface rugueuse A A C
Rectification de surfaces inégales
- Surface lisse A A C
- Surface moyennement lisse A A C
- Surface rugueuse B A C
Nivellement de passages,
bords et joints B A C
Rénovation A B A
Réparation A B A
Erreur lors de la réalisation A B A
Ponçage
- Béton dur A C B
- Sols huileux A B A
- Sols peints A A A
- Revêtements époxy A A A
Enlèvement de surfaces
de 1 à 5 mm de profondeur A C A
Enlèvement de colles moquette
et de colle carrelage C A A
Ponçage d'asphalte B B A
A = approprié B = moins approprié C = non approprié
3.2 Domaines d'application des disques diamantés
Traitement de : Dénomination : Couleur :
Sols extrêmement compactés CS16 argenté
Résidus de résine d'époxy / PU CS06 rouge
4.0 Règles de sécurité
pour l'utilisation de la ponceuse monodisque
Les ponceuses monodisques ne doivent être utilisées que
si tous les dispositifs de sécurité nécessaires sont installés.
Pour le transport, le nettoyage, la réparation et l'entretien
de la machine, il faut retirer la prise de secteur. Cela vaut
également pour l'échange des outils.
Le conducteur machine ne doit pas s'éloigner de la
ponceuse en route.
Avant de quitter la ponceuse, le conducteur machine doit
arrêter le moteur et protéger le matériel contre tout mouve-
ment non voulu. En outre, il doit retirer la prise de secteur.
La machine ne doit être utilisée
que pour l'emploi auquel elle est destinée
que dans un état parfait à l'égard de la sécurité
technique.
Les points suivants font partie de l'utilisation conforme
à la fonction prévue :
l'observation de toutes les consignes des
instructions de service et
le respect des opérations d'inspection et d'entretien.
Attention !
La ponceuse monodisque O EGA a été développée en
respectant les règles de sécurité standard en vigueur.
Ces règles de sécurité ne doivent en aucun cas être
jetées ou modifiées. Les points suivants doivent être
observés lors de toute utilisation de la ponceuse :
Bodenschleif aschine OMEGA 400 V, #
036555
16

Attention :
Avant d'initier les travaux d'entretien,
arrêter le moteur et retirer la prise de secteur.
Attention :
Bien tenir la machine lors du démarrage car elle démarre
par saccade.
Attention : Ne jamais mettre en circuit le
moteur de la ponceuse lorsque les outils touchent encore
le sol. Basculer toujours d'abord les roues arrières et
lever ainsi les outils du sol.
Après tous travaux d'entretien ou de réparation, les dispositifs
de sécurité doivent être à nouveau correctement installés.
Le conducteur machine doit obligatoirement porter une
protection de l'ouïe.
Le conducteur machine doit obligatoirement porter une
protection de la vue.
Le conducteur machine doit obligatoirement porter des
chaussures de sécurité pourvues de coquilles en acier.
Lors de dégagement de poussière très important dans une
pièce fermée, un aspirateur doit être utilisé simultanément
à la ponceuse monodisque.
En fonction de la nature du sol et du revêtement, des gaz
peuvent se dégager pendant le ponçage. Il incombe à
l'utilisateur d'évaluer si ces gaz peuvent comprendre des
substances dangereuses ou si des mesures de protection
doivent être prises.
Surtout lors du ponçage, par exemple, de sols contenant
de l'amiante, il faut prendre des mesures particulières pour
garantir que le conducteur machine peut toujours respirer un
air propre. Les dispositifs d'aspiration doivent en plus être
pourvus des filtres appropriés.
Il faut veiller à ce que la surface à poncer soit bien nettoyée
au balai car les outils de ponçage pourraient entraîner et
lancer ces particules qui se trouvent sur le sol. Le balayage
permet aussi de détecter mieux des chevilles, des vis et
des boulons qui sont en saillie. Cela permet d'éviter le risque
d'une collision des outils de ponçage avec ces pièces et
d'un éclatement des parties d'outils et/ou des pièces.
5.0 Mise en service et utilisation
Après le montage des outils nécessaires à l'utilisation, il est
possible de commencer le travail de ponçage.
Tourner le volant pour le réglage de la hauteur (Annexe croquis
pos. 35) et aligner la ponceuse de manière à ce que le moteur
de la machine donne à 90° vers le sol. Lever les outils de ponçage
du sol en basculant les roues arrières. Mettre le moteur en marche.
Une fois que le moteur a démarré, poser les outils de ponçage
avec précaution sur le sol. Si l'alignement de la machine est
correct (voir ci-dessus), elle est facile à conduire pendant le
ponçage. Si la ponceuse a tendance à tirer vers la gauche ou la
droite, il faut régler la machine à nouveau sur le volant pour le
réglage de la hauteur.
Une forte formation de poussière peut être évitée en raccordant
un dispositif d'aspiration. Avant de terminer le ponçage, il faut
débrancher la machine et arrêter les outils de ponçage en les
déposant avec précaution sur le sol. Retirer la prise de secteur.
6.0 Echange des outillages
Basculer la machine sur les roues arrières et la déposer ainsi.
Tous les outils et/ou porte-outils sont fixés sur la plaque de
fixation à l'aide de trois vis à six pans creux.
Desserrer les vis avec une clé mâle coudée pour vis à six
pans creux 6 mm et les enlever.
Retirer l'outil de ponçage et vérifier l'usage éventuel de
l'outil pour sa future utilisation.
Monter le nouvel outil selon la description dans l'annexe
“Outils Omega“.
Bodenschleif aschine OMEGA 400 V, #
036555
17

Les différentes hauteurs des outils doivent être réglées
avec le volant pour le réglage de la hauteur. Le moteur de
la ponceuse doit toujours être placé à 90° par rapport au sol.
Les différentes hauteurs d'outil demandent des joints en caout-
chouc pour la cloche de ponçage en différentes largeurs.
7.0 Outillages et accessoires
7.1 Outillages
1. Segment diamanté, cubique . . . . . . . . . . . . . . .#48037
Pour l‘élimination des résines synthétiques
et colles dispersions sur le béton.
2. Segment diamanté, argent . . . . . . . . . . . . . . . . .#48038
Pour l‘élimination rapide des revêtements
polyuréthane, résine synthétique et colles
dispersions sur le béton.
3. Segment diamanté, or . . . . . . . . . . . . . . . . . . . .#48040
Pour un meulage rapide des chapes et du
béton (abrasion rapide / aspect poncé fi n)
et pour un ponçage effi cace de l‘asphalte coulé.
4. Segment diamanté, noir . . . . . . . . . . . . . . . . . . .#48041
Pour le ponçage (grossier) du béton et des chapes.
5. Segment PCD . . . . . . . . . . . . . . . . . . . . . . . . . . .#48028
Pour une élimination agressive des vernis
polyuréthane, des ragréages et des colles
à carrelage.
6. Segment à éclats de PCD . . . . . . . . . . . . . . . . . .#48036
Pour l‘élimination des couches anciennes
sur supports de tous types (grande
effi cacité). Spécialement adapté pour
l‘élimination des envers non-tissés.
7. Porte-disque pour . . . . . . . . . . . . . . . . . . . . . . . .#33140
anciens segments diamantés. Utilisable avec
3 ou 6 segments diamantés individuels, tels ceux
livrés jusqu‘en avril 2008.
8. Porte-disque pour . . . . . . . . . . . . . . . . . . . . . . . .#49152
nouveaux segments diamantés
Idem ci-dessus, mais pour segments
diamantés livrés après avril 2008.
9. Kit d‘adaptation . . . . . . . . . . . . . . . . . . . . . . . . . .#48957
Pour les plateaux de ponçage diamantés
livrés jusqu‘en avril 2008, pour l‘utilisation
des nouveaux segments.
7.2 Accessoires
Joint pour l'obturation de la tête de fraisage, . . . . . . . . .#33877
pour le plateau à segments de fraisage
Roue avant à monter . . . . . . . . . . . . . . . . . . . . . . . . . . .#33876
sur le plateau à segments de fraisage
Joint pour l'obturation de la tête de fraisage . . . . . . . . .#33375
pour le segment + OMEGA
Disque à gravillon en métal dur
Tuyau flexible d'aspiration . . . . . . . . . . . . . . . . . . . . . . .#33847
ASTUCE
Dispositif d'aspiration TORNADO . . . . . . . . . . . . .#15756
pour l'aspiration efficace des poudres fines et des
matériaux grossiers
1.
2.
3.
4.
5.
6.
7.
8.
9.
Bodenschleif aschine OMEGA 400 V, #
036555
18

Garantie
La durée de la garantie pour le nouvelle machine Wolff ’élève à un an à partir de la remi e / livrai on au
client auf indication contraire conformément aux pre cription légale obligatoire .
Il e t impératif par ailleur de pré enter la facture ou le ju tificatif d’achat pour pouvoir faire valoir le droit
découlant de la garantie.
Toute le réparation effectuée ou garantie doivent être réali ée par un atelier de ervice Wolff reconnu.
Le réparation effectuée par oi-même et / ou non conforme entraînent l’exclu ion de droit de garantie.
Cette clau e ’applique également à l’utili ation non conforme de machine .
Machines Wolff: remplacement de pi ces, accessoires et autres modifications
Le machine Wolff offrent à l’utili ateur un niveau élevé de écurité et de fiabilité. Afin de maintenir ce niveau
haut de gamme, le réglage u ine propo é au moment de la livrai on de votre machine Wolff ne doit pa être
modifié an tenir compte de règle uivante . Ce règle ’appliquent au i bien au remplacement de
pièce , à l’in tallation d’acce oire qu’à toute autre modification technique.
Tou le travaux effectué ur votre machine Wolff doivent être exclusivement réalisés par un atelier
péciali é, di po ant d’un per onnel expérimenté et formé en con équence ain i que de outil de
travail néce aire . Pour ce faire, nou vou recommandon le atelier de ervice Wolff.
Si vou avez l’intention de remplacer de pièce , d’in taller de acce oire ou d’effectuer d’autre
modification technique , il e t con eillé avant le début des travaux de demander con eil auprè
d’un atelier de ervice Wolff autori é ou auprè de no ervice à titre de fabricant.
Il e t vivement recommandé de n’utili er que de pièce détachée et de acce oire Wolff d’origine
répondant aux directive de écurité et que nou avon validé en tant que fabricant. Ce pièce
détachée et acce oire ont di ponible auprè de votre atelier de ervice Wolff qui e chargera
également du montage approprié.
Le pièce détachée et le acce oire Wolff d’origine ont été contrôlé pécialement pour le machine
Wolff, répondant aux critère de écurité et de conformité.
Nous ne sommes pas en mesure d’évaluer de manière satisfaisante la sécurité et la conformité
des produits autres que les pièces détachées et accessoires Wolff d’origine ; nous déclinons
par conséquent toute responsabilité pour ces pièces.
Afin de garantir la écurité du fonctionnement et d’éviter tout dommage, il convient, en ca de
modification technique , quelle qu’elle oient, de tenir compte de nos directives techniques.
N’hé itez pa par ailleur à nou contacter pour toute que tion relative à votre machine Wolff.
Nous déclinons toute responsabilité pour les dommages résultant de travaux non conformes ou faisant suite à
la violation des r gles précitées. Nous vous remercions de votre compréhension.
Bodenschleif aschine OMEGA 400 V, #
036555
19

Service-Stationen in Deutschland
D-04179 Leipzig · Goldacker Bautechnik · Herr Goldacker · Spinnereistr. 13 · 0341/484090 · Fax 4840910
D-07607 Eisenberg · ühl Qualitätswerkzeuge e. . · Herr Andreas ühl · Goethestr. 1 · 036691/5580 · Fax 54222 · [email protected]
D-09111 Chemnitz · EMB Service GmbH · Herr Teichert · Jägerstr. 9-13 · 0371/67414-51 · Fax 67414-53
D-10961 Berlin-Kreuzberg · nopf Elektromotoren · Herr Engler · Blücherstr. 22/3 Hof · 030/69041683 · Fax - 84
D-15236 Frankfurt/Oder-Markendorf · Lothar lähr Elektromaschinen Service · Herr urz · Ringstr. 216 · 0335/61019-10 · Fax -14
D-16866 Kyritz · Wagner Elektromotoren und Pumpen · Herr Wagner · Leddiner Weg 2 · 033971/52266 · Fax 56352
D-18069 Rostock · Lindner Industriewerkzeuge · Herr Lindner · Am ühlhaus 208 · 0381/81129-02 · Fax - 01
D-22335 Hamburg · Theodor Erich GmbH · Herr Arndt · Sportallee 68 · 040/8888866-0 · Fax -9
D-22848 Norderstedt · EMH Elektro-Maschinen-Hydraulik Service GmbH · Herr Dehnert · Rugenbarg 76 · 040/5234860 · Fax 52878447
D-24537 Neumünster · EMH Elektro-Maschinen-Hydraulik Service GmbH · Herr Dehnert · leingartenweg 1 · 04321/13301 · Fax 14669
D-28211 Bremen · Beese Elektromaschinen Service · Herr lattenhoff · leiner Ort 6 · 0421/271388 · Fax 2768554
D-30169 Hannover · Hampe Elektromaschinenbau · Herr Hampe · Hildesheimer Str. 50 · 0511/886318 = Fax
D-33818 Leopoldshöhe · Ralf Doberstein Reparatur und Verleih · Westring 95 · 05202/923551 · Fax 923552 · [email protected]
D-34127 Kassel · Heinrich Pape GmbH · Herr Gruessner · Niedervelmarer Str. 4 · 0561/897013 · Fax 893630
D-37079 Göttingen · Horst Schwarzer Elektro-Maschinen · Herr Reinhardt · Gotthelf-Leimbach-Str. 7 · 0551/504900 · Fax 50490-25
D-38271 Wartjenstedt · Hampe Elektromaschinenbau · Herr Hampe · Mühlenweg 5 · 05062/1413 · Fax 2019
D-39326 Wolmirstedt-Elbeu · Quartier & iesler Elektrowerkzeugservice · Herr iesler · Quergasse 4 · 039201/22615
D-41460 Neuss · Hans Loerper GmbH Elektromaschinenbau · Herr Loerper jun. · Osterather Str. 4a · 02131/5613-00 · Fax-20
D-42799 Leichlingen · Dipl. Ing. Frank Hädrich Schleif u. Reinigungstechnik · Herr Hädrich · Moltkestr. 25 · 02175/970-600 · Fax-601
D-44379 Dortmund · Flühs GmbH & Co. G Antriebstechnik · Herr Holtmann · Schoopställer Str. 2a · 0231/616278 · Fax 619785
D-45139 Essen · Hans Schreckling GmbH · Frau Starke · leine Steubenstraße 13 · 0201/270072 · Fax 273610
D-47167 Duisburg · Oliver Grund Reparaturservice · Herr Grund · Theodor-Heuss-Str. 135 · 0203/5019841 · Fax 5019842
D-47167 Duisburg · Elektro örner GmbH · Elektromotoren Reparaturen · Herr Sosna · Am Inzerfeld 68 · 0203/581301 · Fax 588437
D-49134 Wallenhorst · Röwekamp Werkzeuge und Maschinen · Herr Röwekamp · Xaver-Lütz-Str. 2 · 05407/31763 · Fax 45135
D-53332 Bornheim-Walberberg · Zimmer Elektrotechnik · Herr Zimmer · Nonnenweg 5 · 02227/9044-00 · Fax - 01
D-53757 St.-Augustin-Meindorf · Floor Sandig Tools · Herr remer · Bölkestr. 10 · 02241/2516831 od. 0172/2577439
D-54526 Landscheid-Niederkail · reutz Elektromaschinen-Service · Herr reutz · Trierer Str. 18 · 06575/8513
D-55743 Idar-Oberstein · Matthias Weingart · Vertrieb und Service · Siesbachstr. 36 · 06781/450499 · Fax 450611
D-56070 Koblenz · Moskopp Elektromotoren GmbH · Herr Moskopp · Schönbornsluster Str. 35 · 0261/98822-11 · Fax - 22
D-63075 Offenbach/Main · Maschinenreparatur OF Nord · Herr Zimmermann · leines Gässchen 13-15 · 069/986641-41 · Fax - 42
D-65203 Wiesbaden · INFRA SERV Elektro Technik · Herr Niedringhaus · asteler Str. 45 · 0611/962-6674 · Fax 962-9362
D-65719 Hofheim · Pfeifer & Martinez Maschinenservice · Herr Pfeifer · Feldstr. 9 · 06192/296178 · Fax 979815
D-67661 Kaiserslautern · Charles Force · Landolfstr. 3 · 0631/35047-21 · Fax -22
D-70734 Fellbach · WG Elektrowerkzeuge · Frau Wolf · Bruckstr. 57 · 0711/579550 · Fax 583997
D-76200 Karlsruhe · HCS Scherer GmbH · Herr Scherer · Tiengener Str. 14 · 0721/42148 · Fax 407036
D-76287 Rheinstetten-Forchheim · Ludwig GmbH · Herr ühle · Grossklamm 8 · 0721/95152-0 · Fax 95152-30
D-79618 Rheinfelden · Fa. Rütschlin · Herr Martin Rütschlin · Hebelstraße 44 · Tel. 07623/2954 · Fax 308160
D-80469 München · H. Dummer Großhandel · Herr Dummer · Müllerstr. 13-15 · 089/2607178 · Fax 236044
D-80939 München · Verleihnix (Zentrale) · Heidemannstr. 11b · 089/316991-61 · Fax -62
D-89079 Ulm · SEG Elektrogeräte · Maybachstr. 13 · 0731/94044-23 · Fax -24
D-89542 Herbrechtingen · Lauer Elektrotechnik · Mergelstetter Str. 23 · 07324/9647-0 · Fax -47
D-90482 Nürnberg · Frank Elektrotechnik GmbH · Herr Neubauer · Happurger Str. 66 · 0911/45093-13 · Fax -22
D-95098 Hof · HSW Elektro Maschinenbau GmbH · Herr Sabath · Graben 9 · 09281/843-10 · Fax 843-8344
D-97076 Würzburg · Babinsky Technischer Service · Herr Babinsky · Am Greinberg · 0931/2810-12 · Fax 2810-13
D-98554 Benshausen (Suhl) · Pabst Elektromotorenservice · Herr Pabst · Paßberg 3 · 036843/60532 od. 0171/6405862
Service-Stationen in Österreich
A-1140 Wien · Reparaturzentrum Pospischil · Lützowgasse 12 - 14 · +43 (1) 911 63 00 Fax: +43 (1) 911 63 00 29
A-4310 Mauthausen · HST – Maschinen-Service · Machlandstraße 18 · Ansprechpartner: Herr Stadler · 0664/9078407
A-8051 Graz · Leihmax Hecker GmbH · Augasse 140 a · Ansprechpartner: Herr Markus Hecker · +43 (0)360 401626
Service-Adress Great Britain
UZIN Ltd. - Unit 2 - Mitchell Court - Central ark
Rugby - Warwickshire CV23 0UY
Tel.: 0044 / 1788 / 530 080 - Fax: 0044 / 1788 / 536 508
Adress de service France
UZIN France - rue du résident Coty - 02880 Crouy
Tel.: 0033 / 3 / 23 76 37 40 - Fax: 0033 / 3 / 23 76 37 47
Table of contents
Languages:
Other WOLFF Floor Machine manuals

WOLFF
WOLFF NEO 400 Operating and installation instructions

WOLFF
WOLFF C 35 E User manual

WOLFF
WOLFF ECO-STRIPPER 013993 Repair manual

WOLFF
WOLFF TURBO-STRIPPER Operating and installation instructions

WOLFF
WOLFF VARIO-STRIPPER 230 V Quick guide

WOLFF
WOLFF DURO-STRIPPER 2.0 Operating and installation instructions

WOLFF
WOLFF ALPHA User manual

WOLFF
WOLFF Turbo-stripper 230V User manual

WOLFF
WOLFF Neo 230 Operating and installation instructions

WOLFF
WOLFF Vario-Stripper SILENT 230 V User manual