Woodley InSight Mini Chem User manual

User Manual

2
InSight Mini Chem Meter
Important Safety Instructions
•Misuse of the InSight Mini Chem can cause electrocution, burns, fire and other
hazards
•Do not place the meter in or near to liquid. If the meter becomes wet, unplug it
before touching it
•Use the meter only for the purpose described in the instructions for use
•Failure to use the meter in the manner specified by Woodley Equipment Company
may void the warranty of the InSight Mini Chem
•Do not use accessories which are not supplied or recommended by Woodley
Equipment Company
•Do not use the meter if it is damaged. Please contact Woodley Equipment Company
•Do not let the meter come into contact with surfaces which are too hot
•Do not use the meter where aerosol sprays are being used or where oxygen is being
administered
•Do not use the meter outdoors
•Only use control solution purchased from Woodley Equipment Company
•Keep these instructions in a safe place
•For veterinary use only

3
Table of Contents
Section 1 Introduction ............................................................................................................................4
Section 2 Getting Started........................................................................................................................5
Section 3 Components............................................................................................................................7
Section 4 Initial Setup ...........................................................................................................................12
Section 5 Meter Setup and Options......................................................................................................13
Section 6 Testing...................................................................................................................................14
Section 7 Memory/Communication......................................................................................................18
Section 8 Control Strip Test ..................................................................................................................19
Section 9 Quality Control......................................................................................................................20
Section 10 Maintenance .......................................................................................................................22
Section 11 Precautions..........................................................................................................................23
Section 12 Limitations...........................................................................................................................24
Section 13 Troubleshooting..................................................................................................................25
Section 14 Meter Performance.............................................................................................................26
Appendix 1 Meter Specifications..........................................................................................................27
Appendix 2 Labelling and Information..................................................................................................28
Appendix 3 Warranty............................................................................................................................29

4
Section 1 Introduction
The InSight Mini Chem Meter is intended for the quantitative determination of Uric Acid
(UA), Creatinine (CR) and Urea (UR) in capillary whole blood, venous whole blood, plasma
(lithium heparin) and serum. The easy to operate system consists of a portable meter which
analyses the intensity and colour of light reflected from the reagent area of a test strip,
ensuring quick and accurate results.
The InSight Mini Chem Meter reports in the following units: UA (µmol/L), CR (µmol/L) and
UR (mmol/L).
The InSight Mini Chem Meter can store up to 500 results.
To ensure accurate results:
•Read the instructions carefully and complete any necessary training before use
•Use the code chip that is included in each box of test strips. Do not mix code chips
from different lots
•Only use the InSight Mini Chem Test Strips with the InSight Mini Chem Meter
•For in vitro diagnostic use only
•For veterinary use only
•Keep out of reach of children
Principle of Measurement
The InSight Mini Chem Meter applies the principle of photochemistry and is used with the
InSight Mini Chem Test Strips. The whole blood, serum or plasma sample is added to the
sample area of the test strip. In the process of rapid infiltration, blood cells are filtered out.
The substrate reacts with enzymes and chemicals in the reaction layer which leads to the
colour change. The colour intensity is proportional to the concentration of the substance.

5
Section 2 Getting Started
Please check the following when you first receive the InSight Mini Chem Meter:
•Check contents of delivery are complete
•Check for damage during transport
If you have any questions, please contact Woodley Equipment Company.
Before testing, read the instructions carefully and learn about all the components of the
InSight Mini Chem Meter. Depending on the packaging type, some of the components may
need to be purchased separately. Please check the list of contents on the outer box for
details of which components are included with your purchase. The following items are
needed to perform a test:

6
Component Descriptions
1. InSight Mini Chem Meter –Reads the test strips and displays the concentrations of
Uric Acid (UA), Creatinine (CR) and Uric Acid (UR)
2. InSight Mini Chem Test Strips –Part of the system, these are inserted into the meter
to measure the concentrations of UA, CR and UR
3. Control Strip –Verifies the operation of the meter by checking that the meter can
detect a pre-calibrated value
4. Code Chip –Automatically calibrates the meter with the code number when inserted
into the meter
5. Lancing Device –Used with sterile safety lancets to prick the patient’s ear or paw for
capillary blood collection. The packaged lancing device has multiple depth settings
allowing users to adjust the depth of the puncture and minimise discomfort. It can
also eject the used lancets
6. Sterile Lancets –Used with the lancing device to draw capillary blood samples.
Sterile lancets are inserted into the lancing device for each blood draw and are
discarded after use or safety lancets can be used
7. Capillary Transfer Tubes/Pipettes –Collects blood sample for accurate results
8. Carrying Case –Provides portability for the meter
9. Instructions for Use –Provides detailed instructions on using the InSight Mini Chem
Meter
10. Test Strips Instructions for Use –Provides detailed instructions on using the InSight
Mini Chem Test Strips
11. Control Solution –Verifies the correct operation of testing and validates the test
strips and meter are working properly
12. Control Solution Instructions for Use –Provides detailed instructions on how to use
the control solution
Note: Test strips, safety lancets, sterile lancets and capillary transfer tubes/pipettes
are disposable materials. Please use before the expiration date.

7
Section 3 Components
The InSight Mini Chem Meter reads the test strips and displays the concentrations of Uric
Acid (UA), Creatinine (CR) and Urea (UR). Use this diagram to become familiar with all the
parts of the meter.
Meter Use and Precautions
•Do not get water or other liquids on or inside the meter
•Keep the Test Strip Holder clean
•Keep the meter dry and avoid exposing it to extreme temperatures and humidity
•Do not drop the meter or get it wet. If the meter is dropped or has got wet, ensure
the meter is working properly by running a Control Check. Refer to ‘Control Strip
Test’ for details
•Do not take the meter apart as this will void the warranty
•Refer to ‘Maintenance’ for details on cleaning the meter
•Keep the meter and all associated parts out of reach of children
USB Port (for charging the meter)
Liquid Crystal Display (LCD) Screen
Left Key
Power Key
Right Key
Code Chip Slot
Test Strip Holder

8
Test Strips
The InSight Mini Chem Test Strips work with the InSight Mini Chem Meter only, to measure
the Uric Acid (UA), Creatinine (CR) and Urea (UR) concentration in whole blood, plasma and
serum.
The InSight Mini Chem Test Strips can detect Uric Acid (UA), Creatinine (CR) and Urea (UR).
•Insert Arrow –Located on the front of the test strip, the arrows indicate the
direction in which the test strip should be inserted into the meter
•Sample Collection Area –After the test strip is inserted into the Test Strip Holder,
apply the correct sample volume (using the supplied capillary pipette) to the Sample
Application Area
•Handle –Located on the end of the test strip, the handle is used to insert and
remove the test strip from the meter, so the user does not touch the Sample
Application Area
•Test Area –Located on the back of the test strip. This is where analysis is completed

9
Sample Application
For best results, fill the Sample Application Area with the correct sample volume (35µl or
use the supplied capillary pipette for correct volume). Incorrect results may occur if the
sample is not applied correctly or if the Sample Application Area is not filled correctly.
Before Testing
After applying the sample, ensure that the Sample Application Area is completely covered.
The Sample Application Area should remain covered throughout the entire test. If the
Sample Application Area is not covered or if there is too much sample covering the Sample
Application Area, repeat the test with a new test strip.
Note: If the sample applied to the Sample Application Area is not enough, do not add more
sample to the test strip. Retest with a new test strip. If the E-2 error or another error (refer
to Section 13 for error codes) appears on the display, please discard the used strip and
retest with a new strip.
Code Number
Printed on each package of test strips is a code number, lot number, unopened expiration
date and test quantity. Ensure the code number matches with the test strips and code chip.
Test Strip Precautions and Instructions for Use
•Test strips should be stored in their tightly capped protective canister or foil pouch
to keep them in working condition
•Do not transfer test strips to a new package of any other container
•Replace the cap on the test strip canister immediately after removing a test strip
•The opened expiration date is 3 months after the date the canister was first opened.
Write the opened expiration date on the canister label after opening. Discard the
canister 3 months after it was first opened. Usage after this period may result in
inaccurate readings
•For in vitro diagnostic use

10
•Do not use test strips which are torn, bent or damaged in any way
•Do not reuse test strips
•Before performing a test, make sure the code number on the meter display matches
the number shown on the test strip canister or foil pouch and on the code chip
•Refer to the InSight Mini Chem Test Strips Package Insert for more details
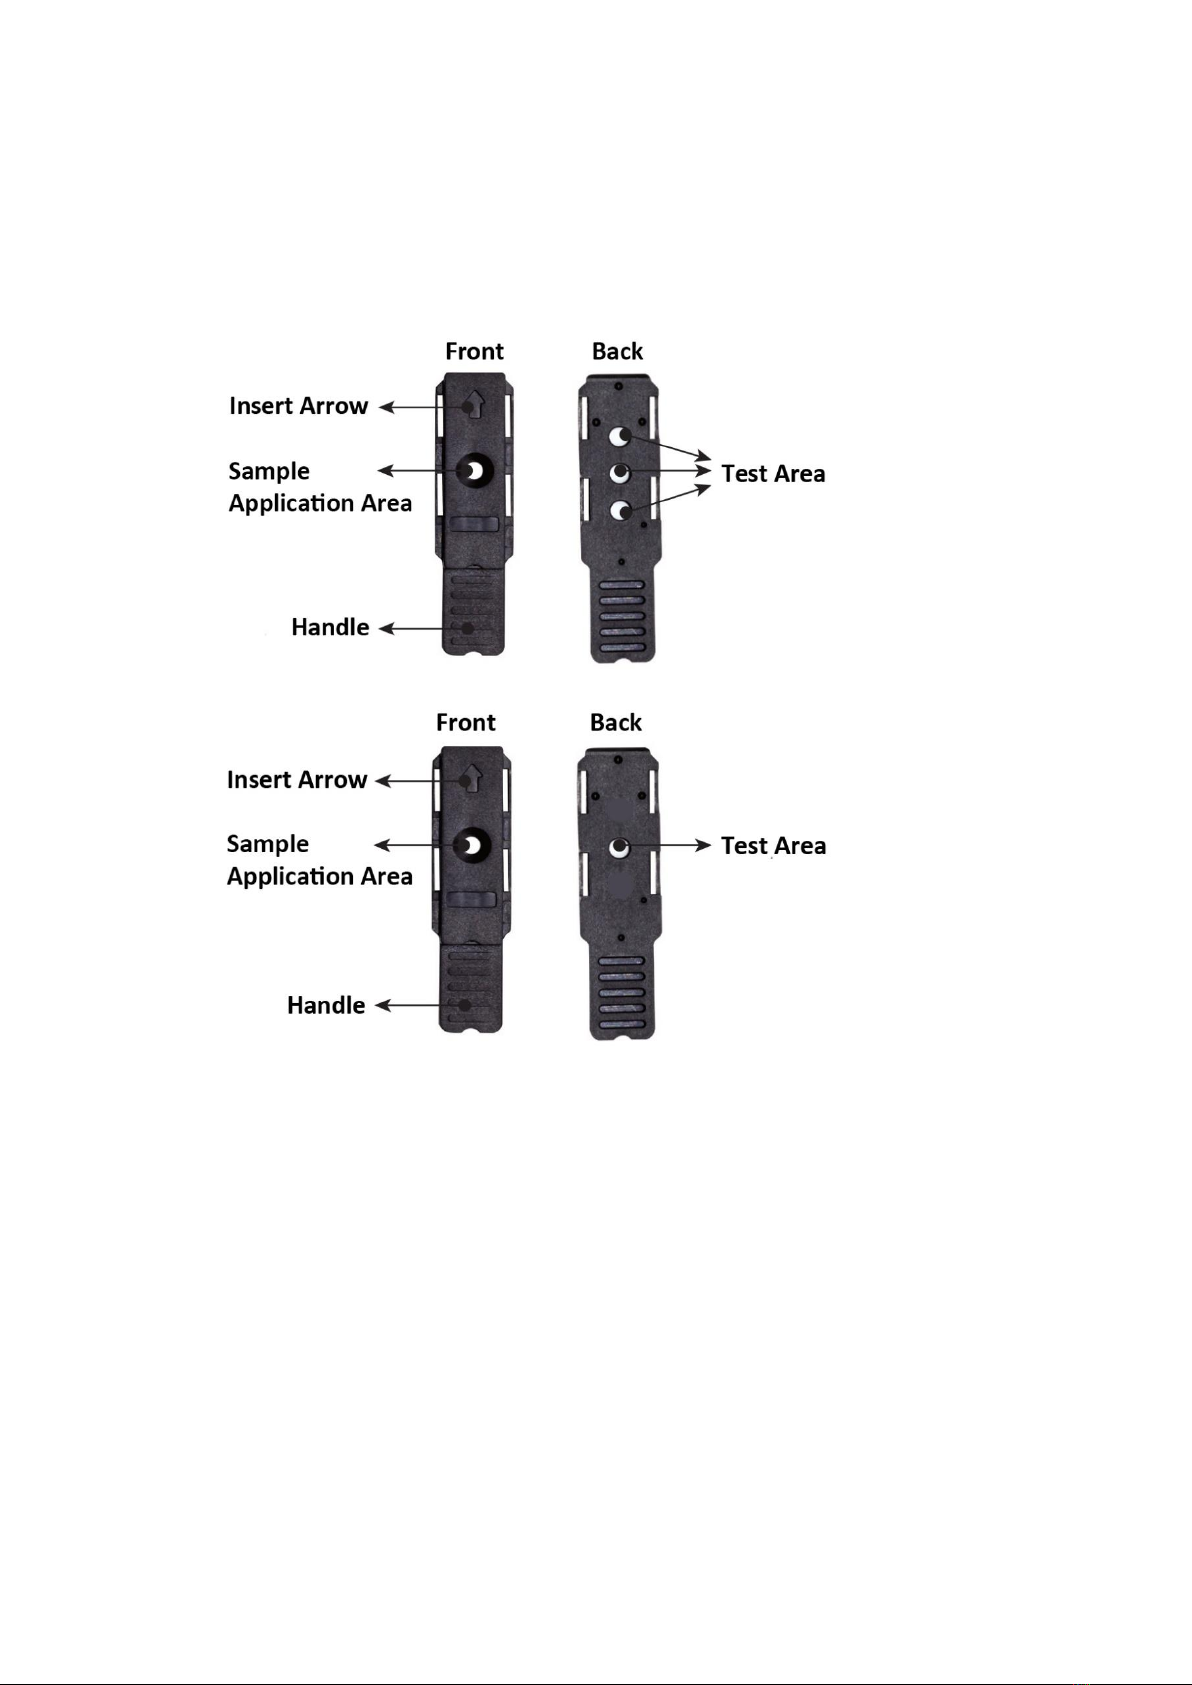
Control Strip
The InSight Mini Chem Control Strips work with the InSight Mini Chem Meter to ensure the
optics are working correctly. After the control strip is inserted into the meter, the meter’s
optics detect the colour intensity of the control strip. The meter displays ‘OH’ (normal) or
‘FL’ (fail) to indicate whether the meter is functioning properly.
Precautions
•Store in a closed canister between 2-30°C. Avoid exposure to direct sunlight,
extreme temperatures and humidity
•Control strips should be stored in their tightly capped canister at room temperature
to keep them in working condition
•Keep the control strip clean. Do not touch the test area of the strip
•Do not use contaminated, discoloured or damaged control strips
•Do not use after the expiration date
•For in vitro diagnostic use only
Storage and Handling
•Store control strips in a cool, dry place. Store away from heat and direct sunlight
•Transport and store control strips in a closed canister between 2-30°C with less than
90% humidity
•Replace the cap on the strip canister immediately after removing a strip. Expired
strips may produce incorrect test results
Control Solution
The InSight Mini Chem Control Solution contains stabilisers, preservatives and added
chemicals. To confirm that the test strip and meter are working correctly and that the test is

11
being performed correctly, the control solution is applied to the Sample Application Area of
a test strip that has been inserted into the meter. Refer to Section 9 for more information.
Note: The InSight Mini Chem Control Solution is intended for validating Renal Function
testing while using the InSight Mini Chem Meter. Both levels of control solution must be
tested and fall within the assigned values printed on the bottles.
Refer to the control solution package insert before using the controls. The control solution
bottle is labelled with an acceptable range that is specific for that lot of control solution. The
system is working correctly if the control value displayed by the meter is within the
acceptable range printed on the bottle label. If the value doesn’t fall within the range, refer
to the InSight Mini Chem Control Solution Package Insert for further instructions.
Precautions
•Make sure the control solution and all the test materials reach an operating
temperature of 10-35°C prior to testing. The control solutions and test materials are
only accurate within this temperature range
•Use the control solution before the expiration date shown on the bottle
•Discard the control solution if it appears cloudy
•Use the InSight Mini Chem Control Solution with the InSight Mini Chem Meter and
InSight Mini Chem Test Strips
Storage and Handling
•Store the control solution either refrigerated or at room temperature between
2-30°C
•Do not freeze
•If the control solution has been refrigerated, allow it to reach a temperature of
10-35°C before use
•Once opened, the control solution has an open vial stability of 3 months. Record the
date the control solution was opened and dispose of QC 3 months after the recorded
date

12
Section 4 Initial Setup
Before testing, ensure the following procedures are followed.
Turn on the Meter
Press to turn the meter on.
The meter will automatically turn off after 5 minutes of inactivity.
Coding the Meter
Each time a new box of test strips is opened, the new code chip included in the box must be
inserted into the meter. Compare the code number on the code chip with the code number
printed on the test strip packaging or the foil pouch. Results may be inaccurate if the two
numbers are not identical. Insert the new code chip into the code chip slot of the meter. The
code chip should remain in the meter. Do not take it out until a new box of test strips is
needed. The code number will appear on the Initial Screen after start-up.
If the code chip is not properly inserted into the code chip slot or if it is missing, the meter
will display E-6.

13
Section 5 Meter Setup and Options
With the meter turned on, press and hold for 2 seconds to enter the Settings mode.
Press ◄or ►to display several setup sub-modes.
SET
Press to enter the SET item.
Year Setup
As the year is displayed, press ◄or ►to change it. Press to save.
Month Setup
As the month is displayed, press ◄or ►to change it. Press to save.
Day Setup
As the day is displayed, press ◄or ►to change it. Press to save.
Hour Setup
As the hour is displayed, press ◄or ►to change it. Press to save.
Minute Setup
As the minute is displayed, press ◄or ►to change it. Press to save.
Sound Setup
As the sound is displayed, press ◄or ►to switch between On and Off. Press to save.
Bluetooth Setup
As the Bluetooth is displayed, press ◄or ►to switch between On and Off. Press to
save.
Printer Setup
As the printer is displayed, press ◄or ►to switch between On and Off. Press to
save.
Sample Select
As the sample shows FB, VB or SP, press to enter the Sample Set. Press ◄or ►to switch
between Capillary Blood (FB), Venous Blood (VB) and Plasma and Serum (SP). Press to
save and go back to menu.
Caution: The Capillary Blood (FB) is the meter’s default sample.

14
Section 6 Testing
The following steps show how to use each component to measure the sample
concentration.
Sample Collection
1. Use fresh capillary blood from the paw or ear
2. Use heparinised or EDTA venous whole blood, plasma or serum
Caution: Before testing, choose a clean, dry work surface. Review the procedure and
make sure all of the items needed to obtain a sufficient amount of blood are
available.
Testing with Heparinised or EDTA Venous Whole Blood, Plasma and Serum
For heparinised or EDTA venous whole blood, mix the specimen well, then collect the blood
into a plastic/glass capillary transfer tube or pipette. For heparinised or EDTA plasma or
serum, collect the sample into a plastic/glass capillary pipette. Apply the sample to the
centre of the Sample Application Area of the test strip. Do not touch the test strip with the
pipette or tube.
•The sample must be tested within 8 hours of collection
•Mix the specimen well before testing in order to ensure the cellular components are
evenly distributed
•Allow the specimen to attain operating temperature (10-35°C) for approximately 15
minutes if the specimen has been refrigerated
•Anticoagulants other than EDTA and lithium heparin are not recommended
Testing with Capillary Blood
After using the lancing device and lancet to puncture the skin, wipe away the first drop of
blood. Apply light pressure to obtain a second drop of blood. Use a capillary transfer tube or
pipette to collect capillary blood.
For use with a capillary transfer tube, hold the tube slightly downward and touch the tip of
the capillary transfer tube to the blood drop. Capillary action will automatically draw the
sample to the fill line and stop.
Note: The capillary transfer tube will fill automatically. Make sure the blood covers the air
vent of the tube or it will be difficult to squeeze the blood out. Never squeeze the capillary
transfer tube while sampling.
Align the tip of the capillary transfer tube with the centre hole of the Sample Application
Area of the test strip to apply the drop of blood.

15
Note: Do not touch the test strip with the end of the capillary transfer tube or pipette. The
capillary blood should be tested immediately after collection. Use of a capillary transfer tube
or pipette is recommended for accurate results.
Capillary blood samples can be obtained by using a lancing device and a lancet or a safety
lancet.
Lancing Device
For obtaining a drop of blood from the paw or ear, adjust the puncture depth on the lancing
device as needed.
Unscrew the lancing device cover from the body of the lancing device. Insert a sterile lancet
into the lancet holder and push it until the lancet comes to a complete stop in the lancet
holder.
Hold the lancet firmly in the lancet holder and twist the safety tab of the lancet until it
loosens. Then, pull the safety tab off the lancet. Save the safety tab for lancet disposal.
Carefully screw the cover back onto the lancing device. Avoid contact with the exposed
needle. Make sure the cover is fully sealed on the lancing device.
Adjust the puncture depth by rotating the lancing device cover. There are a total of 5
puncture depth settings (1=lowest setting, 5=highest setting). To reduce discomfort, use the
lowest setting that still produces an adequate drop of blood.
Note: Greater pressure of the lancing device against the paw/ear will also increase the
puncture depth.
Pull the cocking barrel back to set the lancing device. A click may be heard. The device is
now loaded and ready to obtain a drop of blood.

16
Prior to testing, clean the testing site with an alcohol swab or by washing it with warm,
soapy water. Dry the testing site thoroughly.
Hold the lancing device against the paw/ear. Push to release button to prick the site. A click
should be heard as the lancing device activates. Avoid smearing the drop of blood.
Note: Don’t use an infection swab containing iodine to clean the puncture site as this can
cause inaccurate results.
Disposal of the Lancet
Unscrew the lancing device cover. Place the safety tab back onto the lancet needle. Pull the
used lancet off. Place the lancing device cover back on the lancing device.
Note: For veterinary use only.
Safety Lancets
1. Carefully rotate and pull off the protective cap
2. After cleaning the skin, hold the lancet firmly against the puncture site
3. Press the lancet against the puncture site. Discard the lancet in an appropriate
sharps container
Test Processing
Ensure the meter is set up properly as described in Sections 4 and 5. Turn the meter on.
Ensure the code chip is inserted. Compare the number shown on the display with the code
number printed on the box label or foil pouch. The test strip icon flashes to indicate that it is
ready for the strip to be inserted.
Check the sample type on the meter is the same as the sample type collected. If not, set the
correct sample type as described in Section 5.
Testing
Insert a test strip into the Test Strip Holder in the same direction as the arrows indicate on
the strip. Ensure that the test strip is inserted all the way to the end of the Test Strip Holder.

17
The blood drop symbol will flash when the meter is ready for the sample to be applied.
Apply the sample to the centre of the Sample Application Area of the test strip.
Once analysis has completed, remove the used test strip. The meter will return to the Initial
Screen and is ready for another test strip to be inserted and to perform a new test.
Note: Discard all blood samples, used test strips and materials carefully. Treat all blood
samples as if they were infectious material. Follow precautions and local regulations when
discarding blood samples and materials.
Perform daily cleaning when testing is completed for the day. Refer to Section 10.
The meter will automatically turn off after 5 minutes of inactivity or when is pressed.

18
Section 7 Memory/Communication
Memory/Database
Press to switch the meter on. Press and hold to access the menu. Use ◄and ►to
scroll across to MEM. Press to enter. Use ◄and ►to scroll through results.
Deleting Data
To delete the data from the meter’s memory, press ◄and ►at the same time to enable
data deletion.
Press to return to the Setting screen.
Communication
If Bluetooth is turned on (Bluetooth icon is displayed), when querying records at the MEM
mode, the meter will send the current record to Bluetooth. If the printer is turned on
(printer icon is displayed), when querying records at the MEM mode, the meter will print
out the current record.

19
Section 8 Control Strip Test
Press and hold to enter the menu, use ◄or ►to scroll across to CTR. Press to enter
CTR Mode. After entering the CTR Mode, the meter will display OPt. Press and then
insert a control strip into the Test Strip Holder. Follow the direction of the arrows indicated
on the strip. Ensure that the control strip is inserted all the way. The optical check will start
automatically. If the meter displays ‘OH’, the meter is normal. If the meter displays ‘FL’, the
meter is not functioning properly.
Note:
•The control strip is intended to check the optical system
•Allow the control strips and the meter to reach operating temperature (10-35°C)
prior to testing
•The optical check should be performed under normal lighting conditions. Do not
perform under direct sunlight or extreme lighting conditions
If the meter displays ‘FL’, check the control strip for contamination or check if it is damaged.
If there are any visible signs of damage or contamination, discard the control strip and retest
using a new control strip.
Once the control strip is removed, the meter will return to the Initial Screen.

20
Section 9 Quality Control
Each laboratory should have its own protocol for running quality control.
A quality control should be performed:
•When a new package of test strips is opened
•When a new operator uses the meter
•When test results seem inaccurate
•After performing maintenance or service on the meter
If quality control results are outside of the range, perform the following checks:
•Ensure that the test strips used have not expired
•Ensure that the test strips have been stored in the vial correctly
•Ensure that the controls have not expired
•Repeat the test to ensure no errors were made during the test
Control Solution Testing
Renal Function Control Solution testing is performed in a very similar manner to blood tests.
The InSight Mini Chem Control Solution is used instead of blood.
Note: Make sure the control solution and all the test materials reach operating
temperatures of 10-35°C prior to testing. Tests can only be accurately performed when the
control solutions and test materials are within this temperature range.
1. Turn on the meter
2. Insert the code chip into the meter. Refer to Section 4 ‘Coding the Meter’ for details
3. Compare the code number on the code chip with the code number printed on the
test strip pouch label and ensure the two numbers are identical to avoid inaccurate
results
4. Press and hold for 2 seconds to enter the Settings mode and press ►to change
the selection. Press to enter the CTR. Press ◄or ►to switch between OPt and
SOLU. Press once SOLU is selected.
5. The meter will flash the test strip icon. Insert a test strip completely into the Test
Strip Holder in the same direction as the arrows printed on the strip
6. When the meter is flashing the blood drop symbol, open the screw cap of the
control solution bottle and turn the bottle upside down. Squeeze the control
solution bottle gently and discard the first drop. If there are bubbles in the previous
drop, squeeze the bottle and discard another drop until there are no bubbles in the
drop. Apply the next drop to the specimen well on the test strip while keeping the
bottle vertical. Make sure the control solution is applied directly into the specimen
well and there are no bubbles in the solution drop. The meter will automatically
Table of contents
Other Woodley Measuring Instrument manuals

Woodley
Woodley InSight V3 PLUS User manual

Woodley
Woodley InSight V5 User manual

Woodley
Woodley InSight V-IA User manual

Woodley
Woodley InSight V-IA PLUS User manual

Woodley
Woodley Skyla VB1 User manual

Woodley
Woodley The Edge User manual

Woodley
Woodley Insight User manual

Woodley
Woodley Insight User manual

Woodley
Woodley InSight V-CHEM User manual