Woodpecker Endo Smart User manual

Endo Smart Endo Motor
INSTRUCTION MANUAL

Contents
1 Product introduction.............................................................................. 1
2 Installation............................................................................................. 5
3 Function and operation of product........................................................ 7
4 Operation instruction ............................................................................ 8
5 Troubleshooting .................................................................................. 13
6 Cleaning and Sterilization................................................................... 14
7 Storage, maintenance and transportation ........................................... 18
8 Environmental protection ................................................................... 18
9 After service ....................................................................................... 18
10 Symbol instruction ........................................................................... 19
11 European authorized representative ................................................. 19
12 Statement .......................................................................................... 19
13 EMC-Declaration of comformity...................................................... 20

1
Preface
Guilin Woodpecker Medical Instrument Co., Ltd is a professional
manufacturer researching, developing, and producing dental products.
Woodpecker owns a sound quality control system. Guilin Woodpecker
Medical Instrument Co., Ltd has two brands, Woodpecker and DTE.
Its main products include Ultrasonic Scaler, Curing light, Apex locator,
Ultrasurgery, Endo Motor, etc.
1 Product introduction
1.1 Product description
Endo Smart is mainly used in Endodontic treatment. During root canal
preparation procedure, it is used to mold and clean the root canal.
Features:
a) Adopt real-time feedback technology and dynamic torque control,
eectively preventing needle breakage.
b) Wireless handpiece enables more convenient operation.
c) Wireless charging avoids poor contact problem of traditional contact
charging.
d) Storage of 9 user-dened modes allows invocation at any time.
Under each mode, Continuous Rotation Mode, Reciprocating Motion
Mode, and Reverse Rotation Mode are for options.
1.2 Model and specication
Endo Smart
Please refer to packing list for device congurations.
1.3 Scope of application
1.3.1 The device is suitable for root canal molding and cleaning in
endodontic treatment.
1.3.2 The device must be operated in hospital and clinic by the qualied
dentists.

2
1.4 Performance and composition
The device is composed of charging base, handpiece, contra-angle, and
power adapter, etc.
The version of software is displayed on the OLED screen when starting
up.
1.5 Contraindication
Patients with implanted pacemakers (or other electrical equipment) who
are warned not to use household appliances such as electric razors, hair
dryers, etc. are not recommended to use this device.
1.6 Warnings
1.6.1 Please carefully read this Instruction Manual before first

3
operation.
1.6.2 This device should be operated by professional and qualified
dentist in qualied hospital or clinic.
1.6.3 Do not directly or indirectly place this device near heat source.
Operate and store this device in reliable environment.
1.6.4 This device requires special precautions regarding electromagnetic
compatibility (EMC) and must be in strict accordance with the EMC
information for installation and use. Do not use this equipment
especially in the vicinity of fluorescent lamps, radio transmitting
devices, remote control devices, handheld and mobile high-frequency
communication devices.
1.6.5 Long time use of Reciprocating Motion Mode may result
in handpiece overheat, thus it should be left to cool for use. If the
handpiece is overheated frequently, please contact local distributor.
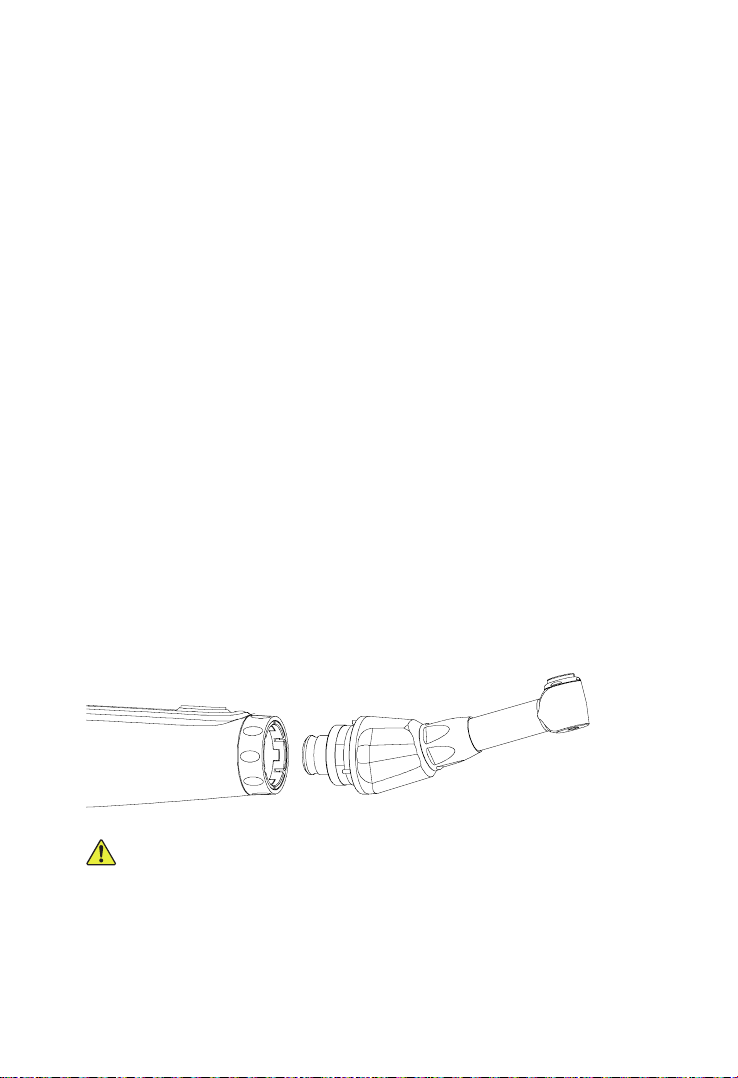
1.6.6 Please use the original contra-angle. Otherwise it will not be used
or cause adverse consequences.
1.6.7 Please do not make any changes to the device. Any changes may
violate safety regulations, causing harm to the patient. There will be no
promises of any modication.
1.6.8 Please use original power adapter. Other power adapter will result
in damage to lithium battery and control circuit.
1.6.9 The handpiece cannot be autoclaved. Use disinfectant of neutral
pH value or ethyl alcohol to wipe its surface.
1.6.10 Before the contra-angle stopping rotating, do not press the push
cover of contra-angle. Otherwise the contra-angle will be broken.
1.6.11 Before the handpiece stopping rotating, do not remove the
contra-angle. Otherwise the contra-angle and the gear inside handpiece
will be broken.
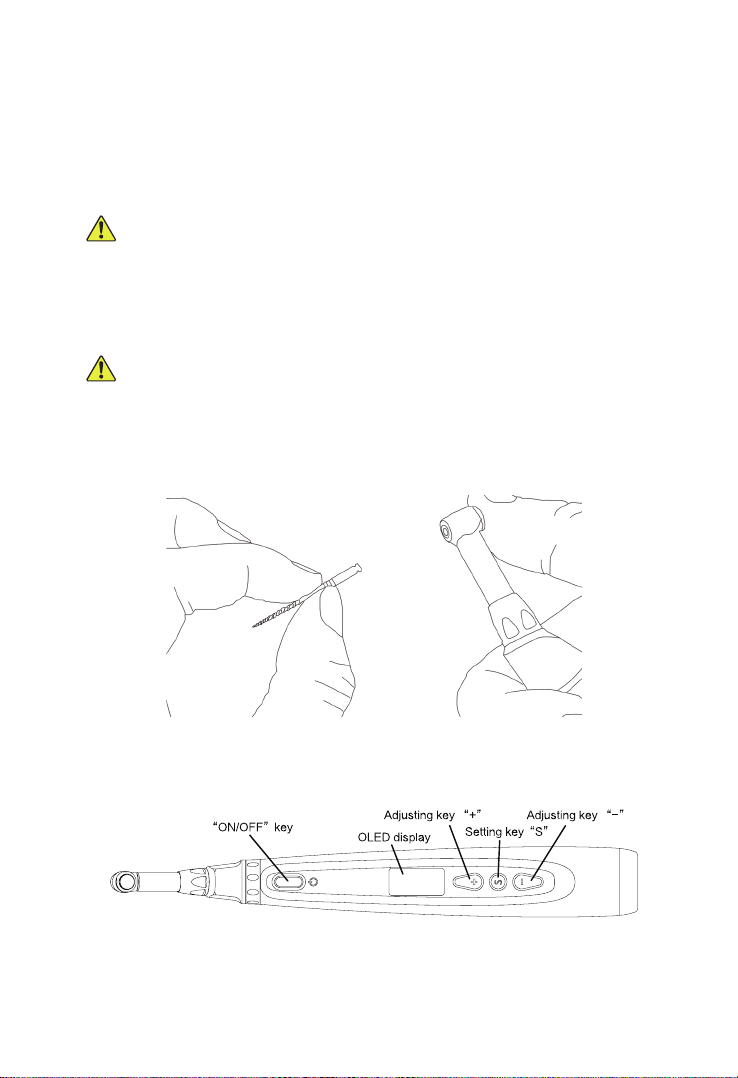
1.6.12 Please confirm whether the file is well installed and locked
before starting the handpiece.
1.6.13 The le of Continuous Rotation Mode shall not be used under
Reciprocating Motion Mode and vice versa.
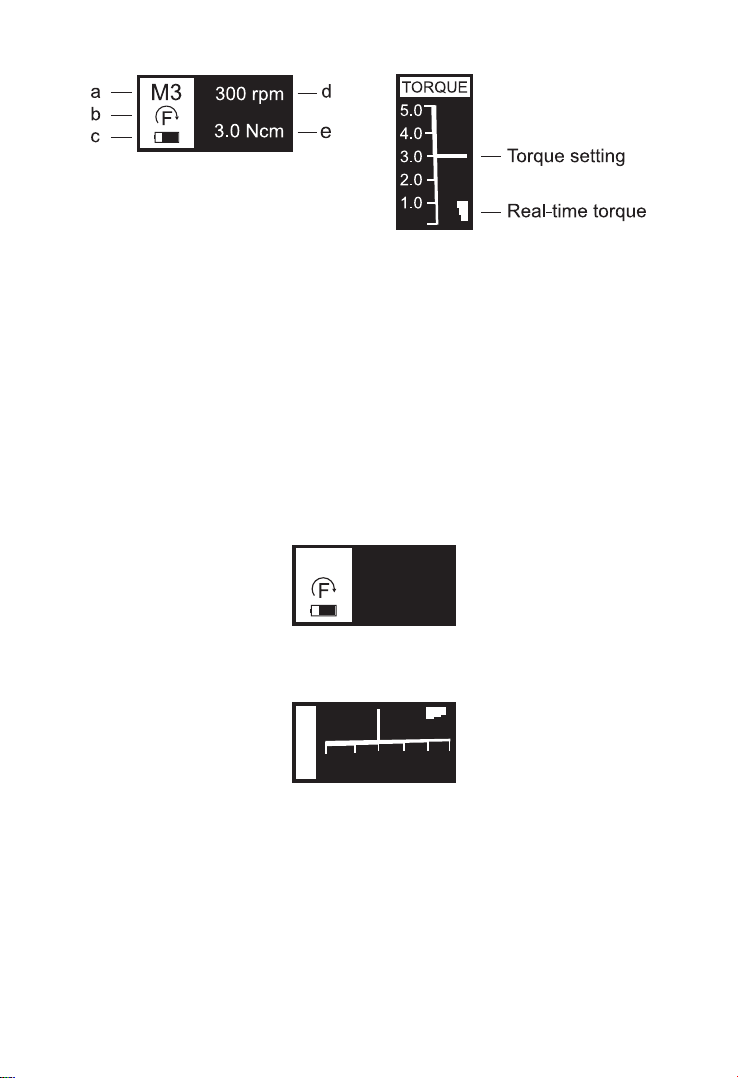
1.6.14 Please set torque and speed as per the recommended

4
specications of le manufacturer.
1.6.15 The Continuous Rotation Mode matches continuous rotating
files; the Reciprocating Motion Mode matches reciprocating files
(i.e. WAVE ONE); the Reverse Rotation Mode is adopted to pick the
continuous rotating les out while the le accidentally gets stuck in the
root canal.
1.6.16 Error in replacing lithium batteries can lead to unacceptable
risks, so use the original lithium battery and replace the lithium battery
according to the correct steps in the instructions.
1.6.17 Not to position equipment to make it difficult to operate the
disconnection device.
1.6.18 Please remove the battery if the motor handpiece is not likely to
be used for some time.
1.7 Device safety classication
1.7.1 Type of operation mode: Continuous operating device
1.7.2 Type of protection against electric shock: Class II equipment with
internal power supply
1.7.3 Degree of protection against electric shock: BF type applied part
1.7.4 Degree of protection against harmful ingress of water: Ordinary
equipment (IPX0)
1.7.5 Degree of safety application in the presence of a flammable
anesthetic mixture with air, oxygen, or nitrous oxide: Equipment cannot
be used in the presence of a flammable anesthetic mixture with air,
oxygen, or nitrous oxide.
1.7.6 Applied part: contra-angle.
1.7.7 The contact duration of applied part: 1 to 10 minutes.
1.7.8 The temperature of the surface of applied part may reach 46.6℃.
1.8 Primary technical specications
1.8.1 Battery
Lithium battery in handpiece: 3.6V /750mAh
1.8.2 Power adapter
Input: ~100V-240V 50Hz/60Hz 0.4A Max

5
Output: DC5V/1A
1.8.3 Torque: 0.6Ncm-5.0Ncm(6mNm ~ 50mNm)
1.8.4 Rotate speed: 100rpm~1000rpm
1.9 Environment parameters
1.9.1 Environment temperature: +5℃ ~ +40℃
1.9.2 Relative humidity: 30% ~ 75%
1.9.3 Atmospheric pressure: 70kPa ~ 106kPa
2 Installation
2.1 Basic accessories of product
Motor handpiece Contra-angle
Charging base Lubricator
Power adapter
2.2 Instructions for contra-angle
2.2.1 The contra-angle adopts precision gear transmission, and the
transmission ratio is 1: 1. The material for contra-angle is copper.

6
(Model: CA001)
2.2.2 Before the rst use and after treatments, please clean and disinfect
contra-angle with disinfectant of neutral PH value. After disinfection,
lubricate it with specific cleaning oil. Finally, sterilize it under high
temperature and high pressure (134℃, 2.0bar ~ 2.3bar (0.20MPa ~
0.23MPa)).
2.2.3 The contra-angle can only be used cooperatively with this device.
Otherwise the motor handpiece and the contra-angle will be damaged.
2.2.4 The service life of contra-angle is ONE year. But as a result of
dierent use frequency, operating time, and the treatment complexity,
the real service lives are dierent.
2.3 Installation and removal of contra-angle
2.3.1 Installation
Align the positioning pin of contra-angle with the positioning hole
of handpiece, horizontally pushing the contra-angle. A click sound
indicates that it is well installed. By aligning those three pins on contra-
angle with those six holes on handpiece, the contra-angle can be
installed in dierent angle. (As shown below)
2.3.2 Removal
Pull out the contra-angle horizontally when the motor handpiece does
not start.
Warnings
a) Before plugging in or pulling out contra-angle, please rst stop the
handpiece motor.
b) After installation, please check and conrm that the contra-angle has
been well installed.

7
2.4 Installation and removal of le
2.4.1 Installation of le
Before starting the device, plug the file into the hole of contra-angle
head. While plugging, slightly screw the le with one hand, and press
the push cover of contra-angle with another hand.
Warnings
After plugging the le into contra-angle, let go the hand on push cover
to assure that the le cannot be taken out.
2.4.2 Removal of le
Pressing the push cover, and then directly pull out the le.
Warnings
a) Before plugging and pulling out the file, the handpiece must be
stopped.
b) After the le is well installed, without pressing the push cover, the
le should be rmly locked while slightly pulling the le.
3 Function and operation of product
3.1 Schematic drawing of handpiece
Schematic drawing of handpiece
3.2 OLED display

8
a) Customized program sequence number 1-9, totally 9 programs.
b) Operation mode
c) Battery consumption
d) Set speed
e)Set torque
4 Operation instruction
4.1 Starting and Stopping
4.1.1 Starting and stopping of handpiece
a) Under the power o state of handpiece, press “ON/OFF” key, and
then the handpiece will enter Standby mode. The interface displays are
as follow:
M3 300 rpm
3.0 Ncm
Standby interface
b) Under Standby mode, press “ON/OFF” key, and then the handpiece
will enter Operating mode. The interface displays are as follow:
5.0
4.0
3.0
2.0
1.0
TORQUE
Continuous Rotation Mode interface
c) Press the “ON/OFF” key again, and then the handpiece backs to
Standby mode.
4.2 Speed setting, torque setting, and operation mode setting
Schematic drawing of speed setting, torque setting, and operation mode
setting interfaces

9
In setting interface, it will automatically back to Standby interface after
5s without operation. Press “ON/OFF” key to directly enter operating
interface.
a) Speed setting
In the Speed Setting Interface, press “+” to increase speed, press “-” to
decrease speed, and long press to fast increase or fast decrease speed.
b) Torque setting
In the Torque Setting Interface, press “+” to increase torque, press
“-” to decrease torque, and long press to fast increase or fast decrease
torque.
c) Operation Mode Setting
In the Operation Mode Setting Interface, press “+” or press “-” button
to select Continuous Rotation Mode, Reciprocating Motion Mode or
Reverse Rotation Mode. There will be tick indication while setting to
Reverse Rotation Mode. Long press to realize fast modes handover.
M3 TURN
DIR Fwd Press“-”
Press“+”
Press“-”
Press“+”
Continuous Rotation Mode Reverse Rotation Mode Reciprocating Motion Mode
MEM MEM
M3 TURN
DIR Rev
MEM
M3 TURN
DIR F+R
4.3 Customized program handover setting
In Standby interface, shortly press adjusting key “+” and adjusting key
“-” to realize handovers among different customized programs. Long
press adjusting key “+” and adjusting key “-” to realize cyclic handover.
4.4 Contra-angle calibration setting
After replacement of contra-angle, the contra-angle shall be calibrated
before use. In Standby Interface, first long press setting key “S” and
then long press “-” for 2s to enter Calibration Interface of contra-angle.
After 15s’s countdown, the interface of successful calibration will

10
appear. Five more seconds later, it will switch to Standby Interface.
4.5 Power-o
In Standby Interface, the handpiece would automatically shut down
after 3 minutes without any button-pressing operation. The handpiece
will also automatically shut down while it is put into the charging base.
In Standby Interface, long press setting key “S”, and then long press
Adjusting key “+”, nally the device will automatically shut down 2s
later.
4.6 Standby interface and operating state interface of three dierent
Operation Modes.
a) Standby interface and operating state interface of continuous
Rotation Mode
Standby Interface Operating State Interface
b) Standby interface and operating state interface of Reverse Rotation
Mode
Standby Interface Operating State Interface
c) Standby interface and operating state interface of Reciprocating
Motion Mode
Standby Interface Operating State Interface
4.6 Protective function of automatic reverse
During operation, if the load value exceeds the preset torque value, the
file continuous rotation mode will automatically change to Reverse

11
Rotation Mode. And the le would return to normal continuous rotation
mode when the load is below the preset torque value again.
a) b) c)
a) Clockwise rotation
Load value is lower than preset torque value
b) Counterclockwise rotation
Load value is higher than preset torque value
c) Clockwise rotation
Load value is lower than preset torque value again
Note
a) Protective function of automatic reverse is ONLY suitable for
continuous Rotation Mode.
b) This function is forbidden under Reciprocating Motion Mode and
Reverse Rotation Mode.
c) When the handpiece battery indicator indicates a low battery capacity,
the low battery capacity is insucient to support the handpiece to reach
the limit torque value, that is, the auto-reverse function will not work
properly. Please charge it in time.
d) If the motor is under load all the time, the machine may stop
automatically as a result of overheat protection. If it happens, turn o
the handpiece for a while until the temperature drops.
4.7 Battery Charging
When charging the battery, leave approximately 10cm around the
charging base for easy access to inlet and the power cord.
The handpiece has built-in rechargeable lithium battery, and is equipped
with wireless sensor charging.
After the handpiece is inserted into the charging base, the three yellow
LED indicators of the charging base are lights ashing, indicating that

12
the handpiece is normally charged. After the handpiece is fully charged,
those three yellow LED lights would be on.
Cautions
The front of the handpiece must be inserted in the same direction as the
front of the charging base. Otherwise it may cause charging failure as a
result of induction failure.
4.8 Replacing Battery
Replace the battery if it seems to be running out of power sooner than it
should. Please use the original lithium battery.
a) Turn the motor handpiece power o.
b) Use tweezers etc. to open the rubber cover and then remove the
screw.
c) Remove the battery cover.
d) Remove the old battery and disconnect the connector.
e) Connect the new battery and put it in the motor handpiece.
f) Replace the cover and its screw.
It is recommended to contact local distributors or manufacturer to
replace the battery.
4.9 Lubricating the contra-angle
Only the original oil lubricator nozzle can be used for oiling of contra-
angle. After disinfection of contra-angle and before sterilization, oiling
should be conducted under high pressure and high temperature.
a) Firstly, screw the lubricator nozzle into jet of oil bottle. (Around 10
circles)
b) Next, plug the nozzle into the end part of contra-angle, and then
grease the contra-angle for 2-3s till the oil ow out of contra-angle head
part.
c) Vertically place the end part of contra-angle or tilt the contra-angle to
let go the redundant oil under gravity.
Warnings
Handpiece cannot be lled with oil.
Cautions
a) To avoid the contra-angle from ying out for the pressure, use hand
to safely hold the contra-angle while greasing.
b) Do not use a swirling lubricator. Swing lubricator can only be used
for injection of gas, not for oiling.

13
5 Troubleshooting
Failure Possible cause Solutions
There is continuous beep
sounds after starting the
handpiece.
The continuous beep
sound is indicating that the
handpiece is under reverse
rotation state.
Stop the handpiece and
change the operating
mode to Continuous
Rotation Mode.
Contra-angle calibration
failure
Calibration failure caused
by strong resistance of
contra-angle
Clean the contra-angle,
and recalibrate after oil
injection.
Handpiece heating a) The bottom of
handpiece is heating
during wireless
charging.
b) Under Reciprocating
Motion Mode, the using
time is too long.
a) Normal
phenomenon.
b) Stop use. Use after
the temperature of
handpiece drops.
After plugging
the handpiece into
charging base, the
wireless charging
indicator does not
lights ashing.
a) The handpiece is not
in place.
b) The handpiece is
fully charged.
a) Plug the handpiece
in place.

14
Failure Possible cause Solutions
The time of endurance
becomes shorter after
charging.
Battery capacity
becomes smaller.
Please contact
local distributor or
manufacturer.
The continuously
rotating le is stuck at
the root canal.
Incorrect specication
setting.
Too high load torque of
le.
Choose Reverse
Rotation Mode, start
the handpiece, and take
the le out.
6 Cleaning and Sterilization
6.1 Foreword
For hygiene and sanitary safety purposes, the contra-anglemust be
cleanedand sterilized before each usage to prevent any contamination.
This concerns the rst use, as well as all subsequent uses.
6.2 General recommendations
6.2.1 Use only a Medical multienzyme detergent(Protease,
phospholipase, etc.) which is approved for its ecacy (VAH/DGHM-
listing, CE marking, FDA and Health Canada approval) and in
accordance with the DFU of the detergent manufacturer.
6.2.3 Do not place the contra-angle in a disinfectant solution or in an
ultrasonic bath.
Do not use chloride detergent materials.
6.2.4 Do not use bleach or chloride disinfectant materials.
6.2.5 For your own safety, please wear personal protective equipment
(gloves, glasses, mask).
6.2.6 The user is responsible for the sterility of the product for the rst
cycle and each further usage as well as for the usage of damaged or
dirty instruments where applicable after sterility.
6.2.7 The water quality has to be convenient to the local regulations
especially for the last rinsing step or with a washer-disinfector.
6.2.8 Do not sterilize the motor handpiece, the AC adapter or the
charding base. After each use, all the objects that were in contact with
infectious agents should be cleaned using towels impregnated with a
detergent solution (a bactericidal, fungicidal and aldehyde free solution)

15
approved by VAH/DGHM-listing, CE marking, FDA and Health
Canada.
6.2.9 To sterilize the endodontic files, refer to the manufacturer's
instructions for use.
6.2.10 The contra-angle needs to be lubricated after cleaning but before
sterilization.
6.3 Step-by-Step Procedure
# Operation Operating Mode Warning
1 Preparation Remove the contra-
angle from handpiece
and charging base.
2 Manual
cleaning(
Contra-angle,
etc.)
For 5 minutes, rinse
and
brush under running
deionized water (DI),
or
water that has this
degree of purity
(<38°C
(100.4°F)).
Remove any liquid
residues (ultra-
absorbent
cloth, particle-free
compressed air).
Use a cleaning tool (brush).
In order to clean faster and
more effective,use only
a Medical multienzyme
detergent(Protease,
phospholipase, etc.)which
is approved for its efficacy
(VAH/DGHM-listing, CE
marking, FDA and Health
Canada approval) and follow
instructions and observe
concentrations given by the
detergent manufacturer.

16
3 Automated
Cleaning
with washer-
disinfector
Put the contra-angle
into the washer
disinfector (Ao value
>3000 or, at least 5
min at 90°C/194°F)
- Avoid any contact between
the contra-angle and any
instruments, kits, supports or
container.
- Follow instructions and
observe concentrations given
by the manufacturer (see also
general recommendations).
- Use only approved washer-
disinfector according to EN
ISO 15883, maintain and
calibrate it regularly.
- Make sure contra-angle, is
dry before moving to the next
step.
4 Inspection Inspect the contra-
angle and sort out
those with defects.
- Dirty contra-angle must be
cleaned
- Lubricate the contra-angle
with an adequate spray before
packaging.
5 Packaging Pack the contra-
angle in "Sterilization
pouches".
- Check the validity period
of the pouch given by the
manufacturer to determine the
shelf life.
- Use packaging which is
resistant to a temperature
up to 141°C (286°F) and in
accordance with EN ISO
11607.

17
6 Sterilization Steam sterilization
at 134°C, 2.0bar-
2.3bar(0.20Mpa-
0.23MPa), for 4
minutes.
- Use only autoclaves that are
matching the requirements of
EN 13060, EN 285.
- Use a validated sterilization
procedure according to ISO
17665.
- Respect the maintenance
procedure of the autoclave
device given by the
manufacturer.
- Use only this recommended
sterilization procedure.
- Control the eciency
(packaging integrity, no
humidity, color change
of sterilization indicators,
physico-chemical integrators,
digital records of cycles
parameters).
- Maintain traceability of
procedure records.
7 Storage Keep the contra-
angle in sterilization
packaging in a
dry and clean
environment.
- Sterility cannot be
guaranteed if packaging is
open, damaged or wet.
- Check the packaging and
the contra-angle before using
it (packaging integrity, no
humidity and validity period).

18
7 Storage, maintenance and transportation
7.1 Storage
7.1.1 This equipment should be stored in a room where the relative
humidity is 10% ~ 93%, atmospheric pressure is 70kPa to106kPa, and
the temperature is -20°C ~ +55°C.
7.1.2 Avoid the storage in a too hot condition. High temperature will
shorten the life of electronic components, damage battery, reshape or
melt some plastic.
7.1.3 Avoid the storage in a too cold condition. Otherwise, when the
temperature of the equipment increases to a normal level, there will be
dew that will possibly damage PCB board.
7.2 Maintenance
7.2.1 This device do not include accessories for repair usage, the repair
should be carried out by authorized person or authorized after service
center.
7.2.2 Keep the equipment in a dry storage condition.
7.2.3 Do not throw, beat or shock the equipment.
7.2.4 Do not smear the equipment with pigments.
7.2.5 Calibration is recommended when using a new/other contra-angle
or after an extend period of operation, as the running properties can
change with usage, cleaning and sterilization.
7.2.6 Replace the battery if it seems to be running out of power sooner
than it should.
7.3 Transportation
7.3.1 Excessive impact and shake should be prevented in transportation.
Lay it carefully and lightly and don’t invert it.
7.3.2 Don’t put it together with dangerous goods during transportation.
7.3.3 Avoid solarization and getting wet in rain and snow during
transportation.
8 Environmental protection
Please dispose according to the local laws.
9 After service
From the date this equipment has been sold, based on the warranty
Table of contents
Other Woodpecker Medical Equipment manuals