Woodpecker ULTRASURGERY Instruction manual

ULTRASURGERY
MANUAL OF USE AND MAINTENANCE
Industrial design patent No.: CN 200830301694.8

Content
1. Introduction------------------------------------------------------------------------------1
1.1 Forward-----------------------------------------------------------------------------1
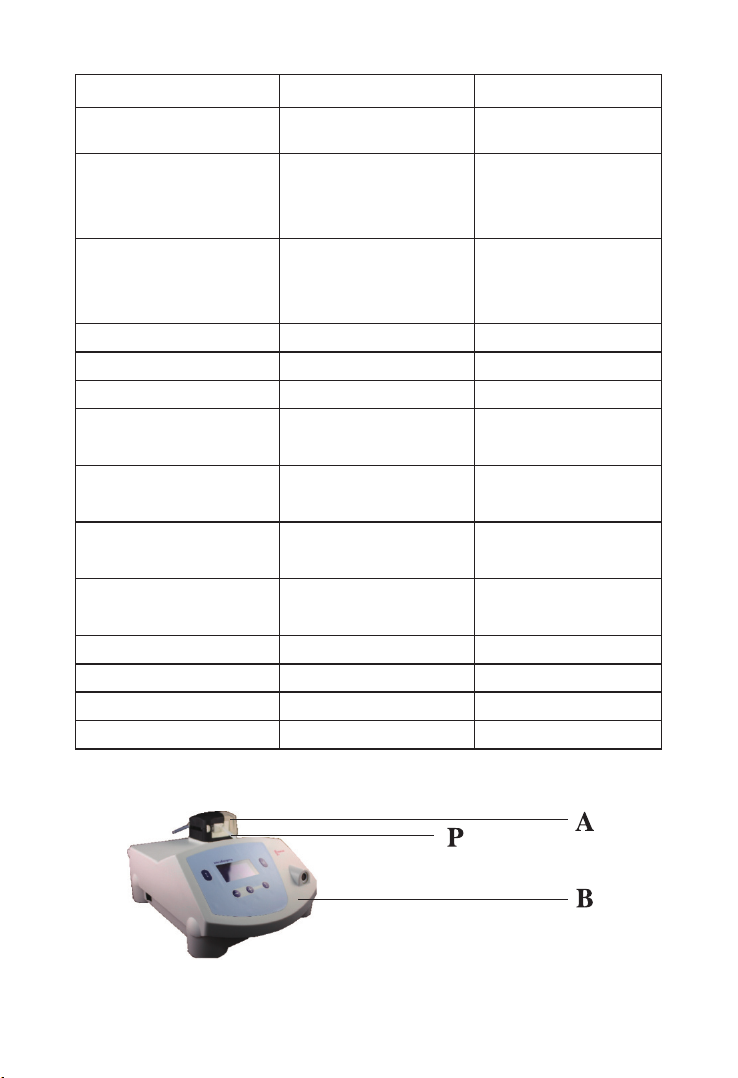
1.2 Description of the device----------------------------------------------------------1
1.3 Intended use-------------------------------------------------------------------------2
1.4 Safety requirement-----------------------------------------------------------------2
2. Identication data-----------------------------------------------------------------------5
2.1 Identication data------------------------------------------------------------------5
2.2 Data plate of the device-----------------------------------------------------------5
2.3 Data plate of the ULTRASURGERY handpiece--------------------------------5
3. Testing of the device-------------------------------------------------------------------6
4. Delivery----------------------------------------------------------------------------------6
5. List of material included in the supply-----------------------------------------------6
6. Installation-------------------------------------------------------------------------------9
6.1 Safety requirements during Installation-----------------------------------------9
6.2 Initial installation-----------------------------------------------------------------10
6.3 Connection the accessories------------------------------------------------------10
7. Controls---------------------------------------------------------------------------------12
7.1 Description of the controls-------------------------------------------------------12
7.2Description of the display and functions----------------------------------------13
7.3 Safety requirements during use-------------------------------------------------14
7.4 Protection systems and alarms--------------------------------------------------15
7.5 Instruction for use-----------------------------------------------------------------16
7.6 Rules for keeping the device in proper working order------------------------17
7.7 Settings permitted according to insert type------------------------------------17
8. Cleaning, disinfection and sterilization---------------------------------------------18
8.1 CLEAN function—Cleaning of the liquid circuit----------------------------18
8.2 Cleaning and disinfecting the casing of the apparatus------------------------18
8.3 Sterilization procedure-----------------------------------------------------------19
8.4 Autoclave sterilization of the handpiece---------------------------------------19
8.5 Autoclave sterilization of the tips-----------------------------------------------20

8.6 Autoclave sterilization of the torque wrench----------------------------------21
8.7 Autoclave sterilization of the peristaltic pump tube--------------------------21
8.8 Autoclave sterilization of the connection between cord and peristaltic pump
tube connection------------------------------------------------------------------------21
8.9 Autoclave sterilization of the handpiece support------------------------------21
9. Regular maintenance------------------------------------------------------------------21
10. Replacement of the fuses------------------------------------------------------------22
11. Disposal procedures and precautions----------------------------------------------23
12. Tips-------------------------------------------------------------------------------------23
13. Symbols-------------------------------------------------------------------------------24
14. Troubleshooting----------------------------------------------------------------------25
15. Technical data-------------------------------------------------------------------------28
16. After service---------------------------------------------------------------------------30
17. Environmental protection-----------------------------------------------------------30
18. Manufacturer’s right-----------------------------------------------------------------30
19. For technical data, please contact--------------------------------------------------30
20. Declaration of conformity-----------------------------------------------------------31
21. Guarantee------------------------------------------------------------------------------36
22. Statement------------------------------------------------------------------------------38

1
1. Introduction
1.1 Foreword
Before proceeding with the installation, use, maintenance or any other activities
on the equipment please read the manual carefully.
Important: To avoid causing personal injuries or damages to property, read
all the points concerning “safety requirement” contained in this manual with
particular attention.
Depending on the level of risk involved, safety requirements are classed under
the following indications:
Danger(always referred to personal injury)
Warning(referred to possible damage to property)
The purpose of this manual is to ensure that operators are aware of the safety
requirements, of the installation procedures and of the instructions for correct use
and maintenance of the apparatus.
The user is not authorized to tamper with the equipment under any circumstances.
If any problems are encountered, please contact a Woodpecker Service Centre.
Any attempts on the part of the user or any unauthorized personnel to tamper with
or alter the apparatus will invalidate the warranty and release the Manufacturers
from any liability in respect of any harm or damage to persons or property.
The information and illustration contained in this manual are up-dated to the date
of publication indicated on the last page.
WOODPECKER is committed to continuous up-dating of the products,
which may entail changes to components of the equipment. If there are any
discrepancies between the descriptions contained in this manual and your
equipment, please contact your dealer or the WOOKPECKER After-sale service
for explanations.
Using this manual for purposes other than those relating to the installation, use
and maintenance of the equipment is strictly prohibited.
1.2 Description of the Device

2
Thanks to its controlled three-dimensional ultrasound oscillations, the original
ULTRASURGERY technique rings in a new age for osteotomy and osteoplasty
in Implantology, Periodontology, Endodontics and Orthodontic Surgery. Its main
features are:
Micrometric cutting: Maximum surgical precision and intra-operative sensibility;
Selective cutting: Maximum safety for the soft tissues;
Cavitation effect: Maximum intra-operative visibility (bloodless eld);
The equipment has an automatic tuning circuit that offsets wear of the tips, thus
ensuring work in constant conditions of maximum efciency.
1.3 Intended Use
The ULTRASURGERY is a piezoelectric device for bone surgery that enables
osteotomy and osteoplasty techniques to be applied to in almost any anatomical
situation. This equipment can be used in the following elds:
a) Oral surgery;
b) Orthopedic surgery;
c) Maxillofacial surgery;
d) Cosmetic surgery;
e) Neurosurgery;
f) Otolaryngology.
This equipment cannot function in places where there is an inflammable
atmosphere (anaesthetic mixture, oxygen, etc).
1.4 Safety requirements
Woodpecker will not accept any liability for direct or incidental personal injury
or damage to property in the following cases:
1.4.1 If the equipment is used for purposes other than that for which it is
intended;
1.4.2 If the equipment is not used in accordance with all the instructions and
requirements described in this manual;
1.4.3 If the wiring system in the room where the equipment is used does not
comply with the application standard and appropriate requirements;

3
1.4.4 If any assembly operations, extensions, settings, alterations or repairs have
been carried out by personnel not authorized by Woodpecker;
1.4.5 If the environmental conditions in which the device is kept and stored
do not comply with the requirements indicated in the chapter on technical
specications.
Danger: Qualied and specialized personnel.
This equipment may be used only by specialized and suitably trained personnel
such as surgeons. If correctly used, this equipment does not give rise to side
effects. Improper use, on the other hand, will give rise to transmission of heat to
the tissues.
Danger: Intended use.
Use the equipment solely for the purpose for which it is intended (see point 1.3),
failure to comply with this requirement could lead to serious harm to the patient
and/or to the operator and/or damage to/failure of the equipment.
Danger: Contraindications.
Do not use the ULTRASURGERY on patients with pace-makers or other
implantable electronic devices. The same requirement applies also to the
operator.
Danger: Contraindications.
An electrosurgical knife could interfere with correct functioning of the device.
Danger: Cleaning, disinfection and sterilization of new or repaired
products.
All new or repaired products are delivered in no sterile conditions. Before being
used for treatments, all new or repaired products should be cleaned, disinfected
and sterilization following the instructions provided under point 8 strictly.
Danger: Use only original Woodpecker accessories and spare parts.

4
Danger: Check the condition of the device before treatment.
Always make sure that there is no water under the apparatus. Before each
treatment always check that the equipment is in proper working order and that
the accessories are efcient. Do not carry out the treatment if any problems are
encountered in operating the device. If the problems concern the equipment
contact an authorized technical service centre.
Danger: Breakage and wear of the tips.
The high-frequency vibrations and wear may, very occasionally, lead to breakage
of the tip. Tips of which the shape has been changed or which are otherwise
damaged are liable to break during use. Any such tips should denitely not be
used. It is necessary to instruct the patient to breathe though his nose during the
treatment in order to avoid ingestion of the broken off fragment of the tip.
Danger: Do not install this equipment anywhere there is a risk of
explosions.
This equipment cannot function in places where there is an inflammable
atmosphere. (anaesthetic mixture, oxygen, etc)
Danger: Personnel injury.
The foot switch of the ULTRASURGERY must not be activated when the door of
the peristaltic pump open. (Fig.5—Ref.B).Moving parts could injure the operator.
Danger: Contraindication.
Do not carry out this treatment on metal or ceramic prosthetic artifacts. The
ultrasonic vibrations could lead to decrementing of such artifacts.
Danger: Contraindication.
After autoclave sterilizing of the handpiece, wait for it to cool down completely
before using itm.

5
2. Identication data
2.1 Identication data
An exact description of the model including the serial number of the equipment
will make it easier for our After-Sale Service to respond quickly and efciently
to your enquiry.
Always provide the above information whenever you contact a Woodpecker
Service Centre.
2.2 Data plate of the device
Each device has its own data plate (Fig.1), on which technical specifications
and serial number are indicated. The data plate is on the rear of the device. The
remaining data are included in this manual (see point 15).
Fig.1
2.3 Data plate of the scaler handpiece
The serial number of the Ultrasurgery handpiece is engraved on the ring nut
(Fig.2).
Fig.2

6
2.4 Data plate of the foot switch
Fig.3
3. Testing of the device
All the devices are checked and tested by Woodpecker completely, including all
the parts.
When testing, all the parts will work in intermittent operation.
The test emphasized that all the problems are from the failure parts.
This procedure ensures the function and reliability of all the parts.
4. Delivery
Avoid the excessive concussion, shake, cover in delivery.
Do not mix with the danger articles.
Avoid the sunlight, rain and snow in delivery.
5. List of material included in the supply
The material included in the supply may vary in case of promotional campaigns.
Warning: Handpiece and cord can’t be detached.
Name Quality Ref
Peristaltic pump 1 Fig.4—Ref.A
Device 1 Fig.4—Ref.B

7
Name Quality Ref
Torque wrench 1 Fig.4—Ref.C
ULTRASURGERY
handpiece complete with
cord
1 Fig.4—Ref.D
Connection for the cord
and tube of the peristaltic
pump
1 Fig.4—Ref.E
Connector of handpiece 1 Fig.4—Ref.F
Plug of Footswitch 1 Fig.4—Ref.G
Footswitch 1 Fig.4—Ref.H
Tip Holder Marked on the packing
list
Fig.4—Ref.I
Tip Marked on the packing
list
Fig.4—Ref.J
Input of power-supply
cable
1 Fig.4—Ref.K
Output of power-supply
cable
1 Fig.4—Ref.L
Surgical tray 1 Fig.4—Ref.M
Rod for supporting the bag 1 Fig.4—Ref.N
Support for the handpiece 1 Fig.4—Ref.O
Pump tube 1 Fig.4—Ref.P

8
Fig.4

9
Applied parts : Handpiece , tips .
6. Installation
6.1 Safety requirements during Installation
Danger: The wiring system of the premises where the apparatus
is installed and used must comply with the applicable standards and the
relevant electrical safety requirements.
Danger: Do not install the apparatus in places where there is a
risk of explosion. The apparatus may not be used in areas where there are
inammable atmospheres (anaesthetic mixtures, oxygen, etc).
Danger: Install the apparatus in a place where it will be protected
from blows and from accidental sprays of water or other liquids.
Danger: Do not install the device on or in the vicinity of sources of
heat. Install it such a way that there is an adequate circulation of air around
it. Leave sufcient free space around it, in particular with reference to the
fan on the rear. (Fig.6)
Warning: Do not expose the apparatus to direct sunlight or to
sources of UV light.
Warning: The apparatus is transportable, however it must be
handled with care when it is moved.
Warning: Before connecting the cord to the device, make sure that
the electrical contacts are perfectly dry. If necessary, dry them with the air
syringe.
Warning: To avoid risk of electric shock, this equipment must only

10
be connected to a supply mains with protective earth.
6.2 Initial installation
To ensure perfect operation of the equipment, it is installed by technical
personnel authorized by Woodpecker. The equipment will be installed in a
suitable and handy place for it to be used.
The technician must:
6.2.1 Install the device in a suitable place;
6.2.2 Explain the main aspects of correct installation to the user;
6.2.3 Fill in the installation form, including the purchaser’s data;
6.2.4 Send the installation form to Woodpecker to ensure traceability and
activation of the warranty.
Fig.5
6.3 Connection the accessories
The accessories listed as follow should be connected with the ULTRASURGERY:
6.3.1 Insert the silicone tube into the peristaltic pump, proceeding as follows:
a) Open the door(Fig.5—Ref.A)as far as it will go.
b) Position the tube in the impeller(Fig.5—Ref.B).
c) Close the door completely(Fig.5—Ref.C).
Danger: personnel injury.
The footswitch of the ULTRASURGERY must not be activated when the door of
the peristaltic pump open. (Fig.5—Ref.B).Moving parts could injure the operator.
6.3.2 Insert the rod for supporting the bag into the holes provided for it (Fig.6—
Ref.A);

11
6.3.3 Connect the footswitch to the casting of the device by inserting the plug
into the footswitch socket (Fig.6—Ref.D);
6.3.4 Plug the power cable into the connector on the casting of the device
(Fig.6—Ref.E) and then into the power outlet;
6.3.5 Insert the handpiece support into the two holes provided for it (Fig.6—Ref.
C);
6.3.6 Insert the tube of ULTRASURGERY cord to the cord connector on the
device (Fig.4—Ref.P);
6.3.7 Put the handpiece on the support (Fig.4—Ref.O);
6.3.8 Connect end of the tube of the peristaltic pump;
6.3.9 Connect the flow-control system to the bag containing the appropriate
liquid for the treatment;
6.3.10 Use the torque wrench to screw the tip (Fig.8) till the clattering voice;
6.3.11 press the button “on/off” (Fig.6—Ref.B), then can use the device.
Fig.6
Fig.7

12
Fig.8
7. Controls
7.1 Description of the controls
This section illustrates the parts of the front panel of the ULTRASURGERY unit,
enabling the controls described in this manual to be located immediately.
7.1.1Description of bone function:
Fig.9
7.1.2 Description of root function:

13
Fig.10
7.1.3 Description of clean function:
Fig.11
7.2 Description of the display and functions
There are three functions of bone root, clean for this ULTRASURGERY.
7.2.1 BONE function (Fig.9)
In bone function, the power model is unavailable, but we can adjust the water
model, four models as follows:
a) Quality1: Very high bone density
b) Quality2: High bone density
c) Quality3: Middle bone density

14
d) Special: Low bone density
7.2.2 Root function (Fig.10)
In this function, both the water and power model are available, two models as
follow:
a) Perio.
b) Endo.
7.2.3 Clean function (Fig.11)
In this function, press the footswitch and hold it on for 3 seconds, the device can
clean the tube automatically in 25 seconds.
7.3 Safety requirements during use.
Danger: Contraindications.
Do not use the ULTRASURGERY on patients with pacemakers or other
implantable electronic devices. This requirement also applies to the operator.
Danger: Breakage and wear of the tips.
The high-frequency vibrations and wear may, very occasionally, lead to breakage
of the tip. Tips of which the shape has been changed or which are otherwise
damaged are liable to break during use. Any such tips should denitely not be
used. It is necessary to instruct the patient to breathe through his nose during the
treatment in order to avoid ingestion of the broken fragment of the tip.
Danger: Control of infections.
For maximum safety of both the patient and the operator, clean, disinfect and
sterilize the piezo electronic handpiece, the tips and the torque wrench after each
treatment.
Warning: Contraindication.
Do not carry out this treatment on metal or ceramic prosthetic artifacts. The
ultrasonic vibrations could lead to decrementing of such artifacts.
Warning: Contraindication.

15
After autoclave sterilizing of the handpiece, wait for it to cool down completely
before using it.
Warning: The electrical contacts inside the cord connector must be
dry.
Before connecting the handpiece to the device, make sure the electrical contacts
of the connector are perfectly dry, in particular after the autoclave sterilization
cycle. If necessary, dry the contacts by blowing air onto them with the syringe.
Warning: To use the device correctly, it is necessary to press
the footswitch and start it up without letting the tip rest on the part to
be treated. This will allow the electronic circuit to detect the point where
resonance of the tip is without any interference, thus enabling optimum
performance.
If this is not done, contact with the part to be treated or with other surfaces before
start-up could cause tripping of the protection systems.
Warning: For spray treatment, use only tips through which liquid
is passed.
7.4 Protection systems and alarms.
The device has a diagnostics circuit that is used to recognize tripping of the
protection system and of the alarms. These are shown on the display, as follows:
Warning code Possible Cause
Warn 01
There is a signal transmission problem.
Switch the device off and then on again, If
the problem persists contact Woodpecker
service centre.
Warn 02 Tuning circuit not working properly.
Handpiece failure.
Warn 03 Fan failure.
Warn 04 Pump failure.

16
Warning code Possible Cause
Warn 05 Beyond the electricity.
Warn 06
Tip is not correctly secured to the handpiece
or tip is worn or broken or deformed.
Handpiece failure.
Warn 07
Tuning circuit not working properly.
Please restart the device, if the problem
persists, stop using it and call the
Woodpecker service centre immediately.
7.5 Instruction for use
7.5.1 Open the air intake on the drip system;
7.5.2 Screw the chosen tip onto the ULTRASURGERY handpiece until it is ush
against it;
7.5.3 To use the torque wrench correctly (Fig.8) proceed as follow;
a) Hold the body of the handpiece rmly;
Warning: Do not grip the end part of the handpiece or the cord, only
the plastic casting (Fig.8) and do not turn it while fastening the tip in place;
b) Turn the wrench in a clockwise direction until the cultch engages (till making
clicking sound);
c) The tip is now properly tightened in place;
7.5.4 Make sure that the ULTRASURGERY handpiece is correctly connected to
the handpiece connector (Fig.6-Ref.C, Fig.7);
7.5.5 Check the display to see the type of power that has been set. If the type of
power required different from the type that has been set, use key “M” (see 7.1) to
switch;
7.5.6 Check the display to see the power level that has been set, if the type of
power required differs from the level that has been set, use the key “+”/“-”(Fig.10)
for selecting, depending on the type of function that has been set;
7.5.7 Check the display to see the delivery rate of the peristaltic pump, if the
delivery rate required is other than the level that has been set, use the key

17
“+”/“-”(see7.1)to choose,, depending on the type of function that has been set.
7.6 Rules for keeping the device in proper working order
7.6.1 Check the state of wear of the tips periodically and replace any for which a
drop in performance is noted;
7.6.2 Do not alter the shape of the tips by bending or lling them;
7.6.3 Replace any tip that has become deformed or damaged by impacts;
7.6.4 Always make sure that any threaded parts and their contact surfaces are
perfectly clean;
7.6.5 If an tip becomes too worn, the device will stop working.
7.7 Settings permitted according to insert type
The following table shows the Mode and Power settings permitted for correct use
of the device.
Insert Mode Power
US1-US2-US3-US4-US5-US6-
US1L-US1R
BONE Quality1-Quality3,
Special
UL1-UL2-UL3-UL4-UL5 BONE Quality1-Quality3,
Special
UC1 BONE Quality1-Quality3,
Special
UI1-UI2-UI7-UI8-UI9 BONE Quality1-Quality3,
Special
UP1-UP2-UP3-UP4-UP5-UP6-
UP7
ROOT Perio
UE1-UE2-UE3-UE4 ROOT Endo
Other manuals for ULTRASURGERY
1
Table of contents
Other Woodpecker Medical Equipment manuals