Work Sharp E3 User manual

USER’S
GUIDE

THANK YOU FOR
PURCHASING THIS
SHARPENER.
Your purchase supports our fourth generation family
owned business. All of our products are designed,
hand assembled, quality checked and shipped from our
headquarters in Ashland, Oregon. We are confident you
will be pleased with your purchase, but if not, please get
in touch so we can make it right. We aim to surprise and
delight the people who buy and use our products and
would love to hear how we are doing. Let us know what
you are slicing and dicing on Facebook and Instagram
(#worksharpculinary). Until then, enjoy your delicious
homemade meals, prepped by your sharp knife.
TEAM DAREX
Ashland, Oregon
PHONE: 1.800.418.1439
WEB: www.worksharpculinary.com
WARRANTY
REGISTER ONLINE AT: www.worksharpculinary.com
3-year warranty on all Work Sharp Culinary components;
excludes abrasives. Warranty for consumer use, not
commercial or industrial use.

Safety...............................................................................4
Tour Your Sharpener .............................................................6
Sharpening Basics ...............................................................7
Re-Shape A Knife ................................................................8
Ceramic Honing Rod............................................................9
Serrated Knives.................................................................10
Replacing Belts .................................................................10
Sharpening Belt Information .................................................11
Belts and Accessories .........................................................11
TABLE OF CONTENTS
For tips and tricks, instructional videos,
and frequently asked questions, visit
WorkSharpCulinary.com

4
IMPORTANT SAFEGUARDS
⚠ WARNING! READ all safety warnings and all instructions. When using electrical
appliances, basic safety precautions should always be followed. Every user should read
these instructions.
⚠ WARNING! You will be creating incredibly sharp knives and tools with this sharpener.
Please handle them with care. Use caution to avoid cutting yourself.
FOR HOUSEHOLD USE ONLY
Close supervision is necessary when any appliance is used by or near children.
Children should not play with appliance.
Do not let the power cord hang over edge of table or counter.
The appliance is only to be used with the power supply unit provided with the appliance.
It must be supplied at safety extra low voltage corresponding to the marking on the
appliance.
For US market, this appliance is to be supplied with a UL-approved “class 2 power supply”.
For Canadian market, this appliance is to be supplied with CSA22.2 No. 223 approved
power supply.
Do not abuse the cord. Never use the cord for carrying, pulling or unplugging the
appliance. Keep cord away from heat, oil, sharp edges and moving parts. Damaged or
entangled cords increase the risk of electric shock.
Carefully route the power cord to avoid damage from the knife blades while sharpening.
The ON and OFF positions of the appliance Power Switch are designed by the
following , , and sybmols.
= ON (REFINE), = ON (SHARPEN), and = OFF
Do not use appliance with a damaged cord or plug or after the appliance malfunctions or
is dropped or damaged in any manner. Return appliance to the nearest qualied service
center for examination, repair or electrical or mechanical adjustment. (Type X attachment).
Unplug from outlet when not in use, before putting on or taking off parts, and before
cleaning.
Stay alert. This appliance is not to be used by persons (including children) with reduced
physical, sensory or mental capabilities, or lack of experience and knowledge, unless they
have been given supervision or instruction.
To protect against electrical hazards, do not immerse in water or other liquid. Do not
expose to rain or wet conditions.
SAFETY

5
Avoid contact with moving parts.
Only use replacement parts or attachments recommended or sold by the manufacturer.
Use of unauthorized parts may cause re, electric shock or injury.
Only insert clean knife blades into the appliance. Do not attempt to sharpen axes, scissors
or other tools, or any blade that does not t properly into the sharpening slots.
Do not use oils, water or any other lubricant with appliance.
Do not operate appliance if the switch does not turn it on and off.
Do not use outdoors.
⚠ WARNING! This product contains chemicals known to the State of California to cause
cancer, birth defects or other reproductive harm. Some dust created by power sanding,
sawing, grinding, drilling and other such activities contains chemicals or particulates harmful
to humans. Your risk from these exposures varies, depending on how often you do this type
of work. To reduce your exposure to these chemicals, work in a well ventilated area, and
work with approved safety equipment, such as dust masks that are specically designed to
lter out airborne microscopic debris.
SAVE THESE INSTRUCTIONS
— Original Instructions —
SERVICE
Please contact Darex Customer Support:
DAREX, LLC
210 E. Hersey St.
Ashland, OR 97520 USA
WEB: www.worksharpculinary.com
PHONE: 1.800.418.1439
FAX: 1.541.552.1377
E-Mail: [email protected]
V.......................Volt A ............ amperes
Hz .....................Hertz W ........... watts
min ....................minutes ......... alternating current
..................direct current no........... no load speed
....................Class III Construction .......... earthing terminal
⚠.....................safety alert symbol rpm ......... revolutions or
reciprocations per minute
THE APPLIANCE LABEL MAY INCLUDE THE FOLLOWING SYMBOLS:

6
SHARPEN* Manual Click High Speed Untimed Cycle
REFINE Manual Click Low Speed Untimed Cycle
TOUR YOUR SHARPENER
E3 MULTIPLE SPEED STAGES
*Also use this stage to re-shape knives.
ELECTRIC
SHARPENER CERAMIC
HONING ROD
Edge Rollers
Belt Storage
Sharpening Guides
Dual Grit
Ceramic Rod
17° Sharpening Guides
sharpenrefine

7
SHARPENING BASICS
Keep the knife lightly resting
against the leather lining and on
rollers as you pull through slowly.
17° STANDARD RECIPE
All purpose recipe for any knife style.
SHARPEN STAGE | CLICK TO ( )
MAINTAIN
TIP: Maintain once or twice per week
Use CERAMIC HONING ROD or REFINE stage.
REFINE STAGE | CLICK TO ( )
Use this stage to maintain a sharp blade between sharpenings. Make 10 slow
strokes, alternating sides.
1. Click into ( ) SHARPEN stage.
2. Insert the heel of the knife into the left
sharpening guide, keeping it up against the
leather lining and softly resting on the left
rollers.
3. Using light pressure, slowly pull your knife
blade through the sharpening guide
(8” knife = 8 seconds per side).
4. Repeat on the right guide. Continue
alternating sides for a total of 10 slow
strokes.
5. Click into ( ) REFINE stage.
6. Make 10 more slow alternating strokes
starting on the left.
7. Test for sharpness by slicing a tomato or bell
pepper.
a. If the blade slices well, proceed to
step 6 in the CERAMIC HONING ROD
section.
b. If your blade doesn’t slice easily, move
to RE-SHAPE A KNIFE section.

8
RE-SHAPE A KNIFE
CLICK TO ( ) SHARPEN STAGE
Use this process when your knife does not get sharp after following 10 alternating
strokes in the SHARPEN stage instructions.
1. Make 5 slow strokes, heel to tip, on the
left side.
2. Check for a burr along the entire length of
the blade.
TIP: See below for details on how to feel for a burr.
3. Repeat sets of 5 strokes on the left side
until a burr is formed.
4. Move to the right guide and repeat the
same number of strokes as on the left side
to evenly sharpen the blade.
5. Return to SHARPENING BASICS section
and repeat steps.
Keep the knife lightly resting against
the leather lining and on rollers as
you pull through slowly.
HOW TO FEEL FOR A BURR
A burr will form on the opposite side of the blade you are sharpening. A burr
is a small, rolled over bit of steel that forms as you sharpen. Using your fingers,
brush your fingers across and away from the knife edge. You are feeling for the
material that has rolled over. You can feel a slight raise right as your fingers come
to the edge of the blade. If the edge feels smooth as you brush your fingers off
the edge, no burr has been raised. Be careful. Exercise caution when feeling for
a burr.
Burr
Cutting
Edge
TIP: Check for a burr by
brushing fingers across and
away from the blade edge.

9
The Ceramic Honing Rod included with the E3 Electric Sharpener was designed
to work in combination with the E3’s 17° STANDARD GUIDES.
CERAMIC HONING ROD
1. Insert the ceramic rod into the handle.
Twist a quarter turn to set.
2. Continue to twist the ceramic rod so the
coarse (ribbed) side lines up with the
guides.
3. Hold the handle vertically with the rubber
tip of the honing rod resting on a cutting
board.
4. Place the heel of your knife against one
of the guides to establish the proper
sharpening angle. While maintaining the
angle established by the guide, slowly
draw the entire length of blade, from heel
to tip, along the full length of the ceramic
rod with light pressure.
5. Repeat 10 slow, alternating strokes.
6. Now, twist the ceramic rod so the fine
(smooth) side lines up with the guides.
Using light pressure, make 10 alternating
strokes. Lighter pressure creates sharper
results.
Sharpening Guide
Sharpening Guide
For best results, use built-in
angle guides.
Coarse
Fine
CERAMIC ROD
CROSS SECTION
10
Most serrated and bread knives have a flat side and a beveled side on the blade.
Sharpen only the FLAT SIDE using the CERAMIC HONING ROD.
1. Align the fine (smooth) side of the ceramic
rod with the guides.
2. Hold the handle hoizontally.
3. Lay the knife flat on the rod with the flat side
of the blade resting on the rod. Pull from
heel to tip across the rod for 5 strokes at a
slight angle.
SERRATED KNIVES
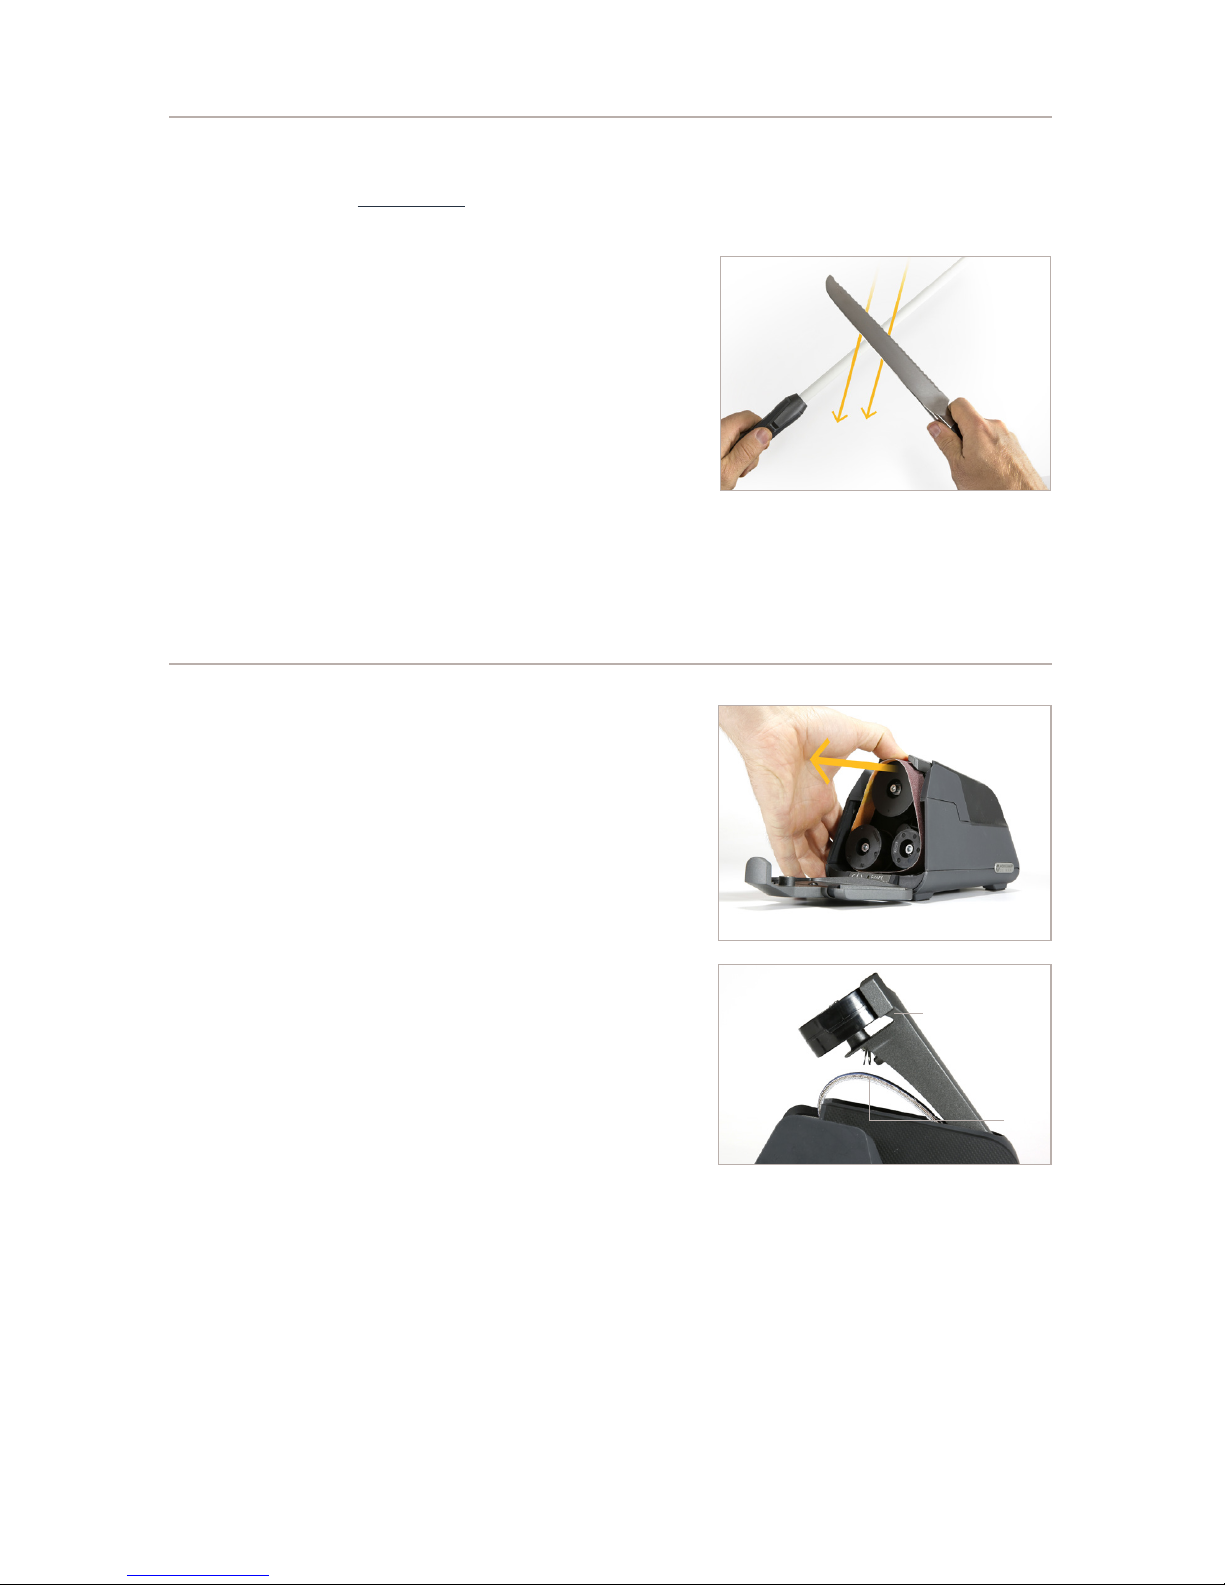
1. Pull open the front cover of the unit. Cover is
secured with magnet.
2. Press down on the tensioner, located behind
the top, large pulley (wheel).
3. Holding tensioner down, slide belt off.
4. Lift up tensioner to find extra belt storage.
5. To install new belt, hold tensioner down and
slide belt around all 3 pulleys (wheels).
For more info about belts, see SHARPENING
BELT INFORMATION section.
REPLACING BELTS
Belts
Belt Tensioner
Table of contents
Other Work Sharp Accessories manuals

Work Sharp
Work Sharp WSKTS2-I User manual

Work Sharp
Work Sharp PRECISION ADJUST User manual

Work Sharp
Work Sharp CPE2 User manual

Work Sharp
Work Sharp E5 User manual

Work Sharp
Work Sharp E5 User manual

Work Sharp
Work Sharp Combo User manual

Work Sharp
Work Sharp Guided Field Sharpener 2.2.1 User manual

Work Sharp
Work Sharp Ken Onion User manual

Work Sharp
Work Sharp WSBCHPAJ-PRO User manual

Work Sharp
Work Sharp M3 User manual


