WorkPro W125041A User manual

ORIGINAL OPERATING INSTRUCTIONS
CORDLESS HOT GLUE GUN
W125041A
SAVE THIS MANUAL FOR FUTURE REFERENCE


1
Danger! - Read the operating instructions to reduce the risk of injury
Caution! Wear safety goggles. Sparks generated during working or splinters, chips
and dust emitted by the device can cause loss of sight.
For use in dry rooms only.
Safety class II

9B
1
7
8
5
3
4
6
1
6
2a
2a
2b
2b
2
Fig. 1
Fig. 2 Fig. 3

3
Danger!
When using the equipment, a few safety
precautions must be observed to avoid
injuries and damage. Please read the
complete operating instructions and
safety regulations with due care.
Keep this manual in a safe place, so that
the information is available at all times. If
you give the equipment to any other
person, hand over these operating
instructions and safety regulations as
well. We cannot accept any liability for
damage or accidents which arise due to
a failure to follow these instructions and
the safety instructions.
1. This equipment can be used by
children of 8 years and older and by
people with limited physical, sensory
or mental capacities or those with no
experience and knowledge if they are
supervised or have received instruc-
tion in how to use the equipment safely
and understand the dangers which
result from such use. Children are not
allowed to play with the equipment.
Unless supervised, children are not
allowed to clean the equipment or
carry out user-level maintenance work.
2. The battery must be removed before
the equipment is scrapped.
3. The equipment must be disconnected
from the power supply before
removing the battery.
4. The battery must be disposed of
properly.
1. SAFETY REGULATIONS
The corresponding safety information
can be found in the enclosed booklet.
Danger!
Read all safety regulations and
instructions.
Any errors made in following the safety
regulations and instructions may result in
an electric shock, fire and/or serious
injury.
Keep all safety regulations and
instructions in a safe place for future
use.
2.2 Items supplied
CARTON CONTENTS
• Cordless Hot Glue Gun
• Charger
• 20pc 7x100mm(5/16x4inch) glue sticks
• Original safety and operating instruc-
tions
1. Carefully check to see that all of the
above items are supplied.
2. Inspect the product carefully to make
sure no breakage or damage occurred
during shipping. If you find damaged
or missing parts, please contact us at
the first time.
NOTE: Do not discard the shipping
carton and packaging material until
you are ready to use your new
cordless hot glue gun. The packaging
is made of recyclable materials.
Properly dispose of these materials in
accordance with local regulations.
IMPORTANT! The equipment and
packaging material are not toys. Do
not let children play with plastic bags,
foils or small parts. These items can
be swallowed and pose a suffocation
risk!
2. LAYOUT AND ITEMS SUPPLIED
2.1 Layout (Fig. 1)
1. ON/OFF switch
2. LED indicators
2a Battery capacity/charge level indicator
2b Temperature indicator
3. Nozzle
4. Trigger lever
5. Fold up stable stand
6. Micro USB charging port
7. Charging cable
8. Charger
9. Glue stick

3. PROPER USE
You can use the cordless hot glue gun to
glue the following materials: Wood,
plastics, textiles, cardboard, ceramics,
leather, etc.
The equipment is to be used only for its
prescribed purpose. Any other use is
deemed to be a case of misuse. The user
/ operator and not the manufacturer will
be liable for any damage or injuries of any
kind caused as a result of this.
Please note that our equipment has not
been designed for use in commercial,
trade or industrial applications. Our
warranty will be voided if the machine is
used in commercial, trade or industrial
businesses or for equivalent purposes.
4. TECHNICAL DATA
Power supply: 3.6 V DC
Heat-up time: approx. 100 seconds
Melting temperature: 150 °C (302°F)
Glue stick diameter: 7 mm(5/16")
Glue stick length: 100 mm((4")
Battery capacity: 2.6 Ah
Battery type: Lithium-ion
Weight: 0.2 kg
Charger for the product
Battery charge voltage: 5 V DC
Battery charge current: 1 A
Charging unit
supply voltag: 100-240V~ 50/60 Hz
Charging time: 2.5-3.5 hours
Caution!
Residual risks
Even if you use this electric power tool
in accordance with instructions,
certain residual risks cannot be rules
out. The following hazards may arise in
connection with the equipment’s
construction and layout:
1.Lung damage if no suitable protective
dust mask is used.
4
5. BEFORE STARTING THE
EQUIPMENT
Hazard!
Charge the equipment only with the
charger supplied. Only place the
equipment on non-flammable surfaces.
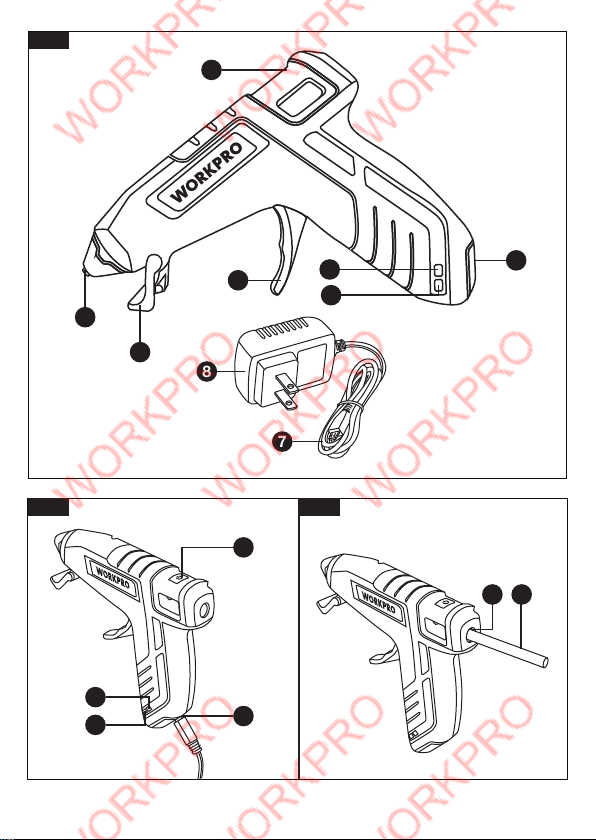
5.1 Charging the battery (Fig. 2)
The battery is protected from exhaustive
discharge.An integrated protective circuit
automatically switches off the equipment
when the battery is flat.
Note! Do not actuate the ON/OFF switch
any more if the protective circuit has
tripped. This may damage the battery.
Check that your mains voltage is the same
as that marked on the rating plate. Plug
the battery charger(8) in the plug socket
and connect the charging cable (7) to the
Micro USB charging port (6). The charging
process starts as soon as the charging
cable is connected to the charging
adapter.
The LED (2a) will light up red to indicate
that the battery pack is being charged.
When charging is finished, the LED (2a)
changes to green.
If no LEDs come on during charging, this
means that the battery pack is defective.
A defective battery is not allowed to be
used any more.
Important! The handle may become a
little warm during the charging process.
This is normal.
If the battery fails to charge, please check
• whether there is voltage at the socket
outlet
• whether there is good contact at the
charging contacts of the charging unit.
If the battery still fails to charge, please
contact with our online customer service
5.2 Inserting the glue stick (Fig. 3)
Push the glue stick (9) into the opening (B)
as far as the stop.

5
6. OPERATION
6.1 Operation
• Check that a glue stick is fitted (see
point 5.2)
• Long press the ON/OFF switch (1) for
approx. 2 seconds.
• The LED (2b) will light up red to indicate
that the equipment is heating up
• This takes approx. 100 seconds, after
which the LED (2b) changes to green
• The equipment is now ready for
operation.
• To switch the equipment off again,
press the ON/OFF briefly just the once
Warning!
Never set the equipment down once you
have started using it.
If or when your gluing work is interrupted or
finished,always be sure to stand the
equipment on its fold up stable stand as
shown in Fig.1. Switch the equipment off
and allow it to cool down completely
before you pack it away.
6.2 Working with the cordless hot glue
gun
• You can now apply the glue by pressing
the trigger lever (4) after the heating up
time
• Press both surfaces together immedi-
ately and apply pressure to them
• It takes about 30 seconds for the glue
to set.
The equipment switches off automati-
cally after approx. 5 minutes of non-use.
Important!
Glue stains on textiles cannot be removed.
6.3 LED indicator (Fig. 2/Item 2)
The indicator (2) displays the charging
status during charging (see point 5.1), the
heating time and when the equipment is
ready for operation (see point 6.1). If the
red LED (2a) turns to be red during
operation,the battery is empty. Recharge
the battery.
7. CLEANING AND MAINTENANCE
Warning!
Allow the equipment to cool down before
you start to clean it.
7.1 Cleaning
• Keep all safety devices, air vents and
the motor housing free of dirt and dust
as far as possible. Wipe the equipment
with a clean cloth or blow it with
compressed air at low pressure.
• We recommend that you clean the
device immediately each time you have
finished using it.
• Clean the equipment regularly with a
moist cloth and some soft soap. Do not
use cleaning agents or solvents; these
could attack the plastic parts of the
equipment. Ensure that no water can
seep into the device. The ingress of
water into an electric tool increases the
risk of an electric shock.
7.2 Maintenance
There are no parts inside the equipment
which require additional maintenance.
8. STORAGE
Store the equipment and accessories in a
dark and dry place at above freezing
temperature. The ideal storage tempera-
ture is between 5°C(41°F) and 30°C(86°F).
Store the electric tool in its original
packaging.

6
9. DISPOSAL AND RECYCLING
The equipment is supplied in packaging
to prevent it from being damaged in
transit. The raw materials in this packag-
ing can be reused or recycled. The
equipment and its accessories are made
of various types of material, such as
metal and plastic. Never place defective
equipment in your household refuse. The
equipment should be taken to a suitable
collection center for proper disposal. If
you do not know the wherea bout of such
a collection point, you should ask in your
local council offices.
This product has been marked
with a symbol relating to
removing electric and electronic
waste. This means that this
product shall not be discarded with
household waste but that it shall be
returned to a collection system. It will then
be recycled or dismantled in order to
reduce the impact on the environment.
Electric and electronic equipment can be
hazardous for the environment and for
human health since they contain hazard-
ous substances.
To preserve natural resources,
please recycle or dispose of the
battery pack properly. This
battery pack contains Li-ion
batteries. Consult your local waste
authority for information regarding
available recycling and/or disposal
options. Discharge your battery pack by
operating your tool, then remove the
battery pack from the tool housing and
cover the battery pack connections with
heavy-duty adhesive tape to prevent short
circuit and energy discharge. Do not
attempt to open or remove any of the
components.
DISPOSAL OF AN EXHAUSTED
BATTERY PACK
Table of contents
Other WorkPro Glue Gun manuals
Popular Glue Gun manuals by other brands

Parkside
Parkside PNKP 105 B1 Translation of the original instructions

Hubner
Hubner MS 150 operating instructions

Parkside
Parkside PHPA 20-Li A1 Translation of the original instructions

Grizzly
Grizzly T25955 instructions

SHARKS
SHARKS SH 3.6Li Instruction for operation and maintenance

Parkside
Parkside PHP 500 B2 Quick user guide