Worx Nitro HYDROSHOT WG633 X Series User manual

20V High ow Hydroshot EN
F
ES
P09
P18
P27
WG633 WG633.X

14
*
12
*
13
*
17
*
16
*
19
*
20
*
21
*
22
*
15*
23
*
24
*
18
*
OPTIONAL ACCESSORIES
10 11
89
1
2
3
4
5
6
7

100%
0%
D
A3
A2
A1
A4
B1
100%
0%
1
2

1
2
DC
D1 DD2
B3B2
B4
1
2
Extension lance
sold separately.
Extension lance
sold separately.
1
2
1
2

1
2
E1
FG
DD3
E2 E3

L1*
D
K*
L2*
2
1
D
J*
I
H
1
2

2
1
21
M*
N1*
1
2
N2* N3*
O1
Extension lance
sold separately.
N4*
1
2

O3
P1 P2
O2
Q2*
Q1*
1
2
1
2

2
1
Extension lance sold separately.
T* D
U*
R*
2
1
S*
W
D
V
25

10
20V High ow Hydroshot EN
TABLE OF CONTENT
1. SAFETY INSTRUCTIONS
2. COMPONENT LIST
3. TECHNICAL DATA
4. INTENDED USE
5. OPERATING INSTRUCTIONS
6. ATTACHMENT OF ACCESSORIES
7. MAINTENANCE
8. CLEANING/STORAGE
9. ENVIRONMENTAL PROTECTION
10.TROUBLESHOOTING
11. DECLARATION OF CONFORMITY
1. SAFETY INSTRUCTIONS
PRODUCT SAFETY
GENERAL SAFETY
WARNINGS
WARNING: Read all safety warnings and all
instructions. Failure to follow the warnings
and instructions may result in electric shock,
re and/or serious injury.
SAVE ALL WARNINGS AND INSTRUCTIONS FOR
FUTURE REFERENCE.
IMPORTANT SAFETY INSTRUCTIONS
WARNING – When using this product basic
precautions should always be followed, including
the following:
1. Read all the instructions before using the product.
2. To reduce the risk of injury, close supervision is
necessary when a product is used near children.
3. Know how to stop the product and bleed
pressures quickly. Be thoroughly familiar with the
controls.
4. Stay alert – watch what you are doing.
5. Do not operate the product when fatigued or
under the inuence of alcohol or drugs.
6. Keep operating area clear of all persons
7. Do not overreach or stand on unstable support.
Keep good footing and balance at all times.
8. Follow the maintenance instructions specied in
the manual.
9. WARNING – Risk of injection or injury– do not
direct discharge stream at persons.
10. Do not spray electrical apparatus and wiring.
SAVE THESE INSTRUCTIONS
FOR ALL BATTERY – OPERATED GARDENING
APPLIANCES
1. Prevent unintentional starting. Ensure the switch
is in the off-position before connecting to battery
pack, picking up or carrying the appliance.
Carrying the appliance with your nger on the
switch or energizing appliance that have the
switch on invites accidents.
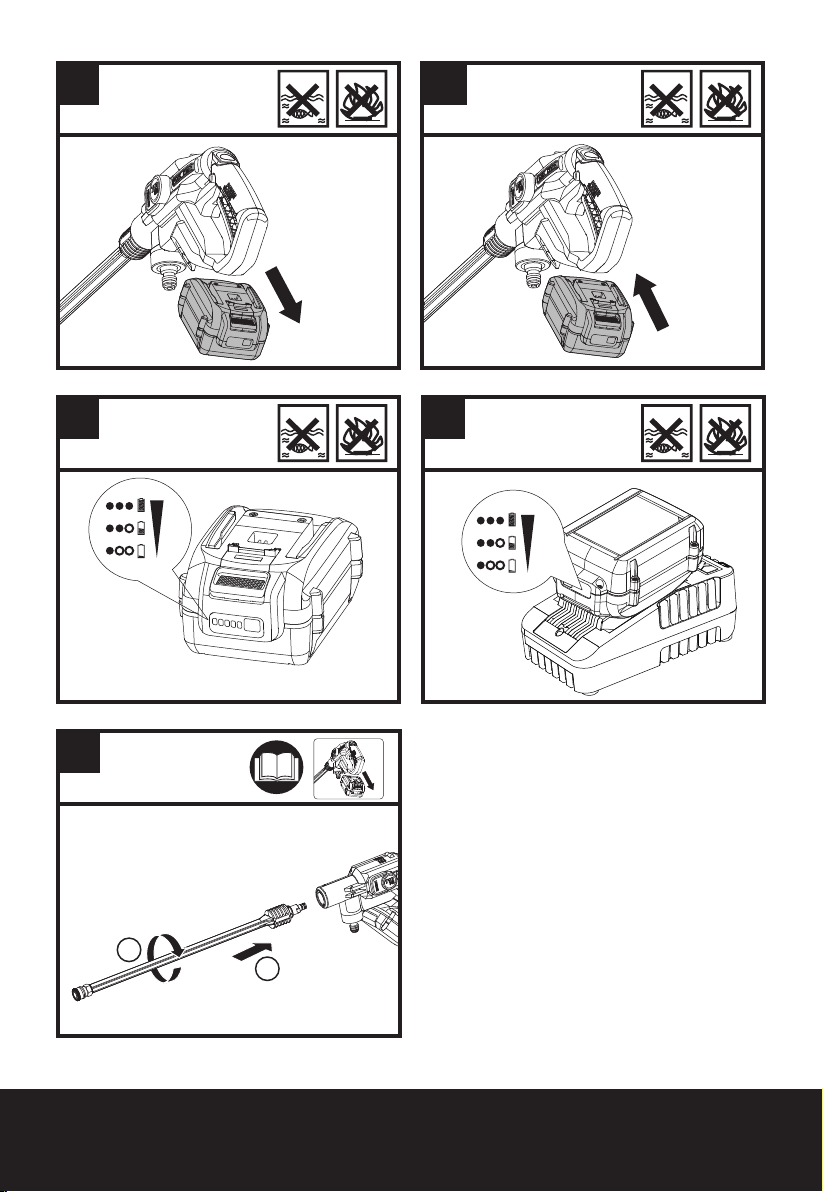
2. Disconnect the battery pack from the appliance
before making any adjustments, changing
accessories, or storing appliance. Such
preventive safety measures reduce the risk of
starting the appliance accidentally.
3. Recharge only with the charger specied by the
manufacturer .A charger that is suitable for one
type of battery pack may create a risk of re
when used with another battery pack.
4. Use appliances only with specically designated
battery packs. Use of any other battery packs
may create a risk of injury and re.
5. When battery pack is not in use, keep it away
from other metal objects, like paper clips, coins,
keys, nails, screws or other small metal objects,
that can make a connection from one terminal to
another. Shorting the battery terminals together
may cause burns or a re.
6. Under abusive conditions, liquid may be ejected
from the battery; avoid contact. If contact
accidentally occurs, ush with water. If liquid
contacts eyes, additionally seek medical help.
Liquid ejected from the battery may cause
irritation or burns.
7. Do not use a battery pack or appliance that is
damaged or modied. Damaged or modied
batteries may exhibit unpredictable behavior
resulting in re, explosion or risk of injury.
8. Do not expose a battery pack or appliance to re
or excessive temperature. Exposure to re or
temperature above 130°C may cause explosion.
9. Follow all charging instructions and do
not charge the battery pack or appliance
outside of the temperature range specied
in the instructions. Charging improperly or at
temperatures outside of the specied range may
damage the battery and increase the risk of re.
10.Have servicing performed by a qualied repair
person using only identical replacement parts.
This will ensure that the safety of the product is
maintained.
11. Do not modify or attempt to repair the appliance
or the battery pack (as applicable) except as
indicated in the instructions for use and care.

20V High ow Hydroshot
11
EN
SAFETY WARNINGS FOR
BATTERY PACK
a) Do not dismantle, open or shred battery pack.
b) Do not expose battery pack to heat or re. Avoid
storage in direct sunlight.
c) Do not short-circuit a battery pack. Do not store
battery packs haphazardly in a box or drawer
where they may short-circuit each other or be
short-circuited by other metal objects. When
battery pack is not in use, keep it away from other
metal objects, like paper clips, coins, keys, nails,
screws or other small metal objects, that can
make a connection from one terminal to another.
Shorting the battery terminals together may cause
burns or re.
d) Do not subject battery pack to mechanical shock.
e) In the event of battery leaking, do not allow the
liquid to come in contact with the skin or eyes. If
contact has been made, wash the affected area
with copious amounts of water and seek medical
advice.
f) Do not use any battery pack which is not
designed for use with the equipment.
g) Keep battery pack out of the reach of children.
h) Always purchase the battery pack recommended
by the device manufacturer for the equipment.
i) Keep battery pack clean and dry.
j) Wipe the battery pack terminals with a clean dry
cloth if they become dirty.
k) Battery pack needs to be charged before use.
Always use the correct charger and refer to
the manufacturer’s instructions or equipment
manual for proper charging instructions.
l) Do not leave battery pack on prolonged charge
when not in use.
m) After extended periods of storage, it may
be necessary to charge and discharge the
battery pack several times to obtain maximum
performance.
n) Recharge only with the charger specied by
Worx. Do not use any charger other than that
specically provided for use with the equipment.
o) Retain the original product literature for future
reference.
p) Use only the battery pack in the application for
which it was intended.
q) Remove the battery pack from the equipment
when not in use.
r) Dispose of properly.
s) Do not mix cells of different manufacture,
capacity, size or type within a device.
t) Keep the battery away from microwaves and
high pressure.
SYMBOLS
To reduce the risk of injury, user
must read instruction manual
Warning
Read operator’s manual
Batteries may enter water cycle if
disposed improperly, which can
be hazardous for ecosystem. Do
not dispose of waste batteries as
unsorted municipal waste.
Do not burn
Li-Ion
Li-Ion battery, battery must be
recycled
Remove battery from the socket
before carrying out any adjust-
ment, servicing or maintenance.
POSITEC Inc. has established a partnership with
the RBRC Corporation to recycle any Positec
batteries with the RBRC-call2recycle seal. For
environmental protection, please do not discard
batteries in the trash. After the batteries’ life cycle
is ended, please call 1-800-822-8837 for a free
service that will properly dispose of the battery.

12
20V High ow Hydroshot EN
2. COMPONENT LIST
1. HI/LO PRESSURE-SETTING BUTTON
2. LOCK-OFF SWITCH
3. BATTERY PACK *
4. ON/OFF TRIGGER
5. HOSE QUICK-CONNECT ADAPTER
6. PRESSURE CLEANING LANCE
7. MULTI-SPRAY NOZZLE
8. DRAW-HOSE QUICK-CONNECT
ADAPTER
9. DRAW-HOSE WATER FILTER
10. FLOATER
11. DRAW HOSE
12. SOAP BOTTLE *
13. BRUSH *
14. TURBO NOZZLE *
15. FOLDABLE WATER BUCKET *
16. WATER BOTTLE ADAPTER*
17. SQUEEGEE *
18. SHORT LANCE *
19. EXTENSION LANCE *
20. PIVOTING QUICK CONNECT ADAPTER*
21. ROTARY CLEANING BRUSH *
22. ADJUSTABLE POWER SCRUBBER *
23. QUICK CONNECT ADAPTER*
24. CARRY BAG*
25. WATER FILTER (SEE FIG. V )
* Not all the accessories illustrated or described are
included in standard delivery.
3. TECHNICAL DATA
Type: WG633 WG633.X (620-649 - designation
of machinery, representative of battery-powered
washer)
WG633 WG633.X **
Voltage 20 V Max***
Permissible pressure 5.6 MPa (710psi)****
Rated pressure 3.8 Mpa @high
2.5 Mpa @Eco
Max water ow rate 220 L/hr
Max. inlet water
pressure 0.6 Mpa
Suction height Max 1.5m
Protection degree IPX5
Water temperature Max 40°C
Bare tool weight
(with lance) 2.95lbs(1.34Kg)
**
“The “X” noted at the end of the model number is a
placeholder that represents a variation to the original
model (kit contents or packaging change). “X” may be
replaced with any number from “1” to “999” or English
letter “A” to “Z” or “M1” to” M9”.”.
*** Voltage measured without workload. Initial
battery voltage reaches maximum of 20 volts.
Nominal voltage is 18 volts.
****Permissible pressure
is checked by the following
test: The pressure is increased to 110% of the allowable
pressure, or by 1,5 Mpa for unheated machines, and the
device shall operate.
SUGGESTED BATTERIES
AND CHARGERS
Category Type Capacity
20V Battery WA3012 4.0 Ah
20V Charger WA3881 2.0 A
We recommend that you purchase your accessories
from the same store that sold you the tool. Refer to
the accessory packaging for further details. Store
personnel can assist you and offer advice.
4. INTENDED USE
This tool is intended for cleaning and watering.

20V High ow Hydroshot
13
EN
5.
OPERATING INSTRUCTIONS
NOTE: Before using the tool, read the
instruction book carefully.
ASSEMBLY & OPERATION
ACTION FIGURE
BEFORE OPERATION
Removing the battery pack See Fig.A1
Installing the battery pack See Fig. A2
Checking the battery condition
NOTE: Fig. A3 only applies for the
battery pack with battery indicator light.
See Fig. A3
Charging the battery pack
More details can be found in charger’s
manual
See Fig. A4
ASSEMBLY
NOTE: The power nozzle has three
working modes: pressure cleaning
lance only, short lance only and short
lance used together with extension
lance.
Working mode 1
Attaching
pressure cleaning lance
to the
power nozzle
See Fig. B1
Working mode 2
Attaching
short lance
to the power
nozzle
See Fig. B2
Working mode 3
Attaching
extension lance
to the power
nozzle
Attaching
short lance
to the
extension
lance
See Fig.
B3, B4
Attaching the Multi-spray nozzle
NOTE: When attaching, rotate the
nozzle left and right to make sure the
nozzle is fully seated into position and
gently pull it to make sure it is locked
into position securely.
See Fig. C
Attaching the hose to the power nozzle
NOTE: After the hose is attached, check
the connection by gently pulling upon
the hose. It should not be pulled off.
See Fig.
D1, D2 , D3
OPERATION
WARNING: The supplied battery is
not waterproof. To avoid risk of
battery failure,
protect the battery from water
exposure during use. Store the tool
and battery in a dry place after use.
Start
NOTE: At the rst use or after long-term
storage, it is recommended to attach
the tap or inject water into the hose
adapter with the machine turned on, so
as to empty the air. Do not start working
until the water goes up along the hose
and sprays out.
See Fig.
E1,E2,E3
Selecting the nozzle pattern
NOTE: Choose a suitable nozzle pattern
according to your work. Spray
patterns 0o, 15o, 25oand 40oare
applicable for cleaning, and the spray
pattern with the symbol is best
suitable for watering.
WARNING:
Do not shift the nozzle
pattern when the tool is powered
on.
See Fig. F
Cleaning
WARNING: Do not connect the
machine to water supplies that
are dirty, rusty, muddy, or corrosive.
(Including window cleaning liquids,
plant foods, or fertilizers etc.)
NOTE: If sea water is used, the product
should be rinsed and used with fresh
water after that in order to extend the
life time of the machine.
See Fig.
G, H
Watering See Fig. I
WARNING:Permissible pressure is
checked by the following test: The
pressure is increased to 110% of the
allowable pressure, or by 1,5 Mpa for
unheated machines, and the device
shall operate.
See Fig. W
6. ATTACHMENT OF
ACCESSORIES
A number of accessories have been supplied with
this product and are required for use in different
applications. Do not attempt to use cleaning without
a lance or any accessories attached.
1. Soap bottle (WA4036, sold separately)
Soap bottle provides detergent suds for deeper
cleaning of dirt. It is used in conjunction with power
nozzle. (See Fig. J)
NOTE: Keep the machine connected to water source
when using soap bottle.
2. Brush (WA4048, sold separately)
Brush is for cleaning cars, boats, motorcycles etc. It
is used in conjunction with power nozzle. (See Fig. K)
3. Foldable water bucket (WA4015, sold separately)

14
20V High ow Hydroshot EN
Foldable water bucket allows you to connect to water
supply when you are far away from a water source.
When not in use, it can be folded for storage. (See
Fig. L1, L2)
4. Turbo nozzle (WA4037, sold separately)
The turbo nozzle delivers 360° of rotating water,
which cleans a larger area than the 0° water pattern
during the same time period. Recommend to use it
with high pressure setting (See Fig. M)
5. Window squeegee with water sprayer (WA4050,
sold separately)
The window squeegees quick connection easily
snaps into the tool to spray water or wipe off
water from glass or tiled surfaces. Suitable for the
HydroShot power cleaner or the extension lance.
(See Fig. N1, N2, N3, N4)
6. Bottle cap connector (WA4038)
The bottle cap connector accessory allows the tool
to directly connect with most 2 Liter bottles with
approximately 1” openings. (NOTE: May not t all
consumable soda and water bottles) (See Fig. O1,
O2, O3)
WARNING: Do not install the bottle cap
connector accessory until it is ready to be used.
The accessories vents will leak liquid, if a bottle is
installed, with the machine lying on a surface.
7. Pivoting Quick Connect Adapter (WA4039, sold
separately)
The Pivoting Quick Connect Adapter allows power
cleaning tips to be fully adjusted up to 180° in any
direction. Ideal for cleaning around hard-to-reach
areas. Suitable for the HYDROSHOTTM power cleaner
and multi-spray nozzle (See Fig. Q1, Q2)
8. Rotary Cleaning Brush (WA4042, sold separately)
The rotary cleaning brush accessory easily snaps
into the tool for cleaning sensitive surfaces and
around tight spaces. Suitable for the HYDROSHOTTM
power cleaner with/without the extension lance
installed. (See Fig. R)
9. Adjustable Power Scrubber (WA1820/WA1821,
sold separately)
The water powered rotary scrubber accessory easily
snaps into the tool for cleaning hard surfaces.
Suitable for the HYDROSHOTTM power cleaner with/
without the extension lance installed. (See Fig. S,
T, U) The soft scrubber (WA1820) is applicable for
sensitive surfaces and the hard bristle scrubber
(WA1821) is applicable for cleaning hard surfaces
(not recommended for cars and surfaces that could
be scratched).
7. MAINTENANCE
Remove the Battery Pack from the tool before
carrying out any adjustment, servicing or
maintenance.
Inspect the product for damaged or worn parts
before each use. Do not operate it if you nd
damaged or worn parts. Contact your supplier or the
manufacturer for replacement parts.
Hose lter maintenance
Unscrew the hose lter from the hose and remove
the strainer. Rinse the parts with clean water before
reassembling. (See Fig. P1, P2)
Filter maintenance (See Fig. V)
Rinse it with clean water before reassembling.
NOTE: When retightening the hose adapter, please
tighten securely. Otherwise, it may not draw any
water for proper operation.
WARNING: Any other servicing should be
performed by an authorized service
representative.
8. CLEANING/STORAGE
Before Storage, completely drain all the water from
the machine and hose.
Clean the moulded plastic housing of the machine
using a soft brush and clean cloth. Do not use water,
solvents or polishes. Store in a secure and dry place
out of the reach of children. Do not place other
objects on the product.
Store the machine and the accessories in a frost free
place.
9. ENVIRONMENTAL
PROTECTION
Waste electrical products must not be
disposed of with household waste. Please
recycle where facilities exist. Check with your
local authorities or retailer for recycling advice.

20V High ow Hydroshot
15
EN
10. TROUBLESHOOTING
Symptom
Possible causes
Solution
Machine turns on but
it does not draw any
water or there is not
sucient pressure.
Hydroshot is being held too high
from the water source.
NOTE: The higher the Hydroshot is
held in the air, the harder the pump
needs to work to draw water (up)
against gravity.
Hold the Hydroshot lower to the ground (less
than 5’ off of the ground) to improve water ow.
Hose lter is blocked. Take out the hose lter and rinse the parts with
clean water. (See Fig. Q1, Q2)
The users garden hose is not well
connected to the machine.
Check and reattach the garden hose tightly. (See
Fig. E2)
Hose Quick-Connect Adapter gets
loose.
Tighten the hose adapter securely with a wrench.
The lter is missing. (See Fig. R) Contact customer service to request a
replacement part.
The lter screen is blocked. (See
Fig. R) Clean the lter screen regularly.
Pump, hose, or other parts
are frozen due to outside
temperatures.
Wait for the pump, hose or other parts to thaw.
Hose kinks. Straighten out the hose.
An excessive amount of air can be
in the hose and Hydroshot.
If air builds up within the hose or pump, the
water pressure will drop. 1) Hold the Hydroshot
lower to the ground (less than 5’ off of the
ground) to improve water ow.
2) “Pre-ll the draw-hose” completely with water
to ensure all air is removed.
3) Operate the hydroshot without the lance or
nozzle attached to allow a higher volume of
water to quickly and easily ow throw the unit.
Once all air pockets appear to be removed,
reinstall the lance and nozzle.
3) Connect directly to a water spigot with garden
hose to clear all air from the system. Refer to
gures I1, I2, I3.
Multi-spray nozzle
leaks.
The nozzle pattern does not spray
correctly.
Make sure the nozzle pattern symbol aligns with
the indicator mark on tool.
Air built up within the hose or
pump.
Continue to operate the machine for a few
moments until leakage stops. Refer to
comments from above to remove air pockets.
Outlet pressure
increases suddenly. Multi-spray nozzle is blocked.
Clear any visible debris with a small object such
as a paper clip. Replace with a new multi-spray
nozzle.
Machine drains out
water after stopping.
There is water remaining in the
lance and pump after stopping.
Remove batteries and hoses. Press trigger and
rotate the Hydroshot in various directions to
allow all water to drain.
Soap accessory
cannot spray out any
detergent.
Blockage in the soap bottle. Clean it with fresh water.
The machine is not connected to
the water source.
Connect to the water source before turning on
the machine.

16
20V High ow Hydroshot EN
Machine does not start.
The battery pack is not attached
well. Reinstall the battery pack.
Battery pack charge has been
depleted.
Replace with a new battery pack or recharge the
battery pack.
Defective battery. Replace with a new battery pack.
Machine pressure is
not consistent.
Additional air could be sucked into
the machine.
Check connection between the hose adapter
and the draw hose.
It is at low pressure setting. No action need.
Machine stops
automatically.
Battery pack charge has been
depleted.
Replace with a new battery pack or recharge the
battery pack.
The multi-spray nozzle is blocked.
The current protection is activated.
Remove the multi-spray nozzle and turn on the
machine. If the machine works normally, replace
with a new multi-spray nozzle.
The end of the draw
hose will not stay
submerged.
There is air remaining in the
draw hose and/or the oat is not
adjusted properly.
Ensure all air is removed from draw hose.
Adjust oat location on draw hose to allow lter
to sit well below water’s surface, yet just above
water source’s bottom where lter may quickly
ll with debris.
Machine does not draw
any water after long
time storage.
Additional air could be sucked into
the machine.
1) Hold the Hydroshot lower to the ground (less
than 5’ off of the ground) to improve water ow.
2) “Pre-ll the draw-hose” completely with water
to ensure all air is removed.
3) Operate the hydroshot without the lance or
nozzle attached to allow a higher volume of
water to quickly and easily ow throw the unit.
Once all air pockets appear to be removed,
reinstall the lance and nozzle.
3) Connect directly to a water spigot with garden
hose to clear all air from the system. Refer to
gures I1, I2, I3.
This manual suits for next models
1
Other Worx Nitro Paint Sprayer manuals
Popular Paint Sprayer manuals by other brands

Toro
Toro 132-5570 installation instructions

WALTHER PILOT
WALTHER PILOT PILOT WA 800 operating instructions

WALTHER PILOT
WALTHER PILOT PILOT WA XV operating instructions

Carlisle
Carlisle DeVIBISS JCK Operation manual

Mac Afric
Mac Afric TPOWDR-001 Assembly and operating instructions

Powermate
Powermate 010-0013CT instruction manual