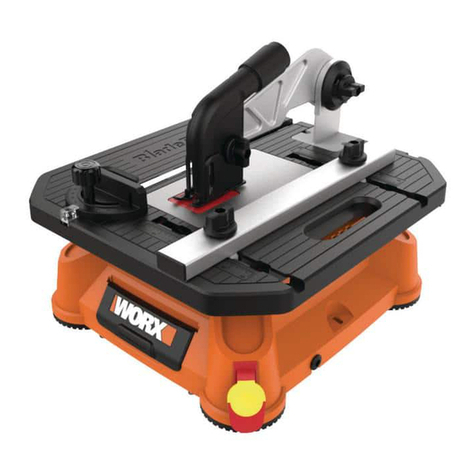
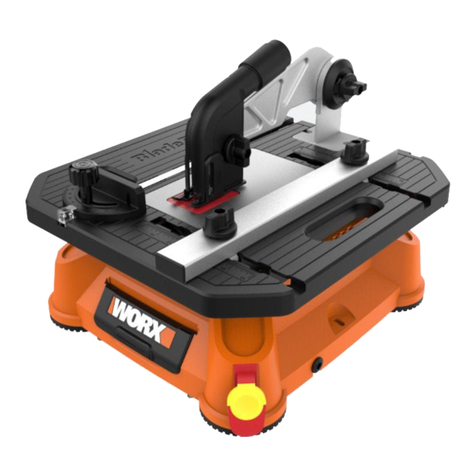
Worx BladeRunner X2 WX572 User manual

WX572
P10
P18
P26
P34
P42
P50
P58
P66
P74
P82
P90
EN
D
F
I
ES
NL
PL
HU
RO
CZ
SK
BladeRunner®X2
BladeRunner®X2
BladeRunner®X2
BladeRunner®X2
BladeRunner®X2
BladeRunner®X2
BladeRunner®X2
BladeRunner®X2
BladeRunner®X2
BladeRunner®X2
BladeRunner®X2


Original instructions EN
Originalbetriebsanleitung D
Notice originale F
Istruzioni originali I
Manual original ES
Oorspronkelijke gebruiksaanwijzing NL
Tłumaczenie oryginalnych instrukcji PL
Eredeti használati utasítás HU
Traducerea instrucţiunilor iniţiale RO
Překlad původních pokynů CZ
Preklad pôvodných pokynov SK

12
11
10
8
9
7
3
4
15
13
14
5
6
1
2
20

ONOFF
G1
1
2
E2
CD1
2
1
G2 G3
B3
1
2
3
4
B2
2
1
B1
1
2
19
A2
A1
18
17
E1
2
1
D2
F

ONOFF
G1
1
2
E2
CD1
2
1
G2 G3
B3
1
2
3
4
B2
2
1
B1
1
2
19
A2
A1
18
17
E1
2
1
D2
F

ONOFF
G1
1
2
E2
CD1
2
1
G2 G3
B3
1
2
3
4
B2
2
1
B1
1
2
19
A2
A1
18
17
E1
2
1
D2
F
H1 H2
I1 I2
16
K
J
L1 L2
L3 L4
MN
e
O
19
P

H1 H2
I1 I2
16
K
J
L1 L2
L3 L4
MN
e
O
19
P

H1 H2
I1 I2
16
K
J
L1 L2
L3 L4
MN
e
O
19
P

BladeRunner®X2 EN
10
1. ON SWITCH
2. OFF SWITCH
3. STABILIZER BRACKET
4. BLADE STORAGE
5. MITER GAUGE
6. TABLE INSERT
7. GUARD KNOB
8. GUARD
9. VACUUM PORT
10. GUARD ARM
11. GUARD ARM CLAMP KNOB
12. RIP FENCE
13. FENCE SLOT
14. MITER SLOT
15. BLADE RELEASE
16. VACUUM ADAPTER (See Fig. K )
17. BOLT (See Fig. A1)
18. GUARD ARM ASSEMBLY KNOB
(See Fig. A1)
19. BLADE (See Fig. B2)
20. BLADE HOLDER
TECHNICAL DATA
Type WX572 (5 - designation of machinery, representative of Blade Runner)
Voltage 230-240V~50/60Hz
Rated power 650W
No load speed 3000/min
Cutting capacity
Wood 40mm
PVC pipe 30mm
Aluminum 10mm
Steel 3mm
Ceramic 10mm
Stroke Length 19mm
Blade shank T-shank
Blade length 100mm or less
Table size 400X430mm
Protection class /ll
Weight 6.7Kg

BladeRunner®X2 EN
11
NOISE INFORMATION
A weighted sound pressure LpA: 83.4dB(A)
A weighted sound power LwA: 96.4dB(A)
KPA& KWA 3.0dB(A)
Wear ear protection when sound pressure is over 80dB(A)
ACCESSORIES
Miter gauge 1
Rip Fence 1
Blades:
Wood cutting blade 1
Aluminum cutting blade 1
Steel cutting blade 1
Ceramic Tile Cutting Blade 1
Scrolling Blade 1
Vacuum Adapter 1
Blade Grip 1
We recommend that you purchase your accessories from the same store that sold you the tool.
Use good quality accessories marked with a well-known brand name. Choose the type according
to the work you intend to undertake. Refer to the accessory packaging for further details. Store
personnel can assist you and offer advice.

BladeRunner®X2 EN
12
ADDITIONAL SAFETY
INSTRUCTIONS FOR YOUR
BLADE RUNNER
1. SAFETY PRECAUTION
1) Do not use saw blades which are damaged
or deformed;
2) Replace the table insert when worn;
3) Connect blade runner to a dust-collecting
device when sawing wood;
4) Take care that the selection of the saw
blade and the speed depends on the
material to be cut;
5) Do not clean the saw blade whilst it is in
motion;
6) Wear suitable personal protective
equipment, when necessary, this could
include:
– hearing protection to reduce the risk of
induced hearing loss;
– respiratory protection to reduce the risk of
inhalation of harmful dust;
– gloves for handling the saw blade and
rough material.
2. SAFE OPERATION
1) During transportation the saw blade guard
should be locked at fully down (close to the
table) position;
2) Do not use guard and its support system
for handling or transportation;
3) When cutting round timber use a suitable
holding device to prevent twisting of the
workpiece;
4) Any time after cutting, the knob for locking
blade guard shall be released so that the
guard is fully down to the table.
5) The thickness of cutting material cannot
exceed the recommended maximum
thickness.This tool cannot be used for
cutting glass or mesh wire.
To reduce the risk of injury, user
must read instruction manual
Double insulation
Wear ear protection
Wear eye protection
Warning: do not expose to rain or
use in damp locations
Before any work on the machine
itself, pull the power plug from the
outlet
Wear protective gloves
Wood
Aluminium
Metal
Plastic
Ceramic tile
Teeth per inch
SYMBOLS

BladeRunner®X2 EN
13
Incorrect
Correct
Lock
Unlock
Tighten Guard and Guard Arm firmly
down onto material, don’t raise up
the Guard Arm when cutting.
OPERATING INSTRUCTIONS
NOTE: Before using the tool, read the
instruction book carefully.
BladeRunner
®
— A compact, easy-to-use table-top
tool for cutting wood, metal, plastic, and ceramic
tile. Lightweight and portable for use right at the
work area. Blade is stationary while user moves
the material for easier, more precise work.
BEFORE PUTTING THE MACHINE INTO
OPERATION
1. All covers and safety devices have to
be properly fitted before the machine is
switched on.
2. It must be possible for the blade to run freely.
3. When working with wood that has been
processed before, watch out for foreign
bodies such as nails or screws etc.
4. Before you turn ON the switch, make sure
that the saw blade is correctly fitted and that
the machine’s moving parts run smoothly.
5. If the cutting operation will produce a high
amount of dust, especially hazardous dust
such as ceramic tile or treated wood, connect
an effective vacuum to the vacuum port (9).
ASSEMBLY AND OPERATION
Action Figure
Guard arm installation See Fig. A1,A2
Blade installation See Fig. B1-B3
Blade changing See Fig. C
Stabilizer bracket
adjustment
See Fig. D1,D2
Guard adjustment See Fig. E1,E2
On/off safety switch See Fig. F
Rip cut See Fig. G1-G3
Cross cut See Fig. H1,H2
Miter cut See Fig. I1,I2
Internal cut See Fig. J
Dust collection See Fig. K
Store the accessories See Fig. L1,L2,L3,L4
Carrying See Fig. M
MAINTENANCE
WARNING: Remove the plug from the
socket before carrying out any adjustment,
servicing or maintenance.To insure proper
operation and extend tool life, prevent dust from
accumulating under the table insert (5).
a) Be sure to use a vacuum or dust extractor
for dusty cutting operations such as
ceramic tile. (See Fig. N)
b) If dust accumulates, remove theTable Insert
by lifting the latch (e). (See Fig. O)
c) Vacuum out the dust in and around the
Blade Holder. (See Fig. P)
d)
Reattach theTable Insert securely.
There are no user serviceable parts in your power
tool. Never use water or chemical cleaners to
clean your power tool. Wipe clean with a dry
cloth. Always store your power tool in a dry place.
Keep the motor ventilation slots clean. Keep all
working controls free of dust. If you see some
sparks flashing in the ventilation slots, this is
normal and will not damage your power tool.
If the supply cord is damaged, it must be
replaced by the manufacturer, its service
agent or similarly qualified persons in order to
avoid a hazard.

BladeRunner®X2 EN
14
TROUBLE SHOOTING
Symptom Possible Causes Possible Solution
Tool will not start when
switched on.
• Power cord is not plugged
in.
• Check to make sure power cord
is connected well into a working
outlet.
Poor cut quality
• Blade is worn out.
• Blade is set incorrectly
•Too much vibration in
material.
•Too much vibration of the
saw.
• Feed rate too fast.
• Make sure the blade is sharp and
not broken.
• Make sure the blade is installed
properly.
• Tighten Guard and Guard Arm
firmly down onto material.
• Clamp or fasten saw base to
tabletop.
• Feed the material more slowly.
Work efficiency is low. • Blade is worn out.
• Feed rate too fast.
• Change to a new blade.
• Feed the material more slowly.
Blade is not clamped tightly by
the Blade Holder.
• Blade is not inserted into
place fully.
• Use blade grip to push the blade as
far into the blade holder as possible
before letting go of Blade Release.
Blade Release button cannot be
pressed down. • Dust accumulates. • Clean the dust around the Blade
Release button.
Guard Arm vibrates too much.
• Screws fixing the Guard
Arm on the work table are
loose.
• Tighten the screws as shown in
Fig A1.
Rip Fence cannot slide into
Fence Slot smoothly.
• Rip Fence locking knob too
tight.
• Loosen the Rip Fence locking
knob.

BladeRunner®X2 EN
15
ENVIRONMENTAL
PROTECTION
This product has been marked with a
symbol relating to removing electric
and electronic waste.This means that
this product shall not be discarded with
household waste but that it shall be returned
to a collection system which conforms to the
European Directive 2012/19/EU. It will then
be recycled or dismantled in order to reduce
the impact on the environment. Electric and
electronic equipment can be hazardous for the
environment and for human health since they
contain hazardous substances.
PLUG REPLACEMENT
( UK & IRELAND ONLY )
If you need to replace the fitted plug then
follow the instructions below.
IMPORTANT
The wires in the mains lead are colored in
accordance with the following code:
BLUE =NEUTRAL
Brown = Live
As the colors of the wires in the mains lead of
this appliance may not correspond with the
colored markings identifying the terminals
in your plug, proceed as follows.The wire
which is colored blue must be connected to
the terminal which is marked with N.The wire
which is colored brown must be connected to
the terminal which is marked with L.
WARNING! Never connect live or neutral
wires to the earth terminal of the plug. Only
fit an approved 13ABS1363/A plug and the
correct rated fuse.
NOTE: If a moulded plug is fitted and has to
be removed take great care in disposing of the
plug and severed cable, it must be destroyed
to prevent engaging into a socket.
Connect
Blue to N
(neutral)
Outer sleeve
firmly clamped
Cable grip
Brown L (live)
13 Amp fuse approved
to BS1362
DECLARATION OF
CONFORMITY
We,
POSITEC Germany GmbH
Konrad-Adenauer-Ufer 37
50668 Köln
Declare that the product,
Description WORX BladeRunner®X2
Type WX572 (5-designation of machinery,
representative of Blade Runner )
Function Sawing various materials
Complies with the following Directives,
2006/42/EC
2004/108/EC
2011/65/EU
Standards conform to:
EN 61029-1
EN 55014-1
EN 55014-2
EN 61000-3-2
EN 61000-3-3
The person authorized to compile the technical
file,
Name: Russell Nicholson
Address: Positec Power Tools (Europe)
Ltd, PO Box 152, Leeds, LS10 9DS, UK
2014/07/16
YujinTang
POSITEC Quality Manager

BladeRunner®X2 D
1716
1. EIN- SCHALTER
2. AUS-SCHALTER
3. STABILISIERUNGSHALTERUNG
4. SÄGEBLATTAUFBEWAHRUNG
5. GEHRUNGSLEHRE
6. TISCHEINSATZ
7. KNOPF DER SCHUTZVORRICHTUNG
8. SCHUTZVORRICHTUNG
9. ABSAUGANSCHLUSS
10. SCHUTZARM
11. KLEMMKNOPF DES SCHUTZARMS
12. PARALLELANSCHLAG
13. STECKPLATZ FÜR ANSCHLAG
14. STECKPLATZ FÜR GEHRUNGSLEHRE
15. GRIFFMUSCHEL DER
BLATTENTRIEGELUNG
16. STAUBABSAUGADAPTER
(SIEHE ABB. K)
17 BOLZEN (Siehe Abb. A1)
18. MONTAGEKNOPF DES SCHUTZARMS
(Siehe Abb. A1)
19. SÄGEBLATT (Siehe Abb. B2)
20. BLATTHALTERUNG
TECHNISCHE DATEN
Typ WX572 (5 - Bezeichnung der Maschine, Vertreter von Blade Runner)
Nennspannung 230-240V~50/60Hz
Nennleistung 650W
Leerlaufnenndrehzahl 3000/min
Schneidleistung
Holz 40mm
PVC Rohre 30mm
Aluminum 10mm
Stahlblech 3mm
Keramik 10mm
Hublänge 19mm
Blattschaft T-schaft
Blattlänge 100mm oder weniger
Tischgröße 400X430mm
Zweifach isoliert /ll
Gewicht 6.7Kg

BladeRunner®X2 D
1716
INFORMATIONEN ÜBER LÄRM
Gewichteter Schalldruck LpA: 83.4dB(A)
Gewichtete Schallleistung LwA: 96.4dB(A)
KPA& KWA 3.0dB(A)
Tragen Sie bei einem Schalldruck über einen Gehörschutz 80dB(A)
ACCESSORIES
Gehrungslehre 1
Parallelanschlag 1
Sägeblatt
Holzsägeblatt 1
Aluminiumsägeblatt 1
Stahlsägeblatt 1
Keramikfliesen-Sägeblatt 1
Dekupierblatt 1
Staubsaugeradapter 1
Blattgriff 1
Wir empfehlen Ihnen, sämtliche Zubehörteile beim selben Fachhändler zu beziehen, bei dem
Sie auch Ihr Elektrowerkzeug gekauft haben.Verwenden Sie nur hochwertige Zubehörteile von
namhaften Herstellern. Weitere Informationen finden Sie auf der Verpackung der Zubehörteile.
Auch Ihr Fachhändler berät Sie gerne.

BladeRunner®X2 D
1918
ZUSÄTZLICHE
SICHERHEITSHINWEISE
FÜR BladeRunner
1. SICHERHEITSHINWEISE
1) Benutzen Sie keine beschädigten oder
verformten Sägeblätter.
2) Tauschen Sie denTischeinsatz bei
Verschleiß aus.
3) Schließen Sie den Blade Runner beim
Sägen von Holz an einen Staubsauger an;
4) Achten Sie bei der Auswahl des
Sägeblattes darauf, dass es sich für die
zu bearbeitenden Materialien und die
erwarteten Geschwindigkeiten eignet.
5) Reinigen Sie das Sägeblatt nur, wenn es
vollständig zum Stillstand gekommen ist.
6) Tragen Sie bei Bedarf passende persönliche
Schutzausrüstung. Dazu zählt:
– Gehörschutz zur vermeidung dauerhafter
gehörschädigungen.
– Atemschutz zum schutz gegen das
einatmen schädlicher stäube.
– Verwenden sie schutzhandschuhe
beim hantieren mit dem sägeblatt und
rohmaterial.
2. SICHERER BETRIEB
1) BeimTransport sollte der Sägeblattschutz
in der vollständig geschlossenen Stellung
(nahe amTisch) und arretiert sein;
2) Missbrauchen Sie Führungen und deren
Halterungen niemals für Handhabung oder
Transport.
3) Setzen Sie eine geeignete Halterung beim
Schneiden von runden Hölzern ein, damit
sich das Werkstück nicht verdreht.
4) Nach jedem Einsatz sollte der Knopf zum
Arretieren des Blattschutzes gelöst werden,
damit der Blattschutz amTisch anliegt.
5) Die Dicke des Schneidstoffs darf die
empfohlene maximale Dicke nicht
übersteigen. Dieses Werkzeug kann
nicht zum Schneiden von Glas oder
Maschendraht verwendet werden.
Lesen Sie unbedingt die
Anleitung, damit es nicht zu
Verletzungen kommt
Schutzisolation
Tragen Sie Gehörschutz.
Tragen Sie eine Schutzbrille
Warnung: Verwenden Sie das
Gerät nicht im Regen oder an
feuchten Standorten
Ziehen Sie vor jeglichen Arbeiten an
der Maschine selbst den
Netzstecker aus der Steckdose
Schutzhandschuhe tragen
Holz
Aluminium
Metall
Plastik
Keramikfliese
Zähne pro Zoll
SYMBOLE

BladeRunner®X2 D
1918
Falsch
Richtig
Verriegeln
Entriegeln
Schutz und Schutzarm sicher am
Material befestigen, Schutzarm
beim Schneiden nicht anheben.
BEDIENUNG
HINWEIS: Lesen Sie das Handbuch
vor Inbetriebnahme des Werkzeuges
sorgfältig durch.
BladeRunner®— Ein kompaktes,
leicht bedienbaresTischwerkzeug zum
Schneiden von Holz, Metall, Kunststoff
und Keramikfliesen. Geringes Gewicht,
leicht zu transportieren – zum Einsatz an
unterschiedlichen Orten. Das Blatt bleibt
unbeweglich, lediglich das Werkstück wird
bewegt: Einfacheres, präziseres Arbeiten.
VOR DER INBETRIEBNAHME
1. Sämtliche Abdeckungen und
Sicherheitseinrichtungen müssen
ordnungsgemäß angebracht werden, bevor
das Gerät eingeschaltet wird.
2. Das Blatt muss sich frei bewegen können.
3. Wenn Sie mit Holz arbeiten, das zuvor
bereits bearbeitet wurde, achten Sie auf
Fremdkörper wie Nägel, Schrauben, und so
weiter.
4. Bevor Sie den Einschalter betätigen,
vergewissern Sie sich, dass das Sägeblatt
richtig angebracht wurde und sich
die beweglichenTeile der Maschine
störungsfrei bewegen lassen.
5. Falls bei der Bearbeitung große
Mengen Staub anfallen (insbesondere
bei gefährlichen Stäuben, die unter
anderem bei der Bearbeitung von
Keramikfliesen oder behandeltem
Holz entstehen), schließen Sie eine
geeignete Absaugvorrichtung an den
Absauganschluss (9) an.

BladeRunner®X2 D
2120
MONTAGE UND BEDIENUNG
Massnahme Abbildung
Installation des
Schutzarms Siehe Abb. A1,A2
Installation des Blatts Siehe Abb. B1-B3
Wechseln des Blatts Siehe Abb. C
Einstellen der
Stabilisierung-
shalterung
Siehe Abb. D1,D2
Einstellen der
Schutzvorrichtung Siehe Abb. E1,E2
EIN/AUS
Sicherheitsschalter Siehe Abb. F
Längsschnitt Siehe Abb. G1-G3
Querschnitt Siehe Abb. H1,H2
Gehrungsschnitt Siehe Abb. I1,I2
Innenschnitt Siehe Abb. J
Staubsammler Siehe Abb.K
Aufbewahrung des
Zubehörs
Siehe Abb.
L1,L2,L3,L4
Tragen Siehe Abb.M
WARTUNG
WARNUNG: Ziehen Sie grundsätzlich
den Netzstecker, bevor Sie Einstell-,
Reparatur- oder Wartungstätigkeiten
ausführen.
Um den ordnungsgemäßen Betrieb und
eine lange Lebensdauer des Werkzeugs
zu gewährleisten, verhindern Sie das
Ansammeln von Staub unter dem
Tischeinsatz (5).
a) Stellen Sie sicher, dass bei staubigen
Schneidarbeiten, beispielsweise bei
Keramikfliesen, ein Staubsauger oder
-sammler verwendet wird. (Siehe Abb. N)
b) Wenn sich Staub ansammelt, entfernen
Sie denTischeinsatz, indem Sie die
Verriegelung (e) anheben. (Siehe Abb. O)
c) Saugen Sie den Staub in und um die
Blatthalterung ab. (Siehe Abb. P)
d) Bringen Sie denTischeinsatz wieder
ordnungsgemäß an.
Es enthält keineTeile, die Sie warten müssen.
Reinigen Sie Ihr Werkzeug niemals mit
Wasser oder chemischen Loesungsmitteln.
Wischen Sie es mit einem trockenenTuch
sauber. Lagern Sie Ihr Werkzeug immer an
einem trockenen Platz. Sorgen Sie dafür, dass
bei staubigen Arbeiten die Lüftungsöffnungen
frei sind. Falls es erforderlich sein sollte, den
Staub zu entfernen, trennen Sie zuerst das
Elektrowerkzeug vom Stromversorgungsnetz.
Verwenden Sie nichtmetallische Objekte zum
Entfernen von Staub und vermeiden Sie
das Beschädigen innererTeile. Gelegentlich
sind durch die Lüftungsschlitze hindurch
Funken zu sehen. Dies ist normal und wird Ihr
Werkzeug nicht beschädigen.
Wenn ein Ersatz von Stecker oder
Anschlussleitung erforderlich ist, dann ist
dies von unserer Servicestelle oder einer
Elektrofachwerkstatt durchzuführen, um
Sicherheitsgefährdungen zu vermeiden.
Lassen Sie Reparaturen nur durch unsere
Servicestelle oder durch eine Fachwerkstatt
mit Originalersatzteilen durchführen.
UMWELTSCHUTZ
Innerhalb der EU weist dieses Symbol
darauf hin, dass dieses Produkt
nicht über den Hausmüll entsorgt
werden darf. Altgeräte enthalten wertvolle
recyclingfähige Materialien, die einer
Wiederverwertung zugeführt werden sollten
und um der Umwelt bzw. der menschlichen
Gesundheit nicht durch unkontrollierte
Müllbeseitigung zu schaden. Bitte entsorgen
Sie Altgeräte deshalb über geeignete
Sammelsysteme oder senden Sie das Gerät
zur Entsorgung an die Stelle, bei der Sie es
gekauft haben. Diese wird dann das Gerät der
stofflichen Verwertung zuführen.
Other manuals for BladeRunner X2 WX572
2
Table of contents
Languages:
Other Worx Saw manuals

Worx
Worx WX523 WorxSaw User manual

Worx
Worx WX429 User manual

Worx
Worx WX437L.X User manual

Worx
Worx WX445 User manual

Worx
Worx WX550 User manual

Worx
Worx WX520 Series User manual

Worx
Worx WX527 User manual

Worx
Worx WU507 User manual

Worx
Worx AXIS WX550L.X User manual

Worx
Worx WX424 HandyCut Installation manual
Popular Saw manuals by other brands

Clarke
Clarke Contractor CTS12 operating & maintenance manual

Bosch
Bosch GKS Professional 65 Original instructions

eXact
eXact PipeCut 170 operating instructions

Festool
Festool Precisio CS 70 EB Original operating manual

King Canada
King Canada KC-712S Service manual & parts list

EINHELL
EINHELL RT-SS 120 L operating instructions